The Management Console provides tools to manage Eon Mode and Enterprise Mode databases, including creating a database, provisioning resources, subcluster management, and query optimization.
This is the multi-page printable view of this section. Click here to print.
Database management
The Management Console provides tools to manage Eon Mode and Enterprise Mode databases, including creating a database, provisioning resources, subcluster management, and query optimization.
- 1: Creating a database using MC
- 2: Provisioning databases using MC
- 3: Managing database clusters
- 3.1: Viewing cluster infrastructure
- 3.2: Viewing and managing your cluster
- 3.3: Importing an existing database into MC
- 4: Subclusters in MC
- 4.1: Charting subcluster resource usage in MC
- 4.2: Viewing subcluster layout in MC
- 4.3: Adding subclusters in MC
- 4.4: Rebalancing data using Management Console
- 4.5: Subcluster action rules in MC
- 4.6: Starting and stopping subclusters in MC
- 4.7: Scaling subclusters in MC
- 4.8: Terminating subclusters in MC
- 4.9: Node action rules in MC
- 4.10: Starting, stopping, and restarting nodes in MC
- 5: Eon Mode on-premises
- 5.1: Reviving an Eon Mode database on premises with FlashBlade using MC
- 5.2: Creating an Eon Mode database on premises with FlashBlade in MC
- 6: Managing queries using MC
- 6.1: About profile data in Management Console
- 6.1.1: Projection metadata
- 6.1.2: Query phase duration
- 6.1.3: Profile metrics
- 6.1.4: Execution events
- 6.1.5: Optimizer events
- 6.2: Profiling queries using MC
- 6.3: Viewing profile data in MC
- 7: Working with query plans in MC
- 7.1: Accessing query plans in Management Console
- 7.2: Query plan view options
- 7.3: Expanding and collapsing query paths
- 7.4: Clearing query data
- 7.5: Viewing projection and column metadata
- 8: Creating a database design in Management Console
- 9: Running queries in Management Console
- 10: Working with workload analyzer recommendations in MC
- 11: Running Database Designer using MC
- 12: Using the Management Console to replace nodes
- 13: Import and monitor a database in a Hadoop environment
1 - Creating a database using MC
If you installed the Management Console using an RPM, there is a wizard to help you create a new database on an existing Vertica cluster.
If you installed the Management Console using an RPM, there is a wizard to help you create a new database on an existing Vertica cluster.
Note
If you did not install MC with an RPM, see one of the following:
-
For Management Console on Amazon Web Services (AWS) using a CloudFormation Template, see Creating an Eon Mode database in AWS with MC or Creating an Enterprise Mode database in AWS with MC.
-
For Google Cloud Platform (GCP), see Provision an Eon Mode cluster and database on GCP in MC.
-
To provision a new database and cluster on-premises, see Creating a cluster using MC.
- Connect to Management Console, and log in.
- On the home page, click View Infrastructure to go to the Database and Cluster View. This tab provides a summary of your environment, clusters, and databases.
- If the Database row displays a database running on the cluster that you want to add a new database to, select the database and click Stop. Wait until the database status is Stopped.
- In the Clusters row, click the existing cluster that you want to create a database on. If a database is already running on it, you must stop the database.
- Click Create Database in the window to start the database creation wizard.
- Follow the steps in the wizard to successfully create a database.
You can close the web browser during the process and sign back in to MC later. The creation process continues unless an unexpected error occurs.
See also
2 - Provisioning databases using MC
Management Console allows all users to create, import, and connect to Vertica databases using the MC Provision Databases tab.
Management Console allows all users to create, import, and connect to Vertica databases using the MC Provision Databases tab.
-
Import cluster or database using IP discovery
-
Create a new cluster
- Import and monitor a database in a Hadoop environment
3 - Managing database clusters
Management Console allows you to monitor multiple databases on one or more clusters at the same time.
Management Console allows you to monitor multiple databases on one or more clusters at the same time. MC administrators can see and manage all databases and clusters monitored by MC, while non-administrative MC users see only databases on which they have been assigned the appropriate access levels.
Depending on your access level, you can use the MC to perform the following database and cluster-related management operations:
-
Create an Eon Mode and Enterprise Mode database.
-
Install an Eon Mode and Enterprise Mode database in a cloud or on-premises environment.
-
Import an existing database or cluster into the MC interface.
-
Start the database, unless it is already running.
-
Stop the database, if no users are connected.
-
Remove the database from the MC interface.
Note
Remove does not drop the database. A Remove operation leaves it in the cluster, hidden from the UI. To add the database back to the MC interface, import it using the IP address of any cluster node. A Remove operation also stops metrics gathering on that database, but statistics gathering automatically resumes after you re-import. -
Drop the database when you are certain that no users are connected. Drop is a permanent action that drops the database from the cluster.
Database clusters in the cloud
When you use the Management Console to create a database or cluster on a supported cloud provider, you can perform the following operations on individual machines or the entire cluster:
-
Start
-
Stop
-
Revive
-
Reboot
-
Terminate
For details, see Viewing and managing your cluster.
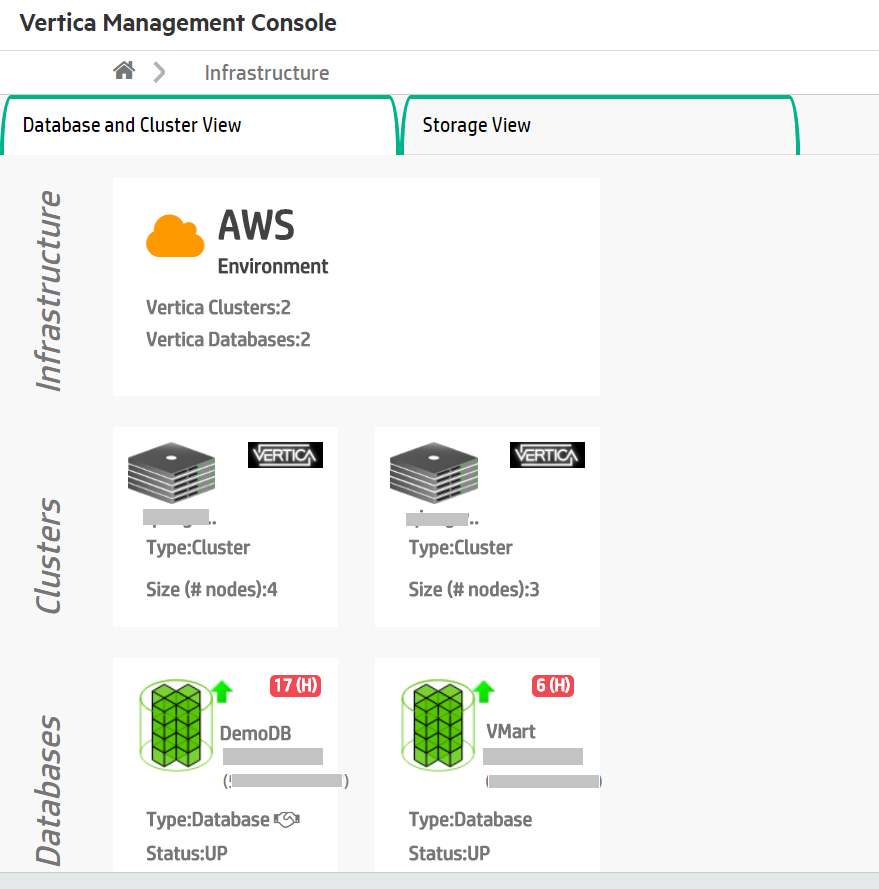
3.1 - Viewing cluster infrastructure
For a summary of all databases and clusters currently monitored by MC, click View Infrastructure on the MC Home page.
For a summary of all databases and clusters currently monitored by MC, click View Infrastructure on the MC Home page.
Note
Some of the features on this page are currently available in MC only on AWS and GCP.The first tab on the Infrastructure page, Database and Cluster View, is overview of the infrastructure of all the clusters and databases currently monitored by MC.
Three rows are displayed: Infrastructure, Clusters, and Databases.
-
Infrastructure. Specifies the type of environment on which your clusters reside:
-
Cloud: Displays the name of the cloud platform, such as AWS or GCP
-
On premises: Displays "Data Center"
-
Apache Hadoop: Displays "Hadoop Environment"
-
-
Clusters. You can click a cluster to see its full details. From the dialog that opens, you can:
-
Add the cluster's master API key
-
Remove the cluster from MC monitoring
-
Create a new database on the cluster (if all other databases on the cluster are stopped)
-
-
Databases. A numbered badge on the top right displays the number of highest-priority messages from that database that are in your inbox. If a handshake icon (
 ) displays next to "Type," that indicates the database is running in Eon Mode. If the handshake is absent, the database is running in Enterprise Mode. Click any database for more details. From the dialog that opens, you can:
-
Stop or start the database
-
Drop the database (if the database is stopped)
-
Remove the database from MC monitoring
In the illustration below, MC is monitoring two different clusters that both reside on an AWS environment. One database is running on each cluster. The DemoDB database, displayed on the left, has a handshake icon next to its "Type" label that indicates it is running in Eon Mode. The VMart database on the 3-node cluster, displayed on the right, is running in Enterprise Mode.
3.2 - Viewing and managing your cluster
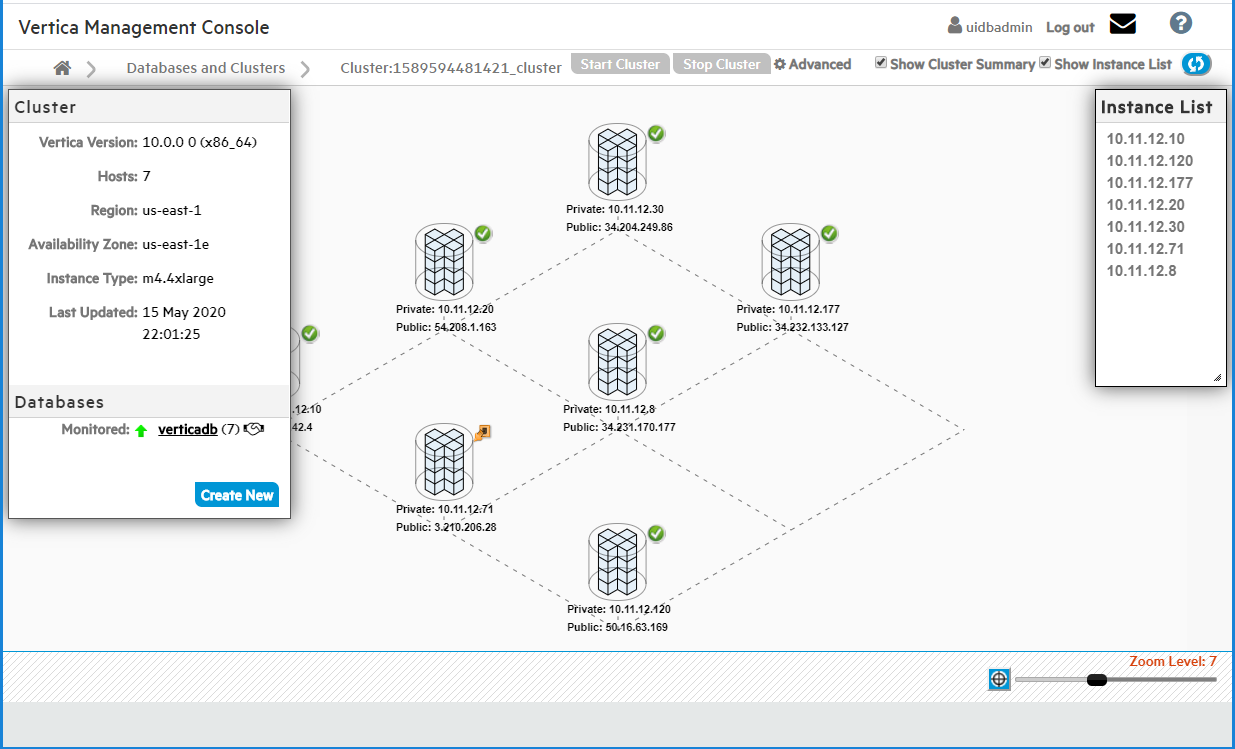
The Cluster page in Management Console shows a node-based visualization of your cluster.
The Cluster page in Management Console shows a node-based visualization of your cluster. This page shows the cluster's host addresses, the installed version of Vertica running, and a list of the databases on the cluster that MC is currently monitoring.
Note
Some of the features on this page are currently available in MC only on AWS and GCP.From the Cluster page, you can also create a new empty database on the cluster, or import any existing databases MC discovers on the cluster. (These features are currently available only on AWS and GCP.)
MC displays different options depending on whether you imported the cluster to MC, or created the cluster using MC:
-
Imported cluster: MC displays monitoring information about the cluster.
-
Cluster created using MC: MC displays both monitoring information and management options for third-party cloud platforms such as AWS. For clusters you created using the current MC, the Cluster page provides cluster and instance management options.
Cluster and instance management option availability
For Eon Mode databases, MC supports actions for subcluster and node management for the following public and private cloud providers:
Note
Enterprise Mode does not support subclusters.For Enterprise Mode databases, MC supports these actions:
-
In the cloud on AWS: Add Node action, Add Instance action.
-
On-premises: Add Node action.
Note
In the cloud on GCP, Enterprise Mode databases are not supported.Go to the cluster page
To view the Cluster page:
-
On the MC Home page, click View Infrastructure to go to the Infrastructure page. This page lists all the clusters the MC is monitoring.
-
Click any cluster shown on the Infrastructure page.
-
Select View or Manage from the dialog that displays, to view its Cluster page. (In a cloud environment, if MC was deployed from a cloud template the button says "Manage". Otherwise, the button says "View".)
Note
You can click the pencil icon beside the cluster name to rename the cluster. Enter a name that is unique within MC.
Monitor imported clusters
Whether you have imported or created a cluster using MC, you can view information about it through the Cluster page.
This page includes the following information:
-
Node visualization: A visualization of all nodes within the cluster. Icons at the top right of each node indicate if the nodes are up. Click any node to see details about its host name, CPU information and total memory. If there are many nodes in the cluster, use the Zoom Level slider at the bottom right of the page to zoom the visualization in or out.
-
Instance List: A list of all the instance IPs within the cluster. Click any instance in the list to see details about it.
-
Cluster Summary: A summary of details about the cluster, including the version of Vertica running on the cluster and the number of hosts. If the cluster is running on cloud-platform resources such as AWS, you can also see region and instance type information.
-
Databases: Lists all databases monitored by MC and their current state.
-
At the bottom of the Databases section, click Create New to create a new empty database.
-
This section also lists any Vertica databases on this cluster, if existing, that are not yet monitored by Management Console. See Importing an existing database into MC for the process of importing a discovered database.
-
The following image shows an overview of a 7-node cluster, which was created in MC using a Cloud Formation Template. This cluster has a running Eon Mode database on it.
Manage a cluster created on AWS with the cluster creation wizard
If you installed Vertica from the AWS Marketplace using AWS resources, MC offers cluster management operations that are specific to the cloud. Using MC, you can manage a cluster running on AWS without going to the AWS console.
Note
Note: The AWS management operations to add or terminate instances are only available for clusters on AWS resources that were created using the current MC. Add and terminate capabilities are disabled for any cluster imported to MC, even if the imported cluster is on an AWS environment.If you upgrade the cluster's Vertica version manually through the command line, AWS management operations in MC become disabled for the cluster, even if you created that cluster using MC. Make sure to upgrade the cluster's Vertica version through MC in order to preserve AWS management capabilities for that cluster in MC.
In the screen capture below, the Cluster page shows a 7-node cluster, which was provisioned using the Cluster Creation wizard. Use the wizard to create an Eon Mode or Enterprise Mode.
Cluster management actions (Eon Mode and Enterprise Mode)
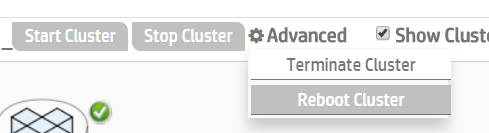
You can perform the following operations on your cluster through the Cluster page. These options are available at the top of the Cluster page or in the Advanced menu at the top of the page:
You can perform the following operations on your cluster through the cluster page:
-
Start Cluster: Start all the instances in the cluster. Available at the top of the Cluster page.
-
Stop Cluster: Stop all the instances in the cluster. You must first stop any running database on the cluster. Available at the top of the cluster page.
-
Reboot Cluster: Restart all instances in the cluster. Available under the Advanced menu at the top of the page. Note: Reboot Cluster is currently available only on AWS.
-
Terminate Cluster: Terminate all instances in the cluster, the databases on it, and all AWS resources from the cluster. The Terminate Cluster operation is available under the Advanced menu at the top of the page.
-
For Enterprise Mode databases, this operation permanently deletes any data you had on the cluster or its databases.
-
For Eon Mode databases, the data is preserved in communal storage and you can later revive the database in a new cluster. When you choose to terminate the cluster, MC gives you the option to also stop the database before termination, which is recommended in order to safely revive later.
-
View cluster instance details
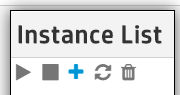
You can view the details for any instance in your cluster. Select the IP address of an instance in the Instance List. MC displays a popup beside that instance showing information about its private and public IP addresses, host name, total memory, and other details.
Manage individual instances/nodes in Eon Mode
If your database is Eon Mode, you use actions available on the Database > Manage > Subclusters tab in MC to manage individual nodes.
To change the state of individual nodes in your Eon Mode database, you can:
- Start, stop, or terminate a node in a subcluster.
To change the number of nodes in your Eon Mode database, you can:
-
Add or subtract individual nodes from a subcluster by scaling the subcluster up or down.
See Subcluster action rules in MC.
Manage individual instances in Enterprise Mode
If your database is Enterprise Mode, the Cluster page Instance List includes action icons you use to manage individual instances in your cluster.
In the Instance List panel of the Cluster page, select the IP address of any instance in your cluster that you want to perform the action on. Then click an icon from the icon menu at the top of the panel. Hover over an icon to read the action it performs.
-
Start Instance: Start an individual instance in the cluster.
-
Stop Instance: Stop an individual instance in the cluster.
-
Add Instance: Add another instance to your cluster. When you select this action, Management Console opens the Add AWS Instance wizard, where you specify volume and storage information for the instance. You must supply your AWS key pair (and a Vertica Premium Edition license if you are adding more nodes to the cluster than a Community Edition license allows). You can add up to 10 instances at a time using the Add Instance action.
-
Restart Instance: Restart an individual instance in the cluster.
-
Terminate Instance: Permanently remove the instance from your cluster.
3.3 - Importing an existing database into MC
If you have already created a Vertica database, you can import it into MC to monitor its health and activity.
If you have already created a Vertica database, you can import it into MC to monitor its health and activity.
When you install MC on the same cluster as the existing database you intend to monitor, MC automatically discovers the cluster and any databases installed on it, whether those databases are currently running or are down.
Note
If you haven't created a database and want to create one through the MC, see Creating a database using MC.Import a database existing on a monitored cluster
The following procedure describes how to import an existing database that is on a cluster MC is already monitoring.
-
Connect to Management Console and sign in as an MC administrator.
-
On the MC Home page, click View Your Infrastructure.
-
On the Databases and Clusters page, click the cluster and click View in the dialog box that opens.
-
On the left side of the page under the Databases heading, click Import Discovered.
Tip
A running database appears as Monitored; any non-running databases appear as Discovered. MC supports only one running database on a single cluster at a time. You must shut down a running database on a cluster in order to monitor another database on that cluster. -
In the Import Database dialog box:
-
Select the database you want to import.
-
Optionally clear auto-discovered databases you don't want to import.
-
Supply the database administrator username and password and click Import. (Supplying a non-administrator username prevents MC from displaying some charts after import.)
-
If the Vertica database is configured for TLS security, you need to configure TLS for all Management Console connections to this database over JDBC. Click Use TLS. Management Console launches the Certificates wizard. See MC certificates wizard.
-
After Management Console connects to the database it opens the Manage page, which provides a view of the cluster nodes. See Monitoring Cluster Status for more information.
You perform the import process once per existing database. Next time you connect to Management Console, your database appears under the Recent Databases section on the Home page, as well as on the Databases and Clusters page.
Note
The system clocks in your cluster must be synchronized with the system that is running Management Console to allow automatic discovery of local clusters.Import a database existing on a new cluster
If the database you intend to monitor is on a cluster MC is not currently monitoring, MC cannot automatically discover it. You can import it with the following procedure.
-
Connect to Management Console and sign in as an MC administrator.
-
On the MC Home page, click Import a Vertica Database Cluster.
-
Enter the IP address of one of the database's cluster nodes.
-
Enter the master API key for the cluster. Find the key here:
/opt/vertica/config/apikeys.dat -
In the Import Database dialog box:
-
Select the database you want to import.
-
Optionally clear auto-discovered databases you don't want to import.
-
Supply the database administrator username and password and click Import. (Supplying a non-administrator username prevents MC from displaying some charts after import.)
-
To configure TLS security for all Management Console connections to this database over JDBC, click Use TLS. Management Console launches the Certificates wizard. For instructions on completing the wizard, see Configuring TLS while importing a database on MC.
-
4 - Subclusters in MC
In Eon Mode databases, you can use subclusters (groups of nodes) to separate different workloads, to control how those workloads use resources, and to facilitate scaling your database up and down as workloads fluctuate.
In Eon Mode databases, you can use subclusters (groups of nodes) to separate different workloads, to control how those workloads use resources, and to facilitate scaling your database up and down as workloads fluctuate. This allows you to better manage your cloud resource expenses or data center resources. For an overview of subcluster concepts and how subclusters work, see Subclusters.
MC makes it easy to view and manage your subclusters. You can track how queries are performing and how well your subcluster resources are balanced. Using MC, you can use the information to adjust the number and size of your subclusters to improve your query throughput and system performance.
Visualizing your subclusters
The charts on the Database Overview page allow you to view and drill down into the resource usage of your database at any level. You can look at the resource usage of all nodes, or all subclusters, or individual subclusters. For details, see Charting subcluster resource usage in MC.
You can view statistics for the individual nodes in each subcluster in table format on the Database Manage page, in the Subclusters tab.
For a tour of the monitoring features of the Manage > Subclusters tab, see Viewing subcluster layout in MC.
Managing your subclusters
For Eon Mode databases, MC supports actions for subcluster and node management for the following public and private cloud providers:
Note
Enterprise Mode does not support subclusters.For Enterprise Mode databases, MC supports these actions:
-
In the cloud on AWS: Add Node action, Add Instance action.
-
On-premises: Add Node action.
Note
In the cloud on GCP, Enterprise Mode databases are not supported.To view and manage your subclusters, select your database from the MC Home page or the Databases and Clusters page. MC displays your database's Overview page. Select Manage at the bottom of the Overview page.
To view the Subclusters page, click the Manage > Subclusters tab:
Eon Mode in the cloud
In Eon Mode on cloud platforms, you can use the Manage > Subclusters tab to add subclusters, rebalance your subclusters, stop and start subclusters, scale subclusters up or down, or terminate a subcluster. You can also stop or start a node, or restart a database node and its underlying instance.
Eon Mode on-premises
In Eon Mode on-premises, available subcluster and node actions behave a little differently than in the cloud, because your Vertica nodes reside on actual machines in your data center rather than on cloud instances.
Subcluster Actions in Eon Mode on Premises
-
In Eon Mode on-premises, you can use the Manage > Subclusters tab to add subclusters, rebalance your subclusters, or delete a subcluster.
-
You can add (create) a subcluster only if additional Vertica host machines are available.
-
When you delete a subcluster, MC deletes the subcluster from the database but does not delete the actual machines. MC stops the nodes in the subcluster, removes them from the subcluster, and deletes the subcluster. The Vertica host machines are then available to be added to other subclusters.
- When you start or stop a subcluster in an Eon Mode database on-premises, MC starts or stops the subcluster nodes on the Vertica host machines, but not the machines themselves.
-
When you scale up a subcluster on-premises, the MC wizard displays a list of the available Vertica host machines that are not currently part of a database. You select the ones you want to add to the subcluster as nodes, then confirm that you want to scale up the subcluster.
When you scale down a subcluster on-premises, MC removes the nodes from the subcluster in the database, but does not terminate the Vertica host machines. The hosts are now available for scaling up other subclusters.
-
Scale Up displays the IP addresses of all available Vertica hosts that are not part of the database. The Scale Up button is grayed out if there are no Vertica hosts in the cluster that are not part of the database.
Node actions in Eon Mode on premises
When you start or stop a node on-premises, MC starts or stops the node in the database, but does not start or stop the Vertica host machine. The Restart Node action is not available for on-premises Eon Mode databases.4.1 - Charting subcluster resource usage in MC
On the Database Overview page, in the CPU/Memory/Disk I/O chart and the Database General Pool Usage chart, you can use the dropdown in the title bar to focus the chart on:.
On the Database Overview page, in the CPU/Memory/Disk I/O chart and the Database General Pool Usage chart, you can use the dropdown in the title bar to focus the chart on:
-
All nodes in the database
-
All subclusters in the database
-
An individual subcluster, by name
For example, the CPU/Memory/Disk I/O chart dropdown allows you to choose the database nodes, one named subcluster, or all subclusters.
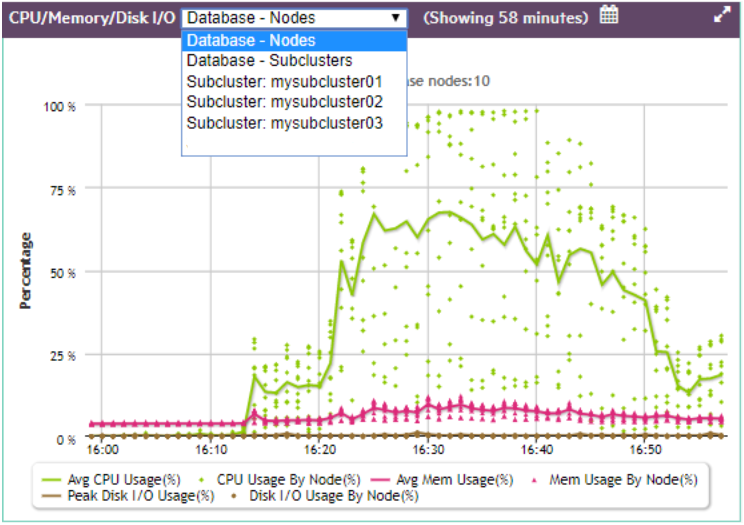
If you choose Database - Subclusters, the line in a given color represents the trend of all subclusters averaged together for that statistic, and each dot of the same color represents an individual subcluster at a certain time, for that same statistic.
For more in-depth information on how expand detail areas of charts and drill into the details, see Viewing the overview page.
4.2 - Viewing subcluster layout in MC
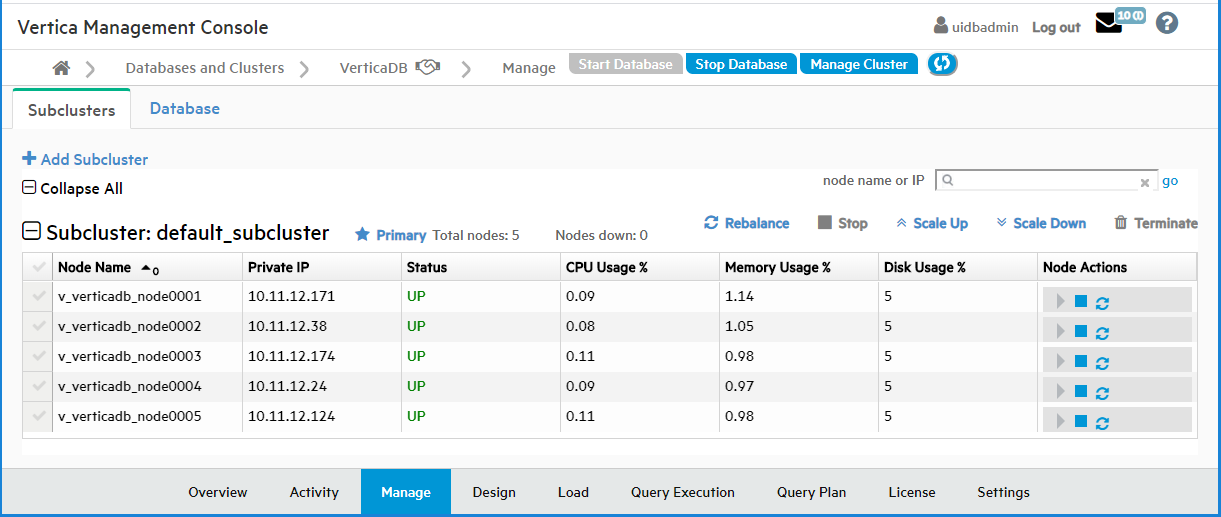
The MC Database Manage page displays two tabs, the Subclusters tab and the Database tab.
The MC Database Manage page displays two tabs, the Subclusters tab and the Database tab.
This topic describes the monitoring functions of the Subclusters tab. To monitor your subclusters, on the Subclusters tab you can view, sort, and search for subclusters and view their layout and statistics.
For information about using the Subclusters tab to make changes — adding, rebalancing, stopping and starting, scaling up or down, or terminating subclusters — see Subclusters in MC and its subtopics.
The Subclusters tab includes the following statistics in table form for the nodes in each subcluster:
-
Node name
-
Private IP address
-
Status (UP or DOWN)
-
CPU Usage %
-
Memory Usage %
-
Disk Usage %

Searching for nodes
To find a particular node, enter its node name or IP address in the "node name or IP" search field at the top right of the Subclusters tab. Searching for nodes is especially helpful if your cluster is very large. To find a specific node, enter its complete node name or IP address. You can enter a partial node name or IP address to find all nodes whose name or IP address contains that string. For example, if you enter "240" in the search field, MC would find both of the following nodes:
-
Node name: MyNode24018
-
Node IP address: 1.160.10.240
Note
Wildcard characters are not supported in the search field.Starting, stopping, or removing nodes
The right column provides icons for executing node actions. You can start, stop, or remove a node in the subcluster. Removing a node also removes it from the database. Only the Start, Stop, and Remove actions are available on this page. For details, see Starting, stopping, and restarting nodes in MC
Note
If you change the layout of your subcluster, for example by removing nodes, you must rebalance shards. See REBALANCE_SHARDS.Sorting nodes within a subcluster
You can sort the nodes within each subcluster by the values in any column, by clicking on the column heading.
Collapsing or expanding a subcluster, or the entire table
To collapse a subcluster section to one summary row, click the minus icon or the subcluster heading. To collapse the entire table to summary rows, click the minus icon or "Collapse All".
To expand a collapsed subcluster section, click the plus icon or the subcluster heading. To expand the entire table, click the plus icon or Expand All.
4.3 - Adding subclusters in MC
You can add a subcluster to an Eon Mode database on-premises or in the cloud, to provide your database with more compute power, and to separate workloads.
You can add a subcluster to an Eon Mode database on-premises or in the cloud, to provide your database with more compute power, and to separate workloads.
For more information about the rules governing subclusters, see Subclusters.
Adding a subcluster on a cloud platform
When you use MC to add an Eon Mode subcluster on a cloud platform, MC provisions the requested instances, configures them as nodes in your database cluster, and forms those nodes into a new subcluster.
You can add a second primary subcluster in order to stop the original primary. Be sure to make the replacement primary subcluster at least one node larger than the original. (If you make them the same size, they both count equally toward the quorum, and stopping either would violate the quorum, so you cannot stop either one. For more information, see Data integrity and high availability in an Eon Mode database.)
Amazon Web Services (AWS)
The following steps add a subcluster on AWS:
-
On the Manage > Subclusters tab, click Add Subcluster to open the Add Subcluster window.
-
On Enter AWS Credentials and preferences, some values might populate based on your current configuration. Accept the defaults or enter the following values:
-
AWS Region: Enter the same region as your cluster.
-
AWS Subnet: The subnet for your cluster. By default, Vertica creates your cluster in the same subnet as your MC instance.
Important
Use security groups and network access control lists (ACLs) to secure your subnet. For details, see the Amazon documentation. -
AWS Key Pair: Your Amazon key pair for SSH access to EC2 instances.
-
-
Select Next. On the Specify Subcluster Information screen, supply the following information:
-
Subcluster Name: Enter a name for your subcluster.
-
Subcluster type from the dropdown list. Select Primary or Secondary.
-
Number of instances in this subcluster: Select the number of nodes that you want in the subcluster. If you are using the free Community Edition license, you are limited to 3 nodes. If you enter a value greater than 3, you are prompted to enter an upgraded license to continue.
-
Vertica License: Click Browse to locate and upload your Vertica license key file.
If you do not supply a license key file here, the MC uses the Vertica Community Edition license. This license has a three node limit, so the value in Number of instances in this subcluster cannot be larger than 3 if you do not supply a license. See Managing licenses for more information.
-
Node IP setting: Choose a node IP setting. If you choose Public IP, the address is not persistent across instance stop and start.
-
-
Select Next. On the Specify cloud instance and data storage info screen, Database Depot Path is populated to match the original cluster configuration. Choose or enter a value in the following:
-
EC2 Instance Type: For recommended instance types, see Choosing AWS Eon Mode Instance Types. For a comprehensive list of Vertica supported instance types, see Supported AWS instance types.
-
Database Depot Path: This field is populated with the existing subcluster's depot path.
-
EBS Volume Type: This field is populated with the volume configuration defaults for the associated instance type. Select a new value to change the default.
-
EBS Volume Size (GB) per Volume per Available Node: This field is populated with the volume configuration defaults for the associated instance type. Enter a new value to change the default.
-
-
Select Next. On the Specify additional storage and tag info screen, the following fields are populated:
-
Database Catalog Path: The path to a persistent storage location.
-
Database Temp Path: The path to an ephemeral storage location if the node instance type includes the ephemeral storage option.
Under each path, there are EBS Volume Type and EBS Volume Size (GB) per Volume per Available Node fields that are populated with volume configuration defaults for the associated instance type. Select or enter a new value to change the default path. -
Optionally, select Tag EC2 Instances to assign distinctive, searchable metadata tags to the instances in your new subcluster. Existing tags are displayed.
-
-
Select Next. On Review 'Add Subcluster' information, confirm the configuration details for your new subcluster.
-
Select Add Subcluster to create the subcluster.
After the subcluster is created, The Subcluster page displays. The MC automatically subscribes the nodes in your new subcluster to shards so that the nodes are ready to use.
Google Cloud Platform (GCP)
The following steps add a subcluster on GCP:
-
On the Manage > Subclusters tab, click Add Subcluster to open the Add Subcluster window.
-
On Specify Subcluster Information, supply the following information:
-
Subcluster Name: Enter a name for your subcluster.
-
Subcluster type from the dropdown list. Select Primary or Secondary.
-
Number of instances in this subcluster: Select the number of nodes that you want in the subcluster. If you are using the free Community Edition license, you are limited to 3 nodes. If you enter a value greater than 3, you are prompted to enter an upgraded license to continue.
-
Vertica License: Click Browse to locate and upload your Vertica license key file.
If you do not supply a license key file here, the MC uses the Vertica Community Edition license. This license has a three node limit, so the value in Number of instances in this subcluster cannot be larger than 3 if you do not supply a license. See Managing licenses for more information.
-
Node IP setting: Choose a node IP setting. If you choose Public IP, the address is not persistent across instance stop and start.
-
-
Select Next. Cluster configuration might take a few minutes.
-
On Specify cloud instance and depot storage info, supply the following information:
-
Instance Type: Select the instance type. For recommended instance types, see GCP Eon Mode instance recommendations. For a comprehensive list of Vertica supported instance types, see Supported GCP machine types.
-
Database Depot Path: This value is populated to match the original cluster configuration.
-
Disk Type: Volume type for each node. This value is populated with the volume configuration defaults for the associated instance type.
-
Volume Size (GB) per Volume per Available Node: Volume size for each node. This value is populated with the volume configuration defaults for the associated instance type.
-
-
Select Next. On Specify additional storage and label info, supply the following:
-
Database Catalog Path: The path to a persistent storage location.
-
Disk Type: Volume type for the database catalog.
-
Size (GB) per Available Node: Volume size for the database catalog.
-
Database Temp Path: The path to an ephemeral storage location if the node instance type includes the ephemeral storage option.
-
Disk Type: Volume type for the database temp storage location.
-
Size (GB) per Available Node: Volume size for the database temp storage location.
-
Label Instances: Optional. Assign distinctive, searchable metadata tags to the instances in your new subcluster. Existing tags are displayed.
-
-
Select Next. On Review Information, confirm the configuration details for your new subcluster, and accept the terms and conditions.
-
Select Add Subcluster to create the subcluster.
After the subcluster is created, The Subcluster page displays. The MC automatically subscribes the nodes in your new subcluster to shards so that the nodes are ready to use.
Microsoft Azure
The following steps add a subcluster on Azure:
-
On the Manage > Subclusters tab, click Add Subcluster to open the Add Subcluster window.
-
On Specify Subcluster Information, supply the following information:
-
Subcluster Name: Enter a name for your subcluster.
-
Subcluster type from the dropdown list. Select Primary or Secondary.
-
Number of instances in this subcluster: Select the number of nodes that you want in the subcluster. If you are using the free Community Edition license, you are limited to 3 nodes. If you enter a value greater than 3, you are prompted to enter an upgraded license to continue.
-
Vertica License: Click Browse to locate and upload your Vertica license key file.
If you do not supply a license key file here, the MC uses the Vertica Community Edition license. This license has a three node limit, so the value in Number of instances in this subcluster cannot be larger than 3 if you do not supply a license. See Managing licenses for more information.
-
Node IP setting: Choose a node IP setting. If you choose Public IP, the address is not persistent across instance stop and start.
-
-
Select Next. Cluster configuration might take a few minutes.
-
On Specify cloud instance and depot storage info, supply the following information:
-
Virtual Machine (VM) Size: Select the instance type. For a comprehensive list of Vertica supported instance types, see Recommended Azure VM types and operating systems.
-
Database Depot Path: This value is populated to match the original cluster configuration.
-
Managed Disk Volume Type: Volume type for each node. This value is populated with the volume configuration defaults for the associated instance type.
-
Managed Disk Volume Size (GB) per Volume per Available Node: Volume size for each node. This value is populated with the volume configuration defaults for the associated instance type.
-
-
Select Next. On Specify additional storage and label info, supply the following:
-
Database Catalog Path: The path to a persistent storage location.
-
Managed Disk Volume Type: Volume type for the database catalog.
-
Managed Disk Volume Size (GB) per Available Node: Volume size for the database catalog.
-
Database Temp Path: The path to an ephemeral storage location if the node instance type includes the ephemeral storage option.
-
(E16_v4 VMs only) Managed Disk Volume Type: Volume type for the database temp storage location.
-
(E16_v4 VMs only) Managed Disk Volume Size (GB) per Available Node: Volume size for the database temp storage location.
-
Label Instances: Optional. Assign distinctive, searchable metadata tags to the instances in your new subcluster. Existing tags are displayed.
-
-
Select Next. On Review Information, confirm the configuration details for your new subcluster.
-
Select Add Subcluster to create the subcluster.
After the subcluster is created, The Subcluster page displays. The MC automatically subscribes the nodes in your new subcluster to shards so that the nodes are ready to use.
On-premises
For an Eon Mode database on-premises, you can use MC to create additional subclusters. MC displays all available Vertica hosts that are not part of the database. It configures the ones you select to become the nodes in the new subcluster in your database.
-
On the Manage > Subclusters tab, click Create Subcluster at top left. MC opens the Create Subcluster wizard.
-
In the first screen, respond in the following fields:
-
**Subcluster Name:**Enter a name for the new subcluster.
-
**Subcluster type dropdown (unlabeled):**Select Primary or Secondary.
-
**Select nodes that will be added to a subcluster:**Select from the list of IP addresses. MC displays all available Vertica hosts within the cluster that are not currently members of a database.
-
**Confirmation:**Click the Confirmation check box to indicate that you want to create the named subcluster, to include the Vertica hosts you selected as nodes.
-
-
After you click the Confirmation check box, the Proceed button becomes active. Click Proceed.
MC displays a progress screen while it creates the requested subcluster. Wait for all steps to complete.
See also
Subcluster action rules in MC4.4 - Rebalancing data using Management Console
Vertica can rebalance your subcluster when you add or remove nodes.
Vertica can rebalance your subcluster when you add or remove nodes. If you notice data skew where one node shows more activity than another (for example, most queries processing data on a single node), you can manually rebalance the sublcluster using MC if the database is imported into the MC interface.
On the Management Console Manage page in the Subclusters tab, click Rebalance above the subcluster to initiate the rebalance operation.
During a rebalance operation, you cannot perform any other activities on the database, such as start, stop, add, or remove nodes.
4.5 - Subcluster action rules in MC
The table below summarizes when each subcluster action is available for the primary subcluster or a secondary subcluster.
The table below summarizes when each subcluster action is available for the primary subcluster or a secondary subcluster.
For Eon Mode databases, MC supports actions for subcluster and node management for the following public and private cloud providers:
Note
Enterprise Mode does not support subclusters.In the cloud
The explanations in this table apply to subcluster actions in the cloud. For the differences on-premises, see On-Premises further below.
| Subcluster Action | Primary Subcluster | Secondary Subcluster |
|---|---|---|
| Add Subcluster |
Allowed. Must include at least one node. The subcluster cannot be empty. Vertica recommends having only one primary subcluster. You can add a second primary subcluster in order to stop the original primary. Be sure to make the replacement primary subcluster at least one node larger than the original. (If you make them the same size, they both count equally toward the quorum, and stopping either would violate the quorum, so you cannot stop either one. For more information, see Data integrity and high availability in an Eon Mode database.) |
Allowed. Creates a new subcluster. Provisions cloud instance(s). Adds nodes to that subcluster. Defaults to minimum of one node. |
|
Rebalance
|
Always allowed. NoteWhen you scale down a subcluster, Vertica rebalances the shards automatically, whereas when you scale up a subcluster, you must rebalance the shards yourself. |
Always allowed. See note for primary subcluster. |
|
Start Subcluster
|
Available if primary subcluster is stopped. |
Available if:
|
|
Stop Subcluster
|
Stop Subcluster is available for the primary subcluster only under certain conditions:
|
Available if running. |
|
Scale Up
|
Always allowed.
|
Always allowed. |
|
Scale Down
|
Allowed only under the following conditions:
|
Same as for primary. |
|
Terminate Subcluster
|
Available if another primary subcluster exists in the database. |
Always allowed.
|
On-premises
When you start or stop a subcluster in an Eon Mode database on-premises, MC starts or stops the subcluster nodes on the Vertica host machines, but not the machines themselves.When you scale up a subcluster on-premises, the MC wizard displays a list of the available Vertica host machines that are not currently part of a database. You select the ones you want to add to the subcluster as nodes, then confirm that you want to scale up the subcluster.
When you scale down a subcluster on-premises, MC removes the nodes from the subcluster in the database, but does not terminate the Vertica host machines. The hosts are now available for scaling up other subclusters.
4.6 - Starting and stopping subclusters in MC
On the Manage > Subclusters tab, the tool bar displays the available subcluster actions above each subcluster.
For Eon Mode databases, MC supports actions for subcluster and node management for the following public and private cloud providers:
Note
Enterprise Mode does not support subclusters.On the Manage > Subclusters tab, the tool bar displays the available subcluster actions above each subcluster. For example, the screen capture below shows the available actions for the default subcluster, which is also the primary subcluster: Rebalance, Stop (grayed out), Scale Up, Scale Down, and Terminate (grayed out).
Note
Terminate Subcluster is available for Eon Mode databases only in the cloud, not on premises.
Why are some actions grayed out?
Stop and Terminate are grayed out in this example because if you stopped or terminated the only primary subcluster, the database would shut down. For each subcluster, Stop displays if the subcluster is currently running, or Start displays if the subcluster is currently stopped. Both Stop and Terminate are grayed out if their execution would be unsafe for the database.
Starting a subcluster in the cloud
You can start any subcluster that is currently stopped.
-
In the Manage > Subclusters tab, locate the subcluster you want to start.
-
Just above it on the right, click Start.
-
In the Start Subcluster screen, click the check box to confirm you want to start the subcluster.
MC displays a progress screen while the startup tasks are executing.
-
When all the tasks are checked, click Close.
The Manage > Subclusters tab shows that your subcluster is started and its nodes are up.
Stopping a subcluster in the cloud
Important
Stopping a subcluster does not warn you if there are active user sessions connected to the subcluster. This behavior is the same as stopping an individual node. Before stopping a subcluster, verify that no users are connected to it.You can stop a primary subcluster only if there is another primary subcluster in the database with node count greater at least by 1 node, to maintain K-safety.
You can add a second primary subcluster in order to stop the original primary. Be sure to make the replacement primary subcluster at least one node larger than the original. (If you make them the same size, they both count equally toward the quorum, and stopping either would violate the quorum, so you cannot stop either one. For more information, see Data integrity and high availability in an Eon Mode database.)
You can stop a secondary subcluster anytime, to save money on cloud resources.
-
In the Manage > Subclusters tab, locate the subcluster you want to stop.
If the Stop button is displayed but grayed out, you cannot stop this subcluster because doing so would shut down the database.
-
Just above the subcluster on the right, click Stop.
-
In the Stop Subcluster window, click the check box to confirm you want to stop the subcluster.
MC displays a progress screen while the subcluster stopping tasks are executing.
-
When all the tasks are checked, click Close.
The Manage > Subclusters tab shows that your subcluster is stopped and its nodes are down.
Starting or stopping a subcluster on premises
When you start or stop a subcluster in an Eon Mode database on-premises, MC starts or stops the subcluster nodes on the Vertica host machines, but not the machines themselves.See also
Subcluster action rules in MC4.7 - Scaling subclusters in MC
You can scale an Eon Mode subcluster up or down, to increase or decrease the number of nodes in the subcluster.
You can scale an Eon Mode subcluster up or down, to increase or decrease the number of nodes in the subcluster. This lets you add compute capacity when you need it, and reduce it to save money or redirect resources when you don't.
For Eon Mode databases, MC supports actions for subcluster and node management for the following public and private cloud providers:
Note
Enterprise Mode does not support subclusters.Scaling up in the cloud
When you scale up a subcluster, MC adds one or more cloud instances to your database cluster as hosts, and adds them to your subcluster as nodes.
-
On the Manage > Subclusters tab, click Scale Up immediately above the subcluster you want to enlarge. MC launches the Scale Up wizard.
-
Wait a moment or two while MC pre-populates the fields on the Enter AWS Credentials and preferences screen with your credentials, then click Next.
-
On the Specify Subcluster information screen, enter the number of instances you want to add to the subcluster in Number of Instances to Add. MC pre-populates the number of existing hosts in the cluster.
-
Click Browse and select your Vertica license to insert in the license field, then click Next.
-
The Specify cloud instance and data storage info screen has fields that specify the cloud instance and data storage information. MC sets all the fields to the same values as the existing instances in your subcluster. Select Next to accept the existing values.
-
The Specify additional storage and tag info screen displays any tags you specified for your instances when you created the database cluster. You can use the same tags for the instances you are adding, or use the fields on the screen to add new tags for these instances. You can keep and apply or delete the existing tags. If you delete tags, they are not used for the instances you are adding now. When you are done modifying the tags, click Next.
-
MC displays the Review 'Scale Up' information screen for your approval. If the information is correct, click Scale Up to add the instances to the subcluster.
-
Wait until all operations on the progress screen show check marks, then click Close.
Scaling down in the cloud
When you scale down a subcluster, MC removes the requested number of nodes from the subcluster, and removes their hosts from the database cluster. It then terminates the underlying cloud instances. Scaling down a subcluster is allowed only when doing so will not cause the database to shut down.
For details on when Scale Down is or is not available for a subcluster, see Subcluster action rules in MC.
-
On the Manage > Subclusters tab, click Scale Down above the subcluster to launch the Scale Down page:
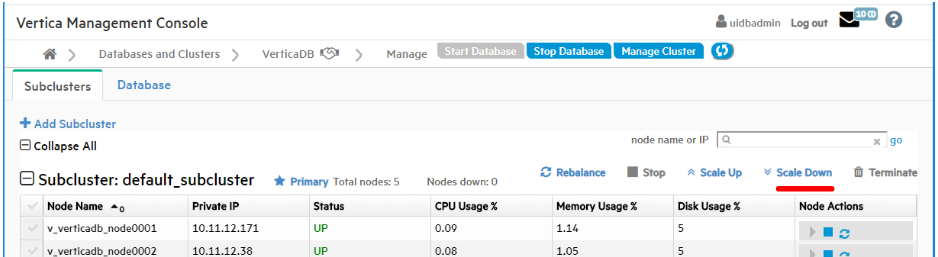
-
In the Number of hosts to remove field, enter the number of hosts you would like to remove from the subcluster.
-
Under Confirmation, click the checkbox to affirm that you want to scale down the named subcluster, and terminate the instances the nodes were using.
-
Click Scaledown Subcluster.
The scale down operation may take a little time. When it finishes, the progress screen displays the details about the removed nodes and their hosts and the terminated instances.
-
When all steps show check marks, click Close.
Scaling on-premises
When you scale up a subcluster on-premises, the MC wizard displays a list of the available Vertica host machines that are not currently part of a database. You select the ones you want to add to the subcluster as nodes, then confirm that you want to scale up the subcluster.
When you scale down a subcluster on-premises, MC removes the nodes from the subcluster in the database, but does not terminate the Vertica host machines. The hosts are now available for scaling up other subclusters.
4.8 - Terminating subclusters in MC
The Terminate action for subclusters is available for Eon Mode databases only in the cloud.
For Eon Mode databases, MC supports actions for subcluster and node management for the following public and private cloud providers:
Note
Enterprise Mode does not support subclusters.In the cloud
The Terminate action for subclusters is available for Eon Mode databases only in the cloud.
You can terminate any subcluster that will not cause the database to go down. You can terminate:
-
Any secondary subcluster.
-
A primary subcluster, provided that:
-
There is at least one other primary subcluster in the database.
-
The other primary subcluster is at least one node larger than the one you want to terminate.
-
Terminate a subcluster
-
On the Manage > Subclusters tab, click Terminate immediately above the target subcluster.
-
In the Terminate Subcluster window, click the check box to confirm you want to delete the chosen subcluster and terminate its instances.
-
Click Terminate Subcluster.
MC displays a progress window that shows the steps it is executing to terminate the subcluster.
-
When all the steps are checked, click Close.
On-premises
The Terminate action for subclusters is not available for Eon Mode on-premises. You can stop a subcluster on-premises, provided doing so will not bring down the database. You cannot terminate a subcluster on-premises, because terminating a subcluster stops the nodes and then terminates the cloud instances those nodes reside on. MC cannot terminate on-premises Vertica host machines.
To free up some of the Vertica host machines in an on-premises subcluster, scale down the subcluster.
See also
Subcluster action rules in MC4.9 - Node action rules in MC
The table below summarizes when each node action is available for nodes in the primary subcluster or in a secondary subcluster.
The table below summarizes when each node action is available for nodes in the primary subcluster or in a secondary subcluster.
For Eon Mode databases, MC supports actions for subcluster and node management for the following public and private cloud providers:
Note
Enterprise Mode does not support subclusters.For Enterprise Mode databases, MC supports these actions:
-
In the cloud on AWS: Add Node action, Add Instance action.
-
On-premises: Add Node action.
Note
In the cloud on GCP, Enterprise Mode databases are not supported.| Node Action | Primary Subcluster | Secondary Subcluster |
|---|---|---|
|
Start Node Starts instance if needed. |
Always allowed. | Always allowed. |
|
Stop Node Stops the instance on a cloud platform. |
|
|
| Restart Node |
|
|
| The Remove Node action has been deleted from existing actions for all nodes. Use Scale Down subcluster instead. | ||
When you start or stop a node on-premises, MC starts or stops the node in the database, but does not start or stop the Vertica host machine. The Restart Node action is not available for on-premises Eon Mode databases.
See also
Starting, stopping, and restarting nodes in MC4.10 - Starting, stopping, and restarting nodes in MC
In MC you can start, stop, and restart nodes in a subcluster in your database.
In MC you can start, stop, and restart nodes in a subcluster in your database. This allows you to tailor the amount of compute power you are using to the current demands for the workload assigned to that subcluster.
For Eon Mode databases, MC supports actions for subcluster and node management for the following public and private cloud providers:
Note
Enterprise Mode does not support subclusters.For Enterprise Mode databases, MC supports these actions:
-
In the cloud on AWS: Add Node action, Add Instance action.
-
On-premises: Add Node action.
Note
In the cloud on GCP, Enterprise Mode databases are not supported.On the Manage > Subcluster page in the right column, the Node Actions column displays icons that let you start, stop, or restart a node and the underlying cloud machine. Hover over an icon to read the action it performs. If an icon is grayed out, that action is not available for that node.
-
Start Node. Start an individual node in the subcluster.
-
Stop Node. Stop an individual node in the subcluster.
-
Restart Node (GCP only). Restart an individual node in the subcluster.
See also
Node action rules in MC5 - Eon Mode on-premises
5.1 - Reviving an Eon Mode database on premises with FlashBlade using MC
An Eon Mode database keeps an up-to-date version of its data and metadata in its communal storage location. After a cluster hosting an Eon Mode database is terminated, this data and metadata continue to reside in communal storage. When you revive the database later, Vertica uses the data in this location to restore the database in the same state on a newly provisioned cluster.(For details on how to stop or terminate a cluster using Management Console, see Viewing and managing your cluster.)
Prerequisites
You can revive a terminated Eon Mode database on premises that uses a Pure Storage FlashBlade appliance as its communal storage location if you have the following facts available:
-
The endpoint IP address of the FlashBlade.
-
The endpoint port for the FlashBlade.
-
The access key and secret key for FlashBlade.
-
The S3 URL for the FlashBlade.
-
The name of the stopped database stored on the FlashBlade, that you wish to revive.
Revive an Eon Mode database from communal storage on FlashBlade
-
On the MC Infrastructure page, click the box for the cluster you wish to revive. MC displays a pop-up with cluster details and action buttons.
-
Click Revive Database. MC launches the Revive an Eon Mode Database wizard.
-
In the S3 Communal Storage Information screen, enter the following fields, then click Next:
S3-compatible End Point IP The IP address of the Pure Storage FlashBlade appliance. End Point IP The port for the FlashBlade. Access ID The access key for the FlashBlade. Secret Key The secret key for the FlashBlade. -
When you click Next, MC validates your credentials. If validation is successful, MC reads the list of S3 buckets on the end point (the FlashBlade).
-
In the Path for Database Communal Location screen, enter the following field , then click Discover.
S3 path for Communal Storage of database(s) Enter the complete S3 bucket URL for the database you wish to revive, in the following format:
s3://bucket-name/subfolder-name
-
MC populates the table under the Discover button with the database names and complete S3 URLs of all the databases it finds on the S3 location.
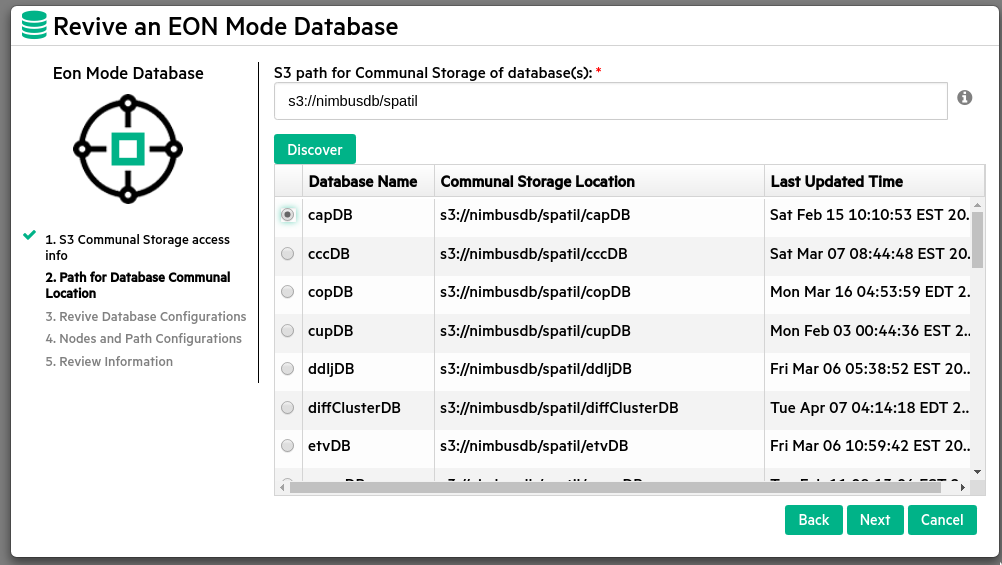
-
Click the radio button for the database you want to revive, then click Next.
-
In the Details of Selected Database to Revive screen, MC pre-fills most of the fields. Enter and confirm your password:
Vertica Database Name Database name is pre-entered. Original Database Version Database Vertica version is pre-filled. Cluster Vertica Version Cluster Vertica version is pre-filled. Database size Number of nodes is pre-filled. Original Vertica Database Super User Name Database super user name is pre-filled. Password Enter the database password. Confirm Password Re-enter the password to confirm. -
MC validates the information. If validation is successful, the Next button changes from grayed out to active. Click Next.
-
In the Eon Mode Database screen, select the IP addresses of the nodes in the cluster on which you wish to revive the database. MC fills in the Number of Nodes field and displays the catalog path and depot path that were configured for the database when it was created.
-
In the Temp Path field, enter the complete path for the Temp directory. Then click Next.
-
MC displays the S3 Provider Details screen with a summary of all the information you have entered to revive the database. Review the information to verify it is correct. Then click Revive Database.
-
MC displays a progress screen indicating the database revival tasks that have been completed and the overall percentage of the revival that is complete. Wait until the revive is 100% complete, then click Close.
When the work is complete, Vertica displays the MC landing page.
5.2 - Creating an Eon Mode database on premises with FlashBlade in MC
This topic describes how to create an Eon Mode database using only on-premises machines, with Pure Storage FlashBlade as the communal storage reservoir, using Management Console.
This topic describes how to create an Eon Mode database using only on-premises machines, with Pure Storage FlashBlade as the communal storage reservoir, using Management Console.
Step 1: create a bucket and credentials on the Pure Storage FlashBlade
To use a Pure Storage FlashBlade appliance as a communal storage location for an Eon Mode database you must have:
-
The IP address of the FlashBlade appliance. You must also have the connection port number if your FlashBlade is not using the standard port 80 or 443 to access the bucket. All of the nodes in your Vertica cluster must be able to access this IP address. Make sure any firewalls between the FlashBlade appliance and the nodes are configured to allow access.
-
The name of the bucket on the FlashBlade to use for communal storage.
-
An access key and secret key for a user account that has read and write access to the bucket.
See the Pure Storage support site for instructions on how to create the bucket and the access keys needed for a communal storage location.
Step 2: install and configure MC
Install and configure Management Console on one of the on-premises machines.
Step 3: create or import a Vertica cluster
In MC, create a Vertica cluster on a group of on-premises machines, or import a previously created cluster to MC.
Step 4: create an Eon Mode database with FlashBlade as communal storage
Create an Eon Mode database on the on-premises cluster, using Pure Storage FlashBlade as your S3-compatible communal storage, as explained below.
-
In MC on the Infrastructure page, click the square for the specific cluster where you want to create the database. MC displays a pop-up with cluster details and action buttons.
-
Click Create Database. MC launches the Create a New Database wizard.
-
In the Vertica Database Mode screen, click the icon for Eon Mode Database, then click Next.
-
In the S3 Communal Storage Information screen, enter the following information, then click Next:
S3-compatible End Point IP Enter the IP address of the Pure Storage FlashBlade appliance. End Point Port Enter the port of the FlashBlade appliance for a valid connection with the Management Console (80 for an unencrypted connection or 443 for an encrypted connection). Access ID Enter the access key for the FlashBlade. Secret Key Enter secret key for the FlashBlade. Communal Location URL Enter a communal location URL beginning with s3:// that points to the third-party storage appliance you will be using, for example Pure Storage FlashBlade. For example, s3://bucket/subfolder or s3://bucket/folder/subfolder. The bucket must already exist, and the subfolder must not exist. -
In the Database Parameters screen, enter these fields, then click Next:
Database Name Enter 1-30 letters, numbers, and underscores. The first character must be alphabetic. Password Enter a new administrator password for the new Eon Mode database. Allowed characters: Alphanumeric (letters and digits) and ASCII special characters. Maximum is 100 characters. Confirm Password Enter the same password again to confirm it. Port Currently, Vertica supports only port 5433. Catalog Path Enter the directory path for the catalog of the Eon Mode database. The catalog should always reside on persistent storage. This path must exist on the host machines. If the path does not exist on the host machines you must create it manually before specifying it in this wizard. Depot Path Enter the directory path for the Eon Mode depot. MC populates the depot with recently used data. Queries that find their data in the depot get better performance. The directory must exist on the filesystem that was mounted during cluster creation. If the path does not exist on the host machines you must create it manually before specifying it in this wizard. Depot Size Enter the percentage of total disk space to use for the Eon Mode depot. The default is 60% of available disk. The maximum is 99,999T, or the equivalent in G or M units. Temp Path Directory path to use for temp data. This path must exist on the host machines. If the path does not exist on the host machines you must create it manually before specifying it in this wizard. For Temp, you may want to use a scratch disk. -
In the Specify Node Preferences screen, select the IP addresses of the hosts for the database nodes. Then enter these fields, and click Next:
Number of nodes selected for the database This value is set automatically. Always equal to the number of IP addresses you select. Data Segmentation Shards The number of shards is the number of segments that the data will be divided into in communal storage. For best performance, Vertica recommends you choose a number of shards that is a multiple of the number of nodes in the database. Vertica requires a minimum of 1 and allows a maximum of 960 shards. A good strategy is to choose an even number divisible by multiple factors. Consider the future growth of your database, as Vertica requires that the number of nodes be no greater than the number of shards, and you add nodes later but you cannot change the number of shards later. -
MC displays a confirmation screen labeled S3 Provider Details, that summarizes all of your choices for configuring the Eon database. Verify the details are correct, then click Create Database.
-
MC creates the database, displaying a progress indicator screen. Wait for all steps to complete, which may take several minutes.
When the work is complete, navigate to the MC landing page to use your new database.
6 - Managing queries using MC
Management Console allows you to view the query plan of an active query or a manually entered query specified by the user.
Management Console allows you to view the query plan of an active query or a manually entered query specified by the user.
-
On the MC Home Page, click the database you want to view the Overview page.
-
Select the Activity tab to view the query activity.
-
Click the Explain tab to access the query plan.
See Working with query plans in MC and Accessing query plans in Management Console for further information.
Management Console provides two options for viewing the query plan: Path Information and Tree Path. For details on each, refer Query plan view options.
Additionally, you can also Viewing projection and column metadata using the MC Explain tab.
See also
6.1 - About profile data in Management Console
After you profile a specific query, the Management Console Explain page displays profile data like query duration, projection metadata, execution events, optimizer events, and metrics in a pie chart.
After you profile a specific query, the Management Console Explain page displays profile data like query duration, projection metadata, execution events, optimizer events, and metrics in a pie chart.
See the following links for more information on the kinds of profile data you can review on the Management Console Explain page:
6.1.1 - Projection metadata
To view projection metadata for a specific projection, click the projection name in the EXPLAIN output.
To view projection metadata for a specific projection, click the projection name in the EXPLAIN output. Metadata for that projection opens in a pop-up window.
To view projection data for all projections accessed by that query, click the View Projection Metadata button at the top of the Explain page. The metadata for all projections opens in a new browser window.
Note
If the View Projection Metadata button is not enabled, click Profile to retrieve the profile data, including the projection metadata.The projection metadata includes the following information:
-
Projection ID
-
Schema name
-
Whether or not it is a superprojection
-
Sort columns
-
IDs of the nodes the projection is stored on
-
Whether or not it is segmented
-
Whether or not it is up to date
-
Whether or not it has statistics
-
Owner name
-
Anchor table name
To display a SQL script that can recreate the projection on a different cluster, click Click to get export data. This script is identical to the output of the EXPORT_OBJECTS function. The SQL script opens in a pop-up window.
Copy and paste the command from this window, and click Close.
6.1.2 - Query phase duration
This pie chart appears in the upper-right corner of the Query Plan window.
This pie chart appears in the upper-right corner of the Query Plan window. It shows what percentage of total query processing was spent in each phase of processing the query.
The phases included in the pie chart (when applicable) are:
-
Plan
-
InitPlan
-
SerializePlan
-
PopulateVirtualProjection
-
PreparePlan
-
CompilePlan
-
ExecutePlan
-
AbandonPlan
Hover over the slices on the pie chart or over the names of the phases in the box to get additional information. You can see the approximate number of milliseconds (ms) and percentage used during each phase.
Note
The time data in the profile metrics might not match the times in the query phase duration. These times can differ because the query phase duration graph uses the longest execution time for a given phase from all the nodes. Network latency can add more data, which is not taken into account in these calculations.6.1.3 - Profile metrics
In the Path Information view, the area to the right of each query path contains profile metrics for that path.
In the Path Information view, the area to the right of each query path contains profile metrics for that path.
-
Disk—Bytes of data accessed from disk by each query path. If none of the query paths accessed the disk data, all the values are 0.
-
Memory—Bytes of data accessed from memory by each query path.
-
Sent—Bytes of data sent across the cluster by each query path.
-
Received—Bytes of data received across the cluster by each query path.
-
Time—Number of milliseconds (ms) that the query path took to process on a given node, shown on progress bars. The sum of this data does not match the total time required to execute the query. This mismatch occurs because many tasks are executed in parallel on different nodes.
Hover over the progress bars to get more information, such as total bytes and percentages.
Note
The time data in the profile metrics might not match the times in the Query phase duration chart. These times can differ because the query phase duration graph uses the longest execution time for a given phase from all the nodes. Network latency can add more data, which is not taken into account in these calculations.
6.1.4 - Execution events
To help you monitor your database system, Vertica logs significant events that affect database performance and functionality.
To help you monitor your database system, Vertica logs significant events that affect database performance and functionality. Click View Execution Events to see information about the events that took place while the query was executing.
If the View Execution Events button is not enabled, click Profile to retrieve the profile data, including the execution events.
The arrows on the header of each column allow you to sort the table in ascending or descending order of that column.
The execution events are described in the following table.
| Event Characteristic | Details |
| Time | Clock time when the event took place. |
| Node Name | Name of the node for which information is listed. |
| Session ID | Identifier of the session for which profile information is captured. |
| User ID | Identifier of the user who initiated the query. |
| Request ID | Unique identifier of the query request in the user session. |
| Event Type | Type of event processed by the execution engine. For a list of events and their descriptions, see Initial process for improving query performance. |
| Event Description | Generic description of the event. |
| Operator Name |
Name of the Execution Engine component that generated the event. Examples include but are not limited to:
Values from the Operator name and Path ID columns let you tie a query event back to a particular operator in the query plan. If the event did not come from a specific operator, then this column is NULL. |
| Path ID | Unique identifier that Vertica assigns to a query operation or a path in a query plan. If the event did not come from a specific operator, this column is NULL. |
| Event OID | A unique ID that identifies the specific event. |
| Event Details | A brief description of the event and details pertinent to the specific situation. |
| Suggested Action | Recommended actions (if any) to improve query processing. |
6.1.5 - Optimizer events
To help you monitor your database system, Vertica logs significant events that affect database performance and functionality.Click View Optimizer Events to see a table of the events that took place while the optimizer was planning the query.
To help you monitor your database system, Vertica logs significant events that affect database performance and functionality.Click View Optimizer Events to see a table of the events that took place while the optimizer was planning the query.
If the View Optimizer Events button is not enabled, click Profile to retrieve the profile data, including the optimizer events.
The arrows on the header of each column allow you to sort the table in ascending or descending order of that column.
The following types of optimizer events may appear in the table:
| Event characteristic | Details |
| Time | Clock time when the event took place. |
| Node Name | Name of the node for which information is listed. |
| Session ID | Identifier of the session for which profile information is captured. |
| User ID | Identifier of the user who initiated the query. |
| Request ID | Unique identifier of the query request in the user session. |
| Event Type | Type of event processed by the optimizer. |
| Event Description | Generic description of the event. |
| Event OID | A unique ID that identifies the specific event. |
| Event Details | A brief description of the event and details pertinent to the specific situation. |
| Suggested Action | Recommended actions (if any) to improve query processing. |
6.2 - Profiling queries using MC
Management Console allows you to view profile data for a query.
Management Console allows you to view profile data for a query.
-
On the MC Home Page, click the database to view the Overview page.
-
Click the Explain tab to perform tasks related to profiling a query.
See Viewing profile data in MC for further details.
On the Explain tab, you can view the following profile data using MC:
You can use any of the four different formats to view the profile data:
-
Path Information view
-
Query Drilldown view
-
Tree Path view
-
Profile Analysis view
See Viewing different profile outputs for detailed explanation of each view.
Additionally, Management Console supports different color codes for viewing the progress of profiling a query. For an explanation of these color codes, see Monitoring profiling progress.
See also
6.3 - Viewing profile data in MC
Management Console allows you to view profile data about a single query.
Management Console allows you to view profile data about a single query. You can:
-
Review the profile data in multiple views
-
View details about projection metadata, execution events, and optimizer events
-
Identify how much time was spent in each phase of query execution and which phases took the most amount of time
After you select the database you want to use, you can view the profile data using Management Consolein either of two ways:
- Focus on specific areas of database activity, such as spikes in CPU usage
- Review the profile data for a specific query
To focus on specific areas of database activity:
-
At the bottom of the Management Console window, click the Activity tab.
-
From the list at the top of the page, select Queries.
-
On the activity graph, click the data point that corresponds to the query you want to view.
-
In the View Plan column, click Profile next to the command for which you want to view the query plan. Only certain queries, like SELECT, INSERT, UPDATE, and DELETE, have profile data.
-
In The Explain Plan window, Vertica profiles the query.
-
You can view the output in Path Information view, Query Plan Drilldown view, Tree Path view, or Profile Analysis view. To do so, click the respective buttons on the left of the output box.
To review the profile data for a specific query:
-
In the Explain window, type or paste the query text into the text box. Additionally, you can monitor queries that are currently running. To do so, perform one of the following. In the Find a Query By ID input window:
-
Enter the query statement and transaction ID
-
Click the Browse Running Queries link
Caution
If you enter more than one query, Management Console profiles only the first query. -
-
To receive periodic updates about the query's progress and resources used, select the Enable Monitoring check box. As a best practice, avoid specifying an interval time of less than 60 seconds because doing so may slow your query's progress.
-
Click the Profile button.
While Vertica is profiling the query, a Cancel Query button is enabled briefly, allowing you to cancel the query and profiling task. If the Cancel Query button is disabled, that means Management Console does not have the proper information to cancel the query or the query is no longer running in the database.
When processing completes, the profile data and metrics display below the text box. You can view the output in Path Information view, Query Plan Drilldown view, Tree Path view , or Profile Analysis view. To do so, click the respective view buttons on the left of the output box.
6.3.1 - Viewing different profile outputs
Vertica Management Console allows you to examine the results of your query profile in multiple views.
Vertica Management Console allows you to examine the results of your query profile in multiple views. You can view your profile in the following formats:
-
Path Information view
-
Query Drilldown view
-
Tree Path view
-
Profile Analysis view
You can change the query profile output using the icons on the bottom portion of the Explain page.
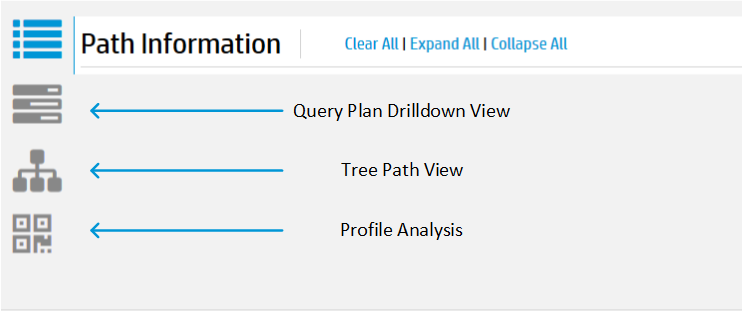
The Path Information view displays the query plan path along with metric data. If you enable profile monitoring, the data will update at the specified interval. To view metadata for a projection or a column, click the object name in the path output. A pop-up window displays the metadata if it is available.
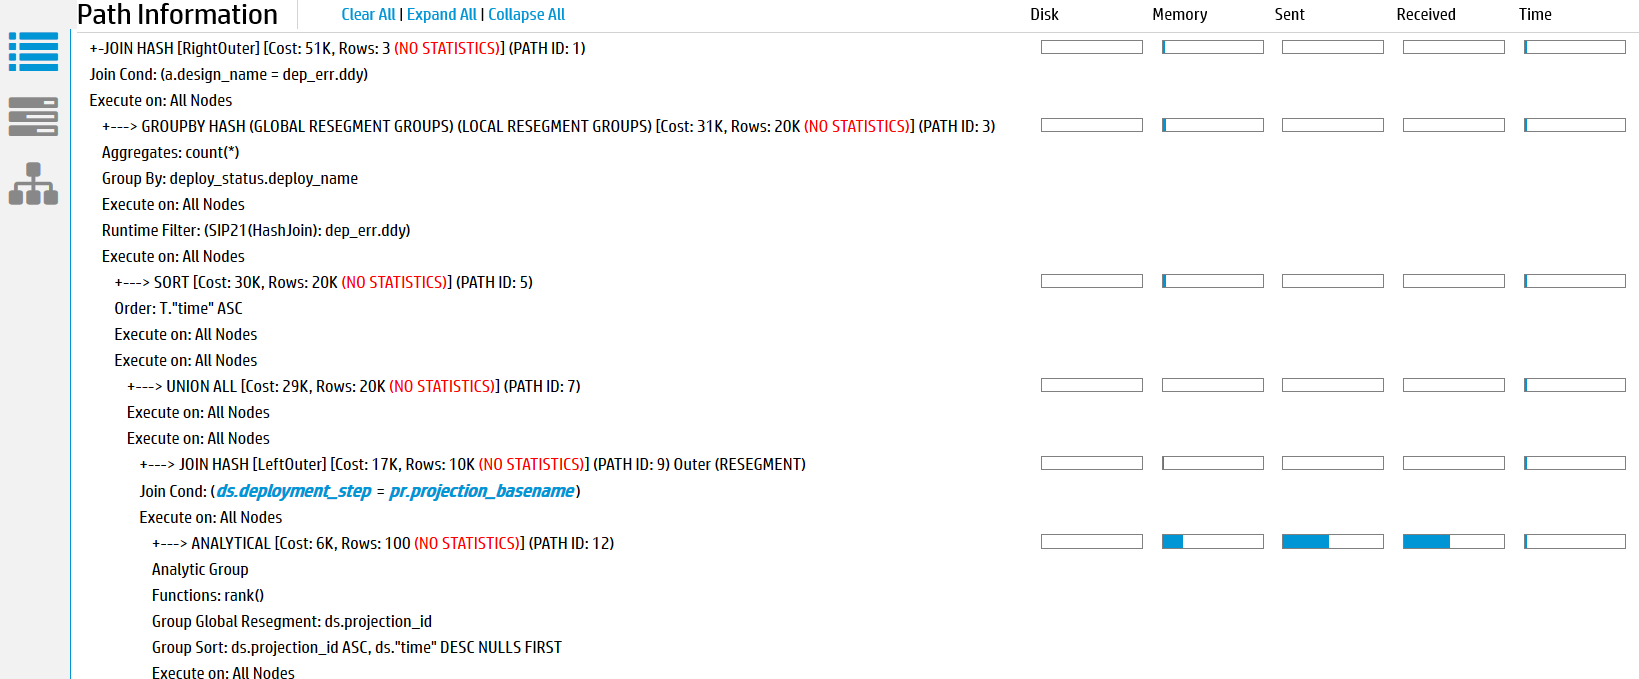
The Query Plan Drilldown view shows detailed counter information at the node and operator level.
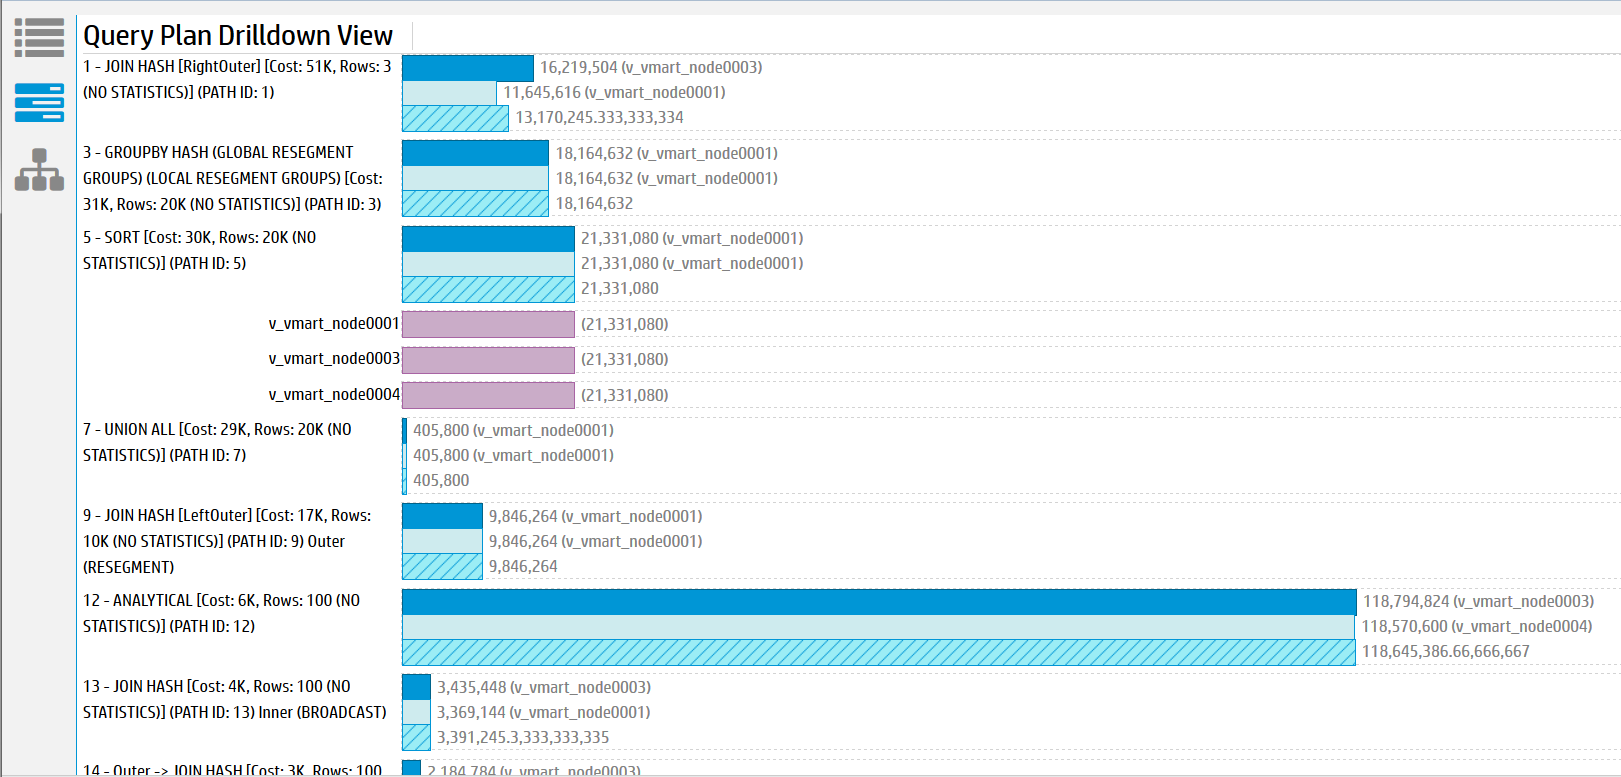
For each path, the path number is listed along with statistical information on the node and operator level. This view allows you to see which nodes are acting as outliers. Click on any of the bars to expand details for that node.
The Tree Path details the query plan in the form of a tree. If you enable monitoring, the state of the path blocks will change depending on whether the path is running, done, or has not started. Metric information is displayed in each path block for the counters you specified in the Profile Settings.
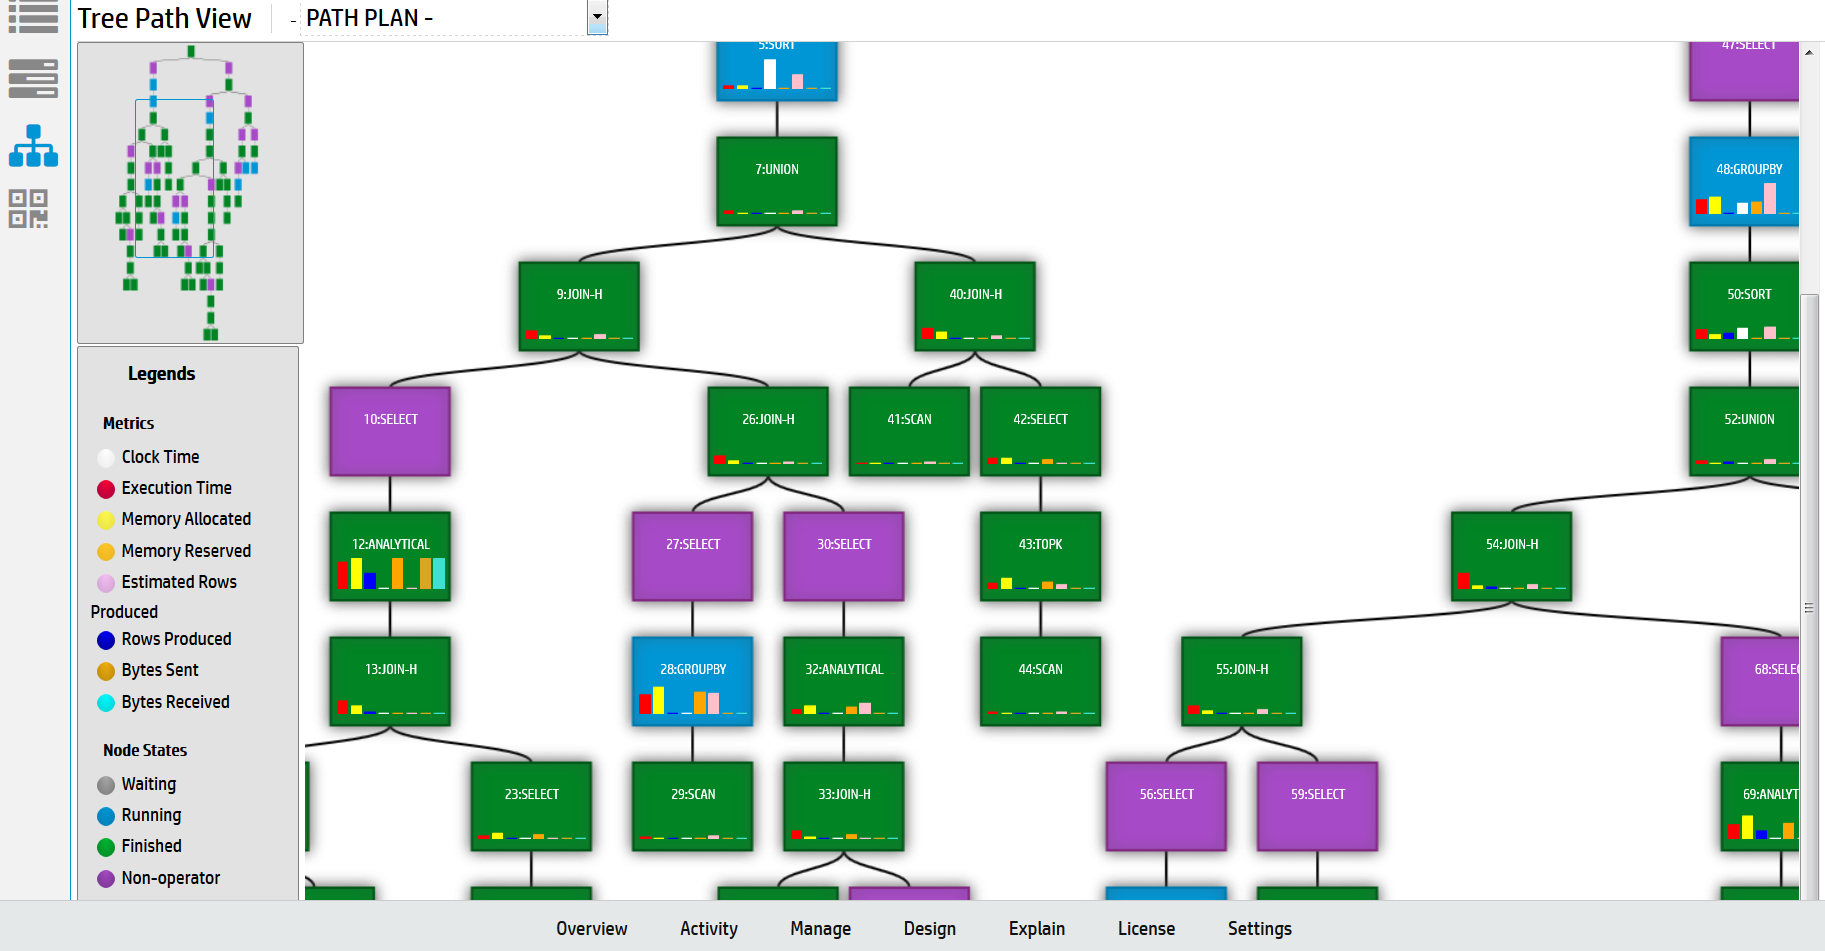
The Profile Analysis view allows you to identify any resource outliers. You can compare the estimated rows produced count with the actual rows produced count, view execution time per path, and identify memory usage per path.
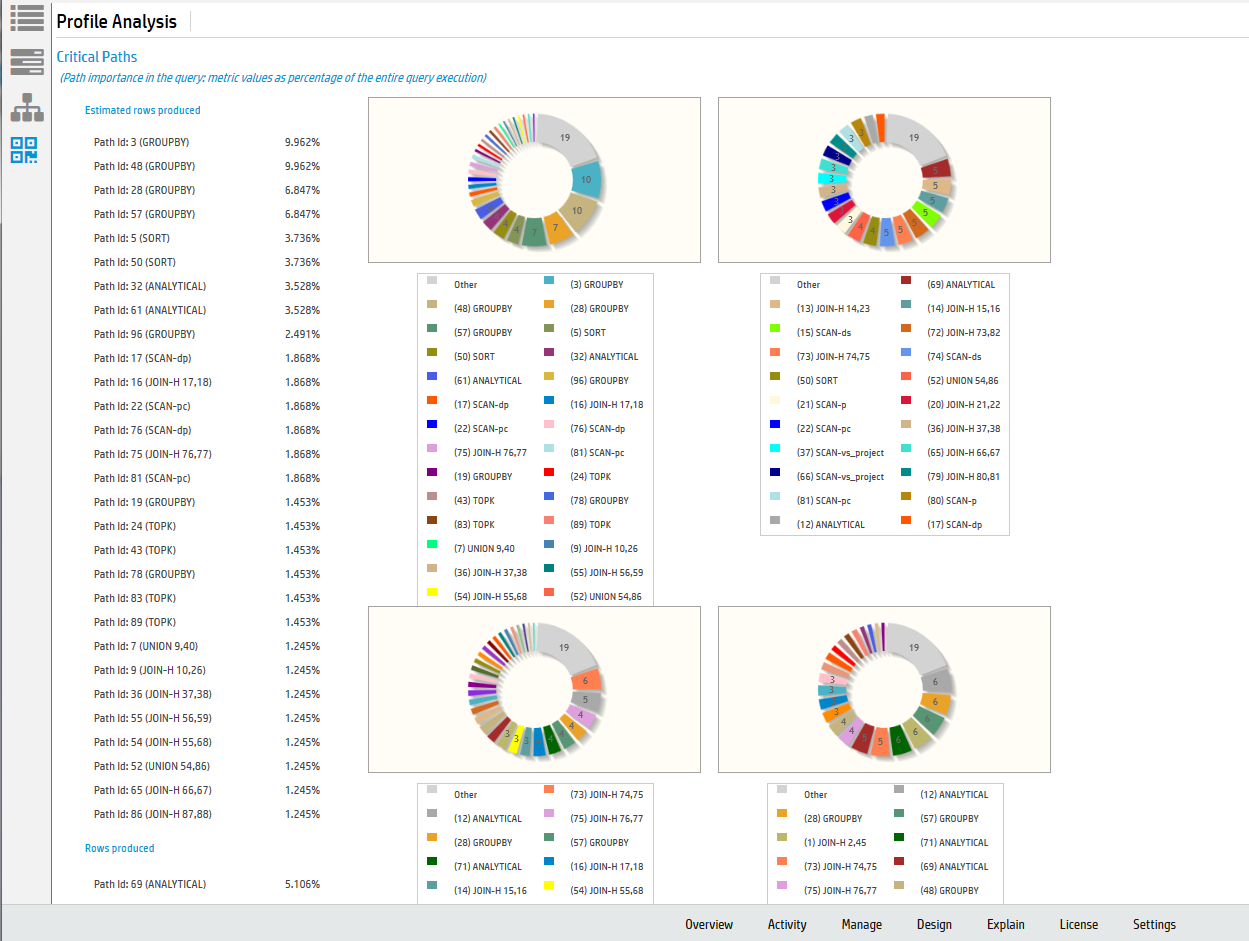
When you profile a query, you will also see a pie chart detailing the query phase duration. You can also view projection metadata, execution events, and optimizer events by clicking on the respective buttons next to the pie chart.
6.3.2 - Monitoring profiling progress
While loading profile data for a query, Management Console can provide updates about the query's progress and resources used.
While loading profile data for a query, Management Console can provide updates about the query's progress and resources used.
To enable profiling progress updates, select the Enable Monitoring check box when profiling a query. See Viewing Profile Data in Management Console.
The default interval time is 60 seconds. At the specified interval, Management Console displays an updated view of the query's progress. Note that interval times of less than 60 seconds may slow down your query.
Viewing updated profile metrics
At every interval, Management Console displays a new set of profile metrics. You can view these metrics in Path Information view, Query Plan Drilldown view, or Tree view by clicking the respective view buttons on the left of the output box.
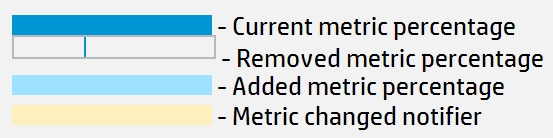
-
A dark blue bar indicates the current metric percentage.
-
When a metric bar has decreased, a dark blue line indicates the previous metric percentage.
-
When a metric bar has increased, a light blue bar indicates the added percentage. The previous percentage appears as a dark blue bar.
-
A metric bar highlighted in yellow indicates it has changed since the last interval.
-
A metric bar highlighted in red indicates the absolute value of the metric has decreased. This typically means Vertica reported the previous value incorrectly, and has readjusted. (For example, if Vertica previously reported path's Time value as 75 seconds, then reports it as 50 seconds at the next interval, the metric bar turns red to indicate the decrease in absolute Time value.)
6.3.3 - Expanding and collapsing query path profile data
When you have a query on the EXPLAIN window, the profile data displays in the right-hand side of the lower half of the window.
When you have a query on the EXPLAIN window, the profile data displays in the right-hand side of the lower half of the window. The query path information can be lengthy, so you can collapse path information that is uninteresting, or expand paths that you want to focus on.
-
To collapse all the query paths, click Collapse All.
-
To expand all the query paths, click Expand All.
-
To expand an individual query path so you can see details about that step in processing the query, click the first line of the path information. Click the first line again to collapse the path data.
For information about what the profile data means, see About profile data in Management Console.
7 - Working with query plans in MC
Management Console can show you a query plan in easy-to-read format, where you can review the optimizer's strategy for executing a specific query.
Management Console can show you a query plan in easy-to-read format, where you can review the optimizer's strategy for executing a specific query. You can view a query plan in either of two ways:
-
View the plan of an active query.
-
View the plan for any query that you manually specify.
Access the plan of an active query
-
At the bottom of the Management Console window, click the Activity tab.
-
From the list at the top of the page, select Queries.
-
On the activity graph, click the data point that corresponds to the query you want to view.
-
In the View Plan column, click Explain next to the command for which you want to view the query plan. Only certain queries use query plans—for example, SELECT, INSERT, DELETE, and UPDATE.
-
In the Explain Plan window, click Explain. Vertica generates the query plan.
-
(Optional) View the output in Path Information view or Tree Path view. To do so, click the respective view buttons on the left of the output box.
Access the plan for a specific query
-
Locate the query for which you want to see the query plan in either of the following ways:
-
Queries Not Running — In the Explain window, type or paste the query text into the text box.
-
Queries Currently Running — In the Find a Query By ID input window, perform one of the following actions:
-
Enter the query statement and transaction ID.
-
Click the Browse Running Queries link.
-
Caution
Entering the word EXPLAIN before the query results in a syntax error. -
-
Click Explain. Vertica generates the plan.
If the query is invalid, Management Console highlights in red the parts of your query that might have caused a syntax error. -
(Optional) View the output in Path Information view or Tree Path view. To do so, click the respective view buttons on the left of the output box.
7.1 - Accessing query plans in Management Console
You can access query plans in Management Console in two ways:.
You can access query plans in Management Console in two ways:
-
In the Detail page for query-related charts on the database's Activity page, click Explain next to a query to view a plan for that query.
-
Enter a query manually on the Explain page and click Explain Plan.
In both cases, the following window opens:
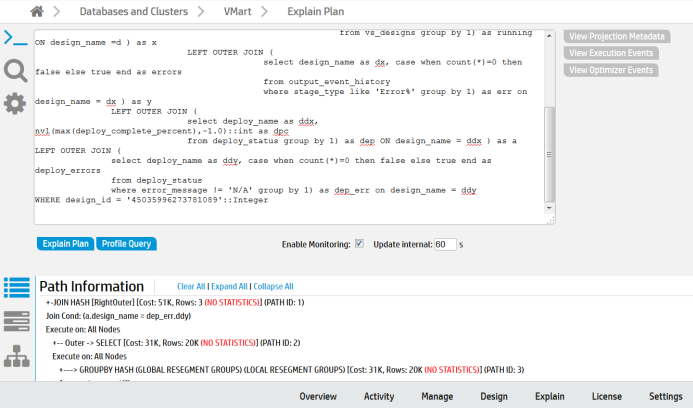
You can also enter the transaction ID and statement ID or browse running or completed queries in the Find a Query input window:
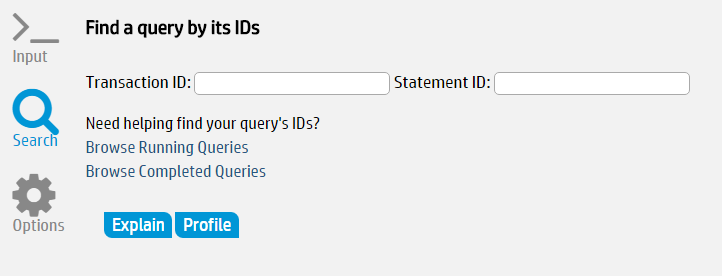
In the output window, you can perform the following tasks related to the query you entered:
7.2 - Query plan view options
Vertica Management Console provides two views for displaying query plans:.
Vertica Management Console provides two views for displaying query plans:
-
Path Information
-
Tree Path
Note
Query Plan Drilldown and Profile Analysis output views are only available when you run PROFILE.You can change the query plan view using the icons on the bottom portion of the Explain page.
The Path Information view displays the query plan path. You can expand or collapse the view to see different levels of detail. To view metadata for a projection or a column, click the object name in the path output. A pop-up window displays the metadata, if it is available.
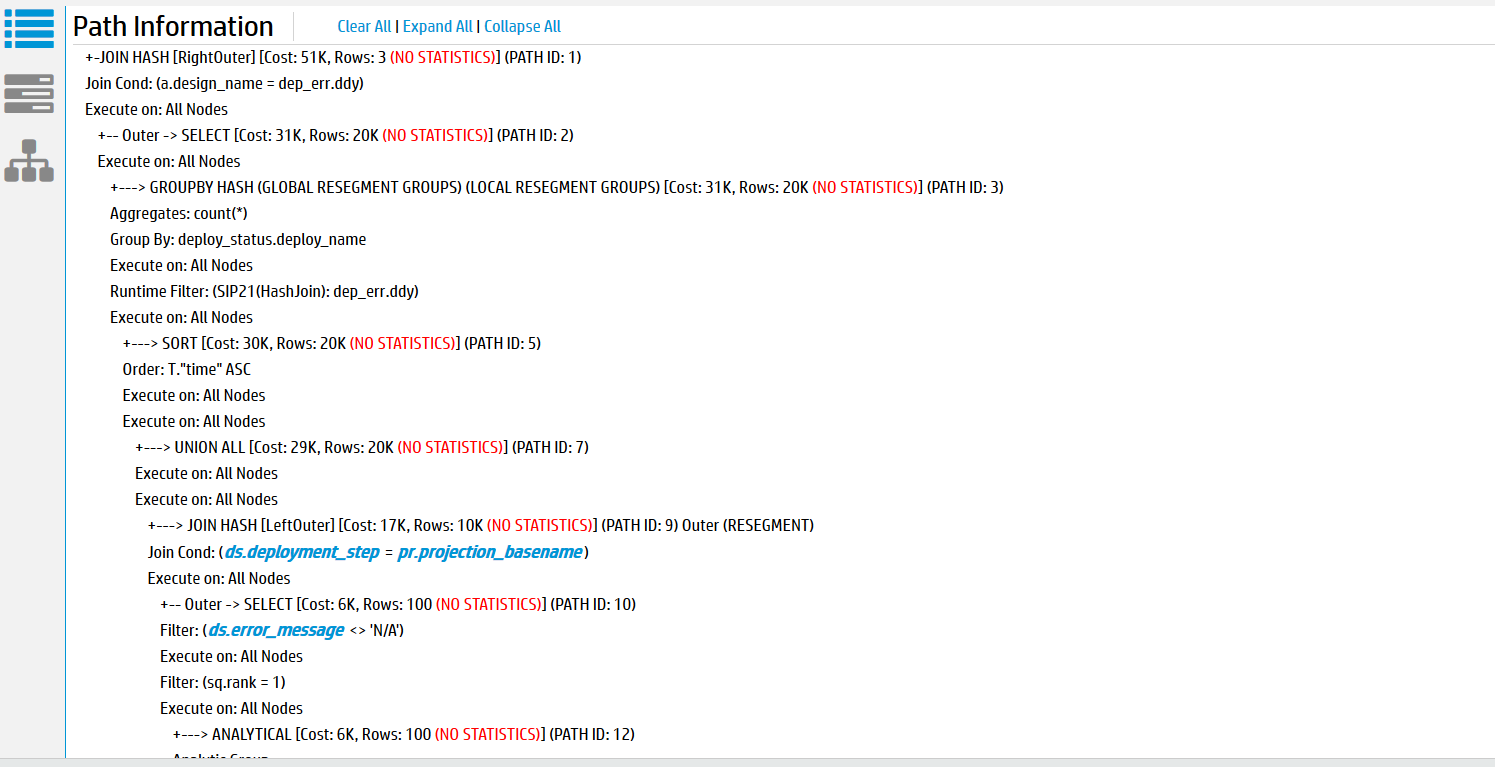 The
The
The Tree Path view details the query plan in the form of a tree. When you run EXPLAIN, the tree view does not contain any metrics because the query has not yet executed.
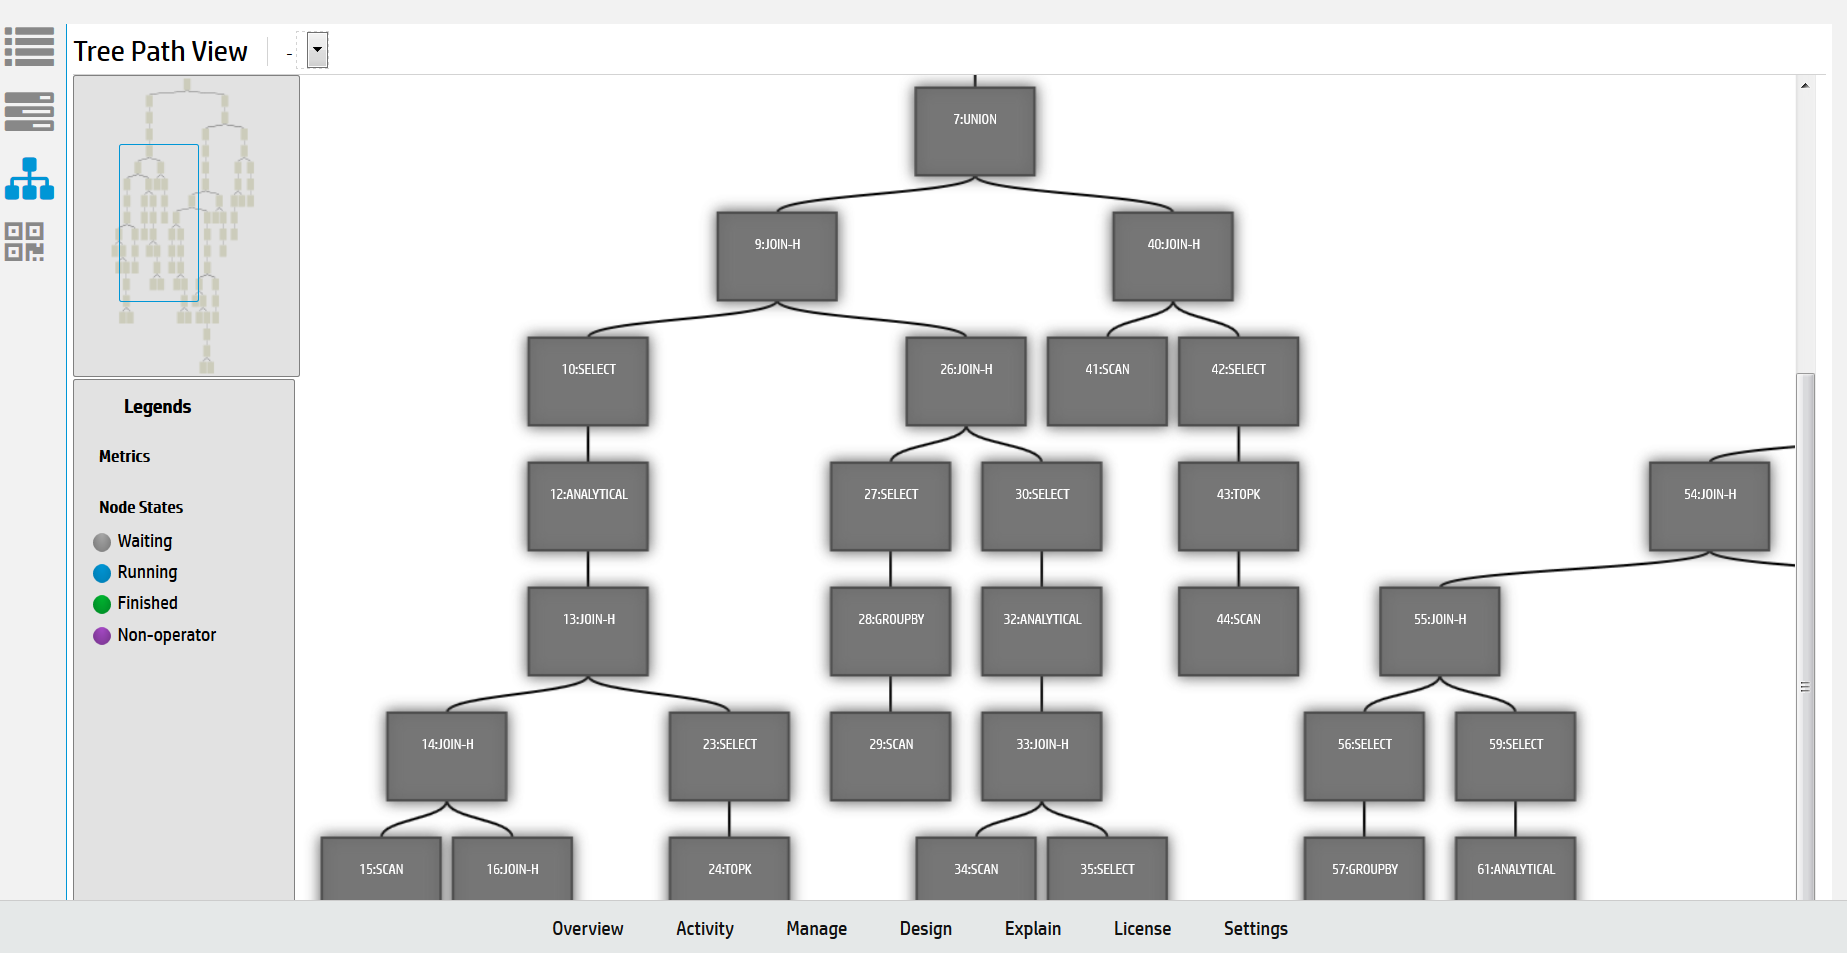
7.3 - Expanding and collapsing query paths
The EXPLAIN window initially displays the full query plan as generated by the EXPLAIN command.
The EXPLAIN window initially displays the full query plan as generated by the EXPLAIN command. Query plans can be lengthy, so you might want to modify the display so you can focus only on areas of interest:
-
Collapse All collapses all query paths, and displays only a summary of each path.
-
Expand All expands all query paths.
-
Click the first line of a path to display details for that path. To collapse that path, click its first line again.
For details about EXPLAIN command output, see EXPLAIN-Generated query plans.
7.4 - Clearing query data
After you finish reviewing the current query data, click Clear All to clear the query text and data.
After you finish reviewing the current query data, click Clear All to clear the query text and data. Alternatively, to display information about another query, enter the query text and click Explain or Profile.
7.5 - Viewing projection and column metadata
In the Management Console EXPLAIN window, when query paths are expanded in the Path Information view, Projection lines contain a projection name and Materialize lines contain one or more column names.
In the Management Console EXPLAIN window, when query paths are expanded in the Path Information view, Projection lines contain a projection name and Materialize lines contain one or more column names.
To view metadata for a projection or a column, click the object name. A pop-up window displays the metadata. The following image on the left shows example projection metadata and the image on the right shows example column metadata.
Note
Most system tables do not have metadata.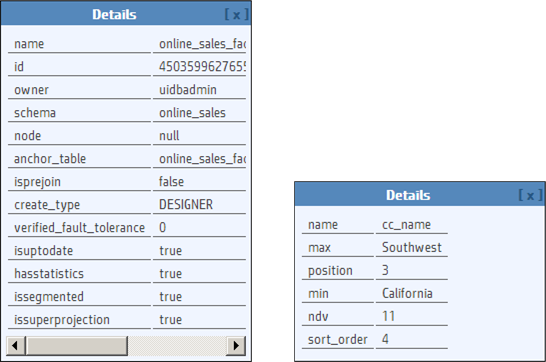
When you are done viewing the metadata, close the pop-up window.
8 - Creating a database design in Management Console
Database Designer creates an design that provides excellent performance for ad-hoc queries and specific queries while using disk space efficiently.
Database Designer creates an design that provides excellent performance for ad-hoc queries and specific queries while using disk space efficiently. Database Designer analyzes the logical schema definition, sample data, and sample queries, and creates a physical schema that you can deploy.
For more about how Database Designer works, see the Creating a database design section of the documentation, and About Database Designer.
To use Management Console to create an optimized design for your database, you must be a DBADMIN user or have been assigned the DBDUSER role.
Management Console provides two ways to create a design:
-
Wizard—This option walks you through the process of configuring a new design. Click Back and Next to navigate through the Wizard steps, or Cancel to cancel creating a new design.
To learn how to use the Wizard to create a design, see Using the wizard to create a design.
-
Manual—This option creates and saves a design with the default parameters.
To learn how to create a design manually, see Creating a design manually.
Tip
If you have many design tables that you want Database Designer to consider, it might be easier to use the Wizard to create your design. In the Wizard, you can submit all the tables in a schema at once; creating a design manually requires that you submit the design tables one at a time.8.1 - Using the wizard to create a design
Take these steps to create a design using the Management Console's Wizard:.
Take these steps to create a design using the Management Console's Wizard:
-
On your database's dashboard, click the Design tab at the bottom of the page to navigate to the Database Designer page.
The left side of the Database Designer page lists the database designs you own, with the most recent design you worked on highlighted. That pane also lists the current status of the design. Details about the most recent design appear in the main pane.
The main pane contains details about the selected design.
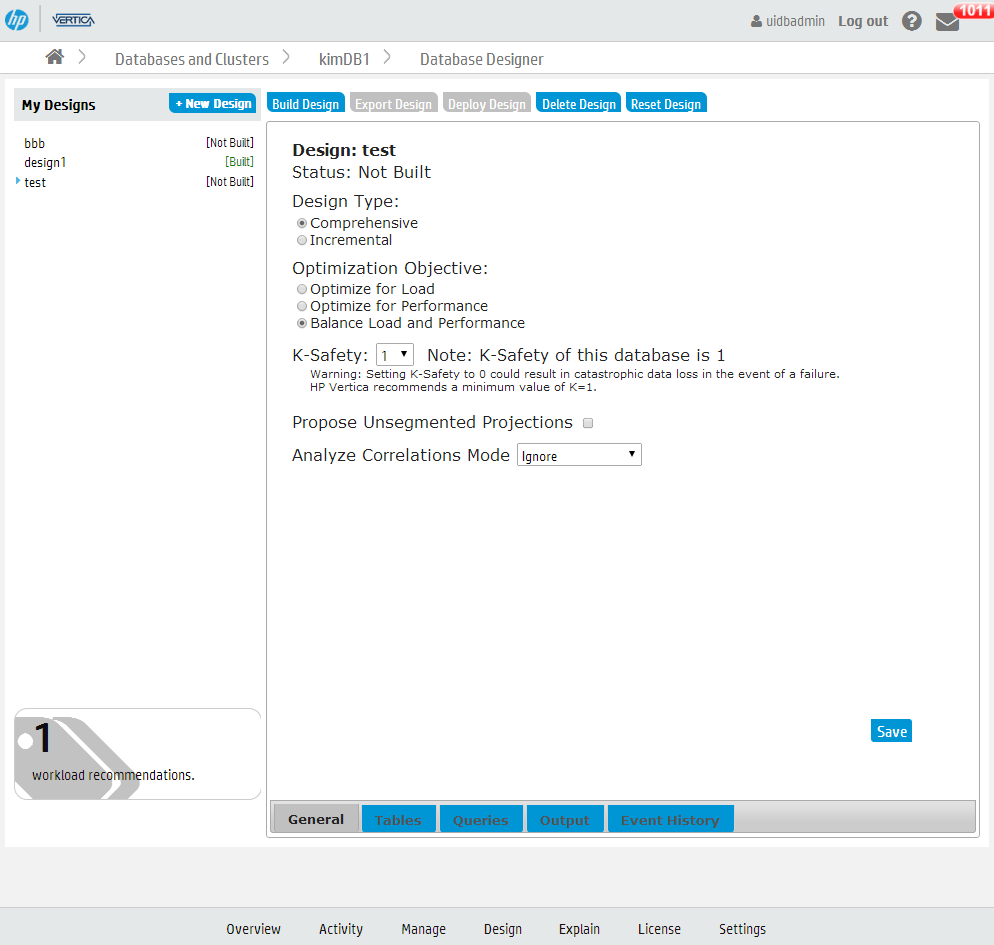
-
To create a new design, click New Design.
-
Enter a name for your design, and click Wizard.
-
Navigate through the Wizard using the Back and Next buttons.
-
To build the design immediately after exiting the Wizard, on the Execution Options window, select Auto-build.
Important
Vertica does not recommend that you auto-deploy the design from the Wizard. There might be a delay in adding the queries to the design, so if the design is deployed but the queries have not yet loaded, deployment might fail. If this happens, reset the design, check the Queries tab to make sure the queries are loaded, and deploy the design. -
After you enter all the information, the Wizard displays a summary of your choices. Click Submit Design to build your design.
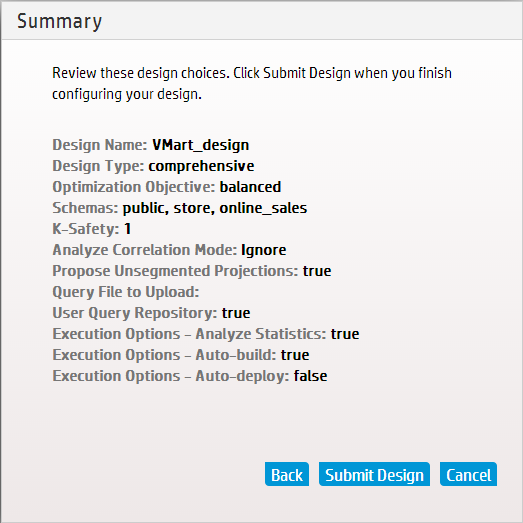
See also
8.2 - Creating a design manually
To create a design using Management Console and specify the configuration, take these steps.
To create a design using Management Console and specify the configuration, take these steps.
-
On your database's dashboard, click the Design tab at the bottom of the page to navigate to the Database Designer page.
The left side of the Database Designer page lists the database designs you own, with the most recent design you worked on highlighted. That pane also lists the current status of the design. Details about the most recent design appear in the main pane.
The main pane contains details about the selected design.
-
To create a new design, click New Design.
-
Enter a name for your design and select Manual.
The main Database Design window opens, displaying the default design parameters. Vertica has created and saved a design with the name you specified, and assigned it the default parameters.
-
On the General window, modify the design type, optimization objectives, K-safety, Analyze Correlations Mode, and the setting that allows Database Designer to create unsegmented projections.
If you choose Incremental, the design automatically optimizes for the desired queries, and the K-safety defaults to the value of the cluster K-safety; you cannot change these values for an incremental design.
Analyze Correlations Mode determines if Database Designer analyzes and considers column correlations when creating the design.
-
Click the Tables tab. You must submit tables to your design.
-
To add tables of sample data to your design, click Add Tables. A list of available tables appears; select the tables you want and click Save. If you want to remove tables from your design, click the tables you want to remove, and click Remove Selected.
If a design table has been dropped from the database, a red circle with a white exclamation point appears next to the table name. Before you can build or deploy the design, you must remove any dropped tables from the design. To do this, select the dropped tables and and click Remove Selected. You cannot build or deploy a design if any of the design tables have been dropped.
-
Click the Queries tab. To add queries to your design, do one of the following:
- To add queries from the QUERY_REQUESTS system table, click Query Repository. In the Queries Repository dialog that appears, you can sort queries by most recent, most frequently executed, and longest running. Select the desired queries and click Save. All valid queries that you selected appear in the Queries window.
Database Designer checks the validity of the queries when you add the queries to the design and again when you build the design. If it finds invalid queries, it ignores them.
If you have a large number of queries, it may take time to load them. Make sure that all the queries you want Database Designer to consider when creating the design are listed in the Queries window.
-
Once you have specified all the parameters for your design, you should build the design. To do this, select your design and click Build Design.
-
Select Analyze Statistics if you want Database Designer to analyze the statistics before building the design.
For more information see Statistics Analysis.
-
If you do not need to review the design before deploying it, select Deploy Immediately. Otherwise, leave that option unselected.
-
Click Start. On the left-hand pane, the status of your design displays as Building until it is complete.
-
To follow the progress of a build, click Event History. Status messages appear in this window and you can see the current phase of the build operation. The information in the Event History tab contains data from theOUTPUT_EVENT_HISTORY system table.
-
When the build completes, the left-hand pane displays Built. To view the deployment script, select your design and click Output.
-
After you deploy the design using Management Console, the deployment script is deleted. To keep a permanent copy of the deployment script, copy and paste the SQL commands from the Output window to a file.
-
Once you have reviewed your design and are ready to deploy it, select the design and click Deploy Design.
-
To follow the progress of the deployment, click Event History. Status messages appear in this window and you can see the current phase of the deployment operation.
In the Event History window, while the design is running, you can do one of the following:
-
Click the blue button next to the design name to refresh the event history listing.
-
Click Cancel Design Run to cancel the design in progress.
-
Click Force Delete Design to cancel and delete the design in progress.
-
-
When the deployment completes, the left-hand pane displays Deployment Completed. To view the deployment script, select your design and click Output.
Your database is now optimized according to the parameters you set.
9 - Running queries in Management Console
You can use the Query Runner to run SQL queries on your database through Management Console (MC).
You can use the Query Runner to run SQL queries on your database through Management Console (MC). After executing a query, you can also get the query plan and profile information for the query on this page.
To reach the Query Runner, select your database from the Home page or the Databases and Clusters page to view your database's Overview page. Select Query Execution at the bottom of the Overview page.
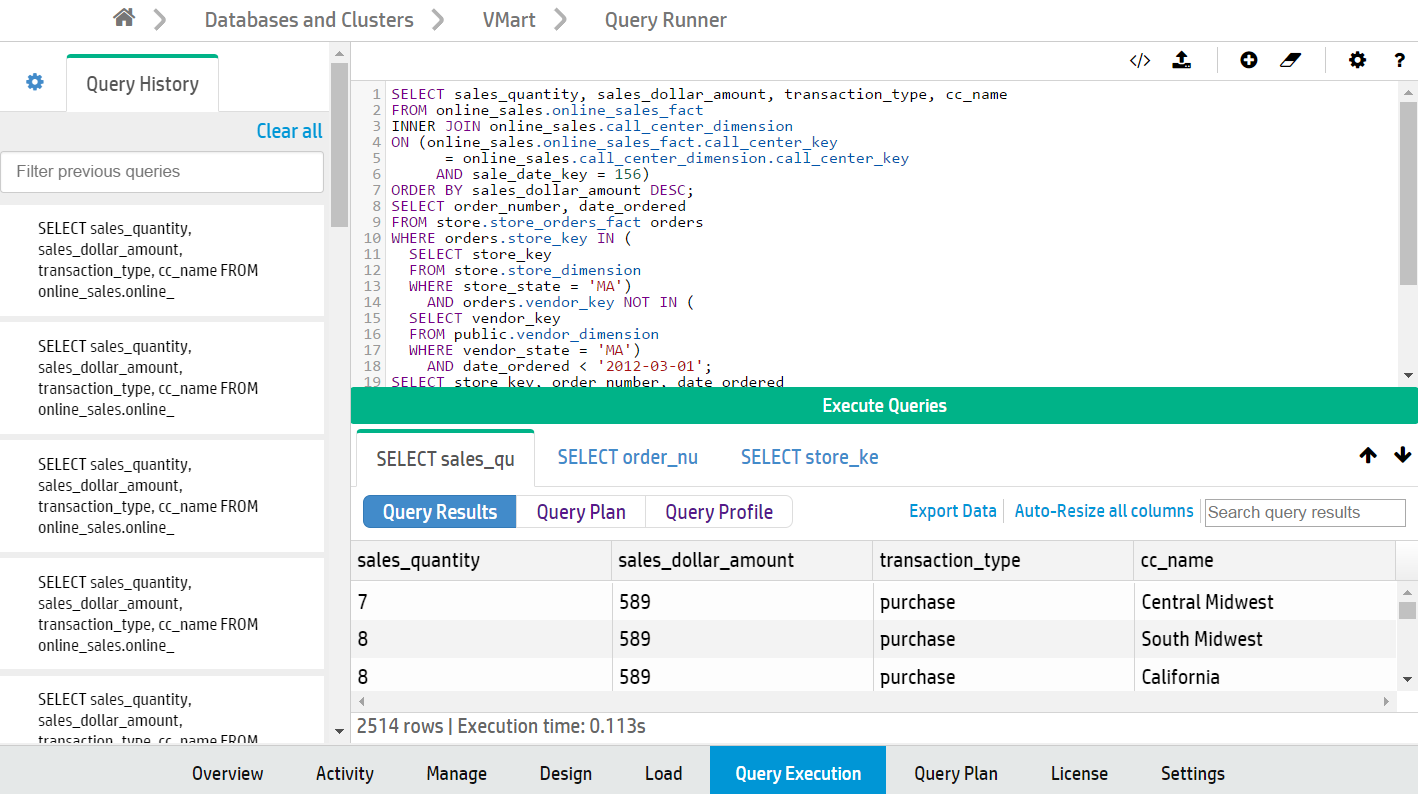
To familiarize yourself with how queries work in Vertica, you can refer to the Queries section of the documentation, as well as the SQL reference.
Limitations
You cannot execute COPY LOCAL statements using the Query Runner. To do so, use the vsql client installed on the server. See Using vsql. (To use MC to import data from Amazon S3 storage to your Vertica database, see Loading data from Amazon S3 using MC.)
Manually commit any transactions (INSERT and COPY statements) you perform by adding the COMMIT statement in the text box after the transaction statements. If you do not do so, the transaction rolls back.
In the following example, to insert values into table1, include a COMMIT statement in the text box and execute the two statements together:
INSERT INTO table1 VALUES (1,2); COMMIT;

Format
To input a series of queries, delimit them with a semicolon (;).
To automatically format the SQL text you have input, click the Format icon (![]() ).
).
Privileges
It is important when running queries in MC that the database administrator has correctly set up MC user privileges. The administrator must map all MC user profiles to their corresponding database user.
The Query Runner only permits MC users to perform actions that their corresponding Vertica database roles allow.
To set up user mappings, go to Home > MC Settings > User Management.
For more about how mapping MC user profiles to database users works, see Database privileges. For information about database-level users and privileges, see the Database users and privileges section of the documentation.
Execute a query
The Query Runner provides several ways to input a query to run:
-
Input text. Enter the text for a query or series of queries into the text box.
-
Import a SQL script. Click the Upload icon (
 ) to the top right of the text box to upload a SQL script (plain text file, typically with an extension of
 .sql). The queries from that file appears in the text box. -
Enter a previous query from the Query History tab. The Query History tab, on the left side of the page, displays the last 100 queries you have executed using the Query Runner on your current device and browser. Click any previous query in this tab to enter that query into the text box.
Hover over a query in the Query History tab to view all the query text. To clear queries from your history, hover over an individual query and click x, or click Clear all at the top of the tab. Click the star to the left of any query to favorite it, so it won't be cleared when you click Clear all.
Cick Execute Query to run the queries you have input.
You can also execute only a portion of the text entered into the text box, as long as the selected text is a valid query. To do so, select that portion of the text. The Execute selected text as query button then appears below the text box.
For example, you might execute only a part of the entered text if you have uploaded a SQL script that containing multiple queries, but you decide to run only one of those queries.
To customize your execution settings, click the Settings icon (![]() ) at the top right of the text box:
) at the top right of the text box:
-
Row Limit: Set the maximum number of rows to return. By default, the limit is 10000 rows.
-
Search Path: Specify the schema to query.
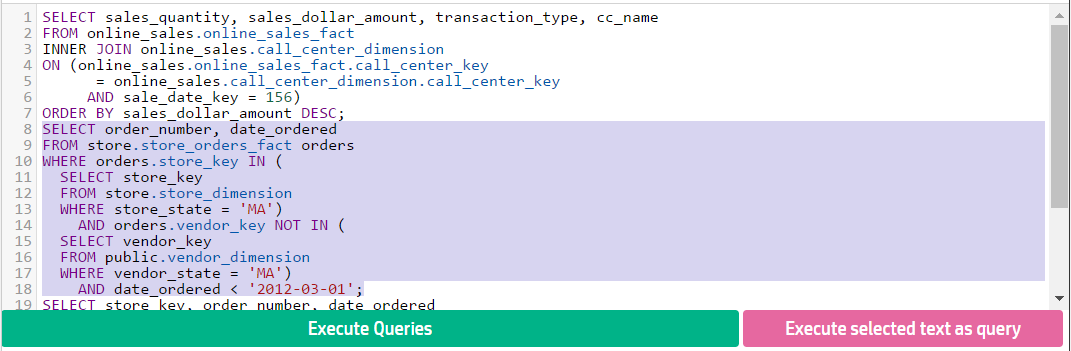
Get query results
The Query Runner returns results in a table format. If you ran multiple queries simultaneously, the results window displays a tab for each set of results. View the number of rows returned and the query execution time at the bottom of the results window.
If your result returns many columns, you can click Auto-resize all columns in the top right of the results window for a better fit, or click and drag column borders to manually resize individual columns.
Sort results by clicking on a column name, or use the search bar to narrow down results.

Query plans and profiles
Each query result also displays an option to retrieve the plan or profile for that query.
After retrieving a plan or profile, you can expand or collapse the results view to see different levels of detail. To view metadata for a projection or a column, click the object name in the path output. A pop-up window displays the metadata, if it is available.
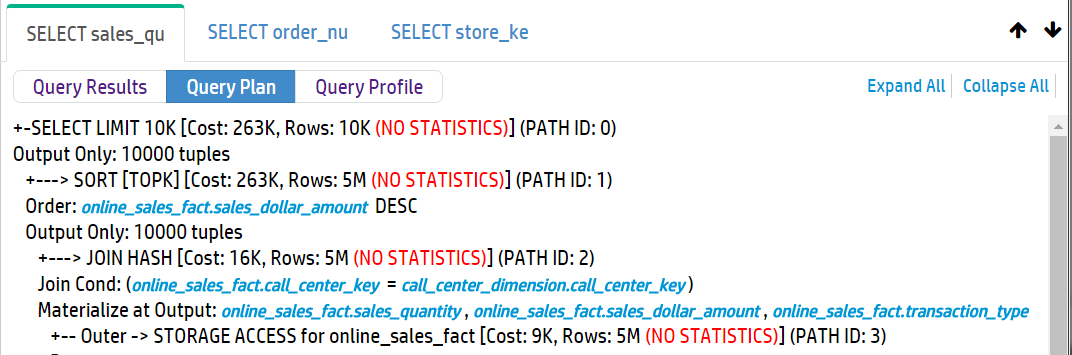
Note that the Query Runner does not automatically provide query profiles for queries that run for less than 1 second. To do so, prepend the word PROFILE to the query and run it.
You can also profile your query on the Query Plan page. The Query Plan page provides more details about both plan and profile results, including a query plan drilldown by node, a tree path view, and a profile analysis.
Keyboard shortcuts
The Query Runner provides the following keyboard shortcuts:
-
?: Press the question mark to display or dismiss a list of the available keyboard shortcuts. (You can also click the question mark icon at the top right of the text box to view this list.)
-
alt + ↑: Press alt + up arrow to decrease the height of the text box.
-
alt + ↓: Press alt + down arrow to increase the height of the text box.
-
ctrl + enter: Press ctrl + enter to run the query.
-
ctrl + shift + enter: Press ctrl + shift + enter to run selected text.
See also
10 - Working with workload analyzer recommendations in MC
If queries perform sub-optimally, use Workload Analyzer to get tuning recommendations and hints about optimizing database objects.
If queries perform sub-optimally, use Workload Analyzer to get tuning recommendations and hints about optimizing database objects.
Workload Analyzer is a Vertica utility that analyzes system information in Vertica system tables. It then returns a set of tuning recommendations based on statistics, system and data collector events, and database/table/projection design. You can use these recommendations to tune query performance.
Configuring the workload analyzer execution time
By default, Workload Analyzer runs each day at 2 AM. To optimize when Workload Analyzer uses resources, you can set Workload Analyzer to run at a different time for any or all databases that Management Console monitors. Alternately, you can set Management Console to never run Workload Analyzer automatically.
Note
Workload Analyzer automatically begins monitoring data one minute after the Management Console process starts. Workload Analyzer then runs once per day, or immediately after you import a database to Management Console. It continually gathers data in the background as long as the database is running. If you have not yet created a database, or if the database is down, Workload Analyzer does nothing until the database is back up.-
On the Home page, click MC Settings.
-
Click the Monitoring tab.
-
Under the Workload Analyzer Assistant section of the Monitoring page, select your time zone.
-
Select the radio button for one of the options:
-
All Databases: Select a time from the list. Workload Analyzer will run at that time on all databases that MC monitors.
-
Specific Database at Specific Time: Select a database and a time from the list. At the time you specify, Workload Analyzer will run at that time on the database you selected.
-
Do Not Run Workload Analyzer On Any Database: MC will never run Workload Analyzer automatically on any database it monitors.
-
-
Click Apply at the top right of the page.
For additional information about tuning recommendations and their triggering event, see Workload analyzer recommendations.
View workload analyzer recommendations
Workload Analyzer recommendations are available from the Quick Stats sidebar on the right of the database's Overview page. The Workload Analyzer module displays the number of tuning recommendations that the Workload Analyzer has generated.
To view the Workload Analyzer Results on the Database Designer page, click the number in the Workload Analyzer module.
![]()
The Workload Analyzer Results window allows you to view details about and perform actions using current and processed recommendations.
Click the Current Recommendations radio button to display available Workload Analyzer recommendations. When
ANALYZE_STATISTICS is returned as a tuning recommendation, select the check mark to the left of the row and click Run Selected Recommendations to execute the recommendation automatically.
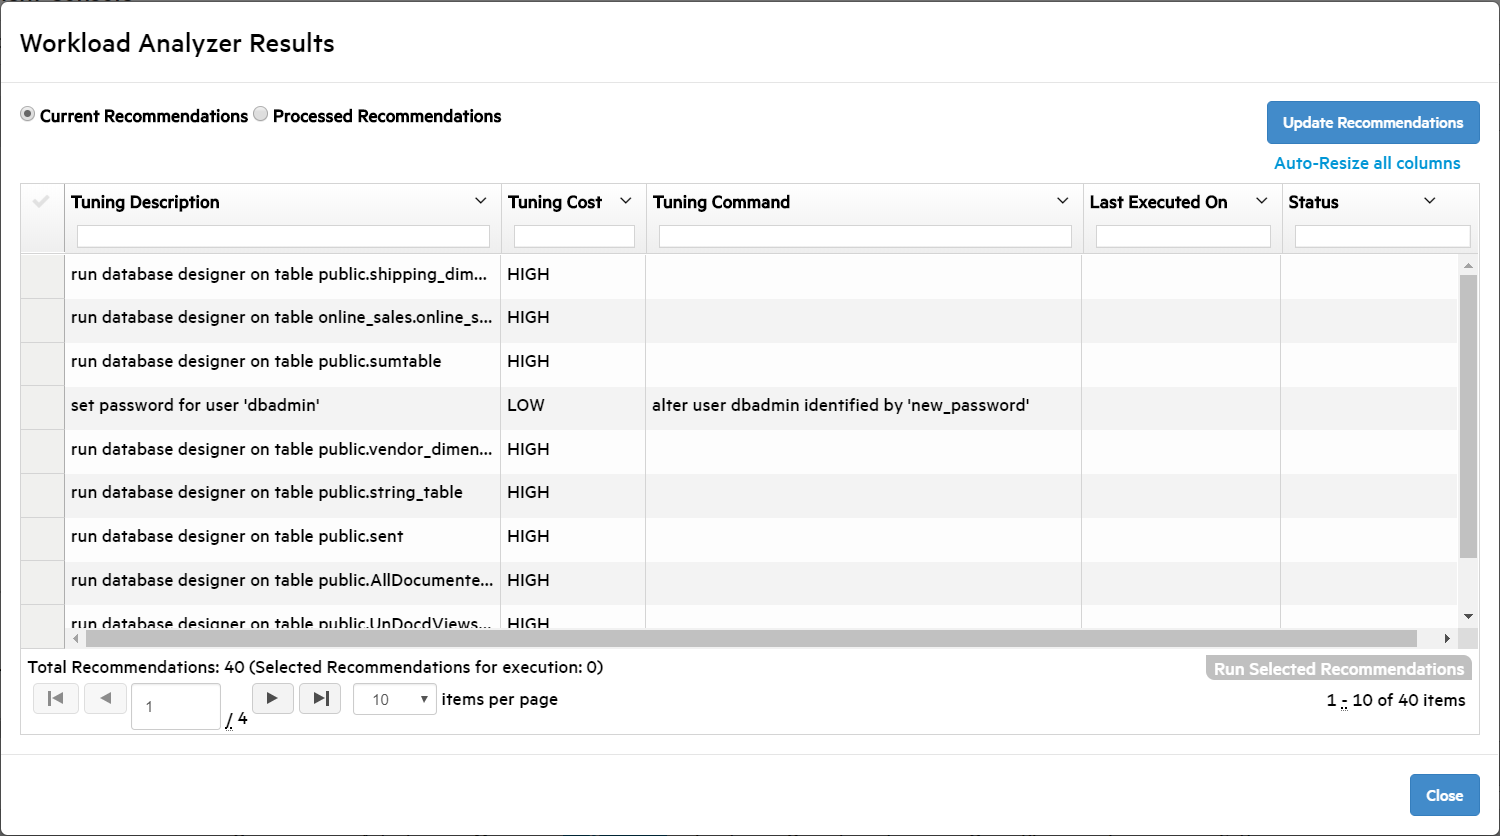
Click the Processed Recommendations radio button to display the Workload Analyzer recommendations that you previously executed. To remove a recommendation from the list, click the check mark to the left of the row and click Clear, located above the Close button in the bottom-right of the window. To expand or hide the processed recommendation's execution history, click the plus or minus sign to the left of the row.
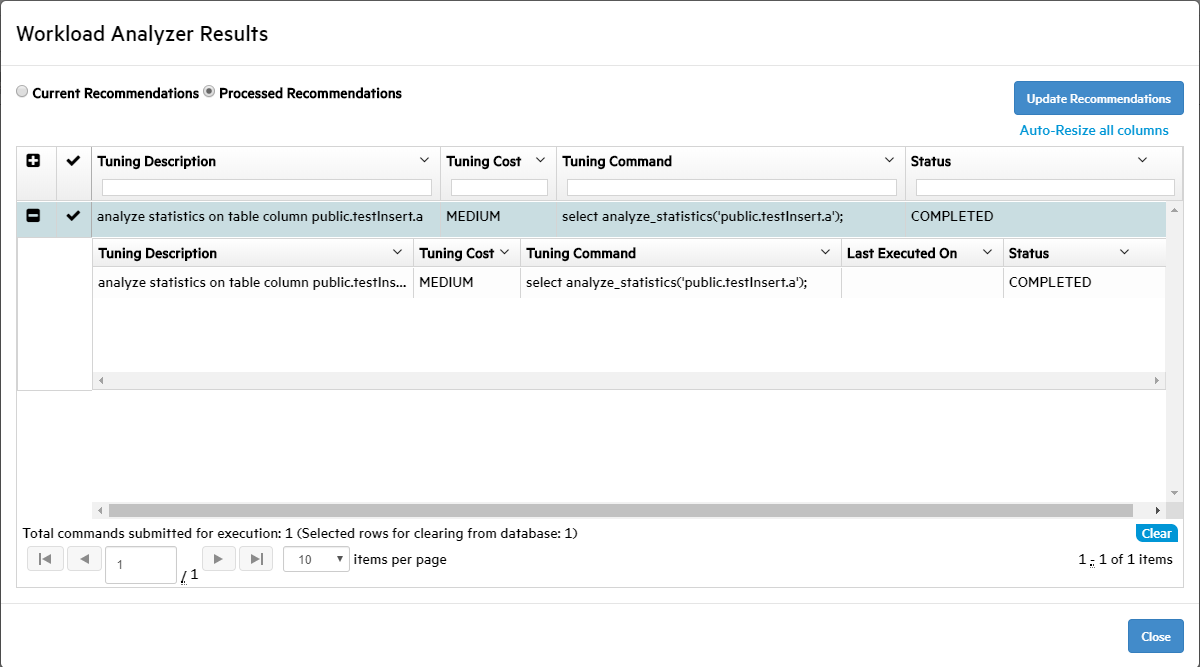
You can force the Workload Analyzer task to run immediately by clicking Update Recommendations, located above the Status column.
The total recommendations and the number of recommendations currently selected to run are displayed under the recommendations grid. Use the settings under the grid to view more recommendations per page or to cycle through the recommendations that do not fit on the page.
The following columns are used to describe recommendations:
-
Tuning Description — Describes the Workload Analyzer recommendation.
-
Tuning Cost — Resource cost of running each command (LOW, MEDIUM, or HIGH).
Tip
When the tuning cost is HIGH, consider running the recommended tuning during off-peak load times. -
Tuning Command — SQL command used to execute the recommendation.
-
Last Executed On — Date that the recommendation was last run. In MM/DD/YYYY format.
-
Status — Describes the execution stage of a tuning recommendation ran from Workload Analyzer Results.
For more information about tuning recommendations, see Getting tuning recommendations and
ANALYZE_WORKLOAD.
Running workload analyzer recommendations to optimize a query
When the Workload Analyzer recommends that you run
ANALYZE_STATISTICS to optimize a query, you can run the recommendation automatically from Workload Analyzer Results.
-
Record the data source and execution time for a query that is running sub-optimally.
-
Click the Query Execution tab at the bottom.
-
Use the Query Runner to execute a query that you want to optimize.
-
Record the database table or tables in the query's
FROMclause, and record the Execution time, located under the Query Results table.
-
-
Click the Overview tab at the bottom of the window.
-
On the Overview page, click the number in the Workload Analyzer box on the right.
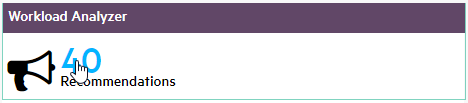
Workload Analyzer Results opens. -
To filter the recommendations, enter the sub-optimal query's database table or tables in the field at the top of the Tuning Description column.
-
Select one or more
ANALYZE_STATISTICSrecommendations by clicking the check mark to the left of the row. To select all of the filteredANALYZE_STATISTICSrecommendations, click the check mark to the left of the Tuning Description column header.
-
Click Run Selected Recommendations, located in the bottom-right of the window.
This process might take several minutes. -
After the tuning recommendations are completed, click the Processed Recommendations radio button at the top of the window.
The previously executed recommendations are displayed. -
Locate any recommendations that you just executed, and verify that the Status column says COMPLETED.
-
Verify that the query was optimized.
-
Click the Query Execution tab at the bottom of the Management Console.
-
Execute the query that was performing sub-optimally. Note the Execution time under the query results to verify the performance increase.

-
See also
Analyzing workloads Getting tuning recommendations11 - Running Database Designer using MC
You can use Database Designer to create a comprehensive design, which allows you to create new projections for all tables in your database.
You can use Database Designer to create a comprehensive design, which allows you to create new projections for all tables in your database.
Additionally, you can use Database Designer to create an incremental design. An incremental design creates projections for all tables referenced in the queries you supply.
To run Database Designer using MC, follow the steps listed at Running Database Designer with Management Console.
12 - Using the Management Console to replace nodes
On the MC Manage page, you can quickly replace a DOWN node in the database by selecting one of the STANDBY nodes in the cluster.
On the MC Manage page, you can quickly replace a DOWN node in the database by selecting one of the STANDBY nodes in the cluster.
A DOWN node shows up as a red node in the cluster. Click the DOWN node and the Replace node button in the Node List becomes activated, as long as there is at least one node in the cluster that is not participating in the database. The STANDBY node will be your replacement node for the node you want to retire; it will appear gray (empty) until it has been added to the database, when it turns green.
Tip
You can resize the Node List by clicking its margins and dragging to the size you want.When you highlight a node and click Replace, MC provides a list of possible STANDBY nodes to use as a replacement. After you select the replacement node, the process begins. A node replacement could be a long-running task.
MC transitions the DOWN node to a STANDBY state, while the node you selected as the replacement will assume the identity of the original node, using the same node name, and will be started.
Assuming a successful startup, the new node will appear orange with a status of RECOVERING until the recovery procedure is complete. When the recovery process completes, the replacement node will turn green and show a state of UP.
13 - Import and monitor a database in a Hadoop environment
You can use Management Console to connect to and monitor a Vertica database that resides in an Apache Hadoop environment.
You can use Management Console to connect to and monitor a Vertica database that resides in an Apache Hadoop environment. To monitor the database in the Hadoop environment, you must connect to an Apache Ambari server.
Prerequisites
Before you begin, you must:
-
Install Vertica on a Hadoop cluster
-
Install Apache Ambari version 1.6.1 or 2.1.0
-
Enable Ganglia on your Hadoop cluster, to get the most information from your Hadoop environment
Importing Vertica within a Hadoop environment
To import your Vertica database that resides in a Hadoop environment, connect to that Hadoop environment in Management Console through an Apache Ambari server.
-
From the Management Console home page, select Additional import options.
-
In Provisioning, select Connect using an Ambari server to impot Vertica within a Hadoop environment.
-
The Provision Access Within Hadoop Environment window provides the following options:
-
Connect to a new Ambari server: Choose this option to create a enter your username and password for a new Ambari server connection.
-
Known Ambari URLs: If you have a pre-existing Ambari connection that you want to use, select it from the drop-down list.
-
-
In the next window, select the Hadoop cluster with the Vertica database that you want to monitor.
Management Console automatically discovers Hadoop clusters that are currently monitored by the Ambari server that you specify. If Management Console does not monitor Vertica clusters in the specified Hadoop environment, you can import clusters at this time.
After you select the Hadoop cluster, you receive confirmation that your Hadoop cluster is saved. -
Enter the IP address for the Vertica database you want to import and monitor. If Vertica is running on multiple hosts, enter the IP address of one of them.
-
Enter the API key for the Vertica cluster. The API key is generated during Vertica installation, and you can find it in the
/opt/vertica/config/apikeys.datfile. -
The next window displays the discovered databases. Select one or more databases you want to import, and enter the corresponding username and password.
-
If the import is successful, you receive a success message. Click Done to go to the Existing Infrastructure page.
To import an additional Vertica cluster within a Hadoop environment, click Import Cluster or database using IP address discovery under Provisioning. Management Console will automatically associate the cluster with the existing Hadoop environment.
Monitoring Vertica within a Hadoop environment
To monitor the Vertica clusters in a Hadoop environment, navigate to the Existing Infrastructure page:
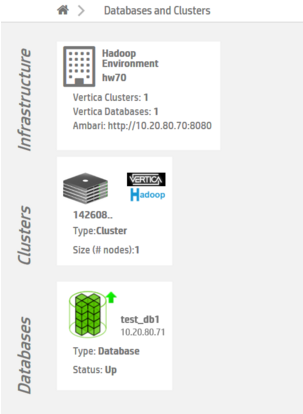
Click to select the Hadoop environment, and then click View Vertica Databases.
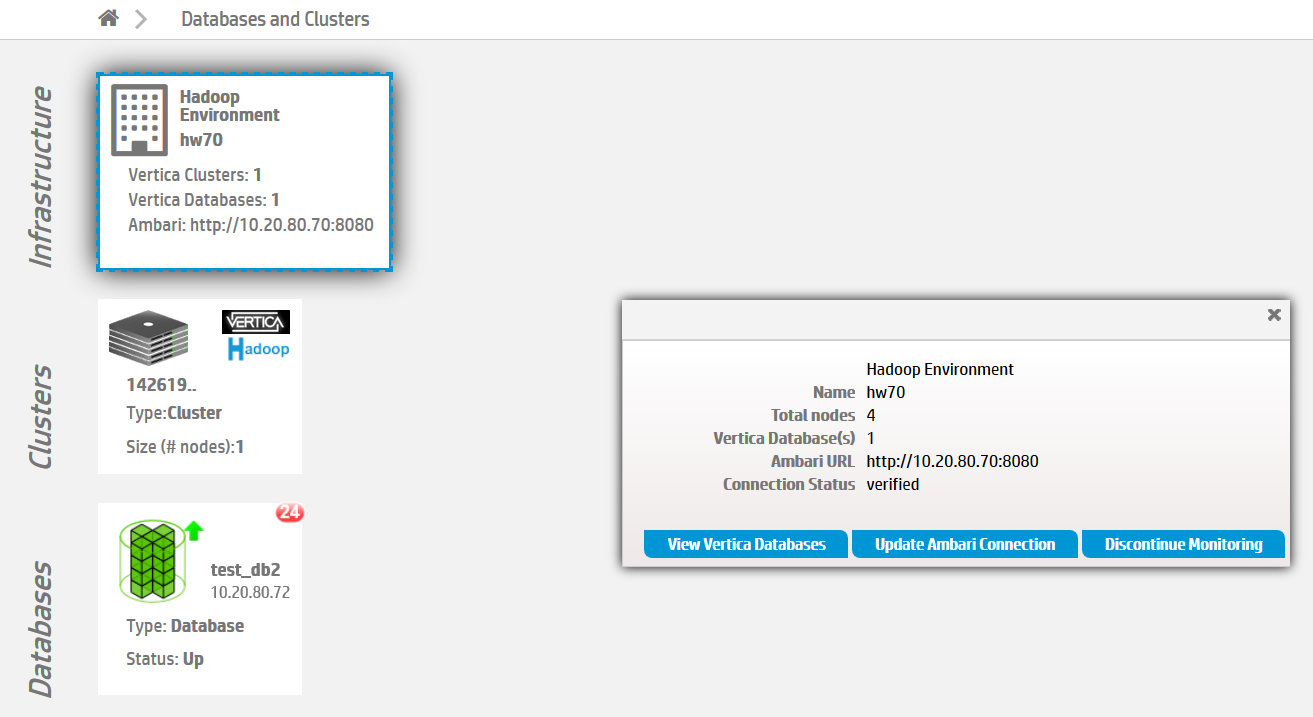
The Management Console displays information about the Vertica databases that reside in a Hadoop environment:
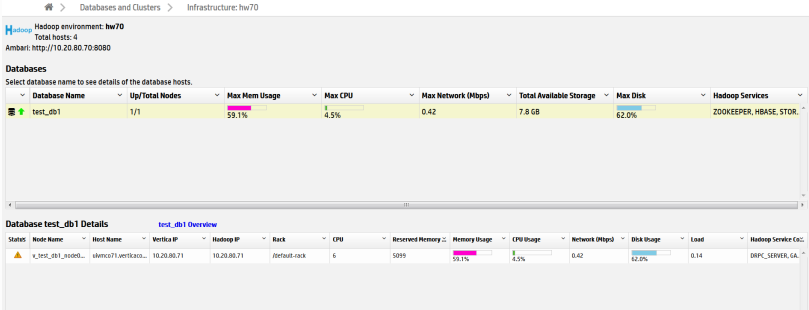
You can monitor information like resource usage, Hadoop services, and database and connection status.
Update or remove an ambari connection
To update or remove an existing Ambari connection, go to the MC Existing Infrastructure page, and click on the relevant Hadoop environment.
To update a connection, click Update Ambari Connection. Step through the wizard to update the connection.
To remove a connection, select Update Ambari Connection and choose Remove Connection, or click Discontinue Monitoring and then confirm that you want to remove the connection. Removing the connection also removes all Vertica databases associated with this connection from MC monitoring. You can re-import the databases later if needed.