OpenText Core Analytics Database
OpenText™ Core Analytics Database (OTCAD) is a managed database service that delivers a unified, high performance advanced analytics and machine learning platform in the cloud. The database gets automatically provisioned in an OpenText AWS account. OpenText manages the database hardware and environment. OTCAD is optimized for efficiency and query performance, ensuring you meet your service level agreements within your budget.
OTCAD enhances the speed and scalability of a database without the need to manage hardware. OTCAD is a data warehouse and data lake platform that enables organizations to deploy databases securely. To get access to OTCAD, contact your sales representative or contact us.
OTCAD UI tour
You can view and manage the provisioned database. After logging in to the OTCAD application, the home page appears. This page displays the three-dot menu and other SQL editor options as shown in this image:
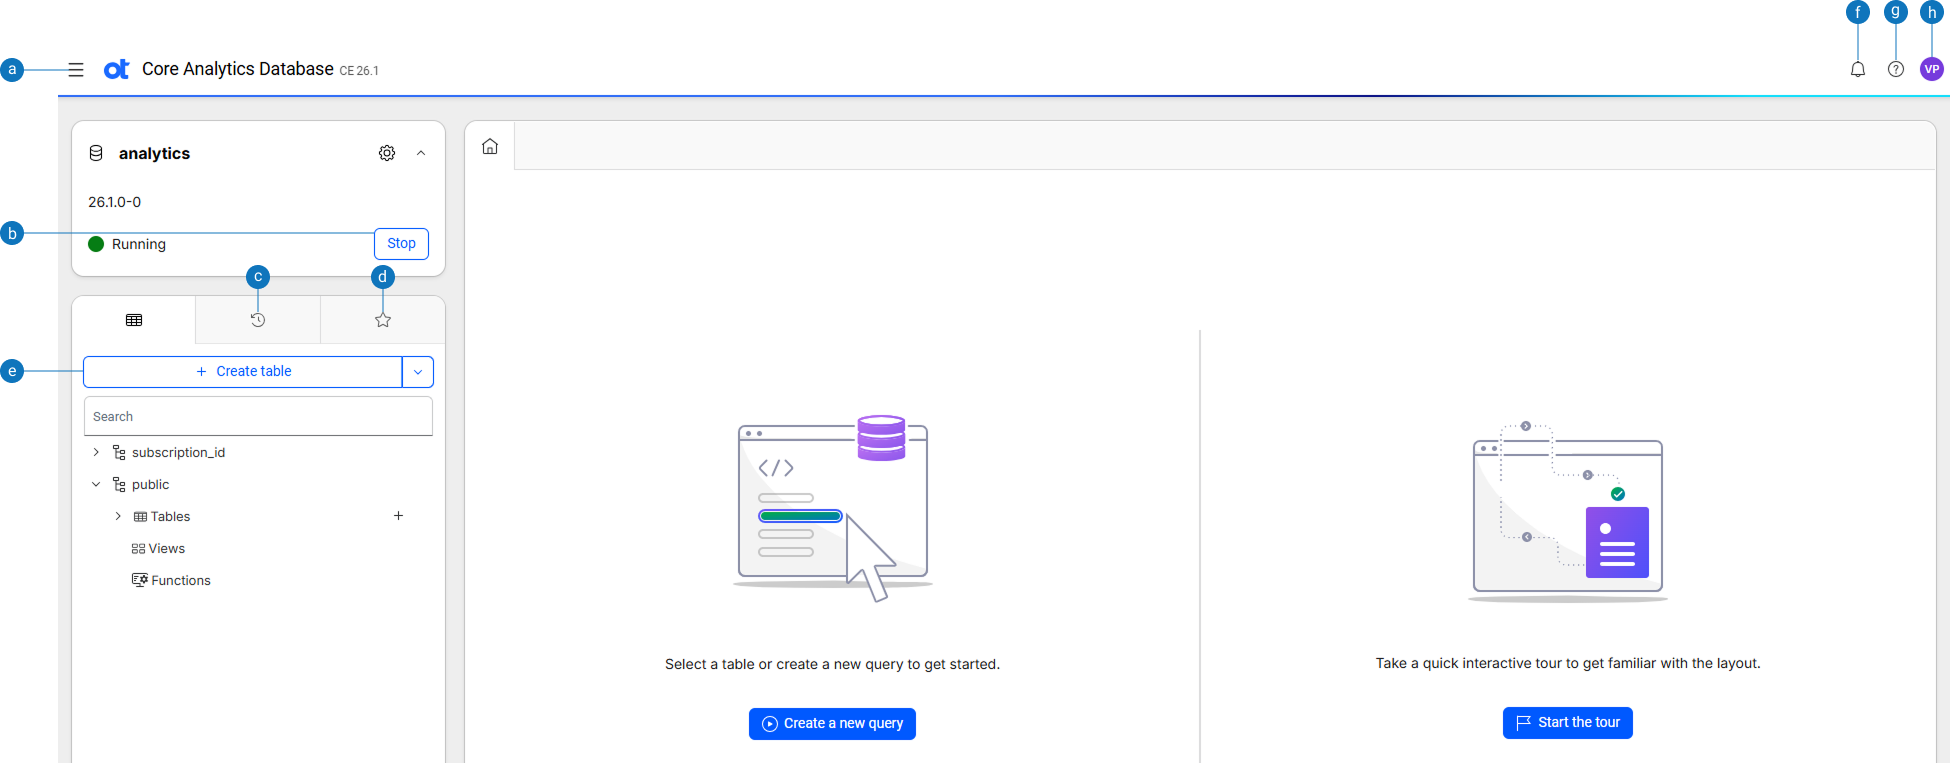
| Option | Description |
|---|---|
| a | More options: Displays the More options button with options to access the SQL editor, Settings, Data pipelines, User-defined extensions, Database designer, Dashboards, Restore points, and the Integrations page. |
| b | Stop: Displays the option to stop the database. |
| c | History view: Displays the queries run previously. |
| d | Favorite view: Displays the bookmarked SQL queries. |
| e | Create table: Displays options to create the table and schema. |
| f | Notifications: Displays message alert notifications. |
| g | Help: Displays OpenText™ Analytics Database user documentation. |
| h | View profile: Displays the user profile and option to sign out of the application. |
More options
When you log in to the application, the More options button is displayed with these options:
- SQL editor: Select this option to work with the SQL editor.
- Settings: Select this option to configure the database settings.
- Data pipeline: Select this option to work with data pipelines.
- User-defined extensions: Select this option to work with user-defined extensions.
- Database designer: Select this option to work with the database designer.
- Dashboards: Select this option to work with dashboards.
- Restore points: Select this option to work with restore points.
- Integrations: Select this option to display the Integrations page.
Database connection options
The Home page displays the option to stop an active database.
- To stop OTCAD, select Stop. <--Or-->
- To re-start an inactive database, select Start.
SQL Editor
Use OTCAD SQL editor to write, edit, and execute SQL statements in a query view. You can write and execute analytical queries without using any external tools.
You can use the SQL editor to:
- gain valuable insights from your data without needing expertise to set up database connections.
- write, execute, and save queries that need to be repeated.
- view sample data returned from your queries.
- validate the execution of SQL queries.
- view data about the execution of SQL queries.
- export queries into a spread sheet.
- execute SQL commands for OTCAD operations, such as creation of schemas, tables, and so on.
Working with SQL editor
After logging in to the OTCAD application, the home page appears.
To launch the SQL editor, select SQL Editor in the three-dots menu. The Schema view displays with a list of available schemas and tables. You can either select a table or create an SQL query.
Create an SQL query
You create SQL queries either in the Home page or the Schema view.
-
Select Create a new query in the Home page.
-
Enter your query in the SQL editor. You can enter multiple queries one below the other in the SQL editor.
-
From the Run list, do one of the following:
- Select Run last query to run the SQL query that was last executed. This option is helpful when you have multiple SQL queries but need to run only the latest SQL query.
- Select Run from cursor to run an SQL query using a database cursor to manage and process the results of a statement one row at a time, rather than as a single set of data.
- Select Run selection to run only the selected SQL query. This option is helpful when you have multiple SQL queries but need to run only one SQL query.
-
Select the SQL query in the editor and click Format to arrange and format the SQL query for better readability.
-
Select the SQL query in the editor and click Explain. This returns a formatted description of the database optimizer's plan for executing the specified statement. By default, the output represents the query plan as a hierarchy, where each level or path represents a single database operation that the optimizer uses to execute a query.
-
Enter the name of the query at the top.
-
To view the schema details of a table, select View Schema. The table columns display along with the datatypes.
-
To save the SQL query results, do the following: a. Select Export CSV. b. Enter the file name and select Export.
You can export upto a maximum of 10 thousand records. To import data that exceeds 10 thousand records, modify the SQL query and export again.
Query plans
When you submit a query, the query optimizer quickly chooses the projections to use, optimizes and plans the query execution, and logs the SQL statement to its log. This planning results in an query plan, which maps out the steps the query performs. A query plan is a sequence of step-like paths that the database cost-based query optimizer uses to execute queries. The database can produce different query plans for a given query. For each query plan, the query optimizer evaluates the data to be queried: number of rows, column statistics such as number of distinct values (cardinality), distribution of data across nodes. It also evaluates available resources such as CPUs and network topology, and other environment factors.
Query plan view options
There are two views for displaying query plans:
- Path Information
- Tree Path
In the SQL query results page, select Path information from the list at the bottom of the page. This view displays the query plan path. You can expand or collapse the view to see different levels of detail. For information about Explain-related query plans, see EXPLAIN-Generated query plans
For example, the following EXPLAIN output shows the path ID for each path in the optimizer's query plan:
=> EXPLAIN SELECT * FROM fact JOIN dim ON x=y JOIN ext on y=z;
Access Path:
+-JOIN MERGEJOIN(inputs presorted) [Cost: 815, Rows: 10K (NO STATISTICS)] (PATH ID: 1)
| Join Cond: (dim.y = ext.z)
| Materialize at Output: fact.x
| Execute on: All Nodes
| +-- Outer -> JOIN MERGEJOIN(inputs presorted) [Cost: 408, Rows: 10K (NO STATISTICS)] (PATH ID: 2)
| | Join Cond: (fact.x = dim.y)
| | Execute on: All Nodes
| | +-- Outer -> STORAGE ACCESS for fact [Cost: 202, Rows: 10K (NO STATISTICS)] (PATH ID: 3)
| | | Projection: public.fact_super
| | | Materialize: fact.x
| | | Execute on: All Nodes
| | +-- Inner -> STORAGE ACCESS for dim [Cost: 202, Rows: 10K (NO STATISTICS)] (PATH ID: 4)
| | | Projection: public.dim_super
| | | Materialize: dim.y
| | | Execute on: All Nodes
| +-- Inner -> STORAGE ACCESS for ext [Cost: 202, Rows: 10K (NO STATISTICS)] (PATH ID: 5)
| | Projection: public.ext_super
| | Materialize: ext.z
| | Execute on: All Nodes
In the Query results page, select Tree view from the list at the bottom of the page. The Tree Path view details the query plan in the form of a tree. The tree view does not contain any metrics because the query has not yet executed. The results appear in the form of a tree with a root and connected branches in the form of parent-child relationship.
Profile analysis data
In the Query results page, select Profile analysis from the list at the bottom of the page. After you profile an SQL query, the Explain page displays profile data and metrics in a pie chart. Hover over the slices on the pie chart or over the names of the phases to get additional information. You can see the approximate number of milliseconds (ms) and percentage used during each phase.
Profile metrics
After running an SQL query, in the Query results page, select Path information from the list at the bottom of the page. In the Path Information view, the area to the right of each query path contains profile metrics for that path.
- Disk—Bytes of data accessed from the disk by each query path. If none of the query paths accessed the disk data, all the values are 0.
- Memory—Bytes of data accessed from memory by each query path.
- Sent—Bytes of data sent across the cluster by each query path.
- Received—Bytes of data received across the cluster by each query path.
- Time—Time in milliseconds (ms) that the query path took to process on a node, shown on progress bars.
Hover over the progress bars to view more information, such as total bytes and percentages.
History view
The History view tab stores the queries run previously. When you run a query, it appears in the Query History list. Queries of the last 2 weeks only are displayed.
To run a SQL query:
- Select ….
- Select Run.
To remove a SQL query:
- Select ….
- Select Remove.
Favorite view
You can bookmark SQL queries and run them again later in the Favorite view tab. Saved SQL queries display as a list of favorites next to the History view tab.
To bookmark a SQL query as a favorite:
- Select the SQL query.
- Select Run.
- Select Favorite.
- Enter a name and select Add.
To run a SQL query from the Favorites view:
- Select ….
- Select Run. After successful execution of the query, the results are displayed in the SQL editor.
To rename a favorite SQL query:
- Select the SQL query.
- Select ….
- Select Rename.
- Enter the new name and select Update.
To remove a favorite SQL query:
- Select the query.
- Select ….
- Select Remove.
- When prompted for confirmation, select Remove.
Upload and download scripts
You can create SQL queries offline and upload them to the system.
- In the SQL query page, select ⋮ and Upload script. The Upload script dialog appears.
- Select Browse or +.
- Select Upload.
The file content is loaded to the SQL editor.
Note
All uploaded code or content is the sole responsibility of the uploading party. OpenText does not review, endorse, or accept any liability for uploaded materials. Uploads are made at the uploading party's own risk.
You can also download SQL queries in the system.
- In the SQL query page, select ⋮ and Download script.
The SQL query is downloaded in a file with
.sqlextension in the Downloads folder.
Create a table
You can create tables in the database logical schema.
-
In the Schema view, do one of the following:
-
Select +Create table.
OR
-
Expand a schema in the Schema view and click + for Tables. The Create table page appears.
-
-
In the Table name field, enter the name of the table to create. This name must be unique among names of all sequences, tables, and projections within the schema. Ensure that the table name meets the following requirements:
- Must comply with keyword restrictions and rules for Identifiers.
- Cannot begin with
v_; this prefix is reserved for OTCAD system tables.
-
From the Schema list, select an existing schema for which the table needs to be created. If no schema is specified, the table is created in the public schema.
-
In the Column name field, enter the name of the column to be created. A table can have up to 9800 columns.
Note
Provide unique column names for all columns. You cannot provide the same column name for multiple columns in the table. -
From the Type list, select an internal data type.
-
In the Length field, enter the maximum number of characters that the column can store. It is a crucial aspect of database design that helps enforce data integrity, optimize storage, and ensure data consistency. For more information about the data types and their corresponding length or size, see data type.
Note
Provide a valid number. The system does not consider invalid numbers or characters. -
Select the Nullable option to permit this column to store NULL values, representing missing, unknown, or optional data. Selecting this option allows rows to be inserted without providing a value for that specific column.
-
Select the Primary option to designate this column as the primary key. The primary key is a column in a database table that uniquely identifies each row, ensuring data integrity by prohibiting duplicate or NULL values. It enables efficient data retrieval and acts as a target for foreign keys to establish table relationships. Every table must have one primary key.
-
Select the Unique option to specify a unique constraint on a column so that each value in that column is unique among all other values.
-
Select the Order by option to sort the result set of a query in a specific order based on the values in one or more columns. This allows you to control the presentation of the data for better analysis and readability, as database rows are not guaranteed to be in any specific order by default.
-
Select More. The Advance configuration page appears. You can set the foreign key references to link one table with another in this page. This page is enabled only when you enter the column name.
-
In the Reference tab, do the following:
- From the Reference schema list, select a reference schema which is a specification that defines the structure, data types, and relationships for data, often including mechanisms to link to or reuse other schemas or subschemas.
- From the Reference table list, select a table that links to the primary key of another table. It ensures that the data in both tables stays connected and valid. It acts as a primary source for validating input, mapping values, and normalizing data, allowing other tables to reference it through foreign keys. If you omit this column, the database uses the table's primary key. Only those columns that have at least one primary key in the reference table are listed.
- From the Reference column list, select a reference column. Updates to the referenced data are automatically reflected in all locations. Primary key columns only are listed.
Note
When linking a new table with an existing table, ensure that the data types of the primary key and foreign key match. A mismatch in the data types of the primary key and foreign key results in an error.
-
In the Sequence tab, from the Sequence list, select the name of the sequence. Use sequences to set the default values of columns to sequential integer values.
-
In the Column constraints tab, enter the boolean expression that evaluates a column's value on each row in the Check constraintsfield.
-
Select Save.
-
To import data from a csv file, do the following:
- Select Import from CSV.
- Select Browse.
- Navigate to the folder containing the CSV file and click Open.
Note
Only the header rows in the CSV file are saved as column names. The system does not infer data types from the data in the CSV file. All uploaded code or content is the sole responsibility of the uploading party. OpenText does not review, endorse, or accept any liability for uploaded materials. Uploads are made at the uploading party's own risk. - Select Save.
-
Select SQL preview. A real-time preview of the SQL statement is displayed. The SQL syntax is validated and errors are displayed. This helps you identify errors and fix them before running the SQL queries.
-
Click the Download icon to download the SQL query to a file with
.sqlextension. -
In the Partition expression field, specify a partition key that is derived from one or more table columns. Creating partitions decreases the SQL query execution time and improves table efficiency. For information about partitioning tables, see Partition clause.
-
Select Create. The table is created and displayed under the schema where you created it.
Flex tables
Flex tables are a different kind of database table designed for loading and querying unstructured data, also called semi-structured data. Flex tables allow you to load data with different schemas into a single table. You can then explore this data and materialize real columns from it.
If you know some of the columns in the data, you can define them. A flex table that also has real columns is called a hybrid table. Both flex and hybrid tables are fully supported tables, stored as projections and with the same K-safety as your database.
After you create a flex table, you can quickly load data without specifying its schema. This allows you to load arbitrary JSON data, log files, and other semi-structured data and immediately begin querying it. For more information about flex tables, see Flex tables and Understanding flex tables.
Create a flex table
- Expand a schema in the Schema view and click + for Flex tables. The Create Flex Table page appears.
- In the Flex table name field, enter the name of the flex table.
- From the Schema list, select an existing schema for which the flex table needs to be created. If no schema is specified, the flex table is created in the public schema. Follow steps 4-17 mentioned in Create a table.
- Select Create. The flex table is created and displayed under the schema where you created it.
Views
A view is a stored query that comprises one or more SELECT statements. Views dynamically access and compute data from the database at execution time. Views are read-only and can reference any combination of tables, temporary tables, and other views. Views do not support insert, update, delete, or copy operations. For more information about views, see Views.
Create a view
- Expand a schema in the Schema view and click + for Views. The Create view page appears. Do the following:
- Review and edit the viewname.
- Enter the SELECT statement that the view executes. The SELECT statement can reference tables and other views.
- Format and execute the view. See Create an SQL query.
- Click the Reload icon to refresh the schema.
The new view appears in the
Viewsfolder.
Example
The following example shows how you can create a view that contains data from multiple tables.
=> CREATE VIEW temp_t0 AS SELECT * from t0_p1 UNION ALL
     SELECT * from t0_p2 UNION ALL
       SELECT * from t0_p3 UNION ALL
         SELECT * from t0_p4 UNION ALL
           SELECT * from t0_p5;
Create a schema
You can create as many schemas as necessary for your database. For example, you can create a schema for each database user. By default, only an administrator can create a schema or give a user the right to create a schema.
The database logical schema comprises a set of tables and referential integrity constraints in the database. The objects in the logical schema are visible to SQL users. The logical schema does not include projections, which make up the physical schema. The physical schema comprises a set of projections used to store data on the disk. The projections in the physical schema are based on the objects in the logical schema.
-
In the Schema view, expand the +Create table list and select Schema. The Create schema page appears.
-
In the Schema name field, enter the name of the schema. Ensure that the schema name meets the following requirements:
- Must be unique among all other schema names in the namespace under which the schema is created.
- Must comply with keyword restrictions and rules for Identifiers.
- Cannot begin with
v_; this prefix is reserved for OTCAD system tables. - If the schema name contains a period, the part before the period cannot be the same as the name of an existing namespace.
Inheritance of privileges specifies whether to enable or disable default inheritance of privileges for new tables in the schema.
-
Do one of the following:
- Select Include to grant tables in the specified schema the same privileges granted to that schema. This option has no effect on existing tables in the schema.
OR
- Select Exclude to disable inheritance of schema privileges. By default, inheritance of schema privileges is disabled.
-
Select Create. The schema is created and displayed in the Schema view.
Procedures
You can condense complex database tasks and routines into procedures. Procedures live and can be executed from inside your database; this lets them communicate and interact with your database directly to maintain, execute queries, and update tables. To view procedures, you can open the SQL editor and search for or browse to the procedure. Select the procedure to review details and manage the procedure. For more information about procedures, see Stored procedures.
Create a procedure
Ensure that you have non-superuser privilege to create procedures.
- Expand a schema in the Schema view and click + for Procedures. The Create procedure page appears. Do the following:
- Review and edit the procedure_name and parameters.
- Enter the procedure logic.
- Format and execute the procedure. See Create an SQL query.
- Click the Reload icon to refresh the schema.
The new stored procedure is displayed in the
Proceduresfolder.
View information about procedures
To view information about procedures, do the following:
- Open the SQL editor.
- Expand the schema.
- Hover over and select Procedures.
The Procedures page displays the following information:
- Language - Specifies the language of the procedure source. It can be either PLvSQL or PLpgSQL.
- Namespace name - Name of the database or namespace that contains
table:- Database name: If specified, it must be the current database.
- Namespace name (Eon Mode only): You must specify the namespace of objects in non-default namespaces. If no namespace is provided, it is assumed the object is in the default namespace.
- Owner - The name of the person who created the stored procedure.
- Procedure arguments - A comma-delimited list of formal parameters, each specified as
parameter-nameandparameter-type. - Procedure name - The name of the stored procedure, where procedure-name conforms to conventions described in Identifiers.
- Schema name - Name of the schema. The default is
public. - Security - Determines whose privileges to use when the procedure is called and executes it as if the user is one of the following:
- DEFINER: User who defined the procedure.
- INVOKER: User who called the procedure. For more information about these parameters, see create procedure.
Example
The following procedure echoes its inputs as a result set:
=> CREATE PROCEDURE echo_int_varchar(INOUT x INT, INOUT y VARCHAR) LANGUAGE PLvSQL AS $$
BEGIN
   RAISE NOTICE 'This procedure outputs a result set of its inputs:';
END
$$;

=> CALL echo_int_varchar(3, 'a string');
NOTICE 2005:  This procedure outputs a result set of its inputs:
 x |    y
---+----------
 3 | a string
(1 row)