This is the multi-page printable view of this section.
Click here to print.
Return to the regular view of this page.
Configuring Management Console
After you complete the steps in Installing [%=Vertica.MC%] (MC), you need to configure it through a client browser connection.
After you complete the steps in Installing Management Console (MC), you need to configure it through a client browser connection. An MC configuration assistant walks you through creating the Linux MC super administrator account, storage locations, and other settings that MC needs to run. Information you provide during the configuration process is stored in the /opt/vconsole/config/console.properties file.
If you need to change settings after the configuration assistant ends, such as port assignments, use the Home > MC Settings page.
-
Open a browser session.
-
Enter the IP address or host name of the server on which you installed MC and include the default MC port 5450. For example, enter the following using a IP address:
https://10.20.30.40:5450/
Or enter the following for a host name:
https://hostname:5450/
-
Accept the license agreement.
- You must accept the End-user license Agreement terms.
- Optionally, you can consent to the collection of anonymous data about your MC usage.
-
On Configure Management Console, complete the fields to create a local MC Superuser. Local user credentials are stored internally in the MC.
-
On Configure authentication, select Use Management Console for authentication.
-
Select Finish.
Shortly after you click Finish, you should see a status in the browser. However, you might see only an empty page for several seconds. During this brief period, MC runs as the local user 'root' long enough to bind to port number 5450. Then MC switches to the MC super administrator account that you just created, restarts MC, and displays the MC login page.
For instructions on adding other users, see User administration in MC.
1 - Changing MC or agent ports
When you configure MC, the Configuration Wizard sets up the following default ports:.
When you configure MC, the Configuration Wizard sets up the following default ports:
-
5450—Used to connect a web browser session to MC and allows communication from Vertica cluster nodes to the MC application/web server
-
5444—Provides MC-to-node and node-to-node (agent) communications for database create/import and monitoring activities
If you need to change the MC default ports
A scenario might arise where you need to change the default port assignments for MC or its agents. For example, perhaps one of the default ports is not available on your Vertica cluster, or you encounter connection problems between MC and the agents. The following topics describe how to change port assignments for MC or its agents.
Changing the MC port
Use this procedure to change the default port for MC's application server from 5450 to a different value.
-
Open a web browser and connect to MC as a user with MC ADMIN privileges.
-
On the MC Home page, navigate to MC Settings > Configuration and change the Application server running port value from 5450 to a new value.
-
In the change-port dialog, click OK.
-
Restart MC.
-
Reconnect your browser session using the new port. For example, if you changed the port from 5450 to 5555, use one of the following formats:
https://00.00.00.00:5555/
OR
https://hostname:5555/
Changing the agent port
Changing the agent port takes place in two steps: at the command line, where you modify the config.py file and through a browser, where you modify MC settings.
Change the agent port in config.py
-
Log in as root on any cluster node and change to the agent directory:
$ cd /opt/vertica/oss/python3/lib/python3.9/site-packages/vertica/agent/
-
Use any text editor to open config.py.
-
Scroll down to the agent_port = 5444 entry and replace 5444 with a different port number.
-
Save and close the file.
-
Copy config.py to the /opt/vertica/oss/python3/lib/python3.9/site-packages/vertica/agent/ directory on all nodes in the cluster.
-
Restart the agent process by running the following command:
$ /etc/init.d/vertica_agent restart
Note
If you are using Red Hat Enterprise Linux/CentOS 7, use the following command instead:
$ /opt/vertica/sbin/vertica_agent restart
-
Repeat (as root) Step 6 on each cluster node where you copied the config.py file.
Change the agent port on MC
-
Open a web browser and connect to MC as a user with MC ADMIN privileges.
-
Navigate to MC Settings > Configuration.
-
Change Default Vertica agent port from 5444 to the new value you specified in the config.py file.
-
Click Apply and click Done.
-
Restart MC so MC can connect to the agent at its new port. See Restarting MC.
See also
2 - Management Console settings
The MC Settings page allows you to configure properties specific to Management Console.
The MC Settings page allows you to configure properties specific to Management Console. To access MC Settings, go to the Management Console home page > MC Tools > MC Settings.
Configuration settings
The Configuration tab contains the following sections:
System User configurations
View the user name, user group, and user home path for the MC user.
Vertica database configurations
Edit the following database paths:
-
License path
-
Catalog path
-
Data path
MC and Agent Port settings
Configure the server port and the default port the Vertica agent uses.
Application Server JVM settings
Set the initial and maximum heap size for the JVM.
Browser connections settings
Enable and disable username and password auto-complete at Management Console login. After disabling, clear your browser's cache.
MC Password configuration settings
Set password requirements to log into the Management Console. This includes length, expiration, and login attempt settings.
User Analytics and Tracking
Choose if you want to provide Vertica with analytic information about your MC usage. Vertica uses this information to improve the MC in future releases.
Note
When you accept the End-User License Agreement Terms for the MC, you are given the option to provide Vertica with your anonymous user data. If you want to stop providing data, clear the checkbox in User Analytics and Tracking.
Vertica collects the following information:
-
Database type (Eon Mode or Enterprise Mode)
-
License type (Community Edition, Paid, By the Hour)
-
Cloud provider name
-
Vertica version
-
MC version
-
Current page
-
Interactions with MC page components, including buttons, drop-down lists, checkboxes, and radio buttons.
To protect your privacy, all collected information is stored and processed anonymously, and in compliance with GDPR regulations. It is stored securely on Vertica servers, and never shared with third-party organizations.
Monitoring settings
Control the following monitoring settings in Management Console:
-
Enable checks and set alert thresholds for spread retransmit rate. This setting is disabled by default. The recommended alert threshold for spread retransmit rate is 10%.
-
Set alert thresholds for free Management Console disk space checks. The recommended alert threshold is 500 MB.
-
Exclude MC queries from activity charts.
-
Set refresh intervals for MC charts and pages.
Security and authentication settings
-
On the SSL/TLS Certificates tab, upload a new SSL certificate or view the current certificate.
-
Use LDAP for user authentication (Authentication tab).
User Federation
You can authenticate users to MC with the following federated servers:
For implementation details, see User administration in MC.
Identity Providers
You can authenticate users to MC with an identity provider (IDP). You can configure the MC to use a user-defined authentication protocol for your corporate IDP, or you can select a list of social IDPs, such as GitHub, Facebook, or Google.
For implementation details, see User administration in MC.
User management settings
Create new Management Console users and, with their user credentials, map them to an database managed by Management Console on the Vertica server. See User administration in MC and /en/mc/users-roles-and-privileges/.
Extended monitoring settings
Configure Extended monitoring, which allows you to monitor more long-term data in Management Console:
Email Gateway
Local users require an email so they can manage their passwords. Local user profiles require that you complete the following fields:
- Host
- Port
- From Display Name
- From
- EnableSSL
After the administrator completes the email gateway configuration, the user receives an email to reset their password.
Other MC settings
Modifying database-specific settings
To inspect or modify settings related to a database managed by Management Console, go to the Existing Infrastructure page. On this page, select a running database to see its Overview page. From the bottom of the Overview page, click the Settings tab to make modifications to database-specific settings.
3 - Backing up MC
Before you upgrade MC, Vertica recommends that you back up your MC metadata (configuration and user settings). Use a storage location external to the server on which you installed MC.
-
On the target server (where you want to store MC metadata), log in as root or a user with sudo privileges.
-
Create a backup directory as in following example:
# mkdir /backups/mc/mc-backup-20130425
-
Copy the /opt/vconsole directory to the new backup folder:
# cp –r /opt/vconsole /backups/mc/mc-backup-20130425
4 - Connecting securely from MC to a Vertica database
When you use MC to monitor and manage a Vertica database, MC (running in a browser) connects as the client to the Vertica database server.
When you use MC to monitor and manage a Vertica database, MC (running in a browser) connects as the client to the Vertica database server.
MC uses JDBC for most database connections
MC uses Java Database Connectivity (JDBC) for most connections to a Vertica database, including:
-
Retrieving database information to display in charts
-
Running SQL queries through JDBC
-
Configuring and updating database properties
-
Configuring the database for extended monitoring
Exception
When MC uses Agents to perform AdminTools tasks, MC does not use JDBC to connect to the database.
Vertica software supports TLS
Vertica databases and Vertica MC support TLS up to version 1.2. This topic and its subtopics describe configuring TLS in MC for JDBC connections to a Vertica database.
MC requires that all certificate and key files for upload to MC must be in PEM (Privacy-enhanced Electronic Mail) format.
Vertica database security dictates how MC connects
The TLS/SSL security you configure for a database in MC must be consistent with the security configured on the database itself.
Whether the Vertica database has TLS/SSL configured in server mode or mutual mode, you should configure TLS/SSL for that database in MC to match.
To find out how a Vertica database is configured, see Determining the TLS mode of a Vertica database.
You can configure TLS/SSL in either server mode or mutual mode in MC.
The rest of this topic and related topics use the term TLS, TLS/SSL, and SSL interchangeably.
TLS server mode
When the MC client connects to a Vertica database configured in server mode:
-
The client requests and verifies the server's credentials.
-
The client does not need to present a client certificate and private key file to the server.
-
The MC administrator must configure the CA certificate that can verify server's certificate on MC when MC connects to the database over JDBC.
TLS mutual mode
When the MC client connects to a Vertica database configured in mutual mode:
-
The MC client requests and verifies the database server's credentials.
-
The server also requests and verifies the MC client's credentials.
-
Each MC user is a separate client, and must present a valid client certificate file and private key file pair (keypair), namely a certificate signed by a CA recognized by the Vertica database server as valid.
-
The MC administrator must configure:
-
The CA certificate to verify the Vertica database server certificate.
-
A client certificate and private key file (keypair) for each MC user. The keypair can be unique for each user, or shared by multiple users, depending on how client authentication is configured on the Vertica database. See Configuring client authentication.
-
Each MC user must be configured to map correctly to a user who is configured on the Vertica database server.
For more information on how Vertica supports TLS/SSL security, see TLS protocol.
Only MC users having Admin or Super privileges on a database are able to configure TLS certificates and keys on MC for database connections. The topics in this section use "MC administrator" to refer to both of these roles. For more information about MC user roles and privileges, see User administration in MC.
As the MC administrator, when you first configure security in MC for a Vertica database that requires mutual mode, you configure these certificates for the Vertica database:
-
The server certificate and public key of the database.
-
Your own client certificate and private key, as the first configured MC user mapped to a Vertica database user.
Configuring TLS/SSL on MC
MC provides the Certificates wizard for configuring TLS certificates for all JDBC connections to the database, to ensure those connections are secure.
In MC, there are three scenarios in which you need to configure TLS security for a Vertica database:
Adding certificates to MC for later use
You may want to add multiple CA certificates or client certificates to MC all at one time, to streamline the configuration of security when you are importing databases to MC or creating MC users. For details, see and .
To connect successfully, MC and database security must match
|
MC Security |
Vertica Database Security |
Does the connection succeed? |
|
None |
None |
Connection succeeds, and it is open and therefore unsecured. |
|
TLS server mode |
TLS server mode |
Connection succeeds provided MC can verify the server's certificate using the CA certificate configured on MC. |
|
TLS mutual mode |
TLS mutual mode |
Connection succeeds provided:
-
MC can verify the server's certificate using the CA certificate configured on MC.
-
The server can verify the client certificate and private key that MC presents as belonging to a mapped user on the Vertica database.
|
|
None |
TLS server mode |
MC attempts to establish an open connection. The connection fails if the Vertica database requires TLS for client connections. For more information, see:
|
|
None |
TLS mutual mode |
MC attempts to establish an open connection. The connection fails if the Vertica database requires TLS for client connections. The connection fails because MC does not present what the database requires: a valid client certificate and private key that the database can verify as belonging to a mapped database user. |
|
TLS server mode |
None |
MC attempts to connect to the database securely, however the connection fails as the database is not configured with TLS certificates. |
|
TLS mutual mode |
None |
MC attempts to connect to the database securely, however the connection fails as the database is not configured with TLS certificates. |
4.1 - Management Console security
The Management Console (MC) manages multiple Vertica clusters, all of which might have different levels and types of security, such as user names and passwords and LDAP authentication.
The Management Console (MC) manages multiple Vertica clusters, all of which might have different levels and types of security, such as user names and passwords and LDAP authentication. You can also manage MC users who have varying levels of access across these components.
Open authorization and SSL
Management Console (MC) uses a combination of OAuth (Open Authorization), Secure Socket Layer (SSL), and locally-encrypted passwords to secure HTTPS requests between a user's browser and MC, and between MC and the agents. Authentication occurs through MC and between agents within the cluster. Agents also authenticate and authorize jobs.
The MC configuration process sets up SSL automatically, but you must have the openssl package installed on your Linux environment first.
See the following topics for more information:
User authentication and access
MC provides two user authentication methods, LDAP or MC. You can use only one method at a time. For example, if you chose LDAP, all MC users will be authenticated against your organization's LDAP server.
You set up LDAP authentication up through MC Settings > Authentication on the MC interface.
Note
MC uses LDAP data for authentication purposes only. It does not modify user information in the LDAP repository.
The MC authentication method stores MC user information internally and encrypts passwords. These MC users are not system (Linux) users. They are accounts that have access to MC and, optionally, to one or more MC-managed Vertica databases through the MC interface.
Management Console also has rules for what users can see when they sign in to MC from a client browser. These rules are governed by access levels, each of which is made up of a set of roles.
See also
4.2 - Determining the TLS mode of a Vertica database
When you configure Vertica for TLS through the Management Console, you must configure the security mode to match what the Vertica database is configured to require: server mode or mutual mode.
When you configure Vertica for TLS through the Management Console, you must configure the security mode to match what the Vertica database is configured to require: server mode or mutual mode.
To determine the TLS mode for existing sessions, query the SESSIONS system table:
=> SELECT session_id, user_name, ssl_state FROM sessions;
           session_id            | user_name | ssl_state
---------------------------------+-----------+-----------
 v_vmart_node0001-333611:0x1ab   | dbadmin   | mutual
To determine the Vertica database's client-server TLS configuration, query the TLS_CONFIGURATIONS system table for the "server":
=> SELECT name, certificate, ca_certificates, mode FROM tls_configurations WHERE name = 'server';
  name  |   certificate    |   ca_certificates   |   mode
--------+------------------+---------------------+-----------
 server | server_cert      | ca_cert,ica_cert    | VERIFY_CA
(1 row)
The "mode" can be one of the following, in ascending security:
-
DISABLE: Disables TLS. All other options for this parameter enable TLS.
-
ENABLE: Enables TLS. Vertica does not check client certificates.
-
TRY_VERIFY: Establishes a TLS connection if one of the following is true:
If the other host presents an invalid certificate, the connection will use plaintext.
-
VERIFY_CA: Connection succeeds if Vertica verifies that the other host's certificate is from a trusted CA. If the other host does not present a certificate, the connection uses plaintext.
-
VERIFY_FULL: Connection succeeds if Vertica verifies that the other host's certificate is from a trusted CA and the certificate's cn (Common Name) or subjectAltName attribute matches the hostname or IP address of the other host.
Note that for client certificates, cn is used for the username, so subjectAltName must match the hostname or IP address of the other host.
Mutual mode corresponds to TRY_VERIFY or higher, which indicates that Vertica is in mutual mode. In mutual mode, Vertica sends its server certificate to the client for verification, and uses the CA certificates (in this case, "ca_cert" and "ica_cert") to verify client certificates.
In contrast, a server mode configuration (which doesn't verify client certificates) might have the following TLS configuration instead:
=> SELECT name, certificate, ca_certificates, mode FROM tls_configurations WHERE name = 'server';
  name  |   certificate    |   ca_certificates   |   mode
--------+------------------+---------------------+-----------
 server | server_cert      |                     | ENABLE
(1 row)
4.3 - Configuring TLS while importing a database on MC
To configure TLS as you are importing an existing Vertica database on MC:.
To configure TLS as you are importing an existing Vertica database on MC:
-
Follow the steps in Importing an existing database into MC.
-
In the Import Vertica window, select the database and click the Use TLS checkbox.
-
Click Configure TLS and Import DB to launch and complete the Certificates wizard.
MC certificates wizard
The MC Certificates wizard lets you configure a CA certificate for the Vertica database server and client certificates for MC to allow secure TLS communication over the JDBC connections between MC and the Vertica database server. Each screen presents options. When you select an option, the wizard displays additional options and details.
-
The first wizard screen provides helpful overview information. Read it, and click Configure TLS Certificates to continue.
-
On the Configure CA Certificates screen, configure a CA certificate (public key) to add to MC. MC uses this trusted certificate to verify the server's identity during TLS communications over JDBC connections between MC and the Vertica database server.
Complete one of these options:
-
Upload a new CA certificate Browse and select the certificate file and enter an alias for this certificate
-
To add another CA certificate, click Add More CA Certificates.
-
Continue adding additional CA certificates until you are finished.
-
Choose a certificate alias from previously uploaded certificates Select the alias for the previously uploaded CA certificate you wish to configure for the current database.
-
When you are done adding CA certificates, click Next.
-
The Configure Client Certificate screen displays the check box Add Client Certificate and Private Key for Mutual Mode TLS Connection.
-
If the database is configured for server mode, you do not need a client certificate or key.
-
If the database is configured for mutual mode:
-
Complete the detail fields for the client certificate and private key option you have chosen above, then click Next.
-
The Apply TLS configuration to MC users mapped to database window allows you to configure the client certificate-key pair you have just entered, for use by multiple MC users.
Note
All the MC users you select must be mapped to the same user id on the Vertica database server.
-
Click Review. The wizard displays a review window with the TLS options you have configured.
-
Select one of these options:
-
To modify your TLS choices, click Back.
-
To confirm your choices:
-
If you are importing a database, click Configure TLS and Import DB.
-
If you are configuring TLS for a database already imported to MC, click Configure TLS for DB.
-
Click Close to complete the wizard.
-
To close the wizard without importing the database and without setting up TLS configuration, click Cancel.
4.4 - MC certificates wizard
The MC Certificates wizard lets you configure a CA certificate for the Vertica database server and client certificates for MC to allow secure TLS communication over the JDBC connections between MC and the Vertica database server.
The MC Certificates wizard lets you configure a CA certificate for the Vertica database server and client certificates for MC to allow secure TLS communication over the JDBC connections between MC and the Vertica database server. Each screen presents options. When you select an option, the wizard displays additional options and details.
-
The first wizard screen provides helpful overview information. Read it, and click Configure TLS Certificates to continue.
-
On the Configure CA Certificates screen, configure a CA certificate (public key) to add to MC. MC uses this trusted certificate to verify the server's identity during TLS communications over JDBC connections between MC and the Vertica database server.
Complete one of these options:
-
Upload a new CA certificate Browse and select the certificate file and enter an alias for this certificate
-
To add another CA certificate, click Add More CA Certificates.
-
Continue adding additional CA certificates until you are finished.
-
Choose a certificate alias from previously uploaded certificates Select the alias for the previously uploaded CA certificate you wish to configure for the current database.
-
When you are done adding CA certificates, click Next.
-
The Configure Client Certificate screen displays the check box Add Client Certificate and Private Key for Mutual Mode TLS Connection.
-
If the database is configured for server mode, you do not need a client certificate or key.
-
If the database is configured for mutual mode:
-
Complete the detail fields for the client certificate and private key option you have chosen above, then click Next.
-
The Apply TLS configuration to MC users mapped to database window allows you to configure the client certificate-key pair you have just entered, for use by multiple MC users.
Note
All the MC users you select must be mapped to the same user id on the Vertica database server.
-
Click Review. The wizard displays a review window with the TLS options you have configured.
-
Select one of these options:
-
To modify your TLS choices, click Back.
-
To confirm your choices:
-
If you are importing a database, click Configure TLS and Import DB.
-
If you are configuring TLS for a database already imported to MC, click Configure TLS for DB.
-
Click Close to complete the wizard.
-
To close the wizard without importing the database and without setting up TLS configuration, click Cancel.
4.5 - Configuring TLS for a monitored database in MC
This procedure describes how to configure TLS for all JDBC connections to a database that is already being monitored in MC.
This procedure describes how to configure TLS for all JDBC connections to a database that is already being monitored in MC. Note that the Vertica database should already be configured with the TLS certificates required for TLS connections.
-
In MC, navigate to Databases and Clusters > DB-name > Settings and click the Security tab in the left navigation bar.
-
In the Configure TLS Connection for Database section, click Enabled in the drop-down beside Use TLS Connection to database.
-
Click Configure TLS Connection to launch and complete the Certificates wizard.
MC certificates wizard
The MC Certificates wizard lets you configure a CA certificate for the Vertica database server and client certificates for MC to allow secure TLS communication over the JDBC connections between MC and the Vertica database server. Each screen presents options. When you select an option, the wizard displays additional options and details.
-
The first wizard screen provides helpful overview information. Read it, and click Configure TLS Certificates to continue.
-
On the Configure CA Certificates screen, configure a CA certificate (public key) to add to MC. MC uses this trusted certificate to verify the server's identity during TLS communications over JDBC connections between MC and the Vertica database server.
Complete one of these options:
-
Upload a new CA certificate Browse and select the certificate file and enter an alias for this certificate
-
To add another CA certificate, click Add More CA Certificates.
-
Continue adding additional CA certificates until you are finished.
-
Choose a certificate alias from previously uploaded certificates Select the alias for the previously uploaded CA certificate you wish to configure for the current database.
-
When you are done adding CA certificates, click Next.
-
The Configure Client Certificate screen displays the check box Add Client Certificate and Private Key for Mutual Mode TLS Connection.
-
If the database is configured for server mode, you do not need a client certificate or key.
-
If the database is configured for mutual mode:
-
Complete the detail fields for the client certificate and private key option you have chosen above, then click Next.
-
The Apply TLS configuration to MC users mapped to database window allows you to configure the client certificate-key pair you have just entered, for use by multiple MC users.
Note
All the MC users you select must be mapped to the same user id on the Vertica database server.
-
Click Review. The wizard displays a review window with the TLS options you have configured.
-
Select one of these options:
-
To modify your TLS choices, click Back.
-
To confirm your choices:
-
If you are importing a database, click Configure TLS and Import DB.
-
If you are configuring TLS for a database already imported to MC, click Configure TLS for DB.
-
Click Close to complete the wizard.
-
To close the wizard without importing the database and without setting up TLS configuration, click Cancel.
4.6 - Configuring mutual TLS for MC users
You can configure TLS for existing MC users who are already mapped to Vertica database user ids.
You can configure TLS for existing MC users who are already mapped to Vertica database user ids. You would do so if you had just configured TLS in mutual mode on a previously unsecured Vertica database, and needed to configure a client certificate and private key for each MC user who accesses that database.
-
In MC, navigate to MC Settings and click the User Management tab.
-
Select a user from the list and click Edit.
-
In the Add permissions window:
-
Choose the database for which you want to edit this MC user's security permissions.
-
MC displays the database username to which this MC user is currently mapped.
-
In the Restrict Access drop-down, choose Admin, Associate, IT, or User to specify the privilege level for this user.
-
In the Use TLS Connection drop-down, choose Yes.
-
Click Configure TLS for user to launch and complete the Certificates wizard.
MC certificates wizard
The MC Certificates wizard lets you configure a CA certificate for the Vertica database server and client certificates for MC to allow secure TLS communication over the JDBC connections between MC and the Vertica database server. Each screen presents options. When you select an option, the wizard displays additional options and details.
-
The first wizard screen provides helpful overview information. Read it, and click Configure TLS Certificates to continue.
-
On the Configure CA Certificates screen, configure a CA certificate (public key) to add to MC. MC uses this trusted certificate to verify the server's identity during TLS communications over JDBC connections between MC and the Vertica database server.
Complete one of these options:
-
Upload a new CA certificate Browse and select the certificate file and enter an alias for this certificate
-
To add another CA certificate, click Add More CA Certificates.
-
Continue adding additional CA certificates until you are finished.
-
Choose a certificate alias from previously uploaded certificates Select the alias for the previously uploaded CA certificate you wish to configure for the current database.
-
When you are done adding CA certificates, click Next.
-
The Configure Client Certificate screen displays the check box Add Client Certificate and Private Key for Mutual Mode TLS Connection.
-
If the database is configured for server mode, you do not need a client certificate or key.
-
If the database is configured for mutual mode:
-
Complete the detail fields for the client certificate and private key option you have chosen above, then click Next.
-
The Apply TLS configuration to MC users mapped to database window allows you to configure the client certificate-key pair you have just entered, for use by multiple MC users.
Note
All the MC users you select must be mapped to the same user id on the Vertica database server.
-
Click Review. The wizard displays a review window with the TLS options you have configured.
-
Select one of these options:
-
To modify your TLS choices, click Back.
-
To confirm your choices:
-
If you are importing a database, click Configure TLS and Import DB.
-
If you are configuring TLS for a database already imported to MC, click Configure TLS for DB.
-
Click Close to complete the wizard.
-
To close the wizard without importing the database and without setting up TLS configuration, click Cancel.
4.7 - Updating TLS security for MC connections
Maintaining TLS security for MC JDBC connections to a Vertica database is an ongoing process.
Maintaining TLS security for MC JDBC connections to a Vertica database is an ongoing process. Initially, you as the MC administrator must configure the appropriate certificates and keys. As time passes, certificates expire or otherwise become invalid. To maintain TLS security in MC, you must configure new certificates to replace any that are about to expire.
If any of the certificates that secure an MC connection to a Vertica database changes or expires, the MC administrator must update the TLS configuration for that database on MC to ensure that unexpired certificates are available so that connections can succeed.
MC flags the current certificate for a given connection with a "use me" bit. This bit is set only for the current certificate. When you configure a new certificate for a given connection, the new certificate is marked current, and the previous certificate (although still present in the trust store or keystore) is no longer marked as the current certificate.
4.8 - Enabling or disabling TLS for a database in MC
To enable TLS for all JDBC connections from MC to a Vertica database, configure the certificate and key appropriate for that connection.
To enable TLS for all JDBC connections from MC to a Vertica database, configure the certificate and key appropriate for that connection. See:
Disabling a TLS connection
Under some conditions, you as the system administrator might need to disable TLS for JDBC connections from MC to a Vertica database. Here are some examples:
-
The TLS certificates are expired and you have not yet obtained new certificates.
-
The TLS certificates and keys are revoked and the user does not have new certificates and keys, but you still want to allow that user to connect from MC to the database to show monitoring information and run queries.
To disable TLS for connecting to a Vertica database:
-
In MC, navigate to Home > Databases and Clusters > DatabaseName > Settings.
-
Click the Security tab in the left navigation bar.
-
In the Use TLS Connection to database drop-down, choose Disabled.
Note
To reenable TLS for a database connection after you disable it, you must reconfigure the necessary certificates.
Disabling TLS for a database removes the configuration that tells MC to use the current certificates and keys for a given database, for all users. If it is a mutual mode TLS connection and each user had a separate client certificate and private key configured for that database, to re-enable TLS you must reconfigure the certificate and key for each user individually, for that database.
Re-enabling a disabled TLS connection
-
In MC, navigate to Home > Databases and Clusters > DatabaseName > Settings.
-
Click the Security tab in the left navigation bar.
-
In the Use TLS Connection to database drop-down, choose Enabled.
-
MC displays Configure MC to use secured connection to query Vertica database or modify existing configuration.
-
To finish re-enabling TLS, click Configure TLS Connection to launch the Certificates Wizard.
-
Complete the MC certificates wizard.
4.9 - Adding TLS certificates in MC
You can add one or more certificates to MC for later use, without immediately associating the certificates with a database.
You can add one or more certificates to MC for later use, without immediately associating the certificates with a database. Adding certificates ahead of time makes it easier to configure security for a database or for one or more MC users, because you can just choose a CA or client certificate from a list rather than having to add it to MC during the configuration steps.
Adding CA certificates in MC
To add one or more CA certificates in MC:
-
From the MC home page, navigate to MC Settings > SSL/TLS Certificates.
-
Under Manage TLS Certificates for Database Connection, click Add New CA Certificate.
-
In the Add new CA certificates for TLS connection window, enter an alias for the certificate, to make it easier to refer to later.
-
Click Browse to locate the certficate file you want to add. MC opens an Explorer window.
-
Select the file you want to upload, and click Open.
Note
Make sure the certificate file is unexpired, and is not protected by a password.
-
To add just this one certificate, click Add New CA. MC adds the certificate to its list.
-
To add additional CA certificates, click Add More CA Certificates. MC adds the certificate to a list, and clears the fields so you can enter the next CA certificate.
-
Repeat the process until you have entered the last certificate you want to add.
-
Click Add New CA to add all the CA certificates in the list to the MC:
Adding client certificates and keys in MC
You can add one or more client certificate and private key pairs to MC. In each pair, you can add either a single certificate, a preexisting certificate chain, or a series of client certificates that MC uses to create a new certificate chain.
To add one or more client certificates with their private key files to MC for later use:
-
Navigate to Home > MC Settings > SSL/TLS Certificates.
-
Under Manage TLS Certificates for Database Connection, click Add New Client Certificate. MC displays the Add new Client Certificate and Private Key for TLS Connection screen.
Note
When you add a client certificate to MC, you always add it with its private key file. The client certificate and its key are a key pair.
-
Click one of these file upload options:
- Upload Client Certificate and Private Key for TLS Connection. With this option, you paste a certificate and key into browser fields. MC posts the certificate and key from your browser to the MC server via an https connection over the network, secured with TLS/SSL.
- Manually upload Client Certificate and Private Key on MC host and provide paths. Sending the certificates from your browser to the MC server across an https network connection may not be not your preference. If so, you can use this option to specify the paths on the MC server host where you have manually uploaded the client certificate and private key files, instead. The URL of your MC browser shows the IP address of the MC host. Using this option, you must manually handle the transfer of the certificate and the key files to the server.
-
To provide a single client certificate and private key with either input option:
-
Enter a recognizable alias for the key pair.
-
Browse and select the private key file or provide the path.
-
Browse and select the client certificate file or provide the path.
-
Click Add New Client Certificate.
-
MC adds the key pair to its list.
-
To upload several certificates and private keys and create a certificate chain:
-
Enter an alias for the key pair.
-
Browse and select the private key file or provide the path.
-
Browse and select the client certificate file or provide the path.
-
Click Add Certificate to Chain (or Add More Certificate Paths).
-
Repeat the process until you have added the last certificate and key for this certificate chain.
-
Click Add New Client Certificate.
-
MC adds the resulting certificate chain to its list.
Adding a new certificate for the browser connection
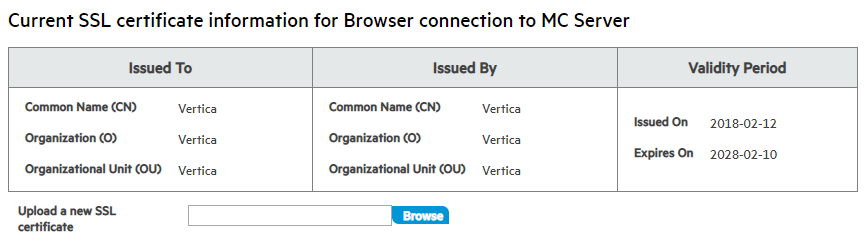
You can view the existing TLS certificate for the browser connection to the MC server, or add a new certificate to replace it.
To view or replace the current SSL/TLS certificate that MC uses for the user's browser's HTTPS connection to the MC server:
-
From the MC home page, navigate to MC Settings > SSL/TLS Certificates.
The top pane displays the current certificate for the browser connection to the MC server, including the certificate's expiration date:
-
To replace the current certificate, click Browse next to the Upload a new SSL certificate field.
MC opens an explorer window.
-
Select the certificate file you wish to upload and click Open. The certificate file must be in PEM (Privacy-enhanced Email Message) format.
MC replaces the prior certificate with the new certificate.
4.10 - Managing TLS certificates in MC
MC maintains a secure list containing all the CA certificates, and the client certificates or certificate chains and their corresponding key files, that you have uploaded into MC.
MC maintains a secure list containing all the CA certificates, and the client certificates or certificate chains and their corresponding key files, that you have uploaded into MC.
To manage the certificates already uploaded to MC, navigate to Home > MC Settings > SSL/TLS Certificates. This screen controls the TLS security settings for all of MC.
The top pane displays information about the current TLS certificate used to secure the user's browser connection to the MC server. You can add a new certificate to replace it. See .
The middle and lower panes allow you to add and remove CA and client certificates in MC.
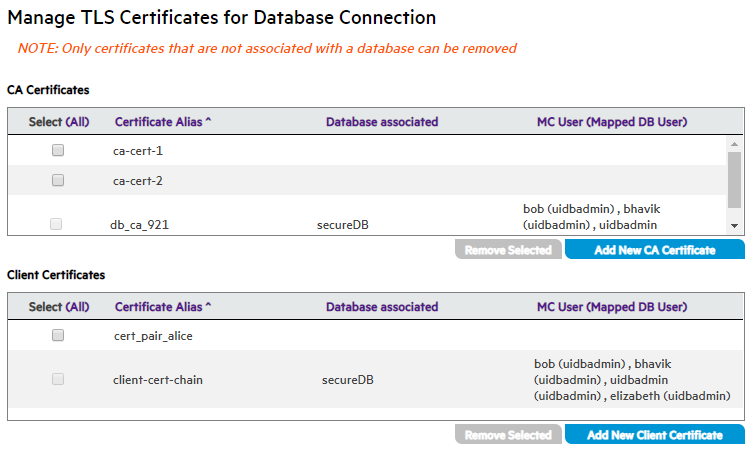
You can perform the following tasks to manage your TLS certificates and keys in MC.
For the security settings for a specific database, open the database in MC and navigate to Home > Databases and Clusters > DatabaseName > Settings and click the Security tab in the left navigation bar.
4.11 - Updating a TLS certificate in MC
When a TLS certificate is about to expire, has already expired, or otherwise becomes unusable, it needs to be updated.
When a TLS certificate is about to expire, has already expired, or otherwise becomes unusable, it needs to be updated.
This is the method for updating a certificate:
-
In MC, add the new certificate that will replace the expiring or invalid certificate. See Adding TLS certificates in MC.
Note
You can add and configure the new certificate for the database or user whose existing certificate is or will soon be invalid, as a single step, or two steps. Configuring the new certificate for the database dissociates the previously configured certificate from that database. See
Connecting securely from MC to a Vertica database.
-
After the old certificate has been disassociated from all databases and users, you can remove it from the MC. See Removing TLS certificates from MC.
4.12 - Removing TLS certificates from MC
In some cases, it may be appropriate to disable TLS for a database in MC.
In some cases, it may be appropriate to disable TLS for a database in MC. Disabling TLS for the database disassociates all the certificates configured for that database. For more information, see Enabling or disabling TLS for a database in MC.
Disassociating a certificate from a database in MC
Before you can remove a certificate from MC, you must be sure the certificate is not associated with (being used by) any databases. The MC administrator can disassociate a certificate from a database in MC using either of these methods:
Configuring a new certificate on the database in MC
When you configure a new certificate to serve a specific purpose on a database in MC, the new certificate replaces the old certificate. The newly configured certificate is now associated with the database, and the old certificate is no longer associated and can be removed.
Navigate to Databases and Clusters > DbName > Database Settings > Configure TLS.
For details, see Configuring TLS for a monitored database in MC
Removing the TLS configuration on the database
You can remove one or more TLS certificates from the MC, provided the certificates are not associated with a database. To remove a certificate:
-
From the MC home page, navigate to MC Settings > SSL/TLS Certificates.
-
In the Manage TLS Certificates for Database Connection section, locate the row or rows for one or more CA or client certificates you want to remove. This example shows only the CA Certificates pane:
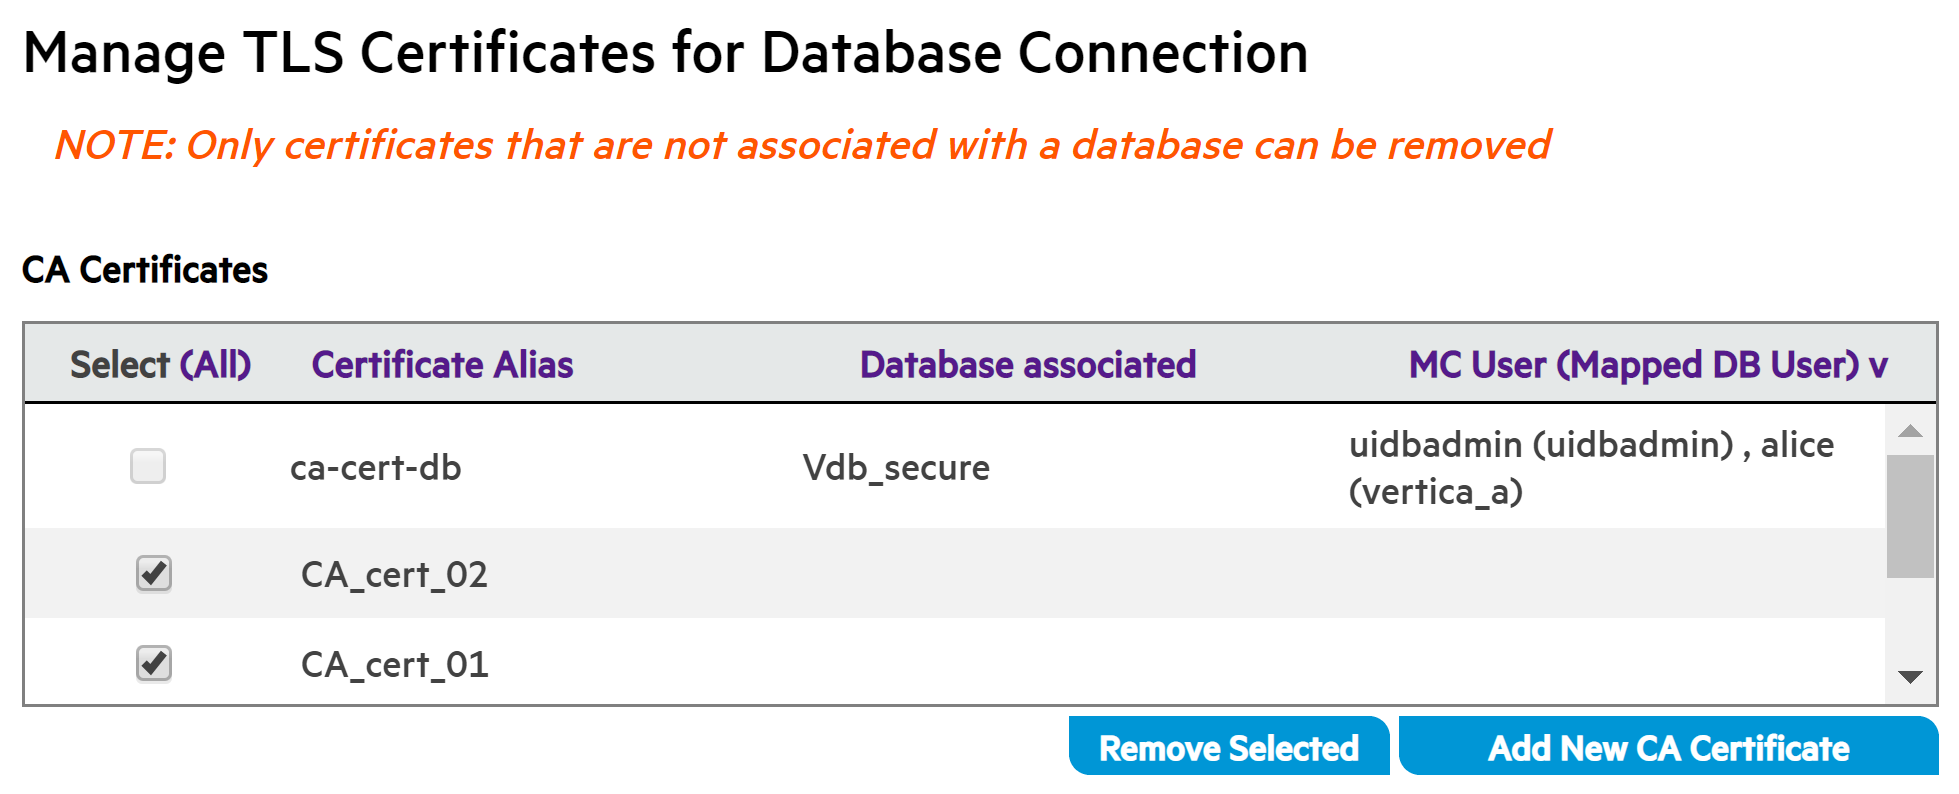
-
If the Database associated field is empty for that certificate, you can click to select the certificate for removal, and click Remove Selected. In the illustration above, CA_cert_02 and CA_cert_01 are selected for removal.
Note
If you remove one client certificate that is part of a certificate chain, MC removes the entire certificate chain.
4.14 - Bulk-configure a group of MC users for TLS
You as the MC administrator can create multiple MC users and map them all to the same database user id on the Vertica database server side.
You as the MC administrator can create multiple MC users and map them all to the same database user id on the Vertica database server side. You map the users in MC when you create them. For details, see User administration in MC.
You can then configure all the MC users that are mapped to a single Vertica database user id, to use the same client certificate or certificate chain and private key in MC, in a single bulk configuration process:
-
Navigate to MC Home > Databases and Clusters > DbName> Settings > Security.
-
Click Configure TLS Connection to launch the MC certificates wizard.
-
Complete steps 1 through 3 in the wizard to configure a CA certificate and the client certificate or certificate chain and key that you want to use for multiple MC users. For details, see MC certificates wizard.
-
After you complete these steps, the wizard displays the Apply TLS configuration to MC users mapped to database page as step 4 in the left wizard pane.
-
To apply the same CA certificate, client certificate and key you just configured to one or more additional users, click the check boxes for those users.
Note
All the users you select must be mapped to the same Vertica database user id.
-
To complete the configuration, click Review. MC displays a confirmation screen:
-
To complete the configuration of this CA certificate for the database and this client certificate/key pair for the selected MC users, click Configure TLS for DB.
-
MC confirms that the action was a success. Click Close to close the Certificate wizard.
5 - Upgrading Management Console manually
If you installed MC manually, follow the procedure below to upgrade MC.
If you installed MC manually, follow the procedure below to upgrade MC.
If you installed MC automatically on AWS resources, see Upgrading MC automatically on AWS.
Backing up MC before you upgrade
-
Log in as root or a user with sudo privileges on the server where MC is already installed.
-
Open a terminal window and shut down the MC process:
# /etc/init.d/vertica-consoled stop
For versions of Red Hat 7/CentOS 7 and above, use:
# systemctl stop vertica-consoled
-
Back up MC to preserve configuration metadata.
Important
A full backup is required in order to restore MC to its previous state. Restoring MC is essential if the upgrade fails, or you decide to revert to the previous version of Vertica. For details, see
Backing up MC.
-
Stop the database if MC was installed on an Ubuntu or Debian platform.
Extended monitoring upgrade recommendations
If you use Extended monitoring to monitor a database with MC, Vertica recommends the following upgrade procedure to avoid data loss.
-
Log in to MC as an administrator.
-
To stop the monitored database, navigate to the Existing Infrastructure > Databases and Clusters page, select the monitored database and click Stop.
-
On MC Settings > MC Storage DB Setup, click Disable Streaming to stop the storage database's collection of monitoring data.
-
To stop the storage database, navigate to the Existing Infrastructure > Databases and Clusters page, select the monitored database and click Stop.
-
Upgrade MC and Vertica according to Upgrade MC and Upgrading Vertica instructions.
-
To start the storage database, navigate to the Existing Infrastructure > Databases and Clusters page, select the monitored database and click Start.
-
Start the monitored database.
-
On MC Settings > MC Storage DB Setup, click Enable Streaming to enable collection of monitoring data.
Important
To avoid data loss, enable streaming soon after starting your monitored database. While your storage database is down and streaming is disabled, the Kafka server can retain data from your running monitored database for a limited amount of time. Data loss occurs when the data exceeds the Kafka retention policy's log size or retention time limits.
Upgrading MC
Note
After you upgrade, you can authenticate users to the MC with a federated server or your corporate identity provider. In addition, you are prompted to provide the following information:
- A new password.
- If your user profile does not have an email address, you must enter one immediately after accepting the end-user license agreement (EULA).
-
Download the MC package from the Vertica website:
vertica-console-current-version.Linux-distro)
Save the package to a location on the target server, such as /tmp.
-
On the target server, log in as root or a user with sudo privileges.
-
Change to the directory where you saved the MC package.
-
Install MC using your local Linux distribution package management system—rpm, yum, zypper, apt, dpkg. For example:
Red Hat 8
# rpm -Uvh vertica-console-current-version.x86_64.rpm
Debian and Ubuntu
# dpkg -i vertica-console-current-version.deb
-
If you stopped the database before upgrading MC, restart the database.
As the root user, use the following command:
/etc/init.d/verticad start
For versions of Red Hat 8/CentOS 8 and above, run:
# systemctl start verticad
-
Open a browser and enter the URL of the MC installation, one of the following:
By default, mc-port is 5450.
If MC was not previously configured, the Configuration Wizard dialog box appears. Configuration steps are described in Configuring MC.
If MC was previously configured, Vertica prompts you to accept the end-user license agreement (EULA) when you first log in to MC after the upgrade.
Additionally, you can choose to provide Vertica with analytic information about your MC usage. For details, see Management Console settings.
6 - Upgrading MC automatically on AWS
If you automatically installed Management Console (MC) version 9.1.1 or later on AWS resources, you can automatically upgrade it from the MC interface using the Upgrade wizard.
If you automatically installed Management Console (MC) version 9.1.1 or later on AWS resources, you can automatically upgrade it from the MC interface using the Upgrade wizard.
This process provisions a new Management Console instance and copies any current MC configuration data to the new MC. All MC settings, users, and monitored clusters will be transferred.
After upgrading, you can terminate the previous Management Console instance.
In addition, when you revive an Eon Mode database through the upgraded Management Console, that database will also be automatically upgraded to the same Vertica version as MC.
Upgrade MC automatically
Automatic upgrade is only available if the existing MC has been installed automatically through the AWS Marketplace.
-
From the MC home page, select MC Settings.
-
From the menu on the left side of the page, select Upgrade MC. The Upgrade MC page displays current Management Console information and indicates whether you are using the latest version of MC, or if a newer version is available.
-
Click Start MC Upgrade at the bottom of the page (this button is only displayed if a newer version of MC is available). The Upgrade wizard appears.
-
Go through the wizard and enter the following information when prompted:
-
AWS access key ID and AWS secret key (only required if existing MC was not installed using an IAM role)
-
AWS key pair
-
MC version to upgrade to
-
EC2 instance type for new MC host
-
EC2 instance tags (optional)
-
When upgrade is successful, the wizard displays the URL for the upgraded Management Console. Save this URL; this how to access your new MC. It is important to save this URL for future use; after you terminate your previous MC, the new MC URL will not be available elsewhere. (The MC URL referenced from the original stack when you created MC will continue to reference the previous MC, not the new MC.)
-
Follow the URL and log into your new MC.
-
To terminate the previous version of MC:
-
If necessary, disable termination protection for the previous MC instance. You can do so from the AWS console. See the AWS guide for enabling and disabling instance termination protection.
-
From the AWS console, terminate the instance on which the previous MC resides. See the AWS guide for how to terminate instances.
Note
Do not delete other associated resources for the previous MC. Some of these resources may still be in use by the new MC, or by any clusters that were created using the previous MC.
Next steps
If you plan to upgrade an Eon Mode database from Vertica version 9.1.0 or above to a later version, you can do so automatically by reviving it through a newer version of Management Console. As MC revives the database, it will also upgrade the Eon Mode database to the same Vertica version as the upgraded MC. See Reviving an Eon Mode database on AWS in MC.
7 - Localizing user interface text
You can translate Management Console (MC) user interface (UI) text with language files in the Vertica server.
You can translate Management Console (MC) user interface (UI) text with language files in the Vertica server. After you translate the UI text, users can select the language from the language selector, a dropdown located to the right of the username in the MC toolbar.
The required language files include the locales.json file and the resource bundle, a directory of JSON-formatted files that contain the text strings translated into the target language.
Language files are located in the /opt/vconsole/temp/webapp/resources/i18n/lang directory.
locales.json
The locales.json file contains an array of JSON objects with a name key and properties, where each object represents a language that the MC supports. For example, the following object represents Mexican Spanish:
"es_MX": {
    "code": "es_MX",
    "name": "Spanish - Mexico",
    "country_code": "MX"
}
The preceding object provides the following information that you use to translate UI text:
-
The object name key is a two- or four-letter country code. In the preceding example, the name key is es_MX. The resource bundle name must match this country code, or the MC cannot detect the translation files.
-
The MC lists the name value in the language selector. If you translated the UI text into Mexican Spanish, the language selector would list Spanish - Mexico.
Resource bundle
The resource bundle is a directory in /opt/vconsole/temp/webapp/resources/i18n/lang that stores a collection of JSON-formatted files that contain the UI text strings that you can translate. By default, Vertica provides the following resource bundles:
Creating a custom resource bundle
Important
Custom resource bundles are not preserved when you upgrade Management Console versions. Before you upgrade, you must back up your resource files when you back up your Management Console configuration.
For details, see Upgrading Management Console manually.
To create a resource bundle, you must manually create a new directory and copy files from one of the default resource bundles. For example, to create a resource bundle for Mexican Spanish:
-
Navigate to the directory that contains the language files:
$ cd /opt/vconsole/temp/webapp/resources/i18n/lang
-
Create a new directory named es_MX:
$ mkdir es_MX
Note
If the name of a resource bundle does not exactly match a name key in locales.json, the MC cannot detect the translation, and the translated language is not available in the language selector.
-
Copy all files from the default en_US resource bundle into the new es_MX resource bundle:
$ cp en_US/* es_MX
Text string file structure
Each JSON file in the resource bundle contains text strings for a specific section of the MC interface. For example, the homepage.json file stores text strings for the Management Console home page. Each JSON file represents MC pages and any child UI components that contain text—including subsections, tabs, and buttons—as individual objects. The file nests these pages and child components hierarchically to convey the page structure. For example, the homepage.json file uses the following structure:
{
    "homepage": {
        ...
      },
      "recentDatabase": {
        ...
      },
      "copyright": {
        ...
      },
      ...
The object properties represent the UI text as key/value pairs, where the key is the component with UI text, and the value is the text string that the MC displays in the UI.
Translating text
To translate a text string, edit the text string value. For example, to translate the title of the Recent Databases section into Spanish, open the homepage.json file in a text editor and update homepage.recentDatabase.title value:
{
    "homepage": {
        ...
        },
        "recentDatabase": {
          "title": "Bases de Datos Recientes",
          ...
}