This book explains several methods of connecting to Vertica, including:
Directly connecting to Vertica using the vsql client application.
Installing and configuring the Vertica client libraries to allow client applications to access Vertica.
Developing your own client applications using the Vertica client libraries.
1 - Using vsql
vsql;.
vsql is a character-based, interactive, front-end utility that lets you type SQL statements and see the results. It also provides a number of meta-commands and various shell-like features that facilitate writing scripts and automating a variety of tasks.
If you are using the vsql client installed on the server, then you can connect from the:
SQL statements can be spread over several lines for clarity.
vsql can handle input and output in UTF-8 encoding. The terminal emulator running vsql must be set up to display the UTF-8 characters correctly. The following example shows the settings in PuTTy:
When you disconnect a user session, any transactions in progress are automatically rolled back.
To view wide result sets, use the Linux less utility to truncate long lines.
Before connecting to the database, specify that you want to use less for query output:
$ export PAGER=less
Connect to the database.
Query a wide table:
=> select * from wide_table;
At the less prompt, type:
-S
If a shell running vsql fails (crashes or freezes), the vsql processes continue to run even if you stop the database. In that case, log in as root on the machine on which the shell was running and manually terminate the vsql process. For example: $ ps -ef | grep vertica ... fred 2401 1 0 06:02 pts/1 00:00:00 /opt/vertica/bin/vsql -p 5433 -h test01_site01 quick_start_single ... $ kill -9 2401
Enabling autocommit
By default, you must COMMIT to save changes made in a transaction. To enable automatic commits, see SET SESSION AUTOCOMMIT.
If you downloaded the .tar, create the /opt/vertica/ directory if it does not already exist, copy the .tar to it, navigate to it, and extract the .tar:
Run the installer and follow the prompts to install the drivers.
Reboot your system.
After installing the driver, you can optionally add the vsql directory to your PATH. For example, to append the vsql directory to your PATH with Windows PowerShell for the current session:
The default raster font does not work well with the ANSI code page.
Font
The default raster font does not work well with the ANSI code page. Set the console font to "Lucida Console."
Console encoding
vsql is built as a "console application." The Windows console windows use a different encoding than the rest of the system, so take care when you use 8-bit characters within vsql. If vsql detects a problematic console code page, it warns you at startup.
To change the console code page, set the code page by entering cmd.exe /c chcp 1252.
Note
1252 is a code page that is appropriate for European languages. Replace it with your preferred locale code page.
Running under cygwin
Verify that your cygwin.bat file does not include the "tty" flag. If the "tty" flag is included in your cywgin.bat file, then banners and prompts are not displayed in vsql.
To verify, enter:
set CYGWIN=binmode tty ntsec
To remove the "tty" flag, enter:
set CYGWIN=binmode ntsec
Additionally, when running under Cygwin, vsql uses Cygwin shell conventions as opposed to Windows console conventions.
Tab completion
Tab completion is a function of the shell, not vsql. Because of this, tab completion does not work the same way in Windows vsql as it does on Linux versions of vsql.
On Windows, instead of using tab-completion, press F7 to pop-up a history window of commands. You can also press F8 after typing a few letters of a command to cycle through commands in the history buffer which begin with the same letters.
1.3 - Connecting from the administration tools
You can use the to connect to a database using vsql on any node in the cluster.
You can use the Administration tools to connect to a database using vsql on any node in the cluster.
Log in as the database administrator user; for example, dbadmin.
Note
Vertica does not allow users with root privileges to connect to a database for security reasons.
Run the Administration Tools.
$ /opt/vertica/bin/admintools
On the Main Menu, select Connect to Database.
If prompted, enter the database password:
Password:
When you create a new user with the CREATE USER command, you can configure the password or leave it empty. You cannot bypass the password if the user was created with a password configured. You can change a user's password using the ALTER USER command.
The Administration Tools connect to the database and transfer control to vsql.
Welcome to vsql, the Vertica Analytic Database interactive terminal.
Type:  \h or \? for help with vsql commands
       \g or terminate with semicolon to execute query
       \q to quit

=>
Note
See Meta-commands for the various commands you can run while connected to the database through the Administration Tools.
1.4 - Connecting from the command line
You can connect to a database using vsql from the command line on multiple client platforms.
You can connect to a database using vsql from the command line on multiple client platforms.
If the connection cannot be made for any reason—for example, you have insufficient privileges, or the server is not running on the targeted host—vsql returns an error and terminates.
Optional if you connect to a local server. You can provide an IPv4 or IPv6 IP address or a host name.
For Vertica servers that have both IPv4 and IPv6 addressed and you have provided a host name instead of an IP address, you can prefer to use an IPv4 address with the -4 option and to use the IPv6 adddress with the -6 option if the DNS is configured to provide both IPv4 and IPv6 addresses. If you are using IPv6 and provide an IP address, you must append the address with an %interface name.
Runs one command and exits. This command is useful in shell scripts.
Variables set with -v are not processed when referenced in a -c command. To use variables, create a .sql file that references the variable and pass it to vsql with the -f option.
Specifies the name of the database to which you want to connect. Using this command is equivalent to specifying dbname as the first non-option argument on the command line.
Disables all command line editing and history functionality.
Connection options
-4
When resolving hostnames in dual stack environments, prefer IPv4 addresses.
-6
When resolving hostnames in dual stack environments, prefer IPv6 addresses.
-B server:port[,...]
Sets connection backup server/port. Use comma-separated multiple hosts (default: not set). If using an IPv6 address, enclose the address in brackets ([, ]) and place the port outside of the brackets. For example \B [2620:0:a13:8a4:9d9f:e0e3:1181:7f51]:5433
--enable-connection -load-balance -C
Enables connection load balancing (default: not enabled).
Note
You can only use load balancing with one address family in dual stack environments. For example, if you've configured load balancing for IPv6 addresses, then when an IPv4 client connects and requests load balancing the server does not allow it.
Specifies the host name of the machine on which the server is running.
-k krb-service
Provides the service name portion of the Kerberos principal (default: vertica). Using -k is equivalent to using the drivers' KerberosServiceName connection string.
-K krb-host
Provides the instance or host name portion of the Kerberos principal. -K is equivalent to the drivers' KerberosHostName connection string.
Specifies the policy for making SSL connections to the server. Options are require, prefer, allow, and disable. You can also set the VSQL_SSLMODE variable to achieve the same effect. If the variable is set, the command-line option overrides it.
Specifies the TCP port or the local socket file extension on which the server is listening for connections. Defaults to port 5433.
`--username` *`username`*
`-U` *`username`*
Connects to the database as the user username instead of the default.
-w password
Specifies the password for a database user.
Note
Using this command-line option displays the database password in plain text. Use it with care, particularly if you are connecting as the database administrator, to avoid exposing sensitive information.
--password -W
Forces vsql to prompt for a password before connecting to a database.The password is not displayed on the screen. This option remains set for the entire session, even if you change the database connection with the meta-command \connect.
Specifies the field separator for unaligned output (default: "|") (-P fieldsep=). (See -A --no-align.) Using this command is equivalent to \psetfieldsep or \f.
Lets you specify printing options in the style of \pset on the command line. You must separate the name and value with an equals (=) sign instead of a space. Thus, to set the output format to LaTeX, you could write -P format=latex.
-Q
Turns on trailing record separator. Use \pset trailingrecordsep to toggle the trailing record separator on or off.
Prints all input lines to standard output as they are read. This approach is more useful for script processing than interactive mode. It is the same as setting the variable ECHO to all.
Specifies that vsql do its work quietly (without informational output, such as welcome messages). This command is useful with the -c option. Within vsql you can also set the QUIET variable to achieve the same effect.
Runs in single-step mode for debugging scripts. Forces vsql to prompt before each statement is sent to the database and allows you to cancel execution.
Runs in single-line mode where a newline terminates a SQL command, as if you are using a semicolon.
Note
This mode is provided only by customer request. Vertica recommends that you not use single-line mode in cases where you mix SQL and meta-commands on a line. In single-line mode, the order of execution might be unclear to the inexperienced user.
1.4.1.1 - -A --no-align
-A or --no-align switches to unaligned output mode.
-A or --no-align switches to unaligned output mode. The default output mode is aligned.
1.4.1.2 - -a --echo-all
-a or --echo-all prints all input lines to standard output as they are read.
-a or --echo-all prints all input lines to standard output as they are read. This is more useful for script processing than interactive mode. It is equivalent to setting the variable
ECHO to all.
1.4.1.3 - -c --command
-c command or--command command runs one command and exits.
-c command or--command command runs one command and exits. This is useful in shell scripts.
Use either:
A command string that can be completely parsed by the server that does not contain features specific to vsql
A single meta-command
You cannot mix SQL and vsql meta-commands. You can, however, pipe the string into vsql as shown:
echo "\\timing\\\\select * from t" | ../Linux64/bin/vsql
                Timing is on.
                i | c | v
                ---+---+---
                (0 rows)
Note
If you use double quotes (") with
echo, you must double the backslashes ().
1.4.1.4 - -d --dbname
-d db-name or --dbname db-name specifies the name of the database to connect to.
-d db-name or --dbname db-name specifies the name of the database to connect to. This is equivalent to specifying db-name as the first non-option argument on the command line.
1.4.1.5 - -E
-E displays queries generated by internal commands.
-E displays queries generated by internal commands.
1.4.1.6 - -e --echo-queries
-e --echo-queries copies all SQL commands sent to the server to standard output as well.
-e --echo-queries copies all SQL commands sent to the server to standard output as well. This is equivalent to setting the variable ECHO to queries.
1.4.1.7 - -F --field-separator
-F separator or --field-separator separator specifies the field separator for unaligned output (default: "|") (-P fieldsep=).
-F separator or --field-separator separator specifies the field separator for unaligned output (default: "|") (-P fieldsep=). (See -A --no-align.) This is equivalent to \psetfieldsep or \f.
To set the field separator value to a control character, use your shell's control character escape notation. In Bash, you specify a control character in an argument using a dollar sign ($) followed by a string contained in single quotes. This string can contain C-string escapes (such as \t for tab), or a backslash () followed by an octal value for the character you want to use.
The following example demonstrates setting the separator character to tab (\t), vertical tab (\v) and the octal value of vertical tab (\013).
$ vsql -At -c "SELECT * FROM testtable;"
A|1|2|3
B|4|5|6

$ vsql -F $'\t' -At -c "SELECT * FROM testtable;"
A       1       2       3
B       4       5       6

$ vsql -F $'\v' -At -c "SELECT * FROM testtable;"
A
 1
  2
   3
B
 4
  5
   6
$ vsql -F $'\013' -At -c "SELECT * FROM testtable;"
A
 1
  2
   3
B
 4
  5
   6
1.4.1.8 - -f --file
-f filename or --file filename uses filename as the source of commands instead of reading commands interactively.
-f filename or --file filename uses filename as the source of commands instead of reading commands interactively. After the file is processed, vsql terminates.
If filename is a hyphen (-), standard input is read.
Using this option is different from writing vsql <filename. Using -f enables some additional features such as error messages with line numbers. Conversely, the variant using the shell's input redirection should always yield exactly the same output that you would have gotten had you entered everything manually.
1.4.1.9 - ? --help
-? --help displays help about vsql command line arguments and exits.
-? --help displays help about vsql command line arguments and exits.
1.4.1.10 - -H --html
-H --html turns on HTML tabular output.
-H --html turns on HTML tabular output. This is equivalent to \psetformat html or the \H command.
1.4.1.11 - -h --host
-h hostname or --host hostname specifies the host name of the machine on which the server is running.
-h hostname or --host hostname specifies the host name of the machine on which the server is running. Use this flag to connect to Vertica remotely.
The following requirements and restrictions apply:
If you use client authentication with a Kerberos connection method of either gss or krb5, you must specify -h hostname.
Use the -h option if you want to connect to Vertica from a local connection, but want to use the an authentication record with the access methodHOST (rather than LOCAL).
1.4.1.12 - -i -- timing
Enables the \timing meta-command.
Enables the \timing meta-command. You can only use this command with the
-c --command and
-f --file commands:
$VSQL-h host1 -U user1 -d VMart -p 15 -w ****** -i -c "SELECT user_name,
ssl_state, authentication_method, client_authentication_name, client_type FROM sessions
WHERE session_id=(SELECT session_id FROM current_session);"
1.4.1.13 - -g --label
Assigns a client label to the connection at the start of the session.
Assigns a client label to the connection at the start of the session. Client connections and their labels appear in the SESSIONS and some Data collector tables like DC_REQUESTS_ISSUED. Client labels set with this option appear in DC_SESSION_STARTS.
To set client labels for ongoing sessions, use SET_CLIENT_LABEL.
1.4.1.14 - -l --list
-l or --list returns all available databases, then exits.
-l or --list returns all available databases, then exits. Other non-connection options are ignored. This command is similar to the internal command \list.
1.4.1.15 - -m --sslmode
-m or --sslmode specifies the policy for making SSL connections to the server.
-m or --sslmode specifies the policy for making SSL connections to the server. Options are verify_full, verify_ca require, prefer, allow, and disable. You can also set the VSQL_SSLMODE variable to achieve the same effect. If the variable is set, the command-line option overrides it.
-o filename or --output filename writes all query output into file filename.
-o filename or --output filename writes all query output into file filename. This is equivalent to the vsql meta-command \o.
1.4.1.18 - -P --pset
-P assignment or --pset assignment lets you specify printing options in the style of \pset on the command line.
-P assignment or --pset assignment lets you specify printing options in the style of
\pset on the command line. Note that you have to separate name and value with an equal sign instead of a space. Thus to set the output format to LaTeX, you could write -P format=latex.
1.4.1.19 - -p --port
-p port or--port port specifies the TCP port or the local socket file extension on which the server is listening for connections.
-p port or--port port specifies the TCP port or the local socket file extension on which the server is listening for connections. Defaults to port 5433.
1.4.1.20 - -q --quiet
-q or --quiet specifies that vsql do its work quietly.
-q or --quiet specifies that vsql do its work quietly. By default, it prints welcome messages and various informational output. If this option is used, none of this appears. This is useful with the
-c option. Within vsql you can also set the QUIET variable to achieve the same effect.
1.4.1.21 - -R --record-separator
-R separator or --record-separator separator specifies separator as the record separator.
-R separator or --record-separator separator specifies separator as the record separator. This is equivalent to the \psetrecordsep command.
1.4.1.22 - -S --single-line
-S --single-line runs in single-line mode where a newline terminates a SQL command, like the semicolon does.
-S --single-line runs in single-line mode where a newline terminates a SQL command, like the semicolon does.
Note
This mode is provided for those who insist on it, but you are not necessarily encouraged to use it, particularly if you mix SQL and meta-commands on a line. The order of execution might not always be clear to the inexperienced user.
1.4.1.23 - -s --single-step
-s --single-step runs in single-step mode for debugging scripts.
-s --single-step runs in single-step mode for debugging scripts. Forces vsql to prompt before each statement is sent to the database and allows you to cancel execution.
1.4.1.24 - -T --table-attr
-T table-options or --table-attr table-options lets you specify options to be placed within the HTML table tag.
-T table-options or --table-attr table-options lets you specify options to be placed within the HTML table tag. See \pset for details.
1.4.1.25 - -t --tuples-only
-t or --tuples-only disables printing of column names, result row count footers, and so on.
-t or --tuples-only disables printing of column names, result row count footers, and so on. This is equivalent to the vsql meta-command \t.
1.4.1.26 - -V --version
-V or --version prints the vsql version and exits.
-V or --version prints the vsql version and exits.
1.4.1.27 - -v --variable --set
-v assignment, --variable assignment, and --set assignment perform a variable assignment, like the vsql meta-command \set.
-v assignment, --variable assignment, and --set assignment perform a variable assignment, like the vsql meta-command \set.
Note
You must separate name and value, if any, by an equals sign (=) on the command line.
To unset a variable, omit the equal sign. To set a variable without a value, use the equals sign but omit the value. Make these assignments at a very early stage of start-up, so that variables reserved for internal purposes can get overwritten later.
1.4.1.28 - -X --no-vsqlrc
-X --no-vsqlrc prevents the start-up file from being read: the system-wide vsqlrc file or the user's ~/.vsqlrc file.
-X --no-vsqlrc prevents the start-up file from being read: the system-wide vsqlrc file or the user's ~/.vsqlrc file.
1.4.1.29 - -x --expanded
-x or --expanded enables extended table formatting mode.
-x or --expanded enables extended table formatting mode. This is equivalent to the vsql meta-command\x.
1.4.2 - Connecting from a non-cluster host
You can use the Vertica vsql executable image on a non-cluster Linux host to connect to a Vertica database.
On Red Hat, CentOS, and SUSE systems, you can install the client driver RPM, which includes the vsql executable. See Installing the vsql client for details.
If the non-cluster host is running the same version of Linux as the cluster, copy the image file to the remote system. For example:
$ scp host01:/opt/vertica/bin/vsql .$ ./vsql
If the non-cluster host is running a different distribution or version of Linux than your cluster hosts, you must install the Vertica server RPM in order to get vsql:
Download the appropriate RPM package by browsing to Vertica website. On the Support tab, select Customer Downloads.
If the system you used to download the RPM is not the non-cluster host, transfer the file to the non-cluster host.
Log into the non-cluster host as root and install the RPM package using the command:
# rpm -Uvh filename
Where filename is the package you downloaded. Note that you do not have to run the install_vertica script on the non-cluster host to use vsql.
You cannot run vsql on a Cygwin bash shell (Windows). Use ssh to connect to a cluster host, then run vsql.
1.5 - Meta-commands
Anything you enter in vsql that begins with an unquoted backslash is a vsql meta-command that is processed by vsql itself.
Anything you enter in vsql that begins with an unquoted backslash is a vsql meta-command that is processed by vsql itself. These commands help make vsql more useful for administration or scripting. Meta-commands are more commonly called slash or backslash commands.
The format of a vsql command is the backslash, followed immediately by a command verb, then any arguments. The arguments are separated from the command verb and each other by any number of whitespace characters.
To include whitespace into an argument you can quote it with a single quote. To include a single quote into such an argument, precede it by a backslash. Anything contained in single quotes is furthermore subject to C-like substitutions for \n (new line), \t (tab), \digits, \0digits, and \0xdigits (the character with the given decimal, octal, or hexadecimal code).
If an unquoted argument begins with a colon (:), it is taken as a vsql variable and the value of the variable is used as the argument instead.
Arguments that are enclosed in backquotes (```) are taken as a command line that is passed to the shell. The output of the command (with any trailing newline removed) is taken as the argument value. The above escape sequences also apply in backquotes.
Some commands take a SQL identifier (such as a table name) as argument. These arguments follow the syntax rules of SQL: Unquoted letters are forced to lowercase, while double quotes (") protect letters from case conversion and allow incorporation of whitespace into the identifier. Within double quotes, paired double quotes reduce to a single double quote in the resulting name. For example, FOO"BAR"BAZ is interpreted as fooBARbaz, and "A weird"" name" becomes A weird" name.
Parsing for arguments stops when another unquoted backslash occurs. This is taken as the beginning of a new meta-command. The special sequence \\ (two backslashes) marks the end of arguments and continues parsing SQL commands, if any. That way SQL and vsql commands can be freely mixed on a line. But in any case, the arguments of a meta-command cannot continue beyond the end of the line.
Edits the query buffer (or specified file) with an external editor. For details, see
\edit.
\echo [str]
Writes str to standard output.
Tip
Use \qecho to redirect query output to the query output stream, as set by \o.
\f [str]
Sets the field separator for unaligned query output. The default is the vertical bar (|).
-F --field-separator
\g [file-name|shell-command]
Sends the query in the input buffer (see \p) to the server. You can send query results to file-name, or pipe results to shell-comand; otherwise, \g sends query results to standard output.
\H
Renders output in HTML markup as a table. For details, see
\pset format aligned.
-H --html
\h[elp]
Displays help information about the meta-commands, the same as \?.
--help
\i file
Reads and executes input from filename.
-f --file
\l \list
Lists available databases and owners.
-l --list
\locale [locale]
Displays the current locale setting or sets a new locale for the session. For details, see
\locale.
\o [file-name|shell-command]
Controls where vsql directs query output. You can send query results to file-name, or pipe results to shell-comand; otherwise, \o sends query results to standard output.
-o --output
\p
Prints the current query buffer to standard output.
\password [user-name]
Starts the password change process. Superusers can specify a user name to change that user's password; otherwise, users can only change their own passwords.
Sets options that control how Vertica formats query result output. For details, see
\pset.
-P --pset
\q
Quits the vsql program
\qecho [str]
Writes str to the query output stream, as specified by by \o.
\r
Clears (resets) the query buffer
\s [file]
Valid only if vsql is configured to use the GNU Readline library, prints or saves the command line history to file, or to standard output if no file name is supplied.
Sets internal variable var to value. If you specify multiple values, var is set to their concantenated values. If no values are specified, var is set to no value.
Specifies attributes to be placed inside the HTML table tag—for example, cellpadding or bgcolor, the same as
\pset tableattr html-attribute[...]. For sample usage, see Output formatting examples.
-T --table-attr
\timing
If set to on, returns how long (in milliseconds) each SQL statement runs. For details, see
\timing.
-i -- timing
\unset var
Deletes internal variable var that was set by the meta-command \set .
\w file-name
Outputs the current query buffer to file file-name.
\x
Toggles between regular and expanded format. For details, see
\pset format expanded.
-x --expanded
\z
Returns a summary of privileges on all objects in system table
V_CATALOG.GRANTS: grantee, grantor, privileges, schema, and object name (equivalent to
\dp).
\z supports the same options as \dp for filtering output by schema and object name patterns, . For example:
> \z *.*myseq*
     Access privileges for database "dbadmin"
 Grantee | Grantor | Privileges | Schema |  Name
---------+---------+------------+--------+--------
 dbadmin | dbadmin | SELECT*    | public | mySeq
 dbadmin | dbadmin | SELECT*    | public | mySeq2
(2 rows)
1.5.2 - \connect
Establishes a connection to database db, under the specified user user-name.
Establishes a connection to database db, under the specified user user-name. The previous connection is closed. If you omit specifying a database name, Vertica connects to the current database. If you omit specifying a user name argument, Vertica assumes the current user.
Syntax
\c[connect] [db [user-name]]
Error handling
Errors that prevent execution include specifying an unknown user and denial of access to the specified database. Vertica handles errors differently, depending on whether this command is executed interactively in vsql, or in a script:
VSQL handling: The current connection is maintained.
Script: Processing immediately stops with an error. This is prevents scripts from acting on the wrong database.
1.5.3 - \d meta-commands
Vertica supports a number of \d commands, which return information on different categories of database objects.
Vertica supports a number of \d commands, which return information on different categories of database objects. For a full list, see \d Reference below.
Syntax
Unless otherwise noted, \d commands generally conform to the following syntax:
\dCommand [ [schema.]pattern ]
Arguments
You can supply most \d commands with a string pattern argument, which filters the results that the command returns. The pattern can optionally be qualified by a schema name.
schema
Valid for most \d commands, restricts output to only database objects in schema. For example, the following \dp command obtains privileges information for all V_MONITOR tables that contain the string resource:
=> \dp V_MONITOR.*resource*
                Access privileges for database "dbadmin"
 Grantee | Grantor | Privileges |  Schema   |            Name
---------+---------+------------+-----------+----------------------------
 public  | dbadmin | SELECT     | v_monitor | resource_rejections
 public  | dbadmin | SELECT     | v_monitor | disk_resource_rejections
 public  | dbadmin | SELECT     | v_monitor | resource_usage
 public  | dbadmin | SELECT     | v_monitor | resource_acquisitions
 public  | dbadmin | SELECT     | v_monitor | resource_rejection_details
 public  | dbadmin | SELECT     | v_monitor | resource_pool_move
 public  | dbadmin | SELECT     | v_monitor | host_resources
 public  | dbadmin | SELECT     | v_monitor | node_resources
 public  | dbadmin | SELECT     | v_monitor | resource_queues
 public  | dbadmin | SELECT     | v_monitor | resource_pool_status
(10 rows)
pattern
Returns only the database objects that match the specified string. Pattern strings can include the following wildcards:
* (asterisk): zero or more characters.
? (question mark): any single character.
For example, the following \dt command returns tables that start with the string store:
=> \dt store*
                     List of tables
 Schema |       Name        | Kind  |  Owner  | Comment
--------+-------------------+-------+---------+---------
 public | store_orders      | table | dbadmin |
 public | store_orders_2018 | table | dbadmin |
 public | store_overseas    | table | dbadmin |
 store  | store_dimension   | table | dbadmin |
 store  | store_orders_fact | table | dbadmin |
 store  | store_sales_fact  | table | dbadmin |
(6 rows)
\d reference
\d
Unqualified by a pattern argument, returns all tables with their schema names, owners, and comments. If qualified by a pattern argument, \d returns all matching tables and all columns in each table, with details about each column, such as data type, size, and default value.
\df
Returns all function names, the function return data type, and the function argument data type. Also returns the procedure names and arguments for all procedures that are available to the user.
\dj
Returns all projections showing the schema, projection name, owner, and node. The returned rows include superprojections, live aggregate projections, Top-K projections, and projections with expressions.
\dn
Returns the schema names and schema owner.
\dp
Returns a summary of privileges on all objects in system table
V_CATALOG.GRANTS: grantee, grantor, privileges, schema, and object name (equivalent to
\z).
\dS
Unqualified by a pattern argument, returns all V_CATALOG and V_MONITOR system tables. To obtain system tables for just one schema, qualify the command with the schema name, as follows:
\dS { V_CATALOG | V_MONITOR }.*
\ds
Returns sequences and their parameters.
\dT
Returns all data types that Vertica supports.
Note
\dT returns no results if qualified with a pattern argument.
\dt
Unqualified by a pattern argument, returns the same information as an unqualified \d command. If qualified by a pattern argument, \dt returns matching tables with the same level of detail as an unqualified \dt command.
\dtv
Returns tables and views.
\du
Returns database users and whether they are superusers.
\dv
Unqualified by a pattern argument, returns all views with their schema names, owners, and comments. If qualified by a pattern argument, \dv returns all matching views and the columns in each view, with each column's data type and size.
1.5.4 - \edit
Edits the query buffer (or specified file) with an external editor.
Edits the query buffer (or specified file) with an external editor. When the editor exits, its content is copied back to the query buffer. If no argument is given, the current query buffer is copied to a temporary file which is then edited in the same fashion.
The new query buffer is then re-parsed according to the normal rules of vsql, where the whole buffer up to the first semicolon is treated as a single line. (Thus you cannot make scripts this way. Use \i for that.) If there is no semicolon, vsql waits for one to be entered (it does not execute the query buffer).
Tip
vsql searches the environment variables VSQL_EDITOR, EDITOR, and VISUAL (in that order) for an editor to use. If all of them are unset, vi is used on Linux systems, notepad.exe on Windows systems.
Syntax
\e[dit] [ file ]
1.5.5 - \i
Reads and executes input from the specified file.
Reads and executes input from the specified file.
Note
To see the lines on the screen as they are read, set the variable ECHO to all.
Syntax
\i filename
Examples
The Vertica vsql client on Linux supports backquote (backtick) expansion. For example:
Set an environment variable to a path that contains scripts you want to run:
$ export MYSCRIPTS=/home/dbadmin/testscripts
Issue the vsql command.
$ vsql
Use backquote expansion to include the path for running an existing script—for example, sample.sql.
=> \i `echo $MYSCRIPTS/sample.sql`
1.5.6 - \locale
Displays or sets the locale setting for the current session.
Displays or sets the locale setting for the current session.
Note
This command does not alter the default locale for all database sessions. To change the default for all sessions, set configuration parameter DefaultSessionLocale.
Syntax
\locale [locale-identifier]
Arguments
locale-identifier
Specifies the ICU locale identifier to use, by default set to:
en_US@collation=binary
If set to an empty string, Vertica sets locale to en_US_POSIX.
If you omit this argument, \locale returns the current locale setting.
For details on identifier options, see About locale. For a complete list of locale identifiers, see the ICU Project.
Examples
View the current locale setting:
=> \locale
en_US@collation=binary
Change the default locale for this session:
=> \locale en_GBINFO:
INFO 2567:  Canonical locale: 'en_GBINFO:'
Standard collation: 'LEN'
English (GBINFO:)
Notes
The server locale settings impact only the collation behavior for server-side query processing. The client application is responsible for ensuring that the correct locale is set in order to display the characters correctly. Below are the best practices recommended by Vertica to ensure predictable results:
The locale setting in the terminal emulator for vsql (POSIX) should be set to be equivalent to session locale setting on server side (ICU) so data is collated correctly on the server and displayed correctly on the client.
The vsql locale should be set using the POSIX LANG environment variable in terminal emulator. Refer to the documentation of your terminal emulator for how to set locale.
All input data for vsql should be in UTF-8 and all output data is encoded in UTF-8.
Non UTF-8 encodings and associated locale values are not supported.
1.5.7 - \pset
Sets options that control how Vertica formats query result output.
Sets options that control how Vertica formats query result output.
Syntax
\pset output-option
Output options
Note
Unless otherwise specified, output options are valid for all formats.
format format-option
Sets output format, where format-option is one of the following:
u[naligned] writes all column data of each row on a single line, where each field is separated only by the current separator character. Use this output for use as input to other programs—for example, comma-delimited fields for CSV input.
Valid only if output format is set to html, specifies the table border, where int specifies the border type.
expanded
Toggles between regular and expanded format. When expanded format is enabled, all output has two columns with the column name on the left and the data on the right. This mode is especially useful for wide tables.
fieldsep 'arg'
Valid only if output format is set to unaligned, specifies the field separator, by default | (vertical bar).
For example, to specify tab as the field separator:
\pset fieldsep '\t'
footer
Toggles display of the default footer:
(int rows)
null 'string'
Specifies to represent column null values as string. By default, Vertica renders null values as an empty field, which might be mistaken as an empty string.
For example:
\pset null '(null)'
pager [always]
Toggles use of a pager for query and vsql help output. If the environment variable PAGER is set, the output is piped to the specified program. Otherwise a platform-dependent default (such as more) is used.
When the pager is off, the pager is not used. When the pager is on, the pager is used only when appropriate; that is, the output is to a terminal and does not fit on the screen. (vsql does not do a perfect job of estimating when to use the pager.)
If qualified with the argument always, the pager is always used.
recordsep 'char'
Valid only if output format is set to unaligned, specifies the character used to delimit table records (tuples), by default a newline character.
tableattr html-attribute[...]
Specifies attributes to be placed inside the HTML table tag—for example, cellpadding or bgcolor.
title ['title-str']
Sets a title that precedes query result output, to title-str. HTML output renders this as follows:
<caption>title-str</caption>
To remove the title, reissue the command omit the title-str argument.
trailingrecordsep
Toggles on or off the trailing record separator to use in unaligned output mode.
t[uples_only]
Toggles between tuples only and full display. Full display might show extra information such as column headers, titles, and various footers. In tuples only mode, only actual table data is shown.
Sets an internal variable to one or more values. If multiple values are specified, they are concantenated. An unqualified \set command lists all internal variables.
The name of an internal variable to set. Valid variable names are case sensitive and can contain characters, digits, and underscores. vsql treats several variables as special, which are described in Variables.
value
A value to set in variable var. If no value is specified, the variable is set to no value.
If set to an empty string, the variable is set to no value. If you omit this argument, \set returns all internal variables.
If no arguments are supplied, \set returns all internal variables. For example:
If set to on, returns how long (in milliseconds) each SQL statement runs.
If set to on, returns how long (in milliseconds) each SQL statement runs. Results include:
Length of time required to fetch the first block of rows
Total time until the last block is formatted.
Unqualified, \timing toggles timing on and off. You can explicitly turn timing on and off by qualifying the command with options ON and OFF, respectively.
Note
You can also enable \timing from the command line using the
vsql -i command.
Syntax
\timing [ON | OFF]
Examples
The following unqualified \timing commands toggle timing on and off:
=> \timing
Timing is on
=> \timing
Timing is off
The following example shows a SQL command with timing on:
=> \timing
Timing is on.
=> SELECT user_name, ssl_state, authentication_method, client_authentication_name,
     client_type FROM sessions WHERE session_id=(SELECT session_id FROM current_session);
 user_name | ssl_state | authentication_method | client_authentication_name | client_type
-----------+-----------+-----------------------+----------------------------+-------------
 dbadmin   | None      | ImpTrust              | default: Implicit Trust    | vsql
(1 row)

Time: First fetch (1 row): 73.684 ms. All rows formatted: 73.770 ms
1.6 - Variables
vsql provides variable substitution features similar to common Linux command shells.
vsql provides variable substitution features similar to common Linux command shells. Variables are name/value pairs, where the value can be a string of any length. To set variables, use the vsql meta-command \set. For example, the following statement sets the variable fact to the value dim:
=> \set fact dim
If you call \set on a variable and supply no value, the variable is set to an empty string.
Note
The arguments of \set are subject to the same substitution rules as with other commands. For example, \set dim :fact is a valid way to copy a variable.
Getting variables
To retrieve the content of a given variable, precede the name with a colon and use it as the argument of any slash command. For example:
=> \echo :fact
dim
An unqualified \set command returns all current variables and their values:
vsql internal variable names can contain letters, numbers, and underscores in any order and any number. Some variables are treated specially by vsql. They indicate certain option settings that can be changed at run time by altering the value of the variable or represent some state of the application. Although you can use these variables for any other purpose, this is not recommended. By convention, all specially treated variables consist of all upper-case letters (and possibly numbers and underscores). To ensure maximum compatibility in the future, avoid using such variable names for your own purposes.
SQL interpolation
You can substitute ("interpolate") vsql variables into regular SQL statements. You do so by prepending the variable name with a colon (:). For example, the following statements query the table my_table:
=> \set fact 'my_table'
=> SELECT * FROM :fact;
The value of the variable is copied literally, so it can even contain unbalanced quotes or backslash commands. Make sure that it makes sense where you put it. Variable interpolation is not performed into quoted SQL entities. One exception applies: the contents of backquoted strings (````) are passed to a system shell, and replaced with the shell's output. See Using Backquotes to Read System Variables below.
Using backquotes to read system variables
In vsql, the contents of backquotes are passed to the system shell to be interpreted (the same behavior as many UNIX shells). This is particularly useful in setting internal vsql variables, since you may want to access UNIX system variables (such as HOME or TMPDIR) rather than hard-code values.
For example, to set an internal variable to the full path for a file in your UNIX user directory, you can use backquotes to get the content of the system HOME variable, which is the full path to your user directory:
The contents of the backquotes are replaced with the results of running the contents in a system shell interpreter. In this case, the echo $HOME command returns the contents of the HOME system variable.
1.6.1 - DBNAME
The name of the database to which you are currently connected.
The name of the database to which you are currently connected. DBNAME is set every time you connect to a database (including program startup), but it can be unset.
1.6.2 - ECHO
If set to all, all lines entered from the keyboard or from a script are written to the standard output before they are parsed or run.
If set to all, all lines entered from the keyboard or from a script are written to the standard output before they are parsed or run.
To select this behavior on program start-up, use the switch -a. If set to queries, vsql merely prints all queries as they are sent to the server. The switch for this is -e.
1.6.3 - ECHO_HIDDEN
When this variable is set and a backslash command queries the database, the query is first shown.
When this variable is set and a backslash command queries the database, the query is first shown. This way you can study the Vertica internals and provide similar functionality in your own programs. (To select this behavior on program start-up, use the switch -E.)
If you set the variable to the value noexec, the queries are just shown but are not actually sent to the server and run.
1.6.4 - ENCODING
The current client character set encoding.
The current client character set encoding.
1.6.5 - HISTCONTROL
If this variable is set to ignorespace, lines that begin with a space are not entered into the history list.
If this variable is set to ignorespace, lines that begin with a space are not entered into the history list. If set to a value of ignoredups, lines matching the previous history line are not entered. A value of ignoreboth combines the two options. If unset, or if set to any other value than those previously mentioned, all lines read in interactive mode are saved on the history list.
Source: Bash.
1.6.6 - HISTSIZE
Specifies how much storage space is allocated to store the history of SQL statements issued in the current vsql session.
Specifies how much storage space is allocated to store the history of SQL statements issued in the current vsql session. vsql uses this setting, by default 500, to calculate the size of the history buffer:
HISTSIZE * 50 (bytes)
where 50 bytes approximates the average length of a SQL statement. The actual length of SQL statements in the current session determines how many statements vsql stores.
HISTSIZE has no effect on the history that is stored in .vsql_history.
Source: Bash
1.6.7 - HOST
The database server host you are currently connected to.
The database server host you are currently connected to. This is set every time you connect to a database (including program startup), but can be unset.
1.6.8 - IGNOREEOF
If unset, sending an EOF character (usually Control+D) to an interactive session of vsql terminates the application.
If unset, sending an EOF character (usually Control+D) to an interactive session of vsql terminates the application. If set to a numeric value, that many EOF characters are ignored before the application terminates. If the variable is set but has no numeric value, the default is 10.
Source: Bash.
1.6.9 - ON_ERROR_STOP
By default, if a script command results in an error, for example, because of a malformed command or invalid data format, processing continues.
By default, if a script command results in an error, for example, because of a malformed command or invalid data format, processing continues. If you set ON_ERROR_STOP to ON in a script and an error occurs during processing, the script terminates immediately.
For example:
=> \set ON_ERROR_STOP ON
Note
If you invoke the script on Linux with
vsql -f, vsql returns with error code 3 to indicate that an error occurred in the script.
1.6.10 - PORT
The database server port to which you are currently connected.
The database server port to which you are currently connected. This is set every time you connect to a database (including program start-up), but can be unset.
1.6.11 - PROMPT1 PROMPT2 PROMPT3
These specify what the prompts vsql issues look like.
These specify what the prompts vsql issues look like. See Prompting for details.
1.6.12 - QUIET
This variable is equivalent to the command line option -q.
This variable is equivalent to the command line option -q. It is probably not too useful in interactive mode.
1.6.13 - ROWS_AT_A_TIME
ROWS_AT_A_TIME is set by default to 1000, and retrieves results as blocks of rows of that size.
ROWS_AT_A_TIME is set by default to 1000, and retrieves results as blocks of rows of that size. The column formatting for the first block is used for all blocks, so in later blocks some entries could overflow.
When formatting results, Vertica buffers ROWS_AT_A_TIME rows in memory to calculate the maximum column widths. It is possible that rows after this initial fetch are not properly aligned if any of the field values are longer than those see in the first ROWS_AT_A_TIME rows. ROWS_AT_A_TIME can be unset with vsql meta-command\unset to guarantee perfect alignment. However, this requires re-buffering the entire result set in memory and might cause vsql to fail if the result set is too big.
1.6.14 - SINGLELINE
This variable is equivalent to the command line option -S.
This variable is equivalent to the command line option -S.
1.6.15 - SINGLESTEP
This variable is equivalent to the command line option -s.
This variable is equivalent to the command line option -s.
1.6.16 - USER
The database user you are currently connected as.
The database user you are currently connected as. This is set every time you connect to a database (including program startup), but can be unset.
1.6.17 - VERBOSITY
This variable can be set to the values default, verbose, or terse to control the verbosity of error reports.
This variable can be set to the values default, verbose, or terse to control the verbosity of error reports.
1.6.18 - VSQL_HOME
By default, the vsql program reads configuration files from the user's home directory.
By default, the vsql program reads configuration files from the user's home directory. In cases where this is not desirable, the configuration file location can be overridden by setting the VSQL_HOME environment variable in a way that does not require modifying a shared resource.
In the following example, vsql reads configuration information out of /tmp/jsmith rather than out of ~.
# Make an alternate configuration file in /tmp/jsmith
mkdir -p /tmp/jsmith
echo "\\echo Using VSQLRC in tmp/jsmith" > /tmp/jsmith/.vsqlrc
# Note that nothing is echoed when invoked normally
vsql
# Note that the .vsqlrc is read and the following is
# displayed before the vsql prompt
#
# Using VSQLRC in tmp/jsmith
VSQL_HOME=/tmp/jsmith vsql
1.6.19 - VSQL_SSLMODE
VSQL_SSLMODE specifies how (or whether) clients (like admintools) use SSL when connecting to servers.
VSQL_SSLMODE specifies how (or whether) clients (like admintools) use SSL when connecting to servers. The default value is prefer, meaning to use SSL if the server offers it. Legal values are require, prefer, allow, and disable. This variable is equivalent to the command-line -m option (or --sslmode).
1.7 - Prompting
The prompts vsql issues can be customized to your preference.
The prompts vsql issues can be customized to your preference. The three variables PROMPT1, PROMPT2, and PROMPT3 contain strings and special escape sequences that describe the appearance of the prompt. Prompt 1 is the normal prompt that is issued when vsql requests a new command. Prompt 2 is issued when more input is expected during command input because the command was not terminated with a semicolon or a quote was not closed. Prompt 3 is issued when you run a SQL COPY command and you are expected to type in the row values on the terminal.
The value of the selected prompt variable is printed literally, except where a percent sign (%) is encountered. Depending on the next character, certain other text is substituted instead. Defined substitutions are:
%M
The full host name (with domain name) of the database server, or [local] if the connection is over a socket, or [local:/dir/name], if the socket is not at the compiled in default location.
%m
The host name of the database server, truncated at the first dot, or [local].
%>
The port number at which the database server is listening.
%n
The database session user name.
%/
The name of the current database.
%~
Like %/, but the output is ~ (tilde) if the database is your default database.
%#
If the session user is a database superuser, then a #, otherwise a >. (The expansion of this value might change during a database session as the result of the command SET SESSION AUTHORIZATION.)
%R
In prompt 1 normally =, but ^ if in single-line mode, and ! if the session is disconnected from the database (which can happen if \connect fails). In prompt 2 the sequence is replaced by -, *, a single quote, a double quote, or a dollar sign, depending on whether vsql expects more input because the command wasn't terminated yet, because you are inside a /* ... */ comment, or because you are inside a quoted or dollar-escaped string. In prompt 3 the sequence doesn't produce anything.
%x
Transaction status: an empty string when not in a transaction block, or * when in a transaction block, or ! when in a failed transaction block, or ? when the transaction state is indeterminate (for example, because there is no connection).
%digits
The character with the indicated numeric code is substituted. If digits starts with 0x the rest of the characters are interpreted as hexadecimal; otherwise if the first digit is 0 the digits are interpreted as octal; otherwise the digits are read as a decimal number.
%:name:
The value of the vsql variable name. See the section Variables for details.
%`command`
The output of command, similar to ordinary "back- tick" substitution.
%[ ... %]
Prompts may contain terminal control characters which, for example, change the color, background, or style of the prompt text, or change the title of the terminal window. In order for the line editing features of Readline to work properly, these non-printing control characters must be designated as invisible by surrounding them with %[ and %]. Multiple pairs of these may occur within the prompt. The following example results in a boldfaced (1;) yellow-on-black (33;40) prompt on VT100-compatible, color-capable terminals:
Command history is automatically saved in ~/.vsql_history when vsql exits and is reloaded when vsql starts.
Disabling tab completion
To disable tab completion, add the following to .vsqlrc:
\bind ^I
Key bindings
Key bindings are read from a global configuration at /opt/vertica/config/vsqlrc, if present. To override key bindings, add definitions to ~/.vsqlrc.
Key bindings must be prefixed with a backslash (\). For example, the following definition binds the "backward-word" action to Ctrl+B:
\bind ^B backward-word
The following key bindings are specific to vsql:
Insert switches between insert mode (the default) and overwrite mode.
Delete deletes the character to the right of the cursor.
Home moves the cursor to the front of the line.
End moves the cursor to the end of the line.
^R Performs a history backwards search.
Implementation differences
The vsql implementation of the tecla library deviates from the tecla documentation in the following ways:
Unlike the standard tecla library, which saves all executed lines in the command history, vsql only saves unique non-empty lines.
vsql standardizes the name and location of the history file (~/.vsql_history).
vsql does not support 8-bit meta characters. This can affect international character sets, meta keys, and locales. You can verify that a meta character sends an escape by setting the EightBitInput X resource to False. You can do this in the following ways:
Add the following to ~/.Xdefaults:
XTerm*EightBitInput: False
Start an xterm session with the -xrm '*EightBitInput: False'.
1.9 - vsql environment variables
Set one or more of the following environment variables to be used by the defined properties automatically, each time you start vsql:.
Set one or more of the following environment variables to be used by the defined properties automatically, each time you start vsql:
PAGER
If the query results do not fit on the screen, they are piped through this command. Typical values are more or less. The default is platform-dependent. Use the \pset command to enable/disable the pager.
VSQL_CLIENT_LABEL
The label to identify the vsql client in various system tables like SESSIONS. This is an alternative to setting the client label with the --label option or SET_CLIENT_LABEL, but if either of these is used, they take precedence over VSQL_CLIENT_LABEL.
VSQL_DATABASE
The database to which you are connecting. For example, VMart.
TMPDIR
Directory for storing temporary files. The default is platform-dependent. On Unix-like systems the default is /tmp.
VSQL_EDITOR EDITOR VISUAL
Editor used by the \e command. The variables are examined in the order listed; the first that is set is used.
By default, the vsql program reads configuration files from the user's home directory. In cases where this is not desirable, the configuration file location can be overridden by setting the VSQL_HOME environment variable in a way that does not require modifying a shared resource.
VSQL_HOST
Host name or IP address of the Vertica node.
VSQL_PASSWORD
The database password. Using this environment variable increases site security by precluding the need to enter the database password on the command line.
Specifies whether and how clients such as admintools use SSL when connecting to servers.
VSQL_USER
User name to use for the connection.
1.10 - Locales
The default terminal emulator under Linux is gnome-terminal, although xterm can also be used.
The default terminal emulator under Linux is gnome-terminal, although xterm can also be used.
Vertica recommends that you use gnome-terminal with vsql in UTF-8 mode, which is its default.
To change settings on Linux
From the tabs at the top of the vsql screen, select Terminal.
Click Set Character Encoding.
Select Unicode (UTF-8).
Note
This works well for standard keyboards. xterm has a similar UTF-8 option.
To change settings on Windows using PuTTy
Right click the vsql screen title bar and select Change Settings.
Click Window and click Translation.
Select UTF-8 in the drop-down menu on the right.
Notes
vsql has no way of knowing how you have set your terminal emulator options.
The tecla library is prepared to do POSIX-type translations from a local encoding to UTF-8 on interactive input, using the POSIX LANG, etc., environment variables. This could be useful to international users who have a non-UTF-8 keyboard. See the tecla documentation for details.
Vertica recommends the following (or whatever other .UTF-8 locale setting you find appropriate):
export LANG=en_US.UTF-8
The vsql \locale command invokes and tracks the server SET LOCALE TO command, described. vsql itself currently does nothing with this locale setting, but rather treats its input (from files or from tecla), all its output, and all its interactions with the server as UTF-8. vsql ignores the POSIX locale variables, except for any "automatic" uses in printf, and so on.
1.11 - Entering data with vsql
You often need to insert literal data when using vsql.
You often need to insert literal data when using vsql. For example:
Adding a row of data to a table using an INSERT statement.
Adding multiple rows of data through a COPY FROM STDIN statement.
The following table lists the data types that Vertica supports, and the format you use to enter that data in queries when using vsql.
Data Type
Inserting to vsql using
Example Use in INSERT INTO table...
For More Information See...
Binary types, such as BINARY and VARBINARY
Helper functions such as HEX_TO_BINARY, octal strings, specified data format in COPY statements, casting string values to binary.
Before starting up, vsql attempts to read and execute commands from the system-wide vsqlrc file and the user's ~/.vsqlrc file.
Before starting up, vsql attempts to read and execute commands from the system-wide vsqlrc file and the user's ~/.vsqlrc file. The command-line history is stored in the file ~/.vsql_history.
Tip
If you want to save your old history file, open another terminal window and save a copy to a different file name.
1.13 - Exporting data using vsql
You can use for simple data-export tasks by changing its output format options so the output is suitable for importing into other systems (tab-delimited or comma-separated files, for example).
You can use vsql for simple data-export tasks by changing its output format options so the output is suitable for importing into other systems (tab-delimited or comma-separated files, for example). These options can be set either from within an interactive vsql session, or through command-line arguments to the vsql command (making the export process suitable for automation through scripting). After you have set vsql's options so it outputs the data in a format your target system can read, you run a query and capture the result in a text file.
The following table lists the meta-commands and command-line options that are useful for changing the format of vsql's output.
The following example demonstrates disabling padding and column headers in the output, and setting a field separator to dump a table to a tab-separated text file within an interactive session.
=> SELECT * FROM my_table;
 a |   b   | c
---+-------+---
 a | one   | 1
 b | two   | 2
 c | three | 3
 d | four  | 4
 e | five  | 5
(5 rows)
=> \a
Output format is unaligned.
=> \t
Showing only tuples.
=> \pset fieldsep '\t'
Field separator is "    ".
=> \o dumpfile.txt
=> select * from my_table;
=> \o
=> \! cat dumpfile.txt
a       one     1
b       two     2
c       three   3
d       four    4
e       five    5
Note
You could encounter issues with empty strings being converted to NULLs or the reverse using this technique. You can prevent any confusion by explicitly setting null values to output a unique string such as NULLNULLNULL (for example, \pset null 'NULLNULLNULL'). Then, on the import end, convert the unique string back to a null value. For example, if you are copying the file back into a Vertica database, you would give the argument NULL 'NULLNULLNULL' to the COPY statement.
When logged into one of the database nodes, you can create the same output file directly from the command line by passing the right parameters to vsql:
$ vsql -U username -F $'\t' -At -o dumpfile.txt -c "SELECT * FROM my_table;"
Password:
$ cat dumpfile.txt
a       one     1
b       two     2
c       three   3
d       four    4
e       five    5
If you want to convert null values to a unique string as mentioned earlier, you can add the argument -P null='NULLNULLNULL' (or whatever unique string you choose).
By adding the -w vsql command-line option to the example command line, you could use the command within a batch script to automate the data export. However, the script would contain the database password as plain text. If you take this approach, you should prevent unauthorized access to the batch script, and also have the script use a database user account that has limited access.
To set the field separator value to a control character, use your shell's control character escape notation. In Bash, you specify a control character in an argument using a dollar sign ($) followed by a string contained in single quotes. This string can contain C-string escapes (such as \t for tab), or a backslash () followed by an octal value for the character you want to use.
The following example demonstrates setting the separator character to tab (\t), vertical tab (\v) and the octal value of vertical tab (\013).
$ vsql -At -c "SELECT * FROM testtable;"
A|1|2|3
B|4|5|6

$ vsql -F $'\t' -At -c "SELECT * FROM testtable;"
A       1       2       3
B       4       5       6

$ vsql -F $'\v' -At -c "SELECT * FROM testtable;"
A
 1
  2
   3
B
 4
  5
   6
$ vsql -F $'\013' -At -c "SELECT * FROM testtable;"
A
 1
  2
   3
B
 4
  5
   6
1.14 - Copying data using vsql
You can use vsql to copy data between two Vertica databases.
You can use vsql to copy data between two Vertica databases. This technique is similar to the technique explained in Exporting data using vsql, except instead of having vsql save data to a file for export, you pipe one vsql's output to the input of another vsql command that runs a COPY statement from STDIN. This technique can also work for other databases or applications that accept data from an input stream.
The easiest way to copy using vsql is to log in to a node of the target database, then issue a vsql command that connects to the source Vertica database to dump the data you want. For example, the following command copies the store.store_sales_fact table from the vmart database on node testdb01 to the vmart database on the node you are logged into:
The above example copies the data only, not the table design. The target table for the data copy must already exist in the target database. You can export the design of the table using EXPORT_OBJECTS or EXPORT_CATALOG.
If you are using the Bash shell, you can escape special delimiter characters. For example, DELIMITER E'\t' specifies tab. Shells other than Bash may have other string-literal syntax.
Monitoring progress (optional)
You may want some way of monitoring progress when copying large amounts of data between Vertica databases. One way of monitoring the progress of the copy operation is to use a utility such as Pipe Viewer that pipes its input directly to its output while displaying the amount and speed of data it passes along. Pipe Viewer can even display a progress bar if you give it the total number of bytes or lines you expect to be processed. You can get the number of lines to be processed by running a separate vsql command that executes a SELECT COUNT query.
Note
Pipe Viewer isn't a standard Linux command, so you will need to download and install it yourself. See the Pipe Viewer page for download packages and instructions. Vertica does not support Pipe Viewer. Install and use it at your own risk.
The following command demonstrates how you can use Pipe Viewer to monitor the progress of the copy shown in the prior example. The command is complicated by the need to get the number of rows that will be copied, which is done using a separate vsql command within a Bash backquote string, which executes the string's contents and inserts the output of the command into the command line. This vsql command just counts the number of rows in the store.store_sales_fact table.
While running, the above command displays a progress bar that looks like this:
0:00:39 [12.6M/s] [=============================> ] 50% ETA 00:00:40
1.15 - Output formatting examples
By default, Vertica formats query output as follows:.
By default, Vertica formats query output as follows:
=> SELECT DISTINCT category_description FROM product_dimension ORDER BY category_description;
       category_description
----------------------------------
 Food
 Medical
 Misc
 Non-food
(4 rows)
You can control the format of query output in various ways with the \pset command—for example, change the border:
=> \pset border 2
Border style is 2.
=> SELECT DISTINCT category_description FROM product_dimension ORDER BY category_description;
+----------------------------------+
|       category_description       |
+----------------------------------+
| Food                             |
| Medical                          |
| Misc                             |
| Non-food                         |
+----------------------------------+
(4 rows)
=> \pset border 0
Border style is 0.
=> SELECT DISTINCT category_description FROM product_dimension ORDER BY category_description;
      category_description
--------------------------------
Food
Medical
Misc
Non-food
(4 rows)
The following sequence of pset commands change query output in several ways:
Set border style to 1.
Remove column alignment.
Change the field separator to a comma.
Remove column headings
=> \pset border 1
Border style is 1.
=> \pset format unaligned
Output format is unaligned.
=> \pset fieldsep ','
Field separator is ",".
=> \pset tuples_only
Showing only tuples.
=> SELECT product_key, product_description, category_description FROM product_dimension LIMIT 10;
1,Brand #2 bagels,Food
1,Brand #1 butter,Food
2,Brand #6 chicken noodle soup,Food
3,Brand #11 vanilla ice cream,Food
4,Brand #14 chocolate chip cookies,Food
4,Brand #12 rash ointment,Medical
6,Brand #18 bananas,Food
7,Brand #25 basketball,Misc
8,Brand #27 french bread,Food
9,Brand #32 clams,Food
The following example uses meta-commands to toggle output format—in this case, \a (alignment), \t (tuples only), and -x (extended display):
The Vertica client driver libraries provide interfaces for connecting your client applications (or third-party applications such as Cognos and MicroStrategy) to your Vertica database.
The Vertica client driver libraries provide interfaces for connecting your client applications (or third-party applications such as Cognos and MicroStrategy) to your Vertica database. The drivers simplify exchanging data for loading, report generation, and other common database tasks.
There are three separate client drivers:
Open Database Connectivity (ODBC)—the most commonly-used interface for third-party applications and clients written in C, Python, PHP, Perl, and most other languages.
Java Database Connectivity (JDBC)—used by clients written in the Java programming language.
ActiveX Data Objects for .NET (ADO.NET)—used by clients developed using Microsoft's .NET Framework and written in C#, Visual Basic .NET, and other .NET languages.
Client driver standards
The Vertica client drivers are compatible with the following driver standards:
The ODBC driver complies with version 3.5.1 of the ODBC standard.
Vertica's JDBC driver is a type 4 driver that complies with the JDBC 3.0 standard. It is compiled using JDK version 1.5, and is compatible with client applications compiled using JDK versions 1.5 and 1.6.
ADO.NET drivers conform to .NET framework 3.0 specifications.
2.1 - Client driver and server version compatibility
Backward compatibility between Vertica server and client drivers works in both directions; Vertica server is compatible with all previous versions of client drivers, and all new client drivers are compatible with most versions of Vertica server.
Backward compatibility between Vertica server and client drivers works in both directions; Vertica server is compatible with all previous versions of client drivers, and all new client drivers are compatible with most versions of Vertica server. This compatibility lets you upgrade your Vertica server without having to immediately upgrade your client software, and use new client software with older versions of Vertica. Occasionally, however, individual features of a new server version might be unavailable through older drivers.
Client
Compatible Server Versions
ODBC
7.1.x and above
JDBC
7.2.x and above
ADO.NET
7.2.x and above
FIPS-enabled ODBC
FIPS-enabled 8.0.x and above (FIPS cannot be enabled in Vertica 9.3.x and 10.0.x.).
FIPS-enabled JDBC
FIPS-enabled 8.1.x and above (FIPS cannot be enabled in Vertica 9.3.x and 10.0.x.)
2.2 - Client drivers
You must install the Vertica client drivers to access Vertica from your client application.
You must install the Vertica client drivers to access Vertica from your client application. The drivers create and maintain connections to the database and provide APIs that your applications use to access your data. The client drivers support connections using JDBC, ODBC, and ADO.NET.
Client driver standards
The client drivers support the following standards:
ODBC drivers conform to ODBC 3.5.1 specifications.
JDBC drivers conform to JDK 5 specifications.
ADO.NET drivers conform to .NET framework 3.0 specifications.
2.2.1 - Installing and configuring client drivers
You can access your Vertica database with various programming languages and tools by installing the appropriate client driver.
You can access your Vertica database with various programming languages and tools by installing the appropriate client driver. The following table lists the required client drivers for each access method:
All available client drivers for Windows are included in the Vertica Client Drivers and Tools installer.
All available client drivers for Windows are included in the Vertica Client Drivers and Tools installer. This installs the following components on systems that meet the prerequisites. The individual components may require additional configuration before use, so navigate to their pages linked below for more information:
The Vertica Client Drivers and Tools for Windows has basic system prerequisite requirements.
The Vertica Client Drivers and Tools for Windows has basic system prerequisite requirements. The pack also requires that specific Microsoft components be installed for full integration.
For a list of all prerequisites, see Client drivers support in the Supported Platforms document.
Fully update your system
Before you install the Vertica driver package, verify that your system is fully up to date with all Windows updates and patches. See the documentation for your version of Windows for instructions on how to run Windows update. The Vertica client libraries and vsql executable install updated Windows libraries that depend on Windows service packs. Be sure to resolve any issues that block the installation of Windows updates.
If your system is not fully up-to-date, you may receive error messages about missing libraries such as api-ms-win-crt-runtime-l1-1-0.dll when starting vsql.
2.2.1.1.1.1 - .NET framework
The Vertica Client Drivers and Tools for Windows requires and prompts you to install the Microsoft .NET Framework 4.6 if it is not installed.
The Vertica Client Drivers and Tools for Windows requires and prompts you to install the Microsoft .NET Framework 4.6 if it is not installed.
The Vertica Client Drivers and Tools for Windows installer provides a Visual Studio plug-in which allows you to use Vertica as a Visual Studio Data Source for Visual Studio 2012, 2013, or 2015.
The Vertica Client Drivers and Tools for Windows installer provides a Visual Studio plug-in which allows you to use Vertica as a Visual Studio Data Source for Visual Studio 2012, 2013, or 2015. The connection properties for the plug-in are the same as ADO.NET connection properties.
Important
Important: You must have Visual Studio and the matching SDK installed to use the Visual Studio plug-in.
After installing the plug-in, you can use it to access your Vertica database from within Visual Studio. If you do not have the SDK installed, download the SDK specific to your version of Visual Studio.
Note
For Visual Studio 2015, you do not need to download the SDK separately as it is included as an installation option with the Visual Studio installation. For more information, refer to the Microsoft documentation.
If the Microsoft Visual Studio SDK is missing when you begin the installation, a dialog box will open to install it. You can choose to ignore this dialog box.
Configuring SSDT-BI integration
The Vertica Client Drivers and Tools for Windows installer provides SSDT-BI (Visual Studio 2012, 2013, or 2015) integration. To use SSDT-BI, follow this process:
Install the SSDT-BI development tool add-on for Visual Studio.
Verify that SQL Server is installed on the same or a different machine.
Verify that the SQL Server Shared Features for SSDT-BI have been activated.
You can then develop packages using SSDT-BI, creating your projects using SQL Server's SSIS, SSAS, SSRS features. To use these features, you must connect to Vertica through the Vertica ADO.NET driver (for SSIS and SSRS) or the OLE DB driver (for SSAS).
Use SQL Server 2012, 2014 or 2016. The Vertica Client Drivers and Tools for Windows installer enables support for the following:
SQL Server 2012, 2014, and 2016:
SQL Server Integration Services (SSIS)
SQL Server Reporting Services (SSRS)
SQL Server Analysis Services (SSAS)
SQL Server using 2012, 2013, and 2015—SQL Server Data Tool - Business Intelligence (SSDT-BI)
Note
For SQL Server 2012, you can use either SQL Server 2012 or SQL Server 2012 SP1.
To use the enhanced Vertica .NET support, you must first install SQL Server. Then, you can install the Client Drivers and Tools for Windows. The following components must be installed on the SQL server:
For...
Install...
SSAS
The Analysis Services Instance Feature.
SSRS
The Reporting Services Instance Feature.
SSIS (Data Type Mappings)
The SQL Server Integration Services Shared Feature.
SSDT-BI (Visual Studio 2012, 2013, or 2015)
SQL Server Data Tool - Business Intelligence Shared Feature only after installing Microsoft Visual Studio 2012, 2013, or 2015.
2.2.1.1.2 - The visual studio plug-in for windows
The Visual Studio plug-in for Windows is installed as part of the Client Drivers and Tools for Windows.
The Visual Studio plug-in for Windows is installed as part of the Client Drivers and Tools for Windows.
For information on how the Visual Studio plug-in integrates with Microsoft components previously installed on your system, see Microsoft components.
2.2.1.1.2.1 - Visual studio limitations
Visual Studio 2012 May Require Update 3.
Visual Studio 2012 May Require Update 3
You may need to install update 3 to Visual Studio 2012 if:
You launch Server Explorer to view and work with your Vertica server, but the Vertica data source is not visible.
You create a SSAS cube, connect to Vertica, and find either an empty list of tables or tables not functioning correctly.
This issue does not occur for other versions of Visual Studio supported by Vertica.
Results Viewer Limited to 655 Columns
The Visual Studio results viewer cannot execute a query that includes more than 655 columns. If a table includes more than 655 columns, select specific columns (up to 655 total) rather than selecting all columns.
Manually Refresh Settings for Visual Studio
If, after installing the Visual Studio plug-in, you do not see Vertica listed as a data provider, manually refresh.
To do so, run devenv.exe/setup, which you can find in the Visual Studio installation folder.
SQL Pane Issues
ALTER TABLE or CREATE TABLE
You use Visual Studio 2012, 2013, or 2015 and issue the ALTER TABLE or CREATE TABLE statement in the SQL pane. However, a message displays telling you that the statement is not supported. To resolve the error, click Continue, and the query executes.
Queries with Semicolons
You use Visual Studio 2012, 2013, or 2015 and execute a SQL query in the SQL pane. If you include a semicolon (;) with your query, the query executes, but the result returned cannot be edited. To avoid this issue, enter the same query in the SQL pane without the semicolon.
Quoting Boolean Values
You use Visual Studio 2012, 2013, or 2015 to connect to the Vertica database and execute a SQL query in the SQL pane. When attempting to insert a value into a Boolean column without putting quotes around the value, subsequent execution of the SQL statement returns an error. To work around this issue, include quotes.
Uninstalling Client Drivers and Tools for Windows Error
There is a scenario where an uninstall of the Client Drivers and Tools for Windows package fails with a message that the .NET framework is required. What follows is the scenario that causes this issue.
You Install the Client Drivers and Tools for Windows.
You then install Visual Studio 2012, which includes installation of the .NET framework 4.0 or 4.5.
You uninstall the .NET framework using the Windows Control Panel.
You then attempt to uninstall the Client Drivers and Tools for Windows. The uninstall fails with the message that .NET framework is required.
Perform the following to correct this issue:
Reinstall the .NET framework 4.0 or 4.5 manually, using the Windows Control Panel.
Uninstall the Client Drivers and Tools for Windows.
2.2.1.1.3 - Uninstalling, modifying, or repairing the client drivers and tools
To uninstall, modify, or repair the client drivers and tools, run the Client Drivers and Tools for Windows installer.
To uninstall, modify, or repair the client drivers and tools, run the Client Drivers and Tools for Windows installer.
The installer provides three options:
Action
Description
Modify
Remove installed client drivers and tools or install missing client drivers and tools.
Repair
Reinstall already-installed client drivers and tools.
Uninstall
Uninstall all of the client drivers and tools.
Silently uninstall the client drivers and tools
As a Windows Administrator, open a command-line session, and change directory to the folder that contains the installer.
Run the command:
VerticaSetup.exe -q -uninstall
The client drivers and tools are silently uninstalled.
2.2.1.2 - FIPS client drivers
Vertica offers a FIPS-compliant version of the ODBC and JDBC client drivers.
Vertica offers a FIPS-compliant version of the ODBC and JDBC client drivers.
2.2.1.2.1 - Installing the FIPS client driver for JDBC
Vertica offers a JDBC client driver that is compliant with the Federal Information Processing Standard (FIPS).
Vertica offers a JDBC client driver that is compliant with the Federal Information Processing Standard (FIPS). Use this JDBC client driver to access systems that are FIPS-compatible. For more information on FIPS, see Federal information processing standard.
Implementing FIPS on a JDBC client requires a third-party JRE extension called BouncyCastle, a collection of APIs used for cryptography. Use BouncyCastle APIs with JDK 1.7 and 1.8, and a supported FIPS-compliant operating system.
Important
When using the JDBC FIPS-compliant client, expect a slight delay for the client to establish a secure connection with the database. If necessary, increase your system's entropy to ensure a fast and secure connection.
The following procedure adds the FIPS BouncyCastle .jar as a JVM JSSE provider:
Download the BouncyCastle FIPS .jar file bc-fips-1.0.0.jar.
Add bc-fips-1.0.0.jar as a JRE library extension:
path/to/jre/lib/ext/bc-fips-1.0.0.jar
Add BouncyCastle as an SSL security provider in <path to jre>/lib/security/java.security:
Set the default type for the KeyStore implementation to BCFKS in path/to/jre/lib/security/java.security:
keystore type=BCFKS
ssl.keystore.type=BCFKS
Note
If you are using FIPS with BouncyCastle, you must create all client keys and certificates with the BCFKS store type, including the Vertica-to-Kafka keys and certificates.
The FIPS client installer checks your host system for the value of the sysctl parameter, crypto.fips_enabled. You must set this parameter to 1 (enabled). If your host is not enabled, the client does not install.
You can optionally add the vsql client to your PATH environment variable so that you do not need to enter its full path to run it. To do so, add the following to the .profile file in your home directory or the global /etc/profile file:
export PATH=$PATH:/opt/vertica/bin
How the client searches for OpenSSL libraries
When you launch the client application to connect to the server, the client searches for and loads the OpenSSL libraries libcrypto.so.10 and libssl.so.10 for supported OpenSSL versions:
The client first checks to see if LD_LIBRARY_PATH is set.
If the LD_LIBARY_PATH location does not include the libraries, it checks RunPath, either /opt/vertica/lib or within the ODBC or vsql directory structure (../lib).
Important
The LD_LIBRARY_PATH, if set, directs the search path for the OpenSSL libraries. The client loads the libraries from any set or preset LD_LIBRARY_PATH location.
The following figure depicts the search process for the OpenSSL libraries:
2.2.1.3 - JDBC client driver
The Vertica JDBC client driver conforms to JDK 5 specifications and provides an interface for communicating with the Vertica database with Java.
The Vertica JDBC client driver conforms to JDK 5 specifications and provides an interface for communicating with the Vertica database with Java. For details on this and other APIs, see API Reference.
Download the version of the JDBC client driver from the Client Drivers downloads page compatible with your version of Vertica.
Copy the .jar file to a directory in your Java CLASSPATH on every client system with which you want to access Vertica. You can either:
Copy the .jar file to its own directory (such as
/opt/vertica/java/lib) and then add that directory to your CLASSPATH (recommended). See Modifying the Java CLASSPATH for details.
Copy the .jar file to directory that is already in your CLASSPATH (for example, a directory where you have placed other .jar files on which your application depends).
Copy the .jar file to the system-wide Java Extensions directory. The exact location differs between operating systems. Some examples include:
The CLASSPATH environment variable contains a list of directories where the Java runtime looks for library class files.
The CLASSPATH environment variable contains a list of directories where the Java runtime looks for library class files. For your Java client code to access Vertica, you must add to the CLASSPATH the directory containing the Vertica JDBC .jar.
Using symbolic links for the CLASSPATH
You can optionally add to the CLASSPATH a symbolic link vertica-jdbc-x.x.x.jar (where x.x.x is a version number) that points to the JDBC library .jar file, rather than the .jar file itself.
Using the symbolic link ensures that any updates to the JDBC library .jar file (which will use a different filename) will not invalidate your CLASSPATH setting, since the symbolic link's filename will remain the same. You just need to update the symbolic link to point at the new .jar file.
Linux and OS X
The following examples use a POSIX-compliant shell.
Provide the class paths to the .jar, .zip, or .class files.
C:> SET CLASSPATH=classpath1;classpath2...
For example:
C:> SET CLASSPATH=C:\java\MyClasses\vertica-jdbc-x.x.x.jar
As with the Linux/UNIX settings, this setting only lasts for the current session. To set the CLASSPATH permanently, set an environment variable:
On the Windows Control Panel, click System.
Click Advanced or Advanced Systems Settings.
Click Environment Variables.
Under User variables, click New.
In the Variable name box, type CLASSPATH.
In the Variable value box, type the path to the Vertica JDBC .jar file on your system (for example,
C:\Program Files (x86)\Vertica\JDBC\vertica-jdbc-x.x.x.jar)
Specifying the library directory in the Java command
Another, OS-agnostic way to tell the Java runtime where to find the Vertica JDBC driver is to explicitly add the directory containing the .jar file to the Java command line using either the -cp or -classpath argument. For example, you can start your client application with:
Your Java IDE may also let you add directories to your CLASSPATH, or let you import the Vertica JDBC driver into your project. See your IDE documentation for details.
2.2.1.4 - ODBC client driver
The Vertica ODBC client driver provides an interface for creating client applications with several languages:.
The Vertica ODBC client driver provides an interface for creating client applications with several languages:
Installing Vertica from the RPM automatically installs the ODBC client driver, so you do not need to install them again on the machine running Vertica. To use the ODBC client driver in this case, create a DSN.
To install the ODBC client driver manually on other machines:
Log in to the client system as root.
Verify that your system has a supported ODBC driver manager.
Download the ODBC client driver for Linux in the format appropriate for your distribution.
Install or extract the driver:
If you downloaded the .rpm, install the driver:
Note
If the client driver is already installed on your system (either from a manual installation or from automatic installation from the Vertica RPM) and you attempt to reinstall them manually, you will receive error messages. To bypass these errors and overwrite the existing driver installations, use the --force flag.
$ rpm -Uvh driver_name.rpm
If you downloaded the .tar, create the /opt/vertica/ directory if it does not already exist, copy the .tar to it, navigate to it, and extract the .tar:
/opt/vertica/lib64/ (64-bit) or /opt/vertica/lib/ (32-bit): Contains library files.
Set the following ODBC driver settings in vertica.ini. For details on each, see ODBC driver settings:
ErrorMessagesPath: Required, the path of the directory containing the ODBC driver's error message files.
ODBCInstLib: The path to the ODBC installer library. This is only required if the driver manager's installation library is not in the environment variables LD_LIBRARY_PATH or LIB_PATH.
DriverManagerEncoding: The UTF encoding standard used by the driver manager. This is only required if your driver manager does not use UTF-8.
The following is an example configuration in vertica.ini:
Use encoding for the 64-bit UNIXODBC driver manager.
Use the error messages defined in the standard Vertica 64-bit ODBC driver installation directory.
You can only have one installation per version of the ODBC driver on a macOS system. This is because each installation is identified by a package ID and version number, and package ID does not change between versions of the driver.
To install the ODBC client driver on macOS:
Verify that your system has a compatible driver manager. The driver is designed to be used with the standard iODBC Driver Manager that ships with macOS. You can also use unixODBC.
If you installed a previous version of the ODBC driver, your system might already have a registered driver named "Vertica". You must remove or rename this older version of the driver before installing a new version from the .pkg installer. Renaming the older version allows you to retain the old version after you install the new one.
Upgrade: Newly installed versions of the Vertica ODBC driver for macOS automatically upgrade the relevant driver system settings. Any DSNs associated with a previous version of the driver are not affected, except that they begin using the newer version of the driver.
Downgrade: Run the uninstall script to remove the current version of the Vertica ODBC driver for macOS. Complete this step before installing an older driver version.
Run the installer and follow the prompts to upgrade the driver. The installer upgrades existing drivers in place.
Reboot your system.
2.2.1.4.3 - Uninstalling ODBC
If you installed ODBC with the .rpm:.
Linux
If you installed ODBC with the .rpm:
$ rpm -e package_name
If you installed ODBC with the .tar, delete the directory manually.
macOS
Uninstalling the macOS ODBC Client-Driver does not remove any existing DSNs associated with the driver.
To uninstall:
Open a terminal window.
Run the command:
sudo /Library/Vertica/ODBC/bin/Uninstall
Windows
Open the Add or Remove Programs menu.
EIther uninstall the Vertica Client Installer to remove all client drivers from the system or, to only uninstall ODBC, uninstall the following applications:
Vertica ODBC Driver (32 Bit)
Vertica ODBC Driver (64 Bit)
2.2.1.4.4 - Creating an ODBC data source name (DSN)
A Data Source Name (DSN) is the logical name that is used by Open Database Connectivity (ODBC) to refer to the driver and other information that is required to access data from a data source.
A Data Source Name (DSN) is the logical name that is used by Open Database Connectivity (ODBC) to refer to the driver and other information that is required to access data from a data source. Whether you are developing your own ODBC client code or you are using a third-party tool that needs to access Vertica using ODBC, you need to configure and test a DSN. The method you use depends upon the client operating system you are using.
Refer to the following sections for information specific to your client operating system.
2.2.1.4.4.1 - Creating an ODBC DSN for Linux
You define DSN on Linux and other UNIX-like platforms in a text file.
You define DSN on Linux and other UNIX-like platforms in a text file. Your client's driver manager reads this file to determine how to connect to your Vertica database. The driver manager usually looks for the DSN definitions in two places:
/etc/odbc.ini
~/.odbc.ini (a file named .odbc.ini in the user's home directory)
Users must be able to read the odbc.ini file in order to use it to connect to the database. If you use a global odbc.ini file, consider creating a UNIX group with read access to the file. Then, add the users who need to use the DSN to this group.
The structure of these files is the same—only their location differs. If both files are present, the ~/.odbc.ini file usually overrides the system-wide /etc/odbc.ini file.
Note
See your ODBC driver manager's documentation for details on where these files should be located and any other requirements.
odbc.ini file structure
The odbc.ini is a text file that contains two types of lines:
Section definitions, which are text strings enclosed in square brackets.
Parameter definitions, which contain a parameter name, an equals sign (=), and then the parameter's value.
Caution
The unixODBC driver manager supports parameter values of up to 1000 characters in odbc.ini. If your parameter value is greater than 1000 characters (for example, OAuthAccessToken), you must pass it through a connection string rather than specifying it in odbc.ini.
The first section of the file is always named [ODBC Data Sources], and contains a list of all the DSNs that the odbc.ini file defines. The parameters in this section are the names of the DSNs, which appear as section definitions later in the file. The value is a text description of the DSN and has no function. For example, an odbc.ini file that defines a single DSN named Vertica DSN could have this ODBC Data Sources section:
[ODBC Data Sources]
VerticaDSN = "vmartdb"
Appearing after the ODBC data sources section are sections that define each DSN. The name of a DSN section must match one of the names defined in the ODBC Data Sources section.
Configuring the odbc.ini file:
To create or edit the DSN definition file:
Using the text editor of your choice, open odbc.ini or ~/.odbc.ini.
Create an ODBC Data Sources section and define a parameter:
Whose name is the name of the DSN you want to create
Whose value is a description of the DSN
For example, to create a DSN named VMart, you would enter:
[ODBC Data Sources]
VMart = "VMart database on Vertica"
Create a section whose name matches the DSN name you defined in step 2. In this section, you add parameters that define the DSN's settings. The most commonly-defined parameters are:
Description – Additional information about the data source.
Driver – The location and designation of the Vertica ODBC driver, or the name of a driver defined in the odbcinst.ini file (see below). For future compatibility, use the name of the symbolic link in the library directory, rather than the library file:
(
/opt/vertica/lib, on 32-bit clients
/opt/vertica/lib64, on 64-bit clients
For example, the symbolic link for the 64-bit ODBC driver library is:
/opt/vertica/lib64/libverticaodbc.so
The symbolic link always points to the most up-to-date version of the Vertica client ODBC library. Use this link so that you do not need to update all of your DSNs when you update your client drivers.
Database – The name of the database running on the server. This example uses vmartdb for the vmartdb.
ServerName — The name of the server where Vertica is installed. Use localhost if Vertica is installed on the same machine.
You can provide an IPv4 address, IPv6 address, or host name.
In mixed IPv4/IPv6 networks, the DNS server configuration determines which IP version address is sent first. Use the PreferredAddressFamily option to force the connection to use either IPv4 or IPv6.
UID — Either the database superuser (same name as database administrator account) or a user that the superuser has created and granted privileges. This example uses the user name dbadmin.
PWD —The password for the specified user name. This example leaves the password field blank.
Port — The port number on which Vertica listens for ODBC connections. For example, 5433.
ConnSettings — Can contain SQL commands separated by a semicolon. These commands can be run immediately after connecting to the server.
SSLKeyFile — The file path and name of the client's private key. This file can reside anywhere on the system.
SSLCertFile —The file path and name of the client's public certificate. This file can reside anywhere on the system.
Locale — The default locale used for the session. By default, the locale for the database is: en_US@collation=binary (English as in the United States of America). Specify the locale as an ICU Locale. See the ICU User Guide (http://userguide.icu-project.org/locale) for a complete list of parameters that can be used to specify a locale.
PreferredAddressFamily:
The IP version to use if the client and server have both IPv4 and IPv6 addresses and you have provided a host name, one of the following:
ipv4: Connect to the server using IPv4.
ipv6: Connect to the server using IPv6.
none: Use the IP address provided by the DNS server.
Instead of giving the path of the ODBC driver library in your DSN definitions, you can use the name of a driver defined in the odbcinst.ini file. This method is useful method if you have many DSNs and often need to update them to point to new driver libraries. It also allows you to set some additional ODBC parameters, such as the threading model.
Just as in the odbc.ini file, odbcinst.ini has sections. Each section defines an ODBC driver that can be referenced in the odbc.ini files.
In a section, you can define the following parameters:
Description— Additional information about the data source.
Driver— The location and designation of the Vertica ODBC driver, such as
/opt/vertica/lib64/libverticaodbc.so
If you are using the unixODBC driver manager, you should also add an ODBC section to override its standard threading settings. By default, unixODBC serializes all SQL calls through ODBC, which prevents multiple parallel loads. To change this default behavior, add the following to your odbcinst.ini file:
[ODBC]
Threading = 1
Configuring additional ODBC settings
On Linux and UNIX systems, you need to configure some additional driver settings before you can use your DSN. See ODBC driver settings for details.
2.2.1.4.4.1.1 - Testing an ODBC DSN using isql
The unixODBC driver manager includes a utility named isql, which is a simple ODBC command-line client.
The unixODBC driver manager includes a utility named isql, which is a simple ODBC command-line client. It lets you to connect to a DSN to send commands and receive results, similarly to vsql.
To use isql to test a DSN connection:
Run the following command:
$ isql –v DSNname
Where DSNname is the name of the DSN you created.
A connection message and a SQL prompt display. If they do not, you could have a configuration problem or you could be using the wrong user name or password.
Try a simple SQL statement. For example:
SQL> SELECT table_name FROM tables;
The isql tool returns the results of your SQL statement.
Note
If you have not set the ErrorMessagesPath in the additional driver configuration settings, any errors during testing will trigger a missing error message file ("The error message NoSQLGetPrivateProfileString could not be found in the en-US locale"). See ODBC driver settings for more information.
2.2.1.4.4.2 - Creating an ODBC DSN for windows clients
To create a DSN for Microsoft Windows clients, you must perform the following tasks:.
To create a DSN for Microsoft Windows clients, you must perform the following tasks:
2.2.1.4.4.2.1 - Setting up an ODBC DSN
A Data Source Name (DSN) is the ODBC logical name for the drive and other information the database needs to access data.
A Data Source Name (DSN) is the ODBC logical name for the drive and other information the database needs to access data. The name is used by Internet Information Services (IIS) for a connection to an ODBC data source.
This section describes how to use the Vertica ODBC Driver to set up an ODBC DSN. This topic assumes that the driver is already installed, as described in Installing Client Drivers on Windows.
To set up a DSN
Open the ODBC Administrator. For example, you could navigate to Start > Control Panel > Administrative Tools > Data Sources (ODBC).
Note
The method you use to open the ODBC Administrator depends on your version of Windows. Differences between Windows versions and Start Menu customizations could require you to take a different action to open the ODBC Administrator.
Decide if you want all users on your client system to be able to access to the DSN for the Vertica database.
If you want all users to have access, then click the System DSN tab.
Otherwise, click the User DSN tab to create a DSN that is only usable by your Windows user account.
Click Add to create a new DSN to connect to the Vertica database.
Scroll through the list of drivers in the Create a New Data Source dialog box to locate the Vertica driver. Select the driver, and then click Finish.
Note
If you have installed more than one version of the Vertica client drivers on your Windows client system, you may see multiple versions of the driver in this list. Choose the version that you know is compatible with your client application and Vertica Analytic Database server. If you are unsure, use the latest version of the driver.
The Vertica ODBC DSN configuration dialog box appears.
Click the More >>> button to view a description of the field you are editing and the connection string defined by the DSN.
Enter the information for your DSN. The following fields are required:
DSN Name — The name for the DSN. Clients use this name to identify the DSN to which they want to connect. The DSN name must satisfy the following requirements:
Its maximum length is 32 characters.
It is composed of ASCII characters except for the following: { } , ; ? * = ! @ \
It contains no spaces.
Server — The host name or IP address of the Vertica server to which you want to connect. Use localhost, if Vertica is installed on the same machine.
You can provide an IPv4 address, IPv6 address, or host name.
In mixed IPv4/IPv6 networks, the DNS server configuration determines which IP version address is sent first. Use the PreferredAddressFamily option to force the connection to use either IPv4 or IPv6.
The PreferredAddressFamily option is available on the Client Settings tab.
Backup Servers — A comma-separated list of host names or IP addresses used to connect to if the server specified by the Server field is down. Optional.
Database —The name of the Vertica database.
User Name — The name of the user account to use when connecting to the database. If the application does not supply its own user name when connecting to the DSN, this account name is used to log into the database.
The rest of the fields are optional. See DSN Parameters for detailed information about the DSN parameters you can define.
If you want to test your connection:
Enter at least a valid DSN name, Server name, Database, and either User name or select Windows authentication.
If you have not selected Windows authentication, you can enter a password in the Password box. Alternately, you can select Password for missing password to have the driver prompt you for a password when connecting.
Caution
Passwords entered into the Password box are saved, in plaintext, to the Windows registry.
Click Test Connection.
When you have finished editing and testing the DSN, click OK. The Vertica ODBC DSN configuration window closes, and your new DSN is listed in the ODBC Data Source Administrator window.
Click OK to close the ODBC Data Source Administrator.
Setting up a 32-Bit DSN on 64-Bit versions of Microsoft windows
On 64-bit versions of Windows, the default ODBC Data Source Administrator creates and edits DSNs that are associated with the 64-bit Vertica ODBC library.
Attempting to use these 64-bit DSNs with a 32-bit client application results in an architecture mismatch error. Instead, you must create a specific 32-bit DSN for 32-bit clients by running the 32-bit ODBC Administrator usually located at:
c:\Windows\SysWOW64\odbcad32.exe
This administrator window edits a set of DSNs that are associated with the 32-bit ODBC library. You can then use your 32-bit client applications with the DSNs you create with this version of the ODBC administrator.
2.2.1.4.4.2.2 - Encrypting passwords on ODBC DSN
When you install an ODBC driver and create a Data Source Name (DSN) the DSN settings are stored in the registry, including the password.
When you install an ODBC driver and create a Data Source Name (DSN) the DSN settings are stored in the registry, including the password. Encrypting passwords on ODBC DSN applies only to Windows systems.
Encrypting passwords on an ODBC data source name (DSN) provides security against unauthorized database access. The password is not encrypted by default and is stored in plain-text.
Note
ODBC DSN passwords that were created in Vertica ≤8.0.x are not encrypted when you upgrade to a higher version, regardless of encryption settings.
Enable password encryption
Use the EncryptPassword parameter to enable or disable password encryption for an ODBC DSN:
Use Windows Registry editor to determine if password encryption is enabled based on the value of EncryptPassword. Depending on the type of DSN you installed, check the following:
For a user DSN: HKEY_CURRENT_USER > Software > ODBC > ODBC.INI > dsn name > isPasswordEncrypted=<1/0>
For a system DSN: HKEY_LOCAL_MACHINE > Software > ODBC > ODBC.INI > dsn name > isPasswordEncrypted=<1/0>
For each DSN, the value of the isPasswordEncrypted parameter indicates the status of the password encryption, where 1 indicates an encrypted password and 0 indicates an unencrypted password.
2.2.1.4.4.2.3 - Testing an ODBC DSN using Excel
You can use Microsoft Excel to verify that an application can connect to an ODBC data source or other ODBC application.
You can use Microsoft Excel to verify that an application can connect to an ODBC data source or other ODBC application.
Open Microsoft Excel, and select Data > Get External Data > From Other Sources > From Microsoft Query.
When the Choose Data Source dialog box opens:
Select New Data Source, and click OK.
Enter the name of the data source.
Select the Vertica driver.
Click Connect.
When the Vertica Connection Dialog box opens, enter the connection information for the DSN, and click OK.
Click OK on the Create New Data Source dialog box to return to the Choose Data Source dialog box.
Select VMart_Schema*, and verify that the Use the Query Wizard check box is deselected. Click OK.
When the Add Tables dialog box opens, click Close.
When the Microsoft Query window opens, click the SQL button.
In the SQL window, write any simple query to test your connection. For example:
SELECT DISTINCT calendar_year FROM date_dimension;
* If you see the caution, "SQL Query can't be represented graphically. Continue anyway?" click **OK**. * The data values 2003, 2004, 2005, 2006, 2007 indicate that you successfully connected to and ran a query through ODBC.
Select File > Return Data to Microsoft Office Excel.
In the Import Data dialog box, click OK.
The data is now available for use in an Excel worksheet.
2.2.1.4.4.3 - Creating an ODBC DSN for macOS clients
You can use the Vertica ODBC Driver to set up an ODBC DSN.
You can use the Vertica ODBC Driver to set up an ODBC DSN. This procedure assumes that the driver is already installed, as described in Installing the ODBC client driver.
Locate and open the ODBC Administrator Tool after installation:
Navigate to Finder > Applications > Utilities.
Open the ODBC Administrator Tool.
Click the Drivers tab, and verify that the Vertica driver is installed.
Specify if you want all users on your client system to be able to access the DSN for the Vertica database:
If you want all users to have access, then click the System DSN tab.
Otherwise, click the User DSN tab to create a DSN that is only usable by your Macintosh user account.
Click Add... to create a new DSN to connect to the Vertica database.
Scroll through the list of drivers in the Choose A Driver dialog box to locate the Vertica driver. Select the driver, and then click OK. A dialog box opens that requests DSN parameter information.
In the dialog box, enter the Data Source Name (DSN) and an optional Description. To do so, click Add to insert keywords (parameters) and values that define the settings needed to connect to your database, including database name, server host, database user name (such as dbadamin), database password, and port. Then, click OK.
In the ODBC Administrator dialog box, click Apply.
After configuring the ODBC Administrator Tool, you may need to configure additional driver settings before you can use your DSN, depending on your environment. See Additional ODBC Driver Configuration Settings for details.
2.2.1.4.4.3.1 - Testing an ODBC DSN using iodbctest
The standard iODBC Driver Manager on OS X includes a utility named iodbctest that lets you test a DSN to verify that it is correctly configured.
The standard iODBC Driver Manager on OS X includes a utility named iodbctest that lets you test a DSN to verify that it is correctly configured. You pass this command a connection string in the same format that you would use to open an ODBC database connection. After configuring your DSN connection, you can run a query to verify that the connection works.
For example:
# iodbctest "DSN=VerticaDSN;UID=dbadmin;PWD=password"
iODBC Demonstration program
This program shows an interactive SQL processor
Driver Manager: 03.52.0607.1008
Driver: 07.01.0200 (verticaodbcw.so)
SQL> SELECT table_name FROM tables;
table_name
--------------------------------------------------------------------------------------------------------------------------------
customer_dimension
product_dimension
promotion_dimension
date_dimension
vendor_dimension
employee_dimension
shipping_dimension
warehouse_dimension
inventory_fact
store_dimension
store_sales_fact
store_orders_fact
online_page_dimension
call_center_dimension
online_sales_fact
numbers
result set 1 returned 16 rows.
2.2.1.4.4.4 - ODBC DSN connection properties
The following tables list the connection properties you can set in the DSNs for use with Vertica's ODBC driver.
The following tables list the connection properties you can set in the DSNs for use with Vertica's ODBC driver. To set these parameters, see Setting DSN connection properties.
Required connection properties
These connection properties are the minimum required to create a functioning DSN.
Note
If you use a host name (Servername) whose DNS entry resolves to multiple IP addresses, the client attempts to connect to the first IP address returned by the DNS. If a connection cannot be made to the first address, the client attempts to connect to the second, then the third, continuing until it either connects successfully or runs out of addresses.
Property
Description
Driver
The file path and name of the driver used.
Database
The name of the database running on the server.
Servername
The host name or IP address of any active node in a Vertica cluster.
You can provide an IPv4 address, IPv6 address, or host name.
In mixed IPv4/IPv6 networks, the DNS server configuration determines which IP version address is sent first. Use the PreferredAddressFamily option to force the connection to use either IPv4 or IPv6.
You can also use the aliases "server" and "host" for this property.
UID
The database username.
Optional properties
Property
Description
Port
The port number on which Vertica listens for ODBC connections.
Default: 5433
PWD
The password for the specified user name. You may insert an empty string to leave this property blank.
Default: None, login only succeeds if the user does not have a password set.
PreferredAddressFamily
The IP version to use if the client and server have both IPv4 and IPv6 addresses and you have provided a host name, one of the following:
ipv4: Connect to the server using IPv4.
ipv6: Connect to the server using IPv6.
none: Use the IP address provided by the DNS server.
Default: none
Advanced settings
Property
Description
AutoCommit
A Boolean value that controls whether the driver automatically commits transactions after executing a DML statement.
Default: true
BackupServerNode
A string containing the host name or IP address that client libraries can try to connect to if the host specified in ServerName is unreachable. Connection attempts continue until successful or until the list of server nodes is exhausted.
Valid values: Comma-separated list of servers optionally followed by a colon and port number.
ConnectionLoadBalance
A Boolean value that indicates whether the connection can be redirected to a host in the database other than the ServerNode.
This affects the connection only if the load balancing. is set to something other than "none". When the node differs from the node the client is connected to, the client disconnects and reconnects to the targeted node. See About Native Connection Load Balancing in the Administration Guide.
Default: false
ConnSettings
A string containing SQL commands that the driver should execute immediately after connecting to the server. You can use this property to configure the connection, such as setting a schema search path.
Reserved symbol: In the connection string semicolon (;) is a reserved symbol. To set multiple properties as part of ConnSettings properties, use %3B as the comma delimiter, and + (plus) for spaces.
ConnectionTimeout
The number of seconds to wait for a request to complete before returning to the client application. This is equivalent to the SQL_ATTR_CONNECTION_TIMEOUT parameter in the ODBC API.
Default: 0 (no timeout)
ConvertSquareBracketIdentifiers
Controls whether square-bracket query identifiers are converted to a double quote identifier for compatibility when making queries to a Vertica database.
Default: false
DirectBatchInsert
Deprecated, always set to true.
DriverStringConversions
Controls whether the ODBC driver performs type conversions on strings sent between the ODBC driver and the database. Possible values are:
NONE: No conversion in either direction. This results in the highest performance.
INPUT: Strings sent from the client to the server are converted, but strings sent from the server to the client are not.
OUTPUT: Strings sent by the server to the client are converted, but strings sent from the client to the server are not.
BOTH: Strings are converted in both directions.
Default: OUTPUT
Locale
The locale used for the session. Specify the locale as an ICU Locale.
**See **the ICU User Guide for a complete list of properties that can be used to specify a locale.
Default:en_US@collation=binary
PromptOnNoPassword
[Windows only] Controls whether users are prompted to enter a password, if none is supplied by the connection string or DSN used to connect to Vertica. See Prompting windows users for passwords.
Default: false
ReadOnly
A true or false value that controls whether the connection can read data only from Vertica.
Default: false
ResultBufferSize
Size of memory buffer for the large result sets in streaming mode. A value of 0 means ResultBufferSize is turned off.
Default: 131072 (128KB)
TransactionIsolation
Sets the transaction isolation for the connection, one of the following:
Insert an empty string to leave the description empty.
Standard
Label / SessionLabel
Sets a label for the connection on the server. This value appears in the client_label column of the V_MONITOR.SESSIONS system table.
Label and SessionLabel are synonyms and can be used interchangeably.
Vertica
OAuth connection properties
The following connection properties pertain to OAuth in ODBC.
Caution
The unixODBC driver manager supports parameter values of up to 1000 characters in odbc.ini. If your parameter value is greater than 1000 characters (for example, OAuthAccessToken), you must pass it through a connection string rather than specifying it in odbc.ini.
Property
Description
OAuthAccessToken
Required if oauthrefreshtoken is unspecified, an OAuth token that authorizes a user to the database.
OAuthRefreshToken
Required if oauthaccesstoken is unspecified, allows a user to refresh and obtain a new oauthaccesstoken when their old one expires.
If you set this parameter, you must also set the following refresh properties in oauthjsonconfig:
oauthrefreshtoken
oauthdiscoveryurl or oauthtokenurl
oauthclientid
oauthclientsecret
In cases where introspection fails (e.g. when the access token expires), Vertica responds to the request with an error. If introspection fails and OAuthRefreshToken is specified, the driver attempts to refresh and silently retrieve a new access token. Otherwise, the driver passes error to the client application.
OAuthJsonConfig
A JSON string or file that lets you set the following:
oauthclientid: The client ID of the client application registered in the identity provider.
oauthclientsecret: The client secret of the client application registered in the identity provider.
oauthtokenurl: The endpoint to which token refresh requests are sent. The format for this depends on your provider. For examples, see the Keycloak and Okta documentation.
If oauthdiscoveryurl is not set: this parameter is only required for IDP valdiation if oauthdiscoveryurl, but should also be set for JWT validation to support token refresh.
oauthauthurl: The authorization endpoint used for single sign-on. For examples, see the Keycloak and Okta documentation.
oauthdiscoveryurl: Also known as the OpenID Provider Configuration Document, this endpoint contains a list of all other endpoints supported by the IDP. If set, the other endpoints (such as oauthtokenurl and oauthauthurl) do not need to be specified.
This parameter is only supported for Keycloak. For other identity providers like Okta, the endpoints must be set manually.
If you set both oauthdiscoveryurl and another endpoint (like oauthtokenurl), oauthdiscoveryurl takes precedence.
This parameter is only required for IDP valdiation, but should also be set for JWT validation to support token refresh.
oauthscope: The requested OAuth scopes, delimited with spaces. These scopes define the extent of access to the resource server (in this case, Vertica) granted to the client by the access token. For details, see the OAuth documentation.
oauthvalidatehostname: Boolean, whether to verify the subjectAltName of the identity provider host. If enabled, the IP address or hostname must be set as the subjectAltName in its certificate. Hostname verification is enabled by default.
Unlike oauthaccesstoken or oauthrefreshtoken, which must be set programmatically by the client when they attempt to connect, the same oauthjsonconfig can be reused between connections to the database.
For example, to set it as a JSON string in ODBC.ini as part of the DSN:
Controls whether the connection to the database uses SSL encryption, one of the following. For information on using these parameters to configure TLS, see Configuring TLS for ODBC Clients:
require: Requires that the server use TLS. If the TLS connection attempt fails, the client rejects the connection.
prefer: Prefers that the server use TLS. The client first attempts to connect using TLS. If that attempt fails, the client attempts to connect again in plaintext.
allow: Makes a connection to the server whether the server uses TLS or not. The first connection attempt to the database is attempted over a clear channel. If that fails, a second connection is attempted over TLS.
verify_ca: The client verifies that the server's certificate was issued by a trusted certificate authority (CA).
verify_full: The client verifies that the following conditions are met:
The server's certificate was issued by a trusted CA.
One of the following:
The server's hostname matches the common name specified in the server's certificate.
The server's hostname or IP address appears in the Subject Alternative Name (SAN) field of the server's certificate.
disable: Never connect to the server using TLS. This setting is typically used for troubleshooting.
Default: prefer
Vertica
SSLCertFile
The absolute path of the client's public certificate file. This file can reside anywhere on the system.
Vertica
SSLKeyFile
The absolute path to the client's private key file. This file can reside anywhere on the system.
Vertica
Third-party compatibility
Property
Description
Default
Standard/ Vertica
ColumnsAsChar
Specifies how character column types are reported when the driver is in Unicode mode. When set to false, the ODBC driver reports the data type of character columns as WCHAR. If you set ColumnsAsChar to true, the driver identifies character column as CHAR.
You typically use this setting for compatibility with some third-party clients.
Default: false
false
Vertica
ThreePartNaming
A Boolean value that controls how catalog names are interpreted by the driver. When this value is false, the driver reports that catalog names are not supported. When catalog names are not supported, they cannot be used as a filter in database metadata API calls. In this case, the driver returns NULL as the catalog name in all driver metadata results.
When this value is true, catalog names can be used as a filter in database metadata API calls. In this case, the driver returns the database name as the catalog name in metadata results. Some third-party applications assume a certain catalog behavior and do not work properly with the default values. Enable this option if your client software expects to get the catalog name from the database metadata and use it as part of a three-part name reference.
Default: false for UNIX, true for Windows
false (UNIX)
true (Window)
Vertica
EnforceBatchInsertNullConstraints
Prevents NULL values from being loaded into columns with a NOT NULL constraint during batch inserts. When this value is set to true, batch inserts roll back when NULL values are inserted in to columns with NOT NULL constraints. When this value is set to false, batch insert behavior is unchanged.
Vertica recommends only using this property with SAP Data Services as it could negatively impact database performance.
false
Vertica
Kerberos connection properties
Use the following properties for client authentication using Kerberos.
Property
Description
Standard/ Vertica
KerberosServiceName
Provides the service name portion of the Vertica Kerberos principal; for example: vertichost@EXAMPLE.COM
Default: vertica
Vertica
KerberosHostname
Provides the instance or host name portion of the Vertica Kerberos principal; for example: verticaosEXAMPLE.COM
Default: Value specified in the servername connection string property
The properties in the following tables are common for all user and system DSN entries.
The properties in the following tables are common for all user and system DSN entries. The examples provided are for Windows clients.
To edit DSN properties:
On UNIX and Linux client platforms, you can edit the odbc.ini file. The location of this file is specific to the driver manager. See Creating an ODBC DSN for Linux.
You can also edit the DSN properties directly by opening the DSN entry in the Windows registry (for example, at HKEY_LOCAL_MACHINE\SOFTWARE\ODBC\ODBC.INI\DSNname). Directly editing the registry can be risky, so you should only use this method for properties that cannot be set through the ODBC driver's user interface, or via your client code.
You can set properties in the connection string when opening a connection using the SQLDriverConnect() function:
In the connection string ';' is a reserved symbol. If you need to set multiple properties as part of the ConnSettings property use '%3B' in place of ';'. Also use '+' instead of spaces.
Your client code can retrieve DSN property values after a connection has been made to Vertica using the SQLGetConnectAttr() and SQLGetStmtAttr() API calls. Some properties can be set and using SQLSetConnectAttr() and SQLSetStmtAttr().
While required settings are required for all platforms, these settings automatically set by the Windows and macOS installers, so all directives to change these settings are for Linux users.
Note
While required settings are required for all platforms, these settings automatically set by the Windows and macOS installers, so all directives to change these settings are for Linux users.
DriverManagerEncoding: The UTF encoding standard used by the driver manager. This can be one of the following:
UTF-8
UTF-16
UTF-32
The ODBC driver encoding must match that of your driver manager. The following table lists default encodings for various platforms that take effect if you do not set this parameter. If the defaults do not match the encoding used by your driver manager, you must set it manually. Consult your driver manager's documentation for details on its encoding.
Note
While both UTF-16 and UTF-8 are valid settings for the DataDirect driver manager, UTF-16 is recommended.
Client Platform
Default Encoding
Linux 32-bit
UTF-32
Linux 64-bit
UTF-32
Linux Itanium 64-bit
UTF-32
OS X
UTF-32
Windows 32-bit
UTF-16
Windows 64-bit
UTF-16
ErrorMessagesPath: Required, the path of the directory containing the ODBC driver's error message files. These files (ODBCMessages.xml and VerticaMessages.xml) are stored in the same directory as the Vertica ODBC driver files (for example, opt/vertica/en-US in the downloaded.tar).
ODBCInstLib: The path to the ODBC installer library. This setting is only required if the directory containing the library is not set in the LD_LIBRARY_PATH or LIB_PATH environment variables. The library files for the major driver managers are:
UnixODBC: libodbcinst.so
iODBC: libiodbcinst.so (libiodbcinst.2.dylib on macOS)
DataDirect: libodbcinst.so
You can also control client-server message logging for both ODBC and ADO.NET. For details, see Configuring ODBC logs.
Linux and macOS
To set these parameters on Linux or macOS:
Create a file vertica.ini anywhere on the client system. Common locations are in /etc/ for a shared configuration, or the home directory for a per-user configuration.
Verify that users of the ODBC driver have read privileges on the file.
Set the VERTICAINI environment variable to the path of vertica.ini. For example:
$ export VERTICAINI=/etc/vertica.ini
Create a section called [Driver] in vertica.ini:
[Driver]
Under [Driver], set parameters with the following format. Each parameter must have its own line:
The Windows client driver installer automatically configures all necessary settings for the ODBC driver. Settings are stored in the registry in HKEY_LOCAL_MACHINE\SOFTWARE\Vertica\ODBC\Driver.
If you want to configure ODBC further, use the ODBC Data Sources program.
2.2.1.4.6 - Configuring ODBC logs
The following parameters control whether and how the ODBC client driver logs messages between the client and server.
The following parameters control whether and how the ODBC client driver logs messages between the client and server.
The way you set these parameters differs between operating systems:
On Linux and macOS, edit vertica.ini you created during the installation. For example, to log all warnings and more severe messages to log files in /tmp/:
[Driver]
LogLevel=4
LogPath=/tmp
On Windows, edit the keys in the Windows Registry under HKEY_LOCAL_MACHINE\SOFTWARE\Vertica\ODBC\Driver.
Parameters
LogLevel: The severity of messages that are logged between the client and the server. The valid values are:
0: No logging
1: Fatal errors
2: Errors
3: Warnings
4: Info
5: Debug
6: Trace (all messages)
The value you specify for this setting sets the minimum severity for a message to be logged. For example, setting LogLevel to 3 means that the client driver logs all warnings, errors, and fatal errors.
LogPath: The absolute path of a directory to store log files. For example: /var/log/verticaodbc
Diverting log entires to ETW (windows)
On Windows clients, ODBC log entries can be sent to Event Tracing for Windows (ETW) so they appear in the Windows Event Viewer:
Register the driver as a Windows Event Log provider and enable the logs.
Activate ETW by adding a string value LogType with data ETW to your Windows Registry.
Understand how Vertica compresses log levels for the Windows Event Viewer.
Know where to find the logs within Event Viewer.
Understand the meaning of the Event IDs in your log entries.
Registering the ODBC driver as a windows event log provider
To use ETW logging, you must register the ODBC driver as a Windows Event Log provider. You can choose to register either the 32-bit or 64-bit driver. After you have registered the driver, you must enable the logs.
Important
If you do not both register the driver and enable the logs, output is directed to stdout.
Open a command prompt window as Administrator, or launch the command prompt with the Run as Administrator option.
Important
You must have administrator privileges to successfully complete the next step.
Run the command wevtutil im to register either the 32-bit or 64-bit version of the driver.
Should you want to later disable the logs, you can use the same wevtutil sl command, substituting /e:false in place of /e:true when you issue the statement. Alternatively, you can enable or disable logs within the Windows Event Viewer itself.
Add the string value LogType
By default, Vertica does not send ODBC log entries to ETW. To activate ETW, add the string LogType to your Windows registry, and set its value to ETW.
Start the registry editor by typing regedit.exe in the Windows Run command box.
Navigate to HKEY_LOCAL_MACHINE\SOFTWARE\Vertica\ODBC\Driver in the registry.
Right-click in the right pane of the Registry Editor window.
Select New, then select String Value.
Change the name of the string value from New Value #1 to LogType.
Double-click the new LogType entry. When prompted for a new value, enter ETW.
Exit the registry editor.
ETW is disabled by default. When ETW is enabled, you can disable it by clearing the value ETW from the LogType string.
LogLevel in the windows event viewer
While LogLevel ranges from 0 through 6, this range is compressed for the Windows Event Viewer to a range of 0 through 3.
Vertica LogLevel Setting
Vertica LogLevel Description
Log level sent to the Windows Event Viewer
Log level displayed by the Windows Event Viewer
0
(No logging)
0
(No logging)
1
Fatal Errors
1
Critical
2
Errors
2
Error
3
Warnings
3
Warning
4
Info
4
Information
5
Debug
4
6
Trace (all messages)
4
The following examples show how LogLevel is converted when displayed in the Windows Event Viewer.
A LogLevel of 5 sends fatal errors, errors, warnings, info and debug log level entries to Event Viewer as Level 4 (Information).
A LogLevel of 6 sends fatal errors, errors, warnings, debug and trace log level entries to Event Viewer as Level 4.
Finding logs in the event viewer
Launch the Windows Event Viewer.
From Event Viewer (Local), expand Applications and Services Logs.
Expand the folder that contains the log you want to review (for example, VerticaODBC64).
Select the Vertica ODBC log under the folder. Entries appear in the right pane.
Note the value in the Event ID field. Each Event Log entry includes one of four Event IDs:
0: Informational (debug, info, and trace events)
1: Error
2: Fatal event
3: Warning
2.2.1.5 - Python client drivers
Vertica supports several Python drivers for creating client applications.
Vertica supports several Python drivers for creating client applications.
Prerequisites
To create Python client applications, you must install the required drivers.
2.2.1.5.1 - Installing Python client drivers
Vertica supports several Python client drivers.
Vertica supports several Python client drivers.
Installing vertica-python
See the vertica-python repository for installation and usage instructions.
Installing pyodbc
The pyodbc module interacts with the Vertica ODBC client driver. To install it:
Use the Connection Manager to set the OLE DB connection string properties, which define your connection.
Use the Connection Manager to set the OLE DB connection string properties, which define your connection. You access the Connection Manager from within Visual Studio.
These connection parameters appear on the Connection page.
Parameters
Action
Provider
Select the native OLE DB provider for the connection.
OLE DB Provider
Indicates Vertica OLE DB Provider.
Server or file name
Enter the server or file name.
Location
Not supported.
Use Windows NT Integrated Security
Not supported.
Use a specific user name and password
Enter a user name and password.
Connect with No Password:
Select the Blank password check box.
Save and Encrypt Password:
Select Allow saving password.
Initial Catalog
The name of the database running on the server.
The All page from the Connection Manager dialog box includes all possible connection string properties for the provider.
The table that follows lists the connection parameters for the All page.
For OLE DB properties information specific to Microsoft, see the Microsoft documentation OLE DB Properties.
Parameters
Action
Extended Properties
Not supported.
Locale Identifier
Indicates the Locale ID.
Default: 0
Mode
Specifies access permissions.
Default: 0
Connect Timeout
Not supported.
Default: 0
General Timeout
Not supported.
File Name
Not supported.
OLE DB Services
Specifies which OLE DB services to enable or disable.
Password
Specifies the password for the user ID.
For no password, insert an empty string.
Persist Security Info
A security measure. When False, security sensitive-information, such as the password, is not returned as part of the connection if the connection is open or has ever been in an open state.
Default: true
User ID
The database username.
Data Source
The host name or IP address of any active node in a Vertica cluster.
You can provide an IPv4 address, IPv6 address, or host name.
In mixed IPv4/IPv6 networks, the DNS server configuration determines which IP version address is sent first. Use the PreferredAddressFamily option to force the connection to use either IPv4 or IPv6.
Initial Catalog
The name of the database running on the server.
Provider
The name of the OLE DB Provider to use when connecting to the Data Source.
Default: VerticaOLEDB.1
BackupServerNode
A designated host name or IP address to use if the ServerName host is unavailable. Enter as a string.
Connection attempts continue until successful or until the list of server nodes is exhausted.
Valid values: Comma-separated list of servers optionally followed by a colon and port number. For example:
server1:5033,server2:5034
ConnectionLoadBalance
A Boolean value that determines whether the connection can be redirected to a host in the database other than the ServerNode.
This parameter affects the connection only if load balancing is set to a value other than NONE. When the node differs from the node that the client is connected to, the client disconnects and reconnects to the targeted node. See About Native Connection Load Balancing in the Administration Guide.
Default: false
ConnSettings
SQL commands that the driver should execute immediately after connecting to the server. Use to configure the connection, such as setting a schema search path.
Reserved symbol:';' To set multiple parameters in this field use '%3B' for ','.
Spaces: Use '+'.
ConvertSquareBracketIdentifiers
Controls whether square-bracket query identifiers are converted to a double quote identifier for compatibility when making queries to a Vertica database.
Default: false
DirectBatchInsert
Deprecated, always set to true.
KerberosHostName
Provides the instance or host name portion of the Vertica Kerberos principal; for example: verticaosEXAMPLE.COM
KerberosServiceName
Provides the service name portion of the Vertica Kerberos principal; for example: vertichost@EXAMPLE.COM
Label
Sets a label for the connection on the server. This value appears in the session_id column of system table SESSIONS .
LogLevel
Specifies the amount of information included in the log. Leave this field blank or set to 0 unless otherwise instructed by Vertica Customer Support.
LogPath
The path for the log file.
Port
The port number on which Vertica listens for OLE DB connections.
Default: port 5433
PreferredAddressFamily
The IP version to use if the client and server have both IPv4 and IPv6 addresses and you have provided a host name, one of the following:
ipv4: Connect to the server using IPv4.
ipv6: Connect to the server using IPv6.
none: Use the IP address provided by the DNS server.
SSLCertFile
The absolute path of the client's public certificate file. This file can reside anywhere on the system.
SSLKeyFile
The absolute path to the client's private key file. This file can reside anywhere on the system.
SSLMode
Controls whether the connection to the database uses SSL encryption, one of the following:
require: Requires the server to use SSL. If the server cannot provide an encrypted channel, the connection fails.
prefer: Prefers that the server use SSL. If the server does not offer an encrypted channel, the client requests one. The first attempt is made with SSL. If that attempt fails, the second attempt is over a clear channel.
allow: Makes a connection to the server whether or not the server uses SSL. The first attempt is made over a clear channel. If that attempt fails, a second attempt is over SSL.
disable: Never connects to the server using SSL. Typically, you use this setting for troubleshooting.
Default:prefer
2.2.1.8.1.2 - Configuring OLE DB logs
The following parameters control how the OLE DB client driver logs messages between the client and server.
The following parameters control how the OLE DB client driver logs messages between the client and server. To set them, edit the keys in the Windows Registry under HKEY_LOCAL_MACHINE\SOFTWARE\Vertica\OLEDB\Driver:
LogLevel: The severity of messages that are logged between the client and the server. The valid values are:
0: No logging
1: Fatal errors
2: Errors
3: Warnings
4: Info
5: Debug
6: Trace (all messages)
The value you specify for this setting sets the minimum severity for a message to be logged. For example, setting LogLevel to 3 means that the client driver logs all warnings, errors, and fatal errors.
LogPath: The absolute path of a directory to store log files. For example: /var/log/verticaoledb
Diverting OLE DB log entries to ETW
On Windows clients, you can direct Vertica to send OLE DB log entries to Event Tracing for Windows (ETW). Once set, OLE DB log entries appear in the Windows Event Viewer. To use ETW:
Register the driver as a Windows Event Log provider, and enable the logs.
Activate ETW by adding a string value to your Windows Registry.
Understand how Vertica compresses log levels for the Windows Event Viewer.
Know where to find the logs within Event Viewer.
Understand the meaning of the Event IDs in your log entries.
Registering the OLE DB driver as a windows event log provider
To use ETW logging, you must register the OLE DB driver as a Windows Event Log provider. You can choose to register either the 32-bit or 64-bit driver. Once you have registered the driver, you must enable the logs.
Important
If you do not both register the driver and enable the logs, output is directed to stdout.
Open a command prompt window as Administrator, or launch the command prompt with the Run as Administrator option.
Important
You must have administrator privileges to successfully complete the next step.
Run the command wevtutil im to register either the 32-bit or 64-bit version of the driver.
Should you want to later disable the logs, you can use the same wevtutil sl command, substituting /e:false in place of /e:true when you issue the statement. Alternatively, you can enable or disable logs within the Windows Event Viewer itself.
Add the string value LogType
By default, Vertica does not send OLE DB log entries to ETW. To activate ETW, add the string LogType to your Windows registry, and set its value to ETW.
Start the registry editor by typing regedit.exe in the Windows Run command box.
Navigate, in the registry, to: HKEY_LOCAL_MACHINE\SOFTWARE\Vertica\OLEDB\Driver.
Right-click in the right pane of the Registry Editor window.
Select New, then select String Value.
Change the name of the string value from New Value #1 to LogType.
Double-click the new LogType entry. When prompted for a new value, enter ETW.
Exit the registry editor.
ETW is off by default. When ETW is activated, you can subsequently turn it off by clearing the value ETW from the LogType string.
LogLevel in the windows event viewer
While LogLevel ranges from 0 through 6, this range is compressed for the Windows Event Viewer to a range of 0 through 3.
Vertica LogLevel Setting
Vertica LogLevel Description
Log level sent to the Windows Event Viewer
Log level displayed by the Windows Event Viewer
0
(No logging)
0
(No logging)
1
Fatal Errors
1
Critical
2
Errors
2
Error
3
Warnings
3
Warning
4
Info
4
Information
5
Debug
4
6
Trace (all messages)
4
The following examples show how LogLevel is converted when displayed in the Windows Event Viewer.
A LogLevel of 5 sends fatal errors, errors, warnings, info and debug log level entries to Event Viewer as Level 4 (Information).
A LogLevel of 6 sends fatal errors, errors, warnings, debug and trace log level entries to Event Viewer as Level 4.
Finding logs in the event viewer
Launch the Windows Event Viewer.
From Event Viewer (Local), expand Applications and Services Logs.
Expand the folder that contains the log you want to review (for example, VerticaOLEDB64).
Select the Vertica ODBC log under the folder. Entries appear in the right pane.
Note the value in the Event ID field. Each Event Log entry includes one of four Event IDs:
0: Informational (debug, info, and trace events)
1: Error
2: Fatal event
3: Warning
2.2.1.8.2 - The Microsoft connectivity pack for windows
The Vertica Microsoft Connectivity Pack for Windows provides a configuration file for you to access Microsoft Business Intelligence tools.
The Vertica Microsoft Connectivity Pack for Windows provides a configuration file for you to access Microsoft Business Intelligence tools. The Connectivity Pack is installed as part of the Client Drivers and Tools for Windows.
For details about the components included with the Microsoft Connectivity Pack, see Microsoft components.
2.2.1.8.2.1 - Microsoft components
This section describes the Microsoft Business Intelligence components you can use with Microsoft Visual Studio and Microsoft SQL Server.
This section describes the Microsoft Business Intelligence components you can use with Microsoft Visual Studio and Microsoft SQL Server. After configuration, you can use these Microsoft components to develop business solutions using your Vertica server.
Important
Client Drivers and Tools for Windows includes the Vertica Microsoft Connectivity Pack. To use the Connectivity Pack to access Microsoft Business Intelligence tools, reboot your system after installation to ensure integration.
2.2.1.8.2.1.1 - Microsoft component configuration
The Vertica ADO.NET driver, the Visual Studio plug-in, and the OLE DB driver allow you to integrate your Vertica server with an environment that includes Microsoft components previously installed on your system.
The Vertica ADO.NET driver, the Visual Studio plug-in, and the OLE DB driver allow you to integrate your Vertica server with an environment that includes Microsoft components previously installed on your system. Additional tools are also available for integration with Microsoft SQL Server.
The available drivers provide integration with the following Microsoft components:
SQL Server Data Tool - Business Intelligence (SSDT-BI) for Visual Studio 2010/2012/2013/2015 for use with SQL Server 2012, 2014, and 2016. SSDT-BI replaces BIDS for 2010, 2012, 2013, and 2015. It serves the same purpose as BIDS, providing a development environment for developing business intelligence solutions.
SQL Server Analysis Services (SSAS) for SQL Server 2012, 2014, and 2016. Use SSAS for OLAP and data mining, while using Vertica as the source for cube creation.
SQL Server Integration Services (SSIS) for SQL Server 2012, 2014, and 2016. SSIS provides SQL Server Type Mappings to map data types between Vertica and SQL Server. Use SSIS for data migration, data integration and workflow, and ETL.
The following figure displays the relationship between Microsoft components and Vertica dependencies.
2.2.1.8.2.1.2 - SSDT-BI
SQL Server Data Tool - Business Intelligence (SSDT-BI) is a client-based application that provides a development environment for creating business solutions in Visual Studio 2012, 2013, and 2015.
SQL Server Data Tool - Business Intelligence (SSDT-BI) is a client-based application that provides a development environment for creating business solutions in Visual Studio 2012, 2013, and 2015. SSDT-BI includes project types specific to SQL Server Business Intelligence.
You can use the Visual Studio Shell Integration plug-in to browse a database from within the Visual Studio Server Explorer, allowing you to work outside of SSDT-BI development to perform tasks, such as listing tables or inserting data. When you use Visual Studio in SSDT-BI mode, you can develop business solutions using the data in your Vertica database. For example, you can create cubes or open tables.
You cannot use Microsoft Visual Studio 2012/2013/2015 with SSDT-BI development to create a SQL Server 2008 Business Intelligence solution.
2.2.1.8.2.1.3 - SQL server analysis services (SSAS) support
BIDS or SSDT-BI includes the Analysis Services project for developing online analytical processing (OLAP) for business intelligence applications.
BIDS or SSDT-BI includes the Analysis Services project for developing online analytical processing (OLAP) for business intelligence applications. This project type includes templates for:
Cubes
Dimensions
Data sources
Data source views
It also provides the tools for working with these objects.
Note
Note: OpenText recommends that you use the Vertica OLE DB driver when connecting to the Vertica server from SSAS due to improved performance.
2.2.1.8.2.1.4 - SQL server integration services (SSIS) support
BIDS or SSDT-BI includes the Integration Services project for developing ETL solutions.
BIDS or SSDT-BI includes the Integration Services project for developing ETL solutions. This project type includes templates for:
Packages
Data sources
Data source views
It also provides the tools for working with these objects.
You can find support for using Vertica as a data source and target from both SSIS and the import/export wizard. You must install mapping files specific to Vertica on the Integration Server and BIDS or SSDT-BI workstation to enable this capability. The Vertica Client Drivers and Tools for Windows installs these mapping files as the "SQL Server Type Mappings" component(s) in both 32-bit and 64-bit versions.
Note
Note: Always use the Vertica ADO.NET driver when connecting to the Vertica server from SSIS.
2.2.1.8.2.1.5 - SQL server reporting services (SSRS) support
BIDS or SSDT-BI includes Report projects for developing reporting solutions.
BIDS or SSDT-BI includes Report projects for developing reporting solutions.
You can use Vertica as a data source for Reporting Services. The installer implements various configuration file modifications to enable this capability on both the BIDS or SSDT-BI workstation and the Reporting Services server.
2.2.1.8.2.2 - Compatibility issues and limitations
This section lists compatibility issues and limitations for integrating the Microsoft Connectivity Pack with Microsoft Visual Studio and Microsoft SQL Server.
This section lists compatibility issues and limitations for integrating the Microsoft Connectivity Pack with Microsoft Visual Studio and Microsoft SQL Server.
2.2.1.8.2.2.1 - SSDT-BI limitations
SSDT-BI is a 32-bit development environments for Analysis Services, Integration Services, and Reporting Services projects.
SSDT-BI is a 32-bit development environments for Analysis Services, Integration Services, and Reporting Services projects. It is not designed to run on the Itanium 64-bit architecture and thus are not installed on Itanium servers.
2.2.1.8.2.2.2 - SSAS limitations
The SSAS Tabular Model is not supported.
If, after installing the Vertica OLE DB driver, an SSAS cube build fails, restart the SSAS service.
2.2.1.8.2.2.3 - SSIS data type limitations
The following sections cover data type limitations when using SQL Server Integration Services (SSIS).
The following sections cover data type limitations when using SQL Server Integration Services (SSIS).
Time data transfer
When transferring time data, SSIS uses the TimeSpan data type that supports precision greater than six digits. The Vertica ADO.NET driver translates TimeSpan as an Interval data type that supports up to six digits. The Interval type is not converted to the TimeSpan type during transfer. As a result, if the time value has a precision of more than six digits, the data is truncated, not rounded.
To function without errors, DATE and DATETIME have a range from 0001-01-01 00:00:00.0000000 to 9999-12-31 23:59:59.999999.
In SSIS, the DATETIME type (DT_TIMESTAMP) supports only a scale up to three decimal places for seconds. Any decimal places after that are automatically discarded. You can perform derived column transformations only on DATETIME values between January 1, 1753 through December 31, 9999.
Numeric precision
The maximum and minimum decimal allowed is:
Max: +79,228,162,514,264,337,593,543,950,335
Min: -79,228,162,514,264,337,593,543,950,335
For example, if the scale is 16, the range of values is:
+/- 7,922,816,251,426.4337593543950335
The valid scale range is any number that is smaller than 29 and greater than 38. Using a scale between 29 and 38 does not generate an error.
SQL Server does not support NaN, Infinity, or –Infinity values. These values are supported when you use SSIS to transfer between Vertica instances, but they are not supported with a SQL Server Destination.
String Conversion
The CHAR and VARCHAR data types used in SSIS are DT_WSTR, with a maximum length of 4000 characters.
In SSIS, Vertica strings are converted to Unicode strings in SSIS to handle multi-lingual data. You can convert these strings to ASCII using a Data Conversion Task.
Scale
Whenever you use a scale greater than 38, SSIS replaces it with a value of 4.
Interval conversion
SSIS does not support interval types. It converts them to TIME and strips off the day component. Any package that has interval types greater than a day returns incorrect results.
Data mapping issues with SQL server import and export wizard
When you create an Integrated Services package (SSIS) using the SQL Server Import and Export Wizard, certain data types do not automatically map correctly. A mapping issue can occur when you use the wizard with:
SQL Server Native OLE DB Provider for SQL Server 2008 or 2012
SQL Server Native Client 10.0/11.0 Provider for SQL Server 2010/2012
To avoid this issue, manually change the type mappings with BIDS or SSDT-BI.
Data transfer failures
When using an Integrated Services package (SSIS) with the SQL Server OLE DB Provider for SQL Server 2008 or 2012, certain data type transfers can fail when transferring from Vertica to SQL Server. To avoid this issue, use either BIDS or SSDT-BI when transferring data.
Batch insert of VARBINARY/LONG VARBINARY data types
Sometimes, one row of a batch insert of VARBINARY or LONG VARBINARY data types exceeds the data type limit:
VARBINARY: 65 KB
LONG VARBINARY: 32 MB
In such cases, all rows are rejected, rather than just the one row whose length exceeds the type limit. The batch insert fails with the message "row(s) are rejected".
To avoid this issue, use a predicate to filter out rows from the source that do not fit into the receiving database.
Boolean queries in SQL server query designer
When issuing a Boolean query in SQL Server Query Designer, you must enclose Boolean column values in quotes. Otherwise, you receive a SQL execution error (for example, someboolean = 'true').
2.2.1.8.2.2.4 - SSRS limitations
Data Connection Wizard Workaround.
Data Connection Wizard Workaround
The SSRS Report Wizard provides a data connection wizard. After you select the wizard and enter all the connection information, the OK button is disabled. You cannot save your work and continue. The workaround is to not use the wizard and to use the following panel instead:
Report Wizard - Query Designer
Vertica uses the Report Wizard's Generic Query Designer. Other data sources use a Graphical Query Designer that supports building queries visually. The Graphical Query Designer is a part of a package called Visual Data Tools (VDT). The Graphical Query Designer works only with Generic OLE DB providers and the built-in providers. You cannot use it with the Vertica Data Provider.
Report Builder
Report Builder is a web-based report design tool. It does not support creating reports using custom data extensions, so you cannot use it with Vertica. When you create a report using Report Builder, existing Vertica data sources appear in the list of available data sources. However, choosing a Vertica data source causes an error.
Schema Name Not Automatically Provided when Mapping Vertica Destination
Currently, when you map a Vertica destination, the schema name is not automatically provided. You must enter it manually or pick it from the drop-down menu as follows:
2.2.1.9 - ADO.NET client driver
The Vertica ADO.NET driver lets you access with C#.
Run the installer and follow the prompts to install the drivers.
Reboot your system.
2.2.1.9.2 - Configure ADO.NET logs
The following parameters control how messages between the client and server are logged. If they are not set, then the client library does not log any messages.
You can configure the ADO.NET driver's logging behavior at the registry level with HKEY_LOCAL_MACHINE\SOFTWARE\Vertica\ADO.NET\Driver and the class level with VerticaLogProperties.
Registry-level settings
The following parameters control how messages between the client and server are logged. If they are not set, then the client library does not log any messages.
To set these parameters on Windows, edit the keys in the Windows Registry under HKEY_LOCAL_MACHINE\SOFTWARE\Vertica\ADO.NET\Driver.
LogLevel
The minimum severity of a message for it to be logged:
0: No logging
1: Fatal errors
2: errors
3: Warnings
4: Info
5: Debug
6: Trace (all messages)
For example, a LogLevel of 3 means that the client driver logs messages with severities 0, 1, 2, and 3.
LogPath
The absolute path of a directory to store log files. For example: /var/log/verticaadonet.
LogNamespace
Limits logging to messages generated by certain objects in the client driver.
C#PreloadLogging
Normally, logging only starts after the driver has fully loaded. This option specifies whether the ADO.NET driver should start logging before the driver has fully loaded, set to one of the following:
0: Do not start logging until the driver has loaded.
1: Start logging as soon as possible.
Class-level settings
You can set the log properties of the ADO.NET driver with the VerticaLogProperties static class. This class includes the following methods:
SetLogPath(String path, bool persist): Must be set before the connection starts.
Logs are created when the first connection is opened, so you cannot change the log path after the connection starts. You can change the log level and log namespace at any time.
The persist parameter controls whether the setting is written to the client's Windows Registry, where it will be used for all subsequent connections. If set to false, then the setting only applies to the current session.
SetLogPath
The SetLogPath method takes as its arguments a string containing the path to the log file and the persist argument. If the path string contains only a directory path, then the log file is created with the name vdp-driver-MM-dd_HH.mm.ss.log (where MM-dd_HH.mm.ss is the date and time the log was created). If the path ends in a filename, such as log.txt or log.log, then the log is created with that filename.
If SetLogPath is called with an empty string for the path argument, then the client executable's current directory is used as the log path.
If SetLogPath is not called and no registry entry exists for the log path, and you have called any of the other VerticaLogProperties methods, then the client executable's current directory is used as the log path.
When the persist argument is set to true, the path specified is copied to the registry verbatim. If no filename was specified, then the filename is not saved to the registry.
Note
The path must exist on the client system prior to calling this method. The method does not create directories.
For example:
//set the log pathstringpath="C:\\log";VerticaLogProperties.SetLogPath(path,false);
SetLogNamespace
The SetLogNamespace method takes as its arguments a string containing the namespace to log and the persist argument. The namespace string to log can be one of the following:
Vertica
Vertica.Data.VerticaClient
Vertica.Data.Internal.IO
Vertica.Data.Internal.DataEngine
Vertica.Data.Internal.Core
Namespaces can be truncated to include multiple child namespaces. For example, you can specify Vertica.Data.Internal to log for all of the Vertica.Data.Internal namespaces.
If a log namespace is not set, and no value is stored in the registry, then the "Vertica" namespace is used for logging.
For example:
//set namespace to logstringlognamespace="Vertica.Data.VerticaClient";VerticaLogProperties.SetLogNamespace(lognamespace,false);
SetLogLevel
The SetLogLevel method takes as its arguments a VerticaLogLevel type and the persist argument. The VerticaLogLevel argument can be one of:
VerticaLogLevel.None
VerticaLogLevel.Fatal
VerticaLogLevel.Error
VerticaLogLevel.Warning
VerticaLogLevel.Info
VerticaLogLevel.Debug
VerticaLogLevel.Trace
If a log level is not set, and no value is stored in the registry, then VerticaLogLevel.None is used.
The Vertica client drivers are usually updated for each new release of the Vertica server.
The Vertica client drivers are usually updated for each new release of the Vertica server. The client driver installation packages include the version number of the corresponding Vertica server release. Usually, the drivers are forward-compatible with the next release, so your client applications are still be able to connect using the older drivers after you upgrade to the next version of Vertica Analytics Platform server. See Client driver and server version compatibility for details on which client driver versions work with each version of Vertica server.
Note
Vertica ODBC, JDBC and ADO.NET client drivers are backwards compatible to all supported Vertica server versions.
You should upgrade your clients as soon as possible after upgrading your server to take advantage of new features and to maintain maximum compatibility with the server.
To upgrade your drivers, follow the same procedure you used to install them in the first place. The new installation will overwrite the old. See the specific instructions for installing the drivers on your client platform for any special instructions regarding upgrades.
Note
Installing new ODBC drivers does not alter existing DSN settings. You may need to change the driver settings in either the DSN or in the odbcinst.ini file, if your client system uses one. See Creating an ODBC Data Source Name for details.
2.2.3 - Setting a client connection label
A client connection label identifies a connection to the database with a user-defined string.
A client connection label identifies a connection to the database with a user-defined string. You can view the label for an existing session with GET_CLIENT_LABEL:
In JDBC, ODBC, and ADO.NET, you use each client driver's "Label" connection property to set the client label before connecting to the database. Setting the label before you connect ensures that the connection is associated with the label in all system and Data collector tables. Examples of these tables include SESSIONS and DC_SESSION_STARTS.
You can also preemptively set the client label with vsql by using the --label option. For details, see -g --label
Existing connections
You can set a client connection label after you connect to a Vertica database with SET_CLIENT_LABEL:
=> SELECT SET_CLIENT_LABEL('py_data_load_application');
               SET_CLIENT_LABEL
----------------------------------------------
 client_label set to py_data_load_application
(1 row)

=> SELECT GET_CLIENT_LABEL();
     GET_CLIENT_LABEL
--------------------------
 py_data_load_application
(1 row)
Certain client drivers, like JDBC, have dedicated functions for setting the client connection label for existing connections. For details, see Setting and returning a client connection label.
2.2.4 - Using legacy drivers
The Vertica server supports connections from previous versions of the client drivers.
The Vertica server supports connections from previous versions of the client drivers. For detailed information the compatibility between versions of the Vertica server and Vertica client, see Client driver and server version compatibility.
2.3 - Accessing Vertica
The following table shows which client drivers you have to set up to access Vertica with a supported programming language:.
The following table shows which client drivers you have to set up to access Vertica with a supported programming language:
Vertica provides an Open Database Connectivity (ODBC) driver that allows applications to connect to the Vertica database. This driver can be used by custom-written client applications that use the ODBC API to interact with Vertica. ODBC is also used by many third-party applications to connect to Vertica, including business intelligence applications and extract, transform, and load (ETL) applications.
This section details the process for configuring the Vertica ODBC driver. It also explains how to use the ODBC API to connect to Vertica in your own client applications.
While client applications written in C, C++, Perl, PHP, etc. all use the ODBC client driver to connect to Vertica, this section only concerns C and C++ applications.
2.3.1.1 - ODBC architecture
The ODBC architecture has four layers:.
The ODBC architecture has four layers:
Client Application
Is an application that opens a data source through a Data Source Name (DSN). It then sends requests to the data source, and receives the results of those requests. Requests are made in the form of calls to ODBC functions.
Driver Manager
Is a library on the client system that acts as an intermediary between a client application and one or more drivers. The driver manager:
Resolves the DSN provided by the client application.
Loads the driver required to access the specific database defined within the DSN.
Processes ODBC function calls from the client or passing them to the driver.
Retrieves results from the driver.
Unloads drivers when they are no longer needed.
On Windows and macOS client systems, the driver manager is provided by the operating system. On Linux systems, you usually need to install a driver manager. See Client drivers support for a list of driver managers that can be used with Vertica on your client platform.
Driver
A library on the client system that provides access to a specific database. It translates requests into the format expected by the database, and translates results back into the format required by the client application.
Database
The database processes requests initiated at the client application and returns results.
2.3.1.2 - ODBC feature support
The ODBC driver for Vertica supports the most of the features defined in the Microsoft ODBC 3.5 specifications.
The ODBC driver for Vertica supports the most of the features defined in the Microsoft ODBC 3.5 specifications. The following features are not supported:
Updatable result sets
Backwards scrolling cursors
Cursor attributes
More than one open statement per connection. Simultaneously executing statements must each belong to a different connection. For example, you cannot execute a new statement while another statement has a result set open. To execute another statement with the same connection/session, wait for the current statement to finish executing and close its result set, then execute the new statement.
Keysets
Bookmarks
The Vertica ODBC driver accurately reports its capabilities. If you need to determine whether it complies with a specific feature, you should query the driver's capabilities directly using the SQLGetInfo() function.
2.3.1.3 - Vertica and ODBC data type translation
Most data types are transparently converted between Vertica and ODBC.
Most data types are transparently converted between Vertica and ODBC. This section explains several data types require special handling.
The GEOMETRY and GEOGRAPHY data types are treated as LONG VARCHAR data by the ODBC driver.
Vertica supports the standard interval data types supported by ODBC. See Interval Data Types in Microsoft's ODBC reference.
Vertica version 9.0.0 introduced the UUID data type, including JDBC support for UUIDs. The Vertica ADO.NET, ODBC, and OLE DB clients added full support for UUIDs in version 9.0.1. Vertica maintains backwards compatibility with older supported client driver versions that do not support the UUID data type, as follows:
When an older client...
Vertica...
Queries tables with UUID columns
Translates the native UUID values to CHAR values.
Inserts data into a UUID column
Converts the CHAR value sent by the client into a native UUID value.
SQL Data Types in the Microsoft ODBC reference documentation
2.3.1.4 - ODBC header file
The Vertica ODBC driver provides a C header file named odbc.h that defines several useful constants that you can use in your applications.
The Vertica ODBC driver provides a C header file named
verticaodbc.h that defines several useful constants that you can use in your applications. These constants let you access and alter settings specific to Vertica.
This file's location depends on your client operating system:
/opt/vertica/include on Linux and UNIX systems.
C:\Program Files (x86)\Vertica\ODBC\include on Windows systems.
The constants defined in this file are listed below.
Parameter
Description
SQL_ATTR_VERTICA_RESULT_BUFFER_SIZE
Sets the size of the buffer used when retrieving results from the server.
The first step in any ODBC application is to connect to the database.
The first step in any ODBC application is to connect to the database. When you create the connection to a data source using ODBC, you use the name of the DSN that contains the details of the driver to use, the database host, and other basic information about connecting to the data source.
There are 4 steps your application needs to take to connect to a database:
Call SQLAllocHandle() to allocate a handle for the ODBC environment. This handle is used to create connection objects and to set application-wide settings.
Use the environment handle to set the version of ODBC that your application wants to use. This ensures that the data source knows which API your application will use to interact with it.
Allocate a database connection handle by calling SQLAllocHandle(). This handle represents a connection to a specific data source.
Use the SQLConnect() or SQLDriverConnect() functions to open the connection to the database.
Note
If you specify a locale either in the connection string or in the DSN, the call to the connection function returns SQL_SUCCESS_WITH_INFO on a successful connection, with messages about the state of the locale.
When creating the connection to the database, use SQLConnect() when the only options you need to set at connection time is the username and password. Use SQLDriverConnect() when you want to change connection options, such as the locale.
The following example demonstrates connecting to a database using a DSN named ExampleDB. After it creates the connection successfully, this example simply closes it.
// Demonstrate connecting to Vertica using ODBC.
// Standard i/o library
#include<stdio.h>#include<stdlib.h>// Only needed for Windows clients
// #include <windows.h>
// SQL include files that define data types and ODBC API
// functions
#include<sql.h>#include<sqlext.h>#include<sqltypes.h>intmain(){SQLRETURNret;// Stores return value from ODBC API calls
SQLHENVhdlEnv;// Handle for the SQL environment object
// Allocate an a SQL environment object
ret=SQLAllocHandle(SQL_HANDLE_ENV,SQL_NULL_HANDLE,&hdlEnv);if(!SQL_SUCCEEDED(ret)){printf("Could not allocate a handle.\n");exit(EXIT_FAILURE);}else{printf("Allocated an environment handle.\n");}// Set the ODBC version we are going to use to
// 3.
ret=SQLSetEnvAttr(hdlEnv,SQL_ATTR_ODBC_VERSION,(SQLPOINTER)SQL_OV_ODBC3,SQL_IS_UINTEGER);if(!SQL_SUCCEEDED(ret)){printf("Could not set application version to ODBC 3.\n");exit(EXIT_FAILURE);}else{printf("Set application version to ODBC 3.\n");}// Allocate a database handle.
SQLHDBChdlDbc;ret=SQLAllocHandle(SQL_HANDLE_DBC,hdlEnv,&hdlDbc);if(!SQL_SUCCEEDED(ret)){printf("Could not allocate database handle.\n");exit(EXIT_FAILURE);}else{printf("Allocated Database handle.\n");}// Connect to the database using
// SQL Connect
printf("Connecting to database.\n");constchar*dsnName="ExampleDB";constchar*userID="ExampleUser";constchar*passwd="password123";ret=SQLConnect(hdlDbc,(SQLCHAR*)dsnName,SQL_NTS,(SQLCHAR*)userID,SQL_NTS,(SQLCHAR*)passwd,SQL_NTS);if(!SQL_SUCCEEDED(ret)){printf("Could not connect to database.\n");exit(EXIT_FAILURE);}else{printf("Connected to database.\n");}// We're connected. You can do real
// work here
// When done, free all of the handles to close them
// in an orderly fashion.
printf("Disconnecting and freeing handles.\n");ret=SQLDisconnect(hdlDbc);if(!SQL_SUCCEEDED(ret)){printf("Error disconnecting from database. Transaction still open?\n");exit(EXIT_FAILURE);}SQLFreeHandle(SQL_HANDLE_DBC,hdlDbc);SQLFreeHandle(SQL_HANDLE_ENV,hdlEnv);exit(EXIT_SUCCESS);}
Running the above code prints the following:
Allocated an environment handle.
Set application version to ODBC 3.
Allocated Database handle.
Connecting to database.
Connected to database.
Disconnecting and freeing handles.
If you use the DataDirect® driver manager, you should always use the SQL_DRIVER_NOPROMPT value for the SQLDriverConnect function's DriverCompletion parameter (the final parameter in the function call) when connecting to Vertica. Vertica's ODBC driver on Linux and UNIX platforms does not contain a UI, and therefore cannot prompt users for a password.
If your database does not comply with your Vertica license agreement, your application receives a warning message in the return value of the SQLConnect() function. Always have your application examine this return value to see if it is SQL_SUCCESS_WITH_INFO. If it is, have your application extract and display the message to the user.
2.3.1.6 - Load balancing
To enable native load balancing on your client, set the ConnectionLoadBalance connection parameter to true either in the DSN entry or in the connection string.
Native connection load balancing
Native connection load balancing helps spread the overhead caused by client connections on the hosts in the Vertica database. Both the server and the client must enable native connection load balancing. If enabled by both, then when the client initially connects to a host in the database, the host picks a host to handle the client connection from a list of the currently up hosts in the database, and informs the client which host it has chosen.
If the initially-contacted host does not choose itself to handle the connection, the client disconnects, then opens a second connection to the host selected by the first host. The connection process to this second host proceeds as usual—if SSL is enabled, then SSL negotiations begin, otherwise the client begins the authentication process. See About native connection load balancing for details.
To enable native load balancing on your client, set the ConnectionLoadBalance connection parameter to true either in the DSN entry or in the connection string. The following example demonstrates connecting to the database several times with native connection load balancing enabled, and fetching the name of the node handling the connection from the V_MONITOR.CURRENT_SESSION system table.
// Demonstrate enabling native load connection balancing.
// Standard i/o library
#include<stdlib.h>#include<iostream>#include<assert.h>// Only needed for Windows clients
// #include <windows.h>
// SQL include files that define data types and ODBC API
// functions
#include<sql.h>#include<sqlext.h>#include<sqltypes.h>usingnamespacestd;intmain(){SQLRETURNret;// Stores return value from ODBC API calls
SQLHENVhdlEnv;// Handle for the SQL environment object
// Allocate an a SQL environment object
ret=SQLAllocHandle(SQL_HANDLE_ENV,SQL_NULL_HANDLE,&hdlEnv);assert(SQL_SUCCEEDED(ret));// Set the ODBC version we are going to use to
// 3.
ret=SQLSetEnvAttr(hdlEnv,SQL_ATTR_ODBC_VERSION,(SQLPOINTER)SQL_OV_ODBC3,SQL_IS_UINTEGER);assert(SQL_SUCCEEDED(ret));// Allocate a database handle.
SQLHDBChdlDbc;ret=SQLAllocHandle(SQL_HANDLE_DBC,hdlEnv,&hdlDbc);assert(SQL_SUCCEEDED(ret));// Connect four times. If load balancing is on, client should
// connect to different nodes.
for(intx=1;x<=4;x++){// Connect to the database using SQLDriverConnect. Set
// ConnectionLoadBalance to 1 (true) to enable load
// balancing.
cout<<endl<<"Connection attempt #"<<x<<"... ";constchar*connStr="DSN=VMart;ConnectionLoadBalance=1;""UID=ExampleUser;PWD=password123";ret=SQLDriverConnect(hdlDbc,NULL,(SQLCHAR*)connStr,SQL_NTS,NULL,0,NULL,SQL_DRIVER_NOPROMPT);if(!SQL_SUCCEEDED(ret)){cout<<"failed. Exiting."<<endl;exit(EXIT_FAILURE);}else{cout<<"succeeded"<<endl;}// We're connected. Query the v_monitor.current_session table to
// find the name of the node we've connected to.
// Set up a statement handle
SQLHSTMThdlStmt;SQLAllocHandle(SQL_HANDLE_STMT,hdlDbc,&hdlStmt);assert(SQL_SUCCEEDED(ret));ret=SQLExecDirect(hdlStmt,(SQLCHAR*)"SELECT node_name FROM ""V_MONITOR.CURRENT_SESSION;",SQL_NTS);if(SQL_SUCCEEDED(ret)){// Bind varible to column in result set.
SQLTCHARnode_name[256];ret=SQLBindCol(hdlStmt,1,SQL_C_TCHAR,(SQLPOINTER)node_name,sizeof(node_name),NULL);while(SQL_SUCCEEDED(ret=SQLFetchScroll(hdlStmt,SQL_FETCH_NEXT,1))){// Print the bound variables, which now contain the values from the
// fetched row.
cout<<"Connected to node "<<node_name<<endl;}}// Free statement handle
SQLFreeHandle(SQL_HANDLE_STMT,hdlStmt);cout<<"Disconnecting."<<endl;ret=SQLDisconnect(hdlDbc);assert(SQL_SUCCEEDED(ret));}// When done, free all of the handles to close them
// in an orderly fashion.
cout<<endl<<"Freeing handles..."<<endl;SQLFreeHandle(SQL_HANDLE_DBC,hdlDbc);SQLFreeHandle(SQL_HANDLE_ENV,hdlEnv);cout<<"Done!"<<endl;exit(EXIT_SUCCESS);}
Running the above example produces output similar to the following:
Connection attempt #1... succeeded
Connected to node v_vmart_node0001
Disconnecting.

Connection attempt #2... succeeded
Connected to node v_vmart_node0002
Disconnecting.

Connection attempt #3... succeeded
Connected to node v_vmart_node0003
Disconnecting.

Connection attempt #4... succeeded
Connected to node v_vmart_node0001
Disconnecting.

Freeing handles...
Done!
Hostname-based load balancing
You can also balance workloads by resolving a single hostname to multiple IP addresses. The ODBC client driver load balances by automatically resolving the hostname to one of the specified IP addresses at random.
For example, suppose the hostname verticahost.example.com has the following entries in etc/hosts:
SSLMode: Determines whether TLS is required and how the client should behave if the TLS connection attempt fails.
SSLCertFile (SSL CA file in Windows): The absolute path of the client's public certificate file.
SSLKeyFile (SSL cert file in Windows): The absolute path to the client's private key file.
SSLModes: Verify_ca and verify_full
You can use the SSLMode property values verify_ca and verify_full if you want the client to verify the server's information before establishing the connection. If any of these verifications fail, the connection fails:
verify_ca: The client verifies that the server's certificate is from a trusted certificate authority (CA).
verify_full: The client verifies both that the server's certificate is from a trusted CA and that the server's hostname matches the hostname on the certificate.
If verify_ca or verify_full are specified, the client requires the following to establish the connection:
The root.crt, which is the certificate of a CA trusted by both the server and the client.
The server must have:
server.crt, a certificate signed by the trusted CA.
server.key, the server's private key.
For verify_full, each server node must meet one of the following requirements:
Its hostname matches the common name specified in server.crt.
Its hostname or IP address appears in the Subject Alternative Name (SAN) field of server.crt.
TLS behavior flowchart
The following diagram shows an example flowchart for a client connecting with TLS.
In this example:
If SSLMode is set to none or allow, the client connects without authentication.
If SSLMode is set to verify_ca or verify_full and the client does not have root.crt, the connection fails.
At the SSL authentication node, if the SSLMode connection is set to verify_full and the server hostname differs from the hostname specified by the client, authentication fails.
2.3.1.8 - Connection failover
When run, the example's output on the system console is similar to the following:.
If a client application attempts to connect to a host in the Vertica cluster that is down, the connection attempt fails when using the default connection configuration. This failure usually returns an error to the user. The user must either wait until the host recovers and retry the connection or manually edit the connection settings to choose another host.
Due to Vertica Analytic Database's distributed architecture, you usually do not care which database host handles a client application's connection. You can use the client driver's connection failover feature to prevent the user from getting connection errors when the host specified in the connection settings is unreachable. The JDBC driver gives you several ways to let the client driver automatically attempt to connect to a different host if the one specified in the connection parameters is unreachable:
Configure your DNS server to return multiple IP addresses for a host name. When you use this host name in the connection settings, the client attempts to connect to the first IP address from the DNS lookup. If the host at that IP address is unreachable, the client tries to connect to the second IP, and so on until it either manages to connect to a host or it runs out of IP addresses.
Supply a list of backup hosts for the client driver to try if the primary host you specify in the connection parameters is unreachable.
(JDBC only) Use driver-specific connection properties to manage timeouts before attempting to connect to the next node.
For all methods, the process of failover is transparent to the client application (other than specifying the list of backup hosts, if you choose to use the list method of failover). If the primary host is unreachable, the client driver automatically tries to connect to other hosts.
Failover only applies to the initial establishment of the client connection. If the connection breaks, the driver does not automatically try to reconnect to another host in the database.
Choosing a failover method
You usually choose to use one of the two failover methods. However, they do work together. If your DNS server returns multiple IP addresses and you supply a list of backup hosts, the client first tries all of the IPs returned by the DNS server, then the hosts in the backup list.
Note
If a host name in the backup host list resolves to multiple IP addresses, the client does not try all of them. It just tries the first IP address in the list.
The DNS method of failover centralizes the configuration client failover. As you add new nodes to your Vertica Analytic Database cluster, you can choose to add them to the failover list by editing the DNS server settings. All client systems that use the DNS server to connect to Vertica Analytic Database automatically use connection failover without having to change any settings. However, this method does require administrative access to the DNS server that all clients use to connect to the Vertica Analytic Database cluster. This may not be possible in your organization.
Using the backup server list is easier than editing the DNS server settings. However, it decentralizes the failover feature. You may need to update the application settings on each client system if you make changes to your Vertica Analytic Database cluster.
Using DNS failover
To use DNS failover, you need to change your DNS server's settings to map a single host name to multiple IP addresses of hosts in your Vertica Analytic Database cluster. You then have all client applications use this host name to connect to Vertica Analytic Database.
You can choose to have your DNS server return as many IP addresses for the host name as you want. In smaller clusters, you may choose to have it return the IP addresses of all of the hosts in your cluster. However, for larger clusters, you should consider choosing a subset of the hosts to return. Otherwise there can be a long delay as the client driver tries unsuccessfully to connect to each host in a database that is down.
Using the backup host list
To enable backup list-based connection failover, your client application has to specify at least one IP address or host name of a host in the BackupServerNode parameter. The host name or IP can optionally be followed by a colon and a port number. If not supplied, the driver defaults to the standard Vertica port number (5433). To list multiple hosts, separate them by a comma.
The following example demonstrates setting the BackupServerNode connection parameter to specify additional hosts for the connection attempt. The connection string intentionally has a non-existent node, so that the initial connection fails. The client driver has to resort to trying the backup hosts to establish a connection to Vertica.
// Demonstrate using connection failover.
// Standard i/o library
#include<stdlib.h>#include<iostream>#include<assert.h>// Only needed for Windows clients
// #include <windows.hgt;
// SQL include files that define data types and ODBC API
// functions
#include<sql.h>#include<sqlext.h>#include<sqltypes.h>usingnamespacestd;intmain(){SQLRETURNret;// Stores return value from ODBC API calls
SQLHENVhdlEnv;// Handle for the SQL environment object
// Allocate an a SQL environment object
ret=SQLAllocHandle(SQL_HANDLE_ENV,SQL_NULL_HANDLE,&hdlEnv);assert(SQL_SUCCEEDED(ret));// Set the ODBC version we are going to use to
// 3.
ret=SQLSetEnvAttr(hdlEnv,SQL_ATTR_ODBC_VERSION,(SQLPOINTER)SQL_OV_ODBC3,SQL_IS_UINTEGER);assert(SQL_SUCCEEDED(ret));// Allocate a database handle.
SQLHDBChdlDbc;ret=SQLAllocHandle(SQL_HANDLE_DBC,hdlEnv,&hdlDbc);assert(SQL_SUCCEEDED(ret));/* DSN for this connection specifies a bad node, and good backup nodes:
[VMartBadNode]
Description=VMart Vertica Database
Driver=/opt/vertica/lib64/libverticaodbc.so
Database=VMart
Servername=badnode.example.com
BackupServerNode=v_vmart_node0002.example.com,v_vmart_node0003.example.com
*/// Connect to the database using SQLConnect
cout<<"Connecting to database."<<endl;constchar*dsnName="VMartBadNode";// Name of the DSN
constchar*userID="ExampleUser";// Username
constchar*passwd="password123";// password
ret=SQLConnect(hdlDbc,(SQLCHAR*)dsnName,SQL_NTS,(SQLCHAR*)userID,SQL_NTS,(SQLCHAR*)passwd,SQL_NTS);if(!SQL_SUCCEEDED(ret)){cout<<"Could not connect to database."<<endl;exit(EXIT_FAILURE);}else{cout<<"Connected to database."<<endl;}// We're connected. Query the v_monitor.current_session table to
// find the name of the node we've connected to.
// Set up a statement handle
SQLHSTMThdlStmt;SQLAllocHandle(SQL_HANDLE_STMT,hdlDbc,&hdlStmt);assert(SQL_SUCCEEDED(ret));ret=SQLExecDirect(hdlStmt,(SQLCHAR*)"SELECT node_name FROM ""v_monitor.current_session;",SQL_NTS);if(SQL_SUCCEEDED(ret)){// Bind varible to column in result set.
SQLTCHARnode_name[256];ret=SQLBindCol(hdlStmt,1,SQL_C_TCHAR,(SQLPOINTER)node_name,sizeof(node_name),NULL);while(SQL_SUCCEEDED(ret=SQLFetchScroll(hdlStmt,SQL_FETCH_NEXT,1))){// Print the bound variables, which now contain the values from the
// fetched row.
cout<<"Connected to node "<<node_name<<endl;}}cout<<"Disconnecting."<<endl;ret=SQLDisconnect(hdlDbc);assert(SQL_SUCCEEDED(ret));// When done, free all of the handles to close them
// in an orderly fashion.
cout<<endl<<"Freeing handles..."<<endl;SQLFreeHandle(SQL_HANDLE_STMT,hdlStmt);SQLFreeHandle(SQL_HANDLE_DBC,hdlDbc);SQLFreeHandle(SQL_HANDLE_ENV,hdlEnv);cout<<"Done!"<<endl;exit(EXIT_SUCCESS);}
When run, the example's output on the system console is similar to the following:
Connecting to database.
Connected to database.
Connected to node v_vmart_node0002
Disconnecting.

Freeing handles...
Done!
Notice that the connection was made to the first node in the backup list (node 2).
Note
When native connection load balancing is enabled, the additional servers specified in the BackupServerNode connection parameter are only used for the initial connection to a Vertica host. If host redirects the client to another host in the database cluster to handle its connection request, the second connection does not use the backup node list. This is rarely an issue, since native connection load balancing is aware of which nodes are currently up in the database. See Load balancing for more information.
2.3.1.9 - Prompting windows users for missing connection properties
The Vertica Windows ODBC driver can prompt the user for connection information if required information is missing.
The Vertica Windows ODBC driver can prompt the user for connection information if required information is missing. The driver displays the Vertica Connection Dialog if the client application calls SQLDriverConnect to connect to Vertica and either of the following is true:
The DriverCompletion property is set to SQL_DRIVER_PROMPT.
The DriverCompletion property is set to SQL_DRIVER_COMPLETE or SQL_DRIVER_COMPLETE_REQUIRED and the connection string or DSN being used to connect is missing the server, database, or port information.
If either of the above conditions are true, the driver displays a Vertica Connection Dialog to the user to prompt for connection information.
The dialog has all of the property values supplied in the connection string or DSN filled in.
Note
Your connection string at least needs to specify Vertica as the driver, otherwise Windows will not know to use the Vertica ODBC driver to try to open the connection.
The required fields on the connection dialog are Database, UID, Server, and Port. Once these are filled in, the form enables the OK button.
If the user clicks Cancel on the dialog, the SQLDriverConnect function call returns SQL_NO_DATA immediately, without attempting to connect to Vertica. If the user supplies incomplete or incorrect information for the connection, the connection function returns SQL_ERROR after the connection attempt fails.
Note
If the DriverCompletion property of the SQLDriverConnect function call is SQL_DRIVER_NOPROMPT, the ODBC driver immediately returns a SQL_ERROR indicating that it cannot connect because not enough information has been supplied and the driver is not allowed to prompt the user for the missing information.
2.3.1.10 - Prompting windows users for passwords
If the connection string or DSN supplied to the SQLDriverConnect function that client applications call to connect to Vertica lacks any of the required connection properties needed to connect, the Vertica's Windows ODBC driver opens a dialog box to prompt the user to enter the missing information (see Prompting Windows Users for Missing Connection Parameters).
If the connection string or DSN supplied to the SQLDriverConnect function that client applications call to connect to Vertica lacks any of the required connection properties needed to connect, the Vertica's Windows ODBC driver opens a dialog box to prompt the user to enter the missing information (see Prompting windows users for missing connection properties). The user's password is not normally considered a required connection property because Vertica user accounts may not have a password. If the password property is missing, the ODBC driver still tries to connect to Vertica without supplying a password.
You can use the PromptOnNoPassword DSN parameter to force ODBC driver to treat the password as a required connection property. This parameter is useful if you do not want to store passwords in DSN entries. Passwords saved in DSN entries are insecure, since they are stored as clear text in the Windows registry and therefore visible to other users on the same system.
There are two other factors which also decide whether the ODBC driver displays the Vertica Connection Dialog. These are (in order of priority):
The SQLDriverConnect function call's DriverCompletion parameter.
Whether the DSN or connection string contain a password
The following table shows how the PromptOnNoPassword DSN parameter, the DriverCompletion parameter of the SQLDriverConnect function, and whether the DSN or connection string contains a password interact to control whether the Vertica Connection dialog appears.
PromptOnNoPassword Setting
DriverCompletion Value
DSN or Connection String Contains Password?
Vertica Connection Dialog Displays?
Notes
any value
SQL_DRIVER_PROMPT
any case
Yes
This DriverCompletion value forces the dialog to always appear, even if all required connection properties are supplied.
any value
SQL_DRIVER_NOPROMPT
any case
No
This DriverCompletion value always prevents the dialog from appearing.
any value
SQL_DRIVER_COMPLETE
Yes
No
Connection dialog displays if another required connection property is missing.
true
SQL_DRIVER_COMPLETE
No
Yes
false (default)
SQL_DRIVER_COMPLETE
No
No
Connection dialog displays if another required connection property is missing.
The following example code demonstrates using the PromptOnNoPassword DSN parameter along with a system DSN in C++:
There is a difference between not having a password property in the connection string or DSN and having an empty password. The PromptOnNoPassword DSN parameter only has an effect if the connection string or DSN does not have a PWD property (which holds the user's password). If it does, even if it is empty, PromptOnNoPassword will not prompt the Windows ODBC driver to display the Vertica Connection Dialog.
This difference can cause confusion if you are using a DSN to provide the properties for your connection. Once you enter a password for a DSN connection in the Windows ODBC Manager and save it, Windows adds a PWD property to the DSN definition in the registry. If you later delete the password, the PWD property remains in the DSN definition—value is just set to an empty string. The PWD property is created even if you just use the Test button on the ODBC Manager dialog to test the DSN and later clear it before saving the DSN.
Once the password has been set, the only way to remove the PWD property from the DSN definition is to delete it using the Windows Registry Editor:
On the Windows Start menu, click Run.
In the Run dialog, type regedit, then click OK.
In the Registry Editor window, click Edit > Find (or press Ctrl+F).
In the Find window, enter the name of the DSN whose PWD property you want to delete and click OK.
If find operation did not locate a folder under the ODBC.INI folder, click Edit > Find Next (or press F3) until the folder matching your DSN's name is highlighted.
Select the PWD entry and press Delete.
Click Yes to confirm deleting the value.
The DSN now does not have a PWD property and can trigger the connection dialog to appear when used along with PromptOnNoPassword=true and DriverConnect=SQL_DRIVER_COMPLETE.
2.3.1.11 - Setting the locale and encoding for ODBC sessions
Vertica provides the following methods to set the locale and encoding for an ODBC session:.
Vertica provides the following methods to set the locale and encoding for an ODBC session:
Specify the locale for all connections made using the DSN:
On Windows platforms, set the locale in the ODBC DSN configuration editor's Locale field on the Server Settings tab. See Creating an ODBC DSN for windows clients for detailed information.
Set the Locale connection parameter in the connection string in SQLDriverConnect() function. For example:
Use SQLSetConnectAttr() to set the encoding and locale. In general, you should always set the encoding with this function as opposed to, for example, setting it in the DSN.
Pass the SQL_ATTR_VERTICA_LOCALE constant and the ICU string as the attribute value. For example:
Having the client system use a non-Unicode locale (such as setting LANG=C on Linux platforms) and using a Unicode locale for the connection to Vertica can result in errors such as "(10170) String data right truncation on data from data source." If data received from Vertica isn't in UTF-8 format. The driver allocates string memory based on the system's locale setting, and non-UTF-8 data can trigger an overrun. You can avoid these errors by always using a Unicode locale on the client system.
If you specify a locale either in the connection string or in the DSN, the call to the connection function returns SQL_SUCCESS_WITH_INFO on a successful connection, with messages about the state of the locale.
ODBC applications can be in either ANSI or Unicode mode:
If Unicode, the encoding used by ODBC is UCS-2.
If ANSI, the data must be in single-byte ASCII, which is compatible with UTF-8 on the database server.
The ODBC driver converts UCS-2 to UTF-8 when passing to the Vertica server and converts data sent by the Vertica server from UTF-8 to UCS-2.
If the end-user application is not already in UCS-2, the application is responsible for converting the input data to UCS-2, or unexpected results could occur. For example:
On non-UCS-2 data passed to ODBC APIs, when it is interpreted as UCS-2, it could result in an invalid UCS-2 symbol being passed to the APIs, resulting in errors.
Or the symbol provided in the alternate encoding could be a valid UCS-2 symbol; in this case, incorrect data is inserted into the database.
ODBC applications should set the correct server session locale using SQLSetConnectAttr (if different from database-wide setting) in order to set the proper collation and string functions behavior on server.
The following example code demonstrates setting the locale using both the connection string and with the SQLSetConnectAttr() function.
// Standard i/o library
#include<stdio.h>#include<stdlib.h>// Only needed for Windows clients
// #include <windows.h>
// SQL include files that define data types and ODBC API
// functions
#include<sql.h>#include<sqlext.h>#include<sqltypes.h>// Vertica-specific definitions. This include file is located as
// /opt/vertica/include on database hosts.
#include<verticaodbc.h>intmain(){SQLRETURNret;// Stores return value from ODBC API calls
SQLHENVhdlEnv;// Handle for the SQL environment object
// Allocate an a SQL environment object
ret=SQLAllocHandle(SQL_HANDLE_ENV,SQL_NULL_HANDLE,&hdlEnv);if(!SQL_SUCCEEDED(ret)){printf("Could not allocate a handle.\n");exit(EXIT_FAILURE);}else{printf("Allocated an environment handle.\n");}// Set the ODBC version we are going to use to 3.
ret=SQLSetEnvAttr(hdlEnv,SQL_ATTR_ODBC_VERSION,(SQLPOINTER)SQL_OV_ODBC3,SQL_IS_UINTEGER);if(!SQL_SUCCEEDED(ret)){printf("Could not set application version to ODBC 3.\n");exit(EXIT_FAILURE);}else{printf("Set application version to ODBC 3.\n");}// Allocate a database handle.
SQLHDBChdlDbc;ret=SQLAllocHandle(SQL_HANDLE_DBC,hdlEnv,&hdlDbc);if(!SQL_SUCCEEDED(ret)){printf("Could not allocate database handle.\n");exit(EXIT_FAILURE);}else{printf("Allocated Database handle.\n");}// Connect to the database using SQLDriverConnect
printf("Connecting to database.\n");// Set the locale to English in Great Britain.
constchar*connStr="DSN=ExampleDB;locale=en_GB;""UID=dbadmin;PWD=password123";ret=SQLDriverConnect(hdlDbc,NULL,(SQLCHAR*)connStr,SQL_NTS,NULL,0,NULL,SQL_DRIVER_NOPROMPT);if(!SQL_SUCCEEDED(ret)){printf("Could not connect to database.\n");exit(EXIT_FAILURE);}else{printf("Connected to database.\n");}// Get the Locale
charlocale[256];SQLGetConnectAttr(hdlDbc,SQL_ATTR_VERTICA_LOCALE,locale,sizeof(locale),0);printf("Locale is set to: %s\n",locale);// Set the locale to a new value
constchar*newLocale="en_GB";SQLSetConnectAttr(hdlDbc,SQL_ATTR_VERTICA_LOCALE,(SQLCHAR*)newLocale,SQL_NTS);// Get the Locale again
SQLGetConnectAttr(hdlDbc,SQL_ATTR_VERTICA_LOCALE,locale,sizeof(locale),0);printf("Locale is now set to: %s\n",locale);// Set the encoding
SQLSetConnectAttr(hdbc,SQL_ATTR_APP_WCHAR_TYPE,(void*)SQL_DD_CP_UTF16,SQL_IS_INTEGER);// When done, free all of the handles to close them
// in an orderly fashion.
printf("Disconnecting and freeing handles.\n");ret=SQLDisconnect(hdlDbc);if(!SQL_SUCCEEDED(ret)){printf("Error disconnecting from database. Transaction still open?\n");exit(EXIT_FAILURE);}SQLFreeHandle(SQL_HANDLE_DBC,hdlDbc);SQLFreeHandle(SQL_HANDLE_ENV,hdlEnv);exit(EXIT_SUCCESS);}
2.3.1.12 - AUTOCOMMIT and ODBC transactions
The AUTOCOMMIT connection attribute controls whether INSERT, ALTER, COPY and other data-manipulation statements are automatically committed after they complete.
The AUTOCOMMIT connection attribute controls whether INSERT, ALTER, COPY and other data-manipulation statements are automatically committed after they complete. By default, AUTOCOMMIT is enabled—all statements are committed after they execute. This is often not the best setting to use, since it is less efficient. Also, you often want to control whether a set of statements are committed as a whole, rather than have each individual statement committed. For example, you may only want to commit a series of inserts if all of the inserts succeed. With AUTOCOMMIT disabled, you can roll back the transaction if one of the statements fail.
If AUTOCOMMIT is on, the results of statements are committed immediately after they are executed. You cannot roll back a statement executed in AUTOCOMMIT mode.
For example, when AUTOCOMMIT is on, the following single INSERT statement is automatically committed:
ret=SQLExecDirect(hdlStmt,(SQLCHAR*)"INSERT INTO customers VALUES(500,""'Smith, Sam', '123-456-789');",SQL_NTS);
If AUTOCOMMIT is off, you need to manually commit the transaction after executing a statement. For example:
ret=SQLExecDirect(hdlStmt,(SQLCHAR*)"INSERT INTO customers VALUES(500,""'Smith, Sam', '123-456-789');",SQL_NTS);// Other inserts and data manipulations
// Commit the statements(s)
ret=SQLEndTran(SQL_HANDLE_DBC,hdlDbc,SQL_COMMIT);
The inserted row is only committed when you call SQLEndTran(). You can roll back the INSERT and other statements at any point before committing the transaction.
Note
Prepared statements cache the AUTOCOMMIT setting when you create them using SQLPrepare(). Later changing the connection's AUTOCOMMIT setting has no effect on the AUTOCOMMIT settings of previously created prepared statements. See Using prepared statements for details.
The following example demonstrates turning off AUTOCOMMIT, executing an insert, then manually committing the transaction.
// Some standard headers
#include<stdio.h>#include<stdlib.h>// Only needed for Windows clients
// #include <windows.h>
// Standard ODBC headers
#include<sql.h>#include<sqltypes.h>#include<sqlext.h>intmain(){// Set up the ODBC environment
SQLRETURNret;SQLHENVhdlEnv;ret=SQLAllocHandle(SQL_HANDLE_ENV,SQL_NULL_HANDLE,&hdlEnv);if(!SQL_SUCCEEDED(ret)){printf("Could not allocate a handle.\n");exit(EXIT_FAILURE);}else{printf("Allocated an environment handle.\n");}// Tell ODBC that the application uses ODBC 3.
ret=SQLSetEnvAttr(hdlEnv,SQL_ATTR_ODBC_VERSION,(SQLPOINTER)SQL_OV_ODBC3,SQL_IS_UINTEGER);if(!SQL_SUCCEEDED(ret)){printf("Could not set application version to ODBC3.\n");exit(EXIT_FAILURE);}else{printf("Set application to ODBC 3.\n");}// Allocate a database handle.
SQLHDBChdlDbc;ret=SQLAllocHandle(SQL_HANDLE_DBC,hdlEnv,&hdlDbc);if(!SQL_SUCCEEDED(ret)){printf("Could not allocate database handle.\n");exit(EXIT_FAILURE);}else{printf("Allocated Database handle.\n");}// Connect to the database
printf("Connecting to database.\n");constchar*dsnName="ExampleDB";constchar*userID="dbadmin";constchar*passwd="password123";ret=SQLConnect(hdlDbc,(SQLCHAR*)dsnName,SQL_NTS,(SQLCHAR*)userID,SQL_NTS,(SQLCHAR*)passwd,SQL_NTS);if(!SQL_SUCCEEDED(ret)){printf("Could not connect to database.\n");exit(EXIT_FAILURE);}else{printf("Connected to database.\n");}// Get the AUTOCOMMIT state
SQLINTEGERautoCommitState;SQLGetConnectAttr(hdlDbc,SQL_ATTR_AUTOCOMMIT,&autoCommitState,0,NULL);printf("Autocommit is set to: %d\n",autoCommitState);// Disable AUTOCOMMIT
printf("Disabling autocommit.\n");ret=SQLSetConnectAttr(hdlDbc,SQL_ATTR_AUTOCOMMIT,SQL_AUTOCOMMIT_OFF,SQL_NTS);if(!SQL_SUCCEEDED(ret)){printf("Could not disable autocommit.\n");exit(EXIT_FAILURE);}// Get the AUTOCOMMIT state again
SQLGetConnectAttr(hdlDbc,SQL_ATTR_AUTOCOMMIT,&autoCommitState,0,NULL);printf("Autocommit is set to: %d\n",autoCommitState);// Set up a statement handle
SQLHSTMThdlStmt;SQLAllocHandle(SQL_HANDLE_STMT,hdlDbc,&hdlStmt);// Create a table to hold the data
SQLExecDirect(hdlStmt,(SQLCHAR*)"DROP TABLE IF EXISTS customers",SQL_NTS);SQLExecDirect(hdlStmt,(SQLCHAR*)"CREATE TABLE customers ""(CustID int, CustName varchar(100), Phone_Number char(15));",SQL_NTS);// Insert a single row.
ret=SQLExecDirect(hdlStmt,(SQLCHAR*)"INSERT INTO customers VALUES(500,""'Smith, Sam', '123-456-789');",SQL_NTS);if(!SQL_SUCCEEDED(ret)){printf("Could not perform single insert.\n");}else{printf("Performed single insert.\n");}// Need to commit the transaction before closing, since autocommit is
// disabled. Otherwise SQLDisconnect returns an error.
printf("Committing transaction.\n");ret=SQLEndTran(SQL_HANDLE_DBC,hdlDbc,SQL_COMMIT);if(!SQL_SUCCEEDED(ret)){printf("Error committing transaction.\n");exit(EXIT_FAILURE);}// Clean up
printf("Free handles.\n");ret=SQLDisconnect(hdlDbc);if(!SQL_SUCCEEDED(ret)){printf("Error disconnecting from database. Transaction still open?\n");exit(EXIT_FAILURE);}SQLFreeHandle(SQL_HANDLE_STMT,hdlStmt);SQLFreeHandle(SQL_HANDLE_DBC,hdlDbc);SQLFreeHandle(SQL_HANDLE_ENV,hdlEnv);exit(EXIT_SUCCESS);}
Running the above code results in the following output:
Allocated an environment handle.
Set application to ODBC 3.
Allocated Database handle.
Connecting to database.
Connected to database.
Autocommit is set to: 1
Disabling autocommit.
Autocommit is set to: 0
Performed single insert.
Committing transaction.
Free handles.
To retrieve data through ODBC, you execute a query that returns a result set (SELECT, for example), then retrieve the results using one of two methods:.
To retrieve data through ODBC, you execute a query that returns a result set (SELECT, for example), then retrieve the results using one of two methods:
Use the SQLFetch() function to retrieve a row of the result set, then access column values in the row by calling SQLGetData().
Use the SQLBindColumn() function to bind a variable or array to a column in the result set, then call SQLExtendedFetch() or SQLFetchScroll() to read a row of the result set and insert its values into the variable or array.
In both methods you loop through the result set until you either reach the end (signaled by the SQL_NO_DATA return status) or encounter an error.
Note
Vertica supports one cursor per connection. Attempting to use more than one cursor per connection will result in an error. For example, you receive an error if you execute a statement while another statement has a result set open.
The following code example demonstrates retrieving data from Vertica by:
Connecting to the database.
Executing a SELECT statement that returns the IDs and names of all tables.
Binds two variables to the two columns in the result set.
Loops through the result set, printing the ids and name values.
// Demonstrate running a query and getting results by querying the tables
// system table for a list of all tables in the current schema.
// Some standard headers
#include<stdlib.h>#include<sstream>#include<iostream>#include<assert.h>// Standard ODBC headers
#include<sql.h>#include<sqltypes.h>#include<sqlext.h>// Use std namespace to make output easier
usingnamespacestd;// Helper function to print SQL error messages.
template<typenameHandleT>voidreportError(inthandleTypeEnum,HandleThdl){// Get the status records.
SQLSMALLINTi,MsgLen;SQLRETURNret2;SQLCHARSqlState[6],Msg[SQL_MAX_MESSAGE_LENGTH];SQLINTEGERNativeError;i=1;cout<<endl;while((ret2=SQLGetDiagRec(handleTypeEnum,hdl,i,SqlState,&NativeError,Msg,sizeof(Msg),&MsgLen))!=SQL_NO_DATA){cout<<"error record #"<<i++<<endl;cout<<"sqlstate: "<<SqlState<<endl;cout<<"detailed msg: "<<Msg<<endl;cout<<"native error code: "<<NativeError<<endl;}}typedefstruct{SQLHENVhdlEnv;SQLHDBChdlDbc;}DBConnection;voidconnect(DBConnection*pConnInfo){// Set up the ODBC environment
SQLRETURNret;ret=SQLAllocHandle(SQL_HANDLE_ENV,SQL_NULL_HANDLE,&pConnInfo->hdlEnv);assert(SQL_SUCCEEDED(ret));// Tell ODBC that the application uses ODBC 3.
ret=SQLSetEnvAttr(pConnInfo->hdlEnv,SQL_ATTR_ODBC_VERSION,(SQLPOINTER)SQL_OV_ODBC3,SQL_IS_UINTEGER);assert(SQL_SUCCEEDED(ret));// Allocate a database handle.
ret=SQLAllocHandle(SQL_HANDLE_DBC,pConnInfo->hdlEnv,&pConnInfo->hdlDbc);assert(SQL_SUCCEEDED(ret));// Connect to the database
cout<<"Connecting to database."<<endl;constchar*dsnName="ExampleDB";constchar*userID="dbadmin";constchar*passwd="password123";ret=SQLConnect(pConnInfo->hdlDbc,(SQLCHAR*)dsnName,SQL_NTS,(SQLCHAR*)userID,SQL_NTS,(SQLCHAR*)passwd,SQL_NTS);if(!SQL_SUCCEEDED(ret)){cout<<"Could not connect to database"<<endl;reportError<SQLHDBC>(SQL_HANDLE_DBC,pConnInfo->hdlDbc);exit(EXIT_FAILURE);}else{cout<<"Connected to database."<<endl;}}voiddisconnect(DBConnection*pConnInfo){SQLRETURNret;// Clean up by shutting down the connection
cout<<"Free handles."<<endl;ret=SQLDisconnect(pConnInfo->hdlDbc);if(!SQL_SUCCEEDED(ret)){cout<<"Error disconnecting. Transaction still open?"<<endl;exit(EXIT_FAILURE);}SQLFreeHandle(SQL_HANDLE_DBC,pConnInfo->hdlDbc);SQLFreeHandle(SQL_HANDLE_ENV,pConnInfo->hdlEnv);}voidexecuteQuery(SQLHDBChdlDbc,SQLCHAR*pQuery){SQLRETURNret;// Set up a statement handle
SQLHSTMThdlStmt;SQLAllocHandle(SQL_HANDLE_STMT,hdlDbc,&hdlStmt);assert(SQL_SUCCEEDED(ret));// Execute a query to get the names and IDs of all tables in the schema
// search p[ath (usually public).
ret=SQLExecDirect(hdlStmt,pQuery,SQL_NTS);if(!SQL_SUCCEEDED(ret)){// Report error an go no further if statement failed.
cout<<"Error executing statement."<<endl;reportError<SQLHDBC>(SQL_HANDLE_STMT,hdlStmt);exit(EXIT_FAILURE);}else{// Query succeeded, so bind two variables to the two colums in the
// result set,
cout<<"Fetching results..."<<endl;SQLBIGINTtable_id;// Holds the ID of the table.
SQLTCHARtable_name[256];// buffer to hold name of table
ret=SQLBindCol(hdlStmt,1,SQL_C_SBIGINT,(SQLPOINTER)&table_id,sizeof(table_id),NULL);ret=SQLBindCol(hdlStmt,2,SQL_C_TCHAR,(SQLPOINTER)table_name,sizeof(table_name),NULL);// Loop through the results,
while(SQL_SUCCEEDED(ret=SQLFetchScroll(hdlStmt,SQL_FETCH_NEXT,1))){// Print the bound variables, which now contain the values from the
// fetched row.
cout<<table_id<<" | "<<table_name<<endl;}// See if loop exited for reasons other than running out of data
if(ret!=SQL_NO_DATA){// Exited for a reason other than no more data... report the error.
reportError<SQLHDBC>(SQL_HANDLE_STMT,hdlStmt);}}SQLFreeHandle(SQL_HANDLE_STMT,hdlStmt);}intmain(){DBConnectionconn;connect(&conn);executeQuery(conn.hdlDbc,(SQLCHAR*)"SELECT table_id, table_name FROM tables ORDER BY table_name");executeQuery(conn.hdlDbc,(SQLCHAR*)"SELECT table_id, table_name FROM tables ORDER BY table_id");disconnect(&conn);exit(EXIT_SUCCESS);}
Running the example code in the vmart database produces output similar to this:
A primary task for many client applications is loading data into the Vertica database.
A primary task for many client applications is loading data into the Vertica database. There are several different ways to insert data using ODBC, which are covered by the topics in this section.
2.3.1.14.1 - Using a single row insert
The easiest way to load data into Vertica is to run an INSERT SQL statement using the SQLExecuteDirect function.
The easiest way to load data into Vertica is to run an INSERT SQL statement using the SQLExecuteDirect function. However this method is limited to inserting a single row of data.
ret=SQLExecDirect(hstmt,(SQLTCHAR*)"INSERT into Customers values""(1,'abcda','efgh','1')",SQL_NTS);
2.3.1.14.2 - Using prepared statements
Vertica supports using server-side prepared statements with both ODBC and JDBC.
Vertica supports using server-side prepared statements with both ODBC and JDBC. Prepared statements let you define a statement once, and then run it many times with different parameters. The statement you want to execute contains placeholders instead of parameters. When you execute the statement, you supply values for each placeholder.
Placeholders are represented by question marks (?) as in the following example query:
SELECT * FROM public.inventory_fact WHERE product_key = ?
Server-side prepared statements are useful for:
Optimizing queries. Vertica only needs to parse the statement once.
Preventing SQL injection attacks. A SQL injection attack occurs when user input is either incorrectly filtered for string literal escape characters embedded in SQL statements or user input is not strongly typed and thereby unexpectedly run. Since a prepared statement is parsed separately from the input data, there is no chance the data can be accidentally executed by the database.
Binding direct variables to return columns. By pointing to data structures, the code doesn't have to perform extra transformations.
The following example demonstrates a using a prepared statement for a single insert.
// Some standard headers
#include<stdio.h>#include<stdlib.h>// Only needed for Windows clients
// #include <windows.h>
// Standard ODBC headers
#include<sql.h>#include<sqltypes.h>#include<sqlext.h>// Some constants for the size of the data to be inserted.
#define CUST_NAME_LEN 50
#define PHONE_NUM_LEN 15
#define NUM_ENTRIES 4
intmain(){// Set up the ODBC environment
SQLRETURNret;SQLHENVhdlEnv;ret=SQLAllocHandle(SQL_HANDLE_ENV,SQL_NULL_HANDLE,&hdlEnv);if(!SQL_SUCCEEDED(ret)){printf("Could not allocate a handle.\n");exit(EXIT_FAILURE);}else{printf("Allocated an environment handle.\n");}// Tell ODBC that the application uses ODBC 3.
ret=SQLSetEnvAttr(hdlEnv,SQL_ATTR_ODBC_VERSION,(SQLPOINTER)SQL_OV_ODBC3,SQL_IS_UINTEGER);if(!SQL_SUCCEEDED(ret)){printf("Could not set application version to ODBC3.\n");exit(EXIT_FAILURE);}else{printf("Set application to ODBC 3.\n");}// Allocate a database handle.
SQLHDBChdlDbc;ret=SQLAllocHandle(SQL_HANDLE_DBC,hdlEnv,&hdlDbc);// Connect to the database
printf("Connecting to database.\n");constchar*dsnName="ExampleDB";constchar*userID="dbadmin";constchar*passwd="password123";ret=SQLConnect(hdlDbc,(SQLCHAR*)dsnName,SQL_NTS,(SQLCHAR*)userID,SQL_NTS,(SQLCHAR*)passwd,SQL_NTS);if(!SQL_SUCCEEDED(ret)){printf("Could not connect to database.\n");exit(EXIT_FAILURE);}else{printf("Connected to database.\n");}// Disable AUTOCOMMIT
printf("Disabling autocommit.\n");ret=SQLSetConnectAttr(hdlDbc,SQL_ATTR_AUTOCOMMIT,SQL_AUTOCOMMIT_OFF,SQL_NTS);if(!SQL_SUCCEEDED(ret)){printf("Could not disable autocommit.\n");exit(EXIT_FAILURE);}// Set up a statement handle
SQLHSTMThdlStmt;SQLAllocHandle(SQL_HANDLE_STMT,hdlDbc,&hdlStmt);SQLExecDirect(hdlStmt,(SQLCHAR*)"DROP TABLE IF EXISTS customers",SQL_NTS);SQLExecDirect(hdlStmt,(SQLCHAR*)"CREATE TABLE customers ""(CustID int, CustName varchar(100), Phone_Number char(15));",SQL_NTS);// Set up a bunch of variables to be bound to the statement
// parameters.
// Create the prepared statement. This will insert data into the
// table we created above.
printf("Creating prepared statement\n");ret=SQLPrepare(hdlStmt,(SQLTCHAR*)"INSERT INTO customers (CustID, ""CustName, Phone_Number) VALUES(?,?,?)",SQL_NTS);if(!SQL_SUCCEEDED(ret)){printf("Could not create prepared statement\n");SQLFreeHandle(SQL_HANDLE_STMT,hdlStmt);SQLFreeHandle(SQL_HANDLE_DBC,hdlDbc);SQLFreeHandle(SQL_HANDLE_ENV,hdlEnv);exit(EXIT_FAILURE);}else{printf("Created prepared statement.\n");}SQLINTEGERcustID=1234;SQLCHARcustName[100]="Fein, Fredrick";SQLVARCHARphoneNum[15]="555-123-6789";SQLLENstrFieldLen=SQL_NTS;SQLLENcustIDLen=0;// Bind the data arrays to the parameters in the prepared SQL
// statement
ret=SQLBindParameter(hdlStmt,1,SQL_PARAM_INPUT,SQL_C_LONG,SQL_INTEGER,0,0,&custID,0,&custIDLen);if(!SQL_SUCCEEDED(ret)){printf("Could not bind custID array\n");SQLFreeHandle(SQL_HANDLE_STMT,hdlStmt);SQLFreeHandle(SQL_HANDLE_DBC,hdlDbc);SQLFreeHandle(SQL_HANDLE_ENV,hdlEnv);exit(EXIT_FAILURE);}else{printf("Bound custID to prepared statement\n");}// Bind CustNames
SQLBindParameter(hdlStmt,2,SQL_PARAM_INPUT,SQL_C_CHAR,SQL_VARCHAR,50,0,(SQLPOINTER)custName,0,&strFieldLen);if(!SQL_SUCCEEDED(ret)){printf("Could not bind custNames\n");SQLFreeHandle(SQL_HANDLE_STMT,hdlStmt);SQLFreeHandle(SQL_HANDLE_DBC,hdlDbc);SQLFreeHandle(SQL_HANDLE_ENV,hdlEnv);exit(EXIT_FAILURE);}else{printf("Bound custName to prepared statement\n");}// Bind phoneNums
SQLBindParameter(hdlStmt,3,SQL_PARAM_INPUT,SQL_C_CHAR,SQL_CHAR,15,0,(SQLPOINTER)phoneNum,0,&strFieldLen);if(!SQL_SUCCEEDED(ret)){printf("Could not bind phoneNums\n");SQLFreeHandle(SQL_HANDLE_STMT,hdlStmt);SQLFreeHandle(SQL_HANDLE_DBC,hdlDbc);SQLFreeHandle(SQL_HANDLE_ENV,hdlEnv);exit(EXIT_FAILURE);}else{printf("Bound phoneNum to prepared statement\n");}// Execute the prepared statement.
printf("Running prepared statement...");ret=SQLExecute(hdlStmt);if(!SQL_SUCCEEDED(ret)){printf("not successful!\n");}else{printf("successful.\n");}// Done with batches, commit the transaction
printf("Committing transaction\n");ret=SQLEndTran(SQL_HANDLE_DBC,hdlDbc,SQL_COMMIT);if(!SQL_SUCCEEDED(ret)){printf("Could not commit transaction\n");}else{printf("Committed transaction\n");}// Clean up
printf("Free handles.\n");ret=SQLDisconnect(hdlDbc);if(!SQL_SUCCEEDED(ret)){printf("Error disconnecting. Transaction still open?\n");exit(EXIT_FAILURE);}SQLFreeHandle(SQL_HANDLE_STMT,hdlStmt);SQLFreeHandle(SQL_HANDLE_DBC,hdlDbc);SQLFreeHandle(SQL_HANDLE_ENV,hdlEnv);exit(EXIT_SUCCESS);}
2.3.1.14.3 - Using batch inserts
You use batch inserts to insert chunks of data into the database.
You use batch inserts to insert chunks of data into the database. By breaking the data into batches, you can monitor the progress of the load by receiving information about any rejected rows after each batch is loaded. To perform a batch load through ODBC, you typically use a prepared statement with the parameters bound to arrays that contain the data to be loaded. For each batch, you load a new set of data into the arrays then execute the prepared statement.
When you perform a batch load, Vertica uses a COPY statement to load the data. Each additional batch you load uses the same COPY statement. The statement remains open until you end the transaction, close the cursor for the statement, or execute a non-INSERT statement.
Using a single COPY statement for multiple batches improves batch loading efficiency by:
reducing the overhead of inserting individual batches
combining individual batches into larger ROS containers
Note
If the database connection has AUTOCOMMIT enabled, then the transaction is automatically committed after each batch insert statement which closes the COPY statement. Leaving AUTOCOMMIT enabled makes your batch load much less efficient, and can cause added overhead in your database as all of the smaller loads are consolidated.
Even though Vertica uses a single COPY statement to insert multiple batches within a transaction, you can locate which (if any) rows were rejected due to invalid row formats or data type issues after each batch is loaded. See Tracking load status (ODBC) for details.
Note
While you can find rejected rows during the batch load transaction, other types of errors (such as running out of disk space or a node shutdown that makes the database unsafe) are only reported when the COPY statement ends.
Since the batch loads share a COPY statement, errors in one batch can cause earlier batches in the same transaction to be rolled back.
Batch insert steps
The steps your application needs to take in order to perform an ODBC Batch Insert are:
Connect to the database.
Disable autocommit for the connection.
Create a prepared statement that inserts the data you want to load.
Bind the parameters of the prepared statement to arrays that will contain the data you want to load.
Populate the arrays with the data for your batches.
Execute the prepared statement.
Optionally, check the results of the batch load to find rejected rows.
Repeat the previous three steps until all of the data you want to load is loaded.
Commit the transaction.
Optionally, check the results of the entire batch transaction.
The following example code demonstrates a simplified version of the above steps.
// Some standard headers
#include<stdio.h>#include<stdlib.h>// Only needed for Windows clients
// #include <windows.h>
// Standard ODBC headers
#include<sql.h>#include<sqltypes.h>#include<sqlext.h>intmain(){// Number of data rows to insert
constintNUM_ENTRIES=4;// Set up the ODBC environment
SQLRETURNret;SQLHENVhdlEnv;ret=SQLAllocHandle(SQL_HANDLE_ENV,SQL_NULL_HANDLE,&hdlEnv);if(!SQL_SUCCEEDED(ret)){printf("Could not allocate a handle.\n");exit(EXIT_FAILURE);}else{printf("Allocated an environment handle.\n");}// Tell ODBC that the application uses ODBC 3.
ret=SQLSetEnvAttr(hdlEnv,SQL_ATTR_ODBC_VERSION,(SQLPOINTER)SQL_OV_ODBC3,SQL_IS_UINTEGER);if(!SQL_SUCCEEDED(ret)){printf("Could not set application version to ODBC3.\n");exit(EXIT_FAILURE);}else{printf("Set application to ODBC 3.\n");}// Allocate a database handle.
SQLHDBChdlDbc;ret=SQLAllocHandle(SQL_HANDLE_DBC,hdlEnv,&hdlDbc);if(!SQL_SUCCEEDED(ret)){printf("Could not allocate database handle.\n");exit(EXIT_FAILURE);}else{printf("Allocated Database handle.\n");}// Connect to the database
printf("Connecting to database.\n");constchar*dsnName="ExampleDB";constchar*userID="dbadmin";constchar*passwd="password123";ret=SQLConnect(hdlDbc,(SQLCHAR*)dsnName,SQL_NTS,(SQLCHAR*)userID,SQL_NTS,(SQLCHAR*)passwd,SQL_NTS);if(!SQL_SUCCEEDED(ret)){printf("Could not connect to database.\n");exit(EXIT_FAILURE);}else{printf("Connected to database.\n");}// Disable AUTOCOMMIT
printf("Disabling autocommit.\n");ret=SQLSetConnectAttr(hdlDbc,SQL_ATTR_AUTOCOMMIT,SQL_AUTOCOMMIT_OFF,SQL_NTS);if(!SQL_SUCCEEDED(ret)){printf("Could not disable autocommit.\n");exit(EXIT_FAILURE);}// Set up a statement handle
SQLHSTMThdlStmt;SQLAllocHandle(SQL_HANDLE_STMT,hdlDbc,&hdlStmt);// Create a table to hold the data
SQLExecDirect(hdlStmt,(SQLCHAR*)"DROP TABLE IF EXISTS customers",SQL_NTS);SQLExecDirect(hdlStmt,(SQLCHAR*)"CREATE TABLE customers ""(CustID int, CustName varchar(100), Phone_Number char(15));",SQL_NTS);// Create the prepared statement. This will insert data into the
// table we created above.
printf("Creating prepared statement\n");ret=SQLPrepare(hdlStmt,(SQLTCHAR*)"INSERT INTO customers (CustID, ""CustName, Phone_Number) VALUES(?,?,?)",SQL_NTS);if(!SQL_SUCCEEDED(ret)){printf("Could not create prepared statement\n");exit(EXIT_FAILURE);}else{printf("Created prepared statement.\n");}// This is the data to be inserted into the database.
SQLCHARcustNames[][50]={"Allen, Anna","Brown, Bill","Chu, Cindy","Dodd, Don"};SQLINTEGERcustIDs[]={100,101,102,103};// year, month, day, hour, minute, second, fraction
// struct accepts fraction in billionths of a second, but Vertica supports millionths
SQL_TIMESTAMP_STRUCTaccountCreationDates[]={{1997,4,1,12,35,29,0},// 1997-04-01 12:35:29
{2002,6,13,1,0,12,1000},// 2002-06-13 01:00:12.000001
{2000,9,2,2,59,37,999000000},// 2000-09-02 02:59:37.999
{2009,1,25,3,7,59,999999000},// 2009-01-25 03:07:59.999999
};SQLCHARphoneNums[][15]={"1-617-555-1234","1-781-555-1212","1-508-555-4321","1-617-555-4444"};// Bind the data arrays to the parameters in the prepared SQL
// statement. First is the custID.
ret=SQLBindParameter(hdlStmt,1,SQL_PARAM_INPUT,SQL_C_LONG,SQL_INTEGER,0,0,(SQLPOINTER)custIDs,sizeof(SQLINTEGER),NULL);if(!SQL_SUCCEEDED(ret)){printf("Could not bind custID array\n");exit(EXIT_FAILURE);}else{printf("Bound CustIDs array to prepared statement\n");}// Bind the customer account creation date
// timestamp column size is safe at 23 + length of longest fractional component precision
// Max precision that vertica supports for timestamp second precision is 6 digits
ret=SQLBindParameter(stmt.hstmt,2,SQL_PARAM_INPUT,SQL_C_TYPE_TIMESTAMP,SQL_TIMESTAMP,29,6,(SQLPOINTER)accountCreationDates,sizeof(SQL_TIMESTAMP_STRUCT),NULL);if(!SQL_SUCCEEDED(ret)){printf("Could not bind account creation dates\n");exit(EXIT_FAILURE);}else{printf("Bound account creation date array to prepared statement\n");}// Bind CustNames
ret=SQLBindParameter(hdlStmt,3,SQL_PARAM_INPUT,SQL_C_CHAR,SQL_VARCHAR,50,0,(SQLPOINTER)custNames,50,NULL);if(!SQL_SUCCEEDED(ret)){printf("Could not bind custNames\n");exit(EXIT_FAILURE);}else{printf("Bound CustNames array to prepared statement\n");}// Bind phoneNums
ret=SQLBindParameter(hdlStmt,4,SQL_PARAM_INPUT,SQL_C_CHAR,SQL_CHAR,15,0,(SQLPOINTER)phoneNums,15,NULL);if(!SQL_SUCCEEDED(ret)){printf("Could not bind phoneNums\n");exit(EXIT_FAILURE);}else{printf("Bound phoneNums array to prepared statement\n");}// Tell the ODBC driver how many rows we have in the
// array.
ret=SQLSetStmtAttr(hdlStmt,SQL_ATTR_PARAMSET_SIZE,(SQLPOINTER)NUM_ENTRIES,0);if(!SQL_SUCCEEDED(ret)){printf("Could not bind set parameter size\n");exit(EXIT_FAILURE);}else{printf("Bound phoneNums array to prepared statement\n");}// Add multiple batches to the database. This just adds the same
// batch of data four times for simplicity's sake. Each call adds
// the 4 rows into the database.
for(intbatchLoop=1;batchLoop<=5;batchLoop++){// Execute the prepared statement, loading all of the data
// in the arrays.
printf("Adding Batch #%d...",batchLoop);ret=SQLExecute(hdlStmt);if(!SQL_SUCCEEDED(ret)){printf("not successful!\n");}else{printf("successful.\n");}}// Done with batches, commit the transaction
printf("Committing transaction\n");ret=SQLEndTran(SQL_HANDLE_DBC,hdlDbc,SQL_COMMIT);if(!SQL_SUCCEEDED(ret)){printf("Could not commit transaction\n");}else{printf("Committed transaction\n");}// Clean up
printf("Free handles.\n");ret=SQLDisconnect(hdlDbc);if(!SQL_SUCCEEDED(ret)){printf("Error disconnecting. Transaction still open?\n");exit(EXIT_FAILURE);}SQLFreeHandle(SQL_HANDLE_STMT,hdlStmt);SQLFreeHandle(SQL_HANDLE_DBC,hdlDbc);SQLFreeHandle(SQL_HANDLE_ENV,hdlEnv);exit(EXIT_SUCCESS);}
The result of running the above code is shown below.
Allocated an environment handle.
Set application to ODBC 3.
Allocated Database handle.
Connecting to database.
Connected to database.
Creating prepared statement
Created prepared statement.
Bound CustIDs array to prepared statement
Bound CustNames array to prepared statement
Bound phoneNums array to prepared statement
Adding Batch #1...successful.
Adding Batch #2...successful.
Adding Batch #3...successful.
Adding Batch #4...successful.
Adding Batch #5...successful.
Committing transaction
Committed transaction
Free handles.
The resulting table looks like this:
=> SELECT * FROM customers;
 CustID |  CustName   |  Phone_Number
--------+-------------+-----------------
    100 | Allen, Anna | 1-617-555-1234
    101 | Brown, Bill | 1-781-555-1212
    102 | Chu, Cindy  | 1-508-555-4321
    103 | Dodd, Don   | 1-617-555-4444
    100 | Allen, Anna | 1-617-555-1234
    101 | Brown, Bill | 1-781-555-1212
    102 | Chu, Cindy  | 1-508-555-4321
    103 | Dodd, Don   | 1-617-555-4444
    100 | Allen, Anna | 1-617-555-1234
    101 | Brown, Bill | 1-781-555-1212
    102 | Chu, Cindy  | 1-508-555-4321
    103 | Dodd, Don   | 1-617-555-4444
    100 | Allen, Anna | 1-617-555-1234
    101 | Brown, Bill | 1-781-555-1212
    102 | Chu, Cindy  | 1-508-555-4321
    103 | Dodd, Don   | 1-617-555-4444
    100 | Allen, Anna | 1-617-555-1234
    101 | Brown, Bill | 1-781-555-1212
    102 | Chu, Cindy  | 1-508-555-4321
    103 | Dodd, Don   | 1-617-555-4444
(20 rows)
Note
An input parameter bound with the SQL_C_NUMERIC data type uses the default numeric precision (37) and the default scale (0) instead of the precision and scale set by the SQL_NUMERIC_STRUCT input value. This behavior adheres to the ODBC standard. If you do not want to use the default precision and scale, use SQLSetDescField() or SQLSetDescRec() to change them in the statement's attributes.
2.3.1.14.3.1 - Tracking load status (ODBC)
After loading a batch of data, your client application can get the number of rows that were processed and find out whether each row was accepted or rejected.
After loading a batch of data, your client application can get the number of rows that were processed and find out whether each row was accepted or rejected.
Finding the number of accepted rows
To get the number of rows processed by a batch, you add an attribute named SQL_ATTR_PARAMS_PROCESSED_PTR to the statement object that points to a variable to receive the number rows:
When your application calls SQLExecute() to insert the batch, the Vertica ODBC driver saves the number of rows that it processed (which is not necessarily the number of rows that were successfully inserted) in the variable you specified in the SQL_ATTR_PARAMS_PROCESSED_PTR statement attribute.
Finding the accepted and rejected rows
Your application can also set a statement attribute named SQL_ATTR_PARAM_STATUS_PTR that points to an array where the ODBC driver can store the result of inserting each row:
This array must be at least as large as the number of rows being inserted in each batch.
When your application calls SQLExecute to insert a batch, the ODBC driver populates the array with values indicating whether each row was successfully inserted (SQL_PARAM_SUCCESS or SQL_PARAM_SUCCESS_WITH_INFO) or encountered an error (SQL_PARAM_ERROR).
The following example expands on the example shown in Using batch inserts to include reporting the number of rows processed and the status of each row inserted.
In this example, SQLGetDiagRec() is called several times to retrieve the failures for each bulk load. SQLGetDiagRec() returns up to 50 failures for any given operation:
// Some standard headers
#include<stdio.h>#include<stdlib.h>// Only needed for Windows clients
// #include <windows.h>
// Standard ODBC headers
#include<sql.h>#include<sqltypes.h>#include<sqlext.h>// Helper function to print SQL error messages.
template<typenameHandleT>voidreportError(inthandleTypeEnum,HandleThdl){// Get the status records.
SQLSMALLINTi,MsgLen;SQLRETURNret2;SQLCHARSqlState[6],Msg[SQL_MAX_MESSAGE_LENGTH];SQLINTEGERNativeError;i=1;printf("\n");while((ret2=SQLGetDiagRec(handleTypeEnum,hdl,i,SqlState,&NativeError,Msg,sizeof(Msg),&MsgLen))!=SQL_NO_DATA){printf("error record %d\n",i);printf("sqlstate: %s\n",SqlState);printf("detailed msg: %s\n",Msg);printf("native error code: %d\n\n",NativeError);i++;}}intmain(){// Number of data rows to insert
constintNUM_ENTRIES=4;SQLRETURNret;SQLHENVhdlEnv;ret=SQLAllocHandle(SQL_HANDLE_ENV,SQL_NULL_HANDLE,&hdlEnv);if(!SQL_SUCCEEDED(ret)){printf("Could not allocate a handle.\n");exit(EXIT_FAILURE);}else{printf("Allocated an environment handle.\n");}ret=SQLSetEnvAttr(hdlEnv,SQL_ATTR_ODBC_VERSION,(SQLPOINTER)SQL_OV_ODBC3,SQL_IS_UINTEGER);if(!SQL_SUCCEEDED(ret)){printf("Could not set application version to ODBC3.\n");exit(EXIT_FAILURE);}else{printf("Set application to ODBC 3.\n");}SQLHDBChdlDbc;ret=SQLAllocHandle(SQL_HANDLE_DBC,hdlEnv,&hdlDbc);if(!SQL_SUCCEEDED(ret)){printf("Could not allocate database handle.\n");exit(EXIT_FAILURE);}else{printf("Allocated Database handle.\n");}// Connect to the database
printf("Connecting to database.\n");constchar*dsnName="ExampleDB";constchar*userID="dbadmin";constchar*passwd="password123";ret=SQLConnect(hdlDbc,(SQLCHAR*)dsnName,SQL_NTS,(SQLCHAR*)userID,SQL_NTS,(SQLCHAR*)passwd,SQL_NTS);if(!SQL_SUCCEEDED(ret)){printf("Could not connect to database.\n");reportError<SQLHDBC>(SQL_HANDLE_DBC,hdlDbc);exit(EXIT_FAILURE);}else{printf("Connected to database.\n");}// Set up a statement handle
SQLHSTMThdlStmt;SQLAllocHandle(SQL_HANDLE_STMT,hdlDbc,&hdlStmt);SQLExecDirect(hdlStmt,(SQLCHAR*)"DROP TABLE IF EXISTS customers",SQL_NTS);// Create a table into which we can store data
printf("Creating table.\n");ret=SQLExecDirect(hdlStmt,(SQLCHAR*)"CREATE TABLE customers ""(CustID int, CustName varchar(50), Phone_Number char(15));",SQL_NTS);if(!SQL_SUCCEEDED(ret)){reportError<SQLHDBC>(SQL_HANDLE_STMT,hdlStmt);exit(EXIT_FAILURE);}else{printf("Created table.\n");}// Create the prepared statement. This will insert data into the
// table we created above.
printf("Creating prepared statement\n");ret=SQLPrepare(hdlStmt,(SQLTCHAR*)"INSERT INTO customers (CustID, ""CustName, Phone_Number) VALUES(?,?,?)",SQL_NTS);if(!SQL_SUCCEEDED(ret)){reportError<SQLHDBC>(SQL_HANDLE_STMT,hdlStmt);exit(EXIT_FAILURE);}else{printf("Created prepared statement.\n");}// This is the data to be inserted into the database.
charcustNames[][50]={"Allen, Anna","Brown, Bill","Chu, Cindy","Dodd, Don"};SQLINTEGERcustIDs[]={100,101,102,103};charphoneNums[][15]={"1-617-555-1234","1-781-555-1212","1-508-555-4321","1-617-555-4444"};// Bind the data arrays to the parameters in the prepared SQL
// statement
ret=SQLBindParameter(hdlStmt,1,SQL_PARAM_INPUT,SQL_C_LONG,SQL_INTEGER,0,0,(SQLPOINTER)custIDs,sizeof(SQLINTEGER),NULL);if(!SQL_SUCCEEDED(ret)){reportError<SQLHDBC>(SQL_HANDLE_STMT,hdlStmt);exit(EXIT_FAILURE);}else{printf("Bound CustIDs array to prepared statement\n");}// Bind CustNames
SQLBindParameter(hdlStmt,2,SQL_PARAM_INPUT,SQL_C_CHAR,SQL_VARCHAR,50,0,(SQLPOINTER)custNames,50,NULL);if(!SQL_SUCCEEDED(ret)){reportError<SQLHDBC>(SQL_HANDLE_STMT,hdlStmt);exit(EXIT_FAILURE);}else{printf("Bound CustNames array to prepared statement\n");}// Bind phoneNums
SQLBindParameter(hdlStmt,3,SQL_PARAM_INPUT,SQL_C_CHAR,SQL_CHAR,15,0,(SQLPOINTER)phoneNums,15,NULL);if(!SQL_SUCCEEDED(ret)){reportError<SQLHDBC>(SQL_HANDLE_STMT,hdlStmt);exit(EXIT_FAILURE);}else{printf("Bound phoneNums array to prepared statement\n");}// Set up a variable to recieve number of parameters processed.
SQLULENrowsProcessed;// Set a statement attribute to point to the variable
SQLSetStmtAttr(hdlStmt,SQL_ATTR_PARAMS_PROCESSED_PTR,&rowsProcessed,0);// Set up an array to hold the result of each row insert
SQLUSMALLINTrowResults[NUM_ENTRIES];// Set a statement attribute to point to the array
SQLSetStmtAttr(hdlStmt,SQL_ATTR_PARAM_STATUS_PTR,rowResults,0);// Tell the ODBC driver how many rows we have in the
// array.
SQLSetStmtAttr(hdlStmt,SQL_ATTR_PARAMSET_SIZE,(SQLPOINTER)NUM_ENTRIES,0);// Add multiple batches to the database. This just adds the same
// batch of data over and over again for simplicity's sake.
for(intbatchLoop=1;batchLoop<=5;batchLoop++){// Execute the prepared statement, loading all of the data
// in the arrays.
printf("Adding Batch #%d...",batchLoop);ret=SQLExecute(hdlStmt);if(!SQL_SUCCEEDED(ret)){reportError<SQLHDBC>(SQL_HANDLE_STMT,hdlStmt);exit(EXIT_FAILURE);}// Number of rows processed is in rowsProcessed
printf("Params processed: %d\n",rowsProcessed);printf("Results of inserting each row:\n");inti;for(i=0;i<NUM_ENTRIES;i++){SQLUSMALLINTresult=rowResults[i];switch(rowResults[i]){caseSQL_PARAM_SUCCESS:caseSQL_PARAM_SUCCESS_WITH_INFO:printf(" Row %d inserted successsfully\n",i+1);break;caseSQL_PARAM_ERROR:printf(" Row %d was not inserted due to an error.",i+1);break;default:printf(" Row %d had some issue with it: %d\n",i+1,result);}}}// Done with batches, commit the transaction
printf("Commit Transaction\n");ret=SQLEndTran(SQL_HANDLE_DBC,hdlDbc,SQL_COMMIT);if(!SQL_SUCCEEDED(ret)){reportError<SQLHDBC>(SQL_HANDLE_STMT,hdlStmt);}// Clean up
printf("Free handles.\n");ret=SQLDisconnect(hdlDbc);if(!SQL_SUCCEEDED(ret)){printf("Error disconnecting. Transaction still open?\n");exit(EXIT_FAILURE);}SQLFreeHandle(SQL_HANDLE_STMT,hdlStmt);SQLFreeHandle(SQL_HANDLE_DBC,hdlDbc);SQLFreeHandle(SQL_HANDLE_ENV,hdlEnv);exit(EXIT_SUCCESS);}
Running the example code produces the following output:
Allocated an environment handle.Set application to ODBC 3.
Allocated Database handle.
Connecting to database.
Connected to database.
Creating table.
Created table.
Creating prepared statement
Created prepared statement.
Bound CustIDs array to prepared statement
Bound CustNames array to prepared statement
Bound phoneNums array to prepared statement
Adding Batch #1...Params processed: 4
Results of inserting each row:
  Row 1 inserted successfully
  Row 2 inserted successfully
  Row 3 inserted successfully
  Row 4 inserted successfully
Adding Batch #2...Params processed: 4
Results of inserting each row:
  Row 1 inserted successfully
  Row 2 inserted successfully
  Row 3 inserted successfully
  Row 4 inserted successfully
Adding Batch #3...Params processed: 4
Results of inserting each row:
  Row 1 inserted successfully
  Row 2 inserted successfully
  Row 3 inserted successfully
  Row 4 inserted successfully
Adding Batch #4...Params processed: 4
Results of inserting each row:
  Row 1 inserted successfully
  Row 2 inserted successfully
  Row 3 inserted successfully
  Row 4 inserted successfully
Adding Batch #5...Params processed: 4
Results of inserting each row:
  Row 1 inserted successfully
  Row 2 inserted successfully
  Row 3 inserted successfully
  Row 4 inserted successfully
Commit Transaction
Free handles.
2.3.1.14.3.2 - Error handling during batch loads
When loading individual batches, you can find information on how many rows were accepted and what rows were rejected (see Tracking Load Status for details).
When loading individual batches, you can find information on how many rows were accepted and what rows were rejected (see Tracking load status (ODBC) for details). Other errors, such as disk space errors, do not occur while inserting individual batches. This behavior is caused by having a single COPY statement perform the loading of multiple consecutive batches. Using the single COPY statement makes the batch load process perform much faster. It is only when the COPY statement closes that the batched data is committed and Vertica reports other types of errors.
Your bulk loading application should check for errors when the COPY statement closes. Normally, you force the COPY statement to close by calling the SQLEndTran() function to end the transaction. You can also force the COPY statement to close by closing the cursor using the SQLCloseCursor() function, or by setting the database connection's AutoCommit property to true before inserting the last batch in the load.
Note
The COPY statement also closes if you execute any non-insert statement. However having to deal with errors from the COPY statement in what might be an otherwise-unrelated query is not intuitive, and can lead to confusion and a harder to maintain application. You should explicitly end the COPY statement at the end of your batch load and handle any errors at that time.
2.3.1.14.4 - Using the COPY statement
COPY lets you bulk load data from a file stored on a database node into the Vertica database.
COPY lets you bulk load data from a file stored on a database node into the Vertica database. This method is the most efficient way to load data into Vertica because the file resides on the database server. You must be a superuser to use COPY to access the file system of the database node.
Important
In databases that were created in versions of Vertica ≤ 9.2, COPY supports the DIRECT option, which specifies to load data directly into ROS rather than WOS. Use this option when loading large (>100MB) files into the database; otherwise, the load is liable to fill the WOS. When this occurs, the Tuple Mover must perform a
moveout operation on the WOS data. It is more efficient to directly load into ROS and avoid forcing a moveout.
In databases created in Vertica 9.3, Vertica ignores load options and hints and always uses a load method of DIRECT. Databases created in versions ≥ 10.0 no longer support WOS and moveout operations; all data is always loaded directly into ROS.
Note
The exceptions/rejections files are created on the client machine when the exceptions and rejected data modifiers are specified on the COPY command. Specify a local path and filename for these modifiers when executing a COPY query from the driver.
The following example demonstrates using the COPY command:
// Some standard headers
#include<stdio.h>#include<stdlib.h>// Only needed for Windows clients
// #include <windows.h>
// Standard ODBC headers
#include<sql.h>#include<sqltypes.h>#include<sqlext.h>// Helper function to determine if an ODBC function call returned
// successfully.
boolnotSuccess(SQLRETURNret){return(ret!=SQL_SUCCESS&&ret!=SQL_SUCCESS_WITH_INFO);}intmain(){// Set up the ODBC environment
SQLRETURNret;SQLHENVhdlEnv;ret=SQLAllocHandle(SQL_HANDLE_ENV,SQL_NULL_HANDLE,&hdlEnv);if(notSuccess(ret)){printf("Could not allocate a handle.\n");exit(EXIT_FAILURE);}else{printf("Allocated an environment handle.\n");}// Tell ODBC that the application uses ODBC 3.
ret=SQLSetEnvAttr(hdlEnv,SQL_ATTR_ODBC_VERSION,(SQLPOINTER)SQL_OV_ODBC3,SQL_IS_UINTEGER);if(notSuccess(ret)){printf("Could not set application version to ODBC3.\n");exit(EXIT_FAILURE);}else{printf("Set application to ODBC 3.\n");}// Allocate a database handle.
SQLHDBChdlDbc;ret=SQLAllocHandle(SQL_HANDLE_DBC,hdlEnv,&hdlDbc);// Connect to the database
printf("Connecting to database.\n");constchar*dsnName="ExampleDB";// Note: User MUST be a database superuser to be able to access files on the
// filesystem of the node.
constchar*userID="dbadmin";constchar*passwd="password123";ret=SQLConnect(hdlDbc,(SQLCHAR*)dsnName,SQL_NTS,(SQLCHAR*)userID,SQL_NTS,(SQLCHAR*)passwd,SQL_NTS);if(notSuccess(ret)){printf("Could not connect to database.\n");exit(EXIT_FAILURE);}else{printf("Connected to database.\n");}// Disable AUTOCOMMIT
printf("Disabling autocommit.\n");ret=SQLSetConnectAttr(hdlDbc,SQL_ATTR_AUTOCOMMIT,SQL_AUTOCOMMIT_OFF,SQL_NTS);if(notSuccess(ret)){printf("Could not disable autocommit.\n");exit(EXIT_FAILURE);}// Set up a statement handle
SQLHSTMThdlStmt;SQLAllocHandle(SQL_HANDLE_STMT,hdlDbc,&hdlStmt);// Create table to hold the data
SQLExecDirect(hdlStmt,(SQLCHAR*)"DROP TABLE IF EXISTS customers",SQL_NTS);SQLExecDirect(hdlStmt,(SQLCHAR*)"CREATE TABLE customers""(Last_Name char(50) NOT NULL, First_Name char(50),Email char(50), ""Phone_Number char(15));",SQL_NTS);// Run the copy command to load data.
ret=SQLExecDirect(hdlStmt,(SQLCHAR*)"COPY customers ""FROM '/data/customers.txt'",SQL_NTS);if(notSuccess(ret)){printf("Data was not successfully loaded.\n");exit(EXIT_FAILURE);}else{// Get number of rows added.
SQLLENnumRows;ret=SQLRowCount(hdlStmt,&numRows);printf("Successfully inserted %d rows.\n",numRows);}// Done with batches, commit the transaction
printf("Committing transaction\n");ret=SQLEndTran(SQL_HANDLE_DBC,hdlDbc,SQL_COMMIT);if(notSuccess(ret)){printf("Could not commit transaction\n");}else{printf("Committed transaction\n");}// Clean up
printf("Free handles.\n");SQLFreeHandle(SQL_HANDLE_STMT,hdlStmt);SQLFreeHandle(SQL_HANDLE_DBC,hdlDbc);SQLFreeHandle(SQL_HANDLE_ENV,hdlEnv);exit(EXIT_SUCCESS);}
The example prints the following when run:
Allocated an environment handle.
Set application to ODBC 3.
Connecting to database.
Connected to database.
Disabling autocommit.
Successfully inserted 10001 rows.
Committing transaction
Committed transaction
Free handles.
2.3.1.14.5 - Streaming data from the client using COPY LOCAL
COPY LOCAL streams data from a client system file to your Vertica database.
COPY LOCAL streams data from a client system file to your Vertica database. This statement works through the ODBC driver, which simplifies the task of transferring data files from the client to the server.
COPY LOCAL works transparently through the ODBC driver. When a client application executes a COPY LOCAL statement, the ODBC driver reads and streams the data file from the client to the server.
Note
COPY LOCAL must be the first statement in a query,otherwise Vertica returns an error.
This example demonstrates loading data from the client system using the COPY LOCAL statement:
// Some standard headers
#include<stdio.h>#include<stdlib.h>// Only needed for Windows clients
// #include <windows.h>
// Standard ODBC headers
#include<sql.h>#include<sqltypes.h>#include<sqlext.h>intmain(){// Set up the ODBC environment
SQLRETURNret;SQLHENVhdlEnv;ret=SQLAllocHandle(SQL_HANDLE_ENV,SQL_NULL_HANDLE,&hdlEnv);if(!SQL_SUCCEEDED(ret)){printf("Could not allocate a handle.\n");exit(EXIT_FAILURE);}else{printf("Allocated an environment handle.\n");}// Tell ODBC that the application uses ODBC 3.
ret=SQLSetEnvAttr(hdlEnv,SQL_ATTR_ODBC_VERSION,(SQLPOINTER)SQL_OV_ODBC3,SQL_IS_UINTEGER);if(!SQL_SUCCEEDED(ret)){printf("Could not set application version to ODBC3.\n");exit(EXIT_FAILURE);}else{printf("Set application to ODBC 3.\n");}// Allocate a database handle.
SQLHDBChdlDbc;ret=SQLAllocHandle(SQL_HANDLE_DBC,hdlEnv,&hdlDbc);if(!SQL_SUCCEEDED(ret)){printf("Could not aalocate a database handle.\n");exit(EXIT_FAILURE);}else{printf("Set application to ODBC 3.\n");}// Connect to the database
printf("Connecting to database.\n");constchar*dsnName="ExampleDB";constchar*userID="dbadmin";constchar*passwd="password123";ret=SQLConnect(hdlDbc,(SQLCHAR*)dsnName,SQL_NTS,(SQLCHAR*)userID,SQL_NTS,(SQLCHAR*)passwd,SQL_NTS);if(!SQL_SUCCEEDED(ret)){printf("Could not connect to database.\n");exit(EXIT_FAILURE);}else{printf("Connected to database.\n");}// Set up a statement handle
SQLHSTMThdlStmt;SQLAllocHandle(SQL_HANDLE_STMT,hdlDbc,&hdlStmt);// Create table to hold the data
SQLExecDirect(hdlStmt,(SQLCHAR*)"DROP TABLE IF EXISTS customers",SQL_NTS);SQLExecDirect(hdlStmt,(SQLCHAR*)"CREATE TABLE customers""(Last_Name char(50) NOT NULL, First_Name char(50),Email char(50), ""Phone_Number char(15));",SQL_NTS);// Run the copy command to load data.
ret=SQLExecDirect(hdlStmt,(SQLCHAR*)"COPY customers ""FROM LOCAL '/home/dbadmin/customers.txt'",SQL_NTS);if(!SQL_SUCCEEDED(ret)){printf("Data was not successfully loaded.\n");exit(EXIT_FAILURE);}else{// Get number of rows added.
SQLLENnumRows;ret=SQLRowCount(hdlStmt,&numRows);printf("Successfully inserted %d rows.\n",numRows);}// COPY commits automatically, unless it is told not to, so
// there is no need to commit the transaction.
// Clean up
printf("Free handles.\n");ret=SQLDisconnect(hdlDbc);if(!SQL_SUCCEEDED(ret)){printf("Error disconnecting. Transaction still open?\n");exit(EXIT_FAILURE);}SQLFreeHandle(SQL_HANDLE_STMT,hdlStmt);SQLFreeHandle(SQL_HANDLE_DBC,hdlDbc);SQLFreeHandle(SQL_HANDLE_ENV,hdlEnv);exit(EXIT_SUCCESS);}
This example is essentially the same as the example shown in Using the COPY statement, except it uses the COPY statement's LOCAL option to load data from the client system rather than from the file system of the database node.
Note
On Windows clients, the path you supply for the COPY LOCAL file is limited to 216 characters due to limitations in the Windows API.
2.3.2 - C#
The Vertica driver for ADO.NET allows applications written in C# to read data from, update, and load data into Vertica databases.
The Vertica driver for ADO.NET allows applications written in C# to read data from, update, and load data into Vertica databases. It provides a data adapter (Vertica Data Adapter ) that facilitates reading data from a database into a data set, and then writing changed data from the data set back to the database. It also provides a data reader ( VerticaDataReader) for reading data. The driver requires the .NET framework version 3.5+.
This table details the mapping between Vertica data types and .NET and ADO.NET data types.
This table details the mapping between Vertica data types and .NET and ADO.NET data types.
.NET Framework Type
ADO.NET DbType
VerticaType
Vertica Data Type
VerticaDataReader getter
Boolean
Boolean
Bit
Boolean
GetBoolean()
byte[]
Binary
Binary
VarBinary
LongVarBinary
Binary
VarBinary
LongVarBinary
GetBytes()
Note
The limit for LongVarBinary is 32 Million bytes. If you attempt to insert more than the limit during a batch transfer for any one row, then they entire batch fails. Verify the size of the data before attempting to insert a LongVarBinary during a batch.
Datetime
DateTime
Date
Time
TimeStamp
Date
Time
TimeStamp
GetDateTime()
Note
The Time portion of the DateTime object for vertica dates is set to DateTime.MinValue. Previously, VerticaType.DateTime was used for all date/time types. VerticaType.DateTime still exists for backwards compatibility, but now there are more specific VerticaTypes for each type.
DateTimeOffset
DateTimeOffset
TimestampTZ
TimeTZ
TimestampTZ
TimeTZ
GetDateTimeOffset()
Note
The Date portion of the DateTime is set to DateTime.MinValue
Decimal
Decimal
Numeric
Numeric
GetDecimal()
Double
Double
Double
Double
Precision
GetDouble()
Note
Vertica Double type uses a default precision of 53.
Int64
Int64
BigInt
Integer
GetInt64()
TimeSpan
Object
13 Interval Types
13 Interval Types
GetInterval()
Note
There are 13 VerticaType values for the 13 types of intervals. The specific VerticaType used determines the conversion rules that the driver applies. Year/Month intervals represented as 365/30 days
Vertica version 9.0.0 introduced the UUID data type, including JDBC support for UUIDs. The Vertica ADO.NET, ODBC, and OLE DB clients added full support for UUIDs in version 9.0.1. Vertica maintains backwards compatibility with older supported client driver versions that do not support the UUID data type, as follows:
When an older client...
Vertica...
Queries tables with UUID columns
Translates the native UUID values to CHAR values.
Inserts data into a UUID column
Converts the CHAR value sent by the client into a native UUID value.
Queries a UUID column's metadata
Reports its data type as CHAR.
2.3.2.2 - Setting the locale for ADO.NET sessions
ADO.NET applications use a UTF-16 character set encoding and are responsible for converting any non-UTF-16 encoded data to UTF-16. The same cautions as for ODBC apply if this encoding is violated.
The ADO.NET driver converts UTF-16 data to UTF-8 when passing to the Vertica server and converts data sent by Vertica server from UTF-8 to UTF-16.
ADO.NET applications should set the correct server session locale by executing the SET LOCALE TO command in order to get expected collation and string functions behavior on the server.
If there is no default session locale at the database level, ADO.NET applications need to set the correct server session locale by executing the SET LOCALE TO command in order to get expected collation and string functions behavior on the server. See the SET LOCALE command.
2.3.2.3 - Connecting to the database
2.3.2.3.1 - Using TLS: installing certificates on Windows
You can optionally secure communication between your ADO.NET application and Vertica using TLS.
You can optionally secure communication between your ADO.NET application and Vertica using TLS. The Vertica ADO.NET driver uses the default Windows key store when looking for TLS certificates. This is the same key store that Internet Explorer uses.
Before you can use TLS on the client side, you must implement TLS on the server. See TLS protocol, perform those steps, then return to this topic to install the TLS certificate on Windows.
To use TLS for ADO.NET connections to Vertica:
Import the server and client certificates into the Windows Key Store.
If required by your certificates, import the public certificate of your Certifying Authority.
Import the server and client certificates into the windows key store:
Copy the server.crt file you generated when you enabled TLS on the server to your Windows Machine.
Double-click the certificate.
Let Windows determine the key type, and click Install.
Import the public certificate of your CA:
You must establish a chain of trust for the certificates. You may need to import the public certificate for your Certifying Authority (CA) (especially if it is a self-signed certificate).
Using the same certificate as above, double-click the certificate.
Select Place all certificates in the following store.
Click Browse, select Trusted Root Certification Authorities and click Next.
Click Install.
Enable SSL in your ADO.NET applications
In your connection string, be sure to enable SSL by setting the SSL property in VerticaConnectionStringBuilder to true, for example:
//configure connection properties    VerticaConnectionStringBuilder builder = new VerticaConnectionStringBuilder();
    builder.Host = "192.168.17.10";
    builder.Database = "VMart";
    builder.User = "dbadmin";
    builder.SSL = true;
    //open the connection
    VerticaConnection _conn = new VerticaConnection(builder.ToString());
    _conn.Open();
2.3.2.3.2 - Opening and closing the database connection (ADO.NET)
Before you can access data in Vertica through ADO.NET, you must create a connection to the database using the VerticaConnection class which is an implementation of System.Data.DbConnection.
Before you can access data in Vertica through ADO.NET, you must create a connection to the database using the VerticaConnection class which is an implementation of System.Data.DbConnection. The VerticaConnection class takes a single argument that contains the connection properties as a string. You can manually create a string of property keywords to use as the argument, or you can use the VerticaConnectionStringBuilder class to build a connection string for you.
Manually building a connection string and connecting to Vertica
Using VerticaConnectionStringBuilder to create the connection string and connecting to Vertica
Closing the connection
To manually create a connection string:
See ADO.NET connection properties for a list of available properties to use in your connection string. At a minimum, you need to specify the Host, Database, and User.
For each property, provide a value and append the properties and values one after the other, separated by a semicolon. Assign this string to a variable. For example:
Build a Vertica connection object that specifies your connection string.
VerticaConnection _conn = new VerticaConnection(connectString)
Open the connection.
_conn.Open();
Create a command object and associate it with a connection. All VerticaCommand objects must be associated with a connection.
VerticaCommand command = _conn.CreateCommand();
To use the VerticaConnectionStringBuilder class to create a connection string and open a connection:
Create a new object of the VerticaConnectionStringBuilder class.
VerticaConnectionStringBuilder builder = new VerticaConnectionStringBuilder();
Update your VerticaConnectionStringBuilder object with property values. See ADO.NET connection properties for a list of available properties to use in your connection string. At a minimum, you need to specify the Host, Database, and User.
Build a Vertica connection object that specifies your connection VerticaConnectionStringBuilder object as a string.
VerticaConnection _conn = new VerticaConnection(builder.ToString());
Open the connection.
_conn.Open();
Create a command object and associate it with a connection. All VerticaCommand objects must be associated with a connection.
VerticaCommand command = _conn.CreateCommand;
Note
If your database is not in compliance with your Vertica license, the call to VerticaConnection.open() returns a warning message to the console and the log. See Managing licenses for more information.
To close the connection:
When you're finished with the database, close the connection. Failure to close the connection can deteriorate the performance and scalability of your application. It can also prevent other clients from obtaining locks.
_conn.Close();
Example usage:
using System;
using System.Collections.Generic;
using System.Linq;
using System.Text;
using System.Data;
using Vertica.Data.VerticaClient;
namespace ConsoleApplication
{
    class Program
    {
        static void Main(string[] args)
        {
            VerticaConnectionStringBuilder builder = new VerticaConnectionStringBuilder();
            builder.Host = "192.168.1.10";
            builder.Database = "VMart";
            builder.User = "dbadmin";
            VerticaConnection _conn = new VerticaConnection(builder.ToString());
            _conn.Open();
        //Perform some operations
            _conn.Close();
        }
    }
}
2.3.2.3.3 - ADO.NET connection properties
You use connection properties to configure the connection between your ADO.NET client application and your Vertica database.
You use connection properties to configure the connection between your ADO.NET client application and your Vertica database. The properties provide the basic information about the connections, such as the server name and port number, needed to connect to your database.
You can set a connection property in two ways:
Include the property name and value as part of the connection string you pass to a VerticaConnection.
Set the properties in a VerticaConnectionStringBuilder object, and then pass the object as a string to a VerticaConnection.
Property
Description
Default Value
Database
Name of the Vertica database to which you want to connect. For example, if you installed the example VMart database, the database is "VMart".
none
User
Name of the user to log into Vertica.
none
Port
Port on which Vertica is running.
5433
Host
The host name or IP address of the server on which Vertica is running.
You can provide an IPv4 address, IPv6 address, or host name.
In mixed IPv4/IPv6 networks, the DNS server configuration determines which IP version address is sent first. Use the PreferredAddressFamily option to force the connection to use either IPv4 or IPv6.
none
PreferredAddressFamily
The IP version to use if the client and server have both IPv4 and IPv6 addresses and you have provided a host name. Valid values are:
Ipv4—Connect to the server using IPv4.
Ipv6—Connect to the server using IPv6.
None—Use the IP address provided by the DNS server.
The password associated with the user connecting to the server.
string.Empty
BinaryTransfer
Provides a Boolean value that, when set to true, uses binary transfer instead of text transfer. When set to false, the ADO.NET connection uses text transfer. Binary transfer provides faster performance in reading data from a server to an ADO.NET client. Binary transfer also requires less bandwidth than text transfer, although it sometimes uses more when transferring a large number of small values.
Binary transfer mode is not backwards compatible to ADO.NET versions earlier than 3.8. If you are using an earlier version, set this value to false.
The data output by both modes is identical with the following exceptions for certain data types:
FLOAT: Binary transfer has slightly better precision.
TIMESTAMPTZ: Binary transfer can fail to get the session time zone and default to the local time zone, while text transfer reliably uses the session time zone.
NUMERIC: Binary transfer is forcibly disabled for NUMERIC data by the server for Vertica 11.0.2+.
true
ConnSettings
SQL commands to run upon connection. Uses %3B for semicolons.
string.Empty
IsolationLevel
Sets the transaction isolation level for Vertica. See Transactions for a description of the different transaction levels. This value is either Serializable, ReadCommitted, or Unspecified. See Setting the transaction isolation level for an example of setting the isolation level using this keyword.
Note: By default, this value is set to IsolationLevel.Unspecified, which means the connection uses the server's default transaction isolation level. Vertica's default isolation level is IsolationLevel.ReadCommitted.
System.Data. IsolationLevel.Unspecified
Label
A string to identify the session on the server.
string
DirectBatchInsert
Deprecated
true
ResultBufferSize
The size of the buffer to use when streaming results. A value of 0 means ResultBufferSize is turned off.
8192
ConnectionTimeout
Number seconds to wait for a connection. A value of 0 means no timeout.
0
ReadOnly
A Boolean value. If true, throw an exception on write attempts.
false
Pooling
A boolean value, whether to enable connection pooling. Connection pooling is useful for server applications because it allows the server to reuse connections. This saves resources and enhances the performance of executing commands on the database. It also reduces the amount of time a user must wait to establish a connection to the database
false
MinPoolSize
An integer that defines the minimum number of connections to pool.
Valid Values: Cannot be greater than the number of connections that the server is configured to allow. Otherwise, an exception results.
Default: 55
1
MaxPoolSize
An integer that defines the maximum number of connections to pool.
Valid Values: Cannot be greater than the number of connections that the server is configured to allow. Otherwise, an exception results.
20
LoadBalanceTimeout
The amount of time, expressed in seconds, to timeout or remove unused pooled connections.
**Disable: **Set to 0 (no timeouts)
If you are using a cluster environment to load-balance the work, then pool is restricted to the servers in the cluster when the pool was created. If additional servers are added to the cluster, and the pool is not removed, then the new servers are never added to the connection pool unless LoadBalanceTimeout is set and exceeded or VerticaConnection.ClearAllPools() is called manually from an application. If you are using load balancing, then set this property to a value that considers when new servers are added to the cluster. However, do not set it so low that pools are frequently removed and rebuilt, doing so makes pooling ineffective.
0 (no timeout)
SSL
A Boolean value, indicating whether to use SSL for the connection.
false
IntegratedSecurity
Provides a Boolean value that, when set to true, uses the user’s Windows credentials for authentication, instead of user/password in the connection string.
false
KerberosServiceName
Provides the service name portion of the Vertica Kerberos principal; for example: vertica/host@EXAMPLE.COM
vertica
KerberosHostname
Provides the instance or host name portion of the Vertica Kerberos principal; for example: verticaost@EXAMPLE.COM
Value specified in the servername connection string property
2.3.2.3.4 - Load balancing in ADO.NET
Native connection load balancing
Native connection load balancing helps spread the overhead caused by client connections on the hosts in the Vertica database. Both the server and the client must enable native connection load balancing. If enabled by both, then when the client initially connects to a host in the database, the host picks a host to handle the client connection from a list of the currently up hosts in the database, and informs the client which host it has chosen.
If the initially-contacted host does not choose itself to handle the connection, the client disconnects, then opens a second connection to the host selected by the first host. The connection process to this second host proceeds as usual—if SSL is enabled, then SSL negotiations begin, otherwise the client begins the authentication process. See About native connection load balancing for details.
To enable native load balancing on your client, set the ConnectionLoadBalance connection parameter to true either in the connection string or using the ConnectionStringBuilder(). The following example demonstrates connecting to the database several times with native connection load balancing enabled, and fetching the name of the node handling the connection from the V_MONITOR.CURRENT_SESSION system table.
using System;
using System.Text;
using System.Data;
using Vertica.Data.VerticaClient;

namespace ConsoleApplication1 {
    class Program {
        static void Main(string[] args) {
            VerticaConnectionStringBuilder builder = new VerticaConnectionStringBuilder();
            builder.Host = "v_vmart_node0001.example.com";
            builder.Database = "VMart";
            builder.User = "dbadmin";
            // Enable native client load balancing in the client,
            // must also be enabled on the server!
            builder.ConnectionLoadBalance = true;

            // Connect 3 times to verify a new node is connected
            // for each connection.
            for (int i = 1; i <= 4; i++) {
                try {
                    VerticaConnection _conn = new VerticaConnection(builder.ToString());
                    _conn.Open();
                    if (i == 1) {
                        // On the first connection, check the server policy for load balance
                        VerticaCommand sqlcom = _conn.CreateCommand();
                        sqlcom.CommandText = "SELECT LOAD_BALANCE_POLICY FROM V_CATALOG.DATABASES";
                        var returnValue = sqlcom.ExecuteScalar();
                        Console.WriteLine("Status of load balancy policy
             on server: " + returnValue.ToString() + "\n");
                    }
                    VerticaCommand command = _conn.CreateCommand();
                    command.CommandText = "SELECT node_name FROM V_MONITOR.CURRENT_SESSION";
                    VerticaDataReader dr = command.ExecuteReader();
                    while (dr.Read()) {
                        Console.Write("Connect attempt #" + i + "... ");
                        Console.WriteLine("Connected to node " + dr[0]);
                    }
                    dr.Close();
                    _conn.Close();
                    Console.WriteLine("Disconnecting.\n");
                }
                catch(Exception e) {
                    Console.WriteLine(e.Message);
                }
            }
        }
    }
}
Running the above example produces the following output:
Status of load balancing policy on server: roundrobin

Connect attempt #1... Connected to node v_vmart_node0001
Disconnecting.

Connect attempt #2... Connected to node v_vmart_node0002
Disconnecting.

Connect attempt #3... Connected to node v_vmart_node0003
Disconnecting.

Connect attempt #4... Connected to node v_vmart_node0001
Disconnecting.
Hostname-based load balancing
You can also balance workloads by resolving a single hostname to multiple IP addresses. The ADO.NET client driver load balances by automatically resolving the hostname to one of the specified IP addresses at random.
For example, suppose the hostname verticahost.example.com has the following entries in C:\Windows\System32\drivers\etc\hosts:
Specifying the hostname verticahost.example.com randomly resolves to one of the listed IP addresses.
2.3.2.3.5 - ADO.NET connection failover
If a client application attempts to connect to a host in the Vertica cluster that is down, the connection attempt fails when using the default connection configuration. This failure usually returns an error to the user. The user must either wait until the host recovers and retry the connection or manually edit the connection settings to choose another host.
Due to Vertica Analytic Database's distributed architecture, you usually do not care which database host handles a client application's connection. You can use the client driver's connection failover feature to prevent the user from getting connection errors when the host specified in the connection settings is unreachable. The JDBC driver gives you several ways to let the client driver automatically attempt to connect to a different host if the one specified in the connection parameters is unreachable:
Configure your DNS server to return multiple IP addresses for a host name. When you use this host name in the connection settings, the client attempts to connect to the first IP address from the DNS lookup. If the host at that IP address is unreachable, the client tries to connect to the second IP, and so on until it either manages to connect to a host or it runs out of IP addresses.
Supply a list of backup hosts for the client driver to try if the primary host you specify in the connection parameters is unreachable.
(JDBC only) Use driver-specific connection properties to manage timeouts before attempting to connect to the next node.
For all methods, the process of failover is transparent to the client application (other than specifying the list of backup hosts, if you choose to use the list method of failover). If the primary host is unreachable, the client driver automatically tries to connect to other hosts.
Failover only applies to the initial establishment of the client connection. If the connection breaks, the driver does not automatically try to reconnect to another host in the database.
Choosing a failover method
You usually choose to use one of the two failover methods. However, they do work together. If your DNS server returns multiple IP addresses and you supply a list of backup hosts, the client first tries all of the IPs returned by the DNS server, then the hosts in the backup list.
Note
If a host name in the backup host list resolves to multiple IP addresses, the client does not try all of them. It just tries the first IP address in the list.
The DNS method of failover centralizes the configuration client failover. As you add new nodes to your Vertica Analytic Database cluster, you can choose to add them to the failover list by editing the DNS server settings. All client systems that use the DNS server to connect to Vertica Analytic Database automatically use connection failover without having to change any settings. However, this method does require administrative access to the DNS server that all clients use to connect to the Vertica Analytic Database cluster. This may not be possible in your organization.
Using the backup server list is easier than editing the DNS server settings. However, it decentralizes the failover feature. You may need to update the application settings on each client system if you make changes to your Vertica Analytic Database cluster.
Using DNS failover
To use DNS failover, you need to change your DNS server's settings to map a single host name to multiple IP addresses of hosts in your Vertica Analytic Database cluster. You then have all client applications use this host name to connect to Vertica Analytic Database.
You can choose to have your DNS server return as many IP addresses for the host name as you want. In smaller clusters, you may choose to have it return the IP addresses of all of the hosts in your cluster. However, for larger clusters, you should consider choosing a subset of the hosts to return. Otherwise there can be a long delay as the client driver tries unsuccessfully to connect to each host in a database that is down.
Using the backup host list
To enable backup list-based connection failover, your client application has to specify at least one IP address or host name of a host in the BackupServerNode parameter. The host name or IP can optionally be followed by a colon and a port number. If not supplied, the driver defaults to the standard Vertica port number (5433). To list multiple hosts, separate them by a comma.
The following example demonstrates setting the BackupServerNode connection parameter to specify additional hosts for the connection attempt. The connection string intentionally has a non-existent node, so that the initial connection fails. The client driver has to resort to trying the backup hosts to establish a connection to Vertica.
using System;
using System.Text;
using System.Data;
using Vertica.Data.VerticaClient;

namespace ConsoleApplication1
{
    class Program
    {
        static void Main(string[] args)
        {
            VerticaConnectionStringBuilder builder =
        new VerticaConnectionStringBuilder();
            builder.Host = "not.a.real.host:5433";
            builder.Database = "VMart";
            builder.User = "dbadmin";
            builder.BackupServerNode =
        "another.broken.node:5433,v_vmart_node0002.example.com:5433";
            try
            {
                VerticaConnection _conn =
            new VerticaConnection(builder.ToString());
                _conn.Open();
                VerticaCommand sqlcom = _conn.CreateCommand();
                sqlcom.CommandText = "SELECT node_name FROM current_session";
                var returnValue = sqlcom.ExecuteScalar();
                Console.WriteLine("Connected to node: " +
            returnValue.ToString() + "\n");
                _conn.Close();
                Console.WriteLine("Disconnecting.\n");
            }
            catch (Exception e)
            {
                Console.WriteLine(e.Message);
            }
        }
    }
}
Notes
When native connection load balancing is enabled, the additional servers specified in the BackupServerNode connection parameter are only used for the initial connection to a Vertica host. If host redirects the client to another host in the database cluster to handle its connection request, the second connection does not use the backup node list. This is rarely an issue, since native connection load balancing is aware of which nodes are currently up in the database. See Load balancing in ADO.NET.
Connections to a host taken from the BackupServerNode list are not pooled for ADO.NET connections.
2.3.2.4 - Querying the database using ADO.NET
This section describes how to create queries to do the following:.
This section describes how to create queries to do the following:
The ExecuteNonQuery() method used to query the database returns an int32 with the number of rows affected by the query. The maximum size of an int32 type is a constant and is defined to be 2,147,483,547. If your query returns more results than the int32 max, then ADO.NET throws an exception because of the overflow of the int32 type. However the query is still processed by Vertica even when the reporting of the return value fails. This is a limitation in .NET, as ExecuteNonQuery() is part of the standard ADO.NET interface.
2.3.2.4.1 - Inserting data (ADO.NET)
Inserting data can done using the VerticaCommand class.
Inserting data can done using the VerticaCommand class. VerticaCommand is an implementation of DbCommand. It allows you to create and send a SQL statement to the database. Use the CommandText method to assign a SQL statement to the command and then execute the SQL by calling the ExecuteNonQuery method. The ExecuteNonQuery method is used for executing statements that do not return result sets.
Insert data using an INSERT statement. The following is an example of a simple insert. Note that is does not contain a COMMIT statement because the Vertica ADO.NET driver operates in autocommit mode.
command.CommandText =
     "INSERT into test values(2, 'username', 'email', 'password')";
Execute the query. The rowsAdded variable contains the number of rows added by the insert statement.
Int32 rowsAdded = command.ExecuteNonQuery();
The ExecuteNonQuery() method returns the number of rows affected by the command for UPDATE, INSERT, and DELETE statements. For all other types of statements it returns -1. If a rollback occurs then it is also set to -1.
Example usage:
using System;
using System.Collections.Generic;
using System.Linq;
using System.Text;
using System.Data;
using Vertica.Data.VerticaClient;
namespace ConsoleApplication
{
    class Program
    {
        static void Main(string[] args)
        {
            VerticaConnectionStringBuilder builder = new VerticaConnectionStringBuilder();
            builder.Host = "192.168.1.10";
            builder.Database = "VMart";
            builder.User = "dbadmin";
            VerticaConnection _conn = new VerticaConnection(builder.ToString());
            _conn.Open();
        VerticaCommand command = _conn.CreateCommand();
        command.CommandText =
               "INSERT into test values(2, 'username', 'email', 'password')";
        Int32 rowsAdded = command.ExecuteNonQuery();
        Console.WriteLine( rowsAdded + " rows added!");
            _conn.Close();
        }
    }
}
2.3.2.4.1.1 - Using parameters
You can use parameters to execute similar SQL statements repeatedly and efficiently.
You can use parameters to execute similar SQL statements repeatedly and efficiently.
Using parameters
VerticaParameters are an extension of the System.Data.DbParameter base class in ADO.NET and are used to set parameters in commands sent to the server. Use Parameters in all queries (SELECT/INSERT/UPDATE/DELETE) for which the values in the WHERE clause are not static; that is for all queries that have a known set of columns, but whose filter criteria is set dynamically by an application or end user. Using parameters in this way greatly decreases the chances of a SQL injection issue that can occur when simply creating a SQL query from a number of variables.
Parameters require that a valid DbType, VerticaDbType, or System type be assigned to the parameter. See Data types and ADO.NET data types for a mapping of System, Vertica, and DbTypes.
To create a parameter placeholder, place either the at sign (@) or a colon (:) character in front of the parameter name in the actual query string. Do not insert any spaces between the placeholder indicator (@ or :) and the placeholder.
Note
The @ character is the preferred way to identify parameters. The colon (:) character is supported for backward compatibility.
For example, the following typical query uses the string 'MA' as a filter.
SELECT customer_name, customer_address, customer_city, customer_state
FROM customer_dimension WHERE customer_state = 'MA';
Instead, the query can be written to use a parameter. In the following example, the string MA is replaced by the parameter placeholder @STATE.
SELECT customer_name, customer_address, customer_city, customer_state
FROM customer_dimension WHERE customer_state = @STATE;
For example, the ADO.net code for the prior example would be written as:
Although the VerticaCommand class supports a Prepare() method, you do not need to call the Prepare() method for parameterized statements because Vertica automatically prepares the statement for you.
2.3.2.4.1.2 - Creating and rolling back transactions
Transactions in Vertica are atomic, consistent, isolated, and durable.
Creating transactions
Transactions in Vertica are atomic, consistent, isolated, and durable. When you connect to a database using the Vertica ADO.NET Driver, the connection is in autocommit mode and each individual query is committed upon execution. You can collect multiple statements into a single transaction and commit them at the same time by using a transaction. You can also choose to rollback a transaction before it is committed if your code determines that a transaction should not commit.
Transactions use the VerticaTransaction object, which is an implementation of DbTransaction. You must associate the transaction with the VerticaCommand object.
The following code uses an explicit transaction to insert one row each into to tables of the VMart schema.
To create a transaction in Vertica using the ADO.NET driver:
Execute the individual SQL statements to add rows.
command.CommandText =
"insert into product_dimension values( ... )";
command.ExecuteNonQuery();
command.CommandText =
"insert into store_orders_fact values( ... )";
Commit the transaction.
txn.Commit();
Rolling back transactions
If your code checks for errors, then you can catch the error and rollback the entire transaction.
VerticaTransaction txn = _conn.BeginTransaction();
VerticaCommand command = new
VerticaCommand("insert into product_dimension values( 838929, 5, 'New item 5' )", _conn);
// execute the insert
command.ExecuteNonQuery();
command.CommandText = "insert into product_dimension values( 838929, 6, 'New item 6' )";
// try insert and catch any errors
bool error = false;
try
{
command.ExecuteNonQuery();
}
catch (Exception e)
{
Console.WriteLine(e.Message);
error = true;
}
if (error)
{
txn.Rollback();
Console.WriteLine("Errors. Rolling Back.");
}
else
{
txn.Commit();
Console.WriteLine("Queries Successful. Committing.");
}
Commit and rollback example
This example details how you can commit or rollback queries during a transaction.
using System;
using System.Collections.Generic;
using System.Linq;
using System.Text;
using System.Data;
using Vertica.Data.VerticaClient;
namespace ConsoleApplication
{
class Program
{
static void Main(string[] args)
{
VerticaConnectionStringBuilder builder = new VerticaConnectionStringBuilder();
builder.Host = "192.168.1.10";
builder.Database = "VMart";
builder.User = "dbadmin";
VerticaConnection _conn = new VerticaConnection(builder.ToString());
_conn.Open();
bool error = false;
VerticaCommand command = _conn.CreateCommand();
VerticaCommand command2 = _conn.CreateCommand();
VerticaTransaction txn = _conn.BeginTransaction();
command.Connection = _conn;
command.Transaction = txn;
command.CommandText =
"insert into test values(1, 'test', 'test', 'test' )";
Console.WriteLine(command.CommandText);
try
{
command.ExecuteNonQuery();
}
catch (Exception e)
{
Console.WriteLine(e.Message);
error = true;
}
command.CommandText =
"insert into test values(2, 'ear', 'eye', 'nose', 'extra' )";
Console.WriteLine(command.CommandText);
try
{
command.ExecuteNonQuery();
}
catch (Exception e)
{
Console.WriteLine(e.Message);
error = true;
}
if (error)
{
txn.Rollback();
Console.WriteLine("Errors. Rolling Back.");
}
else
{
txn.Commit();
Console.WriteLine("Queries Successful. Committing.");
}
_conn.Close();
}
}
}
The example displays the following output on the console:
insert into test values(1, 'test', 'test', 'test' )
insert into test values(2, 'ear', 'eye', 'nose', 'extra' )
[42601]ERROR: INSERT has more expressions than target columns
Errors. Rolling Back.
2.3.2.4.1.2.1 - Setting the transaction isolation level
You can set the transaction isolation level on a per-connection and per-transaction basis.
You can set the transaction isolation level on a per-connection and per-transaction basis. See Transaction for an overview of the transaction isolation levels supported in Vertica. To set the default transaction isolation level for a connection, use the IsolationLevel keyword in the VerticaConnectionStringBuilder string (see Connection String Keywords for details). To set the isolation level for an individual transaction, pass the isolation level to the VerticaConnection.BeginTransaction() method call to start the transaction.
To set the isolation level on a connection-basis:
Use the VerticaConnectionStringBuilder to build the connection string.
Provide a value for the IsolationLevel builder string. It can take one of two values: IsolationLevel.ReadCommited (default) or IsolationLevel.Serializeable. For example:
To read data from the database use VerticaDataReader, an implementation of DbDataReader.
To read data from the database use VerticaDataReader, an implementation of DbDataReader. This implementation is useful for moving large volumes of data quickly off the server where it can be run through analytic applications.
Note
A VerticaCommand cannot execute anything else while it has an open VerticaDataReader associated with it. To execute something else, close the data reader or use a different VerticaCommand object.
To read data from the database using VerticaDataReader:
Create a query. This query works with the example VMart database.
        command.CommandText =
        "SELECT fat_content, product_description " +
        "FROM (SELECT DISTINCT fat_content, product_description" +
        "      FROM product_dimension " +
        "      WHERE department_description " +        "      IN ('Dairy') " +
        "      ORDER BY fat_content) AS food " +
        "LIMIT 10;";
Execute the reader to return the results from the query. The following command calls the ExecuteReader method of the VerticaCommand object to obtain the VerticaDataReader object.
VerticaDataReader dr = command.ExecuteReader();
Read the data. The data reader returns results in a sequential stream. Therefore, you must read data from tables row-by-row. The following example uses a while loop to accomplish this:
The Vertica data adapter (VerticaDataAdapter) enables a client to exchange data between a data set and a Vertica database.
The Vertica data adapter (VerticaDataAdapter) enables a client to exchange data between a data set and a Vertica database. It is an implementation of DbDataAdapter. You can use VerticaDataAdapter to simply read data, or, for example, read data from a database into a data set, and then write changed data from the data set back to the database.
Batching updates
When using the Update() method to update a dataset, you can optionally use the UpdateBatchSize() method prior to calling Update() to reduce the number of times the client communicates with the server to perform the update. The default value of UpdateBatchSize is 1. If you have multiple rows.Add() commands for a data set, then you can change the batch size to an optimal size to speed up the operations your client must perform to complete the update.
Reading data from Vertica using the data adapter:
The following example details how to perform a select query on the VMart schema and load the result into a DataTable, then output the contents of the DataTable to the console.
using System;
using System.Collections.Generic;
using System.Linq;
using System.Text;
using System.Data;
using System.Data.SqlClient;
Vertica.Data.VerticaClient;
namespace ConsoleApplication
{
    class Program
    {
        static void Main(string[] args)
        {
            VerticaConnectionStringBuilder builder = new VerticaConnectionStringBuilder();
            builder.Host = "192.168.1.10";
            builder.Database = "VMart";
            builder.User = "dbadmin";
            VerticaConnection _conn = new VerticaConnection(builder.ToString());
            _conn.Open();

            // Try/Catch any exceptions
                   try
            {
                using (_conn)
                {
                    // Create the command
                    VerticaCommand command = _conn.CreateCommand();
                    command.CommandText = "select product_key, product_description " +
                        "from product_dimension where product_key < 10";

                        // Associate the command with the connection
                        command.Connection = _conn;

                        // Create the DataAdapter
                        VerticaDataAdapter adapter = new VerticaDataAdapter();
                        adapter.SelectCommand = command;

                        // Fill the DataTable
                        DataTable table = new DataTable();
                        adapter.Fill(table);

                        //  Display each row and column value.
                        int i = 1;
                        foreach (DataRow row in table.Rows)
                        {
                            foreach (DataColumn column in table.Columns)
                            {
                                Console.Write(row[column] + "\t");
                            }
                            Console.WriteLine();
                            i++;
                        }
                    Console.WriteLine(i + " rows returned.");
                }
            }
            catch (Exception e)
            {
                Console.WriteLine(e.Message);
            }
            _conn.Close();
        }
    }
}
Reading data from Vertica into a data set and changing data:
The following example shows how to use a data adapter to read from and insert into a dimension table of the VMart schema.
using System;
using System.Collections.Generic;
using System.Linq;
using System.Text;
using System.Data;
using System.Data.SqlClient;
using Vertica.Data.VerticaClient
namespace ConsoleApplication
{
    class Program
    {
        static void Main(string[] args)
        {
            VerticaConnectionStringBuilder builder = new VerticaConnectionStringBuilder();
            builder.Host = "192.168.1.10";
            builder.Database = "VMart";
            builder.User = "dbadmin";
            VerticaConnection _conn = new VerticaConnection(builder.ToString());
            _conn.Open();

                  // Try/Catch any exceptions
                    try
            {
                using (_conn)
                {

                            //Create a data adapter object using the connection
                            VerticaDataAdapter da = new VerticaDataAdapter();

                            //Create a select statement that retrieves data from the table
                            da.SelectCommand = new
                        VerticaCommand("select * from product_dimension where product_key < 10",
                        _conn);
                            //Set up the insert command for the data adapter, and bind variables for some of the columns
                            da.InsertCommand = new
                        VerticaCommand("insert into product_dimension values( :key, :version, :desc )",
                        _conn);
                    da.InsertCommand.Parameters.Add(new VerticaParameter("key", VerticaType.BigInt));
                    da.InsertCommand.Parameters.Add(new VerticaParameter("version", VerticaType.BigInt));
                    da.InsertCommand.Parameters.Add(new VerticaParameter("desc", VerticaType.VarChar));
                    da.InsertCommand.Parameters[0].SourceColumn = "product_key";
                    da.InsertCommand.Parameters[1].SourceColumn = "product_version";
                    da.InsertCommand.Parameters[2].SourceColumn = "product_description";
                    da.TableMappings.Add("product_key", "product_key");
                    da.TableMappings.Add("product_version", "product_version");
                    da.TableMappings.Add("product_description", "product_description");

                            //Create and fill a Data set for this dimension table, and get the resulting DataTable.
                            DataSet ds = new DataSet();
                    da.Fill(ds, 0, 0, "product_dimension");
                    DataTable dt = ds.Tables[0];

                            //Bind parameters and add two rows to the table.
                            DataRow dr = dt.NewRow();
                    dr["product_key"] = 838929;
                    dr["product_version"] = 5;
                    dr["product_description"] = "New item 5";
                    dt.Rows.Add(dr);
                    dr = dt.NewRow();
                    dr["product_key"] = 838929;
                    dr["product_version"] = 6;
                    dr["product_description"] = "New item 6";
                    dt.Rows.Add(dr);
                    //Extract the changes for the added rows.
                            DataSet ds2 = ds.GetChanges();

                            //Send the modifications to the server.
                            int updateCount = da.Update(ds2, "product_dimension");

                           //Merge the changes into the original Data set, and mark it up to date.
                            ds.Merge(ds2);
                    ds.AcceptChanges();
                    Console.WriteLine(updateCount + " updates made!");
                }
            }
            catch (Exception e)
            {
                Console.WriteLine(e.Message);
            }
            _conn.Close();
        }
    }
}
2.3.2.4.3.2 - Using batch inserts and prepared statements
You can load data in batches using a prepared statement with parameters.
You can load data in batches using a prepared statement with parameters. You can also use transactions to rollback the batch load if any errors are encountered.
If you are loading large batches of data (more than 100MB), then consider using a direct batch insert.
The following example details using data contained in arrays, parameters, and a transaction to batch load data.
The test table used in the example is created with the command:
=> CREATE TABLE test (id INT, username VARCHAR(24), email VARCHAR(64), password VARCHAR(8));
Example batch insert using parameters and transactions
using System;
using System.Collections.Generic;
using System.Linq;
using System.Text;
using System.Data;
using Vertica.Data.VerticaClient;
namespace ConsoleApplication
{
    class Program
    {
        static void Main(string[] args)
        {
            VerticaConnectionStringBuilder builder = new VerticaConnectionStringBuilder();
            builder.Host = "192.168.1.10";
            builder.Database = "VMart";
            builder.User = "dbadmin";
            VerticaConnection _conn = new VerticaConnection(builder.ToString());
            _conn.Open();
            // Create arrays for column data
                    int[] ids = {1, 2, 3, 4};
            string[] usernames = {"user1", "user2", "user3", "user4"};
            string[] emails = { "user1@example.com", "user2@example.com","user3@example.com","user4@example.com" };
            string[] passwords = { "pass1", "pass2", "pass3", "pass4" };
            // create counters for accepted and rejected rows
                    int rows = 0;
            int rejRows = 0;
            bool error = false;
            // Create the transaction
                    VerticaTransaction txn = _conn.BeginTransaction();
            // Create the parameterized query and assign parameter types
                    VerticaCommand command = _conn.CreateCommand();
            command.CommandText = "insert into TEST values (@id, @username, @email, @password)";
            command.Parameters.Add(new VerticaParameter("id", VerticaType.BigInt));
            command.Parameters.Add(new VerticaParameter("username", VerticaType.VarChar));
            command.Parameters.Add(new VerticaParameter("email", VerticaType.VarChar));
            command.Parameters.Add(new VerticaParameter("password", VerticaType.VarChar));
            // Prepare the statement
                    command.Prepare();

                    // Loop through the column arrays and insert the data
                    for (int i = 0; i < ids.Length; i++)            {
                command.Parameters["id"].Value = ids[i];
                command.Parameters["username"].Value = usernames[i];
                command.Parameters["email"].Value = emails[i];
                command.Parameters["password"].Value = passwords[i];
                try
                {
                    rows += command.ExecuteNonQuery();
                }
                catch (Exception e)
                {
                    Console.WriteLine("\nInsert failed - \n  " + e.Message + "\n");
                    ++rejRows;
                    error = true;
                }
            }
            if (error)
            {
                // Roll back if errors
                        Console.WriteLine("Errors. Rolling Back Transaction.");
                Console.WriteLine(rejRows + " rows rejected.");
                txn.Rollback();
            }
            else
            {
                // Commit if no errors
                        Console.WriteLine("No Errors. Committing Transaction.");
                txn.Commit();
                Console.WriteLine("Inserted " + rows + " rows. ");
            }
            _conn.Close();
        }
    }
}
2.3.2.4.3.3 - Streaming data via ADO.NET
There are two options to stream data from a file on the client to your Vertica database through ADO.NET:.
There are two options to stream data from a file on the client to your Vertica database through ADO.NET:
Use the VerticaCopyStream ADO.NET class to stream data in an object-oriented manner
Execute a COPY LOCAL SQL statement to stream the data
The topics in this section explain how to use these options.
2.3.2.4.3.3.1 - Streaming from the client via VerticaCopyStream
The VerticaCopyStream class lets you stream data from the client system to a Vertica database.
The VerticaCopyStream class lets you stream data from the client system to a Vertica database. It lets you use the SQL COPY statement directly without having to copy the data to a host in the database cluster first by substituting one or more data stream(s) for STDIN.
Notes:
Use Transactions and disable auto commit on the copy command for better performance.
Disable auto commit using the copy command with the 'no commit' modifier. You must explicitly disable commits. Enabling transactions does not disable autocommit when using VerticaCopyStream.
The copy command used with VerticaCopyStream uses copy syntax.
VerticaCopyStream.rejects is zeroed every time execute is called. If you want to capture the number of rejects, assign the value of VerticaCopyStream.rejects to another variable before calling execute again.
You can add multiple streams using multiple AddStream() calls.
Example usage:
The following example demonstrates using VerticaCopyStream to copy a file stream into Vertica.
using System;
using System.Collections.Generic;
using System.Linq;
using System.Text;
using System.Data;
using System.IO;
using Vertica.Data.VerticaClient;
namespace ConsoleApplication
{
    class Program
    {
        static void Main(string[] args)
        {
            // Configure connection properties
                    VerticaConnectionStringBuilder builder = new VerticaConnectionStringBuilder();
                builder.Host = "192.168.1.10";
            builder.Database = "VMart";
            builder.User = "dbadmin";
            //open the connection
            VerticaConnection _conn = new VerticaConnection(builder.ToString());
            _conn.Open();
            try
            {
                using (_conn)
                {
                    // Start a transaction
                            VerticaTransaction txn = _conn.BeginTransaction();

                            // Create a table for this example
                            VerticaCommand command = new VerticaCommand("DROP TABLE IF EXISTS copy_table", _conn);
                command.ExecuteNonQuery();
                    command.CommandText = "CREATE TABLE copy_table (Last_Name char(50), "
                                    + "First_Name char(50),Email char(50), "
                                    + "Phone_Number char(15))";
                    command.ExecuteNonQuery();
                    // Create a new filestream from the data file
                            string filename = "C:/customers.txt";
                 Console.WriteLine("\n\nLoading File: " + filename);
                    FileStream inputfile = File.OpenRead(filename);
                    // Define the copy command
                            string copy = "copy copy_table from stdin record terminator E'\n' delimiter '|'" + " enforcelength "
                        + " no commit";
                    // Create a new copy stream instance with the connection and copy statement
                            VerticaCopyStream vcs = new VerticaCopyStream(_conn, copy);

                            // Start the VerticaCopyStream process
                            vcs.Start();
                            // Add the file stream
                            vcs.AddStream(inputfile, false);

                            // Execute the copy
                            vcs.Execute();

                            // Finish stream and write out the list of inserted and rejected rows
                            long rowsInserted = vcs.Finish();
                IList<long> rowsRejected = vcs.Rejects;
                // Does not work when rejected or exceptions defined
                    Console.WriteLine("Number of Rows inserted: " + rowsInserted);
                    Console.WriteLine("Number of Rows rejected: " + rowsRejected.Count);
                    if (rowsRejected.Count > 0)
                    {
                        for (int i = 0; i < rowsRejected.Count; i++)
                        {
                            Console.WriteLine("Rejected row #{0} is row {1}", i, rowsRejected[i]);
                        }
                    }

                            // Commit the changes
                            txn.Commit();
            }
            }
            catch (Exception e)
            {
                Console.WriteLine(e.Message);
            }


                    //close the connection
                    _conn.Close();
    }
    }
}
2.3.2.4.3.3.2 - Using copy with ADO.NET
To use COPY with ADO.NET, just execute a COPY statement and the path to the source file on the client system.
To use COPY with ADO.NET, just execute a COPY statement and the path to the source file on the client system. This method is simpler than using the VerticaCopyStream class. However, you may prefer using VerticaCopyStream if you have many files to copy to the database or if your data comes from a source other than a local file (streamed over a network connection, for example).
The following example code demonstrates using COPY to copy a file from the client to the database. It is the same as the code shown in Bulk Loading Using the COPY Statement and the path to the data file is on the client system, rather than on the server.
To load data that is stored on a database node, use a VerticaCommand object to create a COPY command:
Copy data. The following is an example of using the COPY command to load data. It uses the LOCAL modifier to copy a file local to the client issuing the command.
using System;
using System.Collections.Generic;
using System.Linq;
using System.Text;
using System.Data;
using System.IO;
using Vertica.Data.VerticaClient;
namespace ConsoleApplication
{
    class Program
    {
        static void Main(string[] args)
        {
            // Configure connection properties
            VerticaConnectionStringBuilder builder = new VerticaConnectionStringBuilder();
     builder.Host = "192.168.1.10";
        builder.Database = "VMart";
        builder.User = "dbadmin";

                   // Open the connection
                    VerticaConnection _conn = new VerticaConnection(builder.ToString());
            _conn.Open();
            try
            {
                using (_conn)
                {

                            // Start a transaction
                            VerticaTransaction txn = _conn.BeginTransaction();

                            // Create a table for this example
                            VerticaCommand command = new VerticaCommand("DROP TABLE IF EXISTS lcopy_table", _conn);
                    command.ExecuteNonQuery();
                    command.CommandText = "CREATE TABLE IF NOT EXISTS lcopy_table (Last_Name char(50), "
                                    + "First_Name char(50),Email char(50), "
                                    + "Phone_Number char(15))";
                    command.ExecuteNonQuery();
                    // Define the copy command
                            command.CommandText = "copy lcopy_table from '/home/dbadmin/customers.txt'"
            + " record terminator E'\n' delimiter '|'"
                        + " enforcelength "
                + " no commit";
                            // Execute the copy
        Int32 insertedRows = command.ExecuteNonQuery();
Console.WriteLine(insertedRows + " inserted.");
                            // Commit the changes
                            txn.Commit();
                }
            }
            catch (Exception e)
            {
                Console.WriteLine("Exception: " + e.Message);
            }


                    // Close the connection
                    _conn.Close();
        }
    }
}
2.3.2.5 - Canceling ADO.NET queries
You can cancel a running vsql query by calling the .Cancel() method of any Command object.
You can cancel a running vsql query by calling the .Cancel() method of any Command object. The SampleCancelTests class demonstrates how to cancel a query after reading a specified number of rows. It implements the following methods:
SampleCancelTest() executes the Setup() function to create a test table. Then, it calls RunQueryAndCancel() and RunSecondQuery() to demonstrate how to cancel a query after it reads a specified number of rows. Finally, it runs the Cleanup() function to drop the test table.
Setup() creates a database for the example queries.
Cleanup() drops the database.
RunQueryAndCancel() reads exactly 100 rows from a query that returns more than 100 rows.
RunSecondQuery() reads all rows from a query.
using System;
using Vertica.Data.VerticaClient;

class SampleCancelTests
{
    // Creates a database table, executes a query that cancels during a read loop,
    // executes a query that does not cancel, then drops the test database table.
    // connection: A connection to a Vertica database.

    public static void SampleCancelTest(VerticaConnection connection)
    {
        VerticaCommand command = connection.CreateCommand();

        Setup(command);

        try
        {
            Console.WriteLine("Running query that will cancel after reading 100 rows...");
            RunQueryAndCancel(command);
            Console.WriteLine("Running a second query...");
            RunSecondQuery(command);
            Console.WriteLine("Finished!");
        }
        finally
        {
            Cleanup(command);
        }
    }

    // Set up the database table for the example.
    // command: A Command object used to execute the query.
    private static void Setup(VerticaCommand command)
    {
        // Create table used for test.
        Console.WriteLine("Creating and loading table...");
        command.CommandText = "DROP TABLE IF EXISTS adocanceltest";
        command.ExecuteNonQuery();
        command.CommandText = "CREATE TABLE adocanceltest(id INTEGER, time TIMESTAMP)";
        command.ExecuteNonQuery();
        command.CommandText = @"INSERT INTO adocanceltest
        SELECT row_number() OVER(), slice_time
            FROM(
                    SELECT slice_time FROM(
                    SELECT '2021-01-01'::timestamp s UNION ALL SELECT '2022-01-01'::timestamp s
                    ) sq TIMESERIES slice_time AS '1 second' OVER(ORDER BY s)
            ) sq2";
        command.ExecuteNonQuery();
    }

    // Clean up the database after running the example.
    // command: A Command object used to execute the query.
    private static void Cleanup(VerticaCommand command)
    {
        command.CommandText = "DROP TABLE IF EXISTS adocanceltest";
        command.ExecuteNonQuery();
    }

    // Execute a query that returns many rows and cancels after reading 100.
    // command: A Command object used to execute the query.
    private static void RunQueryAndCancel(VerticaCommand command)
    {
        command.CommandText = "SELECT COUNT(id) from adocanceltest";
        int fullRowCount = Convert.ToInt32(command.ExecuteScalar());

        command.CommandText = "SELECT id, time FROM adocanceltest";
        VerticaDataReader dr = command.ExecuteReader();
        int nCount = 0;
        try
        {
            while (dr.Read())
            {
                nCount++;
                if (nCount == 100)
                {
                    // After reaching 100 rows, cancel the command
                    // Note that it is not necessary to read the remaining rows
                    command.Cancel();
                    return;
                }
            }
        }
        catch (Exception e)
        {
            Console.WriteLine(e.Message);
        }
        finally
        {
            dr.Close();
            // Verify that the cancel stopped the query
            Console.WriteLine((fullRowCount - nCount) + " rows out of " + fullRowCount + " discarded by cancel");
        }
    }

    // Execute a simple query and read all results.
    // command: A Command object used to execute the query.
    private static void RunSecondQuery(VerticaCommand command)
    {
        command.CommandText = "SELECT 1 FROM dual";
        VerticaDataReader dr = command.ExecuteReader();
        try
        {
            while (dr.Read())
            {
                ;
            }
        }
        catch (Exception e)
        {
            Console.WriteLine(e.Message);
            Console.WriteLine("Warning: no exception should be thrown on query after cancel");
        }
        finally
        {
            dr.Close();
        }
    }
}
2.3.2.6 - Handling messages
You can capture info and warning messages that Vertica provides to the ADO.NET driver by using the InfoMessage event on the VerticaConnection delegate class.
You can capture info and warning messages that Vertica provides to the ADO.NET driver by using the InfoMessage event on the VerticaConnection delegate class. This class captures messages that are not severe enough to force an exception to be triggered, but might still provide information that can benefit your application.
To use the VerticaInfoMessageEventHander class:
Create a method to handle the message sent from the even handler:
Create a connection and register a new VerticaInfoMessageHandler delegate for the InfoMessage event:
_conn.InfoMessage += new VerticaInfoMessageEventHandler(conn_InfoMessage);
Execute your queries. If a message is generated, then the event handle function is run.
You can unsubscribe from the event with the following command:
_conn.InfoMessage -= new VerticaInfoMessageEventHandler(conn_InfoMessage);
Examples
using System;
using System.Collections.Generic;
using System.Linq;
using System.Text;
using System.Data;
using Vertica.Data.VerticaClient;
namespace ConsoleApplication {
class Program {
// define message handler to deal with messages
static void conn_InfoMessage(object sender, VerticaInfoMessageEventArgs e)
{
    Console.WriteLine(e.SqlState + ": " + e.Message);
}
static void Main(string[] args) {
//configure connection properties
VerticaConnectionStringBuilder builder = new VerticaConnectionStringBuilder();
builder.Host = "192.168.1.10";
builder.Database = "VMart";
builder.User = "dbadmin";
//open the connection
VerticaConnection _conn = new VerticaConnection(builder.ToString());
_conn.Open();
//create message handler instance by subscribing it to the InfoMessage event of the connection
_conn.InfoMessage += new VerticaInfoMessageEventHandler(conn_InfoMessage);
//create and execute the command
VerticaCommand cmd = _conn.CreateCommand();
cmd.CommandText = "drop table if exists fakeTable";
cmd.ExecuteNonQuery();
//close the connection
_conn.Close();
}
}
}
This examples displays the following when run:
00000: Nothing was dropped
2.3.2.7 - Getting table metadata
You can get the table metadata by using the GetSchema() method on a connection and loading the metadata into a DataTable:.
You can get the table metadata by using the GetSchema() method on a connection and loading the metadata into a DataTable:
database_name, schema_name, and table_name can be set to null, a specific name, or use a LIKE pattern.
table_type can be one of:
"SYSTEM TABLE"
"TABLE"
"GLOBAL TEMPORARY"
"LOCAL TEMPORARY"
"VIEW"
null
If table_type is null, then the metadata for all metadata tables is returned.
using System;
using System.Collections.Generic;
using System.Linq;
using System.Text;
using System.Data;
using Vertica.Data.VerticaClient;
namespace ConsoleApplication
{
    class Program
    {
        static void Main(string[] args)
        {
            // configure connection properties
            VerticaConnectionStringBuilder builder = new VerticaConnectionStringBuilder();
            builder.Host = "192.168.1.10";
            builder.Database = "VMart";
            builder.User = "dbadmin";

            // open the connection
            VerticaConnection _conn = new VerticaConnection(builder.ToString());
            _conn.Open();

            // create a new data table containing the schema
            // the last argument can be "SYSTEM TABLE", "TABLE", "GLOBAL TEMPORARY",
            // "LOCAL TEMPORARY", "VIEW", or null for all types
            DataTable table = _conn.GetSchema("Tables", new string[] { null, null, null, "SYSTEM TABLE" });

            // print out the schema
            foreach (DataRow row in table.Rows) {
                foreach (DataColumn col in table.Columns)
                {
                    Console.WriteLine("{0} = {1}", col.ColumnName, row[col]);
                }
                Console.WriteLine("============================");
            }

            //close the connection
            _conn.Close();
        }
    }
}
2.3.3 - Go
The open-source vertica-sql-go driver lets you interact with your database with Go.
The open-source vertica-sql-go driver lets you interact with your database with Go. For details, see vertica-sql-go.
2.3.4 - Java
The Vertica JDBC driver provides you with a standard JDBC API.
The Vertica JDBC driver provides you with a standard JDBC API. If you have accessed other databases using JDBC, you should find accessing Vertica familiar. This section explains how to use the JDBC to connect your Java application to Vertica.
The Vertica JDBC driver complies with the JDBC 4.0 standards (although it does not implement all of the optional features in them).
The Vertica JDBC driver complies with the JDBC 4.0 standards (although it does not implement all of the optional features in them). Your application can use the DatabaseMetaData class to determine if the driver supports a particular feature it wants to use. In addition, the driver implements the Wrapper interface, which lets your client code discover Vertica-specific extensions to the JDBC standard classes, such as VerticaConnection and VerticaStatement classes.
Some important facts to keep in mind when using the Vertica JDBC driver:
Cursors are forward only and are not scrollable. Result sets cannot be updated.
A connection supports executing a single statement at any time. If you want to execute multiple statements simultaneously, you must open multiple connections.
CallableStatement is supported as of the version 12.0.0 of the client driver.
Multiple SQL statement support
The Vertica JDBC driver can execute strings containing multiple statements. For example:
stmt.executeUpdate("CREATE TABLE t(a INT);INSERT INTO t VALUES(10);");
Only the Statement interface supports executing strings containing multiple SQL statements. You cannot use multiple statement strings with PreparedStatement. COPY statements that copy a file from a host file system work in a multiple statement string. However, client COPY statements (COPY FROM STDIN) do not work.
Multiple batch conversion to COPY statements
The Vertica JDBC driver converts all batch inserts into Vertica COPY statements. If you turn off your JDBC connection's AutoCommit property, the JDBC driver uses a single COPY statement to load data from sequential batch inserts which can improve load performance by reducing overhead. See Batch inserts using JDBC prepared statements for details.
Multiple JDBC version support
The Vertica JDBC driver implements both JDBC 3.0 and JDBC 4.0 compliant interfaces. The interface that the driver returns to your application depends on the JVM version on which it is running. If your application is running on a 5.0 JVM, the driver supplies your application with JDBC 3.0 classes. If your application is running on a 6.0 or later JVM, the driver supplies it with JDBC 4.0 classes.
Multiple active result sets (MARS)
The Vertica JDBC driver supports Multiple active result sets (MARS). MARS allows the execution of multiple queries on a single connection. While ResultBufferSize sends the results of a query directly to the client, MARS stores the results first on the server. Once query execution has finished and all of the results have been stored, you can make a retrieval request to the server to have rows returned to the client.
2.3.4.2 - Creating and configuring a connection
Before your Java application can interact with Vertica, it must create a connection.
Before your Java application can interact with Vertica, it must create a connection. Connecting to Vertica using JDBC is similar to connecting to most other databases.
Importing SQL packages
Before creating a connection, you must import the Java SQL packages. A simple way to do so is to import the entire package using a wildcard:
importjava.sql.*;
You may also want to import the Properties class. You can use an instance of this class to pass connection properties when instantiating a connection, rather than encoding everything within the connection string:
importjava.util.Properties;
If your application needs to run in a Java 5 JVM, it uses the older JDBC 3.0-compliant driver. This driver requires that you to manually load the Vertica JDBC driver using the Class.forName() method:
// Only required for old JDBC 3.0 driver
try{Class.forName("com.vertica.jdbc.Driver");}catch(ClassNotFoundExceptione){// Could not find the driver class. Likely an issue
// with finding the .jar file.
System.err.println("Could not find the JDBC driver class.");e.printStackTrace();return;// Exit. Cannot do anything further.
}
Your application may run in a Java 6 or later JVM. If so, then the JVM automatically loads the Vertica JDBC 4.0-compatible driver without requiring the call to Class.forName. However, making this call does not adversely affect the process. Thus, if you want your application to be compatible with both Java 5 and Java 6 (or later) JVMs, it can still call Class.forName.
Opening the connection
With SQL packages imported, you are ready to create your connection by calling the DriverManager.getConnection() method. You supply this method with at least the following information:
The IP address or host name of a node in the database cluster.
You can provide an IPv4 address, IPv6 address, or host name.
In mixed IPv4/IPv6 networks, the DNS server configuration determines which IP version address is sent first. Use the PreferredAddressFamily option to force the connection to use either IPv4 or IPv6.
Port number for the database
Username of a database user account
Password of the user (if the user has a password)
The first three parameters are always supplied as part of the connection string, a URL that tells the JDBC driver where to find the database. The format of the connection string is (/databaseName is optional):
Of these three methods, the Properties object is the most flexible because it makes passing additional connection properties to the getConnection() method easy. See Connection Properties and Setting and getting connection property values for more information about the additional connection properties.
If there is any problem establishing a connection to the database, the getConnection() method throws a SQLException on one of its subclasses. To prevent an exception, enclose the method within a try-catch block, as shown in the following complete example of establishing a connection.
importjava.sql.*;importjava.util.Properties;publicclassVerySimpleVerticaJDBCExample{publicstaticvoidmain(String[]args){/*
* If your client needs to run under a Java 5 JVM, It will use the older
* JDBC 3.0-compliant driver, which requires you manually load the
* driver using Class.forname
*//*
* try { Class.forName("com.vertica.jdbc.Driver"); } catch
* (ClassNotFoundException e) { // Could not find the driver class.
* Likely an issue // with finding the .jar file.
* System.err.println("Could not find the JDBC driver class.");
* e.printStackTrace(); return; // Bail out. We cannot do anything
* further. }
*/PropertiesmyProp=newProperties();myProp.put("user","dbadmin");myProp.put("password","vertica");myProp.put("loginTimeout","35");myProp.put("KeystorePath","c:/keystore/keystore.jks");myProp.put("KeystorePassword","keypwd");myProp.put("TrustStorePath","c:/truststore/localstore.jks");myProp.put("TrustStorePassword","trustpwd");Connectionconn;try{conn=DriverManager.getConnection("jdbc:vertica://V_vmart_node0001.example.com:5433/vmart",myProp);System.out.println("Connected!");conn.close();}catch(SQLTransientConnectionExceptionconnException){// There was a potentially temporary network error
// Could automatically retry a number of times here, but
// instead just report error and exit.
System.out.print("Network connection issue: ");System.out.print(connException.getMessage());System.out.println(" Try again later!");return;}catch(SQLInvalidAuthorizationSpecExceptionauthException){// Either the username or password was wrong
System.out.print("Could not log into database: ");System.out.print(authException.getMessage());System.out.println(" Check the login credentials and try again.");return;}catch(SQLExceptione){// Catch-all for other exceptions
e.printStackTrace();}}}
Creating a connection with a keystore and truststore
You can create secure connections with your JDBC client driver using a keystore and a truststore. For more information on security within Vertica, refer to Security and authentication.
Generate your own self-signed certificate or use an existing CA (certificate authority) certificate as the root CA. For information on this process, refer to the Schannel documentation.
Optional: Generate or import an intermediate CA certificate signed by your root CA. While not required, having an intermediate CA can be useful for testing and debugging your connection.
Generate and sign (or import) a server certificate for Vertica.
Generate and sign a certificate for your client using the same CA that signed your server certificate.
Convert your chain of pem certificates to a single pkcs 12 file.
Import the client key and chain into a keystore JKS file from your pkcs12 file. For information on using the keytool command interface, refer to the Java documentation.
When you disconnect a user session, any uncommitted transactions are automatically rolled back.
If your database is not compliant with your Vertica license terms, Vertica issues a SQLWarning when you establish the connection to the database. You can retrieve this warning using the Connection.getWarnings() method. See Managing licenses for more information about complying with your license terms.
2.3.4.2.1 - JDBC connection properties
You use connection properties to configure the connection between your JDBC client application and your Vertica database.
You use connection properties to configure the connection between your JDBC client application and your Vertica database. The properties provide the basic information about the connections, such as the server name and port number to use to connect to your database. They also let you tune the performance of your connection and enable logging.
You can set a connection property in one of the following ways:
Include the property name and value as part of the connection string you pass to the method DriverManager.getConnection().
Set the properties in a Properties object, and then pass it to the method DriverManager.getConnection().
Use the method VerticaConnection.setProperty(). With this approach, you can change only those connection properties that remain changeable after the connection has been established.
Also, some standard JDBC connection properties have getters and setters on the Connection interface, such as Connection.setAutoCommit().
Connection properties
The properties in the following table can only be set before you open the connection to the database. Two of them are required for every connection.
Property
Description
BinaryTransfer
Boolean value that determines which mode Vertica uses when connecting to a JDBC client:
true: binary transfer (default)
false: text transfer
Binary transfer is generally more efficient at reading data from a server to a JDBC client and typically requires less bandwidth than text transfer. However, when transferring a large number of small values, binary transfer may use more bandwidth.
The data output by both modes is identical with the following exceptions for certain data types:
FLOAT: Binary transfer has slightly better precision.
TIMESTAMPTZ: Binary transfer can fail to get the session time zone and default to the local time zone, while text transfer reliably uses the session time zone.
NUMERIC: Binary transfer is forcibly disabled for NUMERIC data by the server for Vertica 11.0.2+.
ConnSettings
A string containing SQL statements that the JDBC driver automatically runs after it connects to the database. You can use this property to set the locale or schema search path, or perform other configuration that the connection requires.
Label
Sets a label for the connection on the server. This value appears in the client_label column of the SESSIONS system table.
Default:jdbc-driver-version-random_number
SSL
When set to true, use SSL to encrypt the connection to the server. Vertica must be configured to handle SSL connections before you can establish an SSL-encrypted connection to it. See TLS protocol. This property has been deprecated in favor of the TLSmode property.
Default: false
TLSmode
TLSmode identifies the security level that Vertica applies to the JDBC connection. Vertica must be configured to handle TLS connections before you can establish an encrypted connection to it. See TLS protocol for details. Valid values are:
disable: JDBC connects using plain text and implements no security measures.
require: JDBC connects using TLS without verifying the CA certificate.
verify-ca: JDBC connects using TLS and confirms that the server certificate has been signed by the certificate authority. This setting is equivalent to the deprecated ssl=true property.
verify-full: JDBC connects using TLS, confirms that the server certificate has been signed by the certificate authority, and verifies that the host name matches the name provided in the server certificate.
If this property and the SSL property are set, this property takes precedence.
Default: disable
HostnameVerifier
If TLSmode is set to verify-full, this property the fully qualified domain name of the verifier that you want to confirm the host name.
Password
Required (for non-OAuth connections), the password to use to log into the database.
User
Required (for non-OAuth connections), the database user name to use to connect to the database.
ConnectionLoadBalance
A Boolean value indicating whether the client is willing to have its connection redirected to another host in the Vertica database. This setting has an effect only if the server has also enabled connection load balancing. See About native connection load balancing for more information about native connection load balancing.
Default: false
BackupServerNode
A string containing the host name or IP address of one or more hosts in the database. If the connection to the host specified in the connection string times out, the client attempts to connect to any host named in this string.The host name or IP address can also include a colon followed by the port number for the database. If no port number is specified, the client uses the standard port number ( 5433) . Separate multiple host name or IP address entries with commas.
PreferredAddressFamily
The IP version to use if the client and server have both IPv4 and IPv6 addresses and you have provided a host name, one of the following:
ipv4: Connect to the server using IPv4.
ipv6: Connect to the server using IPv6.
none: Use the IP address provided by the DNS server.
Default: none
KeyStorePath
The path to a .JKS file containing your private keys and their corresponding certificate chains. For information on creating a keystore, refer to documentation for your development environment. For information on creating a keystore, refer to the Java documentation.
KeyStorePassword
The password protecting the keystore file. If individual keys are also encrypted, the keystore file password must match the password for a key within the keystore.
TrustStorePath
The path to a .JKS truststore file containing certificates from authorities you trust.
TrustStorePassword
The password protecting the truststore file.
OAuth connection properties
The following connection properties pertain to OAuth in JDBC.
Property
Description
oauthaccesstoken
Required if oauthrefreshtoken is unspecified, an OAuth token that authorizes a user to the database.
oauthrefreshtoken
Required if oauthaccesstoken is unspecified, allows a user to refresh and obtain a new oauthaccesstoken when their old one expires.
If you set this parameter, you must also set the following refresh properties in oauthjsonconfig:
oauthrefreshtoken
oauthdiscoveryurl or oauthtokenurl
oauthclientid
oauthclientsecret
In cases where introspection fails (e.g. when the access token expires), Vertica responds to the request with an error. If introspection fails and OAuthRefreshToken is specified, the driver attempts to refresh and silently retrieve a new access token. Otherwise, the driver passes error to the client application.
oauthjsonconfig
A JSON string or file that lets you set the following:
oauthclientid: The client ID of the client application registered in the identity provider.
oauthclientsecret: The client secret of the client application registered in the identity provider.
oauthtokenurl: The endpoint to which token refresh requests are sent. The format for this depends on your provider. For examples, see the Keycloak and Okta documentation.
If oauthdiscoveryurl is not set: this parameter is only required for IDP valdiation if oauthdiscoveryurl, but should also be set for JWT validation to support token refresh.
oauthauthurl: The authorization endpoint used for single sign-on. For examples, see the Keycloak and Okta documentation.
oauthdiscoveryurl: Also known as the OpenID Provider Configuration Document, this endpoint contains a list of all other endpoints supported by the IDP. If set, the other endpoints (such as oauthtokenurl and oauthauthurl) do not need to be specified.
This parameter is only supported for Keycloak. For other identity providers like Okta, the endpoints must be set manually.
If you set both oauthdiscoveryurl and another endpoint (like oauthtokenurl), oauthdiscoveryurl takes precedence.
This parameter is only required for IDP valdiation, but should also be set for JWT validation to support token refresh.
oauthscope: The requested OAuth scopes, delimited with spaces. These scopes define the extent of access to the resource server (in this case, Vertica) granted to the client by the access token. For details, see the OAuth documentation.
oauthvalidatehostname: Boolean, whether to verify the subjectAltName of the identity provider host. If enabled, the IP address or hostname must be set as the subjectAltName in its certificate. Hostname verification is enabled by default.
Unlike oauthaccesstoken or oauthrefreshtoken, which must be set programmatically by the client when they attempt to connect, the same oauthjsonconfig can be reused between connections to the database.
The path to a custom truststore. If unspecified, JDBC uses the default system truststore.
oauthtruststorepassword
The password to the truststore.
Timeout properties
With the following parameters, you can specify various timeouts for each step and the overall connection of JDBC to your Vertica database.
Property
Description
LoginTimeout
The number of seconds Vertica waits for the client to log in to the database before throwing a SQLException.
Default: 0 (no timeout)
LoginNodeTimeout
The number of seconds the JDBC client waits before attempting to connect to the next node if the Vertica process is running, but does not respond. The "next" node is determined by the either the BackupServerNode connection property or DNS resolution. If you only provide a single IP address, the JDBC client returns an error.
A timeout value of 0 instructs JDBC to wait indefinitely for an error/a successful connection rather than attempt to connect to another node.
Default: 0 (no timeout)
LoginNetworkTimeout
The number of seconds the JDBC client has to establish a TCP connection to a Vertica node. A typical use case for this property is to let JDBC connect to another node if the system is down for maintenance and modifying the JDBC application's connection string is infeasible.
Default: 0 (no timeout)
NetworkTimeout
The number of milliseconds for the server to reply to a request after the client has established a connection with the database.
Default: 0
The relationship between these properties and the role they play when JDBC attempts to connect to a Vertica database is illustrated in the following diagram:
General properties
The following properties can be set after the connection is established. None of these properties are required.
Property
Description
AutoCommit
Controls whether the connection automatically commits transactions. Set this parameter to false to prevent the connection from automatically committing its transactions. You often want to do this when you are bulk loading multiple batches of data and you want the ability to roll back all of the loads if an error occurs.
Set After Connection:Connection.setAutoCommit()
Default: true
DirectBatchInsert
Deprecated, always set to true.
DisableCopyLocal
When set to true, disables file-based COPY LOCAL operations, including copying data from local files and using local files to store data and exceptions. You can use this property to prevent users from writing to and copying from files on a Vertica host, including an MC host.
Default: false
MultipleActiveResultSets
Allows more than one active result set on a single connection via MultipleActiveResultSets (MARS).
If both MultipleActiveResultSets and ResultBufferSize are turned on, MultipleActiveResultSets takes precedence. The connection does not provide an error, however ResultBufferSize is ignored.
Set After Connection:VerticaConnection.setProperty()
Default: false
ReadOnly
When set to true, makes the data connection read-only. Any queries attempting to update the database using a read-only connection cause a SQLException.
Set After Connection:Connection.setReadOnly()
Default: false
ResultBufferSize
Sets the size of the buffer the Vertica JDBC driver uses to temporarily store result sets. A value of 0 means ResultBufferSize is turned off.
Note: This property was named maxLRSMemory in previous versions of the Vertica JDBC driver.
Set After Connection:VerticaConnection.setProperty()
Default: 8912 (8KB)
SearchPath
Sets the schema search path for the connection. This value is a string containing a comma-separated list of schema names. See Setting Search Paths for more information on the schema search path.
Set After Connection:VerticaConnection.setProperty()
A Boolean value that controls how DatabaseMetaData reports the catalog name. When set to true, the database name is returned as the catalog name in the database metadata. When set to false, NULL is returned as the catalog name.
Enable this option if your client software is set up to get the catalog name from the database metadata for use in a three-part name reference.
Set After Connection:VerticaConnection.setProperty()
Note: In previous versions of the Vertica JDBC driver, this property was only available using a getter and setter on the PGConnection object. You can now set it in the same way as other connection properties.
Set After Connection:Connection.setTransactionIsolation()
Default: TRANSACTION_READ_COMMITTED
Logging properties
The properties that control client logging must be set before the connection is opened. None of these properties are required, and none can be changed after the Connection object has been instantiated.
Property
Description
LogLevel
Sets the type of information logged by the JDBC driver. The value is set to one of the following values:
"DEBUG"
"ERROR"
"TRACE"
"WARNING"
"INFO"
"OFF"
Default:"OFF"
LogNameSpace
Restricts logging to just messages generated by a specific packages. Valid values are:
com.vertica — All messages generated by the JDBC driver
com.vertica.jdbc — All messages generated by the top-level JDBC API
com.vertica.jdbc.kv — A ll messages generated by the JDBC KV API)
com.vertica.jdbc.core — Connection and statement settings
If the query plan requires more than one node, then the query fails. Only applicable when EnableRoutableQueries = true.
Default: true
MetadataCacheLifetime
The time in seconds to keep projection metadata. Only applicable when EnableRoutableQueries = true.
Default:
MaxPooledConnections
Cluster-wide maximum number of connections to keep in the VerticaRoutableConnection’s internal pool. Only applicable when EnableRoutableQueries = true.
Default: 20
MaxPooledConnections PerNode
Per-node maximum number of connections to keep in the VerticaRoutableConnection’s internal pool. Only applicable when EnableRoutableQueries = true.
Default: 5
Note
You can also use VerticaConnection.setProperty() method to set properties that have standard JDBC Connection setters, such as AutoCommit.
2.3.4.2.2 - Setting and getting connection property values
When creating a connection to Vertica, you can set connection properties by:.
You can set a connection property in one of the following ways:
Include the property name and value as part of the connection string you pass to the method DriverManager.getConnection().
Set the properties in a Properties object, and then pass it to the method DriverManager.getConnection().
Use the method VerticaConnection.setProperty(). With this approach, you can change only those connection properties that remain changeable after the connection has been established.
Also, some standard JDBC connection properties have getters and setters on the Connection interface, such as Connection.setAutoCommit().
Setting properties when connecting
When creating a connection to Vertica, you can set connection properties by:
Specifying them in the connection string.
Modifying the Properties object passed to getConnection().
Connection string properties
You can specify connection properties in the connection string with the same URL parameter format used for usernames and passwords. For example, the following string enables a TLS connection:
Setting a host name using the setProperty() method overrides the host name set in a connection string. If this occurs, Vertica might not be able to connect to a host. For example, using the connection string above, the following overrides the VerticaHost name:
However, if a new connection or override connection is needed, you can enter a valid host name in the hostname properties object.
The NonVertica_host hostname overrides VerticaHost name in the connection string. To avoid this issue, comment out the props.setProperty("hostName", "NonVertica_host");line:
The data type of all of the values you set in the Properties object are strings, regardless of the property value's data type.
Getting and setting properties after connecting
After you establish a connection with Vertica, you can use the VerticaConnection methods getProperty() and setProperty() to set the values of some connection properties, respectively.
The VerticaConnection.getProperty() method lets you get the value of some connection properties. Use this method to change the value for properties that can be set after you establish a connection with Vertica.
Because these methods are Vertica-specific, you must cast your Connection object to the VerticaConnection interface with one of the following methods:
Import the Connection object into your client application.
Use a fully-qualified reference: com.vertica.jdbc.VerticaConnection.
The following example demonstrates getting and setting the value of the ReadOnly property.
importjava.sql.*;importjava.util.Properties;importcom.vertica.jdbc.*;publicclassSetConnectionProperties{publicstaticvoidmain(String[]args){// Note: If your application needs to run under Java 5, you need to
// load the JDBC driver using Class.forName() here.
PropertiesmyProp=newProperties();myProp.put("user","ExampleUser");myProp.put("password","password123");// Set ReadOnly to true initially
myProp.put("ReadOnly","true");Connectionconn;try{conn=DriverManager.getConnection("jdbc:vertica://VerticaHost:5433/ExampleDB",myProp);// Show state of the ReadOnly property. This was set at the
// time the connection was created.
System.out.println("ReadOnly state: "+((VerticaConnection)conn).getProperty("ReadOnly"));// Change it and show it again
((VerticaConnection)conn).setProperty("ReadOnly",false);System.out.println("ReadOnly state is now: "+((VerticaConnection)conn).getProperty("ReadOnly"));conn.close();}catch(SQLExceptione){e.printStackTrace();}}}
When run, the example prints the following on the standard output:
(Optional) Run the SSL debug utility to test your configuration.
Setting keystore/truststore properties
You can set the keystore and truststore properties in the following ways, each with their own pros and cons:
At the driver level.
At the JVM level.
Driver-level configuration
If you use tools like DbVizualizer with many connections, configure the keystore and truststore with the JDBC connection properties. This does, however, expose these values in the connection string:
Setting keystore and truststore parameters at the JVM level excludes them from the connection string, which may be more accommodating for environments with more stringent security requirements:
You can set the TLSmode connection property to determine how certificates are handled. TLSmode is disabled by default.
TLSmode identifies the security level that Vertica applies to the JDBC connection. Vertica must be configured to handle TLS connections before you can establish an encrypted connection to it. See TLS protocol for details. Valid values are:
disable: JDBC connects using plain text and implements no security measures.
require: JDBC connects using TLS without verifying the CA certificate.
verify-ca: JDBC connects using TLS and confirms that the server certificate has been signed by the certificate authority. This setting is equivalent to the deprecated ssl=true property.
verify-full: JDBC connects using TLS, confirms that the server certificate has been signed by the certificate authority, and verifies that the host name matches the name provided in the server certificate.
If this property and the SSL property are set, this property takes precedence.
For example, to configure JDBC to connect to the server with TLS without verifying the CA certificate, you can set the TLSmode property to 'require' with the method VerticaConnection.setProperty():
After configuring TLS, you can run the following for a debugging utility:
$ java -Djavax.net.debug=ssl
You can use several debug specifiers (options) with the debug utility. The specifiers help narrow the scope of the debugging information that is returned. For example, you could specify one of the options that prints handshake messages or session activity.
For information on the debug utility and its options, see Debugging Utilities in the Oracle document, JSSE Reference Guide.
2.3.4.2.4 - Setting and returning a client connection label
The JDBC Client has a method to set and return the client connection label: getClientInfo() and setClientInfo(). You can use these methods with the SQL Functions GET_CLIENT_LABEL and SET_CLIENT_LABEL.
When you use these two methods, make sure you pass the string value APPLICATIONNAME to both the setter and getter methods.
Use setClientInfo() to create a client label, and use getClientInfo() to return the client label:
importjava.sql.*;importjava.util.Properties;publicclassClientLabelJDBC{publicstaticvoidmain(String[]args){PropertiesmyProp=newProperties();myProp.put("user","dbadmin");myProp.put("password","");myProp.put("loginTimeout","35");Connectionconn;try{conn=DriverManager.getConnection("jdbc:vertica://example.com:5433/mydb",myProp);System.out.println("Connected!");conn.setClientInfo("APPLICATIONNAME","JDBC Client - Data Load");System.out.println("New Conn label: "+conn.getClientInfo("APPLICATIONNAME"));conn.close();}catch(SQLTransientConnectionExceptionconnException){// There was a potentially temporary network error
// Could automatically retry a number of times here, but
// instead just report error and exit.
System.out.print("Network connection issue: ");System.out.print(connException.getMessage());System.out.println(" Try again later!");return;}catch(SQLInvalidAuthorizationSpecExceptionauthException){// Either the username or password was wrong
System.out.print("Could not log into database: ");System.out.print(authException.getMessage());System.out.println(" Check the login credentials and try again.");return;}catch(SQLExceptione){// Catch-all for other exceptions
e.printStackTrace();}}}
When you run this method, it prints the following result to the standard output:
Connected!
New Conn Label: JDBC Client - Data Load
2.3.4.2.5 - Setting the locale for JDBC sessions
You set the locale for a connection while opening it by including a SET LOCALE statement in the ConnSettings property, or by executing a SET LOCALE statement at any time after opening the connection.
You set the locale for a connection while opening it by including a SET LOCALE statement in the ConnSettings property, or by executing a SET LOCALE statement at any time after opening the connection. Changing the locale of a Connection object affects all of the Statement objects you instantiated using it.
You can get the locale by executing a SHOW LOCALE query. The following example demonstrates setting the locale using ConnSettings and executing a statement, as well as getting the locale:
importjava.sql.*;importjava.util.Properties;publicclassGetAndSetLocale{publicstaticvoidmain(String[]args){// If running under a Java 5 JVM, you need to load the JDBC driver
// using Class.forname here
PropertiesmyProp=newProperties();myProp.put("user","ExampleUser");myProp.put("password","password123");// Set Locale to true en_GB on connection. After the connection
// is established, the JDBC driver runs the statements in the
// ConnSettings property.
myProp.put("ConnSettings","SET LOCALE TO en_GB");Connectionconn;try{conn=DriverManager.getConnection("jdbc:vertica://VerticaHost:5433/ExampleDB",myProp);// Execute a query to get the locale. The results should
// show "en_GB" as the locale, since it was set by the
// conn settings property.
Statementstmt=conn.createStatement();ResultSetrs=null;rs=stmt.executeQuery("SHOW LOCALE");System.out.print("Query reports that Locale is set to: ");while(rs.next()){System.out.println(rs.getString(2).trim());}// Now execute a query to set locale.
stmt.execute("SET LOCALE TO en_US");// Run query again to get locale.
rs=stmt.executeQuery("SHOW LOCALE");System.out.print("Query now reports that Locale is set to: ");while(rs.next()){System.out.println(rs.getString(2).trim());}// Clean up
conn.close();}catch(SQLExceptione){e.printStackTrace();}}}
Running the above example displays the following on the system console:
Query reports that Locale is set to: en_GB (LEN)
Query now reports that Locale is set to: en_US (LEN)
Notes:
JDBC applications use a UTF-16 character set encoding and are responsible for converting any non-UTF-16 encoded data to UTF-16. Failing to convert the data can result in errors or the data being stored incorrectly.
The JDBC driver converts UTF-16 data to UTF-8 when passing to the Vertica server and converts data sent by Vertica server from UTF-8 to UTF-16 .
2.3.4.2.6 - Changing the transaction isolation level
Changing the transaction isolation level lets you choose how transactions prevent interference from other transactions.
Changing the transaction isolation level lets you choose how transactions prevent interference from other transactions. By default, the JDBC driver matches the transaction isolation level of the Vertica server. The Vertica default transaction isolation level is READ_COMMITTED, which means any changes made by a transaction cannot be read by any other transaction until after they are committed. This prevents a transaction from reading data inserted by another transaction that is later rolled back.
Vertica also supports the SERIALIZABLE transaction isolation level. This level locks tables to prevent queries from having the results of their WHERE clauses changed by other transactions. Locking tables can have a performance impact, since only one transaction is able to access the table at a time.
A transaction retains its isolation level until it completes, even if the session's isolation level changes during the transaction. Vertica internal processes (such as the Tuple Mover and refresh operations) and DDL operations always run at the SERIALIZABLE isolation level to ensure consistency.
You can change the transaction isolation level connection property after the connection has been established using the Connection object's setter (setTransactionIsolation()) and getter (getTransactionIsolation()). The value for transaction isolation property is an integer. The Connection interface defines constants to help you set the value in a more intuitive manner:
Constant
Value
Connection.TRANSACTION_READ_COMMITTED
2
Connection.TRANSACTION_SERIALIZABLE
8
Note
The Connection interface also defines several other transaction isolation constants (READ_UNCOMMITTED and REPEATABLE_READ). Since Vertica does not support these isolation levels, they are converted to READ_COMMITTED and SERIALIZABLE, respectively.
The following example demonstrates setting the transaction isolation level to SERIALIZABLE.
importjava.sql.*;importjava.util.Properties;publicclassSetTransactionIsolation{publicstaticvoidmain(String[]args){PropertiesmyProp=newProperties();myProp.put("user","ExampleUser");myProp.put("password","password123");Connectionconn;try{conn=DriverManager.getConnection("jdbc:vertica://VerticaHost:5433/ExampleDB",myProp);// Get default transaction isolation
System.out.println("Transaction Isolation Level: "+conn.getTransactionIsolation());// Set transaction isolation to SERIALIZABLE
conn.setTransactionIsolation(Connection.TRANSACTION_SERIALIZABLE);// Get the transaction isolation again
System.out.println("Transaction Isolation Level: "+conn.getTransactionIsolation());conn.close();}catch(SQLExceptione){e.printStackTrace();}}}
Running the example results in the following being printed out to the console:
A pooling data source uses a collection of persistent connections in order to reduce the overhead of repeatedly opening network connections between the client and server.
A pooling data source uses a collection of persistent connections in order to reduce the overhead of repeatedly opening network connections between the client and server. Opening a new connection for each request is more costly for both the server and the client than keeping a small pool of connections open constantly, ready to be used by new requests. When a request comes in, one of the pre-existing connections in the pool is assigned to it. Only if there are no free connections in the pool is a new connection created. Once the request is complete, the connection returns to the pool and waits to service another request.
The Vertica JDBC driver supports connection pooling as defined in the JDBC 4.0 standard. If you are using a J2EE-based application server in conjunction with Vertica, it should already have a built-in data pooling feature. All that is required is that the application server work with the PooledConnection interface implemented by Vertica's JDBC driver. An application server's pooling feature is usually well-tuned for the works loads that the server is designed to handle. See your application server's documentation for details on how to work with pooled connections. Normally, using pooled connections should be transparent in your code—you will just open connections and the application server will worry about the details of pooling them.
If you are not using an application server, or your application server does not offer connection pooling that is compatible with Vertica, you can use a third-party pooling library, such as the open-source c3p0 or DBCP libraries, to implement connection pooling.
Note
The Vertica Analytic Database client driver's native connection load balancing feature works with third-party connection pooling supplied by application servers and third-party pooling libraries. See Load balancing in JDBC for more information.
2.3.4.2.8 - Load balancing in JDBC
To enable native load balancing on your client, set the ConnectionLoadBalance connection parameter to true.
Native connection load balancing
Native connection load balancing helps spread the overhead caused by client connections on the hosts in the Vertica database. Both the server and the client must enable native connection load balancing. If enabled by both, then when the client initially connects to a host in the database, the host picks a host to handle the client connection from a list of the currently up hosts in the database, and informs the client which host it has chosen.
If the initially-contacted host does not choose itself to handle the connection, the client disconnects, then opens a second connection to the host selected by the first host. The connection process to this second host proceeds as usual—if SSL is enabled, then SSL negotiations begin, otherwise the client begins the authentication process. See About native connection load balancing for details.
To enable native load balancing on your client, set the ConnectionLoadBalance connection parameter to true. The following example demonstrates:
Connecting to the database several times with native connection load balancing enabled.
Fetching the name of the node handling the connection from the V_MONITOR.CURRENT_SESSION system table.
importjava.sql.*;importjava.util.Properties;importjava.sql.*;importjava.util.Properties;publicclassJDBCLoadingBalanceExample{publicstaticvoidmain(String[]args){PropertiesmyProp=newProperties();myProp.put("user","dbadmin");myProp.put("password","example_password123");myProp.put("loginTimeout","35");myProp.put("ConnectionLoadBalance","1");Connectionconn;for(intx=1;x<=4;x++){try{System.out.print("Connect attempt #"+x+"...");conn=DriverManager.getConnection("jdbc:vertica://node01.example.com:5433/vmart",myProp);Statementstmt=conn.createStatement();// Set the load balance policy to round robin before testing the database's load balancing.
stmt.execute("SELECT SET_LOAD_BALANCE_POLICY('ROUNDROBIN');");// Query system to table to see what node we are connected to. Assume a single row
// in response set.
ResultSetrs=stmt.executeQuery("SELECT node_name FROM v_monitor.current_session;");rs.next();System.out.println("Connected to node "+rs.getString(1).trim());conn.close();}catch(SQLTransientConnectionExceptionconnException){// There was a potentially temporary network error
// Could automatically retry a number of times here, but
// instead just report error and exit.
System.out.print("Network connection issue: ");System.out.print(connException.getMessage());System.out.println(" Try again later!");return;}catch(SQLInvalidAuthorizationSpecExceptionauthException){// Either the username or password was wrong
System.out.print("Could not log into database: ");System.out.print(authException.getMessage());System.out.println(" Check the login credentials and try again.");return;}catch(SQLExceptione){// Catch-all for other exceptions
e.printStackTrace();}}}}
Running the previous example produces the following output:
Connect attempt #1...Connected to node v_vmart_node0002
Connect attempt #2...Connected to node v_vmart_node0003
Connect attempt #3...Connected to node v_vmart_node0001
Connect attempt #4...Connected to node v_vmart_node0002
Hostname-based load balancing
You can load balance workloads by resolving a single hostname to multiple IP addresses. When you specify the hostname for the DriverManager.getConnection() method, the hostname resolves to a random listed IP address from the each connection.
For example, the hostname verticahost.example.com has the following entries in etc/hosts:
Specifying verticahost.example.com as the connection for DriverManager.getConnection() randomly resolves to one of the listed IP address.
2.3.4.2.9 - JDBC connection failover
When run, the example outputs output similar to the following on the system console:.
If a client application attempts to connect to a host in the Vertica cluster that is down, the connection attempt fails when using the default connection configuration. This failure usually returns an error to the user. The user must either wait until the host recovers and retry the connection or manually edit the connection settings to choose another host.
Due to Vertica Analytic Database's distributed architecture, you usually do not care which database host handles a client application's connection. You can use the client driver's connection failover feature to prevent the user from getting connection errors when the host specified in the connection settings is unreachable. The JDBC driver gives you several ways to let the client driver automatically attempt to connect to a different host if the one specified in the connection parameters is unreachable:
Configure your DNS server to return multiple IP addresses for a host name. When you use this host name in the connection settings, the client attempts to connect to the first IP address from the DNS lookup. If the host at that IP address is unreachable, the client tries to connect to the second IP, and so on until it either manages to connect to a host or it runs out of IP addresses.
Supply a list of backup hosts for the client driver to try if the primary host you specify in the connection parameters is unreachable.
(JDBC only) Use driver-specific connection properties to manage timeouts before attempting to connect to the next node.
For all methods, the process of failover is transparent to the client application (other than specifying the list of backup hosts, if you choose to use the list method of failover). If the primary host is unreachable, the client driver automatically tries to connect to other hosts.
Failover only applies to the initial establishment of the client connection. If the connection breaks, the driver does not automatically try to reconnect to another host in the database.
Choosing a failover method
You usually choose to use one of the two failover methods. However, they do work together. If your DNS server returns multiple IP addresses and you supply a list of backup hosts, the client first tries all of the IPs returned by the DNS server, then the hosts in the backup list.
Note
If a host name in the backup host list resolves to multiple IP addresses, the client does not try all of them. It just tries the first IP address in the list.
The DNS method of failover centralizes the configuration client failover. As you add new nodes to your Vertica Analytic Database cluster, you can choose to add them to the failover list by editing the DNS server settings. All client systems that use the DNS server to connect to Vertica Analytic Database automatically use connection failover without having to change any settings. However, this method does require administrative access to the DNS server that all clients use to connect to the Vertica Analytic Database cluster. This may not be possible in your organization.
Using the backup server list is easier than editing the DNS server settings. However, it decentralizes the failover feature. You may need to update the application settings on each client system if you make changes to your Vertica Analytic Database cluster.
Using DNS failover
To use DNS failover, you need to change your DNS server's settings to map a single host name to multiple IP addresses of hosts in your Vertica Analytic Database cluster. You then have all client applications use this host name to connect to Vertica Analytic Database.
You can choose to have your DNS server return as many IP addresses for the host name as you want. In smaller clusters, you may choose to have it return the IP addresses of all of the hosts in your cluster. However, for larger clusters, you should consider choosing a subset of the hosts to return. Otherwise there can be a long delay as the client driver tries unsuccessfully to connect to each host in a database that is down.
Using the backup host list
To enable backup list-based connection failover, your client application has to specify at least one IP address or host name of a host in the BackupServerNode parameter. The host name or IP can optionally be followed by a colon and a port number. If not supplied, the driver defaults to the standard Vertica port number (5433). To list multiple hosts, separate them by a comma.
The following example demonstrates setting the BackupServerNode connection parameter to specify additional hosts for the connection attempt. The connection string intentionally has a non-existent node, so that the initial connection fails. The client driver has to resort to trying the backup hosts to establish a connection to Vertica.
importjava.sql.*;importjava.util.Properties;publicclassConnectionFailoverExample{publicstaticvoidmain(String[]args){// Assume using JDBC 4.0 driver on JVM 6+. No driver loading needed.
PropertiesmyProp=newProperties();myProp.put("user","dbadmin");myProp.put("password","vertica");// Set two backup hosts to be used if connecting to the first host
// fails. All of these hosts will be tried in order until the connection
// succeeds or all of the connections fail.
myProp.put("BackupServerNode","VerticaHost02,VerticaHost03");Connectionconn;try{// The connection string is set to try to connect to a known
// bad host (in this case, a host that never existed).
// The database name is optional.
conn=DriverManager.getConnection("jdbc:vertica://BadVerticaHost:5433/vmart",myProp);System.out.println("Connected!");// Query system to table to see what node we are connected to.
// Assume a single row in response set.
Statementstmt=conn.createStatement();ResultSetrs=stmt.executeQuery("SELECT node_name FROM v_monitor.current_session;");rs.next();System.out.println("Connected to node "+rs.getString(1).trim());// Done with connection.
conn.close();}catch(SQLExceptione){// Catch-all for other exceptions
e.printStackTrace();}}}
When run, the example outputs output similar to the following on the system console:
Connected!
Connected to node v_vmart_node0002
Notice that the connection was made to the first node in the backup list (node 2).
Specifying connection timeouts
LoginTimeout controls the timeout for JDBC to establish establish a TCP connection with a node and log in to Vertica.
LoginNodeTimeout controls the timeout for JDBC to log in to the Vertica database. After the specified timeout, JDBC attempts to connect to the "next" node, which is determined by either the connection property BackupServerNode or DNS resolution. This is useful if the node is up, but something is wrong with the Vertica process.
LoginNetworkTimeout controls the timeout for JDBC to establish a TCP connection to a Vertica node. If you do not set this connection property, if the node to which the JDBC client attempts to connect is down, the JDBC client will wait "indefinitely," but practically, the system default timeout of 70 seconds is used. A typical use case for LoginNetworkTimeout is to let JDBC connect to another node if the current Vertica node is down for maintenance and modifying the JDBC application's connection string is infeasible.
NetworkTimeout controls the timeout for Vertica to respond to a request from a client after it has established a connection and logged in to the database.
PropertiesmyProp=newProperties();myProp.put("user","dbadmin");myProp.put("loginTimeout","30");// overall connection timeout is 30 seconds to make sure it is not too small for failover
myProp.put("loginNodeTimeout","10");// JDBC waits 10 seconds before attempting to connect to the next node if the Vertica process is running but does not respond
myProp.put("loginNetworkTimeout","2");// node connection timeout is 2 seconds
myProp.put("networkTimeout","500");// after the client has logged in, Vertica has 0.5 seconds to respond to each request
Connectionconn=DriverManager.getConnection("jdbc:vertica://VerticaHost:5433/verticadb",myProp);
Interaction with load balancing
When native connection load balancing is enabled, the additional servers specified in the BackupServerNode connection parameter are only used for the initial connection to a Vertica host. If host redirects the client to another host in the database cluster to handle its connection request, the second connection does not use the backup node list. This is rarely an issue, since native connection load balancing is aware of which nodes are currently up in the database.
The JDBC driver transparently converts most Vertica data types to the appropriate Java data type.
The JDBC driver transparently converts most Vertica data types to the appropriate Java data type. In a few cases, a Vertica data type cannot be directly translated to a Java data type; these exceptions are explained in this section.
2.3.4.3.1 - The VerticaTypes class
JDBC does not support all of the data types that Vertica supports.
JDBC does not support all of the data types that Vertica supports. The Vertica JDBC client driver contains an additional class named VerticaTypes that helps you handle identifying these Vertica-specific data types. It contains constants that you can use in your code to specify Vertica data types. This class defines two different categories of data types:
Vertica's 13 types of interval values. This class contains constant properties for each of these types. You can use these constants to select a specific interval type when instantiating members of the VerticaDayTimeInterval and VerticaYearMonthInterval classes:
// Create a day to second interval.
VerticaDayTimeIntervaldayInt=newVerticaDayTimeInterval(VerticaTypes.INTERVAL_DAY_TO_SECOND,10,0,5,40,0,0,false);// Create a year to month interval.
VerticaYearMonthIntervalmonthInt=newVerticaYearMonthInterval(VerticaTypes.INTERVAL_YEAR_TO_MONTH,10,6,false);
Vertica UUID data type. One way you can use the VerticaTypes.UUID is to query a table's metadata to see if a column is a UUID. See UUID values for an example.
The Vertica server supports data type aliases for integer, float and numeric types.
The Vertica server supports data type aliases for integer, float and numeric types. The JDBC driver reports these as its basic data types (BIGINT, DOUBLE PRECISION, and NUMERIC), as follows:
Vertica Server Types and Aliases
Vertica JDBC Type
INTEGER
INT
INT8
BIGINT
SMALLINT
TINYINT
BIGINT
DOUBLE PRECISION
FLOAT5
FLOAT8
REAL
DOUBLE PRECISION
DECIMAL
NUMERIC
NUMBER
MONEY
NUMERIC
If a client application retrieves the values into smaller data types, Vertica JDBC driver does not check for overflows. The following example demonstrates the results of this overflow.
importjava.sql.*;importjava.util.Properties;publicclassJDBCDataTypes{publicstaticvoidmain(String[]args){// If running under a Java 5 JVM, use you need to load the JDBC driver
// using Class.forname here
PropertiesmyProp=newProperties();myProp.put("user","ExampleUser");myProp.put("password","password123");Connectionconn;try{conn=DriverManager.getConnection("jdbc:vertica://VerticaHost:5433/VMart",myProp);Statementstatement=conn.createStatement();// Create a table that will hold a row of different types of
// numeric data.
statement.executeUpdate("DROP TABLE IF EXISTS test_all_types cascade");statement.executeUpdate("CREATE TABLE test_all_types ("+"c0 INTEGER, c1 TINYINT, c2 DECIMAL, "+"c3 MONEY, c4 DOUBLE PRECISION, c5 REAL)");// Add a row of values to it.
statement.executeUpdate("INSERT INTO test_all_types VALUES("+"111111111111, 444, 55555555555.5555, "+"77777777.77, 88888888888888888.88, "+"10101010.10101010101010)");// Query the new table to get the row back as a result set.
ResultSetrs=statement.executeQuery("SELECT * FROM test_all_types");// Get the metadata about the row, including its data type.
ResultSetMetaDatamd=rs.getMetaData();// Loop should only run once...
while(rs.next()){// Print out the data type used to defined the column, followed
// by the values retrieved using several different retrieval
// methods.
String[]vertTypes=newString[]{"INTEGER","TINYINT","DECIMAL","MONEY","DOUBLE PRECISION","REAL"};for(intx=1;x<7;x++){System.out.println("\n\nColumn "+x+" ("+vertTypes[x-1]+")");System.out.println("\tgetColumnType()\t\t"+md.getColumnType(x));System.out.println("\tgetColumnTypeName()\t"+md.getColumnTypeName(x));System.out.println("\tgetShort()\t\t"+rs.getShort(x));System.out.println("\tgetLong()\t\t"+rs.getLong(x));System.out.println("\tgetInt()\t\t"+rs.getInt(x));System.out.println("\tgetByte()\t\t"+rs.getByte(x));}}rs.close();statement.executeUpdate("drop table test_all_types cascade");statement.close();}catch(SQLExceptione){e.printStackTrace();}}}
The above example prints the following on the console when run:
The JDBC standard does not contain a data type for intervals (the duration between two points in time).
The JDBC standard does not contain a data type for intervals (the duration between two points in time). To handle Vertica's INTERVAL data type, you must use JDBC's database-specific object type.
When reading an interval value from a result set, use the ResultSet.getObject() method to retrieve the value, and then cast it to one of the Vertica interval classes: VerticaDayTimeInterval (which represents all ten types of day/time intervals) or VerticaYearMonthInterval (which represents all three types of year/month intervals).
Note
The units interval style is not supported. Do not use the SET INTERVALSTYLE statement to change the interval style in your client applications.
Using intervals in batch inserts
When inserting batches into tables that contain interval data, you must create instances of the VerticaDayTimeInterval or VerticaYearMonthInterval classes to hold the data you want to insert. You set values either when calling the class's constructor, or afterwards using setters. You then insert your interval values using the PreparedStatement.setObject() method. You can also use the .setString() method, passing it a string in "DD**HH:MM:SS" or "YY-MM" format.
The following example demonstrates inserting data into a table containing a day/time interval and a year/month interval:
importjava.sql.*;importjava.util.Properties;// You need to import the Vertica JDBC classes to be able to instantiate
// the interval classes.
importcom.vertica.jdbc.*;publicclassIntervalDemo{publicstaticvoidmain(String[]args){// If running under a Java 5 JVM, use you need to load the JDBC driver
// using Class.forname here
PropertiesmyProp=newProperties();myProp.put("user","ExampleUser");myProp.put("password","password123");Connectionconn;try{conn=DriverManager.getConnection("jdbc:vertica://VerticaHost:5433/VMart",myProp);// Create table for interval values
Statementstmt=conn.createStatement();stmt.execute("DROP TABLE IF EXISTS interval_demo");stmt.executeUpdate("CREATE TABLE interval_demo("+"DayInt INTERVAL DAY TO SECOND, "+"MonthInt INTERVAL YEAR TO MONTH)");// Insert data into interval columns using
// VerticaDayTimeInterval and VerticaYearMonthInterval
// classes.
PreparedStatementpstmt=conn.prepareStatement("INSERT INTO interval_demo VALUES(?,?)");// Create instances of the Vertica classes that represent
// intervals.
VerticaDayTimeIntervaldayInt=newVerticaDayTimeInterval(10,0,5,40,0,0,false);VerticaYearMonthIntervalmonthInt=newVerticaYearMonthInterval(10,6,false);// These objects can also be manipulated using setters.
dayInt.setHour(7);// Add the interval values to the batch
((VerticaPreparedStatement)pstmt).setObject(1,dayInt);((VerticaPreparedStatement)pstmt).setObject(2,monthInt);pstmt.addBatch();// Set another row from strings.
// Set day interval in "days HH:MM:SS" format
pstmt.setString(1,"10 10:10:10");// Set year to month value in "MM-YY" format
pstmt.setString(2,"12-09");pstmt.addBatch();// Execute the batch to insert the values.
try{pstmt.executeBatch();}catch(SQLExceptione){System.out.println("Error message: "+e.getMessage());}
Reading interval values
You read an interval value from a result set using the ResultSet.getObject() method, and cast the object to the appropriate Vertica object class: VerticaDayTimeInterval for day/time intervals or VerticaYearMonthInterval for year/month intervals. This is easy to do if you know that the column contains an interval, and you know what type of interval it is. If your application cannot assume the structure of the data in the result set it reads in, you can test whether a column contains a database-specific object type, and if so, determine whether the object belongs to either the VerticaDayTimeInterval or VerticaYearMonthInterval classes.
// Retrieve the interval values inserted by previous demo.
// Query the table to get the row back as a result set.
ResultSetrs=stmt.executeQuery("SELECT * FROM interval_demo");// If you do not know the types of data contained in the result set,
// you can read its metadata to determine the type, and use
// additional information to determine the interval type.
ResultSetMetaDatamd=rs.getMetaData();while(rs.next()){for(intx=1;x<=md.getColumnCount();x++){// Get data type from metadata
intcolDataType=md.getColumnType(x);// You can get the type in a string:
System.out.println("Column "+x+" is a "+md.getColumnTypeName(x));// Normally, you'd have a switch statement here to
// handle all sorts of column types, but this example is
// simplified to just handle database-specific types
if(colDataType==Types.OTHER){// Column contains a database-specific type. Determine
// what type of interval it is. Assuming it is an
// interval...
ObjectcolumnVal=rs.getObject(x);if(columnValinstanceofVerticaDayTimeInterval){// We know it is a date time interval
VerticaDayTimeIntervalinterval=(VerticaDayTimeInterval)columnVal;// You can use the getters to access the interval's
// data
System.out.print("Column "+x+"'s value is ");System.out.print(interval.getDay()+" Days ");System.out.print(interval.getHour()+" Hours ");System.out.println(interval.getMinute()+" Minutes");}elseif(columnValinstanceofVerticaYearMonthInterval){VerticaYearMonthIntervalinterval=(VerticaYearMonthInterval)columnVal;System.out.print("Column "+x+"'s value is ");System.out.print(interval.getYear()+" Years ");System.out.println(interval.getMonth()+" Months");}else{System.out.println("Not an interval.");}}}}}catch(SQLExceptione){e.printStackTrace();}}}
The example prints the following to the console:
Column 1 is a INTERVAL DAY TO SECOND
Column 1's value is 10 Days 7 Hours 5 Minutes
Column 2 is a INTERVAL YEAR TO MONTH
Column 2's value is 10 Years 6 Months
Column 1 is a INTERVAL DAY TO SECOND
Column 1's value is 10 Days 10 Hours 10 Minutes
Column 2 is a INTERVAL YEAR TO MONTH
Column 2's value is 12 Years 9 Months
Another option is to use database metadata to find columns that contain intervals.
// Determine the interval data types by examining the database
// metadata.
DatabaseMetaDatadbmd=conn.getMetaData();ResultSetdbMeta=dbmd.getColumns(null,null,"interval_demo",null);intcolcount=0;while(dbMeta.next()){// Get the metadata type for a column.
intjavaType=dbMeta.getInt("DATA_TYPE");System.out.println("Column "+++colcount+" Type name is "+dbMeta.getString("TYPE_NAME"));if(javaType==Types.OTHER){// The SQL_DATETIME_SUB column in the metadata tells you
// Specifically which subtype of interval you have.
// The VerticaDayTimeInterval.isDayTimeInterval()
// methods tells you if that value is a day time.
//
intintervalType=dbMeta.getInt("SQL_DATETIME_SUB");if(VerticaDayTimeInterval.isDayTimeInterval(intervalType)){// Now you know it is one of the 10 day/time interval types.
// When you select this column you can cast to
// VerticaDayTimeInterval.
// You can get more specific by checking intervalType
// against each of the 10 constants directly, but
// they all are represented by the same object.
System.out.println("column "+colcount+" is a "+"VerticaDayTimeInterval intervalType = "+intervalType);}elseif(VerticaYearMonthInterval.isYearMonthInterval(intervalType)){//now you know it is one of the 3 year/month intervals,
//and you can select the column and cast to
// VerticaYearMonthInterval
System.out.println("column "+colcount+" is a "+"VerticaDayTimeInterval intervalType = "+intervalType);}else{System.out.println("Not an interval type.");}}}
2.3.4.3.4 - UUID values
UUID is a core data type in Vertica.
UUID is a core data type in Vertica. However, it is not a core Java data type. You must use the java.util.UUID class to represent UUID values in your Java code. The JDBC driver does not translate values from Vertica to non-core Java data types. Therefore, you must send UUID values to Vertica using generic object methods such as PreparedStatement.setObject(). You also use generic object methods (such as ResultSet.getObject()) to retrieve UUID values from Vertica. You then cast the retrieved objects as a member of the java.util.UUID class.
The following example code demonstrates inserting UUID values into and retrieving UUID values from Vertica.
packagejdbc_uuid_example;importjava.sql.*;importjava.util.Properties;publicclassVerticaUUIDExample{publicstaticvoidmain(String[]args){PropertiesmyProp=newProperties();myProp.put("user","dbadmin");myProp.put("password","");Connectionconn;try{conn=DriverManager.getConnection("jdbc:vertica://doch01:5433/VMart",myProp);Statementstmt=conn.createStatement();// Create a table with a UUID column and a VARCHAR column.
stmt.execute("DROP TABLE IF EXISTS UUID_TEST CASCADE;");stmt.execute("CREATE TABLE UUID_TEST (id UUID, description VARCHAR(25));");// Prepare a statement to insert a UUID and a string into the table.
PreparedStatementps=conn.prepareStatement("INSERT INTO UUID_TEST VALUES(?,?)");java.util.UUIDuuid;// Holds the UUID value.
for(Integerx=0;x<10;x++){// Generate a random uuid
uuid=java.util.UUID.randomUUID();// Set the UUID value by calling setObject.
ps.setObject(1,uuid);// Set the String value to indicate which UUID this is.
ps.setString(2,"UUID #"+x);ps.execute();}// Query the uuid
ResultSetrs=stmt.executeQuery("SELECT * FROM UUID_TEST ORDER BY description ASC");while(rs.next()){// Cast the object from the result set as a UUID.
uuid=(java.util.UUID)rs.getObject(1);System.out.println(rs.getString(2)+" : "+uuid.toString());}}catch(SQLExceptione){e.printStackTrace();}}}
The previous example prints output similar to the following:
JDBC does not support the UUID data type. This limitation means you cannot use the usual ResultSetMetaData.getColumnType() method to determine column's data type is UUID. Calling this method on a UUID column returns Types.OTHER. This value is also to identify interval columns. You can use two ways to determine if a column contains UUIDs:
Use ResultSetMetaData.getColumnTypeName() to get the name of the column's data type. For UUID columns, this method returns the value "Uuid" as a String.
Query the table's metadata to get the SQL data type of the column. If this value is equal to VerticaTypes.UUID, the column's data type is UUID.
The following example demonstrates both of these techniques:
// This example assumes you already have a database connection
// and result set from a query on a table that may contain a UUID.
// Get the metadata of the result set to get the column definitions
ResultSetMetaDatameta=rs.getMetaData();intcolcount;intmaxcol=meta.getColumnCount();System.out.println("Using column metadata:");for(colcount=1;colcount<maxcol;colcount++){// .getColumnType() always returns "OTHER" for UUID columns.
if(meta.getColumnType(colcount)==Types.OTHER){// To determine that it is a UUID column, test the name of the column type.
if(meta.getColumnTypeName(colcount).equalsIgnoreCase("uuid")){// It's a UUID column
System.out.println("Column "+colcount+" is UUID");}}}// You can also query the table's metadata to find its column types and compare
// it to the VerticaType.UUID constant to see if it is a UUID column.
System.out.println("Using table metadata:");DatabaseMetaDatadbmd=conn.getMetaData();// Get the metdata for the previously-created test table.
ResultSettableMeta=dbmd.getColumns(null,null,"UUID_TEST",null);colcount=0;// Each row in the result set has metadata that describes a single column.
while(tableMeta.next()){colcount++;// The SQL_DATA_TYPE column holds the Vertica database data type. You compare
// this value to the VerticvaTypes.UUID constant to see if it is a UUID.
if(tableMeta.getInt("SQL_DATA_TYPE")==VerticaTypes.UUID){// Column is a UUID data type...
System.out.println("Column "+colcount+" is a UUID column.");}}
This example prints the following to the console if it is run after running the prior example:
Using column metadata:
Column 1 is UUID
Using table metadata:
Column 1 is a UUID column.
2.3.4.3.5 - Complex types in JDBC
The results of a java.sql query are stored in a ResultSet.
The results of a java.sql query are stored in a ResultSet. If the ResultSet contains a column of complex type, you can retrieve it with one of the following:
For columns of type ARRAY, SET, or MAP, use getArray(), which returns a java.sql.Array.
For columns of type ROW, use getObject(), which returns a java.sql.Struct.
Type conversion table
The objects java.sql.Array and java.sql.Struct each have their own API for accessing complex type data. In each case, the data is returned as java.lang.Object and will need to be type cast to a Java type. The exact Java type to expect depends on the Vertica type used in the complex type definition, as shown in this type conversion table:
java.sql Type
Vertica Type
Java Type
BIT
BOOL
java.lang.Boolean
BIGINT
INT
java.lang.Long
DOUBLE
FLOAT
java.lang.Double
CHAR
CHAR
java.lang.String
VARCHAR
VARCHAR
java.lang.String
LONGVARCHAR
LONGVARCHAR
java.lang.String
DATE
DATE
java.sql.Date
TIME
TIME
java.sql.Time
TIME
TIMETZ
java.sql.Time
TIMESTAMP
TIMESTAMP
java.sql.Timestamp
TIMESTAMP
TIMESTAMPTZ
com.vertica.dsi.dataengine.utilities.TimestampTz
getIntervalRange(oid, typmod)
INTERVAL
com.vertica.jdbc.VerticaDayTimeInterval
getIntervalRange(oid, typmod)
INTERVALYM
com.vertica.jdbc.VerticaYearMonthInterval
BINARY
BINARY
byte[]
VARBINARY
VARBINARY
byte[]
LONGVARBINARY
LONGVARBINARY
byte[]
NUMERIC
NUMERIC
java.math.BigDecimal
TYPE_SQL_GUID
UUID
java.util.UUID
ARRAY
ARRAY
java.lang.Object[]
ARRAY
SET
java.lang.Object[]
STRUCT
ROW
java.sql.Struct
ARRAY
MAP
java.lang.Object[]
ARRAY, SET, and MAP columns
For example, the following methods run queries that return an ARRAY of some Vertica type, which is then type cast to an array of its corresponding Java type by the JDBC driver when retrieved with getArray(). This particular example starts with ARRAY[INT] and ARRAY[FLOAT], so they are type cast to Long[] and Double[], respectively, as determined by the type conversion table.
getArrayResultSetExample() shows how the ARRAY can be processed as a java.sql.ResultSet. This example uses getResultSet() which returns the underlying array as another ResultSet. You can use this underlying ResultSet to:
Retrieve the parent ResultSet.
Treat it as an Object array or ResultSet.
getArrayObjectExample() shows how the ARRAY can be processed as a native Java array. This example uses getArray() which returns the underlying array as an Object array rather than a ResultSet. This has the following implications:
You cannot use an underlying Object array to retrieve its parent array.
All underlying arrays are treated as Object arrays (rather than ResultSets.
packagecom.vertica.jdbc.test.samples;importjava.sql.Connection;importjava.sql.SQLException;importjava.sql.Statement;importjava.sql.ResultSet;importjava.sql.Array;importjava.sql.Struct;publicclassComplexTypesArraySamples{/**
* Executes a query and gets a java.sql.Array from the ResultSet. It then uses the Array#getResultSet
* method to get a ResultSet containing the contents of the array.
* @param conn A Connection to a Vertica database
* @throws SQLException
*/publicstaticvoidgetArrayResultSetExample(Connectionconn)throwsSQLException{Statementstmt=conn.createStatement();finalStringqueryText="SELECT ARRAY[ARRAY[1,2,3],ARRAY[4,5,6],ARRAY[7,8,9]]::ARRAY[ARRAY[INT]] as array";finalStringtargetColumnName="array";System.out.println("queryText: "+queryText);ResultSetrs=stmt.executeQuery(queryText);inttargetColumnId=rs.findColumn(targetColumnName);while(rs.next()){ArraycurrentSqlArray=rs.getArray(targetColumnId);ResultSetlevel1ResultSet=currentSqlArray.getResultSet();if(level1ResultSet!=null){while(level1ResultSet.next()){// The first column of the result set holds the row index
inti=level1ResultSet.getInt(1)-1;Arraylevel2SqlArray=level1ResultSet.getArray(2);Objectlevel2Object=level2SqlArray.getArray();// For this ARRAY[INT], the driver returns a Long[]
assert(level2ObjectinstanceofLong[]);Long[]level2Array=(Long[])level2Object;System.out.println(" level1Object ["+i+"]: "+level2SqlArray.toString()+" ("+level2SqlArray.getClass()+")");for(intj=0;j<level2Array.length;j++){System.out.println(" Value ["+i+", "+j+"]: "+level2Array[j]+" ("+level2Array[j].getClass()+")");}}}}}/**
* Executes a query and gets a java.sql.Array from the ResultSet. It then uses the Array#getArray
* method to get the contents of the array as a Java Object [].
* @param conn A Connection to a Vertica database
* @throws SQLException
*/publicstaticvoidgetArrayObjectExample(Connectionconn)throwsSQLException{Statementstmt=conn.createStatement();finalStringqueryText="SELECT ARRAY[ARRAY[0.0,0.1,0.2],ARRAY[1.0,1.1,1.2],ARRAY[2.0,2.1,2.2]]::ARRAY[ARRAY[FLOAT]] as array";finalStringtargetColumnName="array";System.out.println("queryText: "+queryText);ResultSetrs=stmt.executeQuery(queryText);inttargetColumnId=rs.findColumn(targetColumnName);while(rs.next()){// Get the java.sql.Array from the result set
ArraycurrentSqlArray=rs.getArray(targetColumnId);// Get the internal Java Object implementing the array
Objectlevel1ArrayObject=currentSqlArray.getArray();if(level1ArrayObject!=null){// All returned instances are Object[]
assert(level1ArrayObjectinstanceofObject[]);Object[]level1Array=(Object[])level1ArrayObject;System.out.println("Vertica driver returned a: "+level1Array.getClass());for(inti=0;i<level1Array.length;i++){Objectlevel2Object=level1Array[i];// For this ARRAY[FLOAT], the driver returns a Double[]
assert(level2ObjectinstanceofDouble[]);Double[]level2Array=(Double[])level2Object;for(intj=0;j<level2Array.length;j++){System.out.println(" Value ["+i+", "+j+"]: "+level2Array[j]+" ("+level2Array[j].getClass()+")");}}}}}}
The output of getArrayResultSetExample() shows that the Vertica column type ARRAY[INT] is type cast to Long[]:
queryText: SELECT ARRAY[ARRAY[1,2,3],ARRAY[4,5,6],ARRAY[7,8,9]]::ARRAY[ARRAY[INT]] as array
 level1Object [0]: [1,2,3] (class com.vertica.jdbc.jdbc42.S42Array)
 Value [0, 0]: 1 (class java.lang.Long)
 Value [0, 1]: 2 (class java.lang.Long)
 Value [0, 2]: 3 (class java.lang.Long)
 level1Object [1]: [4,5,6] (class com.vertica.jdbc.jdbc42.S42Array)
 Value [1, 0]: 4 (class java.lang.Long)
 Value [1, 1]: 5 (class java.lang.Long)
 Value [1, 2]: 6 (class java.lang.Long)
 level1Object [2]: [7,8,9] (class com.vertica.jdbc.jdbc42.S42Array)
 Value [2, 0]: 7 (class java.lang.Long)
 Value [2, 1]: 8 (class java.lang.Long)
 Value [2, 2]: 9 (class java.lang.Long)
The output of getArrayObjectExample() shows that the Vertica column type ARRAY[FLOAT] is type cast to Double[]:
queryText: SELECT ARRAY[ARRAY[0.0,0.1,0.2],ARRAY[1.0,1.1,1.2],ARRAY[2.0,2.1,2.2]]::ARRAY[ARRAY[FLOAT]] as array
Vertica driver returned a: class [Ljava.lang.Object;
 Value [0, 0]: 0.0 (class java.lang.Double)
 Value [0, 1]: 0.1 (class java.lang.Double)
 Value [0, 2]: 0.2 (class java.lang.Double)
 Value [1, 0]: 1.0 (class java.lang.Double)
 Value [1, 1]: 1.1 (class java.lang.Double)
 Value [1, 2]: 1.2 (class java.lang.Double)
 Value [2, 0]: 2.0 (class java.lang.Double)
 Value [2, 1]: 2.1 (class java.lang.Double)
 Value [2, 2]: 2.2 (class java.lang.Double)
ROW columns
Calling getObject() on a java.sql.ResultSet that contains a column of type ROW retrieves the column as a java.sql.Struct which contains an Object[] (itself retrievable with getAttributes()).
Each element of the Object[] represents an attribute from the struct, and each attribute has a corresponding Java type shown in the type conversion table above.
This example defines a ROW with the following attributes:
 Name    | Value        | Vertica Type | Java Type
-----------------------------------------------------------
 name    | Amy          | VARCHAR      | String
 date    | '07/10/2021' | DATE         | java.sql.Date
 id      | 5            | INT          | java.lang.Long
 current | false        | BOOLEAN      | java.lang.Boolean
packagecom.vertica.jdbc.test.samples;importjava.sql.Connection;importjava.sql.SQLException;importjava.sql.Statement;importjava.sql.ResultSet;importjava.sql.Array;importjava.sql.Struct;publicclassComplexTypesSamples{/**
* Executes a query and gets a java.sql.Struct from the ResultSet. It then uses the Struct#getAttributes
* method to get the contents of the struct as a Java Object [].
* @param conn A Connection to a Vertica database
* @throws SQLException
*/publicstaticvoidgetRowExample(Connectionconn)throwsSQLException{Statementstmt=conn.createStatement();finalStringqueryText="SELECT ROW('Amy', '07/10/2021'::Date, 5, false) as rowExample(name, date, id, current)";finalStringtargetColumnName="rowExample";System.out.println("queryText: "+queryText);ResultSetrs=stmt.executeQuery(queryText);inttargetColumnId=rs.findColumn(targetColumnName);while(rs.next()){// Get the java.sql.Array from the result set
ObjectcurrentObject=rs.getObject(targetColumnId);assert(currentObjectinstanceofStruct);StructrowStruct=(Struct)currentObject;Object[]attributes=rowStruct.getAttributes();// attributes.length should be 4 based on the queryText
assert(attributes.length==4);assert(attributes[0]instanceofString);assert(attributes[1]instanceofjava.sql.Date);assert(attributes[2]instanceofjava.lang.Long);assert(attributes[3]instanceofjava.lang.Boolean);System.out.println("attributes[0]: "+attributes[0]+" ("+attributes[0].getClass().getName()+")");System.out.println("attributes[1]: "+attributes[1]+" ("+attributes[1].getClass().getName()+")");System.out.println("attributes[2]: "+attributes[2]+" ("+attributes[2].getClass().getName()+")");System.out.println("attributes[3]: "+attributes[3]+" ("+attributes[3].getClass().getName()+")");}}}
The output of getRowExample() shows the attribute of each element and its corresponding Java type:
For the purposes of this page, a is defined as a date with a year that exceeds 9999.
Converting a date to a string
For the purposes of this page, a large date is defined as a date with a year that exceeds 9999.
If your database doesn't contain any large dates, then you can reliably call toString() to convert the dates to strings.
Otherwise, if your database contains large dates, you should use java.text.SimpleDateFormat and its format() method:
Define a String format with java.text.SimpleDateFormat. The number of characters in yyyy in the format defines the minimum number of characters to use in the date.
Call SimpleDateFormat.format() to convert the java.sql.Date object to a String.
Examples
For example, the following method returns a string when passed a java.sql.Date object as an argument. Here, the year part of the format, YYYY indicates that this format is compatible with all dates with at least four characters in its year.
The method you use to run the query depends on the type of query you want to run:
a DDL query that does not return a result set.
a DDL query that returns a result set.
a DML query
Executing DDL (data definition language) queries
To run DDL queries, such as CREATE TABLE and COPY, use the Statement.execute() method. You get an instance of this class by calling the createStatement method of your connection object.
The following example creates an instance of the Statement class and uses it to execute a CREATE TABLE and a COPY query:
Use the Statement class's executeQuery method to execute queries that return a result set, such as SELECT. To get the data from the result set, use methods such as getInt, getString, and getDouble to access column values depending upon the data types of columns in the result set. Use ResultSet.next to advance to the next row of the data set.
ResultSetrs=null;rs=stmt.executeQuery("SELECT First_Name, Last_Name FROM address_book");intx=1;while(rs.next()){System.out.println(x+". "+rs.getString(1).trim()+" "+rs.getString(2).trim());x++;}
Note
The Vertica JDBC driver does not support scrollable cursors. You can only read forwards through the result set.
Executing DML (data manipulation language) queries using executeUpdate
Use the executeUpdate method for DML SQL queries that change data in the database, such as INSERT, UPDATE and DELETE which do not return a result set.
stmt.executeUpdate("INSERT INTO address_book "+"VALUES ('Ben-Shachar', 'Tamar', 'tamarrow@example.com',"+"'555-380-6466')");stmt.executeUpdate("INSERT INTO address_book (First_Name, Email) "+"VALUES ('Pete','pete@example.com')");
Note
The Vertica JDBC driver's Statement class supports executing multiple statements in the SQL string you pass to the execute method. The PreparedStatement class does not support using multiple statements in a single execution.
Statementst=conn.createStatement();StringcreateSimpleSp="CREATE OR REPLACE PROCEDURE raiseInt(IN x INT) LANGUAGE PLvSQL AS $$ "+"BEGIN"+"RAISE INFO 'x = %', x;"+"END;"+"$$;";st.execute(createSimpleSp);
Stored procedures do not yet support OUT parameters. Instead, you can return and retrieve execution information with RAISE and getWarnings() respectively:
You can cancel JDBC queries with the Statement.cancel() method.
You can cancel JDBC queries with the Statement.cancel() method.
The following example creates a table jdbccanceltest and runs two queries, canceling the first:
importjava.sql.Connection;importjava.sql.SQLException;importjava.sql.Statement;importjava.sql.ResultSet;importjava.sql.Array;importjava.sql.Struct;publicclassCancelSamples{/**
* Sets up a large test table, queries its contents and cancels the query.
* @param conn A connection to a Vertica database
* @throws SQLException
*/publicstaticvoidsampleCancelTest(Connectionconn)throwsSQLException{setup(conn);try{runQueryAndCancel(conn);runSecondQuery(conn);}finally{cleanup(conn);}}// Set up table used in test.
privatestaticvoidsetup(Connectionconn)throwsSQLException{System.out.println("Creating and loading table...");Statementstmt=conn.createStatement();StringqueryText="DROP TABLE IF EXISTS jdbccanceltest";stmt.execute(queryText);queryText="CREATE TABLE jdbccanceltest(id INTEGER, time TIMESTAMP)";stmt.execute(queryText);queryText="INSERT INTO jdbccanceltest SELECT row_number() OVER(), slice_time "+"FROM(SELECT slice_time FROM("+"SELECT '2021-01-01'::timestamp s UNION ALL SELECT '2022-01-01'::timestamp s"+") sq TIMESERIES slice_time AS '1 second' OVER(ORDER BY s)) sq2";stmt.execute(queryText);}/**
* Execute a long-running query and cancel it.
* @param conn A connection to a Vertica database
* @throws SQLException
*/privatestaticvoidrunQueryAndCancel(Connectionconn)throwsSQLException{System.out.println("Running and canceling query...");Statementstmt=conn.createStatement();StringqueryText="select id, time from jdbccanceltest";ResultSetrs=stmt.executeQuery(queryText);inti=0;stmt.cancel();try{while(rs.next());i++;}catch(SQLExceptione){System.out.println("Query canceled after retrieving "+i+" rows");System.out.println(e.getMessage());}}/**
* Run a simple query to demonstrate that it can be run after
* the previous query was canceled.
* @param conn A connection to a Vertica database
* @throws SQLException
*/privatestaticvoidrunSecondQuery(Connectionconn)throwsSQLException{StringqueryText="select 1 from dual";Statementstmt=conn.createStatement();try{ResultSetrs=stmt.executeQuery(queryText);while(rs.next());}catch(SQLExceptione){System.out.println(e.getMessage());System.out.println("warning: no exception should have been thrown on query after cancel");}}/**
* Clean up table used in test.
* @param conn A connetion to a Vertica database
* @throws SQLException
*/privatestaticvoidcleanup(Connectionconn)throwsSQLException{StringqueryText="drop table if exists jdbccanceltest";Statementstmt=conn.createStatement();stmt.execute(queryText);}}
2.3.4.6 - Loading data through JDBC
You can use any of the following methods to load data via the JDBC interface:.
You can use any of the following methods to load data via the JDBC interface:
Executing a SQL INSERT statement to insert a single row directly.
Batch loading data using a prepared statement.
Bulk loading data from files or streams using COPY.
The following sections explain in detail how you load data using JDBC.
2.3.4.6.1 - Using a single row insert
The simplest way to insert data into a table is to use the SQL INSERT statement.
The simplest way to insert data into a table is to use the SQL INSERT statement. You can use this statement by instantiating a member of the Statement class, and use its executeUpdate() method to run your SQL statement.
The following code fragment demonstrates how you can create a Statement object and use it to insert data into a table named address_book:
Statementstmt=conn.createStatement();stmt.executeUpdate("INSERT INTO address_book "+"VALUES ('Smith', 'John', 'jsmith@example.com', "+"'555-123-4567')");
This method has a few drawbacks: you need convert your data to string and escape any special characters in your data. A better way to insert data is to use prepared statements. See Batch inserts using JDBC prepared statements.
2.3.4.6.2 - Batch inserts using JDBC prepared statements
You can load batches of data into Vertica using prepared INSERT statements—server-side statements that you set up once, and then call repeatedly.
You can load batches of data into Vertica using prepared INSERT statements—server-side statements that you set up once, and then call repeatedly. You instantiate a member of the PreparedStatement class with a SQL statement that contains question mark placeholders for data. For example:
PreparedStatementpstmt=conn.prepareStatement("INSERT INTO customers(last, first, id) VALUES(?,?,?)");
You then set the parameters using data-type-specific methods on the PreparedStatement object, such as setString() and setInt(). Once your parameters are set, call the addBatch() method to add the row to the batch. When you have a complete batch of data ready, call the executeBatch() method to execute the insert batch.
Behind the scenes, the batch insert is converted into a COPY statement. When the connection's AutoCommit parameter is disabled, Vertica keeps the COPY statement open and uses it to load subsequent batches until the transaction is committed, the cursor is closed, or your application executes anything else (or executes any statement using another Statement or PreparedStatement object). Using a single COPY statement for multiple batch inserts makes loading data more efficient. If you are loading multiple batches, you should disable the AutoCommit property of the database to take advantage of this increased efficiency.
When performing batch inserts, experiment with various batch and row sizes to determine the settings that provide the best performance.
The following example demonstrates using a prepared statement to batch insert data.
importjava.sql.*;importjava.util.Properties;publicclassBatchInsertExample{publicstaticvoidmain(String[]args){PropertiesmyProp=newProperties();myProp.put("user","ExampleUser");myProp.put("password","password123");//Set streamingBatchInsert to True to enable streaming mode for batch inserts.
//myProp.put("streamingBatchInsert", "True");
Connectionconn;try{conn=DriverManager.getConnection("jdbc:vertica://VerticaHost:5433/ExampleDB",myProp);// establish connection and make a table for the data.
Statementstmt=conn.createStatement();// Set AutoCommit to false to allow Vertica to reuse the same
// COPY statement
conn.setAutoCommit(false);// Drop table and recreate.
stmt.execute("DROP TABLE IF EXISTS customers CASCADE");stmt.execute("CREATE TABLE customers (CustID int, Last_Name"+" char(50), First_Name char(50),Email char(50), "+"Phone_Number char(12))");// Some dummy data to insert.
String[]firstNames=newString[]{"Anna","Bill","Cindy","Don","Eric"};String[]lastNames=newString[]{"Allen","Brown","Chu","Dodd","Estavez"};String[]emails=newString[]{"aang@example.com","b.brown@example.com","cindy@example.com","d.d@example.com","e.estavez@example.com"};String[]phoneNumbers=newString[]{"123-456-7890","555-444-3333","555-867-5309","555-555-1212","781-555-0000"};// Create the prepared statement
PreparedStatementpstmt=conn.prepareStatement("INSERT INTO customers (CustID, Last_Name, "+"First_Name, Email, Phone_Number)"+" VALUES(?,?,?,?,?)");// Add rows to a batch in a loop. Each iteration adds a
// new row.
for(inti=0;i<firstNames.length;i++){// Add each parameter to the row.
pstmt.setInt(1,i+1);pstmt.setString(2,lastNames[i]);pstmt.setString(3,firstNames[i]);pstmt.setString(4,emails[i]);pstmt.setString(5,phoneNumbers[i]);// Add row to the batch.
pstmt.addBatch();}try{// Batch is ready, execute it to insert the data
pstmt.executeBatch();}catch(SQLExceptione){System.out.println("Error message: "+e.getMessage());return;// Exit if there was an error
}// Commit the transaction to close the COPY command
conn.commit();// Print the resulting table.
ResultSetrs=null;rs=stmt.executeQuery("SELECT CustID, First_Name, "+"Last_Name FROM customers ORDER BY CustID");while(rs.next()){System.out.println(rs.getInt(1)+" - "+rs.getString(2).trim()+" "+rs.getString(3).trim());}// Cleanup
conn.close();}catch(SQLExceptione){e.printStackTrace();}}}
The result of running the example code is:
1 - Anna Allen
2 - Bill Brown
3 - Cindy Chu
4 - Don Dodd
5 - Eric Estavez
Streaming batch inserts
By default, Vertica performs batch inserts by caching each row and inserting the cache when the user calls the executeBatch() method. Vertica also supports streaming batch inserts. A streaming batch insert adds a row to the database each time the user calls addBatch(). Streaming batch inserts improve database performance by allowing parallel processing and reducing memory demands.
Note
Once you begin a streaming batch insert, you cannot make other JDBC calls that require client-server communication until you have executed the batch or closed or rolled back the connection.
To enable streaming batch inserts, set the streamingBatchInsert property to True. The preceding code sample includes a line enabling streamingBatchInsert mode. Remove the // comment marks to enable this line and activate streaming batch inserts.
The following table explains the various batch insert methods and how their behavior differs between default batch insert mode and streaming batch insert mode.
Method
Default Batch Insert Behavior
Streaming Batch Insert Behavior
addBatch()
Adds a row to the row cache.
Inserts a row into the database.
executeBatch()
Adds the contents of the row cache to the database in a single action.
Sends an end-of-batch message to the server and returns an array of integers indicating the success or failure of each addBatch() attempt.
clearBatch()
Clears the row cache without inserting any rows.
Not supported. Triggers an exception if used when streaming batch inserts are enabled.
Notes
Using the PreparedStatement.setFloat() method can cause rounding errors. If precision is important, use the .setDouble() method instead.
The PreparedStatement object caches the connection's AutoCommit property when the statement is prepared. Later changes to the AutoCommit property have no effect on the prepared statement.
2.3.4.6.2.1 - Error handling during batch loads
When loading individual batches, you can find how many rows were accepted and what rows were rejected (see Identifying Accepted and Rejected Rows for details).
When loading individual batches, you can find how many rows were accepted and what rows were rejected (see Identifying Accepted and Rejected Rows for details). If you have disabled the AutoCommit connection setting, other errors (such as disk space errors, for example) do not occur while inserting individual batches. This behavior is caused by having a single SQL COPY statement perform the loading of multiple consecutive batches (which makes the load process more efficient). It is only when the COPY statement closes that the batched data is committed and Vertica reports other types of errors.
Therefore, your bulk loading application should be prepared to check for errors when the COPY statement closes. You can trigger the COPY statement to close by:
ending the batch load transaction by calling Connection.commit()
closing the statement using Statement.close()
setting the connection's AutoCommit property to true before inserting the last batch in the load
Note
The COPY statement also closes if you execute any non-insert statement or execute any statement using a different Statement or PreparedStatement object. Ending the COPY statement using either of these methods can lead to confusion and a harder-to-maintain application, since you would need to handle batch load errors in a non-batch load statement. You should explicitly end the COPY statement at the end of your batch load and handle any errors at that time.
2.3.4.6.2.2 - Identifying accepted and rejected rows (JDBC)
The return value of PreparedStatement.executeBatch is an integer array containing the success or failure status of inserting each row.
The return value of PreparedStatement.executeBatch is an integer array containing the success or failure status of inserting each row. A value 1 means the row was accepted and a value of -3 means that the row was rejected. In the case where an exception occurred during the batch execution, you can also get the array using BatchUpdateException.getUpdateCounts().
importjava.sql.*;importjava.util.Arrays;importjava.util.Properties;publicclassBatchInsertErrorHandlingExample{publicstaticvoidmain(String[]args){PropertiesmyProp=newProperties();myProp.put("user","ExampleUser");myProp.put("password","password123");Connectionconn;// establish connection and make a table for the data.
try{conn=DriverManager.getConnection("jdbc:vertica://VerticaHost:5433/ExampleDB",myProp);// Disable auto commit
conn.setAutoCommit(false);// Create a statement
Statementstmt=conn.createStatement();// Drop table and recreate.
stmt.execute("DROP TABLE IF EXISTS customers CASCADE");stmt.execute("CREATE TABLE customers (CustID int, Last_Name"+" char(50), First_Name char(50),Email char(50), "+"Phone_Number char(12))");// Some dummy data to insert. The one row won't insert because
// the phone number is too long for the phone column.
String[]firstNames=newString[]{"Anna","Bill","Cindy","Don","Eric"};String[]lastNames=newString[]{"Allen","Brown","Chu","Dodd","Estavez"};String[]emails=newString[]{"aang@example.com","b.brown@example.com","cindy@example.com","d.d@example.com","e.estavez@example.com"};String[]phoneNumbers=newString[]{"123-456-789","555-444-3333","555-867-53093453453","555-555-1212","781-555-0000"};// Create the prepared statement
PreparedStatementpstmt=conn.prepareStatement("INSERT INTO customers (CustID, Last_Name, "+"First_Name, Email, Phone_Number)"+" VALUES(?,?,?,?,?)");// Add rows to a batch in a loop. Each iteration adds a
// new row.
for(inti=0;i<firstNames.length;i++){// Add each parameter to the row.
pstmt.setInt(1,i+1);pstmt.setString(2,lastNames[i]);pstmt.setString(3,firstNames[i]);pstmt.setString(4,emails[i]);pstmt.setString(5,phoneNumbers[i]);// Add row to the batch.
pstmt.addBatch();}// Integer array to hold the results of inserting
// the batch. Will contain an entry for each row,
// indicating success or failure.
int[]batchResults=null;try{// Batch is ready, execute it to insert the data
batchResults=pstmt.executeBatch();}catch(BatchUpdateExceptione){// We expect an exception here, since one of the
// inserted phone numbers is too wide for its column. All of the
// rest of the rows will be inserted.
System.out.println("Error message: "+e.getMessage());// Batch results isn't set due to exception, but you
// can get it from the exception object.
//
// In your own code, you shouldn't assume the a batch
// exception occurred, since exceptions can be thrown
// by the server for a variety of reasons.
batchResults=e.getUpdateCounts();}// You should also be prepared to catch SQLExceptions in your own
// application code, to handle dropped connections and other general
// problems.
// Commit the transaction
conn.commit();// Print the array holding the results of the batch insertions.
System.out.println("Return value from inserting batch: "+Arrays.toString(batchResults));// Print the resulting table.
ResultSetrs=null;rs=stmt.executeQuery("SELECT CustID, First_Name, "+"Last_Name FROM customers ORDER BY CustID");while(rs.next()){System.out.println(rs.getInt(1)+" - "+rs.getString(2).trim()+" "+rs.getString(3).trim());}// Cleanup
conn.close();}catch(SQLExceptione){e.printStackTrace();}}}
Running the above example produces the following output on the console:
Error message: [Vertica][VJDBC](100172) One or more rows were rejected by the server.Return value from inserting batch: [1, 1, -3, 1, 1]
1 - Anna Allen
2 - Bill Brown
4 - Don Dodd
5 - Eric Estavez
Notice that the third row failed to insert because its phone number is too long for the Phone_Number column. All of the rest of the rows in the batch (including those after the error) were correctly inserted.
Note
It is more efficient for you to ensure that the data you are inserting is the correct data type and width for the table column you are inserting it into than to handle exceptions after the fact.
2.3.4.6.2.3 - Rolling back batch loads on the server
Batch loads always insert all of their data, even if one or more rows is rejected.
Batch loads always insert all of their data, even if one or more rows is rejected. Only the rows that caused errors in a batch are not loaded. When the database connection's AutoCommit property is true, batches automatically commit their transactions when they complete, so once the batch finishes loading, the data is committed.
In some cases, you may want all of the data in a batch to be successfully inserted—none of the data should be committed if an error occurs. The best way to accomplish this is to turn off the database connection's AutoCommit property to prevent batches from automatically committing themselves. Then, if a batch encounters an error, you can roll back the transaction after catching the BatchUpdateException caused by the insertion error.
The following example demonstrates performing a rollback if any error occurs when loading a batch.
importjava.sql.*;importjava.util.Arrays;importjava.util.Properties;publicclassRollbackBatchOnError{publicstaticvoidmain(String[]args){PropertiesmyProp=newProperties();myProp.put("user","ExampleUser");myProp.put("password","password123");Connectionconn;try{conn=DriverManager.getConnection("jdbc:vertica://VerticaHost:5433/ExampleDB",myProp);// Disable auto-commit. This will allow you to roll back a
// a batch load if there is an error.
conn.setAutoCommit(false);// establish connection and make a table for the data.
Statementstmt=conn.createStatement();// Drop table and recreate.
stmt.execute("DROP TABLE IF EXISTS customers CASCADE");stmt.execute("CREATE TABLE customers (CustID int, Last_Name"+" char(50), First_Name char(50),Email char(50), "+"Phone_Number char(12))");// Some dummy data to insert. The one row won't insert because
// the phone number is too long for the phone column.
String[]firstNames=newString[]{"Anna","Bill","Cindy","Don","Eric"};String[]lastNames=newString[]{"Allen","Brown","Chu","Dodd","Estavez"};String[]emails=newString[]{"aang@example.com","b.brown@example.com","cindy@example.com","d.d@example.com","e.estavez@example.com"};String[]phoneNumbers=newString[]{"123-456-789","555-444-3333","555-867-53094535","555-555-1212","781-555-0000"};// Create the prepared statement
PreparedStatementpstmt=conn.prepareStatement("INSERT INTO customers (CustID, Last_Name, "+"First_Name, Email, Phone_Number) "+"VALUES(?,?,?,?,?)");// Add rows to a batch in a loop. Each iteration adds a
// new row.
for(inti=0;i<firstNames.length;i++){// Add each parameter to the row.
pstmt.setInt(1,i+1);pstmt.setString(2,lastNames[i]);pstmt.setString(3,firstNames[i]);pstmt.setString(4,emails[i]);pstmt.setString(5,phoneNumbers[i]);// Add row to the batch.
pstmt.addBatch();}// Integer array to hold the results of inserting
// the batch. Will contain an entry for each row,
// indicating success or failure.
int[]batchResults=null;try{// Batch is ready, execute it to insert the data
batchResults=pstmt.executeBatch();// If we reach here, we inserted the batch without errors.
// Commit it.
System.out.println("Batch insert successful. Committing.");conn.commit();}catch(BatchUpdateExceptione){System.out.println("Error message: "+e.getMessage());// Batch results isn't set due to exception, but you
// can get it from the exception object.
batchResults=e.getUpdateCounts();// Roll back the batch transaction.
System.out.println("Rolling back batch insertion");conn.rollback();}catch(SQLExceptione){// General SQL errors, such as connection issues, throw
// SQLExceptions. Your application should do something more
// than just print a stack trace,
e.printStackTrace();}System.out.println("Return value from inserting batch: "+Arrays.toString(batchResults));System.out.println("Customers table contains:");// Print the resulting table.
ResultSetrs=null;rs=stmt.executeQuery("SELECT CustID, First_Name, "+"Last_Name FROM customers ORDER BY CustID");while(rs.next()){System.out.println(rs.getInt(1)+" - "+rs.getString(2).trim()+" "+rs.getString(3).trim());}// Cleanup
conn.close();}catch(SQLExceptione){e.printStackTrace();}}}
Running the above example prints the following on the system console:
Error message: [Vertica][VJDBC](100172) One or more rows were rejected by the server.Rolling back batch insertion
Return value from inserting batch: [1, 1, -3, 1, 1]
Customers table contains:
The return values indicate whether each rows was successfully inserted. The value 1 means the row inserted without any issues, and a -3 indicates the row failed to insert.
The customers table is empty since the batch insert was rolled back due to the error caused by the third column.
2.3.4.6.3 - Bulk loading using the COPY statement
One of the fastest ways to load large amounts of data into Vertica at once (bulk loading) is to use the COPY statement.
One of the fastest ways to load large amounts of data into Vertica at once (bulk loading) is to use the COPY statement. This statement loads data from a file stored on a Vertica host (or in a data stream) into a table in the database. You can pass the COPY statement parameters that define the format of the data in the file, how the data is to be transformed as it is loaded, how to handle errors, and how the data should be loaded. See the COPY documentation for details.
Important
In databases that were created in versions of Vertica ≤ 9.2, COPY supports the DIRECT option, which specifies to load data directly into ROS rather than WOS. Use this option when loading large (>100MB) files into the database; otherwise, the load is liable to fill the WOS. When this occurs, the Tuple Mover must perform a
moveout operation on the WOS data. It is more efficient to directly load into ROS and avoid forcing a moveout.
In databases created in Vertica 9.3, Vertica ignores load options and hints and always uses a load method of DIRECT. Databases created in versions ≥ 10.0 no longer support WOS and moveout operations; all data is always loaded directly into ROS.
Only a superuser can use COPY to copy a file stored on a host, so you must connect to the database with a superuser account. If you want to have a non-superuser user bulk-load data, you can use COPY to load from a stream on the host (such as STDIN) rather than a file or stream data from the client (see Streaming data via JDBC). You can also perform a standard batch insert using a prepared statement, which uses the COPY statement in the background to load the data.
Note
When using COPY parameter
ON ANY NODE, confirm that the source file is identical on all nodes. Using different files can produce inconsistent results.
The following example demonstrates using the COPY statement through the JDBC to load a file name customers.txt into a new database table. This file must be stored on the database host to which your application connects—in this example, a host named VerticaHost.
importjava.sql.*;importjava.util.Properties;importcom.vertica.jdbc.*;publicclassCOPYFromFile{publicstaticvoidmain(String[]args){PropertiesmyProp=newProperties();myProp.put("user","ExampleAdmin");// Must be superuser
myProp.put("password","password123");Connectionconn;try{conn=DriverManager.getConnection("jdbc:vertica://VerticaHost:5433/ExampleDB",myProp);// Disable AutoCommit
conn.setAutoCommit(false);Statementstmt=conn.createStatement();// Create a table to hold data.
stmt.execute("DROP TABLE IF EXISTS customers;");stmt.execute("CREATE TABLE IF NOT EXISTS customers (Last_Name char(50) "+"NOT NULL, First_Name char(50),Email char(50), "+"Phone_Number char(15))");// Use the COPY command to load data. Use ENFORCELENGTH to reject
// strings too wide for their columns.
booleanresult=stmt.execute("COPY customers FROM "+" '/data/customers.txt' ENFORCELENGTH");// Determine if execution returned a count value, or a full result
// set.
if(result){System.out.println("Got result set");}else{// Count will usually return the count of rows inserted.
System.out.println("Got count");introwCount=stmt.getUpdateCount();System.out.println("Number of accepted rows = "+rowCount);}// Commit the data load
conn.commit();}catch(SQLExceptione){System.out.print("Error: ");System.out.println(e.toString());}}}
The example prints the following out to the system console when run (assuming that the customers.txt file contained two million valid rows):
Number of accepted rows = 2000000
2.3.4.6.4 - Streaming data via JDBC
There are two options to stream data from a file on the client to your Vertica database:.
There are two options to stream data from a file on the client to your Vertica database:
Use the VerticaCopyStream class to stream data in an object-oriented manner - details on the class are available in the JDBC documentation.
Execute a COPY LOCAL SQL statement to stream the data
The topics in this section explain how to use these options.
2.3.4.6.4.1 - Using VerticaCopyStream
The VerticaCopyStream class lets you stream data from the client system to a Vertica database.
The VerticaCopyStream class lets you stream data from the client system to a Vertica database. It lets you use COPY directly without first copying the data to a host in the database cluster. Using COPY to load data from the host requires superuser privileges to access the host's file system. The COPY statement used to load data from a stream does not require superuser privileges, so your client can connect with any user account that has INSERT privileges on the target table.
To copy streams into the database:
Disable the database connections AutoCommit connection parameter.
Instantiate a VerticaCopyStreamObject, passing it at least the database connection objects and a string containing a COPY statement to load the data. This statement must copy data from the STDIN into your table. You can use any parameters that are appropriate for your data load.
Note
The VerticaCopyStreamObject constructor optionally takes a single InputStream object, or a List of InputStream objects. This option lets you pre-populate the list of streams to be copied into the database.
Call VerticaCopyStreamObject.start() to start the COPY statement and begin streaming the data in any streams you have already added to the VerticaCopyStreamObject.
Call VerticaCopyStreamObject.addStream() to add additional streams to the list of streams to send to the database. You can then call VerticaCopyStreamObject.execute() to stream them to the server.
Optionally, call VerticaCopyStreamObject.getRejects() to get a list of rejected rows from the last .execute() call. The list of rejects is reset by each call to .execute() or .finish().
Note
If you used either the REJECTED DATA or EXCEPTIONS options in the COPY statement you passed to VerticaCopyStreamObject the object in step 2, .getRejects() returns an empty list. You can only use one method of tracking the rejected rows at a time.
When you are finished adding streams, call VerticaCopyStreamObject.finish() to send any remaining streams to the database and close the COPY statement.
Call Connection.commit() to commit the loaded data.
Getting rejected rows
The VerticaCopyStreamObject.getRejects() method returns a List containing the row numbers of rows that were rejected after the previous .execute() method call. Each call to .execute() clears the list of rejected rows, so you need to call .getRejects() after each call to .execute(). Since .start() and .finish() also call .execute() to send any pending streams to the server, you should also call .getRejects() after these methods as well.
The following example demonstrates loading the content of five text files stored on the client system into a table.
importjava.io.File;importjava.io.FileInputStream;importjava.sql.Connection;importjava.sql.DriverManager;importjava.sql.Statement;importjava.util.Iterator;importjava.util.List;importjava.util.Properties;importcom.vertica.jdbc.VerticaConnection;importcom.vertica.jdbc.VerticaCopyStream;publicclassCopyMultipleStreamsExample{publicstaticvoidmain(String[]args){// Note: If running on Java 5, you need to call Class.forName
// to manually load the JDBC driver.
// Set up the properties of the connection
PropertiesmyProp=newProperties();myProp.put("user","ExampleUser");// Must be superuser
myProp.put("password","password123");// When performing bulk loads, you should always disable the
// connection's AutoCommit property to ensure the loads happen as
// efficiently as possible by reusing the same COPY command and
// transaction.
myProp.put("AutoCommit","false");Connectionconn;try{conn=DriverManager.getConnection("jdbc:vertica://VerticaHost:5433/ExampleDB",myProp);Statementstmt=conn.createStatement();// Create a table to receive the data
stmt.execute("DROP TABLE IF EXISTS customers");stmt.execute("CREATE TABLE customers (Last_Name char(50), "+"First_Name char(50),Email char(50), "+"Phone_Number char(15))");// Prepare the query to insert from a stream. This query must use
// the COPY statement to load data from STDIN. Unlike copying from
// a file on the host, you do not need superuser privileges to
// copy a stream. All your user account needs is INSERT privileges
// on the target table.
StringcopyQuery="COPY customers FROM STDIN "+"DELIMITER '|' ENFORCELENGTH";// Create an instance of the stream class. Pass in the
// connection and the query string.
VerticaCopyStreamstream=newVerticaCopyStream((VerticaConnection)conn,copyQuery);// Keep running count of the number of rejects
inttotalRejects=0;// start() starts the stream process, and opens the COPY command.
stream.start();// If you added streams to VerticaCopyStream before calling start(),
// You should check for rejects here (see below). The start() method
// calls execute() to send any pre-queued streams to the server
// once the COPY statement has been created.
// Simple for loop to load 5 text files named customers-1.txt to
// customers-5.txt
for(intloadNum=1;loadNum<=5;loadNum++){// Prepare the input file stream. Read from a local file.
Stringfilename="C:\\Data\\customers-"+loadNum+".txt";System.out.println("\n\nLoading file: "+filename);FileinputFile=newFile(filename);FileInputStreaminputStream=newFileInputStream(inputFile);// Add stream to the VerticaCopyStream
stream.addStream(inputStream);// call execute() to load the newly added stream. You could
// add many streams and call execute once to load them all.
// Which method you choose depends mainly on whether you want
// the ability to check the number of rejections as the load
// progresses so you can stop if the number of rejects gets too
// high. Also, high numbers of InputStreams could create a
// resource issue on your client system.
stream.execute();// Show any rejects from this execution of the stream load
// getRejects() returns a List containing the
// row numbers of rejected rows.
List<Long>rejects=stream.getRejects();// The size of the list gives you the number of rejected rows.
intnumRejects=rejects.size();totalRejects+=numRejects;System.out.println("Number of rows rejected in load #"+loadNum+": "+numRejects);// List all of the rows that were rejected.
Iterator<Long>rejit=rejects.iterator();longlinecount=0;while(rejit.hasNext()){System.out.print("Rejected row #"+++linecount);System.out.println(" is row "+rejit.next());}}// Finish closes the COPY command. It returns the number of
// rows inserted.
longresults=stream.finish();System.out.println("Finish returned "+results);// If you added any streams that hadn't been executed(),
// you should also check for rejects here, since finish()
// calls execute() to
// You can also get the number of rows inserted using
// getRowCount().
System.out.println("Number of rows accepted: "+stream.getRowCount());System.out.println("Total number of rows rejected: "+totalRejects);// Commit the loaded data
conn.commit();}catch(Exceptione){e.printStackTrace();}}}
Running the above example on some sample data results in the following output:
Loading file: C:\Data\customers-1.txtNumber of rows rejected in load #1: 3
Rejected row #1 is row 3
Rejected row #2 is row 7
Rejected row #3 is row 51
Loading file: C:\Data\customers-2.txt
Number of rows rejected in load #2: 5Rejected row #1 is row 4143
Rejected row #2 is row 6132
Rejected row #3 is row 9998
Rejected row #4 is row 10000
Rejected row #5 is row 10050
Loading file: C:\Data\customers-3.txt
Number of rows rejected in load #3: 9
Rejected row #1 is row 14142
Rejected row #2 is row 16131
Rejected row #3 is row 19999
Rejected row #4 is row 20001
Rejected row #5 is row 20005
Rejected row #6 is row 20049
Rejected row #7 is row 20056
Rejected row #8 is row 20144
Rejected row #9 is row 20236
Loading file: C:\Data\customers-4.txt
Number of rows rejected in load #4: 8
Rejected row #1 is row 23774
Rejected row #2 is row 24141
Rejected row #3 is row 25906
Rejected row #4 is row 26130
Rejected row #5 is row 27317
Rejected row #6 is row 28121
Rejected row #7 is row 29321
Rejected row #8 is row 29998
Loading file: C:\Data\customers-5.txt
Number of rows rejected in load #5: 1
Rejected row #1 is row 39997
Finish returned 39995
Number of rows accepted: 39995
Total number of rows rejected: 26
Note
The above example shows a simple load process that targets one node in the Vertica cluster. It is more efficient to simultaneously load multiple streams to multiple database nodes. Doing so greatly improves performance because it spreads the processing for the load across the cluster.
2.3.4.6.4.2 - Using COPY LOCAL with JDBC
To use COPY LOCAL with JDBC, just execute a COPY LOCAL statement with the path to the source file on the client system.
To use COPY LOCAL with JDBC, just execute a COPY LOCAL statement with the path to the source file on the client system. This method is simpler than using the VerticaCopyStream class (details on the class are available in the JDBC documentation. However, you may prefer using VerticaCopyStream if you have many files to copy to the database or if your data comes from a source other than a file (streamed over a network connection, for example).
You can use COPY LOCAL in a multiple-statement query. However, you should always make it the first statement in the query. You should not use it multiple times in the same query.
The following example code demonstrates using COPY LOCAL to copy a file from the client to the database. It is the same as the code shown in Bulk loading using the COPY statement, except for the use of the LOCAL option in the COPY statement, and the path to the data file is on the client system, rather than on the server.
Note
The exceptions/rejections files are created on the client machine when the exceptions and rejected data modifiers are specified on the copy local command. Specify a local path and filename for these modifiers when executing a COPY LOCAL query from the driver.
importjava.sql.*;importjava.util.Properties;publicclassCOPYLocal{publicstaticvoidmain(String[]args){// Note: If using Java 5, you must call Class.forName to load the
// JDBC driver.
PropertiesmyProp=newProperties();myProp.put("user","ExampleUser");// Do not need to superuser
myProp.put("password","password123");Connectionconn;try{conn=DriverManager.getConnection("jdbc:vertica://VerticaHost:5433/ExampleDB",myProp);// Disable AutoCommit
conn.setAutoCommit(false);Statementstmt=conn.createStatement();// Create a table to hold data.
stmt.execute("DROP TABLE IF EXISTS customers;");stmt.execute("CREATE TABLE IF NOT EXISTS customers (Last_Name char(50) "+"NOT NULL, First_Name char(50),Email char(50), "+"Phone_Number char(15))");// Use the COPY command to load data. Load directly into ROS, since
// this load could be over 100MB. Use ENFORCELENGTH to reject
// strings too wide for their columns.
booleanresult=stmt.execute("COPY customers FROM LOCAL "+" 'C:\\Data\\customers.txt' DIRECT ENFORCELENGTH");// Determine if execution returned a count value, or a full result
// set.
if(result){System.out.println("Got result set");}else{// Count will usually return the count of rows inserted.
System.out.println("Got count");introwCount=stmt.getUpdateCount();System.out.println("Number of accepted rows = "+rowCount);}conn.close();}catch(SQLExceptione){System.out.print("Error: ");System.out.println(e.toString());}}}
The result of running this code appears below. In this case, the customers.txt file contains 10000 rows, seven of which get rejected because they contain data too wide to fit into their database columns.
Got countNumber of accepted rows = 9993
2.3.4.7 - Handling errors
When the Vertica JDBC driver encounters an error, it throws a SQLException or one of its subclasses.
When the Vertica JDBC driver encounters an error, it throws a SQLException or one of its subclasses. The specific subclass it throws depends on the type of error that has occurred. Most of the JDBC method calls can result in several different types of errors, in response to which the JDBC driver throws a specific SQLException subclass. Your client application can choose how to react to the error based on the specific exception that the JDBC driver threw.
Note
The specific SQLException subclasses were introduced in the JDBC 4.0 standard. If your client application runs in a Java 5 JVM, it will use the older JDBC 3.0-compliant driver which lacks these subclasses. In that case, all errors throw a SQLException.
The hierarchy of SQLException subclasses is arranged to help your client application determine what actions it can take in response to an error condition. For example:
The JDBC driver throws SQLTransientException subclasses when the cause of the error may be a temporary condition, such as a timeout error (SQLTimeoutException) or a connection issue (SQLTransientConnectionIssue). Your client application can choose to retry the operation without making any sort of attempt to remedy the error, since it may not reoccur.
The JDBC driver throws SQLNonTransientException subclasses when the client needs to take some action before it could retry the operation. For example, executing a statement with a SQL syntax error results in the JDBC driver throwing the a SQLSyntaxErrorException (a subclass of SQLNonTransientException). Often, your client application just has to report these errors back to the user and have him or her resolve them. For example, if the user supplied your application with a SQL statement that triggered a SQLSyntaxErrorException, it could prompt the user to fix the SQL error.
2.3.4.7.1 - SQLState mapping to Java exception classes
SQLSTATE Class or Value
Description
Java Exception Class
Class 00
Successful Completion
SQLException
Class 01
Warning
SQLException
Class 02
No Data
SQLException
Class 03
SQL Statement Not Yet Complete
SQLException
Class 08
Client Connection Exception
SQLNonTransientConnectionException
Class 09
Triggered Action Exception
SQLException
Class 0A
Feature Not Supported
SQLFeatureNotSupportedException
Class 0B
Invalid Transaction Initiation
SQLException
Class 0F
Locator Exception
SQLException
Class 0L
Invalid Grantor
SQLException
Class 0P
Invalid Role Specification
SQLException
Class 20
Case Not Found
SQLException
Class 21
Cardinality Violation
SQLException
Class 22
Data Exception
SQLDataException
22V21
INVALID_EPOCH
SQLNonTransientException
Class 23
Integrity Constraint Violation
SQLIntegrityConstraintViolationException
Class 24
Invalid Cursor State
SQLException
Class 25
Invalid Transaction State
SQLTransactionRollbackException
Class 26
Invalid SQL Statement Name
SQLException
Class 27
Triggered Data Change Violation
SQLException
Class 28
Invalid Authorization Specification
SQLInvalidAuthorizationException
Class 2B
Dependent Privilege Descriptors Still Exist
SQLDataException
Class 2D
Invalid Transaction Termination
SQLException
Class 2F
SQL Routine Exception
SQLException
Class 34
Invalid Cursor Name
SQLException
Class 38
External Routine Exception
SQLException
Class 39
External Routine Invocation Exception
SQLException
Class 3B
Savepoint Exception
SQLException
Class 3D
Invalid Catalog Name
SQLException
Class 3F
Invalid Schema Name
SQLException
Class 40
Transaction Rollback
SQLTransactionRollbackException
Class 42
Syntax Error or Access Rule Violation
SQLClientSyntaxErrorException
Class 44
WITH CHECK OPTION Violation
SQLException
Class 53
Insufficient Resources
SQLTransientException
53300
TOO_MANY_CONNECTIONS
SQLTransientConnectionException
Class 54
Program Limit Exceeded
SQLNonTransientException
Class 55
Object Not In Prerequisite State
SQLNonTransientException
55V03
LOCK_NOT_AVAILABLE
SQLTransactionRollbackException
Class 57
Operator Intervention
SQLTransientException
57V01
ADMIN_SHUTDOWN
SQLNonTransientConnectionException
57V02
CRASH_SHUTDOWN
SQLNonTransientConnectionException
57V03
CANNOT_CONNECT_NOW
SQLNonTransientConnectionException
Class 58
System Error
SQLException
Class V0
PL/vSQL errors
SQLException
Class V1
Vertica-specific multi-node errors class
SQLException
Class V2
Vertica-specific miscellaneous errors class
SQLException
V2000
AUTH_FAILED
SQLInvalidAuthorizationException
Class VC
Configuration File Error
SQLNonTransientException
Class VD
DB Designer errors
SQLNonTransientException
Class VP
User procedure errors
SQLNonTransientException
Class VX
Internal Error
SQLException
2.3.4.8 - Routing JDBC queries directly to a single node
The JDBC driver has the ability to route queries directly to a single node using a special connection called a Routable Connection.
The JDBC driver has the ability to route queries directly to a single node using a special connection called a Routable Connection. This feature is ideal for high-volume "short" requests that return a small number of results that all exist on a single node. The common scenario for using this feature is to do high-volume lookups on data that is identified with a unique key. Routable queries typically provide lower latency and use less system resources than distributed queries. However, the data being queried must be segmented in such a way that the JDBC client can determine on which node the data resides.
Vertica Typical Analytic Query
Typical analytic queries require dense computation on data across all nodes in the cluster and benefit from having all nodes involved in the planning and execution of the queries.
Vertica Routable Query API Query
For high-volume queries that return a single or a few rows of data, it is more efficient to execute the query on the single node that contains the data.
To effectively route a request to a single node, the client must determine the specific node on which the data resides. For the client to be able to determine the correct node, the table must be segmented by one or more columns. For example, if you segment a table on a Primary Key (PK) column, then the client can determine on which node the data resides based on the Primary Key and directly connect to that node to quickly fulfill the request.
The Routable Query API provides two classes for performing routable queries: VerticaRoutableExecutor and VGet. VerticaRoutableExecutor provides a more expressive SQL-based API while VGet provides a more structured API for programmatic access.
The VerticaRoutableExecutor class allows you to use traditional SQL with a reduced feature set to query data on a single node.
For joins, the table must be joined on a key column that exists in each table you are joining, and the tables must be segmented on that key. However, this is not true for unsegmented tables, which can always be joined (since all the data in an unsegmented table is available on all nodes).
The VGet class does not use traditional SQL syntax. Instead, it uses a data structure that you build by defining predicates and predicate expressions and outputs and output expressions. This class is ideal for doing Key/Value type lookups on single tables.
The data structure used for querying the table must provide a predicate for each segmented column defined in the projection for the table. You must provide, at a minimum, a predicate with a constant value for each segmented column. For example, an id with a value of 12234 if the table is segmented only on the id column. You can also specify additional predicates for the other, non-segmented, columns in the table. Predicates act like a SQL WHERE clause and multiple predicates/predicate expressions apply together with a SQL AND modifier. Predicates must be defined with a constant value. Predicate expressions can be used to refine the query and can contain any arbitrary SQL expressions (such as less than, greater than, and so on) for any of the non-segmented columns in the table.
Java documentation for all classes and methods in the JDBC Driver is available in the Vertica JDBC documentation.
Note
The JDBC Routable Query API is read-only and requires JDK 1.6 or greater.
2.3.4.8.1 - Creating tables and projections for use with the routable query API
For routable queries, the client must determine the appropriate node to get the data.
For routable queries, the client must determine the appropriate node to get the data. The client does this by comparing all projections available for the table, and determining the best projection to use to find the single node that contains data. You must create a projection segmented by the key column(s) on at least one table to take full advantage of the routable query API. Other tables that join to this table must either have an unsegmented projection, or a projection segmented as described below.
Note
Tables must be segmented by hash for routable queries. See Hash segmentation clause. Other segmentation types are not supported.
Creating tables for use with routable queries
To create a table that can be used with the routable query API, segment (by hash) the table on a uniformly distributed column. Typically, you segment on a primary key. For faster lookups, sort the projection on the same columns on which you segmented. For example, to create a table that is well suited to routable queries:
CREATE TABLE users (
id INT NOT NULL PRIMARY KEY,
username VARCHAR(32),
email VARCHAR(64),
business_unit VARCHAR(16))
ORDER BY id
SEGMENTED BY HASH(id)
ALL NODES;
This table is segmented based on the id column (and ordered by id to make lookups faster). To build a query for this table using the routable query API, you only need to provide a single predicate for the id column which returns a single row when queried.
However, you might add multiple columns to the segmentation clause. For example:
CREATE TABLE users2 (
    id INT NOT NULL PRIMARY KEY,
    username VARCHAR(32),
    email VARCHAR(64),
    business_unit VARCHAR(16))
ORDER BY id, business_unit
SEGMENTED BY HASH(id, business_unit)
ALL NODES;
In this case, you need to provide two predicates when querying the users2 table, as it is segmented on two columns, id and business_unit. However, if you know both id and business_unit when you perform the queries, then it is beneficial to segment on both columns, as it makes it easier for the client to determine that this projection is the best projection to use to determine the correct node.
Designing tables for single-node JOINs
If you plan to use the VerticaRoutableExecutor class and join tables during routable queries, then you must segment all tables being joined by the same segmentation key. Typically this key is a primary/foreign key on all the tables being joined. For example, the customer_key may be the primary key in a customers dimension table, and the same key is a foreign key in a sales fact table. Projections for a VerticaRoutableExecutor query using these tables must be segmented by hash on the customer key in each table.
If you want to join with small dimension tables, such as date dimensions, then it may be appropriate to make those tables unsegmented so that the date_dimension data exists on all nodes. It is important to note that when joining unsegmented tables, you still must specify a segmented table in the createRoutableExecutor() call.
Verifying existing projections for tables
If tables are already segmented by hash (for example, on an ID column), then you can determine what predicates are needed to query the table by using the Vertica function
GET_PROJECTIONS to view that table's projections. For example:
For each projection, only the public.users.id column is specified, indicating your query predicate should include this column.
If the table is segmented on multiple columns, for example id and business_unit, then you need to provide both columns as predicates to the routable query.
2.3.4.8.2 - Creating a connection for routable queries
The JDBC Routable Query API provides the VerticaRoutableConnection (details are available in the JDBC Documentation) interface to connect to a cluster and allow for Routable Queries.
You enable access to this class by setting the EnableRoutableQueries JDBC connection property to true.
The VerticaRoutableConnection maintains an internal pool of connections and a cache of table metadata that is shared by all VerticaRoutableExecutor/VGet objects that are produced by the connection's createRoutableExecutor()/prepareGet() method. It is also a fully-fledged JDBC connection on its own and supports all the functionality that a VerticaConnection supports. When this connection is closed, all pooled connections managed by this VerticaRoutableConnection and all child objects are closed too. The connection pool and metadata is only used by child Routable Query operations.
Example:
You can create the connection using a JDBC DataSource:
Both methods result in a conn connection object that is identical.
Note
Avoid opening many VerticaRoutableConnection connections because this connection maintains its own private pool of connections which are not shared with other connections. Instead, your application should use a single connection and issue multiple queries through that connection.
In addition to the setEnableRoutableQueries property that the Routable Query API adds to the Vertica JDBC connection class, the API also adds additional properties. The complete list is below.
EnableRoutableQueries: Enables Routable Query lookup capability. Default is false.
FailOnMultiNodePlans: If the plan requires more than one node, and FailOnMultiNodePlans is true, then the query fails. If it is set to false then a warning is generated and the query continues. However, latency is greatly increased as the Routable Query must first determine the data is on multiple nodes, then a normal query is run using traditional (all node) execution and execution. Defaults to true. Note that this failure cannot occur on simple calls using only predicates and constant values.
MetadataCacheLifetime: The time in seconds to keep projection metadata. The API caches metadata about the projection used for the query (such as projections). The cache is used on subsequent queries to reduce response time. The default is 300 seconds.
MaxPooledConnections: Cluster-wide maximum number of connections to keep in the VerticaRoutableConnection’s internal pool. Default 20.
MaxPooledConnectionsPerNode: Per-node maximum number of connections to keep in the VerticaRoutableConnection’s internal pool. Default 5.
2.3.4.8.3 - Defining the query for routable queries using the VerticaRoutableExecutor class
Use the VerticaRoutableExecutor class to access table data directly from a single node.
Use the VerticaRoutableExecutor class to access table data directly from a single node. VerticaRoutableExecutor directly queries Vertica only on the node that has all the data needed for the query, avoiding the distributed planning and execution costs associated with Vertica query execution. You can use VerticaRoutableExecutor to join tables or use a GROUP BY clause, as these operations are not possible using VGet.
When using the VerticaRoutableExecutor class, the following rules apply:
If joining tables, all tables being joined must be segmented (by hash) on the same set of columns referenced in the join predicate, unless the table to join is unsegmented.
Multiple conditions in a join WHERE clause must be AND'd together. Using OR in the WHERE clause causes the query to degenerate to a multi-node plan. You can specify OR, IN list, or range conditions on columns outside the join condition if the data exists on the same node.
You can only execute a single statement per request. Chained SQL statements are not permitted.
Your query can be used in a driver-generated subquery to help determine whether the query can execute on a single node. Therefore, you cannot include the semi-colon at the end of the statement and you cannot include SQL comments using double-dashes (--), as these cause the driver-generated query to fail.
You create a VerticaRoutableExecutor by calling the createRoutableExecutor method on a connection object:
A Java map of the column names and corresponding values if the lookup is done on one or more columns. For example: ResultSet rs = q.execute(query, map);. The table must have at least one projection segmented by a set of columns that exactly match the columns in the map. Each column defined in the map can have only one value. For example:
The query to execute must use regular SQL that complies with the rules of the VerticaRoutableExecutor class. For example, you can add limits and sorts, or use aggregate functions, provided the data exists on a single node.
The JDBC client uses the column/value or map arguments to determine on which node to execute the query. The content of the query must use the same values that you provide in the column/value or map arguments.
Also, if a table is segmented on any columns with the following data types then the table cannot be queried with the routable query API:
The driver does not verify the syntax of the query before it sends the query to the server. If your expression is incorrect, then the query fails.
Close
close()
Closes this VerticaRoutableExecutor by releasing resources used by this VerticaRoutableExecutor. It does not close the parent JDBC connection to Vertica.
getWarnings
getWarnings()
Retrieves the first warning reported by calls on this VerticaRoutableExecutor. Additional warnings are chained and can be accessed with the JDBC method getNextWarning().
Example
The following example shows how to use VerticaRoutableExecutor to execute a query using both a JOIN clause and an aggregate function with a GROUP BY clause. The example also shows how to create a customer and sales table, and segment the tables so they can be joined using the VerticaRoutableExecutor class. This example uses the date_dimension table in the VMart schema to show how to join data on unsegmented tables.
Create the customers table to store customer details, and then create projections that are segmented on the table's customer_key column:
=> CREATE TABLE customers (customer_key INT, customer_name VARCHAR(128), customer_email VARCHAR(128));
=> CREATE PROJECTION cust_proj_b0 AS SELECT * FROM customers SEGMENTED BY HASH (customer_key) ALL NODES;
=> CREATE PROJECTION cust_proj_b1 AS SELECT * FROM customers SEGMENTED BY HASH (customer_key) ALL NODES OFFSET 1;
=> CREATE PROJECTION cust_proj_b2 AS SELECT * FROM customers SEGMENTED BY HASH (customer_key) ALL NODES OFFSET 2;
=> SELECT start_refresh();
Create the sales table, then create projections that are segmented on its customer_key column. Because the customer and sales tables are segmented on the same key, you can join them later with the VerticaRoutableExecutor routable query lookup.
=> CREATE TABLE sales (sale_key INT, customer_key INT, date_key INT, sales_amount FLOAT);
=> CREATE PROJECTION sales_proj_b0 AS SELECT * FROM sales SEGMENTED BY HASH (customer_key) ALL NODES;
=> CREATE PROJECTION sales_proj_b1 AS SELECT * FROM sales SEGMENTED BY HASH (customer_key) ALL NODES OFFSET 1;
=> CREATE PROJECTION sales_proj_b2 AS SELECT * FROM sales SEGMENTED BY HASH (customer_key) ALL NODES OFFSET 2;
=> SELECT start_refresh();
Add some sample data:
=> INSERT INTO customers VALUES (1, 'Fred', 'fred@example.com');
=> INSERT INTO customers VALUES (2, 'Sue', 'Sue@example.com');
=> INSERT INTO customers VALUES (3, 'Dave', 'Dave@example.com');
=> INSERT INTO customers VALUES (4, 'Ann', 'Ann@example.com');
=> INSERT INTO customers VALUES (5, 'Jamie', 'Jamie@example.com');
=> COMMIT;

=> INSERT INTO sales VALUES(1, 1, 1, '100.00');
=> INSERT INTO sales VALUES(2, 2, 2, '200.00');
=> INSERT INTO sales VALUES(3, 3, 3, '300.00');
=> INSERT INTO sales VALUES(4, 4, 4, '400.00');
=> INSERT INTO sales VALUES(5, 5, 5, '400.00');
=> INSERT INTO sales VALUES(6, 1, 15, '500.00');
=> INSERT INTO sales VALUES(7, 1, 15, '400.00');
=> INSERT INTO sales VALUES(8, 1, 35, '300.00');
=> INSERT INTO sales VALUES(9, 1, 35, '200.00');
=> COMMIT;
Create an unsegmented projection of the VMart date_dimension table for use in this example. Call the meta-function START_REFRESH to unsegment the existing data:
=> CREATE PROJECTION date_dim AS SELECT * FROM date_dimension UNSEGMENTED ALL NODES;
=> SELECT start_refresh();
Using the customer, sales, and date_dimension data, you can now create a routable query lookup that uses joins and a group by to query the customers table and return the total number of purchases per day for a given customer:
importjava.sql.*;importjava.util.HashMap;importjava.util.Map;importcom.vertica.jdbc.kv.*;publicclassverticaKV_doc{publicstaticvoidmain(String[]args){com.vertica.jdbc.DataSourcejdbcSettings=newcom.vertica.jdbc.DataSource();jdbcSettings.setDatabase("VMart");jdbcSettings.setHost("vertica.example.com");jdbcSettings.setUserID("dbadmin");jdbcSettings.setPassword("password");jdbcSettings.setEnableRoutableQueries(true);jdbcSettings.setFailOnMultiNodePlans(true);jdbcSettings.setPort((short)5433);VerticaRoutableConnectionconn;Map<String,Object>map=newHashMap<String,Object>();map.put("customer_key",1);try{conn=(VerticaRoutableConnection)jdbcSettings.getConnection();Stringtable="customers";VerticaRoutableExecutorq=conn.createRoutableExecutor(null,table);Stringquery="select d.date, SUM(s.sales_amount) as Total ";query+=" from customers as c";query+=" join sales as s ";query+=" on s.customer_key = c.customer_key ";query+=" join date_dimension as d ";query+=" on d.date_key = s.date_key ";query+=" where c.customer_key = "+map.get("customer_key");query+=" group by (d.date) order by Total DESC";ResultSetrs=q.execute(query,map);while(rs.next()){System.out.print("Date: "+rs.getString("date")+": ");System.out.println("Amount: "+rs.getString("Total"));}conn.close();}catch(SQLExceptione){e.printStackTrace();}}}
Your output might be different, because the VMart schema randomly generates dates in the date_dimension table.
2.3.4.8.4 - Defining the query for routable queries using the VGet class
The VGet class is used to access table data directly from a single node when you do not need to join the data or use a group by clause.
The VGet class is used to access table data directly from a single node when you do not need to join the data or use a group by clause. Like VerticaRoutableExecutor, VGet directly queries Vertica nodes that have the data needed for the query, avoiding the distributed planning and execution costs associated with a normal Vertica execution. However, VGet does not use SQL. Instead, you define predicates and values to perform key/value type lookups on a single table. VGet is especially suited to key/value-type lookups on single tables.
You create a VGet by calling the prepareGet method on a connection object:
VGet operations span multiple JDBC connections (and multiple Vertica sessions) and do not honor the parent connection's transaction semantics. If consistency is required across multiple executions, the parent VerticaRoutableConnection's consistent read API can be used to guarantee all operations occur at the same epoch.
VGet is thread safe, but all methods are synchronized, so threads that share a VGet instance are never run in parallel. For better parallelism, each thread should have its own VGet instance. Different VGet instances that operate on the same table share pooled connections and metadata in a manner that enables a high degree of parallelism.
Adds a predicate column and a constant value to the query. You must include a predicate for each column on which the table is segmented. The predicate acts as the query WHERE clause. Multiple addPredicate method calls are joined by AND modifiers. The VGet retains this value after each call to execute. To remove it, use clearPredicates.
The following data types cannot be used as column values. Also, if a table is segmented on any columns with these data types then the table cannot be queried with the Routable Query API:
Accepts arbitrary SQL expressions that operate on the table's columns as input to the query. Predicate expressions and predicates are joined by AND modifiers. You can use segmented columns in predicate expressions, but they must also be specified as a regular predicate with addPredicate. The VGet retains this value after each call to execute. To remove it, use clearPredicates.
The driver does not verify the syntax of the expression before it sends it to the server. If your expression is incorrect then the query fails.
addOutputColumn
addOutputColumn(string)
Adds a column to be included in the output. By default the query runs as SELECT * and you do not need to define any output columns to return the data. If you add output columns then you must add all the columns to be returned. The VGet retains this value after each call to execute. To remove it, use clearOutputs.
addOutputExpression
addOutputExpression(string)
Accepts arbitrary SQL expressions that operate on the table's columns as output. The VGet retains this value after each call to execute. To remove it, use ClearOutputs.
The following restrictions apply:
The driver does not verify the syntax of the expression before it sends it to the server. If your expression is incorrect then the query fails.
addOutputExpression is not supported when querying flex tables. If you use addOutputExpression on a flex table query, then a SQLFeatureNotSupportedException is thrown.
addSortColumn
addSortColumn(string, SortOrder)
Adds a sort order to an output column. The output column can be either the one returned by the default query (SELECT *) or one of the columns defined in addSortColumn or addOutputExpress. You can defined multiple sort columns.
setLimit
setLimit(int)
Sets a limit on the number of results returned. A limit of 0 is unlimited.
Removes sort columns previously added by addSortColumn.
Execute
execute()
Runs the query. Care must be taken to ensure that the predicate columns exist on the table and projection used by VGet, and that the expressions do not require multiple nodes to execute. If an expression is sufficiently complex as to require more than one node to execute, execute throws a SQLException if the FailOnMultiNodePlans connection property is true.
Close
close()
Closes this VGet by releasing resources used by this VGet. It does not close the parent JDBC connection to Vertica.
getWarnings
getWarnings()
Retrieves the first warning reported by calls on this VGet. Additional warnings are chained and can be accessed with the JDBC method getNextWarning.
2.3.4.8.5 - Routable query performance and troubleshooting
This topic details performance considerations and common issues you might encounter when using the routable query API.
This topic details performance considerations and common issues you might encounter when using the routable query API.
Using resource pools with routable queries
Individual routable queries are serviced quickly since they directly access a single node and return only one or a few rows of data. However, by default, Vertica resource pools use an AUTO setting for the execution parallelism parameter. When set to AUTO, the setting is determined by the number of CPU cores available and generally results in multi-threaded execution of queries in the resource pool. It is not efficient to create parallel threads on the server because routable query operations return data so quickly and routable query operations only use a single thread to find a row. To prevent the server from opening unneeded processing threads, you should create a specific resource pool for routable query clients. Consider the following settings for the resource pool you use for routable queries:
Set execution parallelism to 1 to force single-threaded queries. This setting improves routable query performance.
Use CPU affinity to limit the resource pool to a specific CPU or CPU set. The setting ensures that the routable queries have resources available to them, but it also prevents routable queries from significantly impacting performance on the system for other general queries.
If you do not set a CPU affinity for the resource pool, consider setting the maximum concurrency value of the resource pool to a setting that ensures good performance for routable queries, but does not negatively impact the performance of general queries.
Performance considerations for routable query connections
Because a VerticaRoutableConnection opens an internal pool of connections, it is important to configure MaxPooledConnections and MaxPooledConnectionsPerNode appropriately for your cluster size and the amount of simultaneous client connections. It is possible to impact normal database connections if you are overloading the cluster with VerticaRoutableConnections.
The initial connection to the initiator node discovers all other nodes in the cluster. The internal-pool connections are not opened until a VerticaRoutableExecutor or VGet query is sent. All VerticaRoutableExecutors/VGets in a connection object use connections from the internal pool and are limited by the MaxPooledConnections settings. Connections remain open until they are closed so a new connection can be opened elsewhere if the connection limit has been reached.
Troubleshooting routable queries
Routable query issues generally fall into two categories:
Not providing enough predicates.
Queries having to span multiple nodes.
Predicate Requirements
You must provide the same number of predicates that correspond to the columns of the table segmented by hash. To determine the segmented columns, call the Vertica function
GET_PROJECTIONS. You must provide a predicate for each column displayed in the Seg Cols field.
For VGet, this means you must use addPredicate() to add each of the columns. For VerticaRoutableExecutor, this means you must provide all of the predicates and values in the map sent to execute().
Multi-node Failures
It is possible to define the correct number of predicates, but still have a failure because multiple nodes contain the data. This failure occurs because the projection's data is not segmented in such a way that the data being queried is contained on a single node. Enable logging for the connection and view the logs to verify the projection being used. If the client is not picking the correct projection, then try to query the projection directly by specifying the projection instead of the table in the create/prepare statement, for example:
Additionally, you can use the EXPLAIN command in vsql to help determine if your query can run in single node. EXPLAIN can help you understand why the query is being run as single or multi-node.
2.3.4.8.6 - Pre-segmenting data using VHash
The VHash class is an implementation of the Vertica hash function for use with JDBC client applications.
The VHash class is an implementation of the Vertica hash function for use with JDBC client applications.
Hash segmentation in Vertica allows you to segment a projection based on a built-in hash function. The built-in hash function provides even data distribution across some or all nodes in a cluster, resulting in optimal query execution.
Suppose you have several million rows of values spread across thousands of CSV files. Assume that you already have a table segmented by hash. Before you load the values into your database, you probably want to know to which node a particular value loads. For this reason, using VHash can be particularly helpful, by allowing you to pre-segment your data before loading.
The following example shows the VHash class hashing the first column of a file named "testFile.csv". The name of the first column in this file is meterId.
Segment the data using VHash
This example demonstrates how you can read the testFile.csv file from the local file system and run a hash function on the meteterId column. Using the database metadata from a projection, you can then pre-segment the individual rows in the file based on the hash value of meterId.
importjava.io.BufferedReader;importjava.io.FileNotFoundException;importjava.io.FileOutputStream;importjava.io.FileReader;importjava.io.UnsupportedEncodingException;importjava.util.*;importjava.io.IOException;importjava.sql.*;importcom.vertica.jdbc.kv.VHash;publicclassVerticaKVDoc{finalMap<String,FileOutputStream>files;finalMap<String,List<Long>>nodeToHashList;StringsegmentationMetadata;List<String>lines;publicstaticvoidmain(String[]args)throwsException{try{Class.forName("com.vertica.jdbc.Driver");}catch(ClassNotFoundExceptione){System.err.println("Could not find the JDBC driver class.");e.printStackTrace();return;}PropertiesmyProp=newProperties();myProp.put("user","username");myProp.put("password","password");VerticaKVDocex=newVerticaKVDoc();// Read in the data from a CSV file.
ex.readLinesFromFile("C:\\testFile.csv");try(Connectionconn=DriverManager.getConnection("jdbc:vertica://VerticaHost:portNumber/databaseName",myProp)){// Compute the hashes and create FileOutputStreams.
ex.prepareForHashing(conn);}// Write to files.
ex.writeLinesToFiles();}publicVerticaKVDoc(){files=newHashMap<String,FileOutputStream>();nodeToHashList=newHashMap<String,List<Long>>();}publicvoidprepareForHashing(Connectionconn)throwsSQLException,FileNotFoundException{// Send a query to Vertica to return the projection segments.
try(ResultSetrs=conn.createStatement().executeQuery("SELECT get_projection_segments('public.projectionName')")){rs.next();segmentationMetadata=rs.getString(1);}// Initialize the data files.
try(ResultSetrs=conn.createStatement().executeQuery("SELECT node_name FROM nodes")){while(rs.next()){Stringnode=rs.getString(1);files.put(node,newFileOutputStream(node+".csv"));}}}publicvoidwriteLinesToFiles()throwsUnsupportedEncodingException,IOException{for(Stringline:lines){longhashedValue=VHash.hashLong(getMeterIdFromLine(line));// Write the row data to that node's data file.
Stringnode=VHash.getNodeFor(segmentationMetadata,hashedValue);FileOutputStreamfos=files.get(node);fos.write(line.getBytes("UTF-8"));}}privatelonggetMeterIdFromLine(Stringline){// In our file, "meterId" is the name of the first column in the file.
returnLong.parseLong(line.split(",")[0]);}publicvoidreadLinesFromFile(Stringfilename)throwsIOException{lines=newArrayList<String>();Stringline;try(BufferedReaderreader=newBufferedReader(newFileReader(filename))){while((line=reader.readLine())!=null){lines.add(line);}}}}
2.3.5 - JavaScript
The open-source vertica-nodejs client driver lets you interact with your database with JavaScript.
The open-source vertica-nodejs client driver lets you interact with your database with JavaScript. For details, see the vertica-nodejs package on npm.
2.3.6 - Perl
Perl scripts can interact with Vertica using the Perl DBI module along with the DBD::ODBC database driver to interface to the Vertica ODBC driver.
Perl scripts can interact with Vertica using the Perl DBI module along with the DBD::ODBC database driver to interface to the Vertica ODBC driver.
2.3.6.1 - Configuring a Perl development environment
Perl has a Database Interface module (DBI) that creates a standard interface for Perl scripts to interact with databases.
Perl has a Database Interface module (DBI) that creates a standard interface for Perl scripts to interact with databases. The interface module relies on Database Driver modules (DBDs) to handle all of the database-specific communication tasks. The result is an interface that provides a consistent way for Perl scripts to interact with many different types of databases.
Note
With Perl ODBC clients, Vertica allows a forked process (a child process) to drop the parent connection to the Vertica server when the child process completes and exits. Vertica allows this behavior regardless of the setting of the Perl DBI AutoInactiveDestroy attribute.
To change the default setting so that Vertica honors the setting of the Perl DBI AutoInactiveDestroy attribute, add the parameter CleanupInForkChild to your vertica.ini file, and set its value to 1. When the Perl DBI AutoInactiveDestroy attribute is set to 1, and the Vertica parameter CleanupInForkChild is set to 1, Vertica does not drop the parent connection upon child process completion.
Perl scripts can interact with Vertica using the Perl DBI module along with the DBD::ODBC database driver to interface to the Vertica ODBC driver. See the CPAN pages for Perl's DBI and DBD::ODBC modules for detailed documentation.
A Perl development environment depends on the Vertica ODBC driver and the DBI and DBD::ODBC modules.
Verify that Perl is installed with the following command. If this command does not return version information, you must install Perl. For version support, see Perl driver requirements.
Run the following commands to verify that DBI and DBD::ODBC are installed. If installed, these commands should return nothing. Otherwise, they return an error:
$ perl -e "use DBI;"
$ perl -e "use DBD::ODBC;"
Listing DSNs and verifying the installation
Another way to verify your installation is with the following Perl script. This script verifies if DBI and DBD::ODBC are installed and prints your ODBC DSN, if any:
#!/usr/bin/perl
use strict;
# Attempt to load the DBI module in an eval using require. Prevents
# script from erroring out if DBI is not installed.
eval
{
require DBI;
DBI->import();
};
if ($@) {
# The eval failed, so DBI must not be installed
print "DBI module is not installed\n";
} else {
# Eval was successful, so DBI is installed
print "DBI Module is installed\n";
# List the drivers that DBI knows about.
my @drivers = DBI->available_drivers;
print "Available Drivers: \n";
foreach my $driver (@drivers) {
print "\t$driver\n";
}
# See if DBD::ODBC is installed by searching driver array.
if (grep {/ODBC/i} @drivers) {
print "\nDBD::ODBC is installed.\n";
# List the ODBC data sources (DSNs) defined on the system
print "Defined ODBC Data Sources:\n";
my @dsns = DBI->data_sources('ODBC');
foreach my $dsn (@dsns) {
print "\t$dsn\n";
}
} else {
print "DBD::ODBC is not installed\n";
}
}
If your system is properly configured, the output should resemble the following:
DBI Module is installed
Available Drivers:
ADO
DBM
ExampleP
File
Gofer
ODBC
Pg
Proxy
SQLite
Sponge
mysql
DBD::ODBC is installed.
Defined ODBC Data Sources:
dbi:ODBC:dBASE Files
dbi:ODBC:Excel Files
dbi:ODBC:MS Access Database
dbi:ODBC:VerticaDSN
2.3.6.2 - Connecting to Vertica using Perl
You use the Perl DBI module's connect function to connect to Vertica.
You use the Perl DBI module's connect function to connect to Vertica. This function takes a required data source string argument and optional arguments for the username, password, and connection attributes.
The data source string must start with "dbi:ODBC:", which tells the DBI module to use the DBD::ODBC driver to connect to Vertica. The remainder of the string is interpreted by the DBD::ODBC driver. It usually contains the name of a DSN that contains the connection information needed to connect to your Vertica database. For example, to tell the DBD::ODBC driver to use the DSN named VerticaDSN, you use the data source string:
"dbi:ODBC:VerticaDSN"
The username and password parameters are optional. However, if you do not supply them (or just the username for a passwordless account) and they are not set in the DSN, attempting to connect always fails.
The connect function returns a database handle if it connects to Vertica. If it does not, it returns undef. In that case, you can access the DBI module's error string property ($DBI::errstr) to get the error message.
Note
By default, the DBI module prints an error message to STDERR whenever it encounters an error. If you prefer to display your own error messages or handle errors in some other manner, you may want to disable these automatic messages by setting DBI's PrintError connection attribute to false. See Setting Perl DBI connection attributes for details. Otherwise, users may see two error messages: the one that DBI prints automatically, and the one that your script prints on its own.
The following example connects to Vertica with a DSN named VerticaDSN. The call to connect supplies a username and password. After connecting, it calls the database handle's disconnect function, which closes the connection:
#!/usr/bin/perl -w
use strict;
use DBI;
# Open a connection using a DSN. Supply the username and password.
my $dbh = DBI->connect("dbi:ODBC:VerticaDSN","ExampleUser","password123");
unless (defined $dbh) {
# Conection failed.
die "Failed to connect: $DBI::errstr";
}
print "Connected!\n";
$dbh->disconnect();
2.3.6.2.1 - Setting ODBC connection parameters in Perl
To set ODBC connection parameters, replace the DSN name with a semicolon delimited list of parameter name and value pairs in the source data string.
To set ODBC connection parameters, replace the DSN name with a semicolon delimited list of parameter name and value pairs in the source data string. Use the DSN parameter to tell DBD::ODBC which DSN to use, then add in other the other ODBC parameters you want to set. For example, the following code connects using a DSN named VerticaDSN and sets the connection's locale to en_GB.
#!/usr/bin/perl -w
use strict;
use DBI;
# Instead of just using the DSN name, use name and value pairs.
my $dbh = DBI->connect("dbi:ODBC:DSN=VerticaDSN;Locale=en_GB@collation=binary","ExampleUser","password123");
unless (defined $dbh) {
# Conection failed.
die "Failed to connect: $DBI::errstr";
}
print "Connected!\n";
$dbh->disconnect();
The Perl DBI module has attributes that you can use to control the behavior of its database connection.
The Perl DBI module has attributes that you can use to control the behavior of its database connection. These attributes are similar to the ODBC connection parameters (in several cases, they duplicate each other's functionality). The DBI connection attributes are a cross-platform way of controlling the behavior of the database connection.
You can set the DBI connection attributes when establishing a connection by passing the DBI connect function a hash containing attribute and value pairs. For example, to set the DBI connection attribute AutoCommit to false, you would use:
# Create a hash that holds attributes for the connection
my $attr = {AutoCommit => 0};
# Open a connection using a DSN. Supply the username and password.
my $dbh = DBI->connect("dbi:ODBC:VerticaDSN","ExampleUser","password123",
$attr);
See the DBI documentation's Database Handle Attributes section for a full description of the attributes you can set on the database connection.
After your script has connected, it can access and modify the connection attributes through the database handle by using it as a hash reference. For example:
print "The AutoCommit attribute is: " . $dbh->{AutoCommit} . "\n";
The following example demonstrates setting two connection attributes:
RaiseError controls whether the DBI driver generates a Perl error if it encounters a database error. Usually, you set this to true (1) if you want your Perl script to exit if there is a database error.
AutoCommit controls whether statements automatically commit their transactions when they complete. DBI defaults to Vertica's default AutoCommit value of true. Always set AutoCommit to false (0) when bulk loading data to increase database efficiency.
#!/usr/bin/perl
use strict;
use DBI;
# Create a hash that holds attributes for the connection
my $attr = {
RaiseError => 1, # Make database errors fatal to script
AutoCommit => 0, # Prevent statements from committing
# their transactions.
};
# Open a connection using a DSN. Supply the username and password.
my $dbh = DBI->connect("dbi:ODBC:VerticaDSN","ExampleUser","password123",
$attr);
if (defined $dbh->err) {
# Connection failed.
die "Failed to connect: $DBI::errstr";
}
print "Connected!\n";
# The database handle lets you access the connection attributes directly:
print "The AutoCommit attribute is: " . $dbh->{AutoCommit} . "\n";
print "The RaiseError attribute is: " . $dbh->{RaiseError} . "\n";
# And you can change values, too...
$dbh->{AutoCommit} = 1;
print "The AutoCommit attribute is now: " . $dbh->{AutoCommit} . "\n";
$dbh->disconnect();
The example outputs the following when run:
Connected!The AutoCommit attribute is: 0
The RaiseError attribute is: 1
The AutoCommit attribute is now: 1
2.3.6.2.3 - Connecting from Perl without a DSN
If you do not want to set up a Data Source Name (DSN) for your database, you can supply all of the information Perl's DBD::ODBC driver requires to connect to your Vertica database in the data source string.
If you do not want to set up a Data Source Name (DSN) for your database, you can supply all of the information Perl's DBD::ODBC driver requires to connect to your Vertica database in the data source string. This source string must the DRIVER= parameter that tells DBD::ODBC which driver library to use in order to connect. The value for this parameter is the name assigned to the driver by the client system's driver manager:
On Windows, the name assigned to the Vertica ODBC driver by the driver manager is Vertica.
On Linux and other UNIX-like operating systems, the Vertica ODBC driver's name is assigned in the system's odbcinst.ini file. For example, if your /etc/odbcinst.ini contains the following:
You can take advantage of Perl's variable expansion within strings to use variables for most of the connection properties as the following example demonstrates.
#!/usr/bin/perl
use strict;
use DBI;
my $server='VerticaHost';
my $port = '5433';
my $database = 'VMart';
my $user = 'ExampleUser';
my $password = 'password123';
# Connect without a DSN by supplying all of the information for the connection.
# The DRIVER value on UNIX platforms depends on the entry in the odbcinst.ini
# file.
my $dbh = DBI->connect("dbi:ODBC:DRIVER={Vertica};Server=$server;" .
"Port=$port;Database=$database;UID=$user;PWD=$password")
or die "Could not connect to database: " . DBI::errstr;
print "Connected!\n";
$dbh->disconnect();
Note
Surrounding the driver name with braces ({ and }) in the source string is optional.
2.3.6.3 - Executing statements using Perl
Once your Perl script has connected to Vertica (see Connecting to Using Perl), it can execute simple statements that return a value rather than a result set by using the Perl DBI module's do function.
Once your Perl script has connected to Vertica (see Connecting to Vertica Using Perl), it can execute simple statements that return a value rather than a result set by using the Perl DBI module's do function. You usually use this function to execute DDL statements or data loading statements such as COPY (see Using COPY LOCAL to load data in Perl).
#!/usr/bin/perl
use strict;
use DBI;
# Disable autocommit
my $attr = {AutoCommit => 0};
# Open a connection using a DSN.
my $dbh = DBI->connect("dbi:ODBC:VerticaDSN","ExampleUser","password123",
$attr);
unless (defined $dbh) {
# Conection failed.
die "Failed to connect: $DBI::errstr";
}
# You can use the do function to perform DDL commands.
# Drop any existing table.
$dbh->do("DROP TABLE IF EXISTS TEST CASCADE;");
# Create a table to hold data.
$dbh->do("CREATE TABLE TEST( \
C_ID INT, \
C_FP FLOAT,\
C_VARCHAR VARCHAR(100),\
C_DATE DATE, C_TIME TIME,\
C_TS TIMESTAMP,\
C_BOOL BOOL)");
# Commit changes and exit.
$dbh->commit();
$dbh->disconnect();
Note
The do function returns the number of rows that were affected by the statement (or -1 if the count of rows doesn't apply or is unavailable). Usually, the only time you need to consult this value is after you deleted a number of rows or if you used a bulk load command such as COPY. You use other DBI functions instead of do to perform batch inserts and selects (see Batch loading data using Perl and Querying using Perl for details).
2.3.6.4 - Batch loading data using Perl
To load large batches of data into Vertica using Perl:.
To load large batches of data into Vertica using Perl:
Set DBI's AutoCommit connection attribute to false to improve the batch load speed. See Setting Perl DBI connection attributes for an example of disabling AutoCommit.
Call the database handle's prepare function to prepare a SQL INSERT statement that contains placeholders for the data values you want to insert. For example:
# Prepare an INSERT statement for the test table
$sth = $dbh->prepare("INSERT into test values(?,?,?,?,?,?,?)");
The prepare function returns a statement handle that you will use to insert the data.
Assign data to the placeholders. There are several ways to do this. The easiest is to populate an array with a value for each placeholder in your INSERT statement.
Call the statement handle's execute function to insert a row of data into Vertica. The return value of this function call lets you know whether Vertica accepted or rejected the row.
Repeat steps 3 and 4 until you have loaded all of the data you need to load.
Call the database handle's commit function to commit the data you inserted.
The following example demonstrates inserting a small batch of data by populating an array of arrays with data, then looping through it and inserting each row.
#!/usr/bin/perl
use strict;
use DBI;
# Create a hash reference that holds a hash of parameters for the
# connection.
my $attr = {AutoCommit => 0, # Turn off autocommit
PrintError => 0 # Turn off automatic error printing.
# This is handled manually.
};
# Open a connection using a DSN. Supply the username and password.
my $dbh = DBI->connect("dbi:ODBC:VerticaDSN","ExampleUser","password123",
$attr);
if (defined DBI::err) {
# Conection failed.
die "Failed to connect: $DBI::errstr";
}
print "Connection AutoCommit state is: " . $dbh->{AutoCommit} . "\n";
# Create table to hold inserted data
$dbh->do("DROP TABLE IF EXISTS TEST CASCADE;") or die "Could not drop table";
$dbh->do("CREATE TABLE TEST( \
C_ID INT, \
C_FP FLOAT,\
C_VARCHAR VARCHAR(100),\
C_DATE DATE, C_TIME TIME,\
C_TS TIMESTAMP,\
C_BOOL BOOL)") or die "Could not create table";
# Populate an array of arrays with values. One of these rows contains
# data that will not be sucessfully inserted. Another contains an
# undef value, which gets inserted into the database as a NULL.
my @data = (
[1,1.111,'Hello World!','2001-01-01','01:01:01'
,'2001-01-01 01:01:01','t'],
[2,2.22222,'How are you?','2002-02-02','02:02:02'
,'2002-02-02 02:02:02','f'],
['bad value',2.22222,'How are you?','2002-02-02','02:02:02'
,'2002-02-02 02:02:02','f'],
[4,4.22222,undef,'2002-02-02','02:02:02'
,'2002-02-02 02:02:02','f'],
);
# Create a prepared statement to use parameters for inserting values.
my $sth = $dbh->prepare_cached("INSERT into test values(?,?,?,?,?,?,?)");
my $rowcount = 0; # Count # of rows
# Loop through the arrays to insert values
foreach my $tuple (@data) {
$rowcount++;
# Insert the row
my $retval = $sth->execute(@$tuple);
# See if the row was successfully inserted.
if ($retval == 1) {
# Value of 1 means the row was inserted (1 row was affected by insert)
print "Row $rowcount successfully inserted\n";
} else {
print "Inserting row $rowcount failed";
# Error message is not set on some platforms/versions of DBUI. Check to
# ensure a message exists to avoid getting an unitialized var warning.
if ($sth->err()) {
print ": " . $sth->errstr();
}
print "\n";
}
}
# Commit changes. With AutoCommit off, you need to use commit for batched
# data to actually be committed into the database. If your Perl script exits
# without committing its data, Vertica rolls back the transaction and the
# data is not committed.
$dbh->commit();
$dbh->disconnect();
The previous example displays the following when successfully run:
Connection AutoCommit state is: 0
Row 1 successfully inserted
Row 2 successfully inserted
Inserting row 3 failed with error 01000 [Vertica][VerticaDSII] (20) An
error occurred during query execution: Row rejected by server; see
server log for details (SQL-01000)
Row 4 successfully inserted
Note that one of the rows was not inserted because it contained a string value that could not be stored in an integer column. See Conversions between Perl and Vertica Data Types for details of data type handling in Perl scripts that communicate with Vertica.
2.3.6.5 - Using COPY LOCAL to load data in Perl
You can use COPY LOCAL to load delimited files on your client system—for example, a file with comma-separated values—into Vertica.
You can use COPY LOCAL to load delimited files on your client system—for example, a file with comma-separated values—into Vertica. Rather than use Perl to read, parse, and then batch insert the file data, COPY LOCAL directly loads the file data from the local file system into Vertica. When execution completes, COPY LOCAL returns the number of rows that it successfully inserted.
Note
COPY LOCAL must be the first statement in a query,otherwise Vertica returns an error.
The following example uses COPY LOCAL to load into Vertica local file data.txt, which is located in the same directory as the Perl file.
#!/usr/bin/perl
use strict;
use DBI;
# Filesystem path handling module
use File::Spec;
# Create a hash reference that holds a hash of parameters for the
# connection.
my $attr = {AutoCommit => 0}; # Turn off AutoCommit
# Open a connection using a DSN. Supply the username and password.
my $dbh = DBI->connect("dbi:ODBC:VerticaDSN","ExampleUser","password123",
$attr) or die "Failed to connect: $DBI::errstr";
print "Connected!\n";
# Drop any existing table.
$dbh->do("DROP TABLE IF EXISTS Customers CASCADE;");
# Create a table to hold data.
$dbh->do("CREATE TABLE Customers( \
ID INT, \
FirstName VARCHAR(100),\
LastName VARCHAR(100),\
Email VARCHAR(100),\
Birthday DATE)");
# Find the absolute path to the data file located in the current working
# directory and named data.txt
my $currDir = File::Spec->rel2abs(File::Spec->curdir());
my $dataFile = File::Spec->catfile($currDir, 'data.txt');
print "Loading file $dataFile\n";
# Load local file using copy local. Return value is the # of rows affected
# which equates to the number of rows inserted.
my $rows = $dbh->do("COPY Customers FROM LOCAL '$dataFile' DIRECT")
or die $dbh->errstr;
print "Copied $rows rows into database.\n";
$dbh->commit();
# Prepare a query to get the first 15 rows of the results
my $sth = $dbh->prepare("SELECT * FROM Customers WHERE ID < 15 \
ORDER BY ID");
$sth->execute() or die "Error querying table: " . $dbh->errstr;
my @row; # Pre-declare variable to hold result row used in format statement.
# Use Perl formats to pretty print the output. Declare the heading for the
# form.
format STDOUT_TOP =
ID First Last EMail Birthday
== ===== ==== ===== ========
.
# The Perl write statement will output a formatted line with values from the
# @row array. See http://perldoc.perl.org/perlform.html for details.
format STDOUT =
@> @<<<<<<<<<<<<< @<<<<<<<<<<< @<<<<<<<<<<<<<<<<<<<<<<<<<<< @<<<<<<<<<
@row
.
# Loop through result rows while we have them
while (@row = $sth->fetchrow_array()) {
write; # Format command does the work of extracting the columns from
# the @row array and writing them out to STDOUT.
}
# Call commit to prevent Perl from complaining about uncommitted transactions
# when disconnecting
$dbh->commit();
$dbh->disconnect();
data.txt is a text file with a row of data on each line. The columns are delimited by pipe (|) characters. This is the default COPY delimiter for command accepts, which simplifies the COPY LOCAL statement.
The example code produces the following output when run on a large sample file:
Connected!
Loading file /home/dbadmin/Perl/data.txt
Copied 1000000 rows into database.
ID First Last EMail Birthday
== ===== ==== ===== ========
1 Georgia Gomez Rhiannon@magna.us 1937-10-03
2 Abdul Alexander Kathleen@ipsum.gov 1941-03-10
3 Nigel Contreras Tanner@et.com 1955-06-01
4 Gray Holt Thomas@Integer.us 1945-12-06
5 Candace Bullock Scott@vitae.gov 1932-05-27
6 Matthew Dotson Keith@Cras.com 1956-09-30
7 Haviva Hopper Morgan@porttitor.edu 1975-05-10
8 Stewart Sweeney Rhonda@lectus.us 2003-06-20
9 Allen Rogers Alexander@enim.gov 2006-06-17
10 Trevor Dillon Eagan@id.org 1988-11-27
11 Leroy Ashley Carter@turpis.edu 1958-07-25
12 Elmo Malone Carla@enim.edu 1978-08-29
13 Laurel Ball Zelenia@Integer.us 1989-09-20
14 Zeus Phillips Branden@blandit.gov 1996-08-08
Note
Loading a single, large data file into Vertica through a single data connection is less efficient than loading a number of smaller files onto multiple nodes in parallel. Loading onto multiple nodes prevents any one node from becoming a bottleneck.
2.3.6.6 - Querying using Perl
To query Vertica using Perl:.
To query Vertica using Perl:
Prepare a query statement using the Perl DBI module's prepare function. This function returns a statement handle that you use to execute the query and get the result set.
Execute the prepared statement by calling the execute function on the statement handle.
Retrieve the results of the query from the statement handle using one of several methods, such as calling the statement handle's fetchrow_array function to retrieve a row of data, or fetchall_array to get an array of arrays containing the entire result set (not a good idea if your result set may be very large!).
The following example demonstrates querying the table created by the example shown in Batch loading data using Perl. It executes a query to retrieve all of the content of the table, then repeatedly calls the statement handle's fetchrow_array function to get rows of data in an array. It repeats this process until fetchrow_array returns undef, which means that there are no more rows to be read.
#!/usr/bin/perl
use strict;
use DBI;
my $attr = {RaiseError => 1 }; # Make errors fatal to the Perl script.
# Open a connection using a DSN. Supply the username and password.
my $dbh = DBI->connect("dbi:ODBC:VerticaDSN","ExampleUser","password123",
$attr);
# Prepare a query to get the content of the table
my $sth = $dbh->prepare("SELECT * FROM TEST ORDER BY C_ID ASC");
# Execute the query by calling execute on the statement handle
$sth->execute();
# Loop through result rows while we have them, getting each row as an array
while (my @row = $sth->fetchrow_array()) {
# The @row array contains the column values for this row of data
# Loop through the column values
foreach my $column (@row) {
if (!defined $column) {
# NULLs are signaled by undefs. Set to NULL for clarity
$column = "NULL";
}
print "$column\t"; # Output the column separated by a tab
}
print "\n";
}
$dbh->disconnect();
Another method of retrieving the query results is to bind variables to columns in the result set using the statement handle's bind_columns function. You may find this method convenient if you need to perform extensive processing on the returned data, since your code can use variables rather than array references to access the data. The following example demonstrates binding variables to the result set, rather than looping through the row and column values.
#!/usr/bin/perl
use strict;
use DBI;
my $attr = {RaiseError => 1 }; # Make SQL errors fatal to the Perl script.
# Open a connection using a DSN. Supply the username and password.
my $dbh = DBI->connect("dbi:ODBC:VerticaDSN32","ExampleUser","password123",
$attr);
# Prepare a query to get the content of the table
my $sth = $dbh->prepare("SELECT * FROM TEST ORDER BY C_ID ASC");
$sth->execute();
# Create a set of variables to bind to the column values.
my ($C_ID, $C_FP, $C_VARCHAR, $C_DATE, $C_TIME, $C_TS, $C_BOOL);
# Bind the variable references to the columns in the result set.
$sth->bind_columns(\$C_ID, \$C_FP, \$C_VARCHAR, \$C_DATE, \$C_TIME,
\$C_TS, \$C_BOOL);
# Now, calling fetch() to get a row of data updates the values of the bound
# variables. Continue calling fetch until it returns undefined.
while ($sth->fetch()) {
# Note, you should always check that values are defined before using them,
# since NULL values are translated into Perl as undefined. For this
# example, just check the VARCHAR column for undefined values.
if (!defined $C_VARCHAR) {
$C_VARCHAR = "NULL";
}
# Just print values separated by tabs.
print "$C_ID\t$C_FP\t$C_VARCHAR\t$C_DATE\t$C_TIME\t$C_TS\t$C_BOOL\n";
}
$dbh->disconnect();
The output of this example is identical to the output of the previous example.
Preparing, querying, and returning a single row
If you expect a single row as the result of a query (for example, when you execute a COUNT (*) query), you can use the DBI module's selectrow_array function to combine executing a statement and retrieving an array as a result.
The following example shows using selectrow_array to execute and get the results of the SHOW LOCALE statement. It also demonstrates changing the locale using the do function.
#!/usr/bin/perl
use strict;
use DBI;
my $attr = {RaiseError => 1 }; # Make SQL errors fatal to the Perl script.
# Open a connection using a DSN. Supply the username and password.
my $dbh = DBI->connect("dbi:ODBC:VerticaDSN","ExampleUser","password123",
$attr);
# Demonstrate setting/getting locale.
# Use selectrow_array to combine preparing a statement, executing it, and
# getting an array as a result.
my @localerv = $dbh->selectrow_array("SHOW LOCALE;");
# The locale name is the 2nd column (array index 1) in the result set.
print "Locale: $localerv[1]\n";
# Use do() to execute a SQL statement to set the locale.
$dbh->do("SET LOCALE TO en_GB");
# Get the locale again.
@localerv = $dbh->selectrow_array("SHOW LOCALE;");
print "Locale is now: $localerv[1]\n";
$dbh->disconnect();
The result of running the example is:
Locale: en_US@collation=binary (LEN_KBINARY)
Locale is now: en_GB (LEN)
Executing queries and ResultBufferSize settings
When you call the execute() function on a prepared statement, the client library retrieves results up to the size of the result buffer. The result buffer size is set using ODBC's ResultBufferSize setting.
Vertica does not allow multiple active queries per connection. However, you can simulate multiple active queries by setting the result buffer to be large enough to accommodate the entire results from the first query. To ensure that the ODBC client driver's buffer is large enough to store result set for first query you can set ResultBufferSize to 0. Setting this parameter to 0 makes the result buffer size unlimited. The ODBC driver allocates enough memory to read the entire result set. With the entire result set from the first query stored in the result set buffer, the database connection is free to perform another query. Your client can execute this second query even though it has not processed the entire result set from the first query.
However, if you set the ResultBufferSize to 0, you may find that your calls to execute() result in the operating system killing your Perl client script. The operating system may terminate your script if the ODBC driver allocates too much memory to store a large result set.
A workaround for this behavior is limit the number of rows returned by your query. Then you can set the ResultBufferSize to a value that accommodates this limited result set. For example, you can estimate the amount of memory needed to store a single row of your query result. Then use the LIMIT and OFFSET clauses to get a specific number of rows that will fit into the space you allocated using ResultBufferSize. If the results of your query is able to fit within the limited result set buffer, you can then perform additional queries with the same database connection. This solution makes your code more complex as you will need to perform multiple queries to get the entire result set. Also, it is not appropriate in cases where you need to operate on an entire result set at once, rather than just a portion of it at a time.
A better solution is to use separate database connections for each query you want to perform. The overhead of the additional database connection is small compared to the resources needed to process large data sets.
2.3.6.7 - Conversions between Perl and Vertica data types
Perl is a loosely-typed programming language that does not assign specific data types to values.
Perl is a loosely-typed programming language that does not assign specific data types to values. It converts between string and numeric values based on the operations being performed on the values. For this reason, Perl has little problem extracting most string and numeric data types from Vertica. All interval data types (DATE, TIMESTAMP, etc.) are converted to strings. You can use several different date and time handling Perl modules to manipulate these values in your scripts.
Vertica NULL values translate to Perl's undefined (undef) value. When reading data from columns that can contain NULL values, you should always test whether a value is defined before using it.
When inserting data into Vertica, Perl's DBI module attempts to coerce the data into the correct format. By default, it assumes column values are VARCHAR unless it can determine that they are some other data type. If given a string value to insert into a column that has an integer or numeric data type, DBI attempts to convert the string's contents to the correct data type. If the entire string can be converted to a value of the appropriate data type, it inserts the value into the column. If not, inserting the row of data fails.
DBI transparently converts integer values into numeric or float values when inserting into column of FLOAT, NUMERIC, or similar data types. It converts numeric or floating values to integers only when there would be no loss of precision (the value to the right of the decimal point is 0). For example, it can insert the value 3.0 into an INTEGER column since there is no loss of precision when converting the value to an integer. It cannot insert 3.1 into an INTEGER column, since that would result in a loss of precision. It returns an error instead of truncating the value to 3.
The following example demonstrates some of the conversions that the DBI module performs when inserting data into Vertica.
#!/usr/bin/perl
use strict;
use DBI;
# Create a hash reference that holds a hash of parameters for the
# connection.
my $attr = {AutoCommit => 0, # Turn off autocommit
PrintError => 0 # Turn off print error. Manually handled
};
# Open a connection using a DSN. Supply the username and password.
my $dbh = DBI->connect("dbi:ODBC:VerticaDSN","ExampleUser","password123",
$attr);
if (defined DBI::err) {
# Conection failed.
die "Failed to connect: $DBI::errstr";
}
print "Connection AutoCommit state is: " . $dbh->{AutoCommit} . "\n";
# Create table to hold inserted data
$dbh->do("DROP TABLE IF EXISTS TEST CASCADE;");
$dbh->do("CREATE TABLE TEST( \
C_ID INT, \
C_FP FLOAT,\
C_VARCHAR VARCHAR(100),\
C_DATE DATE, C_TIME TIME,\
C_TS TIMESTAMP,\
C_BOOL BOOL)");
# Populate an array of arrays with values.
my @data = (
# Start with matching data types
[1,1.111,'Matching datatypes','2001-01-01','01:01:01'
,'2001-01-01 01:01:01','t'],
# Force floats -> int and int -> float.
[2.0,2,"Ints <-> floats",'2002-02-02','02:02:02'
,'2002-02-02 02:02:02',1],
# Float -> int *only* works when there is no loss of precision.
# this row will fail to insert:
[3.1,3,"float -> int with trunc?",'2003-03-03','03:03:03'
,'2003-03-03 03:03:03',1],
# String values are converted into numbers
["4","4.4","Strings -> numbers", '2004-04-04','04:04:04',
,'2004-04-04 04:04:04',0],
# String -> numbers only works if the entire string can be
# converted into a number
["5 and a half","5.5","Strings -> numbers", '2005-05-05',
'05:05:05', ,'2005-05-05 05:05:05',0],
# Number are converted into string values automatically,
# assuming they fit into the column width.
[6,6.6,3.14159, '2006-06-06','06:06:06',
,'2006-06-06 06:06:06',0],
# There are some variations in the accepted date strings
[7,7.7,'Date/time formats', '07/07/2007','07:07:07',
,'07-07-2007 07:07:07',1],
);
# Create a prepared statement to use parameters for inserting values.
my $sth = $dbh->prepare_cached("INSERT into test values(?,?,?,?,?,?,?)");
my $rowcount = 0; # Count # of rows
# Loop through the arrays to insert values
foreach my $tuple (@data) {
$rowcount++;
# Insert the row
my $retval = $sth->execute(@$tuple);
# See if the row was successfully inserted.
if ($retval == 1) {
# Value of 1 means the row was inserted (1 row was affected by insert)
print "Row $rowcount successfully inserted\n";
} else {
print "Inserting row $rowcount failed with error " .
$sth->state . " " . $sth->errstr . "\n";
}
}
# Commit the data
$dbh->commit();
# Prepare a query to get the content of the table
$sth = $dbh->prepare("SELECT * FROM TEST ORDER BY C_ID ASC");
$sth->execute() or die "Error: " . $dbh->errstr;
my @row; # Need to pre-declare to use in the format statement.
# Use Perl formats to pretty print the output.
format STDOUT_TOP =
Int Float VarChar Date Time Timestamp Bool
=== ===== ================== ========== ======== ================ ====
.
format STDOUT =
@>> @<<<< @<<<<<<<<<<<<<<<<< @<<<<<<<<< @<<<<<<< @<<<<<<<<<<<<<<< @<<<<
@row
.
# Loop through result rows while we have them
while (@row = $sth->fetchrow_array()) {
write; # Format command does the work of extracting the columns from
# the array.
}
# Commit to stop Perl complaining about in-progress transactions.
$dbh->commit();
$dbh->disconnect();
The example produces the following output when run:
Connection AutoCommit state is: 0
Row 1 successfully inserted
Row 2 successfully inserted
Inserting row 3 failed with error 01000 [Vertica][VerticaDSII] (20) An error
occurred during query execution: Row rejected by server; see server log for
details (SQL-01000)
Row 4 successfully inserted
Inserting row 5 failed with error 01000 [Vertica][VerticaDSII] (20) An error
occurred during query execution: Row rejected by server; see server log for
details (SQL-01000)
Row 6 successfully inserted
Row 7 successfully inserted
Int Float VarChar Date Time Timestamp Bool
=== ===== ================== ========== ======== ================ ====
1 1.111 Matching datatypes 2001-01-01 01:01:01 2001-01-01 01:01 1
2 2 Ints <-> floats 2002-02-02 02:02:02 2002-02-02 02:02 1
4 4.4 Strings -> numbers 2004-04-04 04:04:04 2004-04-04 04:04 0
6 6.6 3.14159 2006-06-06 06:06:06 2006-06-06 06:06 0
7 7.7 Date/time formats 2007-07-07 07:07:07 2007-07-07 07:07 1
2.3.6.8 - Perl unicode support
Perl supports Unicode data with some caveats.
Perl supports Unicode data with some caveats. See the perlunicode and the perlunitut (Perl Unicode tutorial) manual pages for details. (Be sure to see the copies of these manual pages included with the version of Perl installed on your client system, as the support for Unicode has changed in recent versions of Perl.) Perl DBI and DBD::ODBC also support Unicode, however DBD::ODBC must be compiled with Unicode support. See the DBD::ODBC documentation for details. You can check the DBD::ODBC-specific connection attribute named odbc_has_unicode to see if Unicode support is enabled in the driver.
The following example Perl script demonstrates directly inserting UTF-8 strings into Vertica and then reading them back. The example writes a text file with the output, since there are may problems displaying Unicode characters in terminal windows or consoles.
#!/usr/bin/perl
use strict;
use DBI;
# Open a connection using a DSN.
my $dbh = DBI->connect("dbi:ODBC:VerticaDSN","ExampleUser","password123");
unless (defined $dbh) {
# Conection failed.
die "Failed to connect: $DBI::errstr";
}
# Output to a file. Displaying Unicode characters to a console or terminal
# window has many problems. This outputs a UTF-8 text file that can
# be handled by many Unicode-aware text editors:
open OUTFILE, '>:utf8', "unicodeout.txt";
# See if the DBD::ODBC driver was compiled with Unicode support. If this returns
# 1, your Perl script will get get strings from the driver with the UTF-8
# flag set on them, ensuring that Perl handles them correctly.
print OUTFILE "Was DBD::ODBC compiled with Unicode support? " .
$dbh->{odbc_has_unicode} . "\n";
# Create a table to hold VARCHARs
$dbh->do("DROP TABLE IF EXISTS TEST CASCADE;");
# Create a table to hold data. Remember that the width of the VARCHAR column
# is the number of bytes set aside to store strings, which often does not equal
# the number of characters it can hold when it comes to Unicode!
$dbh->do("CREATE TABLE test( C_VARCHAR VARCHAR(100) )");
print OUTFILE "Inserting data...\n";
# Use Do to perform simple inserts
$dbh->do("INSERT INTO test VALUES('Hello')");
# This string contains several non-latin accented characters and symbols, encoded
# with Unicode escape notation. They are converted by Perl into UTF-8 characters
$dbh->do("INSERT INTO test VALUES('My favorite band is " .
"\N{U+00DC}ml\N{U+00E4}\N{U+00FC}t \N{U+00D6}v\N{U+00EB}rk\N{U+00EF}ll" .
" \N{U+263A}')");
# Some Chinese (Simplified) characters. This again uses escape sequence
# that Perl translates into UTF-8 characters.
$dbh->do("INSERT INTO test VALUES('\x{4F60}\x{597D}')");
print OUTFILE "Getting data...\n";
# Prepare a query to get the content of the table
my $sth = $dbh->prepare_cached("SELECT * FROM test");
# Execute the query by calling execute on the statement handle
$sth->execute();
# Loop through result rows while we have them
while (my @row = $sth->fetchrow_array()) {
# Loop through the column values
foreach my $column (@row) {
print OUTFILE "$column\t";
}
print OUTFILE "\n";
}
close OUTFILE;
$dbh->disconnect();
Viewing the unicodeout.txt file in a UTF-8-capable text editor or viewer displays:
Was DBD::ODBC compiled with Unicode support? 1
Inserting data...
Getting data...
My favorite band is Ümläüt Övërkïll ☺
你好
Hello
Note
Terminal windows and consoles often have problems properly displaying Unicode characters. That is why the example writes the output to a text file. With some text editors, you may need to manually set the encoding of the text file to UTF-8 in order for the characters to properly appear (and the font used to display text must have a full Unicode character set). If the character still do not show up, it may be that your version of DBD::ODBC was not compiled with UTF-8 support.
Both the Vertica Python client and Vertica ODBC driver (that pyodbc interacts with) do not support the native Vertica UUID data type. Values retrieved using these drivers from a UUID column are converted to strings. When your client queries the metadata for a UUID column, the drivers report its data type as a string. Convert any UUID values that you want to insert into a UUID column to strings. Vertica automatically converts these values into the native UUID data type before inserting them into a table.
2.3.7.1 - Configuring the ODBC run-time environment on Linux
To configure the ODBC run-time environment on Linux:.
To configure the ODBC run-time environment on Linux:
Create the odbc.ini file if it does not already exist.
Add the ODBC driver directory to the LD_LIBRARY_PATH system environment variable:
The example session below uses pyodbc with the Vertica ODBC driver to connect Python to the Vertica database.
The example session below uses pyodbc with the Vertica ODBC driver to connect Python to the Vertica database.
Note
SQLFetchScroll and SQLFetch functions cannot be mixed together in iODBC code. When using pyodbc with the iODBC driver manager, skip cannot be used with the fetchall, fetchone, and fetchmany functions.
Example script
The following example script shows how to query Vertica using Python 3, pyodbc, and an ODBC DSN.
import pyodbc
cnxn = pyodbc.connect("DSN=VerticaDSN", ansi=True)
cursor = cnxn.cursor()
# create table
cursor.execute("CREATE TABLE TEST("
"C_ID INT,"
"C_FP FLOAT,"
"C_VARCHAR VARCHAR(100),"
"C_DATE DATE, C_TIME TIME,"
"C_TS TIMESTAMP,"
"C_BOOL BOOL)")
cursor.execute("INSERT INTO test VALUES(1,1.1,'abcdefg1234567890','1901-01-01','23:12:34','1901-01-01 09:00:09','t')")
cursor.execute("INSERT INTO test VALUES(2,3.4,'zxcasdqwe09876543','1991-11-11','00:00:01','1981-12-31 19:19:19','f')")
cursor.execute("SELECT * FROM TEST")
rows = cursor.fetchall()
for row in rows:
print(row, end='\n')
cursor.execute("DROP TABLE TEST CASCADE")
cursor.close()
cnxn.close()
You must read C/C++ before connecting to Vertica through PHP. The following example ODBC configuration entries detail the typical settings required for PHP ODBC connections. The driver location assumes you have copied the Vertica drivers to /usr/lib64.
Verify the Vertica UnixODBC library can load all dependant libraries with the following command (assuming you have copies the libraries to /usr/lib64):
For example:
ldd /usr/lib64/libverticaodbc.so
You must resolve any "not found" libraries before continuing.
Test your ODBC connection
Test your ODBC connection with the following.
isql -v VerticaDSN
2.3.8.1 - Configuring a PHP development environment
Install the PDO and ODBC PHP extensions. On Linux, these are available as the following packages:
php-odbc
php-pdo
2.3.8.2 - PHP unicode support
PHP does not offer native Unicode support.
PHP does not offer native Unicode support. PHP only supports a 256-character set. However, PHP provides the UTF-8 functions
utf8_encode() and
utf8_decode() to provide some basic Unicode functionality.
See the PHP manual for strings for more details about PHP and Unicode.
2.3.8.3 - Querying the database using PHP
The example script below details the use of PHP ODBC functions to connect to the Vertica Analytics Platform.
The example script below details the use of PHP ODBC functions to connect to the Vertica Analytics Platform.
<?php
# Turn on error reporting
error_reporting(E_ERROR | E_WARNING | E_PARSE | E_NOTICE);
# A simple function to trap errors from queries
function odbc_exec_echo($conn, $sql) {
if(!$rs = odbc_exec($conn,$sql)) {
echo "<br/>Failed to execute SQL: $sql<br/>" . odbc_errormsg($conn);
} else {
echo "<br/>Success: " . $sql;
}
return $rs;
}
# Connect to the Database
$dsn = "VerticaDSNunixodbc";
$conn = odbc_connect($dsn,'','') or die ("<br/>CONNECTION ERROR");
echo "<p>Connected with DSN: $dsn</p>";
# Create a table
$sql = "CREATE TABLE TEST(
C_ID INT,
C_FP FLOAT,
C_VARCHAR VARCHAR(100),
C_DATE DATE, C_TIME TIME,
C_TS TIMESTAMP,
C_BOOL BOOL)";
$result = odbc_exec_echo($conn, $sql);
# Insert data into the table with a standard SQL statement
$sql = "INSERT into test values(1,1.1,'abcdefg1234567890','1901-01-01','23:12:34
','1901-01-01 09:00:09','t')";
$result = odbc_exec_echo($conn, $sql);
# Insert data into the table with odbc_prepare and odbc_execute
$values = array(2,2.28,'abcdefg1234567890','1901-01-01','23:12:34','1901-01-01 0
9:00:09','t');
$statement = odbc_prepare($conn,"INSERT into test values(?,?,?,?,?,?,?)");
if(!$result = odbc_execute($statement, $values)) {
echo "<br/>odbc_execute Failed!";
} else {
echo "<br/>Success: odbc_execute.";
}
# Get the data from the table and display it
$sql = "SELECT * FROM TEST";
if($result = odbc_exec_echo($conn, $sql)) {
echo "<pre>";
while($row = odbc_fetch_array($result) ) {
print_r($row);
}
echo "</pre>";
}
# Drop the table and projection
$sql = "DROP TABLE TEST CASCADE";
$result = odbc_exec_echo($conn, $sql);
# Close the ODBC connection
odbc_close($conn);
?>
Example output
The following is the example output from the script.
2.4 - Managing query execution between the client and Vertica
The following topics describe techniques that help you manage query execution between your client and your Vertica database.
The following topics describe techniques that help you manage query execution between your client and your Vertica database.
2.4.1 - ResultBufferSize
By default, Vertica uses the ResultBufferSize parameter to determine the maximum size (in bytes) of a result set that a client can retrieve from a server.
By default, Vertica uses the ResultBufferSize parameter to determine the maximum size (in bytes) of a result set that a client can retrieve from a server. When ResultBufferSize is enabled, Vertica sends rows of data directly to the client making the query. The number of rows returned to the client at each fetch of data depends on the size (in bytes) of the ResultBufferSize parameter.
Sometimes, the size of the result set requested by the client is greater than what the ResultBufferSize parameter allows. In such cases, Vertica retrieves only a portion of the result set at a time. Each fetch of data returns the amount of data equal to the size set by the ResultBufferSize parameter. Ultimately, as the client iterates over the individual fetches of data, the entire result set is returned.
Benefits of ResultBufferSize
If you are concerned with the effect of your queries on network latency, ResultBufferSize may provide an advantage over MARS. MARS requires that the client wait until all rows of data are written to the server before the client can retrieve the data. This delay may cause latency issues for your network while waiting for the results to be stored.
In addition, MARS requires that you send two separate requests to return rows of data. The first request performs the query execution which stores the result set on the server. The second request retrieves the data rows that are stored on the server. With ResultBufferSize, you only need to send one request. This request both executes and retrieves the data rows of interest.
Query execution with ResultBufferSize
The following graphic shows how Vertica returns rows of data from a database to the client with ResultBufferSize enabled:
The query execution performs the following steps:
The client sends a query, such as a SELECT statement, to the server. In the preceding graphic, the first query is named Query 1.
The server receives the client's request and begins to send both a description of the result set and the requested rows of data back to the client.
After all possible rows are returned to the client, the execution is complete. The size of the data set returned equals either that of the data that was requested or the maximum amount of data that ResultBufferSize parameter can retrieve. If the ResultBufferSize maximum size is not yet reached, Vertica can execute Query 2.
The server can accept Query 2 and perform the same steps that it did for Query 1. If the results for Query 1 had reached the maximum ResultBufferSize allowable, Vertica could not execute Query 2 until the client freed the results from Query 1.
After Query 2 runs, you cannot view the results you retrieved for Query 1, unless you execute Query 1 again.
Setting an unlimited buffer size
Setting ResultBufferSize to 0 tells the client driver to use an unlimited result set buffer. With this setting, the client library allocates as much memory as it needs to read the entire result set of a query. You may choose to set ResultBufferSize to 0 of you want to simulate having multiple active queries over a single database connection at the same time. With an unlimited buffer size, your client can run a query and have its entire result set stored in memory. This ends the first query, so your client can execute a second query before it fully processes the results of the first query.
A drawback of this method is that your query may consume too much memory if your queries return large result sets. This over-allocation of memory can result in the operating system terminating your client. Due to this risk, consider using multiple database connections instead of trying to reuse a single connection for multiple queries. The overhead of multiple database connections is small compared to the overall amount of resources required to process a large data set.
2.4.2 - Multiple active result sets (MARS)
You can only enable MARS when you connect to Vertica using a JDBC client connection.
You can only enable MARS when you connect to Vertica using a JDBC client connection. MARS allows the execution of multiple queries on a single connection. While ResultBufferSize sends the results of a query directly to the client, MARS stores the results first on the server. Once query execution has finished and all of the results have been stored, you can make a retrieval request to the server to have rows returned to the client.
MARS is set at the session level and must be enabled for every new session. When MARS is enabled, ResultBufferSize is disabled. No error is returned, however the ResultBufferSize parameter is ignored.
Benefits of MARS
In comparison with ResultBufferSize, MARS enables you to store multiple result sets from different queries at the same time. You can also send new queries before all of the results of a previous result set have been returned to the client. This allows applications to decouple query execution from result retrieval so that, on a single connection, you can process different results at the same time.
When you enable ResultBufferSize, you must wait until all result sets have been returned to the client before a new query can be executed.
Another benefit of MARS is that it allows you to free up query resources faster than ResultBufferSize allows. While a query is running, resources are held by that query session. When ResultBufferSize is enabled, a client that is performing slowly might read a single row of a result set and then have to stop to retrieve the next row. This prevents the query from finishing quickly and, therefore, prevents the resources used from being freed up for other applications. With MARS, the speed of the client is irrelevant to the reading of rows. As soon as the results are written to the MARS storage, the resources are freed and the speed at which the client retrieves rows no longer matters.
Query execution with MARS
The following graphic demonstrates how multiple queries to the server are handled when MARS is enabled:
Query 1:
Query 1 is sent to the server.
Query 1's row description and the status of its result set are returned to the client. However, no results are returned to the client at this time.
Query 1 completes and its results are saved on the server.
You can now send commands to retrieve the rows of Query 1's result set. These rows are stored on the server. Retrieved rows are sent to the client along with the status of the result set. By keeping track of the status of the result set, Vertica is able to keep track of which rows have been retrieved from the server.
Now that Query 1 has successfully completed, and its result sets are being stored on the server, Query 2 can be executed.
Query 2:
Query 2 is sent to the server.
Query 2's row description and the status of its result set are returned to the client. However, no results are returned to the client at this time.
Query 2 completes and its results are stored on the server. Both Query 1 and Query 2 now have result sets stored on the server.
You can now send retrieval requests to both Query 1 and Query 2's result sets that are stored on the server. Whenever a retrieval request is made for rows from Query 1, the request is sent and rows and the result set status are sent to the client. The same occurs for Query 2.
Once all rows have been read by the client, the MARS storage on the server closes the active results session. The MARS storage on the server is then freed to store more data. The MARS storage also closes and frees once your session is finished.
Enabling and disabling MARS
You can enable and disable MARS in two different ways:
The Management API is a REST API that you can use to view and manage Vertica databases with scripts or applications that accept REST and JSON.
The Management API is a REST API that you can use to view and manage Vertica databases with scripts or applications that accept REST and JSON. The response format for all requests is JSON.
3.1 - cURL
cURL is a command-line tool and application library used to transfer data to or from a server.
cURL is a command-line tool and application library used to transfer data to or from a server. All API requests sent to a Vertica server must be made with HTTPS.
There are four HTTP requests that can be passed using cURL to call API methods:
GET: Retrieves data.
PUT: Updates data.
POST: Creates new data.
DELETE: Deletes data.
Syntax
curl https://<NODE>:5444/
Options
The following is a truncated list of options. For a complete list, see the cURL documentation.
-h --help
Lists all available options.
-H --header
Specifies custom headers. This is useful for sending a request that requires a Vertica API key.
Lists all Management API commands, with a brief description of each one and its parameters.
Lists all Management API commands, with a brief description of each one and its parameters.
Resource URL
https://node-ip-address:5444/api
Authentication
None
Example
$ curl -k https://10.20.100.247:5444/api
[
{
"route": "/",
"method": "GET",
"description": "Returns the agent specific information useful for version checking and service discovery",
"accepts": {},
"params": []
},
{
"route": "/api",
"method": "GET",
"description": "build the list of cluster objects and properties and return it as a JSON formatted array",
"accepts": {},
"params": []
},
{
"route": "/backups",
"method": "GET",
"description": "list all the backups that have been created for all vbr configuration files ( *.ini ) that are located in the /opt/vertica/config directory.",
"accepts": {},
"params": []
},
{
"route": "/backups/:config_script_base",
"method": "POST",
"description": "create a new backup as defined by the given vbr configuration script base (filename minus the .ini extenstion)",
"accepts": {},
"params": []
},
{
"route": "/backups/:config_script_base/:archive_id",
"method": "GET",
"description": "get the detail for a specific backup archive",
"accepts": {},
"params": []
},
{
"route": "/backups/:config_script_base/:archive_id",
"method": "DELETE",
"description": "delete a backup based on the config ini file script",
"accepts": {},
"params": []
},
{
"route": "/databases",
"method": "GET",
"description": "build the list of databases, their properties, and current status (from cache) and return it as a JSON formatted array",
"accepts": {},
"params": []
},
{
"route": "/databases",
"method": "POST",
"description": "Create a new database by supplying a valid set of parameters",
"accepts": {},
"params": [
"name : name of the database to create",
"passwd : password used by the database administrative user",
"only : optional list of hostnames to include in database",
"exclude : optional list of hostnames to exclude from the database",
"catalog : directory used for the vertica catalog",
"data : directory used for the initial vertica storage location",
"port : port the database will listen on (default 5433)",
"restart_policy : (optional) set restart policy",
"force_cleanup_on_failure : (optional) Force removal of existing directories on failure of command",
"force_removal_at_creation : (optional) Force removal of existing directories before creating the database",
"communal_storage_url : (optional) communal storage location for the database",
"num_shards : (optional) number of shared for databases with communal storage",
"depot_path : (optional, but if specified requires depot_size) path to a directory where files from communal storage can be locally cached",
"depot_size : (optional, required by depot_path) size of the depot. Examples: (\"10G\", \"2000M\", \"1T\", \"250K\")",
"aws_access_key_id: (optional)",
"aws_secret_access_key : (optional)",
"configuration_parameters : (optional) A string that is a serialized python-literal dictionary of configuration parameters set at bootstrap.
'{\"kerberosservicename\":\"verticakerb\"}'"]
},
{
"route": "/databases/:database_name",
"method": "GET",
"description": "Retrieve the database properties structure",
"accepts": {},
"params": []
},
{
"route": "/databases/:database_name",
"method": "PUT",
"description": "Control / alter a database values using the PUT http method",
"accepts": {},
"params": ["action : value one of start|stop|rebalance|wla"]
},
{
"route": "/databases/:database_name",
"method": "DELETE",
"description": "Delete an existing database",
"accepts": {},
"params": []
},
{
"route": "/databases/:database_name/configuration",
"method": "GET",
"description": "retrieve the current parameters from the database. if its running return 503 Service Unavailable",
"accepts": {},
"params": [
"user_id : vertica database username",
"passwd : vertica database password"]
},
{
"route": "/databases/:database_name/configuration",
"method": "PUT",
"description": "set a list of parameters in the database. if its not running return 503 Service Unavailable",
"accepts": {},
"params": [
"user_id : vertica database username",
"passwd : vertica database password",
"parameter : value vertica parameter/key combo"]
},
...
{
"route": "/webhooks/subscribe",
"method": "POST",
"description": "post a request with a callback url to subscribe to events from this agent. Returns a subscription_id that can be used to unsubscribe from the service. @returns subscription_id",
"accepts": {},
"params": ["url : full url to the callback resource"]
}
]
3.3 - Rest APIs for the agent
These API calls interact with standard Vertica nodes.
These API calls interact with standard Vertica nodes.
The Management API requires an authentication key, named VerticaAPIKEY, to access some API resources.
The Management API requires an authentication key, named VerticaAPIKEY, to access some API resources. You can manage API keys by using the apikeymgr command-line tool.
usage: apikeymgr [-h] [--user REQUESTOR] [--app APPLICATION] [--delete]
[--create] [--update] [--migrate]
[--secure {restricted,normal,admin}] [--list]
API key management tool
optional arguments:
-h, --help show this help message and exit
--user REQUESTOR The name of the person requesting the key
--app APPLICATION The name of the application that will use the key
--delete Delete the key for the given R & A
--create Create a key for the given R & A
--update Update a key for the given R & A
--migrate migrate the keyset to the latest format
--secure {restricted,normal,admin}
Set the keys security level
--list List all the keys known
Example request
To create a new VerticaAPIKEY for the dbadmin user with admin access, enter the following:
Creates a new backup job for the backup defined in the vbr configuration script :config_script_base.
Creates a new backup job for the backup defined in the vbr configuration script :config_script_base. The vbr configuration script must reside in /opt/vertica/configuration. The :config_script_base value does not include the .ini filename extention.
To determine valid :config_script_base values, see GET backups.
Returns a job ID that you can use to determine the status of the job.
3.3.2.3 - GET backups/:config_script_base/:archive_id
Returns details on a specific backup.
Returns details on a specific backup. You must provide the :config_script_base. This value is the name of a vbr config file (without the .ini filename extension) that resides in /opt/vertica/config. The :archive_id is the value of the backup field that the GET backups command returns.
Creates a new restore job to restore the database from the backup archive identified by :archive_id.
Creates a new restore job to restore the database from the backup archive identified by :archive_id. The :archive_id is the value of a backup field that the GET backups command returns.
Returns a job ID that you can use to determine the status of the job. See GET jobs.
Creates a job to run the action specified by the action parameter against the database identified by :database_name.
Creates a job to run the action specified by the action parameter against the database identified by :database_name. The :database_name is the value of the name field that the GET databases command returns.
Returns a job ID that you can use to determine the status of the job. See GET jobs.
Creates a job to delete (drop) an existing database on the cluster.
Creates a job to delete (drop) an existing database on the cluster. To perform this operation, you must first stop the database. The :database_name is the value of the name field that the GET databases command returns.
Returns a job ID that you can use to determine the status of the job. See GET jobs.
3.3.3.6 - GET databases/:database_name/configuration
Returns a list of configuration parameters for the database identified by :database_name.
Returns a list of configuration parameters for the database identified by :database_name. The :database_name is the value of the name field that the GET databases command returns.
3.3.3.7 - PUT databases/:database_name/configuration
Sets one or more configuration parameters for the database identified by :database_name.
Sets one or more configuration parameters for the database identified by :database_name. The :database_name is the value of the name field that the GET databases command returns.
Returns the parameter name, the requested value, and the result of the attempted change (Success or Failed).
A parameter name and value combination for the parameter to be changed. Values must be URL encoded. You can include multiple name/value pairs to set multiple parameters with a single API call.
Returns the hostname/IP address, node name, and UP/DOWN status of each host associated with the database identified by :database_name.
Returns the hostname/IP address, node name, and UP/DOWN status of each host associated with the database identified by :database_name. The :database_name is the value of the name field that the GET databases command returns.
Creates a job to add a host to the database identified by :database_name.
Creates a job to add a host to the database identified by :database_name. This host must already be part of the cluster. The :database_name is the value of the name field that the GET databases command returns.
Returns a job ID that you can use to determine the status of the job. See GET jobs.
Creates a job to remove the host identified by :host_id from the database identified by :database_name.
Creates a job to remove the host identified by :host_id from the database identified by :database_name. The :database_name is the value of the name field that the GET databases command returns. The :host_id is the value of the host field returned by GET databases/:database_name.
Returns a job ID that you can use to determine the status of the job. See GET jobs.
3.3.3.11 - POST databases/:database_name/hosts/:host_id/process
Creates a job to start the vertica process for the database identified by :database_name on the host identified by :host_id.
Creates a job to start the vertica process for the database identified by :database_name on the host identified by :host_id. The :database_name is the value of the name field that the GET databases command returns. The :host_id is the value of the host field returned by GET databases/:database_name.
Returns a job ID that you can use to determine the status of the job. See GET jobs.
Returns details about the database license being used by the database identified by :database_name.
Returns details about the database license being used by the database identified by :database_name. The :database_name is the value of the name field that the GET databases command returns.
Returns details about all license being used by the database identified by :database_name.
Returns details about all license being used by the database identified by :database_name. The :database_name is the value of the name field that the GET databases command returns.
Creates a job to stop the vertica process for the database identified by :database_name on the host identified by :host_id.
Creates a job to stop the vertica process for the database identified by :database_name on the host identified by :host_id. The :database_name is the value of the name field that the GET databases command returns. The :host_id is the value of the host field returned by GET databases/:database_name.
Returns a job ID that can be used to determine the status of the job. See GET jobs.
Note
If stopping the database on the hosts causes the database to no longer be k-safe, then the all database nodes may shut down.
3.3.3.15 - POST databases/:database_name/hosts/:host_id/replace_with/:host_id_new
Creates a job to replace the host identified by hosts/:host_id with the host identified by replace_with/:host_id.
Creates a job to replace the host identified by hosts/:host_id with the host identified by replace_with/:host_id. Vertica performs these operations for the database identified by :database_name. The :database_name is the value of the name field that the GET databases command returns. The :host_id is the value of the host field as returned by GET databases/:database_name. You can find valid replacement hosts using GET hosts. The replacement host cannot already be part of the database. You must stop the vertica process on the host being replaced.
Returns a job ID that you can use to determine the status of the job. See GET jobs.
Returns a comma-separated list of node IDs for the database identified by :database_name.
Returns a comma-separated list of node IDs for the database identified by :database_name. The :database_name is the value of the name field that the GET databases command returns.
Creates a job to start the database identified by :database_name.
Creates a job to start the database identified by :database_name. The :database_name is the value of the name field that the GET databases command returns.
Returns a job ID that can be used to determine the status of the job. See GET jobs.
Returns a state of UP or DOWN for the database identified by :database_name.
Returns a state of UP or DOWN for the database identified by :database_name. The :database_name is the value of the namefield that the GET databases command returns.
Creates a job to stop the database identified by :database_name.
Creates a job to stop the database identified by :database_name. The :database_name is the value of the name field that the GET databases command returns.
Returns a job ID that you can useto determine the status of the job. See GET jobs.
3.3.3.21 - POST databases/:database_name/rebalance/process
Creates a job to run a rebalance on the database identified by host identified by :database_name.
Creates a job to run a rebalance on the database identified by host identified by :database_name. The :database_name is the value of the name field that the GET databases command returns.
Returns a job ID that you can use to determine the status of the job. See GET jobs.
3.3.3.22 - POST databases/:database_name/Workload analyzer/process
Creates a job to run Workload Analyzer on the database identified by host identified by :database_name.
Creates a job to run Workload Analyzer on the database identified by host identified by :database_name. The :database_name is the value of the name field that the GET databases command returns.
Returns a job ID that you can use to determine the status of the job. See GET jobs.
Returns the current time for the MC server and the timezone of the location where the MC server is located.
3.4.1 - MC-User-ApiKey
The MC-User-ApiKey is a user-specific key used with Management Console.
The MC-User-ApiKey is a user-specific key used with Management Console. Users must have an MC-User-ApiKey to interact with MC using the Rest API. All users with roles other than None automatically receive an MC-User-ApiKey.
This key grants users the same rights through the API that they have available through their MC roles. To interact with the MC, users pass the key in the request header for the API.
View the MC-User-ApiKey
If you are the database administrator, you can view the MC-User-ApiKey for all users. Individual users can view their own keys.
Connect to MC and go to MC Settings > User Management.
Select the user to view and click Edit. The user's key appears in the User API Key field.
3.4.2 - GET alerts
Returns a list of MC alerts, their current status, and database properties.
Returns a list of MC alerts, their current status, and database properties.
The maximum number of alerts to retrieve. If the limit is lower than the number of existing alerts, Vertica retrieves the most recent alerts. Used with the type parameter, Vertica retrieves up to the limit for each type. For example, for a limit of five and types of critical and emergency, you could receive up to ten total alerts.
time_from
The timestamp start point from which to retrieve alerts. You can use this parameter in combination with the time_to parameter to retrieve alerts for a specific time range. Values must be passed in the following format: yyyy-MM-ddTHH:mm.
If you provide only the time_from parameter, and omit the time_to parameter, the response contains all alerts generated from the time_from parameter to the current time.
time_to
The timestamp end point from which to retrieve alerts. You can use this parameter in combination with the time_from parameter to retrieve alerts for a specific time range. Values must be passed in the following format: yyyy-MM-ddTHH:mm.
If you provide only the time_to parameter, and omit the time_from parameter, the response contains all alerts generated from the earliest possible time to the time passed in time_to.
This example shows how you can request alerts using cURL. In this example, the limit parameter is set to '2' and the types parameters is set to info and notice:
Request the alert to a specific end point using the time_to parameter. When you use the time_to parameter without the time_from parameter, the time_from parameter defaults to the oldest alerts your MC contains:
[
{
"alerts":[
{
"id":9,
"markedRead":false,
"eventTypeCode":2,
"create_time":"2015-11-05 15:10:53.391",
"updated_time":"2015-11-05 15:10:53.391",
"severity":"notice",
"status":1,
"databaseName":"mydb",
"databaseId":1,
"clusterName":"1446668057043_cluster",
"description":"Workload analyzed successfully",
"summary":"Analyze Workload operation has succeeded on Database",
"internal":false,
"count":1
},
{
"id":8,
"markedRead":false,
"eventTypeCode":2,
"create_time":"2015-11-05 15:10:31.16",
"updated_time":"2015-11-05 15:10:31.16",
"severity":"notice",
"status":1,
"databaseName":"mydb",
"databaseId":1,
"clusterName":"1446668057043_cluster",
"description":"Analyze Workload operation started on Database",
"summary":"Analyze Workload operation started on Database",
"internal":false,
"count":1
},
{
"id":7,
"markedRead":false,
"eventTypeCode":2,
"create_time":"2015-11-05 00:15:00.204",
"updated_time":"2015-11-05 00:15:00.204",
"severity":"alert",
"status":1,
"databaseName":"mydb",
"databaseId":1,
"clusterName":"1446668057043_cluster",
"description":"Workload analyzed successfully",
"summary":"Analyze Workload operation has succeeded on Database",
"internal":false,
"count":1
},
{
"id":6,
"markedRead":false,
"eventTypeCode":2,
"create_time":"2015-11-04 15:14:59.344",
"updated_time":"2015-11-04 15:14:59.344",
"severity":"notice",
"status":1,
"databaseName":"mydb",
"databaseId":1,
"clusterName":"1446668057043_cluster",
"description":"Workload analyzed successfully",
"summary":"Analyze Workload operation has succeeded on Database",
"internal":false,
"count":1
},
{
"id":5,
"markedRead":false,
"eventTypeCode":2,
"create_time":"2015-11-04 15:14:38.925",
"updated_time":"2015-11-04 15:14:38.925",
"severity":"notice",
"status":1,
"databaseName":"mydb",
"databaseId":1,
"clusterName":"1446668057043_cluster",
"description":"Analyze Workload operation started on Database",
"summary":"Analyze Workload operation started on Database",
"internal":false,
"count":1
},
{
"id":4,
"markedRead":false,
"eventTypeCode":0,
"create_time":"2015-11-04 15:14:33.0",
"updated_time":"2015-11-05 16:26:17.978",
"severity":"notice",
"status":1,
"nodeName":"v_mydb_node0001",
"databaseName":"lmydb",
"databaseId":1,
"clusterName":"1446668057043_cluster",
"description":"Workload analyzed successfully",
"summary":"Analyze Workload operation has succeeded on Database",
"internal":false,
"count":1
},
{
"id":3,
"markedRead":false,
"eventTypeCode":2,
"create_time":"2015-11-04 15:14:32.806",
"updated_time":"2015-11-04 15:14:32.806",
"severity":"info",
"status":1,
"hostIp":"10.20.100.64",
"nodeName":"v_mydb_node0003",
"databaseName":"mydb",
"databaseId":1,
"clusterName":"1446668057043_cluster",
"description":"Agent status is UP on IP 127.0.0.1",
"summary":"Agent status is UP on IP 127.0.0.1",
"internal":false,
"count":1
},
{
"id":2,
"markedRead":false,
"eventTypeCode":2,
"create_time":"2015-11-04 15:14:32.541",
"updated_time":"2015-11-04 15:14:32.541",
"severity":"info",
"status":1,
"hostIp":"10.20.100.63",
"nodeName":"v_mydb_node0002",
"databaseName":"mydb",
"databaseId":1,
"clusterName":"1446668057043_cluster",
"description":"Agent status is UP on IP 127.0.0.1",
"summary":"Agent status is UP on IP 127.0.0.1",
"internal":false,
"count":1
},
{
"id":1,
"markedRead":false,
"eventTypeCode":2,
"create_time":"2015-11-04 15:14:32.364",
"updated_time":"2015-11-04 15:14:32.364",
"severity":"info",
"status":1,
"hostIp":"10.20.100.62",
"nodeName":"v_mydb_node0001",
"databaseName":"mydb",
"databaseId":1,
"clusterName":"1446668057043_cluster",
"description":"Agent status is UP on IP 127.0.0.1",
"summary":"Agent status is UP on IP 127.0.0.1",
"internal":false,
"count":1
}
],
"total_alerts":9,
"request_query":"db_name=mydb",
"request_time":"2015-11-05 16:26:21.679"
}
]
3.4.6 - Combining sub-category filters with category filters
You can combine category filters with sub-category filters, to obtain alert messages for specific thresholds you set in MC.
You can combine category filters with sub-category filters, to obtain alert messages for specific thresholds you set in MC. You can also use sub-category filters to obtain information about alerts on specific resource pools in your database.
Sub-category filters
You can use the following sub-category filters with the category filters. Sub-category filters are case sensitive and must be lowercase.
Sub-Category Filter
Alerts Related to Threshold Value Set For:
THRESHOLD_NODE_CPU
Node CPU
THRESHOLD_NODE_MEMORY
Node Memory
THRESHOLD_NODE_DISK_USAGE
Node Disk Usage
THRESHOLD_NODE_DISKIO
Node Disk I/O
THRESHOLD_NODE_CPUIO
Node CPU I/O Wait
THRESHOLD_NODE_REBOOTRATE
Node Reboot Rate
THRESHOLD_NETIO
Network I/O Error
THRESHOLD_QUERY_QUEUED
Queued Query Number
THRESHOLD_QUERY_FAILED
Failed Query Number
THRESHOLD_QUERY_SPILLED
Spilled Query Number
THRESHOLD_QUERY_RETRIED
Retried Query Number
THRESHOLD_QUERY_RUNTIME
Query Running Time
Resource pool-specific sub-category filters
To retrieve alerts for a specific resource pool, you can use sub-category filters in combination with the following category filters:
thresholds
rp_name
If you use these sub-category filters without the RP_NAME filter, the query retrieves alerts for all resource pools in your database.
Sub-Category Filter
Alerts Related to Threshold Value Set For:
THRESHOLD_RP_QUERY_MAX_TIME
Queries reaching the maximum allowed execution time.
THRESHOLD_RP_QUERY_RESOURCE_REJECT
The number of queries with resource rejections.
THRESHOLD_RP_QUERY_QUEUE_TIME
The number of queries that ended because of queue time exceeding a limit.
THRESHOLD_RP_QUERY_RUN_TIME
The number of queries that ended because of run time exceeding a limit.
Combine the thresholds category filter with a sub-category filter
This example shows how you can request alerts using cURL with the thresholds category filter and a sub-category filter. You apply the following filters:
This example shows how you can request alerts using cURL on a specific resource pool. The name of the resource pool is resourcepool1. You apply the following filters:
[
{
"alerts":[
{
"id":6525,
"markedRead":false,
"eventTypeCode":2,
"create_time":"2015-11-05 14:25:36.797",
"updated_time":"2015-11-05 14:25:36.797",
"severity":"warning",
"status":1,
"databaseName":"mydb",
"databaseId":106,
"clusterName":"1443552354071_cluster",
"description":" Resource Pool: resourcepool1 Threshold Name: Ended Query with Run Time Exceeding Limit Time Interval: 14:20:36 to 14:25:36 Threshold Value: 0 min(s) Actual Value: 2186 query(s) ",
"summary":"Resource Pool: resourcepool1; Threshold : Ended Query with Run Time Exceeding Limit > 0 min(s)",
"internal":false,
"count":1
},
{
"id":6517,
"markedRead":false,
"eventTypeCode":2,
"create_time":"2015-11-05 14:20:39.541",
"updated_time":"2015-11-05 14:20:39.541",
"severity":"warning",
"status":1,
"databaseName":"mydb",
"databaseId":106,
"clusterName":"1443552354071_cluster",
"description":" Resource Pool: resourcepool1 Threshold Name: Ended Query with Run Time Exceeding Limit Time Interval: 14:15:39 to 14:20:39 Threshold Value: 0 min(s) Actual Value: 2259 query(s) ",
"summary":"Resource Pool: resourcepool1; Threshold : Ended Query with Run Time Exceeding Limit > 0 min(s)",
"internal":false,
"count":1
}
],
"total_alerts":14,
"request_query":"category=thresholds&subcategory=threshold_rp_query_run_time&rp_name=resourcepool1",
"request_time":"2015-11-05 11:07:43.988"
}
]
4 - Connect with an SSH tunnel
You can set up an SSH tunnel to connect to Vertica. This can be useful in cases where the client or Vertica server is on a private network.
You can set up an SSH tunnel to connect to Vertica through a proxy server. This can be useful in cases where the client or Vertica server is on a private network.
Server on private network
If the Vertica server is on a private network, run ssh -R to configure remote port forwarding on the Vertica server host. For example, to let the client connect to Vertica through a proxy hosted on proxy.example.com:9595:
On the proxy server, add GatewayPorts yes to /etc/ssh/sshd_config.
On the client host, run the following to connect to Vertica through the proxy server:
$ vsql -h proxy.example.com -p 9595
Client on private network
If the client machine is on a private network, run ssh -L on the client to configure local port forwarding. For example, to let the client use localhost:9595 to connect to Vertica hosted on vertica.example.com:5433 through a proxy on proxy.example.com:
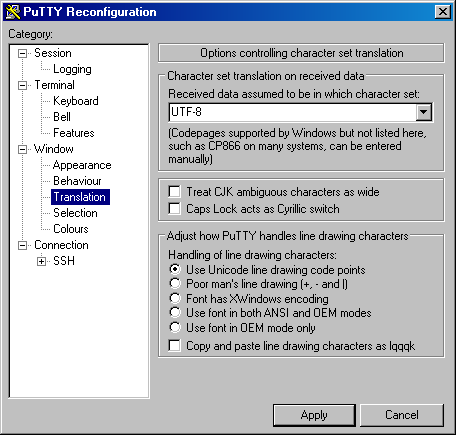
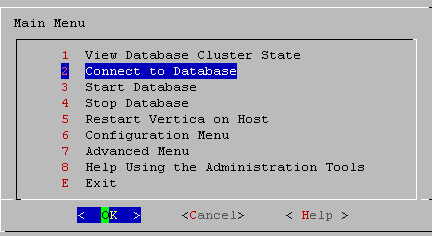


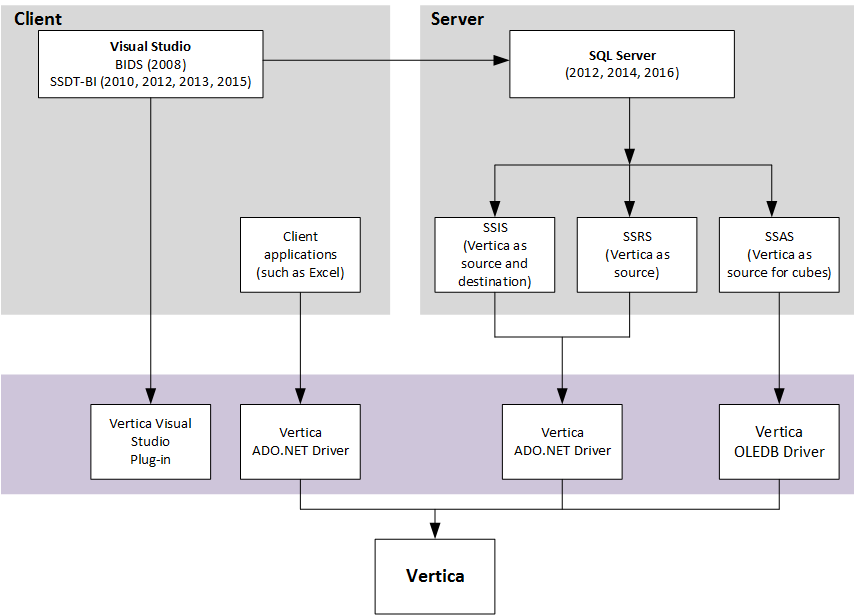
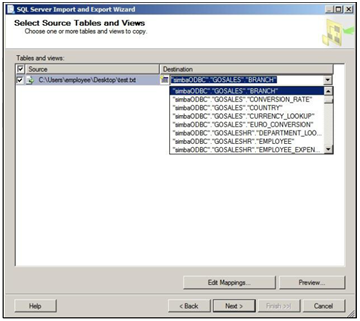
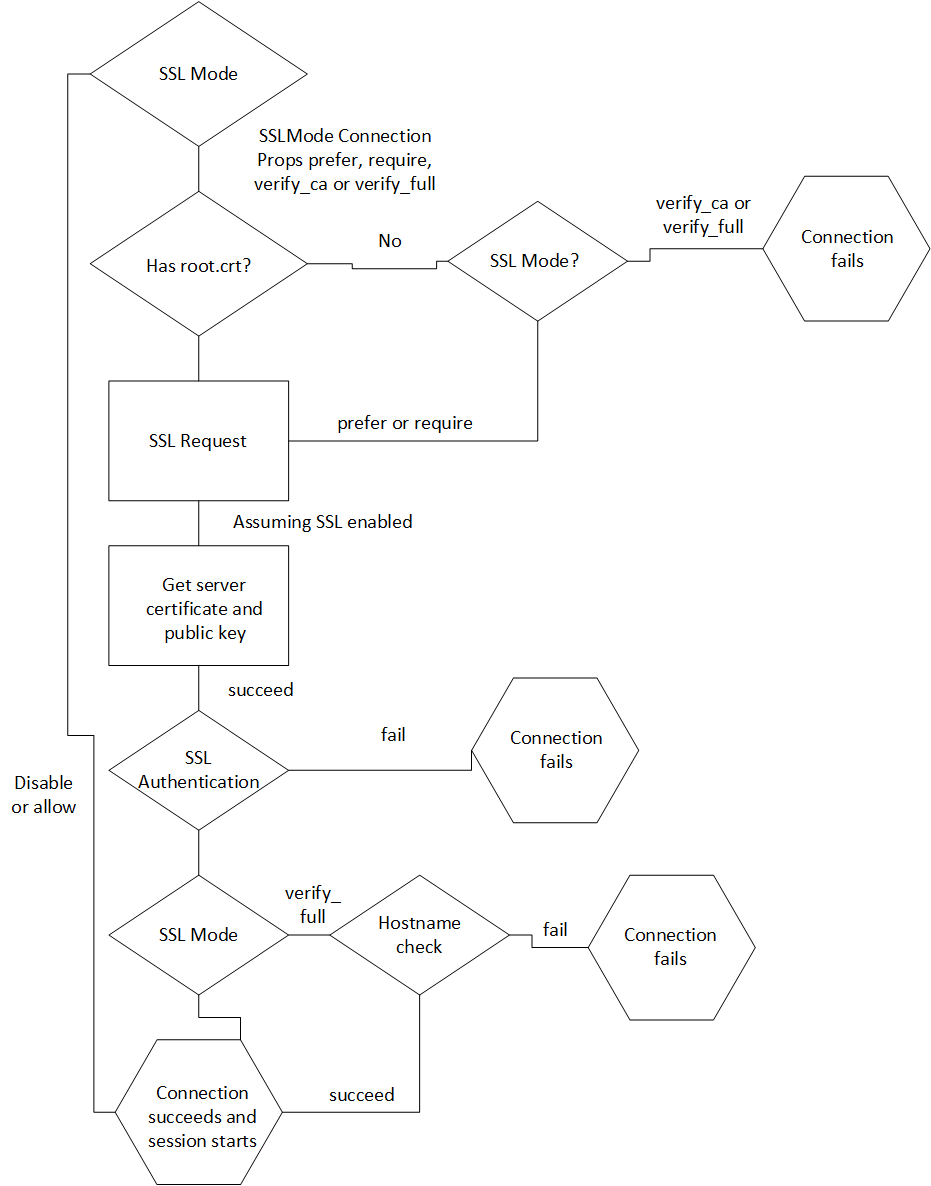
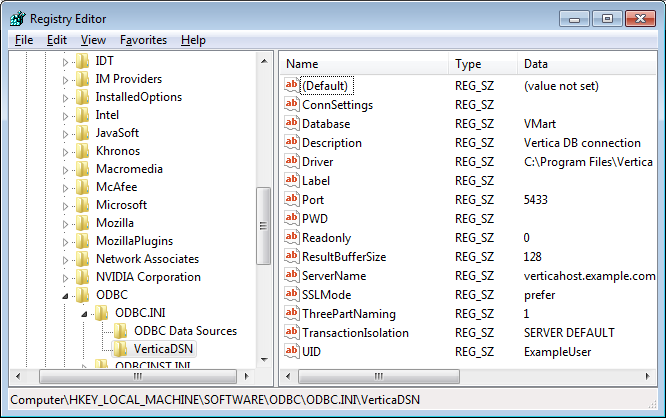

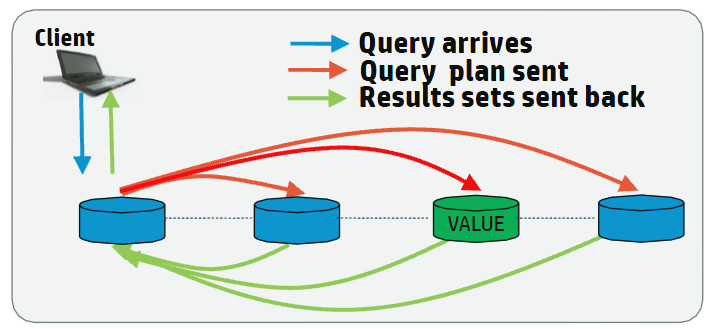
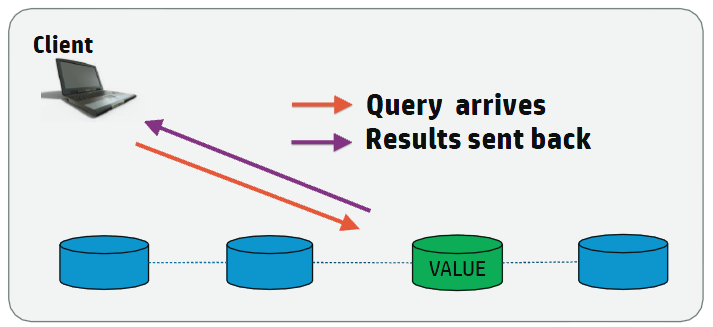
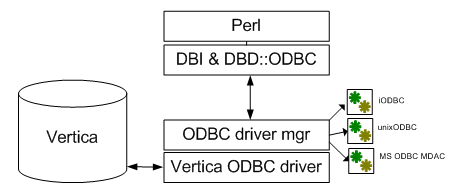

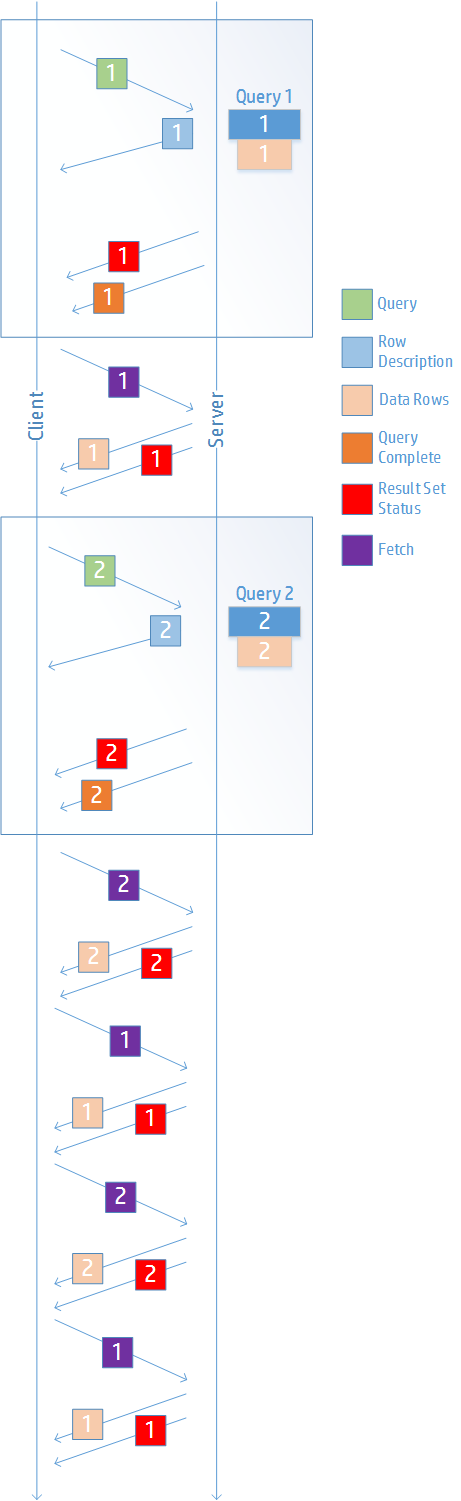 Query 1: