Reviving an Eon Mode database on premises with FlashBlade using MC
(For details on how to stop or terminate a cluster using Management Console, see Viewing and managing your cluster.)
Prerequisites
You can revive a terminated Eon Mode database on premises that uses a Pure Storage FlashBlade appliance as its communal storage location if you have the following facts available:
-
The endpoint IP address of the FlashBlade.
-
The endpoint port for the FlashBlade.
-
The access key and secret key for FlashBlade.
-
The S3 URL for the FlashBlade.
-
The name of the stopped database stored on the FlashBlade, that you wish to revive.
Revive an Eon Mode database from communal storage on FlashBlade
-
On the MC Infrastructure page, click the box for the cluster you wish to revive. MC displays a pop-up with cluster details and action buttons.
-
Click Revive Database. MC launches the Revive an Eon Mode Database wizard.
-
In the S3 Communal Storage Information screen, enter the following fields, then click Next:
S3-compatible End Point IP The IP address of the Pure Storage FlashBlade appliance. End Point IP The port for the FlashBlade. Access ID The access key for the FlashBlade. Secret Key The secret key for the FlashBlade. -
When you click Next, MC validates your credentials. If validation is successful, MC reads the list of S3 buckets on the end point (the FlashBlade).
-
In the Path for Database Communal Location screen, enter the following field , then click Discover.
S3 path for Communal Storage of database(s) Enter the complete S3 bucket URL for the database you wish to revive, in the following format:
s3://bucket-name/subfolder-name
-
MC populates the table under the Discover button with the database names and complete S3 URLs of all the databases it finds on the S3 location.
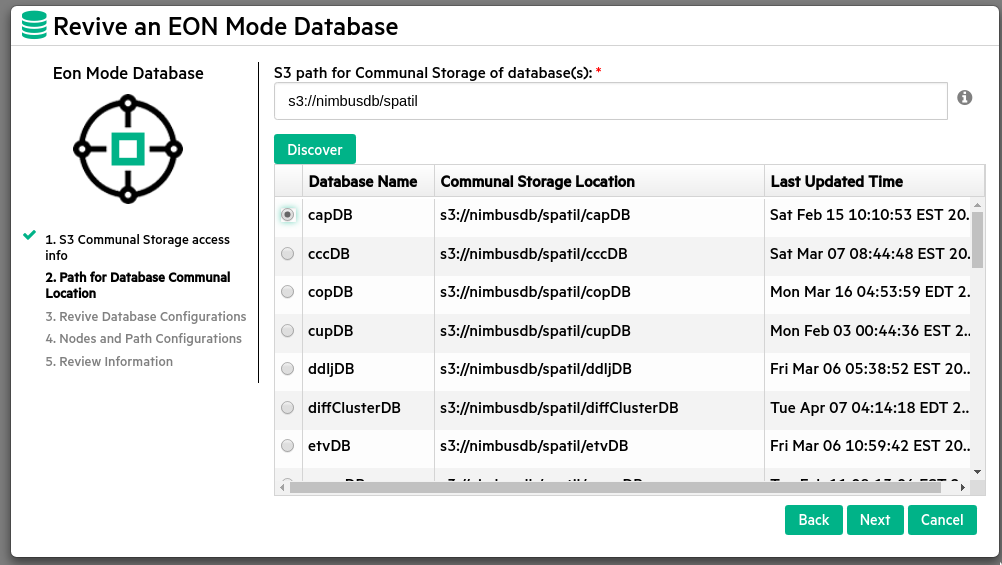
-
Click the radio button for the database you want to revive, then click Next.
-
In the Details of Selected Database to Revive screen, MC pre-fills most of the fields. Enter and confirm your password:
Vertica Database Name Database name is pre-entered. Original Database Version Database Vertica version is pre-filled. Cluster Vertica Version Cluster Vertica version is pre-filled. Database size Number of nodes is pre-filled. Original Vertica Database Super User Name Database super user name is pre-filled. Password Enter the database password. Confirm Password Re-enter the password to confirm. -
MC validates the information. If validation is successful, the Next button changes from grayed out to active. Click Next.
-
In the Eon Mode Database screen, select the IP addresses of the nodes in the cluster on which you wish to revive the database. MC fills in the Number of Nodes field and displays the catalog path and depot path that were configured for the database when it was created.
-
In the Temp Path field, enter the complete path for the Temp directory. Then click Next.
-
MC displays the S3 Provider Details screen with a summary of all the information you have entered to revive the database. Review the information to verify it is correct. Then click Revive Database.
-
MC displays a progress screen indicating the database revival tasks that have been completed and the overall percentage of the revival that is complete. Wait until the revive is 100% complete, then click Close.
When the work is complete, Vertica displays the MC landing page.