This is the multi-page printable view of this section.
Click here to print.
Return to the regular view of this page.
Cloud platforms
Vertica supports Eon Mode database, subcluster, and node actions for the following cloud providers:.
Vertica supports Eon Mode database, subcluster, and node actions for the following cloud providers:
Management Console provides workflows that simplify resource provisioning and database management. Additionally, Vertica provides configuration defaults and recommendations for each cloud provider.
1 - Managing an Eon Mode database in the cloud
After you provision your cluster and database in the cloud, the screens and techniques you use to monitor the database are the same regardless of the database mode or cluster platform.
After you provision your cluster and database in the cloud, the screens and techniques you use to monitor the database are the same regardless of the database mode or cluster platform. (Exceptions are noted in the documentation for particular features.)
Using MC to monitor your cluster, you can monitor the nodes in your subcluster, load data, run queries, and perform all other monitoring tasks for subclusters and nodes.
For details about Vertica and the supported cloud providers, see Set up Vertica on the cloud.
Monitoring primary and secondary subclusters
The Cluster > Manage page Database tab lets you monitor your database nodes in visual format. MC supports only the monitoring features on the Database tab, as described in Viewing and managing your cluster.
You can use the Manage > Subclusters tab to monitor your subcluster and nodes:
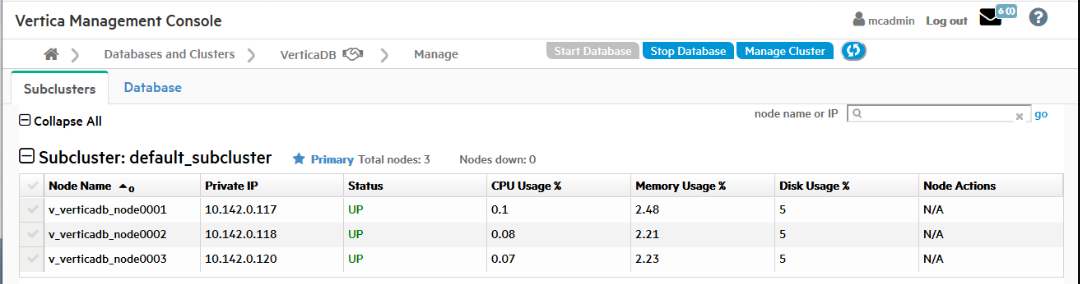
The Subclusters tab displays the following subcluster information:
In addition, the tab displays the following node information:
-
Node name
-
Private IP address
-
UP or DOWN status
-
CPU
-
Memory
-
Disk usage percentages
-
Available node actions
Searching for nodes
On the Manage > Subclusters tab in MC, you can search for a specific node or group of nodes.
In the node name or IP field above the subcluster:
-
To find a single node, enter a complete node name or IP address.
-
To find a related group of nodes, enter a partial node name or IP address that those nodes share.
2 - Amazon Web Services in MC
Management Console provides specific resources for managing database clusters on AWS.
Management Console provides specific resources for managing database clusters on AWS.
You can provision an Eon Mode or Enterprise Mode database cluster on AWS.
You can revive an Eon Mode database cluster on AWS. For more information, see Reviving an Eon Mode database on AWS in MC.
The MC provision and revive wizards for AWS configure separate volumes for the data, depot, catalog, and temp database directories. The specific volumes it uses for each directory depend upon the mode and the specific AWS instance type you select when you provision or revive the cluster. For details on the volumes configured for clusters on AWS, see:
2.1 - Creating an Eon Mode database in AWS with MC
Choose one of the following setup options:.
After you deploy Management Console on Amazon Web Services (AWS) with a CloudFormation Template, you can provision a cluster and database. Vertica clusters are provisioned in the same Virtual Private Cloud (VPC) as the Vertica Management Console. You can create an initial cluster of up to 60 hosts.
Note
See
Creating a cluster using MC if you installed Management Console with an RPM, or to provision an on-premises database and cluster.
Prerequisites
Before you begin, complete or obtain the following:
Choose one of the following setup options:
-
Quick Setup: Select your cluster size based on your estimated compressed working data size. The Management Console calculates the volume size per node, and reserves part of the disk for catalog and temp storage.
-
Advanced Setup: This option provides more granular control over configuration settings related to subnet, Node IP, and depot, temp, and catalog volume sizes.
Quick setup
-
Log in to the Vertica Management Console.
-
On the Management Console home page, select Create new database.
-
On Database Storage Mode, click Eon Mode.
-
Click Next. On Vertica License, select one of the following license mode options:
-
Community Edition: A free Vertica license to preview Vertica functionality. This license provides limited features. If you use a Community Edition license for your deployment, you can upgrade the license later to expand your cluster load. See Managing licenses form more information.
-
Premium Edition: Use your Vertica license. After you select this option, click Browse to locate and upload your Vertica license key file, or manually enter it in the field.
-
Click Next. On Setup Path, select Quick Setup.
-
Click Next. In the Vertica Settings section, select the desired Vertica database version. You can select from the latest hotfix of recent Vertica releases. For each database version, you can also select the operating system. See Choose a Vertica AMI Operating Systems for available OS and major version options.
-
In the AWS EC2 Instance Type section, select from one of the following instance types:
-
Ephemeral Depot
-
EBS Depot
-
In the Cluster Size section, select the number of instances to deploy with your cluster based on your working data size. For details about working data size, see Configuring your Vertica cluster for Eon Mode.
Note
If you are using a Community Edition license, your cluster size selections are limited to Small, Medium, and Large.
-
In the Database Parameters section, supply the following information:
-
Database Name: The name for your new database. See Creating a database name and password for database name requirements.
-
Administrator Username: The name of the database superuser.
-
Administrator Password: The password for the database administrator user account. For details, see Password guidelines.
-
Confirm Password: Reenter the Administrator Password.
-
Load Sample Data: Optional. Click the slider to the right to preload your database with example clickstream data. This option is useful if you are testing features and want some preloaded data in the database to query.
-
In the AWS Environment section, supply the following information:
-
AWS Key Pair: Your Amazon key pair for SSH access to EC2 instances.
-
IP Access: The cluster IP address range for SSH and client access to cluster hosts.
-
S3 Communal Storage URL: The path to a new subfolder in your existing AWS S3 bucket for Communal Storage of your Eon Mode database. Vertica creates the subfolder in the existing S3 bucket.
Important
Use an existing S3 bucket in the same region as your Management Console instance. In addition, you must use the S3 bucket that you specified when you
deployed the CloudFormation template.
-
Tag EC2 Instances: Optional. Assign distinct, searchable metadata tags to the instances in this cluster. Many organizations use labels to organize, track responsibility, and assign costs for instances.
To add a tag, click the slider to the right to display the Tag Name and Tag Value fields. Click Add to create the tag. Added tags are displayed below the fields.
-
Click Create Database Cluster to create a Eon Mode cluster on AWS.
Advanced setup
-
Log in to the Vertica Management Console.
-
On the Management Console home page, select Create new database.
-
On Database Storage Mode, click Eon Mode.
-
Click Next. On Vertica License, select one of the following license mode options:
-
Community Edition: A free Vertica license to preview Vertica functionality. This license provides limited features. If you use a Community Edition license for your deployment, you can upgrade the license later to expand your cluster load. See Managing licenses form more information.
-
Premium Edition: Use your Vertica license. After you select this option, click Browse to locate and upload your Vertica license key file, or manually enter it in the field.
-
Click Next. On Setup Path, select Advanced Setup.
-
Click Next. On AWS Environment, supply the following information:
-
AWS Key Pair: Your Amazon key pair for SSH access to EC2 instances.
-
AWS Subnet: The subnet for your cluster. By default, Vertica creates your cluster in the same subnet as your MC instance.
Important
Use security groups and network access control lists (ACLs) to secure your subnet. For details, see the
Amazon documentation.
-
IP Access: The cluster IP address range for SSH and client access to cluster hosts.
-
Node IP Setting: Select Private, Public, or Elastic. For details about each option, see the Amazon documentation.
-
S3 Communal Storage URL: The path to a new subfolder in your existing AWS S3 bucket for Communal Storage of your Eon Mode database. Vertica creates the subfolder in the existing S3 bucket.
Note
Use an existing S3 bucket in the same region as your Management Console instance.
-
Tag EC2 Instances: Optional. Assign distinct, searchable metadata tags to the instances in this cluster. Many organizations use labels to organize, track responsibility, and assign costs for instances.
To add a tag, click the slider to the right to display the Tag Name and Tag Value fields. Click Add to create the tag. Added tags are displayed below the fields.
-
Click Next. Database Parameters accepts information about your Vertica license. Supply the following information:
-
Database Name: The name for your new database. See Creating a database name and password for database name requirements.
-
Administrator Username: The name of the database superuser.
-
Administrator Password: The password for the database administrator user account. For details, see Password guidelines.
-
Confirm Password: Reenter the Administrator Password.
-
Vertica Version: Select the desired Vertica database version. You can select from the latest hotfix of recent Vertica releases. For each database version, you can also select the operating system. See Choose a Vertica AMI Operating Systems for available OS and major version options.
-
Load Sample Data: Optional. Click the slider to the right to preload your database with example clickstream data. This option is useful if you are testing features and want some preloaded data in the database to query.
-
Click Next. On AWS Configuration, supply the following information:
-
Number of Nodes: The initial number of nodes for your database.
-
Number of Vertica Database Shards: Sets the number of shards in your database. Vertica suggests a number of shards automatically, based on your node count. After you set this value, you cannot change it later. The shard count must be greater than or equal to the maximum subcluster count. Be sure to allow for node growth. See Configuring your Vertica cluster for Eon Mode for recommendations.
-
EC2 Instance Type: The instance types used for the nodes. See Choosing AWS Eon Mode Instance Types for a list of recommended AWS instances. For details about each instance type, see the Amazon EC2 Instance Types documentation.
-
Local Storage: Customize your cluster according to your storage needs. For guidance, see Eon Mode volume configuration defaults for AWS for the Vertica default settings for each supported instance.
-
Click Next. On Review, confirm your selections. Click Edit to return to a previous section and make changes.
-
When you are satisfied with your selections, click the I accept the terms and conditions checkbox.
-
Click Create Cluster to create a Eon Mode cluster on AWS.
After creating the database
After you create the database, click Get Started to view the Databases page. To view your database, select Manage and View Your Vertica Database to go to the database Overview.
You can also view your database from the Recent Databases section of the MC home page.
For additionalinformation about managing your cluster, instances, and database using Management Console, see Managing database clusters .
2.2 - Creating an Enterprise Mode database in AWS with MC
After the cluster and database is successfully created, click Get Started to view the Fast Tasks page.
After you deploy Management Console on Amazon Web Services (AWS) with a CloudFormation Template, you can provision a cluster and database. Vertica clusters are provisioned in the same Virtual Private Cloud (VPC) as the Vertica Management Console. You can create an initial cluster of up to 60 hosts.
Note
See
Creating a cluster using MC if you installed Management Console with an RPM, or to provision an on-premises database and cluster.
Prerequisites
Before you begin, complete or obtain the following:
Provisioning a cluster and database
-
Log in to the Vertica Management Console.
-
On the Management Console home page, select Create new database.
-
On Database Storage Mode, click Enterprise Mode.
-
Click Next. Create a New Vertica Cluster | mode: Enterprise provides you with two workflow options for creating your database. Select one of the following:
-
Click Next. On Enter AWS Credentials and preferences, AWS Region is filled with the region of the Management Console host. Supply the following information:
-
AWS Subnet: Under Show Advanced Options. Select the subnet used to create your cluster.
-
AWS Access Key ID: Displayed if MC was configured to use the AWS Access Keys authentication method. Enter your access key.
-
AWS Secret Access Key: Displayed if MC was configured to use the AWS Access Keys authentication method. Enter the password associated with the AWS Access Key ID.
-
AWS Key Pair: Your Amazon key pair for SSH access to EC2 instances.
-
CIDR Range: The cluster IP address range for SSH and client access to cluster hosts.
-
Click Next. Enter Vertica database name and login credentials accepts information about your Vertica license. Supply the following information:
-
Vertica Database Name: The name for your new database. See Creating a database name and password for database name requirements.
-
Vertica Version: Custom Create mode only. Select the desired Vertica database version. You can select from the latest hotfix of recent Vertica releases. For each database version, you can also select the operating system. See Choose a Vertica AMI Operating Systems for available OS and major version options.
-
Vertica Database User Name: The name of the database superuser.
-
Password: The password associated with the database username. For details, see Password guidelines.
-
Confirm Password: Reenter the Password.
-
Database Node Count: The number of nodes that you want to deploy in this cluster. Quick Create mode provides options for 1 or 3 database node counts.
-
Vertica License: Custom Create mode only. Click Browse to locate and upload your Vertica license key file. If you do not supply a license key file here, the wizard deploys your database with a Vertica Community Edition license. This license has a three node limit, so the value in the Database Size filed cannot be larger than 3 if you do not supply a license. If you use a Community Edition license for your deployment, you can upgrade the license later to expand your cluster load more than 1TB of data. See Managing licenses form more information.
-
Load example test data: Optional. Click the checkbox to preload your database with example clickstream data. This option is useful if you are testing features and want some preloaded data in the database to query.
-
Click Next. Specify cloud instance and main data storage info provides options to let you customize your instance configuration. In Quick Create mode, the options on this screen are pre-selected and read-only.
Database Data Path is filled with the path to your persistent database storage.
EBS Volume Type and EBS Volume Size (GB) per Volume per Available Node fields are filled with default values for the selected EC2 Instance Type. See Eon Mode volume configuration defaults for AWS for more information.
In Custom Create mode, supply information for the following:
-
EC2 Instance Type: The instance type your cluster deploys. See Supported AWS instance types for more information.
-
EBS Volume Type: The block-level storage type for each node in your cluster. See Enterprise Mode volume configuration defaults for AWS for recommendations about supported volume types.
-
EBS Volume Size (GB) per Volume per Available Node: The amount of disk space available on each disk attached to each node in your cluster. This field shows you the total disk space available per node in your cluster.
-
Enable EBS Volume Encryption: Optional. Select the checkbox if you want server-level encryption on your EC2 instances. With AWS, only 4th and 5th generation instance types (c4/5, r4/5, and m4/5) support encryption.
-
Node IP setting: Select Private, Public, or Elastic. For details about each option, see the Amazon documentation.
-
Click Next. Specify additional storage and tag info lets you allocate additional storage for your cluster. In Quick Create mode, the options on this screen are pre-selected and read-only.
-
Database Catalog Path is the location of the local copy of the database catalog. Database Temp Path is the temporary storage space for each node, if the node instance type includes the temporary storage option.
-
In Custom Create mode, select or enter a value for EBS Volume Type, EBS Volume Size (GB) per Volume per Available Node, and Enable EBS Volume Encryption under each path. Each field has the same definition as described in the previous step.
-
Tag EC2 instances: Optional. Assign distinct, searchable metadata tags to the instances in this cluster. Many organizations use labels to organize, track responsibility, and assign costs for instances.
After you click the checkbox, the Tag Name and Tag Value fields are displayed. Click Add to create the tag. Added tags are displayed below the fields.
-
Click Next. On the Review screen, confirm your selections. To edit your selections, click Back until you reach the screen containing information that you want to edit.
-
When you are satisfied with your selections, click the Accept terms and conditions of the "Software Only Terms" for your territory checkbox.
-
Click Create to create an Enterprise Mode cluster on AWS.
After the cluster and database is successfully created, click Get Started to view the Databases page. To view your database, select Manage and View Your Vertica Database to go to the database Overview.
You can also view your database from the Recent Databases section of the MC home page.
See Managing database clusters for further managing your cluster, instances, and database using Management Console.
2.3 - Reviving an Eon Mode database on AWS in MC
You can also revive a database using admintools.
Important
You can also revive a database using
admintools. You must use admintools in order to revive a database on an existing cluster. For example, use admintools if you stopped a cluster whose hosts use instance storage where data is not persistently stored, and plan to bring back the database on the same cluster.
An
Eon Mode database keeps an up-to-date version of its data and metadata in its communal storage location. After a cluster hosting an Eon Mode database is terminated, this data and metadata continue to reside in communal storage. When you revive the database later, Vertica uses the data in this location to restore the database in the same state on a newly provisioned cluster.
If Management Console has been installed using a CloudFormation template from the AWS Marketplace, you can use the Provision and Revive wizard in Management Console.
During a revive of your database, when you select a Vertica version that is higher than the version of the original database in the communal storage, Vertica upgrades your database to match the Vertica version you selected. This upgrade may cause the database revive to take longer. To bypass this upgrade, select the Vertica version of your original database.
Note
After upgrading a Vertica database, you can not revert to an earlier version.
Prerequisites
-
Communal storage location (an AWS S3 bucket) of the stopped Eon Mode database you plan to revive. For guidance, see Viewing and managing your cluster.
-
Username and password of the Eon Mode database you plan to revive.
-
AWS account with permissions to create a VPC, subnet, security group, instances, and roles.
-
Amazon key pair for SSH access to an instance.
Revive the database on the cloud
You use a wizard in Management Console to provision a new cluster on AWS and revive a database onto it. For the new cluster, Management Console automatically provisions the same number of AWS instances used by the database when it was last shut down.
Caution
You should not use the same communal storage location for running multiple databases, as it causes data corruption. To avoid corruption, you should also never use the revive functionality to simultaneously run the same Eon Mode database on different clusters.
-
From the Management Console home page, select Revive Eon Mode Database. The Revive an Eon Mode Database wizard opens.
-
Enter your cloud credentials and cluster preferences. Your cluster must be in the same region as your communal storage location's S3 bucket. To revive the cluster in a new region, you must:
-
Create an S3 bucket in the new region.
-
Copy the previous S3 bucket's contents into it.
-
Provide the new S3 bucket URL in Step 3.
-
By default, Vertica creates your cluster in the same subnet as your Management Console instance. If you want to manage all Vertica clusters in the same VPC, you can provision your Vertica database in a different subnet than the Management Console instance. To do so, on the AWS Credentials page, select Show Advanced Options and enter a value in the Subnet field.
Important
If you specify a different subnet for your database, make sure to secure the subnet.
-
Enter the S3 URL of the database that you are reviving. You can only revive databases that use an S3 bucket that you specified when you deployed the CloudFormation template.
When you enter an S3 bucket location, Management Console discovers all known Eon Mode databases.
-
Select the correct database to revive.
-
Provide the database administrator credentials for the database you are reviving. These credentials are the same as the ones used by the database in the previous cluster.
-
In the Database Version field, choose the desired Vertica database version. Select from the latest hotfix of recent Vertica releases. For each Vertica version, you can select from a list of associated Linux operating systems.
If you select a Vertica version that is higher than the version of the original database in the communal storage, Vertica upgrades your database to match the Vertica version you selected. This upgrade may cause the database revive to take longer. To bypass this upgrade, select the Vertica version of your original database.
Note
After your Vertica database has been upgraded, you can not downgrade your database later.
-
Choose instance types for the cluster. Management Console provisions the same number of instances used by the database when it was last shut down.
The MC populates the existing paths for the depot, catalog, and temp directories.
Note
You cannot persist the catalog with ephemeral instances.
The last step displays a confirmation page showing the configured volumes. For details on the volume configurations that MC provides, see Eon Mode volume configuration defaults for AWS and Enterprise Mode volume configuration defaults for AWS.
Caution
To ensure against data loss, choose instances that use EBS storage. EBS storage is durable, while instance store is temporary. For Eon mode, Management Console displays an alert to inform the user of the potential data loss when terminating instances that support instance store.
-
Choose whether to encrypt your EBS volumes. With AWS, only 4th and 5th generation instance types (c4, r4, and m4; c5, r5, and m5) support encrypting EBS volumes.
-
Optionally, you can tag the instances. In the Tag EC2 instances field, if another cluster is already running, Management Console fills those fields with the tag values for the first instance in the cluster. You can accept the defaults, or enter new tag values.
-
Review your choices, accept the license agreement, and click Create to revive the database on a new cluster. If the version of Management Console you use to revive is higher than that of the database, Management Console first notifies you that it is about to automatically upgrade the database. After starting the revive process, the wizard displays its progress. After a successful revive, the database starts automatically.
Important
If the database fails to start automatically, check the controlmode setting in /opt/vertica/config/admintools.conf. This setting must be compatible with the network messaging requirements of your Eon implementation. AWS relies on unicast messaging, which is compatible with a controlmode setting of point-to-point (pt2pt). If the source database controlmode setting was broacast and you migrate to S3/AWS communal storage, you must change controlmode with admintools:
$ admintools -t re_ip -d dbname -T
When the revive process is complete, click Get Started to navigate to the Databases page.
2.4 - Eon Mode volume configuration defaults for AWS
When you provision or revive an Eon Mode database cluster, Management Console configures separate volumes for the depot, catalog, and temp directories.
When you provision or revive an Eon Mode database cluster, Management Console configures separate volumes for the depot, catalog, and temp directories. The specific volumes and sizes that Management Console configures vary depending on the AWS instance type you select when provisioning or reviving the cluster.
MC follows these rules when allocating resources for these directories for an Eon Mode database cluster:
-
Depot: Allocate instance store if available with the selected instance type. Otherwise, allocate EBS volumes. (In Eon Mode on AWS, S3 is the backup.)
-
Catalog: Always allocate an EBS volume, to ensure the catalog is durable.
-
Temp: Allocate instance store if available with the selected instance type. Otherwise, allocate EBS volumes.
Note
Table below includes all instances types that include instance store.
|
Instance Type API Name |
Instance Storage |
Depot |
Catalog |
Temp |
|
Supported EBS Volumes |
N/A |
Configurable 8 EBS volumes
Default to 75G per volume
|
Configurable 1 EBS volume
Default to 50G
|
Configurable 1 EBS volume
Default to 100G
|
|
c3.4xlarge |
320 G (2 * 160 GiB SSD) |
Configurable 8 EBS volumes
Default to 75G per volume
|
Configurable 1 EBS volume
Default to 50G
|
Instance store
2x160G
|
|
c3.8xlarge |
640 G (2 * 320 GiB SSD) |
Configurable 8 EBS volumes
Default to 75G per volume
|
Configurable 1 EBS volume
Default to 50G
|
Instance store
2x320G
|
|
c5d.4xlarge |
4000 G (1 * 400 GiB SSD) |
Configurable 8 EBS volumes
Default to 75G per volume
|
Configurable 1 EBS volume
Default to 50G
|
Instance store
1x400G
|
|
i3.4xlarge |
3800 G (2 * 1900 GiB NVMe SSD) |
Instance store
1x1900G
|
Configurable 1 EBS volume
Default to 50G
|
Instance store
1x1900G
|
|
i3.8xlarge |
7600 G (4 * 1900 GiB NVMe SSD) |
Instance store
3x1900G
|
Configurable 1 EBS volume
Default to 50G
|
Instance store
1x1900G
|
|
i3.16xlarge |
15200 G (8 * 1900 GiB NVMe SSD) |
Instance store
6x1900G
|
Configurable 1 EBS volume
Default to 50G
|
Instance store
2x1900G
|
|
i3en.3xlarge |
7500 G (1 * 7500 GiB NVMe SSD) |
Configurable 8 EBS volumes
Default to 75G per volume
|
Configurable 1 EBS volume
Default to 50G
|
Instance Store
1x7500G
|
|
i3en.6xlarge |
15000 G (2 * 7500 GiB NVMe SSD) |
Instance store
1x7500G
|
Configurable 1 EBS volume
Default to 50G
|
Instance Store
1x7500G
|
|
i3en.12xlarge |
30000 G (4 * 7500 GiB NVMe SSD) |
Instance store
3x7500G
|
Configurable 1 EBS volume
Default to 50G
|
Instance Store
1x7500G
|
|
i4i.4xlarge |
3750 G (1 * 3750 GiB NVMe SSD) |
Configurable 8 EBS volumes
Default to 75G per volume
|
Configurable 1 EBS volume
Default to 50G
|
Instance store
1x3750G
|
|
i4i.8xlarge |
7500 G (2 * 3750 GiB NVMe SSD) |
Instance Store
1x3750G
|
Configurable 1 EBS volume
Default to 50G
|
Instance store
1x3750G
|
|
i4i.16xlarge |
15000 G (4 * 3750 GiB NVMe SSD) |
Instance store
3x3750G
|
Configurable 1 EBS volume
Default to 50G
|
Instance store
1x3750G
|
|
m5d.4xlarge |
600 G (2 * 300 GiB NVMe SSD) |
Configurable 8 EBS volumes
Default to 75G per volume
|
Configurable 1 EBS volume
Default to 50G
|
Instance store
2x300G
|
|
m5d.8xlarge |
1200 G (2 * 600 GiB NVMe SSD) |
Configurable 8 EBS volumes
Default to 75G per volume
|
Configurable 1 EBS volume
Default to 50G
|
Instance store
2x600G
|
|
m5d.12xlarge |
1800 G (2 * 900 GiB NVMe SSD) |
Instance store
1x900G
|
Configurable 1 EBS volume
Default to 50G
|
Instance store
1x900G
|
|
m5d.16xlarge |
2400 G (4 * 600 GiB NVMe SSD) |
Instance store
3x600G
|
Configurable 1 EBS volume
Default to 50G
|
Instance store
1x600G
|
|
r3.4xlarge |
32G (1 * 320G SSD) |
Configurable 8 EBS volumes
Default to 75G per volume
|
Configurable 1 EBS volume
Default to 50G
|
Instance store
320G
|
|
r3.8xlarge |
640 G (2 * 320 GiB SSD) |
Configurable 8 EBS volumes
Default to 75G per volume
|
Configurable 1 EBS volume
Default to 50G
|
Instance store
2x320G
|
|
r5d.4xlarge |
600 G (2 * 300 GiB NVMe SSD) |
Configurable 8 EBS volumes
Default to 75G per volume
|
Configurable 1 EBS volume
Default to 50G
|
Instance store
2x300G
|
|
r5d.8xlarge |
1200 G (2 * 600 GiB NVMe SSD) |
Configurable 8 EBS volumes
Default to 75G per volume
|
Configurable 1 EBS volume
Default to 50G
|
Instance store
2x600G
|
|
r5d.12xlarge |
1800 G (2 * 900 GiB NVMe SSD) |
Instance store
1x900G
|
Configurable 1 EBS volume
Default to 50G
|
Instance store
1x900G
|
|
r5d.16xlarge |
2400 G (4 * 600 GiB NVMe SSD) |
Instance store
3x600G
|
Configurable 1 EBS volume
Default to 50G
|
Instance store
1x600G
|
Supported EBS volumes
-
c4.4xlarge
-
c4.8xlarge
-
c5.4xlarge
-
c5.9xlarge
-
c6i.4xlarge
-
c6i.8xlarge
-
c6i.12xlarge
-
c6i.16xlarge
-
c6i.24xlarge
-
c6i.32xlarge
-
m4.4xlarge
-
m4.10xlarge
-
m5.4xlarge
-
m5.8xlarge
-
m5.12xlarge
-
r4.4xlarge
-
r4.8xlarge
-
r4.16xlarge
-
r5.4xlarge
-
r5.8xlarge
-
r5.12xlarge
-
r6i.4xlarge
-
r6i.8xlarge
-
r6i.12xlarge
-
r6i.16xlarge
-
r6i.24xlarge
-
r6i.32xlarge
2.5 - Enterprise Mode volume configuration defaults for AWS
When you provision an Enterprise Mode database cluster, Management Console configures separate volumes for the data, catalog, and temp directories.
When you provision an Enterprise Mode database cluster, Management Console configures separate volumes for the data, catalog, and temp directories.
The specific volumes and sizes that MC uses vary depending on the AWS instance type you select when provisioning the cluster.
MC follows these rules when selecting resources for these directories for an Enterprise Mode database cluster:
-
Data: Always use EBS volumes, to ensure the data is durable.
-
Catalog: Always use an EBS volume, to ensure the catalog is durable.
-
Temp: If the chosen instance type offers instance store, then use volumes from instance store.
Note
Table below includes all instance types that include instance store.
|
Instance Type API Name |
Instance Storage |
Data |
Catalog |
Temp |
|
Supported EBS Volumes |
N/A |
Configurable 8 EBS volumes
Default to 75G per volume
|
Configurable 1 EBS volume
Default to 50G
|
Configurable 1 EBS volume
Default to 100G
|
|
c3.4xlarge |
320 G (2 * 160 GiB SSD) |
Configurable 8 EBS volumes
Default to 75G per volume
|
Configurable 1 EBS volume
Default to 50G
|
Instance Store
2x160G
|
|
c3.8xlarge |
640 G (2 * 320 GiB SSD) |
Configurable 8 EBS volumes
Default to 75G per volume
|
Configurable 1 EBS volume
Default to 50G
|
Instance Store
2x320G
|
|
c5d.4xlarge |
400 G (1 * 400 GiB SSD) |
Configurable 8 EBS volumes
Default to 75G per volume
|
Configurable 1 EBS volume
Default to 50G
|
Instance Store
1x400G
|
|
i3.4xlarge |
3800 G (2 * 1900 GiB NVMe SSD) |
Configurable 8 EBS volumes
Default to 75G per volume
|
Configurable 1 EBS volume
Default to 50G
|
Instance Store
2x1900G
|
|
i3.8xlarge |
7600 G (4 * 1900 GiB NVMe SSD) |
Configurable 8 EBS volumes
Default to 75G per volume
|
Configurable 1 EBS volume
Default to 50G
|
Instance Store
4x1900G
|
|
i3.16xlarge |
15200 G (8 * 1900 GiB NVMe SSD) |
Configurable 8 EBS volumes
Default to 75G per volume
|
Configurable 1 EBS volume
Default to 50G
|
Instance Store
8x1900G
|
|
i3en.3xlarge |
7500 G (1 * 7500 GiB NVMe SSD) |
Configurable 8 EBS volumes
Default to 75G per volume
|
Configurable 1 EBS volume
Default to 50G
|
Instance Store
1x7500G
|
|
i3en.6xlarge |
15000 G (2 * 7500 GiB NVMe SSD) |
Configurable 8 EBS volumes
Default to 75G per volume
|
Configurable 1 EBS volume
Default to 50G
|
Instance Store
2x7500G
|
|
i3en.12xlarge |
30000 G (4 * 7500 GiB NVMe SSD) |
Configurable 8 EBS volumes
Default to 75G per volume
|
Configurable 1 EBS volume
Default to 50G
|
Instance Store
4x7500G
|
|
i4i.4xlarge |
3750 G (1 * 3750 GiB NVMe SSD) |
Configurable 8 EBS volumes
Default to 75G per volume
|
Configurable 1 EBS volume
Default to 50G
|
Instance Store
1x3750G
|
|
i4i.8xlarge |
7500 G (2 * 3750 GiB NVMe SSD) |
Configurable 8 EBS volumes
Default to 75G per volume
|
Configurable 1 EBS volume
Default to 50G
|
Instance Store
2x3750G
|
|
i4i.16xlarge |
15000 G (4 * 3750 GiB NVMe SSD) |
Configurable 8 EBS volumes
Default to 75G per volume
|
Configurable 1 EBS volume
Default to 50G
|
Instance Store
4x3750G
|
|
r3.4xlarge |
320 G (1 * 320 GiB SSD) |
Configurable 8 EBS volumes
Default to 75G per volume
|
Configurable 1 EBS volume
Default to 50G
|
Instance Store
320G
|
|
m5d.4xlarge |
600 G (2 * 300 GiB NVMe SSD) |
Configurable 8 EBS volumes
Default to 75G per volume
|
Configurable 1 EBS volume
Default to 50G
|
Instance Store
2x300G
|
|
m5d.8xlarge |
1200 G (2 * 600 GiB NVMe SSD) |
Configurable 8 EBS volumes
Default to 75G per volume
|
Configurable 1 EBS volume
Default to 50G
|
Instance Store
2x600G
|
|
m5d.12xlarge |
1800 G (2 * 900 GiB NVMe SSD) |
Configurable 8 EBS volumes
Default to 75G per volume
|
Configurable 1 EBS volume
Default to 50G
|
Instance Store
2x900G
|
|
m5d.16xlarge |
2400 G (4 * 600 GiB NVMe SSD) |
Configurable 8 EBS volumes
Default to 75G per volume
|
Configurable 1 EBS volume
Default to 50G
|
Instance Store
4x600G
|
|
r3.8xlarge |
640 G (2 * 320 GiB SSD) |
Configurable 8 EBS volumes
Default to 75G per volume
|
Configurable 1 EBS volume
Default to 50G
|
Instance Store
2x320G
|
|
r5d.4xlarge |
600 G (2 * 300 GiB NVMe SSD) |
Configurable 8 EBS volumes
Default to 75G per volume
|
Configurable 1 EBS volume
Default to 50G
|
Instance Store
2x300G
|
|
r5d.8xlarge |
1200 G (2 * 600 GiB NVMe SSD) |
Configurable 8 EBS volumes
Default to 75G per volume
|
Configurable 1 EBS volume
Default to 50G
|
Instance Store
2x600G
|
|
r5d.12xlarge |
1800 G (2 * 900 GiB NVMe SSD) |
Configurable 8 EBS volumes
Default to 75G per volume
|
Configurable 1 EBS volume
Default to 50G
|
Instance Store
2x900G
|
|
r5d.16xlarge |
2400 G (4 * 600 GiB NVMe SSD) |
Configurable 8 EBS volumes
Default to 75G per volume
|
Configurable 1 EBS volume
Default to 50G
|
Instance Store
4x600G
|
Supported EBS volumes
-
c4.4xlarge
-
c4.8xlarge
-
c5.4xlarge
-
c5.9xlarge
-
c6i.4xlarge
-
c6i.8xlarge
-
c6i.12xlarge
-
c6i.16xlarge
-
c6i.24xlarge
-
c6i.32xlarge
-
m4.4xlarge
-
m4.10xlarge
-
m5.4xlarge
-
m5.8xlarge
-
m5.12xlarge
-
r4.4xlarge
-
r4.8xlarge
-
r4.16xlarge
-
r5.4xlarge
-
r5.8xlarge
-
r5.12xlarge
-
r6i.4xlarge
-
r6i.8xlarge
-
r6i.12xlarge
-
r6i.16xlarge
-
r6i.24xlarge
-
r6i.32xlarge
2.6 - Add nodes to a cluster in AWS using Management Console
When you use MC to add nodes to a cluster in the cloud, MC provisions the instances, adds the new instances to the existing Vertica cluster, and then adds those hosts to the database.
When you use MC to add nodes to a cluster in the cloud, MC provisions the instances, adds the new instances to the existing Vertica cluster, and then adds those hosts to the database.
In the Vertica Management Console, you can add nodes in several ways, depending on your database mode.
For Eon Mode databases, MC supports actions for subcluster and node management for the following public and private cloud providers:
Note
Enterprise Mode does not support subclusters.
For Enterprise Mode databases, MC supports these actions:
Note
In the cloud on GCP, Enterprise Mode databases are not supported.
Adding nodes in an Eon Mode database
In an Eon Mode database, every node must belong to a subcluster. To add nodes, you always add them to one of the subclusters in the database:
Adding nodes in an Enterprise Mode database on AWS
In an Enterprise Mode database on AWS, to add an instance to your cluster:
-
On the MC Home page, click View Infrastructure to go to the Infrastructure page. This page lists all the clusters the MC is monitoring.
-
Click any cluster shown on the Infrastructure page.
-
Select View or Manage from the dialog that displays, to view its Cluster page. (In a cloud environment, if MC was deployed from a cloud template the button says "Manage". Otherwise, the button says "View".)
Note
You can click the pencil icon beside the cluster name to rename the cluster. Enter a name that is unique within MC.
-
Click the Add (+) icon on the Instance List on the Cluster Management page.
MC adds a node to the selected cluster.
2.7 - Loading data from Amazon S3 using MC
You can use the Data Load Activity page in Management Console to import data from Amazon S3 storage to an existing Vertica table.
You can use the Data Load Activity page in Management Console to import data from Amazon S3 storage to an existing Vertica table. When you run a load job, Vertica appends rows to the target table you provide. If the job fails, or you cancel the job, Vertica commits no rows to the target table.
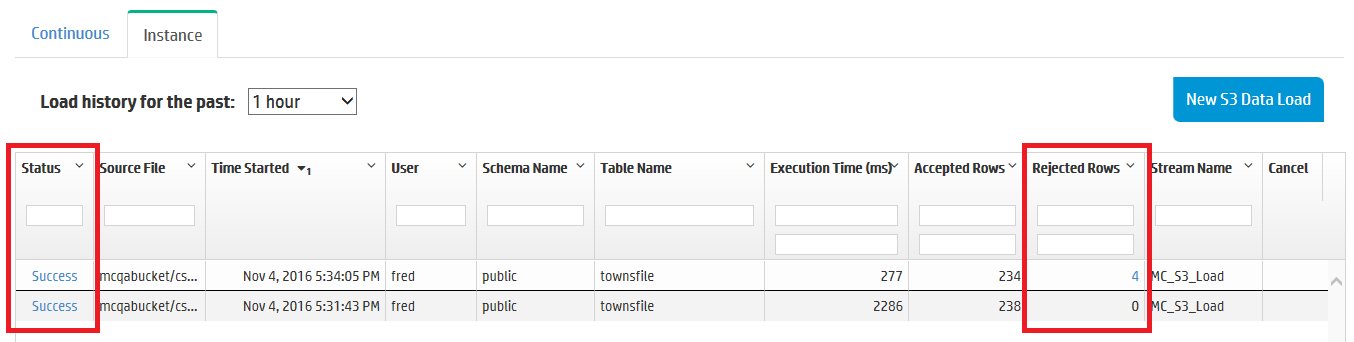
When you view your load history on the Instance tab, loading jobs initiated in MC using Amazon S3 have the name MC_S3_Load in the Stream Name column.
Prerequisites
To use the MC Load feature, you must have:
-
Access to an Amazon S3 storage account.
-
An existing table in your Vertica database to which you can copy your data. You must be the owner of the table.
-
(For non-CloudFormation Template installs) An S3 gateway endpoint.
If you aren't using a CloudFormation Template (CFT) to install Vertica, you must create an S3 gateway endpoint in your VPC. For more information, see the AWS documentation.
For example, the Vertica CFT has the following VPC endpoint:
"S3Enpoint" : {
    "Type" : "AWS::EC2::VPCEndpoint",
    "Properties" : {
    "PolicyDocument" : {
        "Version":"2012-10-17",
        "Statement":[{
        "Effect":"Allow",
        "Principal": "*",
        "Action":["*"],
        "Resource":["*"]
        }]
    },
    "RouteTableIds" : [ {"Ref" : "RouteTable"} ],
    "ServiceName" : { "Fn::Join": [ "", [ "com.amazonaws.", { "Ref": "AWS::Region" }, ".s3" ] ] },
    "VpcId" : {"Ref" : "VPC"}
}
Create a loading job
To load data from an Amazon S3 bucket to an existing table in your target database:
-
On the target database MC dashboard, click on the Load tab at the bottom of the page to view the Data Load Activity page.
-
Click on the Instance tab.
-
Click New S3 Data Load at the top-right of the tab. The Create New Amazon S3 Loading Job dialog box opens.
-
Enter your AWS account credentials and your target location information in the required fields, which are indicated by asterisks (*). Use the format S3:// for the bucket name.
-
(Optional) Specify additional options by completing the following fields:
For more about using these fields, see About configuring a data load from S3.
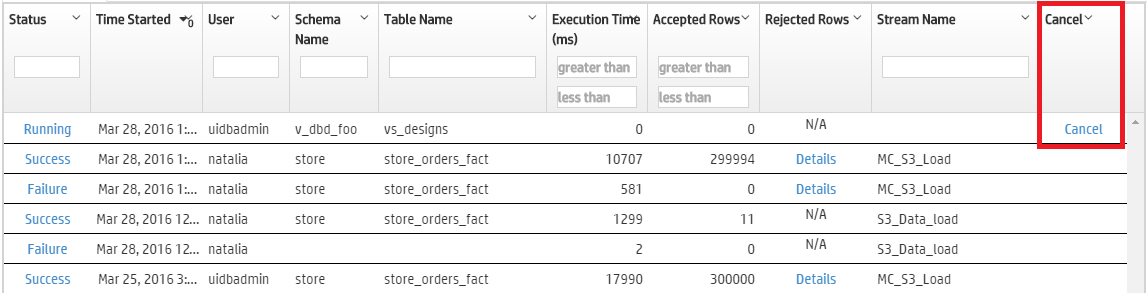
Cancel an initiated loading job
If a loading job is in progress, you can cancel it using the Cancel option in the Load History tab's Cancel column. Click Cancel to cancel the loading job. When you cancel a job, Vertica rolls back all rows and does not commit any data to the target table.
See also
2.7.1 - About configuring a data load from S3
When you create an S3 Data Load using MC, you have the option of further configuring the load operation.
When you create an S3 Data Load using MC, you have the option of further configuring the load operation. You can optionally specify the following:
Add COPY parameters
MC performs the load operation with COPY. You can use the COPY Parameters field to further configure the COPY operation. This field accepts parameters that are specified after the COPY statement's FROM clause. For details on these parameters and special requirements, see Parameters.
Note
The FILTER and PARSER parameters must appear in that order and precede all other parameters.
For example, you can specify the DELIMITER and SKIP parameters to separate columns with a comma, and skip one record of input data, respectively:
DELIMITER ',' SKIP 1
You can also add comments in this field with standard C comment notation.
Note
This field does not support SQL comment notation (double hyphen --).
Capture rejected data in a table
Set Capture rejected data in a table to Yes to create a table that contains rejected row data. You can view this data in the Load History tab.
This table uses the following naming convention:
schema.s3_load_rejections_target-table-name
You must have CREATE privilege on the schema if the table doesn't already exist. When you invoke multiple load processes for the same target table, MC appends all rejections data to the same table. For details, see Saving rejected data to a table.
Set a rejected records maximum
Set Reject Max to the maximum number of rows that can be rejected before the load operation fails. If COPY rejects the specified maximum rows, Vertica rolls back the entire load operation.
See also
2.7.2 - Viewing load history
You can view a history of all your continuous and instance loading jobs in Vertica on the Data Load Activity page.
You can view a history of all your continuous and instance loading jobs in Vertica on the Data Load Activity page.
-
Continuous jobs: Loading jobs that continuously monitor a source and stream data from the source.
-
Instance jobs: Loading jobs that batch load from a source. Instance jobs are of a fixed length and shorter-term than continuous loads.
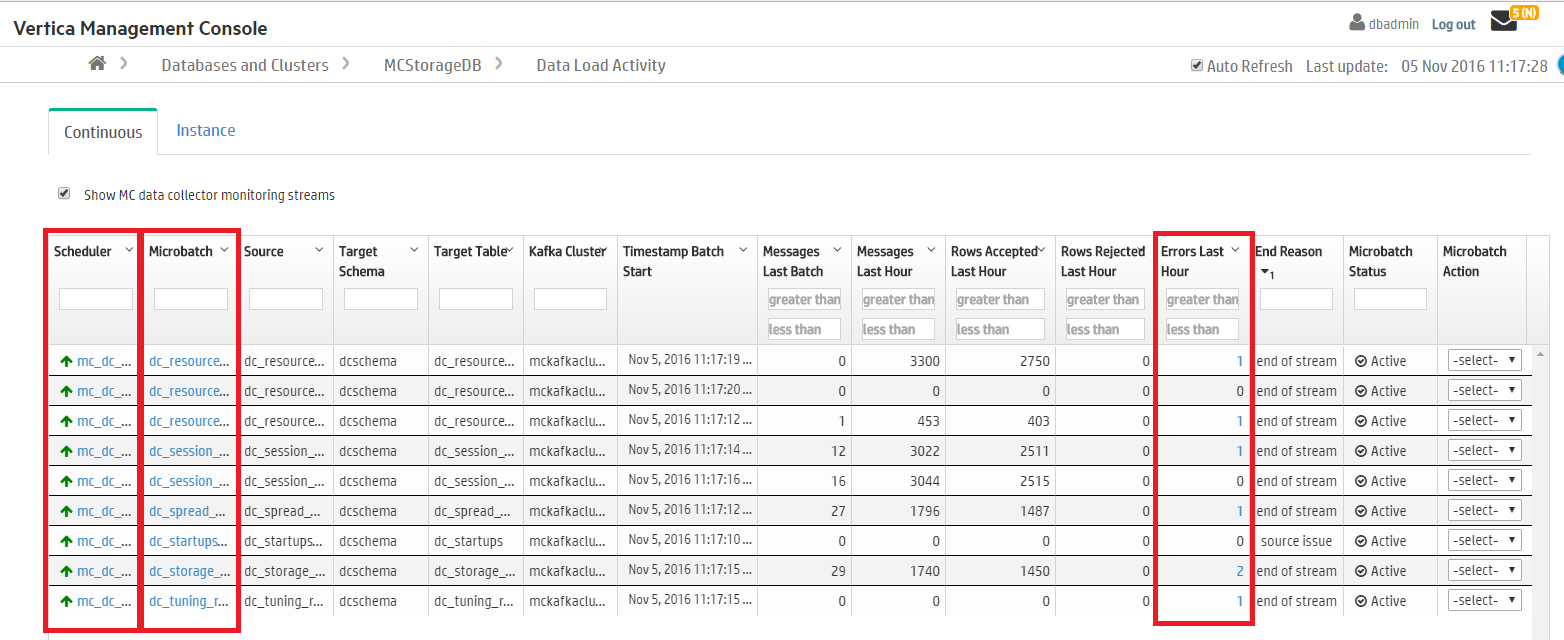
View continuous loads
The Continuous tab on the Data Load Activity page displays history of your database’s continuous loading jobs. For example, you can see loading jobs you create using the Vertica integration with Kafka (see Apache Kafka integration). Additionally, if you enable the MC extended monitoring feature, the Continuous tab displays the continuous jobs that stream data from your monitored database to a storage database. (See Extended monitoring for more on how MC can use Kafka to monitor databases externally.)
Use the Continuous tab to view details about continuous jobs, such as their source, target tables, and other microbatch configuration details.
If extended monitoring is enabled, jobs streaming to the MC storage database show mc_dc_kafka_config as the scheduler name. Deselect Show MC data collector monitoring streams at the top of the tab to remove these jobs from the display.
In the Continuous tab, click the labels in the Scheduler, Microbatch, and Errors Last Hour to view additional details about those loading jobs.
For more on continuous data streaming terminology, see Data streaming integration terms.
View load instances
In the Instance tab, you can see a history of your database's one-time loading jobs. For example, you can view instance jobs you created using the COPY command in vsql (see COPY), or instance jobs you created in MC to copy data from an Amazon S3 bucket. (For more about initiating loading jobs in MC, see Loading data from Amazon S3 using MC.)
In the Instance tab, click the labels in the Status column and Rejected Rows column to view more details about completed jobs. For more about rejected rows, see Handling messy data.
The number of load history results on the Instance tab depends on the Data collector retention policy for Requests Issued and Requests Completed. To change the retention policy, see Configuring data retention policies.
See also
3 - Microsoft Azure in MC
Management Console (MC) supports both Eon Mode and Enterprise Mode clusters on Microsoft Azure as described in the following table:.
Management Console (MC) supports both Eon Mode and Enterprise Mode clusters on Microsoft Azure as described in the following table:
|
Architecture |
Description |
|
Eon Mode |
Deploy an MC instance, and then provision and create an Eon Mode database from the MC. For more details, see the following:
|
|
Enterprise Mode |
Deploy a four-node database comprised of one MC instance and three database nodes. In Enterprise Mode, the database uses the MC primarily as a monitoring tool. For example, you cannot provision and create a database with an Enterprise Mode MC.
For information about creating and managing an Enterprise Mode database, see Create a database using administration tools.
|
For additional details, see Vertica on Microsoft Azure.
Provision and monitor clusters
You can use MC to provision an Eon Mode database cluster on Azure. For details, see Creating an Eon Mode cluster and database in Azure in MC.
MC provides specific resources for monitoring database clusters on Azure. For details, see Managing an Eon Mode database in the cloud.
You can revive a stopped Eon Mode database on Azure using MC. For details, see Reviving an Eon Mode database on Azure in MC.
Managing your cluster in MC
-
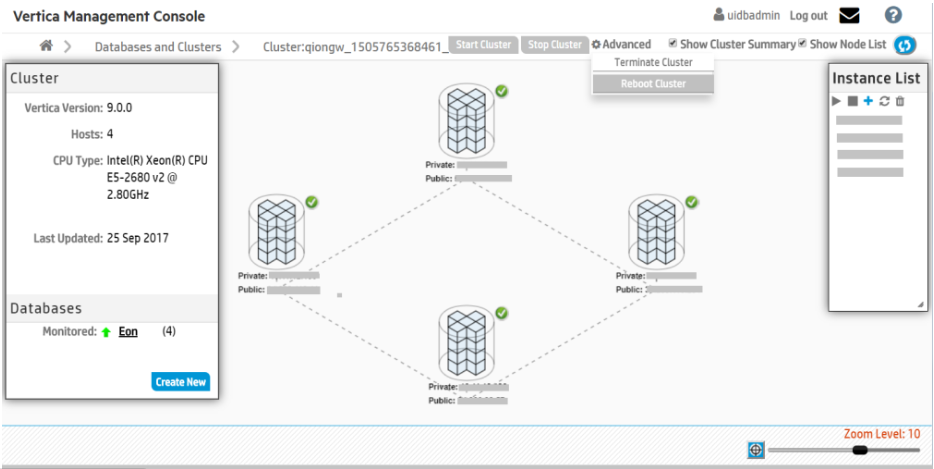
On the MC home page, click View Infrastructure. MC displays the Database and Cluster View. This view shows your infrastructure platform, cluster, and database.
-
On the left side of the screen next to Clusters, click the square for the cluster you want to manage. MC displays a window with your cluster name, an information summary, and several buttons.
-
Click Manage. The Cluster page displays.
-
On the Cluster page, you can view the following information:
-
The instances in your cluster in visual format.
-
The status of each instance, whether it is running.
-
The private and public IP address for each cluster instance.
-
The Vertica version that is running, your region, and your instance type in the Cluster pane.
Cluster actions on Azure in MC
On the Cluster page, you can perform the following cluster actions:
-
Start Cluster: Starts the instances, then starts the database. For Eon Mode databases, MC repopulates the nodes with data from the storage account container.
-
Stop Cluster: Stops the nodes in the database, then stops their cloud instances.
-
Advanced > Terminate: Stops the database, then terminates the cloud instances.
Subcluster management
You can add, Scale Up, Scale Down, remove, and terminate subclusters with MC. For details, see the following:
Node management
You add or delete nodes by scaling subclusters up or down. You can also start, stop, and restart nodes. For details, see the following:
Restrictions
You cannot revive an Eon Mode database with the MC.
3.1 - Creating an Eon Mode cluster and database in Azure in MC
After you deploy a Management Console instance on Azure, you can provision a cluster and create an Eon Mode database.
After you deploy a Management Console instance on Azure, you can provision a cluster and create an Eon Mode database.
Prerequisites
Before you begin, complete or obtain the following:
Creating the database
Complete the following steps from the Management Console:
-
Log in to the Vertica Management Console.
-
On the Management Console home page, select Create new database.
-
On Vertica License, select one of the following license mode options:
-
Community Edition: A free Vertica license to preview Vertica functionality. This license provides limited features. If you use a Community Edition license for your deployment, you can upgrade the license later to expand your cluster load. See Managing licenses form more information.
-
Premium Edition: Use your Vertica license. After you select this option, click Browse to locate and upload your Vertica license key file, or manually enter it in the field.
-
Click Next. On Azure Environment, supply the following information:
-
SSH Public Key: Paste the same public key used when you deployed the MC instance in the Azure Marketplace.
-
Azure Subnet: The subnet for your cluster. Select the same subnet used when you deployed the MC instance in the Azure Marketplace. If your organization requires multiple subnets for security purposes, see the Azure documentation for additional information.
-
CIDR Range: The range of IP addresses for client and SSH access. Azure requires that the last octet is 0 and the prefix is 24. For example, 10.20.30.0/24.
-
Node IP Setting: Choose Public IP - Dynamic, Public IP - Static, or Private IP. For details, see the Azure documentation.
-
Communal Storage URL: The path to a new subfolder in your existing Azure Blob storage account and container. The subfolder must not already exist.
-
Tag Azure Resources: Optional. Assign distinct, searchable metadata tags to the instances in this cluster. Many organizations use labels to organize, track responsibility, and assign costs for instances.
To add a tag, click the slider to the right to display the Tag Name and Tag Value fields. Click Add to create the tag. Added tags are displayed below the fields. Vertica recommends that you use lowercase characters in tag fields.
-
Click Next. Database Parameters accepts identifying information about your database and OS version:
-
Database Name: The name for your new database. See Creating a database name and password for database name requirements.
-
Administrator Username: The name of the database superuser.
-
Administrator Password: The password for the database administrator user account. For details, see Password guidelines.
-
Confirm Password: Reenter the Administrator Password.
-
Vertica Version: Select the desired Vertica database version. You can select from the latest hotfix of recent Vertica releases. For each database version, you can also select the operating system. For available OS and major version options, see Recommended Azure Operating Systems.
-
Load Sample Data: Optional. Click the slider to the right to preload your database with example clickstream data. This option is useful if you are testing features and want some preloaded data in the database to query.
-
Click Next. On Azure configuration, supply the following information:
-
Number of Nodes: The initial number of nodes for your database.
-
Number of Vertica Database Shards: Sets the number of shards in your database. Vertica suggests a number of shards automatically, based on your node count. After you set this value, you cannot change it later. The shard count must be greater than or equal to the maximum subcluster count. Be sure to allow for node growth. See Configuring your Vertica cluster for Eon Mode for recommendations.
-
Virtual machine (VM) size: The instance types used for the nodes. For a list of recommended instances, see Recommended Azure VM types and operating systems.
-
Local Storage per Node: Customize your cluster according to your storage needs. For the Vertica default settings for each supported instance, see Eon Mode volume configuration defaults for Azure.
-
Click Next. On Review, confirm your selections. Click Edit to return to a previous section and make changes.
-
When you are satisfied with your selections, click the I accept the terms and conditions checkbox.
-
Click Create Cluster to create a Eon Mode cluster on Azure.
After creating the database
After you create the database, click Get Started to view the Databases page. To view your database, select Manage and View Your Vertica Database to go to the database Overview.
You can also view your database from the Recent Databases section of the MC home page.
For additionalinformation about managing your cluster, instances, and database using Management Console, see Managing database clusters .
3.2 - Eon Mode volume configuration defaults for Azure
When you provision an Eon Mode database cluster, Management Console (MC) configures separate volumes for the depot, catalog, and temp directories.
When you provision an Eon Mode database cluster, Management Console (MC) configures separate volumes for the depot, catalog, and temp directories. The specific volumes and sizes that Management Console configures vary depending on the Azure instance type that you select when provisioning the cluster.
MC follows these rules when allocating resources for these directories for an Eon Mode database cluster:
-
Depot: Use Standard or Premium LRS to ensure the data is durable.
-
Catalog: Use Standard or Premium LRS to ensure the data is durable.
-
Temp: Allocate instance store if available with the selected instance type. Otherwise, allocate Standard or Premium LRS volumes.
If NVMe or Local SSD are displayed as volume types for an instance, there are no other choices. You must choose a different VM to change the volume type.
For details about each disk type, see the Azure documentation.
|
Instance Type |
Instance Storage |
Depot |
Catalog |
Temp |
|
E16ds v4 |
1 x 600GB |
Configurable 8 Data Disks/Managed Disk/Remote Storage
8 x 75 GB
Premium/Standard LRS
Default: Premium LRS
|
Data Disk
50 GB
Premium/Standard LRS - Durable
Default: Premium LRS
|
1 x 600GB
Temporary local SSD (ephemeral)
Display: "Local SSD"
|
|
E20ds v4 |
1 x 750 GB |
Data Disk
8 x 75 GB
|
Data Disk
50 GB
|
1 x 600GB
Temporary local SSD (ephemeral)
Display: "Local SSD"
|
|
E32ds v4 |
1 x 1200 GB |
Data Disk
8 x 75 GB
|
Data Disk
50 GB
|
1 x 600GB
Temporary local SSD (ephemeral)
Display: "Local SSD"
|
|
E48ds v4 |
1 x 1800 GB |
Data Disk
8 x 75 GB
|
Data Disk
50 GB
|
1 x 600GB
Temporary local SSD (ephemeral)
Display: "Local SSD"
|
|
E64ds v4 |
1 x 2400 GB |
Data Disk
8 x 75 GB
|
Data Disk
50 GB
|
1 x 600GB
Temporary local SSD (ephemeral)
Display: "Local SSD"
|
|
E80ids v4 |
1 x 2400 GB |
Data Disk
8 x 75 GB
|
Data Disk
50 GB
|
1 x 600GB
Temporary local SSD (ephemeral)
Display: "Local SSD"
|
|
E16s v4 |
Instance Store not supported |
Configurable 8 Data Disks
8 x 75 GB (user defined)
|
Data Disk
50 GB
|
Data Disks
1 x 300 GB (user-defined)
No less than 300 GB
Premium/Standard LRS - Durable
Default: Premium LRS 300GB
Min: 50 GB
Max: 10000 GB
Note
This instance type supports Remote storage only. Temp uses Data Disks.
|
|
E20s v4 |
Instance Store not supported |
Data Disk
8 x 75 GB
|
Data Disk
50 GB
|
Data Disks
1 x 300 GB (user-defined)
No less than 300 GB
Premium/Standard LRS - Durable
Default: Premium LRS 300GB
Min: 50 GB
Max: 10000 GB
|
|
E32s v4 |
Instance Store not supported |
Data Disk
8 x 75 GB
|
Data Disk
50 GB
|
Data Disks
1 x 300 GB (user-defined)
No less than 300 GB
Premium/Standard LRS - Durable
Default: Premium LRS 300GB
Min: 50 GB
Max: 10000 GB
|
|
E48s v4 |
Instance Store not supported |
Data Disk
8 x 75 GB
|
Data Disk
50 GB
|
Data Disks
1 x 300 GB (user-defined)
No less than 300 GB
Premium/Standard LRS - Durable
Default: Premium LRS 300GB
Min: 50 GB
Max: 10000 GB
|
|
E64s v4 |
Instance Store not supported |
Data Disk
8 x 75 GB
|
Data Disk
50 GB
|
Data Disks
1 x 300 GB (user-defined)
No less than 300 GB
Premium/Standard LRS - Durable
Default: Premium LRS 300GB
Min: 50 GB
Max: 10000 GB
|
|
E80s v4
Note
You cannot use this type to revive an Eon Mode database.
|
Instance Store not supported |
Data Disk
8 x 75 GB
|
Data Disk
50 GB
|
Data Disks
1 x 300 GB (user-defined)
No less than 300 GB
Premium/Standard LRS - Durable
Default: Premium LRS 300GB
Min: 50 GB
Max: 10000 GB
|
|
E16s v3 |
1 x 256 GB |
Data Disk
8 x 75 GB
|
Data Disk
50 GB
|
1 x 256 GB
Use Temporary local SSD
(instance store is ephemeral)
|
|
E20s v3 |
1 x 320 GB |
Data Disk
8 x 75 GB
|
Data Disk
50 GB
|
1 x 320 GB
Use Temporary local SSD
(instance store is ephemeral)
|
|
E32s v3 |
1 x 512 GB |
Data Disk
8 x 75 GB
|
Data Disk
50 GB
|
1 x 512 GB
Use Temporary local SSD
(instance store is ephemeral)
|
|
E48s v3 |
1 x 768 GB |
Data Disk
8 x 75 GB
|
Data Disk
50 GB
|
1 x 768 GB
Use Temporary local SSD
(instance store is ephemeral)
|
|
E64s v3 |
1 x 864 GB |
Data Disk
8 x 75 GB
|
Data Disk
50 GB
|
1 x 864 GB
Use Temporary local SSD
(instance store is ephemeral)
|
|
E64is v3
Note
You cannot use this type to revive an Eon Mode database.
|
1 x 864 GB |
Data Disk
8 x 75 GB
|
Data Disk
50 GB
|
1 x 864 GB
Use Temporary local SSD
(instance store is ephemeral)
|
3.3 - Reviving an Eon Mode database on Azure in MC
An
Eon Mode database keeps an up-to-date version of its data and metadata in its communal storage location. After a cluster hosting an Eon Mode database is terminated, this data and metadata continue to reside in communal storage. When you revive the database later, Vertica uses the data in this location to restore the database in the same state on a newly provisioned cluster.
Many of the fields in the revive workflow are populated with information provided during provisioning. For details about fields with existing values, see Creating an Eon Mode cluster and database in Azure in MC.
The following steps revive an Eon Mode database on Azure:
-
On the MC home page, select Revive Eon Mode database.
-
On Specify cluster access preferences, supply the following information:
-
Azure Subnet: The subnet for your cluster. Select the same subnet used when you deployed the MC instance in the Azure Marketplace. If your organization requires multiple subnets for security purposes, see the Azure documentation for additional information.
-
SSH Public Key: Paste the same public key used when you deployed the MC instance in the Azure Marketplace.
-
CIDR Range: The range of IP addresses for client and SSH access.
-
Select Next. On Specify Azure AZB path for Communal Storage of database, you can enter a parent directory to list all available Eon Mode databases within that directory:
-
Enter the directory name. At minimum, you must provide the account and container name, and optionally subfolder names in the following format:
azb://storage-account/container[/subfolder-name/...]
-
Select Discover. The MC lists all available Eon Mode databases within the container or subfolder.
-
Select the database that you want to revive from the list.
-
Select Next. On Enter revive database configurations, supply the following information:
-
Revive to Vertica Version: Lists the currently available Vertica versions. If you select a version that is later than the version that you used to provision the database, the MC upgrades the database version automatically.
-
Password: The password for the database superuser.
-
Confirm Password: Reenter Password.
-
Select Next. On Specify cloud instance and depot data storage, supply the following information about the depot:
-
Virtual Machine (VM) Size: The machine types used for the nodes. For recommended machine types, see the memory optimized machine types in Recommended Azure VM types and operating systems.
-
Managed Disk Volume Type: Available for Azure managed disks only. For details about each disk type, see the Azure documentation.
-
Managed Disk Volume Size (GB) per Volume per Available Node: Volume size for each node. This value is populated with the volume configuration defaults for the associated instance type.
-
Node IP Setting: Choose Public IP - Dynamic, Public IP - Static, or Private IP. For details, see the Azure documentation.
-
Select Next. On Specify additional storage and tag info, supply the following information:
-
Managed Volume Type: Available only for Azure managed disks. For details about each disk type, see the Azure documentation.
-
For the catalog and temp paths, provide the following information:
-
Managed Disk Volume Type: Available only for Azure managed disks. For details about each disk type, see the Azure documentation.
-
Managed Disk Volume Size (GB) per Available Node: Volume size for each node. This value is populated with the volume configuration defaults for the associated VM type.
-
Tag Azure Resources: Optional. Assign distinct, searchable metadata tags to the instances in this cluster. Many organizations use labels to organize, track responsibility, and assign costs for instances.
To add a tag, select the checkbox to make the Tag Name and Tag Value available. Click Add to create the tag. Tags are displayed below the fields. Vertica recommends that you use lowercase characters in tag fields.
-
Select Next. On Review revive information, confirm your selections. Select Back to return to a previous section and make changes.
-
When you are satisfied with your selections, select the Accept terms and conditions checkbox.
-
Select Revive Database to revive the Eon Mode database on Azure.
For details about database clusters in Management Console, see Managing database clusters.
4 - Google Cloud Platform in MC
Management Console (MC) supports cluster, subcluster, and node actions on Google Cloud Platform (GCP).
Management Console (MC) supports cluster, subcluster, and node actions on Google Cloud Platform (GCP).
Provision, monitor, and revive clusters
You can use MC to provision an Eon Mode database cluster on GCP. For details, see Provision an Eon Mode cluster and database on GCP in MC.
MC provides specific resources for monitoring database clusters on GCP. For details, see Managing an Eon Mode database in the cloud.
You can revive a stopped Eon Mode database on GCP using MC. For details, see Reviving an Eon Mode database on GCP in MC.
Managing your cluster in MC
-
On the MC home page, click View Infrastructure. MC displays the Database and Cluster View. This view shows your infrastructure platform, cluster, and database.
-
On the left side of the screen next to Clusters, click the square for the cluster you want to manage. MC displays a window with your cluster name, an information summary, and several buttons.
-
Click Manage. The Cluster page displays.
-
On the Cluster page, you can view the following information:
-
The instances in your cluster in visual format.
-
The status of each instance, whether it is running.
-
The private and public IP address for each cluster instance.
-
The Vertica version that is running, your region, and your instance type in the Cluster pane.
Cluster actions on GCP in MC
On the Cluster page, you can perform the following cluster actions:
-
Start Cluster: Starts the instances, then starts the database. For Eon Mode databases, MC repopulates the nodes with data from the storage account container.
-
Stop Cluster: Stops the nodes in the database, then stops their cloud instances.
-
Advanced > Terminate: Stops the database, then terminates the cloud instances.
Note
If a GCP instance has a local SSD attached, Google does not allow you to stop the instance. If you do shut down an instance with a local SSD through the guest operating system, you will not be able to restart the instance, and the data on the local SSD will be lost.
Subcluster management
You can add, Scale Up, Scale Down, remove, and terminate subclusters with MC. For details, see the following:
Node management
You add or delete nodes by scaling subclusters up or down. You can also start, stop, and restart nodes. For details, see the following:
Restrictions
-
Subclusters are supported in Eon Mode only, not in Enterprise Mode.
-
Node actions are not supported in MC on GCP.
See also
Vertica on Google Cloud Platform
4.1 - GCP Eon Mode instance recommendations
When you use the MC to deploy an Eon Mode database to the Google Cloud Platform (GCP), you choose the instance type to deploy as the database's nodes.
When you use the MC to deploy an Eon Mode database to the Google Cloud Platform (GCP), you choose the instance type to deploy as the database's nodes. The default instance settings in the MC are the more conservative option (currently, n1-standard-16). They are sufficient for most workloads. However, you may choose instances with more memory (such as n1-highmem-16) if your queries perform complex joins that may otherwise spill to disk. You can also choose instances with more cores (such as n1-standard-32), if you perform highly-complex compute-intensive analysis. The following links provide additional information about GCP machine type instances and Vertica:
The more powerful instance you choose, the higher the cost per hour. You need to balance whether you want to use fewer, higher-powered but more expensive instances vs. relying on more lower-powered instances that cost less. Thanks to Eon Mode's elasticity, if you choose to use the less-powerful instances, you can always add more nodes to meet peak demands. When you reduce the number of instances to a minimum during off-peak times, you'll spend less than if you had a similar number of more-powerful instances.
Storage options
The MC's deployment wizard also asks you to select the type of local storage for your instances. You can select different options for each type of local storage that Vertica uses: the catalog, the depot, and temporary space. For all of these storage locations, you choose the type of disks to use (standard vs. SSD). You will see the best performance with SSD disks. However, SSD disks cost more.
For the depot, you also choose whether to use local or persistent disks. The local option is faster, as it resides directly on the virtual machine host. However, whenever you shut down the node, this storage is wiped clean. The persistent storage is slower than the local option, as it is not stored directly on the machine hosting the instance. However, it is not wiped out whenever you shut down the instance. See the Google Cloud documentation's Storage options page for more information.
Which of these options you choose depends on how much depot warming the nodes must perform when starting. If the content of your node's depots change little over time (or you tend to frequently start and stop instances), using persistent storage makes sense. In this case, the depot's warming period will be shorter because most of the data the node needs to participate in queries may still be in its depot when it starts. It will perform fewer fetches of data from communal storage while participating in queries.
If your working data set is rapidly changing or you tend to leave nodes stopped for extended periods of time, your best choice is usually to use local storage. In this scenario, the data in the node's depot when it restarts is usually stale. To participate in queries, the node must fetch much of the data it needs from communal storage, resulting in slower performance until it has warmed its depot. Using local ephemeral storage makes sense here, because you will get the benefit of having faster depot storage. Because your nodes have to warm their depots anyhow, there is less of a downside of having the depot on ephemeral storage.
For general guidelines on scaling your cluster for Eon Mode database, see Configuring your Vertica cluster for Eon Mode.
4.2 - Custom GCP image
Vertica publishes a Google Cloud Platform (GCP) image that contains third-party libraries and other software that is required to install and operate the Management Console (MC) instance and Vertica database cluster instances. In some circumstances, you might need to add customizations to your MC environment, such as monitoring or security updates.
You cannot modify the published Vertica image directly, but you can create a custom image from the published image with your customizations. You can select this custom image when you create or revive a cluster.
Prerequisites
GCP account with administrative rights.
Create a custom GCP image
To create a custom GCP image, you must launch a base Virtual Machine (VM) instance from the published Vertica image so that you can make your changes. After you create this base instance, you can save it as a custom image.
Create the base instance
To begin, you must create an instance that includes the published Vertica image. This is a temporary instance that you can delete after you create the custom image:
- Log in to GCP.
- From the GCP console, go to Compute Engine.
- In the side navigation bar, go to Storage > Images.
- Filter the images table for the published Vertica image that you want to use in the base instance. For example, filter for
vertica-23-4-0 to customize the 23.4.0-x image.
- Copy the name of the published Vertica image and save it for later use.
- Go to Virtual machines > VM instances in the side navigation bar.
- Select CREATE INSTANCE.
- Enter a name for your instance.
- Select a region.
- Scroll down to Boot disk, and select CHANGE.
- In the Boot disk window, select the CUSTOM IMAGES tab.
- In the image field, paste the name of the published Vertica image to filter the image list.
- Select SELECT. The Boot disk window closes and you return to Create an instance.
- Select CREATE to create the base instance.
After you select CREATE, you return to Virtual machines > VM instances in Compute Engine. When GCP finishes creating the base instance, you have a running instance that you can access and customize.
Customize the base instance
Note
This section requires access to a separate machine and its public SSH key so you can connect to the base instance and install customizations. You cannot customize the base instance with SSH on the GCP portal or gcloud compute SSH.
To generate a public and private keypair, use the ssh-keygen command, and answer the prompts:
      $ ssh-keygen -t rsa -b 4096 -C gcpAdminUsername
Generating public/private rsa key pair.
Enter file in which to save the key: /path/to/gcp_custom_keys
...
Your public key has been saved in /path/to/gcp_custom_keys.pub
...
The preceding ssh-keygen command includes the following options:
t: Type of key to create. This example creates a key with the rsa algorithm.b: Number of bits in the key. This example creates a key with 4096 bits.C: Adds a comment to help identify the key. Specify your GCP administrator username with this option. If you do not use this option, the command generates the comment as user@hostname, and you must manually remove the @hostname portion.
After you create the base instance, add the contents of your public key to the instance so you can SSH into the machine to add customizations or configurations:
- In Virtual machines > VM instances, filter for the base instance.
- Select the instance name. The instance Details tab displays.
- Select EDIT in the top menu.
- In Security and access > SSH Keys, select ADD ITEM.
- In the SSH key 1 * field, paste the contents of the public SSH key that you just created.
Important
If you use public key with the default comment format, do not include the @hostname portion of the comment. The key that you paste into SSH key 1 * must end with username.
- Select SAVE.
- Return to the VM instances window, go to the Network interfaces section and retrieve the External IP address for the base instance.
- Remotely log in to the base instance with the user string from the public key. The
-i option uses the local machine's private key for authentication:
$ ssh -i path/to/.ssh/private-key username@baseInstanceExternalIPAddress
- Add custom configurations to the base instance environment.
Now, the base instance includes the published Vertica base image, and any custom configurations.
Create the custom image
After you customize the base instance, you can create a new image that includes the published Vertica base image and your customizations:
- On Virtual Machines > VM instances, select the base instance and select STOP.
- After the instance stops, select the instance name in the list. The image DETAILS tab displays.
- Scroll to the Boot disk section. In the Name column, select the instance name.
- In the top navigation bar, select CREATE IMAGE. The Create an image page displays.
- In the Name field, enter a name for the instance. You must use the following naming convention, or the MC cannot identity the image when you create or revive a cluster:
vertica-major-minor-servicepack-hotfix-imageName
For example, the following name uses Vertica version 12, minor release 0, service pack 0, hotfix zero:
vertica-12-0-0-0-customImageName
- Verify that Source disk lists the base instance name.
- Select CREATE.
- Record the name of the image that you just created so you can enter it in the MC.
After GCP creates the image, you have a custom image that includes the published Vertica base image, and any environment customizations. This custom image is available in the current GCP project.
If you no longer need the customized base instance, you can delete it from your GCP VM instances.
Select the custom image in MC
Important
This section requires that you enter the custom image name in the MC. To retrieve the name, log in to the GCP portal and go to Compute Engine > Storage > Images.
After you create the custom image in GCP, return to the MC and use the custom image in a workflow:
- Log into the MC and begin one of the following workflows:
- Create database cluster
- Revive cluster
- On the wizard page Enter Vertica database name and login credentials, select the Use Custom Image box.
- In Custom Image Name, enter the custom image name. For example,
vertica-23-4-0-0-customImageName.
- Complete the create or revive workflow.
After you complete the workflow, any new or revived Vertica database cluster instances run the custom image. If you scale a new or revived cluster, the added instances use the same custom image.
4.3 - Provision an Eon Mode cluster and database on GCP in MC
You can use Google Marketplace and MC to provision an Eon Mode database on GCP.
You can use Google Marketplace and MC to provision an Eon Mode database on GCP. The sections below give an overview of how to set up an Eon Mode database on GCP, with links to the detailed procedures
Prerequisites
Step 1: provision an MC instance using Google marketplace
These steps are an overview of the procedure. For more detailed instructions, see Deploy an MC instance in GCP for Eon Mode.
In Google Marketplace:
-
Select the Vertica Eon Mode solution.
-
Fill in the fields to configure a GCP MC instance.
-
Click the Deploy button to provision the MC instance.
-
Connect to and log into the MC instance.
You are now in the new MC instance running on GCP, and the MC home page appears.
Step 2: use the MC instance to provision an Eon Mode database on GCP
To use the MC to provision and deploy a new Eon Mode database on GCP:
-
From the MC home screen, click Create new database to launch the Create a Vertica Cluster on Google Cloud wizard.
-
On the first page of the wizard enter the following information:
-
Google Cloud Storage HMAC Access Key and HMAC Secret Key: Copy and paste the HMAC access key and secret you created earlier. You find these values on the Interoperability tab of the of the Storage Settings page. See Eon Mode on GCP prerequisites for details.
-
Zone: This value defaults to the zone containing your MC instance. Make this value is the same as the zone containing the Google Cloud Storage bucket that your database will use for communal storage.
-
Caution
You will see significant performance issues if you choose different zones for cluster instances, storage, or the MC.
-
CIDR Range: The IP address range for clients to whom you want to grant access to your database. Make this range as restrictive as possible to limit access to your database.
-
Click Next, and supply the following information:
-
Vertica Database Name: the name for your new database. See Creating a database name and password for database name requirements.
-
Vertica Version: select the desired Vertica database version. You can select from the latest hotfix of recent Vertica releases. For each database version, you can also select the operating system.
-
Vertica Database User Name: the name of the database superuser. This name defaults to dbadmin, but you can enter another user name here.
For details about using a custom GCP instance, see Custom GCP image.
-
Password and Confirm Password: Enter a password for the database superuser account.
-
Database Size: The number of nodes in your initial database. If you specify more than three nodes here, you must supply a valid Vertica license file in the Vertica License field (below).
-
Vertica License: Click Browse to locate and upload your Vertica license key file. If you do not supply a license key file here, the wizard deploys your database with a Vertica Community Edition license. This license has a three node limit, so the value in the Database Size filed cannot be larger than 3 if you do not supply a license. If you use a Community Edition license for your deployment, you can upgrade the license later to expand your cluster load more than 1TB of data. See Managing licenses form more information.
Note
This field does not appear if you created your MC instance using a by-the-hour (BTH) launcher. The BTH license is automatically applied to all clusters you create using a BTH MC instance. For a by-the-hour license, cloud vendors charge the customer for licensed Vertica usage along with their cloud infrastructure charges.
-
Load example data: Check this box if you want your deployed database to load some example clickstream data. This option is useful if you are testing features and just want some preloaded data in the database to query.
-
Click Next and supply the following information:
-
Instance Type: the specifications of the virtual machine instances the MC will use to deploy your database nodes. See the Google Cloud documentation's Machine types page for details of each instance type. Also see GCP Eon Mode instance recommendations.
-
Database Depot Path and Disk Type: the local mount point for the depot, and the type and number of local disks dedicated to the depot for each node. You cannot change the mount path for the depot. The disks you select in the Disk Type field are only used to store the depot. On the next page of the wizard, you will configure disks for the catalog and temporary disk space. You will see the best performance when using SSD disks, although at a higher cost. You can choose to use faster local storage for your depot. However, local storage is ephemeral—GCP wipes the disk clean whenever you stop the instance. This means each time you start a node, it will have to warm its depot from scratch, rather than taking advantage of any still-current data in its depot. See the Google Cloud documentation's Storage options page for more information about the local disk options.
-
Volume Size: the amount of disk space available on each disk attached to each node in your cluster. This field shows you the total disk space available per node in your cluster. For the best practices on choosing the amount of disk space for your nodes, see Configuring your Vertica cluster for Eon Mode.
-
Data Segmentation Shards: sets the number of shards in your database. After you set this value, you cannot change it later. See Configuring your Vertica cluster for Eon Mode for recommendations. The default value is based on the number of nodes you entered in the Database size you specified earlier. It is usually sufficient, unless you anticipate greatly expanding your cluster beyond your initial node count.
-
Communal Location: a Google Cloud Storage URL that specifies where to store your database's communal data.
The storage bucket must use the Standard storage class. See Eon Mode on GCP prerequisites for additional requirements.
-
Instance IP settings: specify whether the nodes in your database will have static or ephemeral network addresses that are accessible from the internet, or addresses that are only accessible from within the internal virtual network.
-
Click Next. The wizard validates your communal storage location URL. If there is an problem with the URL you entered, it displays an error message and prompts you to fix the URL.
After your communal storage URL passes validation, fill in the following information:
-
Database Catalog Path, Disk Type, and Size (GB) per Available Node: the mount point disk type, and disk size for the local copy of the database catalog on each node. You cannot edit the mount point. You choose the type of local disk to use for the catalog, and its size. You can only choose persistent disk storage for the catalog. SSD drives are faster, but more expensive than standard disks. The default setting for the disk size is adequate for most medium size databases. Increase the size if you anticipate maintaining a large database.
-
Database Temp Path, Disk Type, and Size (GB) per Available Node: the mount point disk type, and disk size for the temporary storage space on each node. You cannot edit the mount point. You choose the type of local disk to use, and its size. You can only choose persistent disk storage for the temporary disk space. SSD drives are faster, but more expensive than standard disks. The default setting is adequate for most databases. Consider increasing the temporary space if you perform many complex merges that spill to disk.
-
Label Instances: check this box to enable adding labels to your node's instances. Many organizations use labels to organize, track responsibility, and assign costs for instances. See the Google Cloud documentation's Labeling resources page for more information. If you choose to add labels, enter the label name and value, and click Add.
-
Click Next. Review the summary of all your database settings. If you need to make a correction, use the Back button to step back to previous pages of the wizard.
-
When you are satisfied with the database settings, check Accept terms and conditions and click Create.
The process of provisioning and creating the database takes several minutes. After it completes successfully, the MC displays a Get Started button. This button leads to a page of useful links for getting started with your new database.
See also
4.4 - Reviving an Eon Mode database on GCP in MC
An
Eon Mode database keeps an up-to-date version of its data and metadata in its communal storage location. After a cluster hosting an Eon Mode database is terminated, this data and metadata continue to reside in communal storage. When you revive the database later, Vertica uses the data in this location to restore the database in the same state on a newly provisioned cluster.
Follow these steps to revive an Eon Mode database on GCP:
-
On the MC home page, click Revive Eon Mode Database. MC launches the Provision and Revive an Eon Mode Database wizard.
-
On the first page of the wizard, enter the following information:
-
Google Cloud Storage HMAC Access Key and HMAC Secret Key: Copy and paste the HMAC access key and secret you created when you created the database. See Eon Mode on GCP prerequisites for details.
-
Zone: This value defaults to the zone containing your MC instance. Make this value the same as zone containing the Google Cloud Storage bucket your database will use for communal storage. You will see significant performance issues if you choose different zones for cluster instances, storage, or the MC.
-
CIDR Range: The IP address range for clients you want to grant access to your database. Make this range as restrictive as possible to limit the exposure of your database.
-
Click Next. On the second page of the wizard, set Google Storage Path for Communal Storage of Database to the URL of the communal storage bucket for the Eon Mode database to revive. For requirements, see Eon Mode on GCP prerequisites.
-
Click Discover. MC displays a list of all Eon Mode databases available on the specified communal storage location.
-
Select the database to revive. MC prepopulates the choices for the Data, Depot, and Temp catalogs, using the same machine types and configuration choices used when the database was created.
-
Click Next. Review the summary of all your database settings. If you need to make a correction, use the Back button to step back to previous pages of the wizard.
-
When you are satisfied with the database settings, check the Accept terms and conditions box and click Revive Database.
MC displays a progress screen while creating the cluster and reviving the database onto it, a process which takes several minutes. After it completes successfully, the MC displays a Get Started button. This button leads to a page of useful links for getting started with your new database.
4.5 - Eon Mode volume configuration defaults for GCP
Vertica supports a variety of disk volume resources for provisioning instances on Google Cloud Platform (GCP).
Vertica supports a variety of disk volume resources for provisioning instances on Google Cloud Platform (GCP).
All data is secured with Google-managed data encryption. Management Console does not support user-managed data encryption.
For performance information, see Google's Block storage performance documentation.
Persistent disk defaults
You can allocate up to 128 persistent disks (PDs). The following table describes the default persistent disk volume resources that Vertica provides:
|
Instance Types |
Catalog |
Depot |
Temp |
|
n1-standard/highmem-16
n1-standard/highmem-32
n1-standard/highmem-64
n2-standard/highmem-16
n2-standard/highmem-32
n2-standard/highmem-48
n2-standard/highmem-64
|
Configurable 1 PD (Standard/SSD) volume
Default: 50 GB
|
Configurable 8 PD (Standard/SSD) volume
Default: 600 GB
|
Configurable 1 PD (Standard/SSD) volume
Default: 100 GB
|
Local SSD defaults (ephemeral storage)
Allocate up to 24 local SSDs for ephemeral storage with the following considerations:
-
There is an extra cost for each local SSD.
-
All local SSD are 375G fixed size, with the option of SCSI or NVMe interface. An NVMe disk has twice the input/output operations per second (IOPs) compared to a SCSI disk.
Important
When the local SSD is in use, you cannot stop or start the instance or a cluster containing local SSD instances. If you do shut down an instance with a local SSD through the guest operating system, you will not be able to restart the instance and the data on the local SSD will be lost.
For details, see Google's Adding Local SSDs page.
The following table describes the default local SSD disk volume resources that Vertica provides:
|
Total Local SSDs |
Instance Types |
Catalog (Persistent) |
Depot (Ephemeral) |
Temp (Ephemeral) |
|
4 |
n1-standard/highmem-16
n1-standard/highmem-32
n1-standard/highmem-64
n2-standard/highmem-16
n2-standard/highmem-32
|
Configurable 1 PD (Standard/SSD) volume
Default: 50 GB
|
3 x 375 GB |
1 x 375 GB |
|
5 |
n1-standard/highmem-16
n1-standard/highmem-32
n1-standard/highmem-64
|
Configurable 1 PD (Standard/SSD) volume
Default: 50 GB
|
4 x 375 GB |
1 x 375 GB |
|
6 |
n1-standard/highmem-16
n1-standard/highmem-32
n1-standard/highmem-64
|
Configurable 1 PD (Standard/SSD) volume
Default: 50 GB
|
5 x 375 GB |
1 x 375 GB |
|
8 |
n1-standard/highmem-16
n1-standard/highmem-32
n1-standard/highmem-64
n2-standard/highmem-16
n2-standard/highmem-32
n2-standard/highmem-48
n2-standard/highmem-64
|
Configurable 1 PD (Standard/SSD) volume
Default: 50 GB
|
6 x 375 GB |
2 x 375 GB |
|
16 |
n1-standard/highmem-16
n1-standard/highmem-32
n1-standard/highmem-64
n2-standard/highmem-16
n2-standard/highmem-32
n2-standard/highmem-48
n2-standard/highmem-64
|
Configurable 1 PD (Standard/SSD) volume
Default: 50 GB
|
12 x 375 GB |
4 x 375 GB |
|
24 |
n1-standard/highmem-16
n1-standard/highmem-32
n1-standard/highmem-64
n2-standard/highmem-16
n2-standard/highmem-32
n2-standard/highmem-48
n2-standard/highmem-64
|
Configurable 1 PD (Standard/SSD) volume
Default: 50 GB
|
20 x 375 GB |
4 x 375 GB |