Get started with UC
UC is a database and data management platform that enables Vertica users to interact with and manage databases through a single interface. Only database administrators have access to UC.
UC UI tour
After logging in to MC and switching to UC, the home page appears. This page presents all accessible databases as interactive widgets. Both AI-enabled and non-AI-enabled databases are visible.
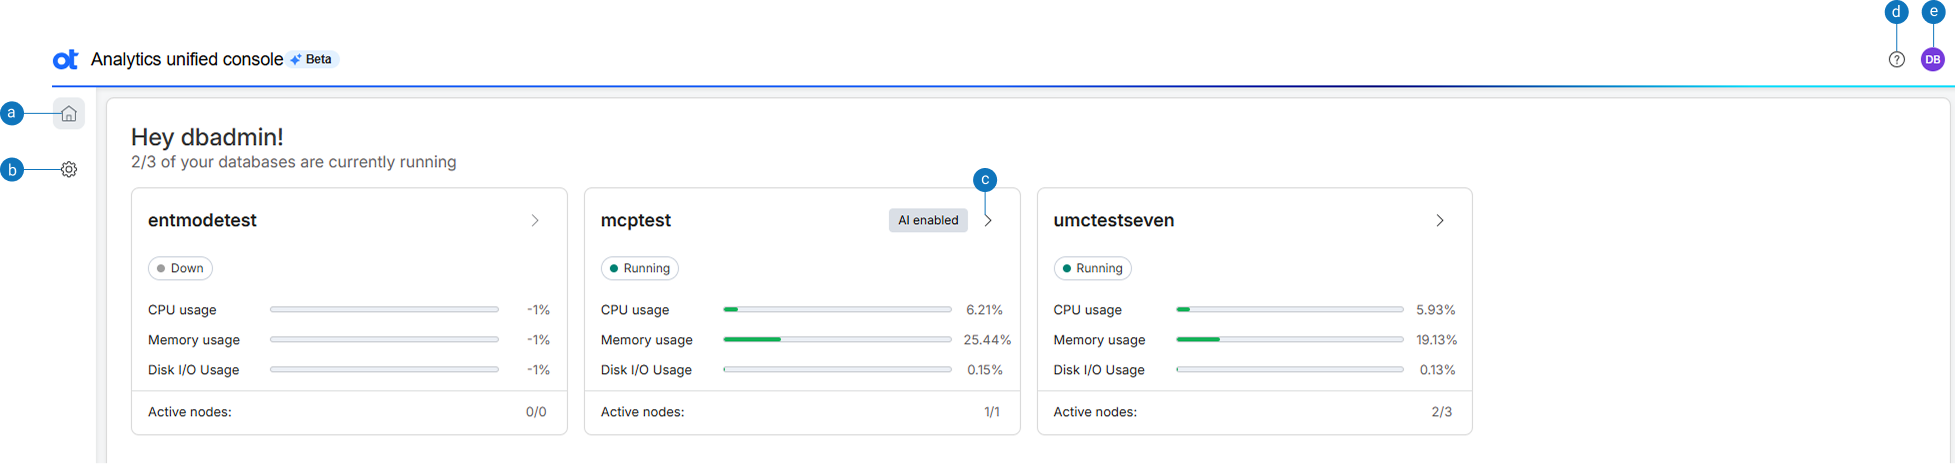
| Option | Description |
|---|---|
| a | Home: Displays the UC home page with database access options. |
| b | Settings: Displays the option to set AI preferences for the database. |
| c | >: Displays the SQL editor. |
| d | Help: Displays Unified console user documentation. |
| e | View profile: Displays the user profile along with options to switch and sign out of MC. |
Enable AI assistance
The Enable AI Assistance banner appears only when none of the available databases have AI enabled. You can enable AI functionality by configuring an AI model. Click Enable in the banner to enable AI assistance for a database. If at least one database in the system is AI enabled, this banner is not displayed.
Configure or edit AI preferences
You can configure or edit the default AI preferences.
- Login to UC.
- Choose AI preferences under Settings in the home page.
The AI preferences page opens and displays the following information:
- Host - The host name.
- Model - The large language model (LLM) that is used.
- Creator - The person who created the LLM.
- Enabled for - The database for which the LLM is enabled.
- Status - The current status of the LLM.
- Hover over ⋮ and select Edit. All the details of the LLM are displayed.
- From the Model provider list, choose the AI model provider that creates, trains, maintains, and hosts AI models. You can choose one among Anthropic, Google Gemini, Amazon Bedrock, or Others.
- From the Model name list, choose the specific LLM to use for inference.
- In the URL of the service hosting the model field, enter the root network address used to send requests to an AI service's API.
- In the Region field, choose the appropriate service region.
Note
This is applicable only if your LLM is Amazon Bedrock. - In the Secret access key field, enter the credential (secret key) required for secure authentication.
- In the API key field, enter the key used to authenticate API requests.
Note
If your LLM is Amazon Bedrock, enter the **Access Key Id**. Enter the **API key** only if you are using an LLM other than Amazon Bedrock. - In the Who should have access area, choose the required users depending on the role played by the user in the organization. For more information, see Configuration roles in MC.
- In the Which databases can access this area, choose the databases that can access the LLM. Note that only database versions 26.1 and above are supported.
- Click MCP status to configure the MCP token. For more information, see Configure the MCP client.
- Click Save.
Add a model
You can add a model from the default AI preferences.
- Login to UC.
- Choose AI preferences under Settings in the home page. The AI preferences page opens.
- Click +Add new model. Follow steps 4-13 in Configure or edit AI preferences.