1 - Install UC
Brief overview of UC installation
By default, UC is installed along with MC.
Pre-requisites
Before installing UC, note the following:
- Install cURL (Client URL) which is a powerful, free, and open-source command line tool used to transfer data to or from a server.
- Configure the MCP client.
Install UC
UC is installed along with MC. For information about installing MC, see Install MC.
Reinstall UC
To reinstall UC:
- Backup the configuration folder.
cp -r /opt/vconsole/uc/config/dbconfigs /tmp/uc_backup
- Reinstall UC. For information, see Install MC.
- After reinstallation completes, restore the configuration files from the backup.
cp -r /tmp/uc_backup/* /opt/vconsole/uc/config/dbconfigs/
Upgrade UC
Upgrade UC to version 26.3 from version 26.2:
- Stop the MC services.
sudo /opt/vconsole/shared/vertica-consoled stop
- Upgrade to UC 26.3.
sudo rpm -Uvh vertica-console-26.3.0-20260723.RHEL8.x86_64.rpm
- Stop the UC services.
sudo ./opt/vconsole/uc/scripts/services.sh stop
- Restart the UC services.
sudo ./opt/vconsole/uc/scripts/services.sh start
Troubleshooting installation issues
If you encounter any issues after installation, stop and restart the services:
./scripts/service.sh stop
./scripts/service.sh start
2 - Import the CA certificate
Information about importing the CA certificate.
A CA (Certificate Authority) certificate is a digital document issued by a trusted third-party organization that validates the identity of websites, individuals, or devices. It enables encrypted HTTPS connections by signing SSL/TLS certificates, ensuring that data transmitted online is secure, authentic, and protected from impersonation.
Import the CA certificate
To enable secure HTTPS communication, import the CA certificate into your browser. This section provides information about how you can import the CA certificate into supported browsers and use custom certificates.
Pre-requisites
- Access to the UC host
- CA certificates available in
/opt/vconsole/uc/certs
Certificate trust requirement
Import the internal CA certificate to your browser’s trusted certificate store /opt/vconsole/uc/certs/ca.crt.
Browser configuration
You can configure your web browser settings such as security, privacy, appearance, and performance to tailor the browsing experience, enhance security, or manage resource usage. For information about configuring different browsers, see:
To configure the Google chrome browser settings, do the following:
- Open the Google chrome browser.
- In the address bar, type
chrome://certificate-manager/.
- Choose Local certificates.
- Click the Manage imported certificates from Windows icon.
- Click the Trusted Root Certification Authorities tab.
- Click Import.
- Click Browse and select the security certificate.
- Click Next.
- Choose Place all certificates in the following store.
- Click Browse.
The Select certificate store dialog opens.
- Choose Trusted Root Certificate Authorities and click OK.
Import the certificate only into Trusted Root Certification Authorities. Failure to import the CA certificate to the correct certificate store results in browser trust errors.
- Click Next.
- Click Finish.
The CA certificate is successfully imported.
To configure the Microsoft edge browser settings, do the following:
- Open the Microsoft edge browser.
- In the address bar, type
edge://certificate-manager/.
- Choose Local certificates.
- Click the Manage imported certificates from Windows icon.
- Click the Trusted Root Certification Authorities tab.
- Click Import.
- Click Browse and select the security certificate.
- Click Next.
- Choose Place all certificates in the following store.
- Click Browse.
The Select certificate store dialog opens.
- Choose Trusted Root Certificate Authorities and click OK.
Import the certificate only into Trusted Root Certification Authorities. Failure to import the CA certificate to the correct certificate store results in browser trust errors.
- Click Next.
- Click Finish.
The CA certificate is successfully imported.
Custom certificates
You can replace the default CA certificate with your own.
CA certificate example
/opt/vconsole/uc/certs

ca.crt
ca.key

bff.crt
bff.key

metadata.crt
metadata.key

sqlexec.crt
sqlexec.key

auth.crt
auth.key

ai.crt
ai.key

aiassist.crt
aiassist.key

unified-console-ui.crt
unified-console-ui.key
Note
- All services rely on the same internal CA certificate
ca.crt.
- You need to establish browser trust only once per client machine.
- Generate the CA certificates through the command
generate-certs.sh.
- Allow inbound traffic on ports 5450, 8433, and 8090 only if you install both MC and UC in the ec2 instance.
4 - Configure the MCP client
Configuring the MCP client
This section provides information about how you can configure the MCP client to enable secure communication between Vertica AI Assist and the Vertica environment.
About the MCP client
The MCP client is a secure bridge that connects Vertica AI Assist to Vertica ensuring that database credentials are never exposed to the LLM. It provides:
- A secure, controlled interface between Vertica AI Assist and Vertica.
- Support for standardized database operations such as query execution, schema retrieval, and EXPLAIN plans.
- Authentication using JWT tokens, along with connection pooling and secure handling of user credentials.
Pre-requisites
Before configuring the MCP client, ensure that the MCP server is installed and configured. For information about installing and configuring the MCP server, see MCP server.
Configuring the MCP client enables Vertica AI Assist to securely access databases and perform operations such as natural language to SQL (NL2SQL) conversion, query optimization, and query explanation.
The configuration process establishes:
- Secure AI-driven database access
- Support for multiple database connections
- Schema-aware SQL generation
- Authenticated and auditable operations
After configuring the MCP serve, use the configuration script to supply the required connection details.
Configuration script
Configure the MCP client using the mcp_configure.sh script located in /opt/vconsole/uc/scripts. This script prompts for the required inputs and generates a YAML configuration file (a human-readable format for configuration data) in config/dbconfigs/. The MCP client uses this file to establish a connection with the MCP server for AI operations.
Gather the following information before you run the configuration script:
- JWT Token — Authentication token for the MCP server. Generate this token on the host where the MCP server is installed. For information about obtaining JWT tokens, see MCP server.
- MCP Server Hostname or IP address — The system on which the MCP server is running. Identify the host by checking the node that is running MCP.
- MCP Port — The port used by the MCP server. The default port is 8667.
- Cluster and Database Information — Obtain this information from the MC View infrastructure page:
- MC cluster name
- Vertica database name
Run the configuration script
- Navigate to the scripts directory.
cd /opt/vconsole/uc/scripts
Note
Run the configuration script only from this directory.
- Run the configuration script.
./mcp_configure.sh
The configuration script prompts you to enter the JWT token, MCP server hostname or IP address, MCP port, cluster, and database information.
- Do one of the following:
- Yes - The configuration script generates a configuration file named <cluster_name>_<db_name>_conf.yaml.
- No - The configuration script prompts you to re-enter the MCP configuration details.
- Exit - The configuration script exits without creating a configuration file.
Post configuration
After completing the configuration:
- Restart the AI service.
- Verify connectivity by checking the log file logs/ai.log.
- Look for the message
MCP connected.
View the MCP server status
To view the MCP server status:
- Choose AI preferences under Settings in the home page.
The AI preferences page opens and displays the following information:
- Host - The host name.
- Model - The large language model (LLM) that is used.
- Creator - The person who created the LLM.
- Enabled for - The database for which the LLM is enabled.
- Status - The current status of the LLM.
- Hover over ⋮ and select Edit. All the details of the LLM are displayed.
The MCP server status can be one of the following:
- Active - Indicates successful connection between the MCP server and the Vertica database.
- Inactive - Indicates when the connection could not be established due to errors. The MCP server might be inactive due to one of these reasons:
- Invalid Token
- Token Expired
- MCP Server is not active
- Not supported - Indicates that the Vertica database version is below 26.1, which is not supported by MCP.
Troubleshooting MCP server in inactive status
The MCP server can be in Inactive status due to one of the following issues:
- Missing or invalid configuration
The YAML configuration file may be missing or contain incorrect cluster or database details. Re-run the configuration script with correct values.
- Expired or invalid JWT token
The token may have expired or been entered incorrectly. Generate a new token on the host where the MCP server is installed and update the configuration.
- MCP server not running
Ensure that the MCP server is running. Restart the service if required.
This configuration ensures that Vertica AI Assist can securely interact with your database environment while maintaining enterprise-grade security, traceability, and performance.
5 - SQL Editor
This topic provides an introduction to the unified console.
Use the SQL editor to write, edit, and execute SQL statements within UC without using any external tools.
Key features
Use the SQL editor to:
- Execute analytical queries.
- Save and reuse queries.
- View query results and execution details.
- Validate query execution.
- Access schema information.
Working with SQL editor
After logging in to the UC application, the home page appears. To launch the SQL editor, select > in the database widget.
Create an SQL query
You create SQL queries:
-
Click + in the SQL editor.
The New query tab opens.
-
Enter your query in the SQL editor.
-
From the Run list, do one of the following:
- Select Run last query to run the SQL query that was last executed. This option is helpful when you have multiple SQL queries but need to run only the latest SQL query.
- Select Run from cursor to run an SQL query using a database cursor to manage and process the results of a statement one row at a time, rather than as a single set of data.
- Select Run selection to run only the selected SQL query. This option is helpful when you have multiple SQL queries but need to run only one SQL query.
-
Select the SQL query in the editor and click Format SQL to arrange and format the SQL query for better readability.
-
Select the SQL query in the editor and click Explain with AI.
This returns a formatted description of the database optimizer's plan for executing the specified statement. By default, the output represents the query plan as a hierarchy, where each level or path represents a single database operation that the optimizer uses to execute a query.
-
In the Enter query name field at the top, enter the name of the query.
-
To view the schema details of a table, select View Schema.
The table columns display along with the datatypes.
-
To save the SQL query results, do the following:
a. Select Export CSV.
b. Enter the file name and select Export.
You can export upto a maximum of 10 thousand records. To import data that exceeds 10 thousand records, modify the SQL query and export again.
Query plans
When you submit a query, the query optimizer quickly chooses the projections to use, optimizes and plans the query execution, and logs the SQL statement to its log. This planning results in an query plan, which maps out the steps the query performs.
A query plan is a sequence of step-like paths that the database cost-based query optimizer uses to execute queries. The database can produce different query plans for a given query. For each query plan, the query optimizer evaluates the data to be queried: number of rows, column statistics such as number of distinct values (cardinality), distribution of data across nodes. It also evaluates available resources such as CPUs and network topology, and other environment factors.
Query plan view options
There are the options for displaying query plans:
- Path information
- Profile analysis
- Drill down
- Tree view
In the SQL query results page, select Path information from the list at the bottom of the page. This view displays the query plan path. You can expand or collapse the view to see different levels of detail. For information about Explain-related query plans, see EXPLAIN-Generated query plans
For example, the following EXPLAIN output shows the path ID for each path in the optimizer's query plan:
=> EXPLAIN SELECT * FROM fact JOIN dim ON x=y JOIN ext on y=z;
Access Path:
+-JOIN MERGEJOIN(inputs presorted) [Cost: 815, Rows: 10K (NO STATISTICS)] (PATH ID: 1)
| Join Cond: (dim.y = ext.z)
| Materialize at Output: fact.x
| Execute on: All Nodes
| +-- Outer -> JOIN MERGEJOIN(inputs presorted) [Cost: 408, Rows: 10K (NO STATISTICS)] (PATH ID: 2)
| | Join Cond: (fact.x = dim.y)
| | Execute on: All Nodes
| | +-- Outer -> STORAGE ACCESS for fact [Cost: 202, Rows: 10K (NO STATISTICS)] (PATH ID: 3)
| | | Projection: public.fact_super
| | | Materialize: fact.x
| | | Execute on: All Nodes
| | +-- Inner -> STORAGE ACCESS for dim [Cost: 202, Rows: 10K (NO STATISTICS)] (PATH ID: 4)
| | | Projection: public.dim_super
| | | Materialize: dim.y
| | | Execute on: All Nodes
| +-- Inner -> STORAGE ACCESS for ext [Cost: 202, Rows: 10K (NO STATISTICS)] (PATH ID: 5)
| | Projection: public.ext_super
| | Materialize: ext.z
| | Execute on: All Nodes
In the Query results page, select Tree view from the list at the bottom of the page. The Tree Path view details the query plan in the form of a tree. The tree view does not contain any metrics because the query has not yet executed. The results appear in the form of a tree with a root and connected branches in the form of parent-child relationship.
Profile analysis data
In the Query results page, select Profile analysis from the list at the bottom of the page. After you profile an SQL query, the Explain page displays profile data and metrics in a pie chart. Hover over the slices on the pie chart or over the names of the phases to get additional information. You can see the approximate number of milliseconds (ms) and percentage used during each phase.
Profile metrics
After running an SQL query, in the Query results page, select Path information from the list at the bottom of the page. In the Path Information view, the area to the right of each query path contains profile metrics for that path.
- Disk—Bytes of data accessed from the disk by each query path. If none of the query paths accessed the disk data, all the values are 0.
- Memory—Bytes of data accessed from memory by each query path.
- Sent—Bytes of data sent across the cluster by each query path.
- Received—Bytes of data received across the cluster by each query path.
- Time—Time in milliseconds (ms) that the query path took to process on a node, shown on progress bars.
Hover over the progress bars to view more information, such as total bytes and percentages.
History view
The History view tab stores the queries run previously. When you run a query, it appears in the Query History list. Queries of the last 2 weeks only are displayed.
To run a SQL query:
- Click ….
- Select Run.
To remove a SQL query:
- Click ….
- Select Remove.
Favorite view
You can bookmark SQL queries and run them again later in the Favorite view tab. Saved SQL queries display as a list of favorites next to the History view tab.
To bookmark a SQL query as a favorite:
- Select the SQL query.
- Select Run.
- Select Favorite.
- Enter a name and select Add.
To run a SQL query from the Favorites view:
- Select ….
- Select Run.
After successful execution of the query, the results are displayed in the SQL editor.
To rename a favorite SQL query:
- Select the SQL query.
- Click ….
- Select Rename.
- Enter the new name and select Update.
To remove a favorite SQL query:
- Select the query.
- Click ….
- Select Remove.
- When prompted for confirmation, select Remove.
Upload and download scripts
You can create SQL queries offline and upload them to the system.
- In the SQL query page, select ⋮ and Upload script.
The Upload script dialog appears.
- Select Browse or +.
- Select Upload.
Note
All uploaded code or content is the sole responsibility of the uploading party. Vertica does not review, endorse, or accept any liability for uploaded materials. Uploads are made at the uploading party's own risk.
The file content is loaded to the SQL editor.
You can also download SQL queries in the system.
- In the SQL query page, select ⋮ and Download script.
The SQL query is downloaded in a file with
.sql extension in the Downloads folder.
Create a table
You can create tables in the database logical schema.
-
In the Schema view, do one of the following:
-
In the Table name field, enter the name of the table to create. This name must be unique among names of all sequences, tables, and projections within the schema.
Ensure that the table name meets the following requirements:
-
From the Schema list, select an existing schema for which the table needs to be created. If no schema is specified, the table is created in the public schema.
-
In the Column name field, enter the name of the column to be created. A table can have up to 9800 columns.
Note
Provide unique column names for all columns. You cannot provide the same column name for multiple columns in the table.
-
From the Type list, select an internal data type.
-
In the Length field, enter the maximum number of characters that the column can store. It is a crucial aspect of database design that helps enforce data integrity, optimize storage, and ensure data consistency. For more information about the data types and their corresponding length or size, see data type.
Note
Provide a valid number. The system does not consider invalid numbers or characters.
-
Select the Nullable option to permit this column to store NULL values, representing missing, unknown, or optional data. Selecting this option allows rows to be inserted without providing a value for that specific column.
-
Select the Primary option to designate this column as the primary key. The primary key is a column in a database table that uniquely identifies each row, ensuring data integrity by prohibiting duplicate or NULL values. It enables efficient data retrieval and acts as a target for foreign keys to establish table relationships. Every table must have one primary key.
-
Select the Unique option to specify a unique constraint on a column so that each value in that column is unique among all other values.
-
Select the Order by option to sort the result set of a query in a specific order based on the values in one or more columns. This allows you to control the presentation of the data for better analysis and readability, as database rows are not guaranteed to be in any specific order by default.
-
Select More.
The Advance configuration page appears. You can set the foreign key references to link one table with another in this page. This page is enabled only when you enter the column name.
-
In the Reference tab, do the following:
- From the Reference schema list, select a reference schema which is a specification that defines the structure, data types, and relationships for data, often including mechanisms to link to or reuse other schemas or subschemas.
- From the Reference table list, select a table that links to the primary key of another table. It ensures that the data in both tables stays connected and valid. It acts as a primary source for validating input, mapping values, and normalizing data, allowing other tables to reference it through foreign keys. If you omit this column, the database uses the table's primary key. Only those columns that have at least one primary key in the reference table are listed.
- From the Reference column list, select a reference column. Updates to the referenced data are automatically reflected in all locations. Primary key columns only are listed.
Note
When linking a new table with an existing table, ensure that the data types of the primary key and foreign key match. A mismatch in the data types of the primary key and foreign key results in an error.
-
In the Sequence tab, from the Sequence list, select the name of the sequence. Use sequences to set the default values of columns to sequential integer values.
-
In the Column constraints tab, enter the boolean expression that evaluates a column's value on each row in the Check constraintsfield.
-
Select Save.
-
To import data from a csv file, do the following:
- Select Import from CSV.
- Select Browse.
- Navigate to the folder containing the CSV file and click Open.
Note
Only the header rows in the CSV file are saved as column names. The system does not infer data types from the data in the CSV file. All uploaded code or content is the sole responsibility of the uploading party. Vertica does not review, endorse, or accept any liability for uploaded materials. Uploads are made at the uploading party's own risk.
- Select Save.
-
Select SQL preview. A real-time preview of the SQL statement is displayed. The SQL syntax is validated and errors are displayed. This helps you identify errors and fix them before running the SQL queries.
-
Click the Download icon to download the SQL query to a file with .sql extension.
-
In the Partition expression field, specify a partition key that is derived from one or more table columns. Creating partitions decreases the SQL query execution time and improves table efficiency. For information about partitioning tables, see Partition clause.
-
Select Create.
The table is created and displayed under the schema where you created it.
Flex tables
Flex tables are a different kind of database table designed for loading and querying unstructured data, also called semi-structured data. Flex tables allow you to load data with different schemas into a single table. You can then explore this data and materialize real columns from it.
If you know some of the columns in the data, you can define them. A flex table that also has real columns is called a hybrid table. Both flex and hybrid tables are fully supported tables, stored as projections and with the same K-safety as your database.
After you create a flex table, you can quickly load data without specifying its schema. This allows you to load arbitrary JSON data, log files, and other semi-structured data and immediately begin querying it. For more information about flex tables, see Flex tables and Understanding flex tables.
Create a flex table
- Expand a schema in the Schema view and click + for Flex tables.
The Create Flex Table page appears.
- In the Flex table name field, enter the name of the flex table.
- From the Schema list, select an existing schema for which the flex table needs to be created. If no schema is specified, the flex table is created in the public schema.
Follow steps 4-17 mentioned in Create a table.
- Select Create.
The flex table is created and displayed under the schema where you created it.
Views
A view is a stored query that comprises one or more SELECT statements. Views dynamically access and compute data from the database at execution time. Views are read-only and can reference any combination of tables, temporary tables, and other views. Views do not support insert, update, delete, or copy operations. For more information about views, see Views.
Create a view
- Expand a schema in the Schema view and click + for Views.
The Create view page appears. Do the following:
- Review and edit the viewname.
- Enter the SELECT statement that the view executes. The SELECT statement can reference tables and other views.
- Format and execute the view. See Create an SQL query.
- Click the Reload icon to refresh the schema.
The new view appears in the
Views folder.
Example
The following example shows how you can create a view that contains data from multiple tables.
=> CREATE VIEW temp_t0 AS SELECT * from t0_p1 UNION ALL
     SELECT * from t0_p2 UNION ALL
       SELECT * from t0_p3 UNION ALL
         SELECT * from t0_p4 UNION ALL
           SELECT * from t0_p5;
Create a schema
You can create as many schemas as necessary for your database. For example, you can create a schema for each database user. By default, only an administrator can create a schema or give a user the right to create a schema.
The database logical schema comprises a set of tables and referential integrity constraints in the database. The objects in the logical schema are visible to SQL users. The logical schema does not include projections, which make up the physical schema. The physical schema comprises a set of projections used to store data on the disk. The projections in the physical schema are based on the objects in the logical schema.
-
In the Schema view, expand the +Create table list and select Schema.
The Create schema page appears.
-
In the Schema name field, enter the name of the schema.
Ensure that the schema name meets the following requirements:
- Must be unique among all other schema names in the namespace under which the schema is created.
- Must comply with keyword restrictions and rules for Identifiers.
- Cannot begin with
v_; this prefix is reserved for Vertica system tables.
- If the schema name contains a period, the part before the period cannot be the same as the name of an existing namespace.
Inheritance of privileges specifies whether to enable or disable default inheritance of privileges for new tables in the schema.
-
Do one of the following:
- Select Include to grant tables in the specified schema the same privileges granted to that schema. This option has no effect on existing tables in the schema.
OR
- Select Exclude to disable inheritance of schema privileges. By default, inheritance of schema privileges is disabled.
-
Select Create.
The schema is created and displayed in the Schema view.
Procedures
You can condense complex database tasks and routines into procedures. Procedures live and can be executed from inside your database; this lets them communicate and interact with your database directly to maintain, execute queries, and update tables. To view procedures, you can open the SQL editor and search for or browse to the procedure. Select the procedure to review details and manage the procedure. For more information about procedures, see Stored procedures.
Create a procedure
Ensure that you have non-superuser privilege to create procedures.
- Expand a schema in the Schema view and click + for Procedures.
The Create procedure page appears. Do the following:
- Review and edit the procedure_name and parameters.
- Enter the procedure logic.
- Format and execute the procedure. See Create an SQL query.
- Click the Reload icon to refresh the schema.
The new stored procedure is displayed in the
Procedures folder.
To view information about procedures, do the following:
- Open the SQL editor.
- Expand the schema.
- Hover over and select Procedures.
The Procedures page displays the following information:
- Language - Specifies the language of the procedure source. It can be either PLvSQL or PLpgSQL.
- Namespace name - Name of the database or namespace that contains
table:
- Database name: If specified, it must be the current database.
- Namespace name (Eon Mode only): You must specify the namespace of objects in non-default namespaces. If no namespace is provided, it is assumed the object is in the default namespace.
- Owner - The name of the person who created the stored procedure.
- Procedure arguments - A comma-delimited list of formal parameters, each specified as
parameter-name and parameter-type.
- Procedure name - The name of the stored procedure, where procedure-name conforms to conventions described in Identifiers.
- Schema name - Name of the schema. The default is
public.
- Security - Determines whose privileges to use when the procedure is called and executes it as if the user is one of the following:
- DEFINER: User who defined the procedure.
- INVOKER: User who called the procedure.
For more information about these parameters, see create procedure.
Example
The following procedure echoes its inputs as a result set:
=> CREATE PROCEDURE echo_int_varchar(INOUT x INT, INOUT y VARCHAR) LANGUAGE PLvSQL AS $$
BEGIN
   RAISE NOTICE 'This procedure outputs a result set of its inputs:';
END
$$;

=> CALL echo_int_varchar(3, 'a string');
NOTICE 2005:  This procedure outputs a result set of its inputs:
 x |    y
---+----------
 3 | a string
(1 row)
Entity relationships
Entity relationships provide a graphical representation of the relationships between tables based on primary key and foreign key relationships. You can view entity relationships within a single schema or across multiple schemas to better understand your database structure and how tables are connected.
View entity relationships for a table within a schema
To view entity relationships between tables within a schema:
- In the Schema view, locate the schema for which you want to view relationships.
- Click the More options menu (⋮) next to the schema name.
- Select View relationships.
The entity relationships diagram appears, displaying all tables in the schema and their relationships.
View entity relationships for a table across schemas
To view entity relationships between tables across different schemas:
- In the Schema view, select the table for which you want to view relationships.
- Click View entity relationships.
The entity relationships diagram appears, displaying the selected table and all related tables across schemas.
Color coding
The entity relationships diagram uses color coding to distinguish tables based on their location relative to the current schema:
- Blue header - Tables within the current schema.
- Black header - Tables outside the current schema that have relationships with tables in the current schema.
Diagram controls
Use the controls to manage and navigate the entitiy relationships diagram:
- Drag and Pan - Move around the diagram to view tables and relationships that are not currently visible.
- Zoom in/out - Hover over or the zoom controls to zoom in for detailed views or zoom out to view the entire diagram.
- Download - Download the diagram in SVG format.
- Refresh - Updates the diagram by retrieving the latest metadata from the database, ensuring that newly added, modified, or removed tables, columns, keys, and relationships are accurately reflected.
- Search - Search for a table within the diagram. As you type a table name, the matching table is highlighted and its entity relationships are displayed.
Primary key indicators
Columns marked with a key icon represent primary key columns.
About Vertica AI Assist
Vertica AI Assist is an AI assistant powered by Model Context Protocol (MCP). It helps database administrators generate, execute, and optimize SQL queries in natural language. AI-generated responses may vary in accuracy and should be validated before use. The following models are supported:
- Anthropic Claude
- Google Gemini
- AWS Bedrock
To get started with Vertica AI Assist:
- In the SQL editor, do one of the following:
- Enter a SQL query or press Ctrl + I keys to generate a query using AI.
<--or-->
- Click Vertica AI Assist at the top.
The list of available LLMs is displayed below the Vertica AI Assist label.
- From the list of LLMs, choose an LLM.
If you are using Vertica AI Assist for the first time, a legal disclaimer is displayed.
- Choose Don't show this message again and click Agree and continue.
A message
Hi! I'm Vertica AI Assist. How can I help you today? is displayed.
- Type your request in the field and click Enter.
Vertica AI Assist analyzes and displays the results of your query.
Optimize SQL queries
Vertica AI Assist can improve query performance by analyzing execution strategies. To optimize your SQL queries:
- In the SQL editor, do one of the following:
- Enter a SQL query or press Ctrl + I keys to generate a SQL query with AI.
<--or-->
- Click Vertica AI Assist at the top.
The list of available LLMs is displayed below the Vertica AI Assist label.
- Select the query.
- Hover over the options and choose Optimize with AI.
The final optimized query with improvements and the summary of the optimization are displayed in the Vertica AI Assist window. Vertica AI Assist optimizes the SQL query and processes the query results quicker than the original query specified.
- Copy and run the query.
Explain queries with AI
You can get detailed information about an SQL query using the Explain with AI option.
- In the SQL editor, do one of the following:
- Enter a SQL query or press Ctrl + I keys to generate a SQL query with AI.
<--or-->
- Click Vertica AI Assist at the top.
The list of available LLMs is displayed below the Vertica AI Assist label.
- Select the query.
- Hover over the options and choose Explain with AI.
Review these insights:
- Execution plan
- Joins and functions
- Performance characteristics
- Optimization recommendations
6 - Token generation and configuration
Generating and configuring JWT tokens
Vertica AI Assist authenticates requests to the MCP server using JWTs. The system uses these tokens to authenticate all MCP requests during the session. Before generating user tokens, a super administrator must configure the MCP Administrator JWT.
Prerequisites
Before configuring tokens:
- Create a VCluster database. For more information, see Database management with VCluster UI.
- Start the MCP server. For more information, see MCP server.
During its initial startup, the MCP server creates the file
/opt/vertica/config/mcp_server.yaml with the default setting token_api_enabled: false.
For information about setting token_api_enabled to true, see Enable the MCP token generation API.
Initial MCP administrator token setup
For security reasons, manually generate the first administrator token. This ensures that only an authorized administrator can create and receive the initial token. Run:
   /opt/vertica/bin/mcp_server --generate-token \

 --user <db_user> \

 --dbname <database_name> \

 --dbpass '<password>' \

 --description "UMC Integration Token" \

 --expiration-days <N>
Sample output:
   User ID:      mcp_superuser

   DB User:      release

   Expires:      2027-06-05 02:34:43 EDT

   Valid Days:   365 days

   Roles:        [admin]

   Storage:      /opt/vertica/config/mcp_server/userdb

   JWT Token:    <generated JWT>
Store this JWT in a secure location. Vertica AI Assist uses it to generate user access tokens.
Enable the MCP token generation API
The token generation endpoint is disabled by default. To enable it:
- Stop the MCP server.
- Open
/opt/vertica/config/mcp_server.yaml.
- Set
token_api_enabled to true.
- Save the file.
- Restart the MCP server.
After you enable the endpoint, Vertica AI Assist can request user-specific access tokens from the MCP server.
Configure the administrator JWT in the database configuration file.
-
Open config/dbconfigs/<cluster>-<database>.yaml.
-
Locate jwt_key.
-
Copy the generated administrator JWT to jwt_key.
-
Save the configuration file.
Note
Vertica AI Assist can generate user access tokens only if the MCP administrator JWT is configured. If `jwt_key` is missing or invalid, users who attempt to use Vertica AI Assist receive an authentication error.
Token scoping and role-based access
From this release, Vertica AI Assist generates user-specific access tokens. Each generated token is scoped to the user's MC role, ensuring that users can perform only the operations they are authorized to perform.
|
MC Role |
MCP Role |
|
MC_SUPER, MC_ADMIN, DB_DBA |
Admin |
|
MC_VOD |
Operator |
|
|
MC_IT, MC_NONE, all other roles |
Viewer |
MCP role capabilities
MCP roles and their capabilities are summarized in this table.
|
Capability |
Admin |
Operator |
Viewer |
|
Execute SQL queries |
✓ |
✓ |
✓ |
|
View schemas and catalog |
✓ |
✓ |
✓ |
|
View cluster status |
✓ |
✓ |
✓ |
|
Start/Stop cluster |
✓ |
✓ |
x |
|
Scale or configure cluster |
✓ |
✓ |
x |
|
Create/manage MCP users |
✓ |
x |
x |
|
Job queue operations |
✓ |
✓ |
✓ |
Role summary
The summary of MCP roles is given below.
Admin
Admin provides unrestricted MCP access, including the following:
- Cluster administration
- Security management
- Backup and restore
- Database administration
- User management
- All MCP tools
Operator
Operator provides operational capabilities, including the following:
- Cluster monitoring
- Start and stop the cluster
- Query management
- Job queue operations
- Performance troubleshooting
Operators cannot modify cluster configuration or manage users.
Note
Assign the `Operator` role only to trusted users as it allows cluster start and stop operations.
Viewer
Viewer provides read-only access to monitoring information, including the following:
- Database schemas
- User sessions
- System metrics
- Cluster status
Viewers cannot perform administrative or operational changes.
Token lifecycle
Vertica AI Assist automatically manages user access tokens throughout the user session. Note the following:
- User tokens remain valid for 1 day.
- Tokens are automatically refreshed while the session is active.
- Tokens are permanently deleted when the user logs out.
- After configuration, no manual token management is required.
Permission enforcement
Vertica AI Assist enforces the permissions associated with the MC role of the authenticated user. If a user requests an action that exceeds their assigned permissions, Vertica AI Assist:
- Rejects the request.
- Informs the user that they do not have the required permissions to perform the action.
- Does not execute any unauthorized action.
This behavior helps ensure that users can perform only the actions permitted by their assigned role.
Compatibility with earlier Vertica versions
Per-user access tokens are available in Vertica 26.3 and later versions. When Vertica AI Assist connects to an earlier Vertica version, it automatically uses a compatible authentication method. For Vertica versions earlier than 26.3:
- The user token generation endpoint is not available.
- Vertica AI Assist automatically detects the Vertica version.
- Vertica AI Assist uses a shared administrator connection for compatibility.
- No additional configuration is required.
This fallback behavior allows Vertica AI Assist to operate with earlier Vertica versions and automatically use per-user access tokens in Vertica 26.3 and later versions.
7 - Get started with UC
This topic provides an introduction to the unified console.
UC is a database and data management platform that enables Vertica users to interact with and manage databases through a single interface. Only database administrators have access to UC.
UC UI tour
After logging in to MC and switching to UC, the home page appears. This page presents all accessible databases as interactive widgets. Both AI-enabled and non-AI-enabled databases are visible.
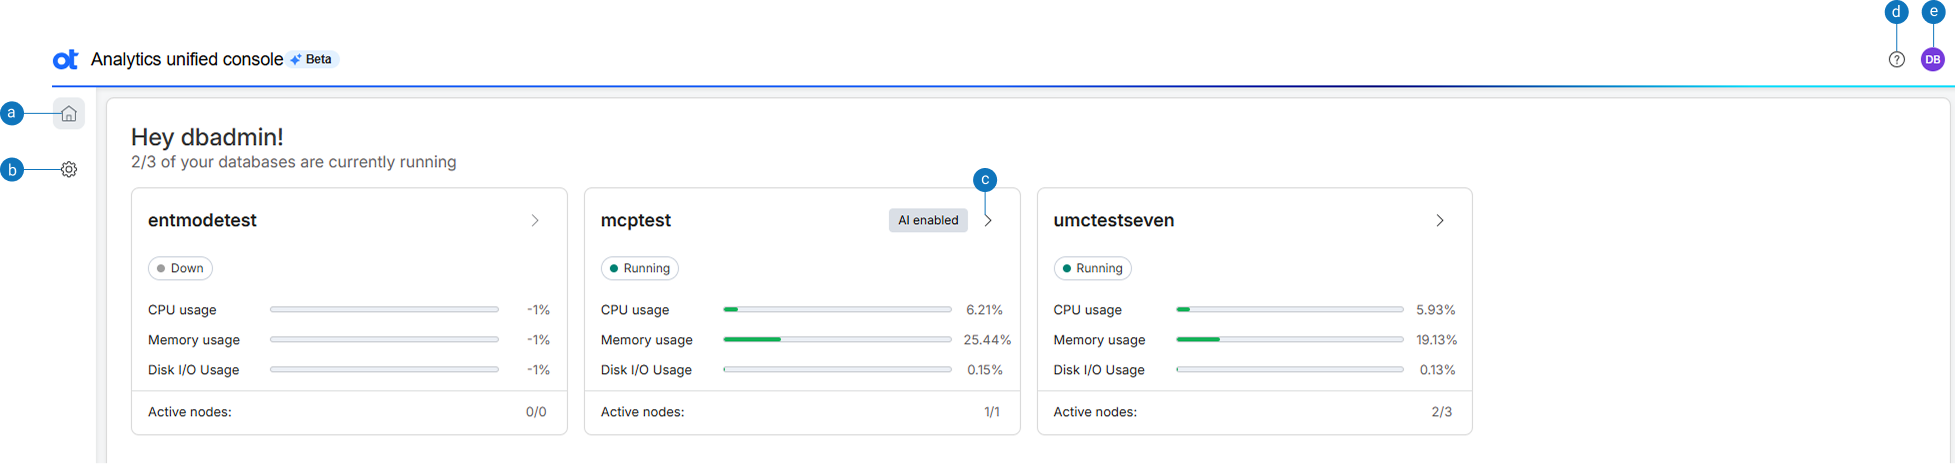
|
Option |
Description |
|
a |
Home: Displays the UC home page with database access options. |
|
b |
Settings: Displays the option to set AI preferences for the database. |
|
c |
>: Displays the SQL editor. |
|
d |
Help: Displays Unified console user documentation. |
|
e |
View profile: Displays the user profile along with options to switch and sign out of MC. |
Enable AI assistance
The Enable AI Assistance banner appears only when none of the available databases have AI enabled. You can enable AI functionality by configuring an AI model. Click Enable in the banner to enable AI assistance for a database. If at least one database in the system is AI enabled, this banner is not displayed.
You can configure or edit the default AI preferences.
- Login to UC.
- Choose AI preferences under Settings in the home page.
The AI preferences page opens and displays the following information:
- Host - The host name.
- Model - The large language model (LLM) that is used.
- Creator - The person who created the LLM.
- Enabled for - The database for which the LLM is enabled.
- Status - The current status of the LLM.
- Hover over ⋮ and select Edit. All the details of the LLM are displayed.
- From the Model provider list, choose the AI model provider that creates, trains, maintains, and hosts AI models. You can choose one among Anthropic, Google Gemini, Amazon Bedrock, or Others.
- From the Model name list, choose the specific LLM to use for inference.
- In the URL of the service hosting the model field, enter the root network address used to send requests to an AI service's API.
- In the Region field, choose the appropriate service region.
Note
This is applicable only if your LLM is Amazon Bedrock.
- In the Secret access key field, enter the credential (secret key) required for secure authentication.
- In the API key field, enter the key used to authenticate API requests.
Note
If your LLM is Amazon Bedrock, enter the **Access Key Id**. Enter the **API key** only if you are using an LLM other than Amazon Bedrock.
- In the Who should have access area, choose the required users depending on the role played by the user in the organization. For more information, see Configuration roles in MC.
- In the Which databases can access this area, choose the databases that can access the LLM. Note that only database versions 26.1 and above are supported.
- Click MCP status to configure the MCP token. For more information, see Configure the MCP client.
- Click Save.
Add a model
You can add a model from the default AI preferences.
- Login to UC.
- Choose AI preferences under Settings in the home page.
The AI preferences page opens.
- Click +Add new model.
Follow steps 4-13 in Configure or edit AI preferences.