This is the multi-page printable view of this section.
Click here to print.
Return to the regular view of this page.
Security and authentication
Vertica provides tools and features that allow you to ensure your system is secure as well as to prevent unauthorized users from accessing sensitive information.
Vertica provides tools and features that allow you to ensure your system is secure as well as to prevent unauthorized users from accessing sensitive information.
Client authentication establish the identity of the requesting client and determines whether that client is authorized to connect to the Vertica server.
1 - Client authentication
Authentication records and their associated methods define what credentials a user/client application must provide to access the database.
Authentication records and their associated methods define what credentials a user/client application must provide to access the database. For example, the hash authentication method requires users to provide a password, while the oauth authentication method requires users to provide an access token.
Client authentication overview
Vertica uses the following procedure to authenticate users:
-
If a client attempts to authenticate as the dbadmin from a local connection (that is, on the same node as the database):
-
If the dbadmin does not have a password, Vertica authenticates the client with the trust method.
-
If the dbadmin has a password, Vertica authenticates the client with the hash method.
-
If a client attempts to authenticate as a database user that does not have a password, and the only authentication records defined are the defaults, then Vertica authenticates the client with the trust method. For details, see Implicit authentication.
-
If a client specifies the credentials for a particular authentication method, Vertica filters for granted authentication records that use that method, skipping higher priority authentication records (except TRUST, which is not skippable). However, if the client sends credentials that correspond with an authentication record that they do not have, Vertica uses the record with the highest priority.
-
If a client attempts to authenticate as a user that has a password and an authentication record, then Vertica attempts to authenticate the client with that record. If more than one authentication record exists for the user or role, Vertica chooses the one with the highest priority.
Note
Typically, if no custom authentication records were defined with
CREATE AUTHENTICATION, the default authentication records take effect (unless they were deliberately dropped by the dbadmin), and clients are authenticated with the
password method.
-
If the client fails to authenticate with the chosen authentication method and authentication fallthrough is enabled, Vertica attempts to authenticate the client with the authentication with the next highest priority. Otherwise, the client is rejected.
-
Otherwise, no authentication records exist and the default authentication records have been dropped; no users (other than the dbadmin from a local connection) can access the database.
Authentication management
Users with the DBADMIN role can perform the following authentication tasks:
-
Create authentication records.
-
Drop an authentication record from the database.
-
Define parameters required by the following authentication methods:
-
Grant (assign) or revoke an authentication record to a user.
-
Use ALTER AUTHENTICATION to:
-
Enable/disable authentication methods.
-
Define a default authentication method to be used if a user has not been assigned a specific authentication method. To assign this as a default authentication method, use GRANT (authentication) to grant it to the PUBLIC role.
-
Change authentication record priority.
-
Enable fallthrough authentication.
1.1 - Default authentication records
Vertica automatically creates the following default authentication records and grants them to the public role.
Vertica automatically creates the following default authentication records and grants them to the public role. These have the lowest possible priority (-1), so user-created authentication records take priority over these default records:
=> SELECT auth_name,is_auth_enabled,auth_host_type,auth_method,auth_priority,is_fallthrough_enabled FROM client_auth;
         auth_name         | is_auth_enabled | auth_host_type | auth_method | auth_priority | is_fallthrough_enabled
---------------------------+-----------------+----------------+-------------+---------------+------------------------
 default_hash_network_ipv4 | True            | HOST           | PASSWORD    |            -1 | False
 default_hash_network_ipv6 | True            | HOST           | PASSWORD    |            -1 | False
 default_hash_local        | True            | LOCAL          | PASSWORD    |            -1 | False
(3 rows)
Note
Do not use the password method for your custom authentication records. If you want to use password-based authentication for your custom authentication records, use hash instead.
If no authentication records are defined (and the default authentication records are dropped), only the dbadmin and users without passwords can access the database. For details, see Implicit authentication.
1.2 - Configuring client authentication
You can restrict how database users can connect with authentication records.
You can restrict how database users can connect with authentication records. The Vertica database uses client authentication to establish the identity of the connecting client and determines whether that client is authorized to connect to the Vertica database using the supplied credentials and from their host address.
Basic authentication configuration workflow
In general, the workflow for configuring client authentication is as follows:
-
Create an authentication record. Authentication records are enabled automatically after creation. For details, see Creating authentication records.
-
Grant the authentication to a user or role.
To view existing authentication records, query the system table CLIENT_AUTH.
IPv4 and IPv6 for client authentication
Vertica supports clients using either the IPv4 or the IPv6 protocol to connect to the database server. Internal communication between database servers must consistently use one address family (IPv4 or IPv6). The client, however, can connect to the database from either type of IP address.
If the client will be connecting from either IPv4 or IPv6, you must create two authentication methods, one for each address. Any authentication method that uses HOST authentication requires an IP address.
For example, the first statement allows users to connect from any IPv4 address. The second statement allows users to connect from any IPv6 address:
=> CREATE AUTHENTICATION <name> METHOD 'gss' HOST '0.0.0.0/0'; --IPv4
=> CREATE AUTHENTICATION <name> METHOD 'gss' HOST '::/0'; --IPv6
If you are using a literal IPv6 address in a URL, you must enclose the IPv6 address in square brackets as shown in the following examples:
=> ALTER AUTHENTICATION Ldap SET host='ldap://[1dfa:2bfa:3:45:5:6:7:877]';
=> ALTER AUTHENTICATION Ldap SET host='ldap://[fdfb:dbfa:0:65::177]';
=> ALTER AUTHENTICATION Ldap SET host='ldap://[fdfb::177]';
=> ALTER AUTHENTICATION Ldap SET host='ldap://[::1]';
=> ALTER AUTHENTICATION Ldap SET host='ldap://[1dfa:2bfa:3:45:5:6:7:877]:5678';
If you are working with a multi-node cluster, any IP/netmask settings in (HOST, HOST TLS, HOST NO TLS) must match all nodes in the cluster. This setup allows the database owner to authenticate with and administer every node in the cluster. For example, specifying 10.10.0.8/30 allows a CIDR address range of 10.10.0.8-10.10.0.11.
For detailed information about IPv6 addresses, see RFC 1924 and RFC 2732.
Supported client authentication methods
Vertica supports the following client authentication methods:
-
trust: Users can authenticate with a valid username (that is, without a password).
-
reject: Rejects the connection attempt.
-
hash: Users must provide a valid username and password. For details, see Hash authentication.
-
gss: Authorizes clients that connect to Vertica with an MIT Kerberos implementation. The Key Distribution Center (KDC) must support Kerberos 5 using the GSS-API. Non-MIT Kerberos implementations must use the GSS-API. For details, see Kerberos authentication.
-
ident: Authenticates the client against a username on an Ident server. For details, see Ident authentication.
-
ldap: Authenticates a client and their username and password with an LDAP or Active Directory server. For details, see LDAP authentication.
-
tls: Authenticates clients that provide a certificate with a Common Name (CN) that specifies a valid database username. Vertica must be configured for mutual mode TLS to use this method. For details, see TLS authentication
-
oauth: Authenticates a client with an access token. For details, see OAuth 2.0 authentication.
Local and host authentication
You can define a client authentication method as:
-
Local: Local connection to the database.
-
Host: Remote connection to the database from different hosts, each with their own IPv4 or IPv6 address and host parameters. For more information see IPv4 and IPv6 for Client Authentication above.
Some authentication methods can only be designated as local or host, as listed in this table:
|
Authentication Method |
Local? |
Host? |
gss (Kerberos) |
No |
Yes |
ident |
Yes |
No |
ldap |
Yes |
Yes |
hash |
Yes |
Yes |
reject |
Yes |
Yes |
trust |
Yes |
Yes |
tls |
No |
Yes |
oauth |
Yes |
Yes |
Authentication for chained users and roles
Vertica supports creating chained users and roles, where you can grant ROLE2 privileges to ROLE1. All users in ROLE1 use the same authentication assigned to ROLE2. For example:
=> CREATE USER user1;
=> CREATE ROLE role1;
=> CREATE ROLE role2;
=> CREATE AUTHENTICATION h1 METHOD 'hash' LOCAL;
=> GRANT AUTHENTICATION h1 to role2;
=> GRANT role2 to role1;
=> GRANT role1 to user1;
The user and role chain in the example above can be illustrated as follows:
auth1 -> role2 -> role1 -> user1
In this example, since role2 privileges are granted to role1 you only need to grant authentication to role2 to also enable it for role1.
1.3 - Fallthrough authentication
Normally, if a user fails to authenticate with the first chosen authentication record, the user is rejected.
Normally, if a user fails to authenticate with the first chosen authentication record, the user is rejected. However, certain authentication methods can be specified to instead, upon failure, "fall through" to an authentication record with a lower priority. This can be useful, for example, for using multiple LDAP search attributes.
Authentication fallthrough is disabled by default for new records.
Another way to bypass method priority or implement fallthrough authentication is to implement it on the client instead. For details, see Authentication filtering.
Authentication method compatibility
The following table shows each authentication method's compatibility with fallthrough authentication. A value of "yes" indicates that the method in the column can fall through and validate the row method it falls through to. A value of "no" indicates that you cannot fall through to it and authentication ends.
A value of "-" (dash) indicates that while fallthrough works, it has no meaningful effect. For example, a hash authentication record can fall through to another hash authentication record, but authentication will always fail because you cannot fall through to a correct password:
|
Column falls through to row |
ldap |
hash |
tls |
ident |
oauth |
gss |
trust |
reject |
|
ldap |
yes |
yes |
yes |
yes |
no |
no |
no |
no |
|
hash |
yes |
- |
yes |
yes |
no |
no |
no |
no |
|
tls |
yes |
yes |
- |
yes |
no |
no |
no |
no |
|
ident |
yes |
yes |
yes |
yes |
no |
no |
no |
no |
|
oauth |
no |
no |
no |
no |
no |
no |
no |
no |
|
gss |
no |
no |
no |
no |
no |
no |
no |
no |
|
trust |
yes |
yes |
yes |
yes |
no |
no |
no |
no |
|
reject |
yes |
yes |
yes |
yes |
no |
no |
no |
no |
For example, suppose the user Bob was granted the following authentication record with fallthrough enabled:
=> CREATE AUTHENTICATION v_tls_auth METHOD 'tls' HOST TLS '0.0.0.0/0' FALLTHROUGH;
In addition, Bob has the public role, and therefore has the default authentication records:
=> SELECT auth_name,is_auth_enabled,auth_host_type,auth_method,auth_priority,is_fallthrough_enabled FROM client_auth;
         auth_name         | is_auth_enabled | auth_host_type | auth_method | auth_priority | is_fallthrough_enabled
---------------------------+-----------------+----------------+-------------+---------------+------------------------
 default_hash_network_ipv4 | True            | HOST           | PASSWORD    |            -1 | False
 default_hash_network_ipv6 | True            | HOST           | PASSWORD    |            -1 | False
 default_hash_local        | True            | LOCAL          | PASSWORD    |            -1 | False
(3 rows)
If Bob, connecting from a remote address, fails to authenticate with v_tls_auth, Vertica attempts to authenticate him with the next (in order of priority) authentication record, default_hash_network_ipv4.
Logging authentication failures
Login failures are only logged if the user is rejected after all granted authentication records have failed. Only the final failure is logged.
For example, suppose a user is granted both tls and password authentication records, and the tls record falls through to the password record.
If the user fails to authenticate with both the tls record and the password record, then only the password failure is logged in LOGIN_FAILURES.
However, if the user fails to authenticate with the tls record, but succeeds with the password record, then no failure is logged in LOGIN_FAILURES because the user was not rejected at the end of the record chain.
Examples
To enable fallthrough on a new authentication record, use CREATE AUTHENTICATION:
=> CREATE AUTHENTICATION v_tls_auth METHOD 'tls' HOST TLS '0.0.0.0/0' FALLTHROUGH;
To toggle fallthrough on an existing authentication record, use ALTER AUTHENTICATION:
=> ALTER AUTHENTICATION v_tls_auth NO FALLTHROUGH; -- disable
=> ALTER AUTHENTICATION v_tls_auth FALLTHROUGH; -- enable
1.4 - Authentication filtering
You can filter for and authenticate with authentication records that use a particular method by specifying the credentials for that method.
You can filter for and authenticate with authentication records that use a particular method by specifying the credentials for that method. This process skips any higher-priority, non-trust authentication records.
If the selected record fails and fallthrough is enabled, Vertica uses to the record with the next highest priority.
If you provide the credentials for an authentication method for which you have not been granted, Vertica instead attempts to authenticate you with the highest priority authentication record.
The following table shows the credentials the client provides and the requested authentication method in descending filter priority. If you attempt to provide more than one type of credential, your client selects and sends the one with the higher priority:
|
Credentials sent by client |
Requested authentication method |
|
OAuthRefreshToken or OAuthAccessToken |
oauth |
|
Non-default KerberosServiceName or KerberosHostname |
gss |
|
Username, Password |
ldap, hash, ident, trust, tls |
For example, if a client provides a username and password for user Alice, and the Alice has oauth, ldap, and hash records, then Vertica attempts to authenticate the client with ldap or hash, whichever has the higher priority.
Similarly, if Alice instead provides an OAuthAccessToken, username, and password, then Vertica attempts to authenticate her with the oauth record because it has a higher filter priority.
However, if Alice provides a KerberosHostname, Vertica attempts to authenticate her with the highest priority authentication record between her oauth, ldap, and hash records.
Client-side fallthrough authentication
A workaround for the incompatibility of certain authentication methods with fallthrough authentication is to use authentication filtering to manually fall through to the proper authentication record by detecting the initial authentication failure, and then making a new connection attempt with a different set of credentials.
For example, oauth and hash cannot fall through to each other, so if a user is granted authentication records with these methods, they can only authenticate with the higher priority record. As a workaround, you can detect the authentication failure with oauth and then filter for hash in another connection attempt. Doing this programmatically depends on the client. In JDBC, you can catch SQLInvalidAuthorizationSpecException and then try to reconnect in the exception handler. In ODBC, you can check the return value of SQLDriverConnect():
// error checking omitted for brevity
    SQLHENV hdlEnv;
    SQLAllocHandle(SQL_HANDLE_ENV, SQL_NULL_HANDLE, &hdlEnv);
    SQLHDBC hdlDbc;
    SQLSetEnvAttr(hdlEnv, SQL_ATTR_ODBC_VERSION,
                (SQLPOINTER) SQL_OV_ODBC3, SQL_IS_UINTEGER);
    SQLAllocHandle(SQL_HANDLE_DBC, hdlEnv, &hdlDbc);
    SQLRETURN ret = SQLDriverConnect(hdlDbc, NULL, (SQLCHAR *)("DSN=VerticaDSN;OAuthAccessToken=" + accessToken + ";OAuthRefreshToken=" + refreshToken + ";OAuthJsonConfig=" + jsonConfig).c_str(), SQL_NTS, NULL, 0, NULL, false);

    if (!SQL_SUCCEEDED(ret))
    {
        std::cout << "Could not connect to database with OAuth, retrying with hash authentication" << std::endl;
        reportError <SQLHDBC>(SQL_HANDLE_DBC, hdlDbc);
        SQLAllocHandle(SQL_HANDLE_DBC, hdlEnv, &hdlDbc);
        const char* dsnName = "ExampleDB";
        const char* userID = "Alice";
        const char* passwd = "mypassword";
        SQLConnect(hdlDbc, (SQLCHAR*)dsnName,SQL_NTS,(SQLCHAR*)userID,SQL_NTS,(SQLCHAR*)passwd, SQL_NTS);
    }
Examples
In the following example, the user Bob is granted two authentication records: one that uses Kerberos authentication (gss) and another that uses password authentication (hash):
=> SELECT auth_name, auth_host_type, auth_method FROM client_auth;
       auth_name     | auth_host_type | auth_method
---------------------+----------------+-------------
 v_hash              | HOST           | HASH
 v_kerberos          | HOST           | GSS
(2 rows)
-
Bob attempts to authenticate with Kerberos, but fails (the exact error message varies):
$ vsql -h vertica_db.example.com -K vcluster.example.com -U Bob
vsql: GSSAPI continuation error: Unspecified GSS failure.  Minor code may provide more information
GSSAPI continuation error: No Kerberos credentials available (default cache: KEYRING:persistent:0)
-
Bob notices the failure. The steps involved in detecting this programmatically depend on your client.
-
An authentication record that uses gss cannot fall through to one that uses hash, so the only way for Bob to authenticate to the database is to filter for the hash by providing the username and password:
=> vsql -h vertica_db.example.com -U Bob -w 'mypassword'
To implement client-side fallthrough authentication, check the initial connection/authentication attempt for errors and then create a new connection in the error handler. For example, the user Alice is granted oauth and hash authentication records:
=> SELECT auth_name, auth_host_type, auth_method FROM client_auth;
       auth_name     | auth_host_type | auth_method
---------------------+----------------+-------------
 v_oauth             | HOST           | OAUTH
 v_hash              | HOST           | HASH
(2 rows)
1.5 - Implicit authentication
Vertica has implicit (that is, not reflected in the CLIENT_AUTH system table) authentication records reserved for the dbadmin and users without passwords.
Vertica has implicit (that is, not reflected in the CLIENT_AUTH system table) authentication records reserved for the dbadmin and users without passwords. These records cannot be dropped.
For the dbadmin user:
For a non-dbadmin user, the trust method is used if all of the following are true:
-
The user does not have a password.
-
No custom (that is, non-default) authentication methods are enabled.
1.6 - Dbadmin authentication access
The dbadmin user must have access to the database at all times.
The dbadmin user must have access to the database at all times. Vertica automatically ensures that a client can authenticate as the dbadmin from a LOCAL connection.
If you need to authenticate as the dbadmin from a remote connection, the dbadmin must have a password. You can use the following methods:
Authenticating from a local connection
You can always implicitly authenticate as the dbadmin from a local connection. These dbadmin-specific authentication records are implicit, so they are not listed in the CLIENT_AUTH system table, and cannot be dropped.
If the dbadmin user does not have a password, then Vertica authenticates them with the trust method. Otherwise, Vertica authenticates them with the password method.
In this example, the dbadmin did not have a password and connected to Vertica from a local connection:
=> SELECT authentication_method, client_authentication_name FROM vs_sessions;
 authentication_method | client_authentication_name
-----------------------+----------------------------
 ImpTrust              | default: Implicit Trust
Authenticating from a remote connection
Fallthrough authentication
Vertica automatically creates the following authentication records and grants them to the public role (for details, see Client authentication):
=> SELECT auth_name,is_auth_enabled,auth_host_type,auth_method,auth_priority,is_fallthrough_enabled FROM client_auth;
         auth_name         | is_auth_enabled | auth_host_type | auth_method | auth_priority | is_fallthrough_enabled
---------------------------+-----------------+----------------+-------------+---------------+------------------------
 default_hash_network_ipv4 | True            | HOST           | PASSWORD    |            -1 | False
 default_hash_network_ipv6 | True            | HOST           | PASSWORD    |            -1 | False
 default_hash_local        | True            | LOCAL          | PASSWORD    |            -1 | False
(3 rows)
These default authentication records ensure that all users with the public role (which includes dbadmin) have access to the database, provided that any custom authentication records are set to fall through (disabled by default) to the default records.
For example, the following ldap authentication enables fallthrough, so if the LDAP server is down, users can still authenticate with password authentication (as defined by the default records).
=> CREATE AUTHENTICATION ldap1 METHOD 'ldap' LOCAL FALLTHROUGH;
=> ALTER AUTHENTICATION ldap1 SET host='ldap://localhost:5389',
    binddn='cn=Manager,dc=example,dc=com',
    bind_password='password',
    basedn='ou=dev,dc=example,dc=com',
    search_attribute='cn';
Custom authentication records
A dbadmin-specific authentication record should:
-
Use the hash authentication method (so authentication is not dependent on some external service).
-
Have a high priority (e.g. 10,000) so it supersedes all other authentication records.
The following example creates an authentication record v_dbadmin_hash and grants it to the dbadmin user. The hash method indicates that the dbadmin must provide a password when logging in. The HOST '0.0.0.0/0' access method indicates that the dbadmin can connect remotely from any IPv4 address:
=> CREATE AUTHENTICATION v_dbadmin_hash METHOD 'hash' HOST '0.0.0.0/0';
=> ALTER AUTHENTICATION v_dbadmin_hash PRIORITY 10000;
=> GRANT AUTHENTICATION v_dbadmin_hash TO dbadmin;
If you want to authenticate as the dbadmin from a local connection, but want to use an authentication record with the HOST access method, specify the --host option with the hostname or IP address of the database:
$ vsql database_name user --host hostname_or_ip;
1.7 - Creating authentication records
You can manage client authentication records with vsql.
You can manage client authentication records with vsql. You must be connected to the database as a supseruser.
Important
You cannot modify client authentication records using the Administration Tools. The Administration Tools interface allows you to modify the contents of the vertica.conf file. However, Vertica ignores any client authentication information stored in that file.
-
Create an authentication records, specifying:
-
The name of the authentication record.
-
The authentication method, one of the following:
-
trust: Users can authenticate with a valid username (that is, without a password).
-
reject: Rejects the connection attempt.
-
hash: Users must provide a valid username and password. For details, see Hash authentication.
-
gss: Authorizes clients that connect to Vertica with an MIT Kerberos implementation. The Key Distribution Center (KDC) must support Kerberos 5 using the GSS-API. Non-MIT Kerberos implementations must use the GSS-API. For details, see Kerberos authentication.
-
ident: Authenticates the client against a username on an Ident server. For details, see Ident authentication.
-
ldap: Authenticates a client and their username and password with an LDAP or Active Directory server. For details, see LDAP authentication.
-
tls: Authenticates clients that provide a certificate with a Common Name (CN) that specifies a valid database username. Vertica must be configured for mutual mode TLS to use this method. For details, see TLS authentication
-
oauth: Authenticates a client with an access token. For details, see OAuth 2.0 authentication.
-
The access method, one of the following, which specify the allowed connection type:
-
LOCAL: Authenticates users or applications that attempt to connect from the same node that the database is running on.
-
HOST: Authentications users or applications that attempt to connect from a node that has a different IPv4 or IPv6 address than the database. You can use TLS or NO TLS to specify an encrypted or plaintext connection, respectively.
-
Whether to enable Fallthrough authentication (disabled by default).
-
Grant the authentication record to a user or role.
Examples
The following examples show how to create authentication records.
Create authentication method localpwd to authenticate users who are trying to log in from a local host using a password:
=> CREATE AUTHENTICATION localpwd METHOD 'hash' LOCAL;
Create authentication method v_ldap that uses LDAP over TLS to authenticate users logging in from the host with the IPv4 address 10.0.0.0/23:
=> CREATE AUTHENTICATION v_ldap METHOD 'ldap' HOST TLS '10.0.0.0/23';
Create authentication method v_kerberos to authenticate users who are trying to connect from any host in the networks 2001:0db8:0001:12xx:
=> CREATE AUTHENTICATION v_kerberos METHOD 'gss' HOST '2001:db8:1::1200/56';
The following authentication record v_oauth authenticates users from any IP address by contacting the identity provider to validate the OAuth token (rather than a username and password) and uses the following parameters:
-
validate_type: The method used to validate the OAuth token. This should be set to IDP (default) to validate the OAuth token by contacting the identity provider.
-
client_id: The client in the identity provider.
-
client_secret: The client secret generated by the identity provider.
-
discovery_url: Also known as the OpenID Provider Configuration Document, Vertica uses this endpoint to retrieve information about the identity provider's configuration and other endpoints (Keycloak only).
-
introspect_url: Used by Vertica to introspect (validate) access tokens. You must specify the introspect_url if you do not specify the discovery_url and are not using JSON Web Token validation.
If discovery_url and introspect_url are both set, discovery_url takes precedence. The following example sets both for demonstration purposes; in general, you should prefer to set the discovery_url:
=> CREATE AUTHENTICATION v_oauth METHOD 'oauth' HOST '0.0.0.0/0';
=> ALTER AUTHENTICATION v_oauth SET validate_type = 'IDP';
=> ALTER AUTHENTICATION v_oauth SET client_id = 'vertica';
=> ALTER AUTHENTICATION v_oauth SET client_secret = 'client_secret';
=> ALTER AUTHENTICATION v_oauth SET discovery_url = 'https://203.0.113.1:8443/realms/myrealm/.well-known/openid-configuration';
=> ALTER AUTHENTICATION v_oauth SET introspect_url = 'https://203.0.113.1:8443/realms/myrealm/protocol/openid-connect/token/introspect';
Alternatively, if your identity provider supports the OpenID Connect protocol and your client is public, Vertica can use JWT validation, where Vertica validates OAuth tokens by verifying that it was signed by the identity provider's private key.
While Vertica does not contact the identity provider for JWT validation, the client does for token refresh if either the discovery or token endpoints are set in oauthjsonconfig.
JWT validation requires the following parameters:
-
validate_type: The validation method, IDP by default. Setting this to JWT enables JWT validation.
-
jwt_rsa_public_key: In PEM format, the public key used to sign the client's OAuth token. Vertica uses this to validate the OAuth token. If your identity provider does not natively provide PEM-formatted public keys, you must convert them to PEM format. For example, keys retrieved from an Okta endpoint are in JWK format and must be converted.
-
jwt_issuer: The issuer of the OAuth token. This value is set by the identify provider.
-
jwt_user_mapping: The name of the Vertica user.
You can also specify the following parameters to define a whitelist based on fields of the OAuth token:
-
jwt_accepted_audience_list: Optional, a comma-delimited list of values to accept from the client JWT's aud field. If set, tokens must include in aud one of the accepted audiences to authenticate.
-
jwt_accepted_scope_list: Optional, a comma-delimited list of values to accept from the client JWT's scope field. If set, tokens must include in scope at least one of the accepted scopes to authenticate.
The following authentication record v_oauth_jwt authenticates users from any IP address by verifying that the client's OAuth token was signed by the identity provider's private key. It also requires the user to provide the proper values in the token's aud and scope fields:
=> CREATE AUTHENTICATION v_oauth_jwt METHOD 'oauth' HOST '0.0.0.0/0';
=> ALTER AUTHENTICATION v_oauth_jwt SET validate_type = 'JWT';
=> ALTER AUTHENTICATION v_oauth_jwt SET jwt_rsa_public_key = 'MIIBIjANBgkqhkiG9w0BAQEFAAOCAQ8AMIIBCgKCAQEAkjXjd6F8PyKkQtY5q2cJ9jNT9y+PeIJS134UvuUnuD9bQFhkBPstTBulpZV1QQivYaQ5k5bYVE2Q7n/XscrWzbRkK/qEwmztjVUH7dQAHSSKEjYcbH1fREx5nR5oNEelrUH2RrGM98Y7ln+Ch4oCl8yCS6gjI6hfaDxwqo2oImmGE+Qi06SIjoWGBCr5EIAhvlNuWe2rWD5uEe4ivaL6KoAR9sADqhGBoaYs/wIVUcv5DHtSjU+yZIz/sVspJehvmb/979eDsct2IddCHLrjUet3DiKz4imIyh+cv9VTEI6MWbk5WIiKW2fFzZ6Oei/ddzmTqVoNdn+d18tWwlf7hQIDAQAB';
=> ALTER AUTHENTICATION v_oauth_jwt SET jwt_issuer = 'token_issuer';
=> ALTER AUTHENTICATION v_oauth_jwt SET jwt_user_mapping = 'oauth_user';
=> ALTER AUTHENTICATION v_oauth_jwt SET jwt_accepted_audience_list = 'vertica,local';
=> ALTER AUTHENTICATION v_oauth_jwt SET jwt_accepted_scope_list = 'email,profile,user';
For example, to reject all plaintext client connections, specify the reject authentication method and the HOST NO TLS access method as follows:
=> CREATE AUTHENTICATION RejectNoSSL METHOD 'reject' HOST NO TLS '0.0.0.0/0';  --IPv4
=> CREATE AUTHENTICATION RejectNoSSL METHOD 'reject' HOST NO TLS '::/0';       --IPv6
See also
1.8 - Modifying authentication records
To modify existing authentication records, you must first be connected to your database.
To modify existing authentication records, you must first be connected to your database. The following examples show how to make changes to your authentication records. For more information see ALTER AUTHENTICATION.
Rename an authentication method
Rename the v_kerberos authentication method to K5, and enable it. All users who have been associated with the v_kerberos authentication method are now associated with the K5 method granted instead.
=> ALTER AUTHENTICATION v_kerberos RENAME TO K5 ENABLE;
Specify a priority for an authentication method
Specify a priority of 10 for K5 authentication:
=> ALTER AUTHENTICATION K5 PRIORITY 10;
For more information see Authentication record priority.
Change a parameter
Set the system_users parameter for ident1 authentication to root:
=> CREATE AUTHENTICATION ident1 METHOD 'ident' LOCAL;
=> ALTER AUTHENTICATION ident1 SET system_users='root';
Change the IP address and specify the parameters for an LDAP authentication method named Ldap1.
In this example, you specify the bind parameters for the LDAP server. Vertica connects to the LDAP server, which authenticates the Vertica client. If the authentication succeeds, Vertica authenticates any users who have been granted the Ldap1 authentication method on the designated LDAP server:
=> CREATE AUTHENTICATION Ldap1 METHOD 'ldap' HOST '172.16.65.196';
=> ALTER AUTHENTICATION Ldap1 SET host='ldap://172.16.65.177',
   binddn_prefix='cn=', binddn_suffix=',dc=qa_domain,dc=com';
Change the IP address, and specify the parameters for an LDAP authentication method named Ldap1. Assume that Vertica does not have enough information to create the distinguished name (DN) for a user attempting to authenticate. Therefore, in this case, you must specify to use LDAP search and bind:
=> CREATE AUTHENTICATION LDAP1 METHOD 'ldap' HOST '172.16.65.196';
=> ALTER AUTHENTICATION Ldap1 SET host='ldap://172.16.65.177',
basedn='dc=qa_domain,dc=com',binddn='cn=Manager,dc=qa_domain,
dc=com',search_attribute='cn',bind_password='secret';
Change the associated method
Change the localpwd authentication from trust to hash:
=> CREATE AUTHENTICATION localpwd METHOD 'trust' LOCAL;
=> ALTER AUTHENTICATION localpwd METHOD 'hash';
ALTER AUTHENTICATION validates the parameters you enter. If there are errors, it disables the authentication method that you are trying to modify.
The advantages of using the Administration Tools are:
-
You do not have to connect to the database
-
The editor verifies that records are correctly formed
-
The editor maintains records so they are available to you to edit later
Note
You must restart the database to implement your changes.
For information about using the Administration Tools to create and edit authentication records, see Creating authentication records.
Deleting authentication records
To delete client authentication record, use DROP AUTHENTICATION. To use this approach, you have to be connected to your database.
To delete an authentication record for md5_auth use the following command:
=> DROP AUTHENTICATION md5_auth;
To delete an authentication record for a method that has been granted to a user, use the CASCADE keyword:
=> CREATE AUTHENTICATION localpwd METHOD 'password' LOCAL;
=> GRANT AUTHENTICATION localpwd TO jsmith;
=> DROP AUTHENTICATION localpwd CASCADE;
See also
1.9 - Authentication record priority
Each authentication record has a priority.
Each authentication record has a priority. If a user is granted more than one authentication record, Vertica attempts to authenticate the user with the authentication record with the highest priority and rejects the user if authentication fails.
There are two ways to authenticate with a record other than that with the highest priority:
-
Fallthrough authentication: If authentication fails, Vertica attempts to authenticate the client with the record with the next highest priority.
-
Authentication filtering: Clients can send the credentials required for a particular authentication method to authenticate with a record that uses that method.
Determining authentication priority
The following factors contribute to an authentication record's priority, as reflected in the CLIENT_AUTH system table:
=> SELECT auth_name, auth_method, auth_priority, method_priority, address_priority FROM client_auth;
   auth_name   | auth_method | auth_priority | method_priority | address_priority
---------------+-------------+---------------+-----------------+------------------
 ldap_auth     | LDAP        |             5 |               5 |               96
 hash_auth     | HASH        |             5 |               2 |              126
 tls_auth      | TLS         |             0 |               5 |               96
 oauth_auth    | OAUTH       |             0 |               5 |               96
 gss_auth      | GSS         |             0 |               5 |               96
 trust_auth    | TRUST       |             0 |               0 |               96
 reject_auth   | REJECT      |             0 |              10 |               96
(7 rows)
Note
Greater values indicate higher priorities. For example:
Priorities are divided into tiers and listed in order of importance; in the event of a tie at one priority tier, Vertica checks the next priority tier. For example, if a user had both ldap and hash authentication records with an auth_priority of 5, Vertica would attempt to use the ldap authentication record because it has a greater method_priority value:
-
auth_priority: The priority explicitly set with ALTER AUTHENTICATION (default: 0).
-
method_priority: The priority specific to the authentication method. These priorities are as follows:
-
trust: 0
-
hash: 2
-
ldap: 5
-
tls: 5
-
oauth: 5
-
gss: 5
-
reject: 10
-
address_priority: The priority for IP address specified in HOST [ TLS | NO TLS ] 'host-ip-address'. This priority is determined by the size of the netmask of the address; fewer zeros indicate greater specificity, and therefore higher priority. LOCAL has the lowest priority: 0.
Setting authentication priority
To set authentication priority:
=> ALTER AUTHENTICATION authentication_name PRIORITY value;
See also
1.10 - Viewing information about client authentication records
For information about client authentication records that you have configured for your database, query the following system tables in the V_CATALOG schema:.
For information about client authentication records that you have configured for your database, query the following system tables in the V_CATALOG schema:
To determine the details behind the client authentication used for a particular user session, query the following tables in the V_MONITOR schema:
1.11 - Enabling and disabling authentication methods
When you create an authentication method, Vertica stores it in the catalog and enables it automatically.
When you create an authentication method, Vertica stores it in the catalog and enables it automatically. To enable or disable an authentication method, use the ALTER AUTHENTICATION statement. To use this approach, you must be connected to your database.
If an authentication method has not been enabled, Vertica cannot use it to authenticate users and clients trying to connect to the database.
To enable an authentication method:
ALTER AUTHENTICATION v_kerberos ENABLE;
To disable this authentication method:
ALTER AUTHENTICATION v_kerberos DISABLE;
See also
1.12 - Granting and revoking authentication methods
Before Vertica can validate a user or client through an authentication method, you must first associate that authentication method with the user or role that requires it, with GRANT (Authentication).
Before Vertica can validate a user or client through an authentication method, you must first associate that authentication method with the user or role that requires it, with GRANT (authentication). When that user or role no longer needs to connect to Vertica using that method, you can disassociate that authentication from that user with REVOKE AUTHENTICATION.
Grant authentication methods
You can grant an authentication method to a specific user or role. You can also specify the default authentication method by granting an authentication method to PUBLIC, as in the following examples.
-
Associate v_ldap authentication with user jsmith:
=> GRANT AUTHENTICATION v_ldap TO jsmith;
-
Associate v_gss authentication to the role DBprogrammer:
=> CREATE ROLE DBprogrammer;
=> GRANT AUTHENTICATION v_gss TO DBprogrammer;
-
Associate client authentication method v_localpwd with role PUBLIC, which is assigned by default to all users:
=> GRANT AUTHENTICATION v_localpwd TO PUBLIC;
Revoke authentication methods
If you no longer want to authenticate a user or client with a given authentication method, use the REVOKE (authentication) statement as in the following examples.
-
Revoke v_ldap authentication from user jsmith:
=> REVOKE AUTHENTICATION v_ldap FROM jsmith;
-
Revoke v_gss authentication from the role DBprogrammer:
=> REVOKE AUTHENTICATION v_gss FROM DBprogrammer;
-
Revoke localpwd as the default client authentication method:
=> REVOKE AUTHENTICATION localpwd FROM PUBLIC;
1.13 - Hiding database usernames
If you want to keep certain database usernames a secret from connecting clients and your authentication records do not use Fallthrough Authentication, then these two user groups must share the same single authentication method (not necessarily the same authentication record):.
If you want to keep certain database usernames a secret from connecting clients and your authentication records do not use Fallthrough authentication, then these two user groups must share the same single authentication method (not necessarily the same authentication record):
If your authentication records use fallthrough, then ensure that the first authentication method that prompts for a password in the authentication chain is the same for both the secret users and the PUBLIC role. The following methods prompt for a password:
A simple way to satisfy this condition is by duplicating the fallthrough chain for both groups with the same methods. For example, a valid authentication chain would be tls > ldap for both the secret users and the PUBLIC role.
Another valid configuration would be tls > ldap > hash for secret users, and ldap for the PUBLIC role.
1.14 - Hash authentication
The hash authentication method authenticates users with passwords.
The hash authentication method authenticates users with passwords.
In general, you should prefer other authentication methods over hash.
1.14.1 - Password hashing algorithm
Vertica strongly recommends that you use SHA-512 for hash authentication.
Note
Vertica strongly recommends that you use SHA-512 for hash authentication.
Vertica does not store user passwords for the hash authentication method. Rather, Vertica stores a hash of the password. The hashing algorithm is determined by two parameters:
-
A system-level configuration parameter, SecurityAlgorithm:
=> ALTER DATABASE DEFAULT SET PARAMETER SecurityAlgorithm = 'hashing_algorithm';
-
A user-level parameter, SECURITY_ALGORITHM:
=> ALTER USER username SECURITY_ALGORITHM 'hashing_algorithm' IDENTIFIED BY 'new_password';
The system-level parameter, SecurityAlgorithm, can have the following values:
The user-level parameter, SECURITY_ALGORITHM, can have the following values. Values other than NONE will take priority over the system-level parameter:
A user's EFFECTIVE_SECURITY_ALGORITHM is determined by a combination of the system-level and user-level parameters. If the user-level parameter is set to NONE, the effective security algorithm will be that of the system-level parameter. You can override the system-level parameter for a particular user by setting the user-level parameter to a non-NONE value.
You can view these parameters and their effects on each user by querying the system table PASSWORD_AUDITOR.
The following table shows the various combinations of the system-level and user-level parameters and the effective security algorithm for each.
FIPS mode forces the effective security algorithm to be SHA-512.
|
Parameter value |
Effective Security Algorithm |
|
System level: SecurityAlgorithm |
User-level: SECURITY_ALGORITHM |
Algorithm Used |
Algorithm Used (FIPS mode) |
MD5 |
NONE |
MD5 |
SHA-512 |
SHA512 |
NONE |
SHA-512 |
SHA-512 |
MD5 |
MD5 |
MD5 |
SHA-512 |
SHA512 |
MD5 |
MD5 |
SHA-512 |
MD5 |
SHA512 |
SHA-512 |
SHA-512 |
SHA512 |
SHA512 |
SHA-512 |
SHA-512 |
1.14.2 - Configuring hash authentication
The hash authentication method allows users to authenticate with a password.
The hash authentication method allows users to authenticate with a password.
Vertica stores hashes (SHA-512 by default) of passwords and not the passwords themselves. For details, see Password hashing algorithm.
-
Create an authentication record with the hash method. Authentication records are automatically enabled after creation. For example, to create the authentication record v_hash for users that log in from the IP address 192.0.2.0/24:
=> CREATE AUTHENTICATION v_hash METHOD 'hash' HOST '192.0.2.0/24';
-
Associate the v_hash authentication method with the desired users or roles, using a GRANT statement:
=> GRANT AUTHENTICATION v_hash to user1, user2, ...;
1.14.3 - Passwords
Assign a password to a user to allow that user to connect to the database using password authentication.
Assign a password to a user to allow that user to connect to the database using password authentication. When the user supplies the correct password a connection to the database occurs.
Vertica hashes passwords according to each user's EFFECTIVE_SECURITY_ALGORITHM. However, the transmission of the hashed password from the client to Vertica is in plaintext. Thus, it is possible for a "man-in-the-middle" attack to intercept the plaintext password from the client.
Configuring Hash authentication ensures secure login using passwords.
About password creation and modification
You must be a superuser to create passwords for user accounts using the CREATE USER statement. A superuser can set any user account's password.
-
To add a password, use the ALTER USER statement.
-
To change a password, use ALTER USER or the vsql meta-command \password.
Users can also change their own passwords.
To make password authentication more effective, Vertica recommends that you enforce password policies that control how often users are forced to change passwords and the required content of a password. You set these policies using Profiles.
Default password authentication
When you have not specified any authentication methods, Vertica defaults to using password authentication for user accounts that have passwords.
If you create authentication methods, even for remote hosts, password authentication is disabled. In such cases, you must explicitly enable password authentication. The following commands create the local_pwd authentication method and make it the default for all users. When you create an authentication method, Vertica enables it automatically:
=> CREATE AUTHENTICATION local_pwd METHOD hash' LOCAL;
=> GRANT AUTHENTICATION local_pwd To Public;
1.14.3.1 - Profiles
You can set password policies for users by assigning them profiles.
You can set password policies for users by assigning them profiles. You can create multiple profiles to manage the password policies for several categories of users. For example, you could create one profile for interactive users that requires frequent password changes and another profile for user accounts that never requires password changes.
Defining profiles
You create profiles with CREATE PROFILE and alter existing profiles with ALTER PROFILE. Both statements let you set one or more profile parameters which can control, among other things, the minimum lifetime of a password, password complexity, and password-reset rules.
Each profile can specify one or more of the following policies.
-
How often users must change their passwords
-
How long a password must be set before it can be reset
-
How many times users must change their passwords before they can reuse an old password
-
How many times a user can fail to log in before the account is locked
-
The required length and content of the password:
-
Maximum and minimum number of characters
-
Minimum number of capital letters, lowercase letters, digits, and symbols required in a password
-
How different a new password must be from the old password
Assigning profiles
After you define a profile, you can assign it to new and existing users with CREATE USER and ALTER USER, respectively.
Changes to profile policies for password content—for example, PASSWORD_MAX_LENGTH and PASSWORD_MIN_SYMBOLS—affect users only when they change their passwords. Vertica does not test existing passwords to verify that they comply with new password requirements. To enforce immediate compliance with new profile requirements, use ALTER USER...PASSWORD EXPIRE to immediately expire the current user's password. The next time the user logs in, Vertica prompts them to supply a new password, which must comply with the current policy.
Default profile
Each database contains a DEFAULT profile. Vertica assigns the default profile to users who are not explicitly assigned a profile. The default profile also sets parameters of non-default profiles in two cases:
All parameters in the default profile are initially set to unlimited. You can use ALTER PROFILE to change these settings. For example, the following statement modifies the default profile parameter PASSWORD_MIN_SYMBOLS. The change requires passwords to contain at least one symbol, such as $, #, @. This change affects all profiles where PASSWORD_MIN_SYMBOLS is set to default:
ALTER PROFILE DEFAULT LIMIT PASSWORD_MIN_SYMBOLS 1;
Profile settings and client authentication
The following profile settings affect client authentication methods, such as LDAP or GSS:
-
FAILED_LOGIN_ATTEMPTS
-
PASSWORD_LOCK_TIME
All other profile settings are used only by Vertica to manage its passwords.
See also
1.14.3.2 - Password guidelines
For passwords to be effective, they must be hard to guess.
For passwords to be effective, they must be hard to guess. You need to protect passwords from:
-
Dictionary-style, brute-force attacks
-
Users who have knowledge of the password holder (family names, birth dates , etc.)
Use Profiles to enforce good password practices (password length and required content). Make sure database users know the password guidelines, and encourage them not to use personal information in their passwords.
For guidelines on creating strong passwords go to Microsoft Tips for Creating a Strong Password.
See also
1.14.3.3 - Password expiration
The following PROFILE parameters control the conditions for password expiration, new passwords, and minimum lifetime:.
The following PROFILE parameters control the conditions for password expiration, new passwords, and minimum lifetime:
-
PASSWORD_LIFE_TIME - The number of days a password remains valid
-
PASSWORD_MIN_LIFE_TIME - The number of days a password must be set before it can be changed
-
PASSWORD_GRACE_TIME - The number of days a password can be used after it expires
-
PASSWORD_REUSE_MAX - The number of times you must change your password before you can reuse an earlier password
-
PASSWORD_REUSE_TIME - The number of days that must pass after a password is set before you can reuse it
-
PASSWORD_MIN_CHAR_CHANGE - Minimum number of characters that must be different from the previous password
For more details on these and other parameters, see CREATE PROFILE and ALTER PROFILE.
Important
Password expiration has no effect on current sessions.
Password expiration and grace period behavior
The profile parameter PASSWORD_LIFE_TIME controls the life time of a password in days. By default, the DEFAULT profile sets PASSWORD_LIFE_TIME to UNLIMITED, which disables password expiration. You can change this for the DEFAULT and custom profiles with ALTER PROFILE.
Normally, when a password expires, Vertica forces users to change their passwords the next time they log in. However, you can set a PASSWORD_GRACE_TIME to allow users to log in after their password expires. If a user logs in during their grace period, Vertica warns the user that their password has expired. Once this grace period ends, Vertica will issue the standard prompt to change the user's password.
Expire a password
You can expire a user's password immediately using the ALTER USER statement's PASSWORD EXPIRE parameter. By expiring a password, you can:
1.14.3.4 - Account locking
In a profile, you can set a password policy for how many consecutive failed login attempts a user account is allowed before locking.
In a profile, you can set a password policy for how many consecutive failed login attempts a user account is allowed before locking. This locking mechanism helps prevent dictionary-style brute-force attempts to guess users' passwords.
Set account locking
Set this value using the FAILED_LOGIN_ATTEMPTS parameter using the CREATE PROFILE or ALTER PROFILE statement.
Vertica locks any user account that has more consecutive failed login attempts than the value to which you set FAILED_LOGIN_ATTEMPTS. The user cannot log in to a locked account, even by supplying the correct password.
Unlock a locked account
You can unlock accounts in one of two ways, depending on your privileges.
-
Manually: If you are a superuser , you can manually unlock the account using the ALTER USER command.
Note
A superuser account cannot be locked, because it is the only user that can unlock accounts. For this reason, choose a very secure password for a superuser account. See
Password guidelines for suggestions.
-
Password Lock Time Setting: PASSWORD_LOCK_TIME specifies the number of days (units configurable with PasswordLockTimeUnit) an account is locked after a specified number of failed login attempts (configurable with FAILED_LOGIN_ATTEMPTS). Vertica automatically unlocks the account after the specified number of days has passed.
If you set this parameter to UNLIMITED, the user's account is never automatically unlocked and a superuser must manually unlock it.
1.15 - Ident authentication
The Ident protocol, defined in RFC 1413, authenticates a database user with a system user name.To see if that system user can log in without specifying a password, you configure Vertica client authentication to query an Ident server.
The Ident protocol, defined in RFC 1413, authenticates a database user with a system user name.To see if that system user can log in without specifying a password, you configure Vertica client authentication to query an Ident server. With this feature, the DBADMIN user can run automated scripts to execute tasks on the Vertica server.
Caution
Ident responses can be easily spoofed by untrusted servers. Use Ident authentication only on local connections, where the Ident server is installed on the same computer as the Vertica database server.
Following the instructions in these topics to install, set up, and configure Ident authentication for your database:
Examples
The following examples show several ways to configure Ident authentication.
Allow system_user1 to connect to the database as Vertica vuser1:
=> CREATE AUTHENTICATION v_ident METHOD 'ident' LOCAL;
=> ALTER AUTHENTICATION v_ident SET system_users='system_user1';
=> GRANT AUTHENTICATION v_ident to vuser1;
=> ALTER AUTHENTICATION v_ident ENABLE;
Allow system_user1, system_user2, and system_user3 to connect to the database as vuser1. Use colons (:) to separate the user names:
=> CREATE AUTHENTICATION v_ident METHOD 'ident' LOCAL;
=> ALTER AUTHENTICATION v_ident SET system_users='system_user1:system_user2:system_user3';
=> GRANT AUTHENTICATION v_ident TO vuser1;
=> ALTER AUTHENTICATION v_ident ENABLE;
Associate the authentication with Public using a GRANT AUTHENTICATION statement. The users, system_user1, system_user2, and system_user3 can now connect to the database as any database user:
=> CREATE AUTHENTICATION v_ident METHOD 'ident' LOCAL;
=> ALTER AUTHENTICATION v_ident SET system_users='system_user1:system_user2:system_user3';
=> GRANT AUTHENTICATION v_ident to Public;
=> ALTER AUTHENTICATION v_ident ENABLE;
Set the system_users parameter to * to allow any system user to connect to the database as vuser1:
=> CREATE AUTHENTICATION v_ident METHOD 'ident' LOCAL;
=> ALTER AUTHENTICATION v_ident SET system_users='*';
=> GRANT AUTHENTICATION v_ident TO vuser1;
=> ALTER AUTHENTICATION v_ident ENABLE;
Using a GRANT statement, associate the v_ident authentication with Public to allow system_user1 to log into the database as any database user:
=> CREATE AUTHENTICATION v_ident METHOD 'ident' LOCAL;
=> ALTER AUTHENTICATION v_ident SET system_users='system_user1';
=> GRANT AUTHENTICATION v_ident to Public;
=> ALTER AUTHENTICATION v_ident ENABLE;
1.15.1 - Installing and setting up an ident server
To use Ident authentication, you must install one or more packages, depending on your operating system, and enable the Ident server on your Vertica server.
To use Ident authentication, you must install one or more packages, depending on your operating system, and enable the Ident server on your Vertica server. oidentd is an Ident daemon that is compatible with Vertica and compliant with RFC 1413.
Note
You can find the source code and installation instructions for oidentd at the
oidentd website.
To install and configure Ident authentication for use with your Vertica database, follow the appropriate steps for your operating system.
Red hat 7.x/CentOS 7.x
Install an Ident server on Red Hat 7.x or CentOS 7.x by installing the authd and xinetd packages:
$ yum install authd
$ yum install xinetd
Ubuntu/debian
Install oidentd on Ubuntu or Debian by running this command:
$ sudo apt-get install oidentd
SUSE Linux enterprise server
Install the pidentd and xinetd RPMs from the following locations:
Post-installation steps for ubuntu/debian
After you install oidentd on your Ubuntu/Debian system, continue with the following steps:
-
Verify that the Ident server accepts IPv6 connections to prevent authentication failure. To do so, you must enable this capability. In the script /etc/init.d/oidentd, change the line from:
exec="/usr/sbin/oidentd"
to
exec="/usr/sbin/oidentd -a ::"
Then, at the Linux prompt, start oidentd with -a ::.
-
Restart the server with the following command:
$ /etc/init.d/oidentd restart
Post-installation steps for red hat 7.x/CentOS 7.x and SUSE Linux enterprise server
After you install the required packages on your Red Hat 7.x/CentOS 7.x or SUSE Linux Enterprise Server system, continue with the following steps:
-
Enable the auth service by setting disable = no in the configuration file /etc/xinetd.d/auth. If this file does not exist, create it. The following is a sample configuration file:
service auth
{
        disable = no
        socket_type = stream
        wait = no
        user = ident
        cps = 4096 10
        instances = UNLIMITED
        server = /usr/sbin/in.authd
        server_args = -t60 --xerror --os
}
-
Restart the xinetd service with the following command:
$ service xinetd restart
1.15.2 - Configuring ident authentication for database users
To configure Ident authentication, take the following steps:.
To configure Ident authentication, take the following steps:
-
Create an authentication method that uses Ident.
The Ident server must be installed on the same computer as your database, so specify the keyword LOCAL. Vertica requires that the Ident server and database always be on the same computer as the database.
=> CREATE AUTHENTICATION v_ident METHOD 'ident' LOCAL;
-
Set the Ident authentication parameters, specifying the system users who should be allowed to connect to your database.
=> ALTER AUTHENTICATION v_ident SET system_users='user1:user2:user3';
-
Associate the authentication method with the Vertica user. Use a GRANT statement that allows the system user user1 to log in using Ident authentication:
=> GRANT AUTHENTICATION v_ident TO user1;
1.16 - Kerberos authentication
Kerberos authentication uses the following components to perform user authentication.
Kerberos authentication uses the following components to perform user authentication.
Client package
The Kerberos 5 client package communicates with the KDC server. This package is not included as part of the Vertica Analytics Platform installation. Kerberos software is built into Microsoft Windows. If you are using another operating system, you must obtain and install the client package.
If you do not already have the Kerberos 5 client package on your system, download it from the MIT Kerberos Distribution page. Install the package on each Vertica server and client used in Kerberos authentication, except the KDC itself.
Refer to the Kerberos documentation for installation instructions.
Service principals
A service principal consists of a host name, a service name, and a realm to which a set of credentials gets assigned (service/hostname@REALM). These credentials connect to the service, which is a host that you connect to over your network and authenticate using the KDC.
See Specify KDC information and configure realms to create the realm name. The host name must match the value supplied by the operating system. Typically this is the fully qualified host name. If the host name part of your principal does not match the value supplied by the operating system, Kerberos authentication fails.
Some systems use a hosts file (/etc/hosts or /etc/hostnames) to define host names. A hosts file can define more than one name for a host. The operating system supplies the first entry, so use that in your principal. For example, if your hosts file contains:
192.168.1.101 v_vmart_node0001.example.com v_vmart_node0001
then use v_vmart_node0001.example.com as the hostname value.
Note
Depending on your configuration it may be safer to use the fully qualified domain name rather than the hostname.
Configure the following as Kerberos principals:
See the following topics for more information:
Keytab files
Principals are stored in encrypted keytab files. The keytab file contains the credentials for the Vertica principal. The keytab allows the Vertica server to authenticate itself to the KDC. You need the keytab so that Vertica Analytic Database does not have to prompt for a password.
Create one service principal for each node in your cluster. You can then either create individual keytab files (one for each node containing only that node's principal) or create one keytab file containing all the principals.
-
Create one keytab file with all principals to simplify setup: all nodes have the same file, making initial setup easier. If you add nodes later you either update (and redistribute) the global keytab file or make separate keytabs for the new nodes. If a principal is compromised it is compromised on all nodes where it is present in a keytab file.
-
Create separate keytab files on each node to simplify maintenance. Initial setup is more involved as you must create a different file on each node, but no principals are shared across nodes. If you add nodes later you create keytabs on the new nodes. Each node's ke ytab contains only one principal, the one to use for that node.
Ticket-granting ticket
The Ticket-Granting Ticket (TGT) retrieves service tickets that authenticates users to servers in the domain. Future login requests use the cached HTTP Service Ticket for authentication, unless it has expired as set in the ticket_lifetime parameter in krb5.conf.
Multi-realm support
Note
When assigning multiple realms to an authentication record, keep in mind that Vertica cannot distinguish between users from one realm and users from the Vertica realm. This allows the same user to log in to Vertica from multiple realms at the same time.
Vertica provides multi-realm support for Kerberos authentication using the SET param=value parameter in ALTER AUTHENTICATION with REALM as the parameter:
=> ALTER AUTHENTICATION krb_auth_users set REALM='USERS.COM';
=> ALTER AUTHENTICATION krb_auth_realmad set REALM='REALM_AD.COM';
This allows you to assign a different realm so that users from another realm can authenticate to Vertica.
Mutli-realm support applies to GSS authentication types only. You can have one realm per authentication method. If you have multiple authentication methods, each can have its own realm:
=> SELECT * FROM client_auth;
auth_oid | auth_name | is_auth_enabled | auth_host_type | auth_host_address | auth_method | auth_parameters     | auth_priority
---------+-----------+-----------------+----------------+-------------------+-------------+-----------------+-----------------
45035996 | krb001    |   True          |   HOST         |  0.0.0.0/0        |  GSS        | realm=USERS.COM     |  0
45035997 | user_auth |   True          |   LOCAL        |                   |  TRUST      |                     |  1000
45035737 | krb002    |   True          |   HOST         |  0.0.0.0/0        |  GSS        | realm=REALM_AD.COM  |  1
1.16.1 - Configure Vertica for Kerberos authentication
Kerberos provides a strong cryptographic authentication against the devices which lets the client & servers to communicate in a more secured manner.
Kerberos provides a strong cryptographic authentication against the devices which lets the client & servers to communicate in a more secured manner. It addresses network security problems.
Your system must have one or more Kerberos Key Distribution Centers (KDC) installed and configured. The KDCs must be accessible from every node in your Vertica Analytic Database cluster.
The KDC must support Kerberos 5 using GSS-API. For details, see the MIT Kerberos Distribution Page.
In this section
1.16.1.1 - Create the Vertica principals and keytabs on Linux KDC
Vertica uses service principals for system-level operations.
Vertica uses service principals for system-level operations. These principals identify the Vertica service and are used as follows:
-
Kerberized Vertica clients request access to this service when they authenticate to the database.
-
System processes like the Tuple Mover use this identity when they authenticate to external services such as Hadoop.
Create principals and keys as follows:
-
Start the Kerberos 5 database administration utility (kadmin or kadmin.local) to create Vertica principals on a Linux KDC.
-
Use kadmin if you are accessing the KDC on a remote server. If you have access to the Kerberos administrator password, you can use kadmin on any machine where the Kerberos 5 client package is installed. When you start kadmin, the utility prompts you for the Kerberos administrator's password. You might need root privileges on the client to run kadmin.
-
Use kadmin.local if:
kadmin.local does not require the administrators login credentials.
For more information about the kadmin and kadmin.local commands, see the kadmin documentation.
-
Create one service principal for Vertica on each node. The host name must match the value supplied by the operating system. The following example creates the service principal vertica for the node named v_vmart_node0001.example.com:
$ sudo /usr/kerberos/sbin/kadmin.local
kadmin.local add_principal vertica/v_vmart_node0001.example.com
Repeat the ktadd command once per principal. You can create separate keytabs for each principal user or add them all to a single keytab file (such as krb5.keytab). If you are using a single file, see the documentation for the -glob option in the MIT Kerberos documentation.
You must have a user principal for each Vertica Analytic Database user that uses Kerberos Authentication. For example:
$ sudo /usr/kerberos/sbin/kadmin.local
kadmin.local add_principal [options] VerticaUser1
-
Copy each keytab file to the /etc folder on the corresponding cluster node. Use the same path and file name on all nodes.
-
On each node, make the keytab file readable by the file owner who is running the database process (typically, the Linux dbadmin user). For example, you can change ownership of the files to dbadmin as follows:
$ sudo chown dbadmin *.keytab
Important
In a production environment, you must control who can access the keytab file to prevent unauthorized users from delegating your server. For more information about delegation (also known as impersonation), see
Technet.Microsoft.com.
After you create a keytab file, you can use the klist command to view keys stored in the file:
$ sudo /usr/kerberos/bin/klist -ke -t
Keytab name: FILE:/etc/krb5.keytab
KVNO    Timestamp        Principal
---- ------------------- --------------------------------------------------------------------------
4     08/15/2017 7:35:41 vertica/v_vmart_node0001.example.com@EXAMPLE.COM (aes256-cts-hmac-sha1-96)
4     08/15/2017 7:35:41 vertica/v_vmart_node0001.example.com@EXAMPLE.COM (aes128-cts-hmac-sha1-96)
-
On Vertica run the following to ensure the Kerberos parameters are set correctly:
=> select parameter_name, current_value from configuration_parameters where parameter_name like 'Ker%';
parameter_name         |                      current_value
-----------------------+---------------------------------------------------------------------
KerberosHostname       | v_vmart_node0001.example.com
KerberosKeytabFile     | /etc/krb5.keytab
KerberosRealm          | EXAMPLE.COM
KerberosTicketDuration | 0
KerberosServiceName    | vertica
(5 rows)
-
Ensure that all clients use the gss authentication method.
From Vertica:
=> CREATE USER bob;
CREATE USER

=> CREATE AUTHENTICATION v_kerberos method 'gss' host '0.0.0.0/0';
CREATE AUTHENTICATION

=> ALTER AUTHENTICATION v_kerberos enable;
ALTER AUTHENTICATION

=> GRANT AUTHENTICATION v_kerberos to bob;
GRANT AUTHENTICATION
From the operating system command line:
$ kinit bob

$ vsql -U bob -k vertica -K v_vmart_node0001.example.com -h v_vmart_node0001 -c "select client_authentication_name,
authentication_method from sessions;"
 client_authentication_name | authentication_method--
----------------------------+-----------------------
 v_kerberos                 |    GSS-Kerberos

(1 row)
-
On Vertica, run KERBEROS_CONFIG_CHECK to verify the Kerberos configuration. KERBEROS_CONFIG_CHECK verifies the following:
-
The existence of the kinit and kb5.conf files.
-
Whether the keytab file exists and is set
-
The Kerberos configuration parameters set in the database:
-
KerberosServiceName
-
KerberosHostname
-
KerberosRealm
-
Vertica Principal
-
That Kerberos can read the Vertica keys
-
That Kerberos can get the tickets for the Vertica principal
-
That Vertica can initialize the keys with kinit
1.16.1.2 - Specify KDC information and configure realms
Each client and Vertica Analytic Database server in the Kerberos realm must have a valid, identically configured Kerberos configuration (krb5.conf) file.
Each client and Vertica Analytic Database server in the Kerberos realm must have a valid, identically configured Kerberos configuration (krb5.conf) file. Without this file, the client does not know how to reach the KDC.
If you use Microsoft Active Directory, you do not need to perform this step. Refer to the Kerberos documentation for your platform for more information about the Kerberos configuration file on Active Directory.
At a minimum, you must configure the following sections in the krb5.conf file.
- [
libdefaults]—Settings used by the Kerberos 5 library
- [
realms]—Realm-specific contact information and settings
- [
domain_realm]—Maps server hostnames to Kerberos realms
See the Kerberos documentation for information about other sections in this configuration file.
You must update the /etc/krb5.conf file to reflect your site's Kerberos configuration. The simplest way to enforce consistency among all clients and servers in the Kerberos realm is to copy the /etc/krb5.conf file from the KDC. Then, place this file in the /etc directory on each Vertica cluster node.
1.16.1.3 - Inform Vertica about the Kerberos principal
Follow these steps to inform Vertica about the principal name and keytab location.
Follow these steps to inform Vertica about the principal name and keytab location.
For information about the parameters that you are setting in this procedure, see Kerberos parameters.
-
Log in to the database as an administrator (typically dbadmin).
-
Set the KerberosKeyTabFile configuration parameter to point to the location of the keytab file:
=> ALTER DATABASE DEFAULT SET PARAMETER KerberosKeytabFile = '/etc/krb5.keytab';
The keytab file must be in the same location (/etc/krb5.keytab in this example) on all nodes.
-
Set the service name for the Vertica principal; for example, vertica:
=> ALTER DATABASE DEFAULT SET PARAMETER KerberosServiceName = 'vertica';
-
Provide the realm portion of the principal, for example, EXAMPLE.COM:
=> ALTER DATABASE DEFAULT SET PARAMETER KerberosRealm = 'EXAMPLE.COM'
1.16.1.4 - Configure the authentication method for all clients
To make sure that all clients use the gss authentication method, run the following statements:.
To make sure that all clients use the gss authentication method, run the following statements:
=> CREATE AUTHENTICATION <method_name> METHOD 'gss' HOST '0.0.0.0/0';
=> GRANT AUTHENTICATION <method_name> TO Public;
For more information, see Implementing Client Authentication.
1.16.1.5 - Creating the principals and keytab on active directory
Active Directory stores information about members of the Windows domain, including users and hosts.
Active Directory stores information about members of the Windows domain, including users and hosts.
Vertica uses the Kerberos protocol to access this information in order to authenticate Windows users to the Vertica database. The Kerberos protocol uses principals to identify users and keytab files to store their cryptographic information. You need to install the keytab files into Vertica to enable the Vertica database to cryptographically authenticate windows users.
This procedure describes:
-
Creating a Vertica service principal.
-
Exporting the keytab files for these principals
-
Installing the keytab files in the Vertica database. This allows Vertica to authenticate Windows users and grant them access to the Vertica database.
-
Create a Windows account (principal) for the Vertica service and one Vertica host for each node/host in the cluster. This procedure creates Windows accounts for host verticanode01 and service vertica running on this node.
When you create these accounts, select the following:
Note
You can deselect Password never expires. However, if you change these user passwords, you must recreate the keytab files and reinstall them into Vertica. This includes repeating the entire procedure.
-
If you are using external tables on HDFS that are secured by Kerberos authentication, you must enable Delegation. To do so, access the Active Directory Users and Computers dialog, right-click the Windows account (principal) for the Vertica service, and select Delegation. Trust this user for delegation to any service.
-
Run the following command to create the keytab for the host verticanode01.dc.com node/host:
$ ktpass -out ./host.verticanode01.dc.com.keytab -princ host/verticanode01.dc.com@DC.COM -mapuser verticanode01
 -mapop set -pass secret  -ptype KRB5_NT_SRV_HST
-
Run the following command to create the keytab for the vertica service:
$ ktpass -out ./vertica.verticanode01dc.com.keytab -princ vertica/verticanode01.dc.com@DC.COM -mapuser vertica
 -mapop set -pass secret  -ptype KRB5_NT_PRINCIPAL
For more information about keytab files, see Technet.Microsoft.com.
-
Run the following commands to verify that the service principal name is mapped correctly. You must run these commands for each node in your cluster:
$ setspn -L vertica
    Registered ServicePrincipalNamefor CN=vertica,CN=Users,DC=dc,DC=com
      vertica/verticanode01.dc.com

$ setspn -L verticanode01
    Registered ServicePrincipalNamefor CN=verticanode01,CN=Users,DC=dc,DC=com
      host/verticanode01.dc.com
-
Copy the keytabs you created above, vertica.verticanode01.dc.com.keytab and host.verticanode01.dc.com.keytab, to the Linux host verticanode01.dc.com.
-
Combine the keytab files into a single keytab:
[release@vertica krbTest]$ /usr/kerberos/sbin/ktutil
ktutil:  rkt host.verticanode01.dc.com.keytab
ktutil:  rkt vertica.verticanode01.dc.com.keytab
ktutil:  list
slot KVNO Principal
---- ---- ---------------------------------------------------------------------
  1    3  host/verticanode01.dc.com@DC.COM
  2   16  vertica/verticanode01.dc.com@DC.COM
ktutil:  wkt verticanode01.dc.com.keytab
ktutil:  exit
This creates a single keytab file that contains the server principal for authentication.
-
Copy the new keytab file to the catalog directory. For example:
$ cp verticanode01.dc.com.keytab /home/dbadmin/VMart/v_vmart_nodennnn_catalog
-
Test the keytab file's ability to retrieve a ticket to ensure it works from the Vertica node:
$ kinit vertica/verticanode01.dc.com -k -t verticanode01.dc.com.keytab
$ klist

Ticket cache: KFILE:/tmp/krb_ccache_1003
Default principal: vertica/verticanode01.dc.com@DC.COM

Valid starting Expires Service principal
04/08/2017 13:35:25 04/08/2017 23:35:25 krbtgt/DC.COM@DC.COM
                renew until 04/15/2017 14:35:25
When the ticket expires or not automatically retrieved you need to manually run the kinit command. See Get the Kerberos ticket and authenticate Vertica.
-
Set the right permissions and ownership on the keytab files:
$ chmod 600 verticanode01.dc.com.keytab
$ chown dbadmin:verticadba verticanode01.dc.com.keytab
-
Set the following Kerberos parameters using ALTER DATABASE to inform Vertica about the Kerberos principal:
KerberosKeytabFile=<CATALOGDIR>/verticanode01.dc.com.keytab
KerberosRealm=DC.COM
KerberosServiceName=vertica
KerberosTicketDuration = 0
KerberosHostname=verticanode01.dc.com
-
Restart the Vertica server.
-
Test your Kerberos setup as follows to ensure that all clients use the gss authentication method.
From Vertica:
=> CREATE USER windowsuser1;
CREATE USER

=> CREATE AUTHENTICATION v_kerberos method 'gss' host '0.0.0.0/0';
CREATE AUTHENTICATION

=> ALTER AUTHENTICATION v_kerberos enable;
ALTER AUTHENTICATION

=> GRANT AUTHENTICATION v_kerberos to windowsuser1;
GRANT AUTHENTICATION
From the operating system command line:
$ kinit windowsuser1

$ vsql -U windowsuser1 -k vertica -K verticanode01.dc.com -h verticanode01.dc.com -c "select client_authentication_name,
authentication_method from sessions;"
 client_authentication_name | authentication_method--
----------------------------+-----------------------
 v_kerberos                 |    GSS-Kerberos

(1 row)
-
Run KERBEROS_CONFIG_CHECK to verify the Kerberos configuration. KERBEROS_CONFIG_CHECK verifies the following:
-
The existence of the kinit and kb5.conf files.
-
Whether the keytab file exists and is set
-
The Kerberos configuration parameters set in the database:
-
KerberosServiceName
-
KerberosHostname
-
KerberosRealm
-
Vertica Principal
-
That Kerberos can read the Vertica keys
-
That Kerberos can get the tickets for the Vertica principal
-
That Vertica can initialize the keys with kinit
1.16.1.6 - Get the Kerberos ticket and authenticate Vertica
If your organization uses Kerberos as part of the login process, Kerberos tickets are automatically retrieved upon login.
If your organization uses Kerberos as part of the login process, Kerberos tickets are automatically retrieved upon login. Otherwise, you need to run kinit to retrieve the Kerberos ticket.
The following example shows how to retrieve the ticket and authenticate Vertica Analytic Database with the KDC using the kinit command. EXAMPLE.COM is the realm name. You must use the realm name with your username to retrieve a Kerberos ticket. See Specify KDC information and configure realms.
$ kinit
Password for principal_user@EXAMPLE.COM: kpasswd
You are prompted for the password of the principal user name created when you created the principals and keytabs (see Create the Vertica principals and keytabs on Linux KDC).
The Kerberos ticket gets cached for a pre-determined length of time. See Ticket Management in the Kerberos documentation for more information on setting expiration parameters.
Upon expiration, you need to run the kinit command again to retrieve another Kerberos ticket.
1.16.2 - Configure clients for Kerberos authentication
Each supported platform has a different security framework.
Each supported platform has a different security framework. Thus, the steps required to configure and authenticate against Kerberos differ among clients.
On the server side, you construct the Vertica Kerberos service name principal using this format:
Kerberos_Service_Name/Kerberos_Host_Name@Kerberos_Realm
For each client, the GSS libraries require the following format for the Vertica service principal:
Kerberos_Service_Name@Kerberos_Host_Name
You can omit the realm portion of the principal because GSS libraries use the realm name of the configured default (Kerberos_Realm) realm.
For information about client connection strings, see the following topics:
In this section
1.16.2.1 - Configure ODBC and vsql clients on non-windows platforms
To configure an ODBC or vsql client on Linux or MAC OSX, you must first install the Kerberos 5 client package.
To configure an ODBC or vsql client on Linux or MAC OSX, you must first install the Kerberos 5 client package. See Kerberos authentication.
After you install the Kerberos 5 client package, you must provide clients with a valid Kerberos configuration file (krb5.conf). To communicate with the KDC, each client participating in Kerberos authentication must have a valid, identically configured krb5.conf file. The default location for the Kerberos configuration file is /etc/krb5.conf.
Tip
To enforce consistency among clients, Vertica Analytic Database, and the KDC, copy the /etc/krb5.conf file from the KDC to the client's/etc directory.
The Kerberos configuration (krb5.conf) file contains Kerberos-specific information, including:
-
How to reach the KDC
-
Default realm name
-
Domain
-
Path to log files
-
DNS lookup
-
Encryption types to use
-
Ticket lifetime
The default location for the Kerberos configuration file is /etc/krb5.conf.
When configured properly, the client can authenticate with Kerberos and retrieve a ticket through the kinit utility (see Acquire an ODBC Authentication Request and Connection below). Likewise, the server can then use ktutil to store its credentials in a keytab file
ODBC and vsql use the client's ticket established by kinit to perform Kerberos authentication. These clients rely on the security library's default mechanisms to find the ticket file and the and Kerberos configuration file.
To authenticate against Kerberos, call the kinit utility to obtain a ticket from the Kerberos KDC server. The following two examples show how to send the ticket request using ODBC and vsql clients.
Acquire an ODBC authentication request and connection
-
On an ODBC client, acquire a ticket for the kuser user by calling the kinit utility.
$ kinit kuser@EXAMPLE.COM
Password for kuser@EXAMPLE.COM:
-
Connect to Vertica, and provide the principals in the connection string:
char outStr[100];
SQLLEN len;
SQLDriverConnect(handle, NULL, "Database=VMart;User=kuser;
Server=myserver.example.com;Port=5433;KerberosHostname=vcluster.example.com",
SQL_NTS, outStr, &len);
Acquire a vsql authentication request connection
If the vsql client is on the same machine you are connecting to, vsql connects through a UNIX domain socket. This connection bypasses Kerberos authentication. When you authenticate with Kerberos, especially if the client authentication method is configured as 'local', you must include the -h hostname option. See Command Line Options.
-
On the vsql client, call the kinit utility:
$ kinit kuser@EXAMPLE.COM
Password for kuser@EXAMPLE.COM:
-
Connect to Vertica, and provide the host and user principals in the connection string:
$ ./vsql -K vcluster.example.com -h myserver.example.com -U kuser
Welcome to vsql, the Vertica Analytic Database
interactive terminal.

Type:  \h or \? for help with vsql commands
\g or terminate with semicolon to execute query
\q to quit
In the future, when you log in to vsql as kuser, vsql uses your cached ticket without prompting you for a password.
Verify the authentication method
You can verify the authentication method by querying the SESSIONS system table:
=> SELECT authentication_method FROM sessions;
 authentication_method
-----------------------
GSS-Kerberos
(1 row)
See also
1.16.2.2 - Configure ADO.NET, ODBC, and vsql clients on Windows
The Vertica client drivers support the Windows SSPI library for Kerberos authentication.
The Vertica client drivers support the Windows SSPI library for Kerberos authentication. Windows Kerberos configuration is stored in the registry.
You can choose between two different setup scenarios for Kerberos authentication on ODBC and vsql clients on Windows and ADO.NET:
Windows KDC on active directory with windows built-in Kerberos client and Vertica
Kerberos authentication on Windows is commonly used with Active Directory, Microsoft's enterprise directory service/Kerberos implementation.Typically your organization's network or IT administrator performs the setup.
Windows clients have Kerberos authentication built into the authentication process. You do not need any additional software.
Your login credentials authenticate you to the Kerberos server (KDC) when you:
To use Kerberos authentication on Windows clients, log in as REALM\user.
Important
When you use the ADO.NET driver to connect to Vertica, you can optionally specify
IntegratedSecurity=true in the connection string. This informs the driver to authenticate the calling user against the user's Windows credentials. As a result, you do not need to include a user name or password in the connection string. Any
user=<username> entry to the connection string is ignored.
Linux KDC with windows built-in Kerberos client and Vertica
A simple, but less common scenario is to configure Windows to authenticate against a non-Windows KDC. In this implementation, you use the ksetup utility to point the Windows operating system native Kerberos capabilities at a non-Active Directory KDC. By logging in to Windows, you obtain a ticket-granting ticket, similar to the Active Directory implementation. However, in this case, Windows is internally communicating with a Linux KDC. See the Microsoft Windows Server Ksetup page for more information.
When a database/windows user logs into their Windows machine (or after performing a kinit on Windows) the Kerberos ticket MUST have ok_as_delegate and forwardable flag set to be able to access webhdfs based external tables as follows:
$ CMD \> klist
#2>     Client: release @ VERT.LOCAL
Server: vertica/example.com @ VERT.LOCAL
KerbTicket Encryption Type: RSADSI RC4-HMAC(NT)
Ticket Flags 0x40a50000 forwardable renewable pre_authent ok_as_delegate name_canonicalize
Start Time: 9/27/2017 13:24:43 (local)
End Time:   9/27/2017 20:34:45 (local)
Renew Time: 10/3/2017 15:04:45 (local)
Session Key Type: RSADSI RC4-HMAC(NT)
Cache Flags: 0
Kdc Called: ADKDC01
Note
The Ticket Flags setting above must contain
ok_as_delegate and
forwardable entries. For information on these parameters see
Kerberos documentation.
Depending on which implementation you want to configure, refer to one of the following pages on the Microsoft Server website:
Authenticate and connect clients
The KDC can authenticate both an ADO.NET and a vsql client.
Note
Use the fully-qualified domain name as the server in your connection string; for example, use host.example.com instead of just host. That way, if the server moves location, you do not have to change your connection string.
Verify an ADO.NET authentication request and connection
This example shows how to use the IntegratedSecurity=true, setting to specify that the ADO.NET driver authenticate the calling user's Windows credentials:
VerticaConnection conn = new
VerticaConnection("Database=VMart;Server=host.example.com;
Port=5433;IntegratedSecurity=true;
KerberosServiceName=vertica;KerberosHostname=vcluster.example.com");
conn.open();
Verify a vsql authentication request and connection
-
Log in to your Windows client, for example, as EXAMPLE\kuser.
-
Run the vsql client and supply the connection string to Vertica:
C:\Users\kuser\Desktop>vsql.exe -h host.example.com -K vcluster -U kuser

Welcome to vsql, the Vertica Analytic Database interactive terminal.
Type:  \h or \? for help with vsql commands
\g or terminate with semicolon to execute query
\q to quit
See also
1.16.2.3 - Configure JDBC clients on all platforms
Kerberos authentication on JDBC clients uses Java Authentication and Authorization Service (JAAS) to acquire the initial Kerberos credentials.
Kerberos authentication on JDBC clients uses Java Authentication and Authorization Service (JAAS) to acquire the initial Kerberos credentials. JAAS is an API framework that hides platform-specific authentication details and provides a consistent interface for other applications.
You specify the client login process through the JAAS Login Configuration File. This file contains options that specify the authentication method and other settings to use for Kerberos. A class called the LoginModule defines valid options in the configuration file.
The JDBC client principal is crafted as jdbc-username@server-from-connection-string.
Implement the LoginModule
Vertica recommends that you use the JAAS public class com.sun.security.auth.module.Krb5LoginModul provided in the Java Runtime Environment (JRE).
The Krb5LoginModule authenticates users using Kerberos protocols and is implemented differently on non-Windows and Windows platforms:
- On non-Windows platforms: The
Krb5LoginModule defers to a native Kerberos client implementation. Thus, you can use the same /etc/krb5.conf setup as you use to configure ODBC and vsql clients on Linux and MAC OSX platforms.
- On Windows platforms: The
Krb5LoginModule uses a custom Kerberos client implementation bundled with the Java Runtime Environment (JRE). Windows settings are stored in a %WINDIR%\krb5.ini file, which has similar syntax and conventions to the non-Windows krb5.conf file. You can copy a krb5.conf from a non-Windows client to %WINDIR%\krb5.ini.
You can find documentation for the LoginModules in the com.sun.security.auth package, and on the Krb5LoginModule web page.
Create the JAAS login configuration
The JAASConfigName connection property identifies a specific configuration within a JAAS configuration that contains the Krb5LoginModule and its settings. The JAASConfigName setting lets multiple JDBC applications with different Kerberos settings coexist on a single host. The default configuration name is verticajdbc.
Important
Carefully construct the JAAS login configuration file. If syntax is incorrect, authentication fails.
You can configure JAAS-related settings in the java.security master security properties file. This file resides in the lib/security directory of the JRE. For more information, see Appendix A in the JavaTM Authentication and Authorization Service (JAAS) Reference Guide.
Create a JDBC login context
The following example shows how to create a login context for Kerberos authentication on a JDBC client. The client uses the default JAASConfigName of verticajdbc and specifies that:
-
The ticket-granting ticket will be obtained from the ticket cache
-
The user will not be prompted for a password if credentials cannot be obtained from the cache, keytab file, or through a shared state.
verticajdbc {
  com.sun.security.auth.module.Krb5LoginModule
  required
  useTicketCache=true
  doNotPrompt=true;
};
JDBC authentication request and connection
You can configure the Krb5LoginModule to use a cached ticket or keytab. The driver can also acquire a ticket or keytab automatically if the calling user provides a password.
In the preceding example, the login process uses a cached ticket and does not prompt for a password because both useTicketCache and doNotPrompt are set to true. If doNotPrompt=false and you provide a user name and password during the login process, the driver provides that information to the LoginModule. The driver then calls the kinit utility on your behalf.
-
On a JDBC client, call the kinit utility to acquire a ticket:
$ kinit kuser@EXAMPLE.COM
If you prefer to use a password instead of calling the kinit utility, see the next section.
-
Connect to Vertica:
Properties props = new Properties();
props.setProperty("user", "kuser");
props.setProperty("KerberosServiceName", "vertica");
props.setProperty("KerberosHostName", "vcluster.example.com");
props.setProperty("JAASConfigName", "verticajdbc");
Connection conn = DriverManager.getConnection
"jdbc:vertica://myserver.example.com:5433/VMart", props);
Have the driver acquire a ticket
Sometimes, you may want to bypass calling the kinit utility yourself but still use encrypted, mutual authentication. In such cases, you can optionally pass the driver a clear text password to acquire the ticket from the KDC. The password is encrypted when sent across the network. For example, useTicketCache and doNotPrompt are both false in the following example. Thus, the calling user's credentials are not obtained through the ticket cache or keytab.
$ verticajdbc  {
  com.sun.security.auth.module.Krb5LoginModule
  required
  useTicketCache=false
  doNotPrompt=false;
};
The preceding example demonstrates the flexibility of JAAS. The driver no longer looks for a cached ticket, and you do not have to call kinit. Instead, the driver takes the password and user name and calls kinit on your behalf.
See also
1.16.3 - Troubleshooting Kerberos authentication
These tips can help you avoid issues related to Kerberos authentication with Vertica and to troubleshoot any problems that occur.
These tips can help you avoid issues related to Kerberos authentication with Vertica and to troubleshoot any problems that occur.
JDBC client authentication fails
If Kerberos authentication fails on a JDBC client, check the JAAS login configuration file for syntax issues. If syntax is incorrect, authentication fails.
Working domain name service (DNS) not configured
Verify that the DNS entries and the system host file (/etc/hosts or /etc/hostnames) on the network are all properly configured for your environment. If you are using a fully qualified domain name, ensure that is properly configured as well. Refer to the Kerberos documentation for your platform for details.
System clocks out of sync
System clocks in your network must remain in sync for Kerberos authentication to work properly. If you access data in HDFS, then Vertica nodes must also be in sync with Hadoop.
All systems except red hat 7/CentOS 7
To keep system clocks in sync:
-
Install NTP on the Kerberos server (KDC).
-
Install NTP on each server in your network.
-
Synchronize system clocks on all machines that participate in the Kerberos realm within a few minutes of the KDC and each other
Clock skew can be a problem on Linux virtual machines that need to sync with the Windows Time Service. Use the following stepsto keep time in sync:
-
Using any text editor, open /etc/ntp.conf.
-
Under the Undisciplined Local Clock section, add the IP address for the Vertica server. Then, remove existing server entries.
-
Log in to the server as root, and set up a cron job to sync time with the added IP address every half hour, or as often as needed. For example:
# 0 */2 * * * /etc/init.d/ntpd restart
-
Alternatively, run the following command to force clock sync immediately:
$ sudo /etc/init.d/ntpd restart
For more information, see Enabling network time protocol (NTP) and the Network Time Protocol website.
Red hat 7/CentOS 7 systems
In Red Hat 7/CentOS 7, ntpd is deprecated in favor of chrony. To keep system clocks in your network in sync for Kerberos authentication to work properly, do the following:
-
Install chrony on the Kerberos server (KDC).
-
Install chrony on each server in your network.
-
Synchronize system clocks on all machines that participate in the Kerberos realm within a few minutes of the KDC and each other.
Clock skew on Linux virtual machines
Clock skew can be problematic on Linux virtual machines that need to sync with the Windows Time Service. Try the following to keep time in sync:
-
Using any text editor, open /etc/chrony.conf.
-
Under the Undisciplined Local Clock section, add the IP address for the Vertica server. Then, remove existing server entries.
-
Log in to the server as root, and set up a cron job to sync time with the added IP address every half hour, or as often as needed. For example:
# 0 */2 * * * systemctl start chronyd
-
Alternatively, run the following command to force clock sync immediately:
$ sudo systemctl start chronyd
For more information, see the Red Hat chrony guide.
Kerberos ticket is valid, but Hadoop access fails
Vertica uses Kerberos tickets to obtain Hadoop tokens. It then uses the Hadoop tokens to access the Hadoop data. Hadoop tokens expire after a period of time, so Vertica periodically refreshes them. However, if your Hadoop cluster is set to expire tokens frequently, it is possible that tokens might not be refreshed in time. If the token expires, you cannot access data.
Setting the HadoopFSTokenRefreshFrequency configuration parameter allows you to specify how often Vertica should refresh the token. Specify this value, in seconds, to be smaller than the expiration period set for Hadoop. For example:
=> ALTER DATABASE exampledb SET HadoopFSTokenRefreshFrequency = '86400';
For another cause of Hadoop access failure, see System Clocks Out of Sync.
Encryption algorithm choices
Kerberos is based on symmetric encryption. Be sure that all Kerberos parties used in the Kerberos realm agree on the encryption algorithm to use. If they do not agree, authentication fails. You can review the exceptions in the vertica.log.
On a Windows client, be sure the encryption types match the types set on Active Directory. See Configure Vertica for Kerberos authentication.
Be aware that Kerberos is used only for securing the login process. After the login process completes, by default, information travels between client and server without encryption. If you want to encrypt traffic, use SSL. For details, see Implementing SSL.
Kerberos passwords not recognized
If you change your Kerberos password, you must re-create all of your keytab files.
Using the ODBC data source configuration utility
On Windows vsql clients, you may choose to use the ODBC Data Source Configuration utility and supply a client Data Source. If so, be sure you enter a Kerberos host name in the Client Settings tab to avoid client connection failures with the Vertica Analytic Database server.
This problem can arise in configurations where each Vertica node uses its own Kerberos principal. (This configuration is recommended.) When using vbr or admintools you might see an error such as the following:
$ vsql: GSSAPI continuation error: Miscellaenous failure
GSSAPI continuation error: Server not found in Kerberos database
Backup/restore and the admin tools use the value of KerberosHostname, if it is set, in the Kerberos principal used to authenticate. The same value is used on all nodes. If you have defined one Kerberos principal per node, as recommended, this value does not match. To correct this, unset the KerberosHostname parameter:
=> ALTER DATABASE DEFAULT CLEAR KerberosHostname;
Server's principal name does not match host name
This problem can arise in configurations where a single Kerberos principal is used for all nodes. Vertica recommends against using a single Kerberos principal for all nodes. Instead, use one principal per node and do not set the KerberosHostname parameter.
In some cases during client connection, the Vertica server's principal name might not match the host name in the connection string. (See also Using the ODBC Data Source Configuration Utility in this topic.)
On Windows vsql clients, you may choose to use the ODBC Data Source Configuration utility and supply a client Data Source. If so, be sure you enter a Kerberos host name in the Client Settings tab to avoid client connection failures with the Vertica server.
On ODBC, JDBC, and ADO.NET clients, set the host name portion of the server's principal using the KerberosHostName connection string.
Tip
On vsql clients, you set the host name portion of the server's principal name using the -K KRB HOST command-line option. The default value is specified by the -h switch, which is the host name of the machine on which the Vertica server is running. -K is equivalent to the drivers' KerberosHostName connection string value.
For details, see Command Line Options.
Principal/host mismatch issues and resolutions
The following issues can occur if the principal and host are mismatched.
The KerberosHostName configuration parameter has been overridden
For example, consider the following connection string:
jdbc:vertica://v_vmart_node0001.example.com/vmart?user=kuser
Because the this connection string includes no explicit KerberosHostName parameter, the driver defaults to the host in the URL (v_vmart_node0001.example.com). If you overwrite the server-side KerberosHostName parameter as “abc”, the client generates an incorrect principal.
To resolve this issue, explicitly set the client’s KerberosHostName to the connection string, as in this example:
jdbc:vertica://v_vmart_node0001.example.com/vmart?user=kuser&kerberoshostname=abc
Connection load balancing is enabled... but the node against which the client authenticates might not be the node in the connection string.
In this situation, consider changing all nodes to use the same KerberosHostName setting. When you use the default to the host that was originally specified in the connection string, load balancing cannot interfere with Kerberos authentication.
A DNS name does not match the Kerberos host name
For example, imagine a cluster of six servers, where you want hr-servers and finance-servers to connect to different nodes on the Vertica cluster. Kerberos authentication, however, occurs on a single (the same) KDC. In the following example, the Kerberos service host name of the servers is server.example.com.
Suppose you have the following list of example servers:
server1.example.com 192.16.10.11
server2.example.com 192.16.10.12
server3.example.com 192.16.10.13
server4.example.com 192.16.10.14
server5.example.com 192.16.10.15
server6.example.com 192.16.10.16
Now, assume you have the following DNS entries:
finance-servers.example.com 192.168.10.11, 192.168.10.12, 192.168.10.13
hr-servers.example.com 192.168.10.14, 192.168.10.15, 192.168.10.16
When you connect to finance-servers.example.com, specify:
For example:
$ vsql -h finance-servers.example.com -K server.example.com
No DNS is set up on the client machine... so you must connect by IP only
To resolve this issue, specify:
For example:
$ vsql -h 192.168.1.12 -K server.example.com
There is a load balancer involved (Virtual IP)... but there is no DNS name for the VIP
Specify:
For example:
$ vsql -h <virtual IP> -K server.example.com
You connect to Vertica using an IP address... but there is no host name to construct the Kerberos principal name.
Provide the instance or host name for the Vertica as described in Inform Vertica about the Kerberos principal
The server-side KerberosHostName configuration parameter is set to a name other than the Vertica node's host name... but the client cannot determine the host name based on the host name in the connection string alone.
Reset KerberosHostName to match the name of the Vertica node's host name. For more information, see the following topics:
1.17 - LDAP authentication
Lightweight Directory Access Protocol (LDAP) is an authentication method that works like password authentication.
Lightweight Directory Access Protocol (LDAP) is an authentication method that works like password authentication. The main difference is that the LDAP method authenticates clients trying to access your Vertica database against an LDAP or Active Directory server. Use LDAP authentication when your database needs to authenticate a user with an LDAP or Active Directory server.
1.17.1 - LDAP prerequisites and definitions
Before you configure LDAP authentication for your Vertica database you must have:.
Prerequisites
Before you configure LDAP authentication for your Vertica database you must have:
-
IP address and host name for the LDAP server. Vertica supports IPv4 and IPv6 addresses.
-
Your organization's Active Directory information.
-
A service account for search and bind.
-
Administrative access to your Vertica database.
-
open-ldap-tools package installed on at least one node. This package includes ldapsearch.
Definitions
The following definitions are important to remember for LDAP authentication:
|
Parameter name |
Description |
|
Host |
IP address or host name of the LDAP server. Vertica supports IPv4 and IPv6 addresses. For more information, see IPv4 and IPv6 for Client Authentication. |
|
Common name (CN) |
Depending on your LDAP environment, this value can be either the username or the first and last name of the user. |
|
Domain component (DC) |
Comma-separated list that contains your organization's domain component broken up into separate values, for example:
dc=vertica, dc=com
|
|
Distinguished name (DN) |
domain.com. A DN consists of two DC components, as in "DC=example, DC= com". |
|
Organizational unit (OU) |
Unit in the organization with which the user is associated, for example, Vertica Users. |
|
sAMAccountName |
An Active Directory user account field. This value is usually the attribute to be searched when you use bind and search against the Microsoft Active Directory server. |
|
UID |
A commonly used LDAP account attribute used to store a username. |
|
Bind |
LDAP authentication method that allows basic binding using the DN. |
|
Search and bind |
LDAP authentication method that must log in to the LDAP server to search on the specified attribute. |
|
Service account |
An LDAP user account that can be used to log in to the LDAP server during bind and search. This account's password is usually shared. |
|
Anonymous binding |
Allows a client to connect and search the directory (search and bind) without needing to log in. |
ldapsearch |
A command-line utility to search the LDAP directory. It returns information that you use to configure LDAP search and bind. |
|
basedn |
Distinguished name where the directory search should begin. |
|
binddn |
Domain name to find in the directory search. |
|
search_attribute |
Text to search for to locate the user record. The default is UID. |
1.17.2 - LDAP authentication parameters
There are several parameters that you need to configure for LDAP authentication.
There are several parameters that you need to configure for LDAP authentication.
General LDAP parameters
Use the following parameters to configure for either LDAP bind or LDAP bind and search:
|
Parameter name |
Description |
host |
LDAP server URL in the following format:
schema://host:optional_port
Where schema is one of the following:
-
ldap: The connection between Vertica and the LDAP server uses plaintext if TLSMODE of LDAPAuth is DISABLE. Set TLSMODE to ENABLE or higher for StartTLS (LDAP over TLS).
-
ldaps: If the TLSMODE of LDAPAuth is ENABLE or higher, the connection between Vertica and the LDAP server uses LDAPS.
|
|
ldap_continue |
When set to yes, this parameter allows a connection retry when a user not found error occurs during the previous connection attempt.
For any other failure error, the system automatically retries the connection.
|
starttls |
Whether to request the connection between Vertica and the LDAP server during user authentication to be upgraded to TLS. You must configure the LDAPAuth TLS Configuration before using this parameter.
starttls can be set to one of the following:
-
soft: If the server does not support TLS, use a plaintext connection. This value is equivalent to the -Z option in ldapsearch. If you use soft, Vertica ignores the certificate verification policies of the TLSMODE in the LDAPAuth TLS configuration.
-
hard: If the LDAP server does not support TLS, reject the connection. This value is equivalent to the -ZZ in ldapsearch.
Using ldaps is equivalent to starttls='hard'. However, if you use them together in the same connection string, authentication fails and the following error appears:
FATAL 2248: Authentication failed for username "<user_name>"
If starttls is not set, whether TLS is requested and required depends on the value of the TLSMODE of the LDAPAuth TLS Configuration.
|
LDAP bind parameters
The following parameters create a bind name string, which specifies and uniquely identifies a user to the LDAP server. For details, see Workflow for configuring LDAP bind.
To create a bind name string, you must set one (and only one) of the following:
For example, if you set binddn_prefix and binddn_suffix, you cannot also set email_suffix. Conversely, if you set email_suffix, you cannot set binddn_prefix and binddn_suffix.
If you do not set a bind parameter, Vertica performs bind and search operations instead of a bind operation.
The following examples use the authentication record v_ldap:
=> CREATE AUTHENTICATION v_ldap METHOD 'ldap' HOST '10.0.0.0/23';
|
Parameter name |
Description |
binddn_prefix |
First half of the bind string. If you set this parameter, you must also set binddn_suffix.
For example, to construct the bind name cn=exampleusername,cn=Users,dc=ExampleDomain,dc=com:
=> ALTER AUTHENTICATION v_ldap SET
    binddn_prefix='cn=', binddn_suffix=',cn=Users,dc=ExampleDomain,dc=com';
|
binddn_suffix |
Second half of bind string.
If you set this parameter, you must also set binddn_prefix.
For example, to construct the bind name cn=exampleusername,ou=ExampleUsers,dc=example,dc=com:
=> ALTER AUTHENTICATION v_ldap SET
    binddn_prefix='cn=', binddn_suffix=',ou=OrgUsers,dc=example,dc=com';
|
domain_prefix |
The domain that contains the user.
For example, to construct the bind name Example\exampleusername:
=> ALTER AUTHENTICATION v_ldap SET domain_prefix='Example';
|
email_suffix |
The email domain.
For example, to construct the bind name exampleusername@example.com
=> ALTER AUTHENTICATION v_ldap SET email_suffix='example.com';
|
LDAP search and bind parameters
Use the following parameters when authenticating with LDAP search and bind. For more information see Workflow for configuring LDAP search and bind.
|
Parameter name |
Description |
basedn |
Base DN for search. |
binddn |
Bind DN. Domain name to find in the directory search. |
bind_password |
Bind password. Required if you specify a binddn. |
search_attribute |
Optional attribute to search for on the LDAP server. |
The following example shows how to set these three attributes. In this example, it sets
=> ALTER AUTHENTICATION auth_method_name SET host='ldap://example13',
basedn='dc=example,dc=com',binddn='cn=Manager,dc=example,dc=com',
bind_password='secret',search_attribute='cn';
The binddn and bind_password parameters are optional. If you omit them, Vertica performs an anonymous search.
1.17.3 - TLS for LDAP authentication
This page covers the LDAPAuth context.
Vertica establishes a connection to an LDAP server in two contexts, and each context has a corresponding TLS Configuration that controls if each connection should use TLS:
-
LDAPLink: using the LDAPLink service or its dry run functions to synchronize users and groups between Vertica and the LDAP server.
-
LDAPAuth: when a user with an ldap authentication method attempts to log into Vertica, Vertica attempts to bind the user to a matching user in the LDAP server. If the bind succeeds, Vertica allows the user to log in.
Query TLS_CONFIGURATIONS to view existing TLS Configurations:
=> SELECT * FROM tls_configurations WHERE name IN ('LDAPLink', 'LDAPAuth');
   name   |  owner  | certificate | ca_certificate | cipher_suites |  mode
----------+---------+-------------+----------------+---------------+----------
 LDAPLink | dbadmin | client_cert | ldap_ca        |               | VERIFY_CA
 LDAPAuth | dbadmin | client_cert | ldap_ca        |               | DISABLE
(2 rows)
This page covers the LDAPAuth context. For details on the LDAPLink context, see TLS for LDAP link.
Keep in mind that configuring TLS for LDAP authentication does not encrypt the connection between Vertica and the client with TLS. To configure client-server TLS, see Configuring client-server TLS.
Configuring LDAP authentication
After a client successfully establishes a connection with Vertica, they must authenticate as a user before they can interact with the database. If the user has the ldap authentication method, Vertica connects to the LDAP server to authenticate the user. To configure TLS for this context, use the following procedure.
Setting the LDAPAuth TLS configuration
The LDAPAuth TLS Configuration takes a client certificate and CA certificate created or imported with CREATE CERTIFICATE. Vertica presents the client certificate to the LDAP server for verification by its CA. Vertica uses the CA certificate to verify the LDAP server's certificate.
For details on key and certificate generation, see Generating TLS certificates and keys.
-
If you want Vertica to verify the LDAP server's certificate before establishing the connection, generate or import a CA certificate and add it to the LDAPAuth TLS CONFIGURATION.
For example, to import the existing CA certificate LDAP_CA.crt:
=> \set ldap_ca '\''`cat ldap_ca.crt`'\''
=> CREATE CA CERTIFICATE ldap_ca AS :ldap_ca;
CREATE CERTIFICATE
Then, to add the ldap_ca CA certificate to LDAPAuth:
ALTER TLS CONFIGURATION LDAPAuth ADD CA CERTIFICATES ldap_ca;
-
If your LDAP server verifies client certificates, you must generate or import a client certificate and its key and add it to the LDAPAuth TLS Configuration. Vertica presents this certificate to the LDAP server for verification by its CA.
For example, to import the existing certificate client.crt (signed by the imported CA) and key client.key:
=> \set client_key '\''`cat client.key`'\''
=> CREATE KEY client_key TYPE 'RSA' AS :client_key;
CREATE KEY

=> \set client_cert '\''`cat client.crt`'\''
=> CREATE CERTIFICATE client_cert AS :client_cert SIGNED BY ldap_ca KEY client_key;
CREATE CERTIFICATE
Then, to add client_cert to LDAPAuth:
=> ALTER TLS CONFIGURATION LDAPAuth CERTIFICATE client_cert;
-
Enable TLS or LDAPS (the exact protocol used depends on the value of host in the AUTHENTICATION object) by setting the TLSMODE to one of the following. TRY_VERIFY or higher requires a CA certificate:
-
ENABLE: Enables TLS. Vertica does not check the LDAP server's certificate.
-
TRY_VERIFY: Establishes a TLS connection if one of the following is true:
If the LDAP server presents an invalid certificate, a plaintext connection is used.
-
VERIFY_CA: Connection succeeds if Vertica verifies that the LDAP server's certificate is from a trusted CA. Using this TLSMODE forces all connections without a certificate to use plaintext.
-
VERIFY_FULL: Connection succeeds if Vertica verifies that the LDAP server's certificate is from a trusted CA and the cn (Common Name) or subjectAltName attribute matches the hostname or IP address of the LDAP server.
The cn is used for the username, so subjectAltName must match the hostname or IP address of the LDAP server.
Note
The value of TLSMODE only applies to
authentication records where the
starttls LDAP authentication parameter is set to
hard or not set at all. If
starttls is set to
soft, Vertica establishes a TLS connection without verifying the LDAP server's certificate and falls back to a plaintext connection if the LDAP server does not support TLS. For details, see the next section.
For example:
=> ALTER TLS CONFIGURATION LDAPAuth TLSMODE 'verify_ca';
ALTER TLS CONFIGURATION
-
Verify that the LDAPAuthConfigParameter parameter is using the TLS Configuration:
=> SHOW CURRENT LDAPAuthTLSConfig;
  level  |       name        | setting
---------+-------------------+----------
 DEFAULT | LDAPAuthTLSConfig | LDAPAuth
(1 row)
Creating an LDAP authentication record
After a client successfully establishes a connection with Vertica, they must authenticate as a user before they can interact with the database. If the user has the ldap authentication method, Vertica connects to the LDAP server and attempts a bind to authenticate the user.
To view existing authentication records, query CLIENT_AUTH.
For details on the parameters referenced in this procedure, see LDAP authentication parameters.
-
CREATE an authentication record with an LDAP method.
Syntax for creating an LDAP authentication record:
=> CREATE AUTHENTICATION auth_record_name method 'ldap' HOST 'user_connection_source';
For example, to create an LDAP authentication record that applies to users that connect from any host:
=> CREATE AUTHENTICATION ldap_auth METHOD 'ldap' HOST '0.0.0.0/0';
-
ALTER the authentication record to to set the host and port (optional) of the LDAP server and the domain name (basedn) and bind distinguished name (binddn).
-
To use a plaintext connection between Vertica and the LDAP server (disable TLS):
-
To use StartTLS and reject plaintext connections:
-
Begin the host URL with ldap://.
-
Set the TLSMODE of LDAPAuth to ENABLE or higher. Vertica only verifies the LDAP server's certificate if TLSMODE is set to TRY_VERIFY or higher.
-
Verify that starttls is set to hard or not set.
-
To use StartTLS, but still accept a plaintext connection if the LDAP server cannot be upgrade the connection to TLS:
-
Begin the host URL with ldap://.
-
Set starttls to soft and the TLSMODE of LDAPAuth to ENABLE or higher. Vertica does not verify the server's certificate before establishing the connection and ignores the certificate verification policy of the LDAPAuth TLSMODE.
-
To use LDAPS:
This example authentication record searches for users in the active directory orgunit.example.com on an LDAP server with an IP address of 192.0.2.0 on port 5389 and requires a TLS connection to the LDAP server:
=> ALTER AUTHENTICATION ldap_auth SET
    host='ldap://192.0.2.0:5389',
    basedn='ou=orgunit,dc=example,dc=com',
    binddn_prefix='cn=',
    binddn_suffix=',ou=orgunit,dc=example,dc=com',
    starttls='hard';
The binddn_prefix and binddn_suffix combine to create the full DN. That is, for some Vertica user asmith, 'cn=asmith,ou=orgunit,dc=example,dc=com' is the full DN when Vertica attempts the bind.
To modify the ldap_auth authentication record to request StartTLS, but still accept plaintext connections, set the starttls parameter to soft:
=> ALTER AUTHENTICATION ldap_auth SET starttls='soft';
-
Enable the authentication record:
=> ALTER AUTHENTICATION ldap_auth ENABLE;
-
GRANT the authentication record to a user or role.
For example:
=> GRANT AUTHENTICATION ldap_auth TO asmith;
In this case, when the user asmith attempts to log in, Vertica constructs the distinguished name 'cn=asmith,ou=orgunit,dc=example,dc=com' from the search base specified in the ldap_auth, connects to the LDAP server, and attempts to bind it to the Vertica user. If the bind succeeds, Vertica allows asmith to log in.
1.17.4 - Authentication fallthrough for LDAP
To use multiple search attributes for a single LDAP server or to configure multiple LDAP servers, create a separate authentication record for each search attribute or server and enable authentication fallthrough on each ldap record except the last (in order of priority).
To use multiple search attributes for a single LDAP server or to configure multiple LDAP servers, create a separate authentication record for each search attribute or server and enable authentication fallthrough on each ldap record except the last (in order of priority).
Examples
The following example creates two authentication records, vldap1 and vldap2. Together, they specify that the LDAP server should first search the entire directory (basedn=dc=example,dc=com) for a DN with an OU attribute Sales. If the first search returns no results or otherwise fails, the LDAP server should then search for a DN with the OU attribute Marketing:
=> CREATE AUTHENTICATION vldap1 method 'ldap' HOST '10.0.0.0/8' FALLTHROUGH;
=> ALTER AUTHENTICATION vldap1 PRIORITY 1;
=> ALTER AUTHENTICATION vldap1
      SET host='ldap://ldap.example.com/search',
      basedn='dc=example,dc=com',
      search_attribute='Sales';
=> GRANT AUTHENTICATION vldap1 to public;
=> CREATE AUTHENTICATION vldap2 method 'ldap' HOST '10.0.0.0/8';
=> ALTER AUTHENTICATION vldap2 PRIORITY 0;
=> ALTER AUTHENTICATION vldap2 SET
      host='ldap://ldap.example.com/search',
      basedn='dc=example,dc=com',
      search_attribute='Marketing';
=> GRANT AUTHENTICATION vldap2 to public;
1.17.5 - LDAP bind methods
There are two LDAP methods that you use to authenticate your Vertica database against an LDAP server.
There are two LDAP methods that you use to authenticate your Vertica database against an LDAP server.
-
Bind—Use LDAP bind when Vertica connects to the LDAP server and binds using the CN and password. (These values are the username and password of the user logging into the database). Use the bind method when your LDAP account's CN field matches that of the username defined in your database. For more information see Workflow for configuring LDAP bind.
-
Search and Bind —Use LDAP search and bind when your LDAP account's CN field is a user's full name or does not match the username defined in your database. For search and bind, the username is usually in another field such as UID or sAMAccountName in a standard Active Directory environment. Search and bind requires your organization's Active Directory information. This information allows Vertica to log into the LDAP server and search for the specified field. For more information see Workflow for configuring LDAP search and bind.
If you are using search and bind, having a service account simplifies your server side configuration. In addition, you do not need to store your Active Directory password.
LDAP anonymous binding
Anonymous binding is an LDAP server function. Anonymous binding allows a client to connect and search the directory (bind and search) without logging in because binddn and bindpasswd are not needed.
You also do not need to log in when you configure LDAP authentication using Management Console.
1.17.5.1 - Workflow for configuring LDAP bind
To configure your Vertica database to authenticate clients using LDAP bind, follow these steps:.
To configure your Vertica database to authenticate clients using LDAP bind, follow these steps:
-
Obtain a service account. For information see the LDAP product documentation.You cannot use the service account in the connection parameters for LDAP bind.
-
Compare the user's LDAP account name to their Vertica username. For example, if John Smith's Active Directory (AD) sAMAccountName = jsmith, his Vertica username must also be jsmith.
However, the LDAP account does not have to match the database user name, as shown in the following example:
=> CREATE USER r1 IDENTIFIED BY 'password';
=> CREATE AUTHENTICATION ldap1  METHOD 'ldap' HOST '172.16.65.177';
=> ALTER AUTHENTICATION ldap1 SET HOST=
   'ldap://172.16.65.10',basedn='dc=dc,dc=com',binddn_suffix=',ou=unit2,dc=dc,dc=com',binddn_prefix='cn=use';
=> GRANT AUTHENTICATION ldap1 TO r1;
\! ${TARGET}/bin/vsql -p $PGPORT -U r1 -w $LDAP_USER_PASSWD -h ${HOSTNAME} -c
   "select user_name, client_authentication_name from sessions;"
 user_name | client_authentication_name
-----------+----------------------------
 r1        | ldap
(1 row)
-
Run ldapsearch from a Vertica node against your LDAP or AD server. Verify the connection to the server and identify the values of relevant fields. Running ldapsearch helps you build the client authentication string needed to configure LDAP authentication.
In the following example, ldapsearch returns the CN, DN, and sAMAccountName fields (if they exist) for any user whose CN contains the username jsmith. This search succeeds only for LDAP servers that allow anonymous binding:
$ ldapsearch -x -h 10.10.10.10 -b "ou=Vertica Users,dc=CompanyCorp,dc=com"
'(cn=jsmith*)' cn dn uid sAMAccountName
ldapsearch returns the following results. The relevant information for LDAP bind is in bold:
# extended LDIF
#
# LDAPv3
# base <ou=Vertica Users,dc=CompanyCorp,dc=com> with scope subtree
# filter: (cn=jsmith*)
# requesting: cn dn uid sAMAccountName
#
# jsmith, Users, CompanyCorp.com
dn:cn=jsmith,ou=Vertica Users,dc=CompanyCorp,dc=com
cn: jsmith
uid: jsmith
# search result
search: 2
result: 0 Success
# numResponses: 2
# numEntries: 1
-
Create a new authentication record based on the information from ldapsearch. In the ldapsearch entry, the CN is username jsmith, so you do not need to set it. Vertica automatically sets the CN to the username of the user who is trying to connect. Vertica uses that CN to bind against the LDAP server.
=> CREATE AUTHENTICATION v_ldap_bind METHOD 'ldap' HOST '0.0.0.0/0';
=> GRANT AUTHENTICATION v_ldap_bind TO public;
=> ALTER AUTHENTICATION v_ldap_bind SET
host='ldap://10.10.10.10/',
basedn='DC=CompanyCorp,DC=com',
binddn_prefix='cn=',
binddn_suffix=',OU=Vertica Users,DC=CompanyCorp,DC=com';
For more information see LDAP Bind Parameters.
1.17.5.2 - Workflow for configuring LDAP search and bind
To configure your Vertica database to authenticate clients using LDAP search and bind, follow these steps:.
To configure your Vertica database to authenticate clients using LDAP search and bind, follow these steps:
-
Obtain a service account. For information see the LDAP product documentation.
-
From a Vertica node, run ldapsearch against your LDAP or AD server. Verify the connection to the server, and identify the values of relevant fields. Running ldapsearch helps you build the client authentication string needed to configure LDAP authentication.
In the following example, ldapsearch returns the CN, DN, and sAMAccountName fields (if they exist) for any user whose CN contains the username, John. This search succeeds only for LDAP servers that allow anonymous binding:
$ ldapsearch -x -h 10.10.10.10 -b 'OU=Vertica Users,DC=CompanyCorp,DC=com' -s sub -D
'CompanyCorp\jsmith' -W '(cn=John*)' cn dn uid sAMAccountName
-
Review the results that ldapsearch returns.The relevant information for search and bind is in bold:
# extended LDIF
#
# LDAPv3
# base <OU=Vertica Users,DC=CompanyCorp,DC=com> with scope subtree
# filter: (cn=John*)
# requesting: cn dn sAMAccountName
#
# John Smith, Vertica Users, CompanyCorp.com
dn: CN=jsmith,OU=Vertica Users,DC=CompanyCorp,DC=com
cn: Jsmith
sAMAccountName: jsmith
# search result
search: 2
result: 0 Success
# numResponses: 2
# numEntries: 1
-
Create the client authentication record. The cn attribute contains the username you want—jsmith. Set your search attribute to the CN field so that the search finds the appropriate account.
=> CREATE AUTHENTICATION v_ldap_bind_search METHOD 'ldap' HOST '10.10.10.10';
=> GRANT AUTHENTICATION v_ldap_bind_search TO public;
=> ALTER AUTHENTICATION v_ldap_bind_search SET
host='ldap://10.10.10.10',
basedn='OU=Vertica,DC=CompanyCorp,DC=com',
binddn='CN=jsmith,OU=Vertica Users,DC=CompanyCorp,DC=com',
bind_password='password',
search_attribute='CN';
For more information see LDAP Bind and Search Parameters
1.18 - OAuth 2.0 authentication
Rather than with a username and password, users can authenticate to Vertica by first verifying their identity with an identity provider, receiving an OAuth token, and then passing the token to Vertica.
Rather than with a username and password, users can authenticate to Vertica by first verifying their identity with an identity provider, receiving an OAuth token, and then passing the token to Vertica.
OAuth in Vertica is tested with Keycloak and Okta, but other providers should work if they support the RFC 7662 Token Introspection standard.
1.18.1 - Configuring OAuth authentication
For a list of ODBC OAuth connection properties, see ODBC OAuth Connection Properties.
For a list of ODBC OAuth connection properties, see ODBC DSN connection properties.
The following procedure performs the following actions:
-
Configures an identity provider for OAuth integration with Vertica (either Okta or Keycloak).
-
Creates an OAuth authentication record.
-
Retrieves an access token with a POST request.
-
Uses a sample application to authenticate to Vertica, passing the access token as an argument and, optionally, parameters for token refresh.
Vertica officially tests and supports OAuth integration with Keycloak and Okta. Other identity providers should also work as long as they implement the RFC 7662 Token Introspection standard. The following example configurations are provided for reference:
Create an authentication record
In Vertica, create an authentication record for OAuth. This uses the client ID, client secret, and either the discovery (Keycloak) or introspect (Okta) endpoint used by your identity provider.
The following authentication record v_oauth authenticates users from any IP address by contacting the identity provider to validate the OAuth token (rather than a username and password) and uses the following parameters:
-
validate_type: The method used to validate the OAuth token. This should be set to IDP (default) to validate the OAuth token by contacting the identity provider.
-
client_id: The client in the identity provider.
-
client_secret: The client secret generated by the identity provider.
-
discovery_url: Also known as the OpenID Provider Configuration Document, Vertica uses this endpoint to retrieve information about the identity provider's configuration and other endpoints (Keycloak only).
-
introspect_url: Used by Vertica to introspect (validate) access tokens. You must specify the introspect_url if you do not specify the discovery_url and are not using JSON Web Token validation.
If discovery_url and introspect_url are both set, discovery_url takes precedence. The following example sets both for demonstration purposes; in general, you should prefer to set the discovery_url:
=> CREATE AUTHENTICATION v_oauth METHOD 'oauth' HOST '0.0.0.0/0';
=> ALTER AUTHENTICATION v_oauth SET validate_type = 'IDP';
=> ALTER AUTHENTICATION v_oauth SET client_id = 'vertica';
=> ALTER AUTHENTICATION v_oauth SET client_secret = 'client_secret';
=> ALTER AUTHENTICATION v_oauth SET discovery_url = 'https://203.0.113.1:8443/realms/myrealm/.well-known/openid-configuration';
=> ALTER AUTHENTICATION v_oauth SET introspect_url = 'https://203.0.113.1:8443/realms/myrealm/protocol/openid-connect/token/introspect';
Alternatively, if your identity provider supports the OpenID Connect protocol and your client is public, Vertica can use JWT validation, where Vertica validates OAuth tokens by verifying that it was signed by the identity provider's private key.
While Vertica does not contact the identity provider for JWT validation, the client does for token refresh if either the discovery or token endpoints are set in oauthjsonconfig.
JWT validation requires the following parameters:
-
validate_type: The validation method, IDP by default. Setting this to JWT enables JWT validation.
-
jwt_rsa_public_key: In PEM format, the public key used to sign the client's OAuth token. Vertica uses this to validate the OAuth token. If your identity provider does not natively provide PEM-formatted public keys, you must convert them to PEM format. For example, keys retrieved from an Okta endpoint are in JWK format and must be converted.
-
jwt_issuer: The issuer of the OAuth token. This value is set by the identify provider.
-
jwt_user_mapping: The name of the Vertica user.
You can also specify the following parameters to define a whitelist based on fields of the OAuth token:
-
jwt_accepted_audience_list: Optional, a comma-delimited list of values to accept from the client JWT's aud field. If set, tokens must include in aud one of the accepted audiences to authenticate.
-
jwt_accepted_scope_list: Optional, a comma-delimited list of values to accept from the client JWT's scope field. If set, tokens must include in scope at least one of the accepted scopes to authenticate.
The following authentication record v_oauth_jwt authenticates users from any IP address by verifying that the client's OAuth token was signed by the identity provider's private key. It also requires the user to provide the proper values in the token's aud and scope fields:
=> CREATE AUTHENTICATION v_oauth_jwt METHOD 'oauth' HOST '0.0.0.0/0';
=> ALTER AUTHENTICATION v_oauth_jwt SET validate_type = 'JWT';
=> ALTER AUTHENTICATION v_oauth_jwt SET jwt_rsa_public_key = 'MIIBIjANBgkqhkiG9w0BAQEFAAOCAQ8AMIIBCgKCAQEAkjXjd6F8PyKkQtY5q2cJ9jNT9y+PeIJS134UvuUnuD9bQFhkBPstTBulpZV1QQivYaQ5k5bYVE2Q7n/XscrWzbRkK/qEwmztjVUH7dQAHSSKEjYcbH1fREx5nR5oNEelrUH2RrGM98Y7ln+Ch4oCl8yCS6gjI6hfaDxwqo2oImmGE+Qi06SIjoWGBCr5EIAhvlNuWe2rWD5uEe4ivaL6KoAR9sADqhGBoaYs/wIVUcv5DHtSjU+yZIz/sVspJehvmb/979eDsct2IddCHLrjUet3DiKz4imIyh+cv9VTEI6MWbk5WIiKW2fFzZ6Oei/ddzmTqVoNdn+d18tWwlf7hQIDAQAB';
=> ALTER AUTHENTICATION v_oauth_jwt SET jwt_issuer = 'token_issuer';
=> ALTER AUTHENTICATION v_oauth_jwt SET jwt_user_mapping = 'oauth_user';
=> ALTER AUTHENTICATION v_oauth_jwt SET jwt_accepted_audience_list = 'vertica,local';
=> ALTER AUTHENTICATION v_oauth_jwt SET jwt_accepted_scope_list = 'email,profile,user';
To enable the authentication record:
=> ALTER AUTHENTICATION v_oauth ENABLE;
For a full list of OAuth authentication parameters, see OAuth authentication parameters.
Create a Vertica user
Vertica users map to the identity provider's users with the same username. You can either create the user manually or enable just-in-time (JIT) user provisioning in the authentication record to automatically create users with valid tokens.
To manually create the user:
-
To map to the user oauth_user in the identity provider, create a Vertica user with the same name. You do not need to specify a password because authentication is performed by the identity provider:
=> CREATE USER oauth_user;
-
Grant the OAuth authentication record to the user (or their role):
=> GRANT AUTHENTICATION v_oauth TO oauth_user;
=> GRANT ALL ON SCHEMA PUBLIC TO oauth_user;
To enable JIT user provisioning:
=> ALTER AUTHENTICATION v_oauth SET oauth2_jit_enabled = 'yes';
If the user already exists and JIT user provisioning is enabled and you use Keycloak as your identity provider, Vertica automatically assigns the roles associated with the user as specified by the identity provider if the roles also exist in Vertica. For details, see Just-in-time user provisioning.
Retrieve an access token
The simple way to get an OAuth access token and refresh token is to send a POST request to the token endpoint, providing the credentials of the user. You can then use the returned access token, refresh token, and scope with the oauthaccesstoken and oauthrefreshtoken connection properties for your client. For details, see JDBC connection properties and ODBC DSN connection properties.
For example, to get an access token for oauth_user from Keycloak:
$ curl --location --request POST 'http://203.0.113.1:8080/realms/master/protocol/openid-connect/token' \
--header 'Content-Type: application/x-www-form-urlencoded' \
--data-urlencode 'username=oauth_user' \
--data-urlencode 'password=oauth_user_password' \
--data-urlencode 'client_id=vertica' \
--data-urlencode 'client_secret=client_secret' \
--data-urlencode 'grant_type=password'
Keycloak responds with a json string containing the access_token and refresh_token if you authenticated correctly.
{
   "access_token":"access_token",
   "expires_in":60,
   "refresh_expires_in":1800,
   "refresh_token":"refresh_token",
   "token_type":"Bearer",
   "not-before-policy":0,
   "session_state":"6745892a-aa74-452f-b6b9-c45637193859",
   "scope":"profile email"
}
Similarly, to retrieve an access token for oauth_user from Okta:
$ curl --insecure -d "client_id=0oa5cgdga1fb812rW697" -d "client_secret=aq22wRl3Z3mmtuoB13omRo6Ql03Ltafet4xYi77p" -d "username=oauth_user" -d "password=oauth_user_password" -d "grant_type=password" -d "scope=offline_access%20openid" https://example.okta.com/oauth2/default/v1/introspect

{"token_type":"Bearer","expires_in":3600,"access_token":"access_token","id_token":"id_token"}
Run the sample applications
The OAuth sample applications, at a minimum, take an access token as an argument to authenticate to the database until the token expires. If you want the sample application to refresh the token after it expires, you must specify the following. The sample applications put these into a JSON string, OAuthJsonConfig or (ODBC) oauthjsonconfig (JDBC).
-
Refresh token
-
Client ID
-
Client secret
-
Token URL
ODBC
-
Follow the instructions in the README.
-
Run the sample application, passing the OAuth parameters as arguments:
-
To authenticate until the token expires:
$ ./a.out --access-token OAuthAccessToken
-
To authenticate and silently refresh the access token when it expires:
$ ./a.out --access-token OAuthAccessToken
    --refresh-token OAuthRefreshToken
    --client-id OAuthClientID
    --client-secret OAuthClientSecret
    --token-url OAuthTokenURL
For a list of all ODBC OAuth parameters, see ODBC DSN connection properties.
JDBC
-
Follow the instructions in the README.
-
Run the sample application, passing the OAuth parameters as arguments:
-
To authenticate until the token expires:
$ mvn compile exec:java -Dexec.mainClass=OAuthSampleApp -Dexec.args="vertica_host database_name --access-token oauthaccesstoken"
-
To authenticate and silently refresh the access token when it expires:
$ mvn compile exec:java -Dexec.mainClass=OAuthSampleApp -Dexec.args="vertica_host database_name --access-token oauthaccesstoken
    --refresh_token oauthrefreshtoken
    --client-id oauthclientid
    --client-secret oauthclientsecret
    --token-url oauthtokenurl"
For a list of all JDBC OAuth parameters, see JDBC connection properties.
Troubleshooting
To get debugging information for TLS, use the -Djavax.net.debug=ssl flag.
Custom CA certificates
A truststore is a container for trusted certificate authority (CA) certificates. These CA certificates are used to verify the identities of other systems when establishing a TLS connection. When your JDBC client connects to the identity provider through an HTTPS endpoint, the JDBC client verifies the identity provider's certificate by making sure that it was issued by a CA in the truststore.
If you configure your identity provider with TLS (that is, if you use HTTPS endpoints for your token or refresh URLs) and its certificate is not issued by a well-known CA, you must either specify a custom truststore or import the issuer's CA certificate into the system truststore with keytool.
To specify a custom truststore, set the JDBC connection properties oauthtruststorepath and oauthtruststorepassword:
connProps = new Properties(connProps);
connProps.setProperty("oauthtruststorepath", "/path/to/truststore/customoauth.truststore");
connProps.setProperty("oauthtruststorepassword", "password");
To add the certificate keycloak/cert.crt to the Java truststore:
$ keytool -trustcacerts -keystore /usr/lib/jvm/java-1.7.0-openjdk-1.7.0.261-2.6.22.2.el7_8.x86_64/jre/lib/security/cacerts -storepass changeit -importcert -alias keycloak -file /keycloak/cert.crt
1.18.1.1 - Configure Keycloak
The following procedure configures a Keycloak 18.0.0 server on 203.0.113.1.
The following procedure configures a Keycloak 18.0.0 server on 203.0.113.1 for integration with Vertica. For details, see Configuring OAuth authentication.
The goals of this procedure are to configure Keycloak and obtain the following information:
- Client ID: The ID used to identify the Vertica database. This is configured by the user and set to
vertica in the example procedure.
- Client secret: A Keycloak-generated string used to refresh the OAuth token when it expires.
- Discovery endpoint: The endpoint that serves information for all other endpoints as a JSON string. The endpoint for a Keycloak server on 203.0.113.1 is one of the following:
https://203.0.113.1:8443/realms/myrealm/.well-known/openid-configuration (if TLS is configured)http://203.0.113.1:8443/realms/myrealm/.well-known/openid-configuration
If you want to use TLS, you must obtain a certificate and key for Keycloak signed by a trusted CA. This example uses a self-signed CA for convenience. The following example creates a certificate and key in Vertica:
-
Generate the CA certificate:
=> CREATE KEY SSCA_key TYPE 'RSA' LENGTH 2048;
CREATE KEY

=> CREATE CA CERTIFICATE SSCA_cert
SUBJECT '/C=US/ST=Massachusetts/L=Cambridge/O=Micro Focus/OU=Vertica/C N=Vertica Root CA'
VALID FOR 3650
EXTENSIONS 'nsComment' = 'Self-signed root CA cert'
KEY SSCA_key;
CREATE CERTIFICATE
-
Generate a server key and certificate, signed by your CA, setting the subjectAltName of the certificate to the DNS server and/or IP address of your Keycloak server:
=> CREATE KEY keycloak_key TYPE 'RSA' LENGTH 2048;
CREATE KEY

=> CREATE CERTIFICATE keycloak_cert
SUBJECT '/C=US/ST=Massachussets/L=Cambridge/O=Micro Focus/OU=Vertica/CN=Vertica Server'
SIGNED BY SSCA_cert
EXTENSIONS 'nsComment' = 'Keycloak CA', 'extendedKeyUsage' = 'serverAuth', 'subjectAltName' = 'DNS.1:dnsserver,IP:203.0.113.1'
KEY keycloak_key;
CREATE CERTIFICATE
-
Create the file keycloak_directory/conf/keyfile.pem with the content from the key column for the generated key:
=> SELECT key FROM cryptographic_keys WHERE name = 'keycloak_key';
-
Create the file keycloak_directory/conf/certfile.pem with the content from the certificate_text column for the generated certificate:
=> SELECT certificate_text FROM certificates WHERE name = 'keycloak_cert';
-
Append to your system's CA bundle the content from the certificate_text column for the generated CA certificate. The default CA bundle path and format varies between distributions; for details, see SystemCABundlePath:
=> SELECT certificate_text FROM certificates WHERE name = 'SSCA_cert';
-
Set the SystemCABundlePath configuration parameter:
=> ALTER DATABASE DEFAULT SET SystemCABundlePath = 'path/to/ca_bundle';
Start Keycloak
-
Enter the following commands for a minimal configuration to create the Keycloak admin and to start Keycloak in start-dev mode:
$ KEYCLOAK_ADMIN=kcadmin
$ export KEYCLOAK_ADMIN
$ KEYCLOAK_ADMIN_PASSWORD=password
$ export KEYCLOAK_ADMIN_PASSWORD
$ cd keycloak_directory/bin/
$ ./kc.sh start-dev --hostname 203.0.113.1 --https-certificate-file ../conf/certfile.pem --https-certificate-key-file=../conf/keyfile.pem
-
Open the Keycloak console with your browser (these examples use the default ports):
-
Sign in as the admin.
-
(Optional) To make testing OAuth more convenient, go to Realm Settings > Tokens and increase Access Token Lifespan to a greater value (the default is 5 minutes).
Create the Vertica client
-
Go to Clients and select on Create. The Add Client page appears.
-
In Client ID, enter
vertica.
-
Select Save. The client configuration page appears.
-
On the Settings tab, use the Access Type dropdown to select confidential.
-
On the Credentials tab, copy the Secret. This is the client secret used to refresh the token when it expires.
Create a Keycloak user
Keycloak users map to Vertica users with the same name. This example creates a the Keycloak user oauth_user.
-
On the Users tab, select Add user. The Add user page appears.
-
In Username, enter oauth_user.
-
On the Credentials tab, enter a password.
1.18.1.2 - Configure Okta
The following procedure configures Okta for integration with Vertica.
The following procedure configures Okta for integration with Vertica and requires administrator privileges. For details, see Configuring OAuth authentication.
The goals of this procedure are to configure Okta and obtain the following information:
- Client ID: The ID used to identify the Vertica database. This is generated by Okta.
- Client secret: An Okta-generated string used to refresh the OAuth token when it expires.
- Token endpoint: Used by the client to retrieve the OAuth token.
- Introspection endpoint: Used by Vertica to validate the OAuth token.
These values are used to create the oauth authentication record in Vertica and act as instructions for Vertica to communicate with Okta when a user attempts to authenticate.
Create an OIDC application
- From the Okta dashboard, go to Applications > Applications and select Create App Integration. The Create a new app integration dialog box appears.
- For the Sign-in method, select OIDC - OpenID Connect. The Application type section appears.
- For the Application type, select Native Application.
- Select Next. The New Native App Integration window opens.
- In the App integration name, enter a name for your application. This example uses Demo_Vertica.
- For the Grant Type, select Authorization Code, Refresh Token, and Resource Owner Password.
- For Controlled access, select the option applicable to your organization. This example uses Allow everyone in your organization to access.
- Select Save to save your application.
Retrieve the client ID and client secret
- From the Okta dashboard, go to Applications > Applications and select the name of your OIDC application.
- In the General tab in the Client Credentials section, select Edit.
- For Client authentication, select Client secret and select Save. This generates a new client secret.
- Copy the client ID and client secret.
Set the authentication policy
- From the Okta dashboard, go to Applications > Applications and select the name of your OIDC application.
- In the Sign On tab in the User authentication section, select Edit.
- Select Password only.
- Select Save to save the new policy.
Retrieve Okta endpoints
- From the Okta dashboard, go to Security > API.
- In the Authorization Servers tab, select the name of your authorization server. By default, the name of this server is default.
- Select the Metadata URI to get a list of all endpoints for your authorization server as a
json string.
- Copy the values for the token_endpoint and introspection_endpoint.
Test the configuration
-
Verify that you can retrieve an OAuth token from the token endpoint. If successful, Okta respond with an access_token and refresh_token:
$ curl --insecure -d "client_id=client_id" -d "client_secret=client_secret" -d "username=okta_username" -d "password=okta_password" -d "grant_type=password" -d "scope=offline_access%20openid" token_endpoint
-
Verify that the tokens are valid with the introspection endpoint. If successful, Okta responds with a json string containing "active":true:
To verify the access token:
$ curl --insecure -d "client_id=client_id" -d "client_secret=client_secret" -d "token=access_token" introspection_endpoint
Similarly, to verify the refresh token:
$ curl --insecure -d "client_id=client_id" -d "client_secret=client_secret" -d "token=refresh_token" introspection_endpoint
The access_token and refresh_token can then be used for the oauthaccesstoken and oauthrefreshtoken parameters. For details, see JDBC connection properties and ODBC DSN connection properties.
1.18.2 - Just-in-time user provisioning
To use this feature, you must use Keycloak as your identity provider.
Just-in-time (JIT) user provisioning is the act of automatically configuring an authenticated user and their roles based on information provided by the identity provider.
When a client uses an OAuth authentication record that enables JIT user provisioning, Vertica automatically performs the following actions:
-
Creates the user if they do not already exist in the database. The length of the username in the identity provider cannot be greater than 128 characters.
-
(Keycloak only) Grants to the user and sets as default the roles associated with the user (as specified by the identity provider), provided the roles already exist in Vertica.
-
Grants to the user the authentication record used to authenticate them if neither their user nor role has a grant on that record.
For example, if a client presents an OAuth token to authenticate as user Alice with role director, and Alice does not exist in Vertica, Vertica automatically creates the user Alice, grants to her the authentication record, and grants to her the director role as a default role.
To view users created by JIT user provisioning and which authentication record they use, query the USERS system table:
=> SELECT user_name, managed_by_oauth2_auth_id FROM users;
 user_name |  managed_by_oauth2_auth_id
-----------+-----------------------------
 dbadmin   |
 Bob       | 45035996273853300
 Margie    |
 Alice     | 45035996273866484
(4 rows)
For details on using JIT user provisioning with OAuth authentication, see Configuring OAuth authentication.
Enabling just-in-time user provisioning
JIT user provisioning is enabled at the authentication record level by setting the oauth2_jit_enabled parameter:
=> CREATE AUTHENTICATION v_oauth METHOD 'oauth' HOST '0.0.0.0/0';
=> ALTER AUTHENTICATION v_oauth SET oauth2_jit_enabled = 'yes';

=> SELECT auth_name, is_oauth2_jit_enabled FROM client_auth WHERE auth_name='v_oauth';
  auth_name  |  is_oauth_2_jit_enabled
-------------+--------------------------
 v_oauth     | True
(1 row)
Automatic role assignment
The roles automatically assigned to JIT-provisioned active users are based on the information provided by the identity provider (either from the endpoints introspect_url or userinfo_url) and are identified by the client/application specified by the OAuth2JITClient configuration parameter (
vertica by default):
=> ALTER DATABASE DEFAULT SET OAuth2JITClient = "vertica";
With OAuth2JITClient set to
vertica, roles that both exist in Vertica and are listed in resource_access.vertica.roles are automatically granted to and set as default roles for JIT-provisioned users.
The identity provider shares user roles through the introspect_url or userinfo_url endpoints. Vertica first sends a request to the introspect_url. If no roles are found in the response, Vertica sends a request to userinfo_url.
For example, if a client attempts to authenticate as the user bob and no user with the same name exists in the database, Vertica sends the following request to the identity provider's introspect_url to retrieve the roles given to bob by the identity provider (this example is truncated):
{
    ...
    "resource_access": {
        "vertica": {
            "roles": [
                "customer-facing",
                "order-management",
                "idp-exclusive-role"
            ]
        },
        "account": {
            "roles": [
                "manage-account",
                "manage-account-links",
                "view-profile"
            ]
        }
    },
    "scope": "email profile roles",
    "sid": "dcdd14b1-fe47-491e-b62b-10d1e05c6ffe",
    "client_id": "vertica",
    "username": "bob",
    "active": true
}
Because the active field is true and bob has no corresponding user in the Vertica server, Vertica automatically creates the user bob and grants to him the roles that exist in Vertica and are listed in
resource_access.vertica.roles: customer-facing and order-management. The role idp-exclusive-role does not exist in Vertica, so it is ignored.
Automatic user pruning
You can enable automatic user pruning to periodically drop users created by JIT user provisioning if they do not log in after a certain period of time. This cleanup service is managed by the following database-level configuration parameters:
-
EnableOAuthJITCleanup: Whether to enable cleanup (disabled by default).
=> ALTER DATABASE DEFAULT SET EnableOAuthJITCleanup = 1; --enables the pruning service
=> ALTER DATABASE DEFAULT SET EnableOAuthJITCleanup = 0; --disables the pruning service
-
OAuth2UserExpiredInterval: The number of days a user must be inactive before it is dropped (14 by default). This is calculated based on the current date and the LAST_LOGIN_TIME in the USERS system table.
Note
The LAST_LOGIN_TIME as recorded by the USERS system table is not persistent; if the database is restarted, the LAST_LOGIN_TIME for users created by just-in-time user provisioning is set to the database start time (this appears as an empty value in LAST_LOGIN_TIME).
You can view the database start time by querying the DATABASES system table:
=> SELECT database_name, start_time FROM databases;
 database_name |          start_time
---------------+-------------------------------
 VMart         | 2023-02-06 14:26:50.630054-05
(1 row)
=> ALTER DATABASE DEFAULT SET OAuth2UserExpiredInterval = 20;
-
GlobalHeirUsername: The user to reassign objects to if the owner is a JIT-provisioned (or LDAP) user that got dropped by the pruning service. If set to <auto>, objects are reassigned to the dbadmin.
=> ALTER DATABASE DEFAULT SET GlobalHeirUsername = <auto>
The cleanup service runs daily and there can be a delay of up to 24 hours for dropping an expired user.
1.18.3 - OAuth authentication parameters
Vertica OAuth authentication records use the following parameters to determine how to validate client OAuth tokens and how to contact the identity provider during the validation process.
Vertica OAuth authentication records use the following parameters to determine how to validate client OAuth tokens and how to contact the identity provider during the validation process. These parameters should be set with ALTER AUTHENTICATION.
Just-in-time provisioning parameters
The optional oauth2_jit_enabled parameter specifies whether to enable just-in-time user provisioning. If set to 'yes', when the user authenticates, Vertica automatically performs the following actions:
-
Creates the user if they do not already exist in the database. The length of the username in the identity provider cannot be greater than 128 characters.
-
(Keycloak only) Grants to the user and sets as default the roles associated with the user (as specified by the identity provider), provided the roles already exist in Vertica.
-
Grants to the user the authentication record used to authenticate them if neither their user nor role has a grant on that record.
If set to 'no' (default), users must be manually created and granted an oauth authentication record to authenticate to Vertica with OAuth tokens.
Validation modes
OAuth authentication records have two modes for validating OAuth tokens, each specified with the authentication parameter validate_type.
The validate_type parameter takes one of the following values:
-
IDP (default): Validate OAuth tokens by contacting the identity provider. This validation type requires the client to specify their client secret. This should be used with confidential clients (set for each client by the identity provider).
-
JWT: Validate OAuth tokens by verifying that it was signed by the identity provider's private key. While Vertica does not contact the identity provider for JWT validation, the client does for token refresh if either the discovery or token endpoints are set in oauthjsonconfig. This should be used for public clients (set for each client by the identity provider). Additionally, clients can connect if they leave oauthjsonconfig or OAuthJsonConfig empty.
Each validation mode uses a different set of parameters, which are detailed in the tables below.
IDP validation parameters
|
Parameter name |
Description |
Required/Optional |
client_id |
The ID of the confidential client application registered in the identity provider. Vertica uses this ID to call the introspection API to retrieve user grants. |
Required |
client_secret |
The secret of the confidential client application registered in the identity provider. This value is not shared with other clients. |
Required |
discovery_url (Keycloak only) |
Also known as the OpenID Provider Configuration Document or the well-known configuration endpoint, this endpoint contains information about the configuration and endpoints of the identity provider.
If you specify the discovery_url and not the introspect_url, Vertica automatically retrieves the introspect_url from the identity provider.
If you specify both the discovery_url and introspect_url, the discovery_url takes precedence.
|
Required for IDP validation if introspect_url is not specified. |
introspect_url |
Used by Vertica to introspect (validate) access tokens. You must specify this parameter if you do not specify the discovery_url. For examples, see the Keycloak and Okta documentation. |
Required if discovery_url is not specified. |
JWT validation parameters
The following table lists the parameters used to configure OAuth authentication records that use the JWT validation mode:
|
Parameter name |
Description |
Required/Optional |
jwt_rsa_public_key |
In PEM format, the public key that corresponds to the private key used to sign the client's OAuth token. Vertica uses this to validate the OAuth token. If your identity provider does not natively provide PEM-formatted public keys, you must convert them to PEM format. For example, keys retrieved from an Okta endpoint are in JWK format and must be converted. |
Required |
jwt_issuer |
The issuer of the OAuth token. This value is set by the identify provider. |
Required |
jwt_user_mapping |
The name of the Vertica user. |
Required |
jwt_accepted_audience_list |
A comma-delimited list of values to accept from the client OAuth token's aud field. If set, tokens must include in aud one of the accepted audiences to authenticate. |
Optional |
jwt_accepted_scope_list |
A comma-delimited list of values to accept from the client OAuth token's scope field. If set, tokens must include in scope at least one of the accepted scopes to authenticate. |
Optional |
1.19 - TLS authentication
The tls authentication method authenticates users that can establish a mutual mode client-server TLS connection using a certificate that specifies a valid database username in the Common Name (CN) field.
The tls authentication method authenticates users that can establish a mutual mode client-server TLS connection using a certificate that specifies a valid database username in the Common Name (CN) field.
Before you create and use a tls authentication method, you must configure Vertica for client-server TLS in mutual mode (disabled by default).
1.19.1 - Client authentication with TLS
Database users or roles granted a tls authentication record can authenticate to Vertica with a TLS certificate.
Database users or roles granted a tls authentication record can authenticate to Vertica with a TLS certificate.
Prerequisites
You must configure Vertica for mutual mode client-server TLS.
In mutual mode, the client and server must verify each other's identity before connecting. This mode allows Vertica to verify the identity of the client and allow them to authenticate the client through their certificate.
Configuring TLS authentication
The following sections generate a private key and certificate for the client. For simplicity, the example signs the client certificate with the following self-signed CA certificate (which has also, in the context of the example, signed the Vertica database's server certificate):
=> CREATE KEY SSCA_key TYPE 'RSA' LENGTH 2048;
=> CREATE CA CERTIFICATE ca_certificate
SUBJECT '/C=US/ST=Massachusetts/L=Cambridge/O=OpenText/OU=Vertica/CN=Vertica Root CA'
VALID FOR 3650
EXTENSIONS 'nsComment' = 'Self-signed root CA cert'
KEY SSCA_key;
In a production environment, you should instead use a CA certificate from a trusted certificate authority.
Create client keys
The following steps generate a client key and certificate, and then make them available to the client:
-
Generate the client key:
=> CREATE KEY client_private_key TYPE 'RSA' LENGTH 2048;
CREATE KEY
-
Generate the client certificate. Mutual TLS requires that the Common Name (CN) in the SUBJECT specifies a database username:
=> CREATE CERTIFICATE client_certificate
SUBJECT '/C=US/ST=Massachusetts/L=Cambridge/O=OpenText/OU=Vertica/CN=dbadmin/emailAddress=example@example.com'
SIGNED BY ca_certificate
EXTENSIONS 'nsComment' = 'Vertica client cert', 'extendedKeyUsage' = 'clientAuth'
KEY client_private_key;
CREATE CERTIFICATE
-
On the client machine, export the client key and client certificate to the client filesystem. The following commands use the vsql client:
$ vsql -At -c "SELECT key FROM cryptographic_keys WHERE name = 'client_private_key';" -o client_private_key.key
$ vsql -At -c "SELECT certificate_text FROM certificates WHERE name = 'client_certificate';" -o client_cert.pem
In the preceding command:
-A: enables unaligned output.-t: prevents the command from outputting metadata, such as column names.-c: instructs the shell to run one command and then exit.-o: writes the query output to the specified filename.
For details about all vsql command line options, see Command-line options
-
Copy or move the client key and certificate to a location that your client recognizes.
The following commands move the client key and certificate to the hidden directory ~/.client-creds, and then grants the file owner read and write permissions with chmod:
$ mkdir ~/.client-creds
$ mv client_private_key.key ~/.client-creds/client_key.key
$ mv client_cert.pem ~/.client-creds/client_cert.pem
$ chmod 600 ~/.client-creds/client_key.key ~/.client-creds/client_cert.pem
Create an authentication record
Next, you must create an authentication record in the database. An authentication record defines a set of authentication and the access methods for the database. You grant this record to a user or role to control how they authenticate to the database:
-
Create the authentication record. The tls method requires that clients authenticate with a certificate whose Common Name (CN) specifies a database username:
=> CREATE AUTHENTICATION auth_record METHOD 'tls' HOST TLS '0.0.0.0/0';
CREATE AUTHENTICATION
-
Grant the authentication record to a user or to a role. The following example grants the authentication record to PUBLIC, the default role for all users:
=> GRANT AUTHENTICATION auth_record TO PUBLIC;
GRANT AUTHENTICATION
Reject plaintext connections
You can create an authentication record that rejects remote connections from a specified IP range.
For example, to reject all plaintext client connections, specify the reject authentication method and the HOST NO TLS access method as follows:
=> CREATE AUTHENTICATION RejectNoSSL METHOD 'reject' HOST NO TLS '0.0.0.0/0';  --IPv4
=> CREATE AUTHENTICATION RejectNoSSL METHOD 'reject' HOST NO TLS '::/0';       --IPv6
2 - Internode TLS
Internode TLS secures communication between nodes within a cluster.
Internode TLS secures communication between nodes within a cluster. It is important to secure communications between nodes if you do not trust the network between the nodes.
Before setting up internode TLS, check the current status of your configuration with SECURITY_CONFIG_CHECK.
=> SELECT SECURITY_CONFIG_CHECK('NETWORK');
Communication between the server nodes uses two channels: the control channel and data channel. To enable internode encryption, set the EncryptSpreadComm parameter (disabled by default) to encrypt Spread communication on the control channel and configure the data_channel TLS Configuration to encrypt the data channel:
-
Encrypt Spread communication on the control channel with EncryptSpreadComm. See Control channel spread TLS for details.
-
Encrypt the data channel with the data_channel TLS Configuration. See Data channel TLS for details.
If you enable internode encryption, some of your queries might run slower than expected. Performance depends on the data sent and network quality.
Admintools generates or retrieves the spread key to encrypt all traffic on the control channel and ships the spread key to all nodes. Vertica uses TLS to encrypt all traffic on the data channel. TLS credentials are shared between nodes over the encrypted control channel.
The following graphic illustrates the internode encryption process.
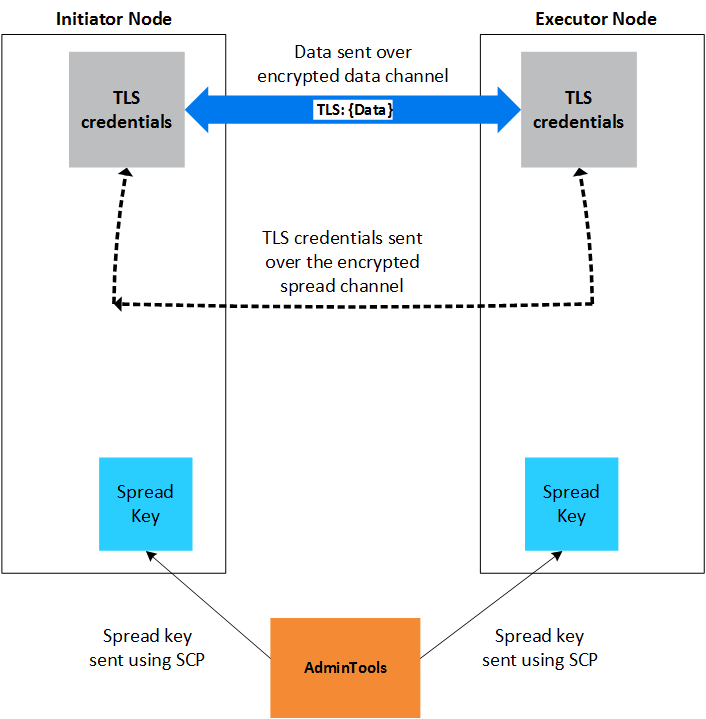
See also
2.1 - Control channel spread TLS
The control channel allows nodes to exchange plan information with one another, and to distribute calls among nodes.
The control channel allows nodes to exchange plan information with one another, and to distribute calls among nodes. Enabling spread security secures this communication. See Internode TLS for more information.
Internode TLS uses the following channels. Both must be enabled, and in the following order, before setting other parameters:
-
Control Channel to exchange plan information and distribute calls. It is implemented using Spread. For more information, visit spread.org.
-
Data Channel to exchange table data. It is implemented using TCP.
Enabling EncryptSpreadComm
EncryptSpreadComm can be set with one of two values:
-
vertica. Vertica generates the spread encryption key for the cluster when the database starts up.
-
aws-kms|<key_name>. Vertica fetches the user-specified key from the AWS Key Management Service when the database starts up, rather than generating one itself.
In general, you should set the EncryptSpreadComm parameter to enable spread encryption before setting any other security parameters.
-
Set the EncryptSpreadComm parameter with ALTER DATABASE.
=> ALTER DATABASE DEFAULT SET PARAMETER EncryptSpreadComm = 'vertica';
-
Restart the database.
-
Verify your settings with SECURITY_CONFIG_CHECK.
=> SELECT SECURITY_CONFIG_CHECK('NETWORK');
Privileges
Superuser
Restrictions
After setting this parameter, you must restart your database.
Example
This enables the EncryptSpreadComm parameter and tells Vertica to generate a spread encryption key the next time the database starts up.
=> ALTER DATABASE DEFAULT SET PARAMETER EncryptSpreadComm = 'vertica';
For more information on this and other security parameters, see Security parameters.
See also
2.2 - Data channel TLS
Nodes use the data channel to exchange table data during operations such as queries.
Nodes use the data channel to exchange table data during operations such as queries.
Internode communication uses the following channels. Their associated components and parameters must be enabled in the following order:
-
Control Channel to exchange plan information and distribute calls. It is implemented using Spread. For more information, visit spread.org.
-
Data Channel to exchange table data. It is implemented using TCP.
Configuring data channel TLS
This procedure configures TLS between Vertica nodes and uses the predefined TLS Configuration data_channel. To use a custom TLS Configuration, see TLS configurations.
-
Enable TLS on the control channel.
-
Generate or import a CA (Certificate Authority) certificate. For example, to create a self-signed CA certificate, generate a key and sign CA certificate with the key:
=> CREATE KEY SSCA_key TYPE 'RSA' LENGTH 2048;
=> CREATE CA CERTIFICATE SSCA_cert
SUBJECT '/C=US/ST=Massachusetts/L=Cambridge/O=OpenText/OU=Vertica/CN=Vertica Root CA'
VALID FOR 3650
EXTENSIONS 'nsComment' = 'Self-signed root CA cert'
KEY SSCA_key;
-
Generate or import a private key. For example, to generate the private key:
=> CREATE KEY internode_key TYPE 'RSA' LENGTH 2048;
-
Generate or import a TLS certificate. The certificate must have a full chain that ends in a CA, and must be either a x509v1 certificate or use the extendedKeyUsage extensions serverAuth and clientAuth. For example, to generate internode_cert and sign it with SSCA_cert:
=> CREATE CERTIFICATE internode_cert
SUBJECT '/C=US/ST=Massachusetts/L=Cambridge/O=Micro Focus/OU=Vertica/CN=data channel'
SIGNED BY SSCA_cert
EXTENSIONS 'nsComment' = 'Vertica internode cert', 'extendedKeyUsage' = 'serverAuth, clientAuth'
KEY internode_key;
-
Set the certificate, and optionally the TLSMODE for data_channel TLS configuration. If the TLSMODE is set to TRY_VERIFY or higher, the certificate's signing CA is added to the TLS Configuration's list of CA certificates:
=> ALTER TLS CONFIGURATION data_channel CERTIFICATE internode_cert TLSMODE 'TRY_VERIFY'
If you do not specify a TLSMODE, and the TLSMODE was previously set to DISABLE (default), TRY_VERIFY, VERIFY_CA, or VERIFY_FULL (which behaves like VERIFY_CA), the TLSMODE automatically changes to VERIFY_CA:
=> ALTER TLS CONFIGURATION data_channel CERTIFICATE internode_cert;
If the certificate is not signed by a known CA, the TLSMODE is set to DISABLE.
-
Verify that the InternodeTLSConfig parameter uses the TLS Configuration:
=> SHOW CURRENT InternodeTLSConfig;
  level  |        name        |   setting
---------+--------------------+--------------
 DEFAULT | InternodeTLSConfig | data_channel
(1 row)
-
Verify that data channel encryption is enabled with SECURITY_CONFIG_CHECK('NETWORK'):
=> SELECT SECURITY_CONFIG_CHECK('NETWORK');
   SECURITY_CONFIG_CHECK
---------------------------
 Spread security details:
* EncryptSpreadComm = [vertica]
Spread encryption is enabled
It is now safe to set/change other security knobs

Data Channel security details:
 TLS Configuration 'data_channel' TLSMODE is VERIFY_CA
TLS on the data channel is enabled
Privileges
Superuser
Restrictions
-
In general, you should set EncryptSpreadComm before configuring data channel TLS.
-
Changes to the InternodeTLSConfig parameter and its underlying TLS Configuration take effect immediately and interrupt all ongoing queries in order to update node connections.
See also
3 - TLS protocol
TLS (Transport Layer Security) is a cryptographic protocol used to secure communications between servers, their nodes, and clients.
TLS (Transport Layer Security) is a cryptographic protocol used to secure communications between servers, their nodes, and clients.
When enabled, a Vertica database and the clients that connect to it use TLS 1.2.
Although TLS, SSL, and TLS/SSL are often used interchangeably, the Vertica documentation always uses TLS to reference the protocol. Some Vertica parameters and components use SSL, and in these cases the documentation uses SSL to reference them, but these too can be categorized under the TLS umbrella.
Enabling TLS is a multi-step process. First, check the status of your security configuration with SECURITY_CONFIG_CHECK. Then, you can configure TLS authentication records to reject non-TLS connections.
3.1 - TLS overview
To secure communications and verify data integrity, you can configure Vertica and database clients to use TLS.
To secure communications and verify data integrity, you can configure Vertica and database clients to use TLS. The TLS protocol uses a key and certificate exchange system along with a trusted third party called a Certificate Authority (CA). Both the owner of a certificate and the other party that relies on the certificate must trust the CA to confirm the certificate holder's identity.
Vertica also supports the following authentication methods using the Transport Layer Security (TLS) v1.2 protocol. Both methods encrypt and verify the integrity of the data in transit:
-
Server Mode - In server mode, the client must confirm the server's identity before connecting. The client verifies that the server's certificate and public key are valid and were issued by a certificate authority (CA) listed in the client's list of trusted CAs. This helps prevent man-in-the-middle attacks.
-
Mutual Mode - In mutual mode, the client and server must verify each other's identity before connecting.
In addition to the requirements detailed in this section, you must create TLS authentication records to reject non-TLS client connections.
TLS handshake process
The following is a high-level/simplified overview of one possible "handshake" process for the client to verify the identity of the server in Server Mode. Additional actions taken in Mutual Mode for the server to identify the client are marked as such.
Public and Private Key Pairs - Key pairs are generated by clients and servers. The owner of a public key must be verified by a certificate authority. The key pairs are used to encrypt messages. For example, suppose Alice wants to send confidential data to Bob. Because she wants only Bob to read it, she encrypts the data with Bob's public key. Even if someone else gains access to the encrypted data, it remains protected. Because only Bob has access to his corresponding private key, he is the only person who can decrypt Alice's encrypted data back into its original form.
Certificates - Certificates contain a public key and identify the owner of the key. They are issued by the certificate authority (CA).
Certificate Authority (CA) - A certificate authority is a trusted party that verifies the identity of public key owners.
Client and Server Random - Client Random and Server Random are random strings that used to created a shared secret which encrypts communication if the handshake succeeds.
-
Before connecting, the server and client generate their own public and private key pairs. The CA then distributes identifying certificates to the server and client for their respective public keys.
-
The client sends its Client Random to the server and requests the server's certificate.
-
The server sends its certificate and its Server Random, encrypted with its private key, to the client. In Mutual Mode, the server also requests the client's certificate.
-
In Mutual Mode, the client sends its certificate.
-
The client uses the certificate to verify that the server owns its public key, then decrypts the Server Random with the server's public key to verify that the server owns its private key.
-
In Mutual Mode, the server uses the certificate to verify that the client owns its public key.
-
The server and client use the Client and Server Randoms to generate a new secret, called a session key, which encrypts future communication.
3.1.1 - TLS configurations
A TLS Configuration is a database object that encapsulates all settings and certificates needed to configure TLS.
A TLS Configuration is a database object that encapsulates all settings and certificates needed to configure TLS. After setting up a TLS Configuration, you can use it by setting it as the value for one or more of the following database parameters, each of which controls TLS for a certain type of connection between the Vertica database and a client or server:
-
ServerTLSConfig
-
LDAPLinkTLSConfig
-
LDAPAuthTLSConfig
-
InternodeTLSConfig
These parameters are set to predefined TLS Configurations by default so if you just want to configure TLS, you should use ALTER TLS CONFIGURATION to modify a predefined TLS Configuration. Otherwise, you can use CREATE TLS CONFIGURATION to create a custom TLS Configuration.
Reusing an existing TLS configurations
To reuse an existing TLS Configuration, use ALTER TLS CONFIGURATION.
The following table lists each TLS connection type parameter with its associated connection type and predefined TLS Configuration:
Note
For OAuth, Vertica is the client and the identity provider is the server. TLS for this connection type is not controlled by a TLS Configuration. For details, see
Configure Keycloak.
Creating custom TLS configurations
You can create TLS Configurations with CREATE TLS CONFIGURATION.
The following example creates a TLS Configuration and enables it for client-server TLS by setting it in ServerTLSConfig:
-
Create the keys and certificates:
-- create CA certificate
=> CREATE KEY k_ca TYPE 'RSA' LENGTH 4096;
=> CREATE CA CERTIFICATE ca
   SUBJECT '/C=US/ST=Massachusetts/L=Cambridge/O=Micro Focus/OU=Vertica/CN=Vertica Root CA'
   VALID FOR 3650
   EXTENSIONS 'nsComment' = 'Vertica generated root CA cert'
   KEY k_ca;

-- create server certificate
=> CREATE KEY k_server TYPE 'RSA' LENGTH 2048;
=> CREATE CERTIFICATE server
    SUBJECT '/C=US/ST=Massachusetts/L=Cambridge/O=Micro Focus/OU=Vertica/CN=Vertica Cluster/emailAddress=example@example.com'
    SIGNED BY ca
    KEY k_server;
-
Create the TLS Configuration with the server's certificate:
=> CREATE TLS CONFIGURATION new_tls_config CERTIFICATE server TLSMODE 'ENABLE';
-
Set the ServerTLSConfig parameter to use the new TLS Configuration for client-server TLS:
=> ALTER DATABASE DEFAULT SET ServerTLSConfig = 'new_tls_config';
3.1.2 - Generating TLS certificates and keys
This page includes examples and sample procedures for generating certificates and keys with CREATE KEY and CREATE CERTIFICATE.
This page includes examples and sample procedures for generating certificates and keys with CREATE KEY and CREATE CERTIFICATE. To view your keys and certificates, query the CRYPTOGRAPHIC_KEYS and CERTIFICATES system tables.
For more detailed information on creating signed certificates, OpenSSL recommends the OpenSSL Cookbook.
For more information on x509 extensions, see the OpenSSL documentation.
Importing keys and certificates
Keys
You only need to import private keys if you intend to use its associated certificate to sign something, like a message in client-server TLS, or another certificate. That is, you only only need to import keys if its associated certificate is one of the following:
If you only need your CA certificate to validate other certificates, you do not need to import its private key.
To import a private key:
=> CREATE KEY imported_key TYPE 'RSA' AS '-----BEGIN PRIVATE KEY-----...-----END PRIVATE KEY-----';
Certificates
To import a CA certificate that only validates other certificates (no private key):
=> CREATE CA CERTIFICATE imported_validating_ca AS '-----BEGIN CERTIFICATE-----...-----END CERTIFICATE-----';
To import a CA that can both validate and sign other certificates (private key required):
=> CREATE CA CERTIFICATE imported_signing_ca AS '-----BEGIN CERTIFICATE-----...-----END CERTIFICATE-----'
KEY ca_key;
To import a certificate for server mode TLS:
=> CREATE CERTIFICATE server_mode_cert AS '-----BEGIN CERTIFICATE-----...-----END CERTIFICATE-----' KEY imported_key;
To import a certificate for mutual mode TLS or client authentication, you must specify its CA:
=> CREATE CERTIFICATE imported_cert AS '-----BEGIN CERTIFICATE-----...-----END CERTIFICATE-----'
SIGNED BY imported_ca KEY imported_key;
Generating private keys and certificates
Keys
To generate an 2048-bit RSA private key:
=> CREATE KEY new_key TYPE 'RSA' LENGTH 2048;
Self-signed CA certificates
Important
A self-signed CA certificate is convenient for development purposes, but you should always use a proper certificate authority in a production environment.
A CA is a trusted entity that signs and validates other certificates with its own certificate. The following example generates a self-signed root CA certificate:
-
Generate or import a private key. The following command generates a new private key:
=> CREATE KEY ca_private_key TYPE 'RSA' LENGTH 4096;
CREATE KEY
-
Generate the certificate with the following format. Sign the certificate the with the private key that you generated or imported in the previous step:
=> CREATE CA CERTIFICATE ca_certificate
SUBJECT '/C=country_code/ST=state_or_province/L=locality/O=organization/OU=org_unit/CN=Vertica Root CA'
VALID FOR days_valid
EXTENSIONS 'authorityKeyIdentifier' = 'keyid:always,issuer', 'nsComment' = 'Vertica generated root CA cert'
KEY ca_private_key;
Note
The CA certificate SUBJECT must be different from the SUBJECT of any certificate that it signs.
For example:
=> CREATE CA CERTIFICATE SSCA_cert
SUBJECT '/C=US/ST=Massachusetts/L=Cambridge/O=OpenText/OU=Vertica/CN=Vertica Root CA'
VALID FOR 3650
EXTENSIONS 'nsComment' = 'Self-signed root CA cert'
KEY SSCA_key;
In addition to server certificates, CAs can also sign the certificates of other CAs. This process produces an intermediate CA and a chain of trust between the top-level CA and the intermediate CA. These intermediate CAs can then sign other certificates.
Note
Intermediate CA certificates generated with
CREATE CERTIFICATE cannot sign other CA certificates.
-
Generate or import the CA that signs the intermediate CA. The example that follows generates and uses a self-signed root CA:
=> CREATE KEY SSCA_key TYPE 'RSA' LENGTH 2048;
=> CREATE CA CERTIFICATE SSCA_cert
SUBJECT '/C=US/ST=Massachusetts/L=Cambridge/O=OpenText/OU=Vertica/CN=Vertica Root CA'
VALID FOR 3650
EXTENSIONS 'nsComment' = 'Self-signed root CA cert'
KEY SSCA_key;
-
Generate or import a private key:
=> CREATE KEY intermediate_key TYPE 'RSA' LENGTH 2048;
-
Generate the intermediate CA certificate, specifying its private key and signing CA using the following format:
=> CREATE CERTIFICATE intermediate_certificate_name
SUBJECT '/C=country_code/ST=state_or_province/L=locality/O=organization/OU=org_unit/CN=Vertica intermediate CA'
SIGNED BY ca_name
KEY intermediate_key;
For example:
=> CREATE CA CERTIFICATE intermediate_CA
SUBJECT '/C=US/ST=Massachusetts/L=Cambridge/O=OpenText/OU=Vertica/CN=Vertica Intermediate CA'
SIGNED BY SSCA_cert
KEY intermediate_key;
Client/server certificates
CREATE CERTIFICATE generates x509v3 certificates, which allow you to specify extensions to restrict how the certificate can be used. The value for the extendedKeyUsage extension will differ based on your use case:
-
Server certificate:
'extendedKeyUsage' = 'serverAuth'
-
Client certificate:
'extendedKeyUsage' = 'clientAuth'
-
Server certificate for internode encryption:
'extendedKeyUsage' = 'serverAuth, clientAuth'
Because these certificates are used for client/server TLS, you must import or generate their private keys.
The following example certificates are all signed by this self-signed CA certificate:
=> CREATE KEY SSCA_key TYPE 'RSA' LENGTH 2048;
=> CREATE CA CERTIFICATE SSCA_cert
SUBJECT '/C=US/ST=Massachusetts/L=Cambridge/O=OpenText/OU=Vertica/CN=Vertica Root CA'
VALID FOR 3650
EXTENSIONS 'nsComment' = 'Self-signed root CA cert'
KEY SSCA_key;
To generate a server certificate:
=> CREATE KEY server_key TYPE 'RSA' LENGTH 2048;
=> CREATE CERTIFICATE server_cert
SUBJECT '/C=US/ST=Massachusetts/L=Cambridge/O=OpenText/OU=Vertica/CN=Vertica server/emailAddress=example@example.com'
SIGNED BY SSCA_cert
EXTENSIONS 'nsComment' = 'Vertica server cert', 'extendedKeyUsage' = 'serverAuth'
KEY server_key;
To generate a client certificate:
=> CREATE KEY client_key TYPE 'RSA' LENGTH 2048;
=> CREATE CERTIFICATE client_cert
SUBJECT '/C=US/ST=Massachusetts/L=Cambridge/O=OpenText/OU=Vertica/CN=Vertica client/emailAddress=clientexample@example.com'
SIGNED BY SSCA_cert
EXTENSIONS 'nsComment' = 'Vertica client cert', 'extendedKeyUsage' = 'clientAuth'
KEY client_key;
To generate an internode TLS certificate:
=> CREATE KEY internode_key TYPE 'RSA' LENGTH 2048;
=> CREATE CERTIFICATE internode_cert
SUBJECT '/C=US/ST=Massachusetts/L=Cambridge/O=Micro Focus/OU=Vertica/CN=data channel'
SIGNED BY SSCA_cert
EXTENSIONS 'nsComment' = 'Vertica internode cert', 'extendedKeyUsage' = 'serverAuth, clientAuth'
KEY internode_key;
3.1.3 - Configuring client-server TLS
Vertica offers two connection modes for client-server TLS:.
Vertica offers two connection modes for client-server TLS:
-
In Server Mode, the client must verify the host's certificate. Hosts must have a server private key and certificate.
-
In Mutual Mode, the client and host must each verify the other's certificate. Hosts must have a server private key, server certificate, and CA certificate(s).
Client-server TLS secures the connection step between Vertica and clients, not the following authentication step to authenticate these clients as users in the database. To configure authentication for TLS connections or to reject plaintext connections, see TLS authentication.
Setting certificates with TLS configuration
This procedure creates keys and certificates for client-server TLS and sets them in the predefined TLS Configuration server, which is the default TLS configuration for ServerTLSConfig. To create a custom TLS configuration, see TLS configurations.
-
Generate or import the following according to your use case:
-
Server Mode: server certificate private key, server certificate
-
Mutual Mode: server certificate private key, server certificate, CA certificate(s)
-
Run the following commands according to your desired configuration. New connections will use TLS.
-
To use Server Mode, set the server certificate for the server's TLS Configuration:
=> ALTER TLS CONFIGURATION server CERTIFICATE server_cert;
-
To use Mutual Mode, set a server and CA certificate. This CA certificate is used to verify client certificates:
=> ALTER TLS CONFIGURATION server CERTIFICATE server_cert ADD CA CERTIFICATES ca_cert;
To use multiple CA certificates, separate them with commas:
=> ALTER TLS CONFIGURATION server CERTIFICATE server_cert
   ADD CA CERTIFICATES intermediate_ca_cert, ca_cert;
-
Enable TLS (disabled by default). Choose one of the following TLSMODEs, listed in ascending security.
-
DISABLE: Disables TLS. All other options for this parameter enable TLS.
-
ENABLE: Enables TLS. Vertica does not verify client certificates.
-
TRY_VERIFY: Establishes a TLS connection if one of the following is true:
- The client presents a valid certificate.
- The client doesn't present a certificate
If the client presents an invalid certificate, the connection is rejected.
-
VERIFY_CA: Connection succeeds if Vertica verifies that the client certificate is from a trusted CA. If the client does not present a client certificate, the connection is rejected.
TLS Configurations also support the TLSMODE VERIFY_FULL, but this TLSMODE is unsupported for client-server TLS (the connection type handled by ServerTLSConfig) and behaves like VERIFY_CA.
For Server Mode, choose ENABLE:
=> ALTER TLS CONFIGURATION server TLSMODE 'ENABLE';
For Mutual Mode, choose TRY_VERIFY or higher:
=> ALTER TLS CONFIGURATION server TLSMODE 'VERIFY_CA';
-
Verify that the ServerTLSConfig parameter is set to the server TLS Configuration:
=> SHOW CURRENT ServerTLSConfig;
  level  |      name        | setting
---------+------------------+---------
 DEFAULT | ServerTLSConfig  | server
(1 row)
If not, set the ServerTLSConfig parameter:
=> ALTER DATABASE DEFAULT SET ServerTLSConfig = 'server';
See also
3.1.4 - Managing CA bundles
Certificate authority (CA) bundles allow you to group CA certificates together and use them to validate connections to your database.
Certificate authority (CA) bundles allow you to group CA certificates together and use them to validate connections to your database.
You can view existing CA bundles by querying the CA_BUNDLES system table.
Creating a CA bundle
To create a CA bundle, use CREATE CA BUNDLE and specify one or more CA certificates. If you don't specify a CA certificate, the CA bundle will be empty.
This example creates a CA bundle called ca_bundle that contains CA certificates root_ca and root_ca2:
=> CREATE CA BUNDLE ca_bundle CERTIFICATES root_ca, root_ca2;
CREATE CA BUNDLE

=> SELECT * FROM ca_bundles WHERE name='ca_bundle';
        oid        |   name    |       owner       |              certificates
-------------------+-----------+-------------------+----------------------------------------
 45035996274026954 | ca_bundle | 45035996273704962 | [45035996274026764, 45035996274026766]
(1 row)
Modifying existing CA bundles
CA_BUNDLES only stores OIDs. Since operations on CA bundles require certificate and owner names, you can use the following query to map bundles to certificate and owner names:
=> SELECT user_name AS owner_name,
       owner     AS owner_oid,
       b.name    AS bundle_name,
       c.name    AS cert_name
FROM   (SELECT name,
               STRING_TO_ARRAY(certificates) :: array[INT] AS certs
        FROM   ca_bundles) b
       LEFT JOIN certificates c
              ON CONTAINS(b.certs, c.oid)
       LEFT JOIN users
              ON user_id = owner
ORDER  BY 1;

 owner_name |     owner_oid     | bundle_name  | cert_name
------------+-------------------+--------------+-----------
 dbadmin    | 45035996273704962 | ca_bundle    | root_ca
 dbadmin    | 45035996273704962 | ca_bundle    | ca_cert
(2 rows)
Adding and removing CA certificates
If you have ownership of a CA bundle, you can add and remove certificates with ALTER CA BUNDLE.
This example modifies ca_bundle by adding ca_cert and removing root_ca2:
=> ALTER CA BUNDLE ca_bundle ADD CERTIFICATES ca_cert;
ALTER CA BUNDLE

=> SELECT * FROM ca_bundles WHERE name='ca_bundle';
        oid        |   name    |       owner       |                       certificates
-------------------+-----------+-------------------+-----------------------------------------------------------
 45035996274027356 | ca_bundle | 45035996273704962 | [45035996274027342, 45035996274027348, 45035996274027396]
(1 row)

=> ALTER CA BUNDLE ca_bundle REMOVE CERTIFICATES root_ca2;
ALTER CA BUNDLE

=> SELECT * FROM CA_BUNDLES;
        oid        |   name    |       owner       |              certificates
-------------------+-----------+-------------------+----------------------------------------
 45035996274027356 | ca_bundle | 45035996273704962 | [45035996274027342, 45035996274027396]
(1 row)
Managing CA bundle ownership
Superusers and CA bundle owners can see whether a bundle exists by querying the CA_BUNDLES system table, but only owners of a given bundle can see the certificates inside.
In the following example, the dbadmin user owns ca_bundle. After giving ownership of the bundle to 'Alice', the dbadmin can no longer see the certificates inside the bundle:
=> => SELECT * FROM ca_bundles WHERE name='ca_bundle';
        oid        |   name    |       owner       |              certificates
-------------------+-----------+-------------------+----------------------------------------
 45035996274027356 | ca_bundle | 45035996273704962 | [45035996274027342, 45035996274027396]
(1 row)

=> ALTER CA BUNDLE ca_bundle OWNER TO Alice;
ALTER CA BUNDLE

=> SELECT * FROM ca_bundles WHERE name='ca_bundle';
        oid        |   name    |       owner       | certificates
-------------------+-----------+-------------------+--------------
 45035996274027356 | ca_bundle | 45035996274027586 | []
(1 row)
Dropping CA bundles
You must have ownership of a CA bundle to drop it:
=> DROP CA BUNDLE ca_bundle;
DROP CA BUNDLE
3.1.5 - Generating certificates and keys for MC
A certificate signing request (CSR) is a block of encrypted text generated on the server on which the certificate is used.
A certificate signing request (CSR) is a block of encrypted text generated on the server on which the certificate is used. You send the CSR to a certificate authority (CA) to apply for a digital identity certificate. The CA uses the CSR to create your SSL certificate from information in your certificate; for example, organization name, common (domain) name, city, and country.
Management Console (MC) uses a combination of OAuth (Open Authorization), Secure Socket Layer (SSL), and locally-encrypted passwords to secure HTTPS requests between a user's browser and MC, and between MC and the agents. Authentication occurs through MC and between agents within the cluster. Agents also authenticate and authorize jobs.
The MC configuration process sets up SSL automatically, but you must have the openssl package installed on your Linux environment first.
When you connect to MC through a client browser, Vertica assigns each HTTPS request a self-signed certificate, which includes a timestamp. To increase security and protect against password replay attacks, the timestamp is valid for several seconds only, after which it expires.
To avoid being blocked out of MC, synchronize time on the hosts in your Vertica cluster, and on the MC host if it resides on a dedicated server. To recover from loss or lack of synchronization, resync system time and the Network Time Protocol.
Create a certificate and submit it for signing
For production, you must use certificates signed by a certificate authority. You can create and submit a certificate and when the certificate returns from the CA, import the certificate into MC.
Use the openssl command to generate a new CSR, entering the passphrase "password" when prompted:
$ sudo openssl req -new -key /opt/vconsole/config/keystore.key -out server.csr
Enter pass phrase for /opt/vconsole/config/keystore.key:
When you press Enter, you are prompted to enter information to be incorporated into your certificate request. Some fields contain a default value, which you should change for security reasons. Other fields you can leave blank, such as password and optional company name. To leave the field blank, type '.'.
Important
The keystore.key value for the -key option creates private key for the keystore. If you generate a new key and import it using the Management Console interface, the MC process does restart properly. You must restore the original keystore.jks file and
restart Management Console.
This information is contained in the CSR and shows both the default and replacement values:
Country Name (2 letter code) [GB]:USState or Province Name (full name) [Berkshire]:Massachusetts
Locality Name (eg, city) [Newbury]: Cambridge
Organization Name (eg, company) [My Company Ltd]:Vertica
Organizational Unit Name (eg, section) []:Information Management
Common Name (eg, your name or your server's hostname) []:console.vertica.com
Email Address []:mcadmin@vertica.com
The Common Name field is the fully qualified domain name of your server. Your entry must exactly match what you type in your web browser, or you receive a name mismatch error.
Self-sign a certificate for testing
To test your new SSL implementation, you can self-sign a CSR using either a temporary certificate or your own internal CA, if one is available.
Note
A self-signed certificate generates a browser-based error notifying you that the signing certificate authority is unknown and not trusted. For testing purposes, accept the risks and continue.
The following command generates a temporary certificate, which expires after 365 days:
$ sudo openssl x509 -req -days 365 -in server.csr -signkey /opt/vconsole/config/keystore.key -out server.crt
Enter passphrase for /opt/vconsole/config/keystore.key:
Enter same passphrase again:
The previous example prompts you for a passphrase. This is required for Apache to start. To implement a passphrase you must put the SSLPassPhraseDialog directive in the appropriate Apache configuration file. For more information see your Apache documentation.
This example shows the command's output to the terminal window:
Signature oksubject=/C=US/ST=Massachusetts/L=Cambridge/O=Vertica/OU=IT/
CN=console.vertica.com/emailAddress=mcadmin@vertica.com
Getting Private key
You can now import the self-signed key, server.crt, into Management Console.
See also
3.1.6 - Importing a new certificate to MC
Use this procedure to import a new certificate into Management Console.
Use this procedure to import a new certificate into Management Console.
-
Connect to Management Console, and log in as an administrator.
-
On the Home page, click MC Settings.
-
In the button panel on the left, click SSL certificates.
-
To the right of "Upload a new SSL certificate," click Browse to import the new key.
-
Click Apply.
-
Restart Management Console.
3.1.7 - Replacing the agent certificate
The uses a preinstalled Certificate Authority (CA) certificate.
The Agent uses a preinstalled Certificate Authority (CA) certificate. You can replace it copying the your preferred certificate and its private key to the host.
To view your current agent certificate:
$ openssl s_client -prexit -connect database_IP:database_port
Generating a certificate
If you don't already have one, you can generate a self-signed certificate. For more information, see Generating TLS certificates and keys
-
Generate the private key and certificate.
$ openssl req -new -newkey rsa:4096 -x509 -sha256 -days 365 -nodes -out agent.cert -keyout agent.key

You are about to be asked to enter information that will be incorporated
into your certificate request.
What you are about to enter is what is called a Distinguished Name or a DN.
There are quite a few fields but you can leave some blank
For some fields there will be a default value,
If you enter '.', the field will be left blank.
-----
Country Name (2 letter code) [AU]:US
State or Province Name (full name) [Some-State]:MA
Locality Name (eg, city) []:Cambridge
Organization Name (eg, company) [Internet Widgits Pty Ltd]:My Company
Organizational Unit Name (eg, section) []:IT
Common Name (e.g. server FQDN or YOUR name) []:*.mycompany.com
Email Address []:myaddress@mycompany.com
-
Make a copy of the certificate in PEM format.
$ openssl x509 -in agent.cert -out agent.pem -outform PEM
-
Review the certificate.
$ openssl x509 -in agent.pem -text
Replacing the agent certificate on a host
The following procedure replaces the Agent's current private key and certificate on a single host. To replace this certificate and key across an entire cluster, repeat this procedure for all the hosts.
-
Stop the Agent service on the host.
$ /etc/init.d/vertica_agent stop
-
Backup and rename the existing agent certificate and key.
$ cd /opt/vertica/config/share
$ mv agent.cert agent.cert.bck
$ mv agent.key agent.key.bck
$ mv agent.p em agent.pem.bck
-
Transfer the new certificate and key to the host's /opt/vertica/config/share directory.
$ scp agent.* root@123.12.12.123:/opt/vertica/config/share
-
Change the owner of the certificate and key to uidbadmin and the group to verticadba.
$ chown installed_Vertica_user:installed_Vertica_group agent.*
-
Make the certificate and key files read-only.
$ chmod -R 400 agent.*
-
Start the Agent service.
$ /etc/init.d/vertica_agent start
starting agent
Opening PID file "/opt/vertica/log/agent.pid".
Overwriting /opt/vertica/log/agent_uidbadmin.log
Overwriting /opt/vertica/log/agent_uidbadmin.err
start OK for user: uidbadmin
-
Verify that you can view information about your database with your API key.
$ curl -X GET https://10.20.80.145:5444/databases -H "VerticaApiKey:wCgXny3Wm+8OhEvGkAclv7v9+VIlxgXblpr4rf" -k
-
Verify that the Agent is using the new certificate.
$ openssl s_client -prexit -connect 10.20.80.145:5444
3.1.8 - Importing and exporting data with TLS
Vertica uses TLS to secure connections and communications between clients and servers.
Vertica uses TLS to secure connections and communications between clients and servers. When you import or export data between Vertica clusters, one of the clusters functions as a client, which means you can use TLS to protect that connection, too.
The ImportExportTLSMode parameter controls the strictness of TLS when importing or exporting data.
By default, ImportExportTLSMode is set to PREFER. With this setting, Vertica attempts to use TLS and falls back to plaintext; you can change this to always require encryption and, further, to validate the certificate on each connection. For more information about TLS during import and export operations, see Configuring connection security between clusters.
4 - LDAP link service
LDAP Link enables synchronization between the LDAP and Vertica servers.
LDAP Link enables synchronization between the LDAP and Vertica servers. This eliminates the need for you to manage two sets of users and groups or roles, one on the LDAP server and another on the Vertica server. With LDAP synchronization, the Vertica server becomes a replication database for the LDAP server.
Note
Users created by the LDAP Link service are compatible with native Vertica roles and do not require LDAP roles for functions like
column access policies.
Automatic synchronization
With LDAP Link the Vertica server closely integrates with an existing directory service such as MS Active Directory or OpenLDAP. The Vertica server automatically synchronizes:
You manage all user and group properties in the LDAP server. If you are the Vertica database administrator, you need only to set up permissions for Vertica Analytic Database access on the users and groups.
Configure LDAP Link with LDAP Link connection parameters that reside in the catalog. See General and Connection Parameters for more information.
The LDAP Link dry run meta-functions allow you to configure the service in discrete stages before making any changes to your database. These stages are:
-
LDAP Link Bind: Establishing a connection between the LDAP server and the Vertica database
-
LDAP Link Search: Searching the LDAP server for users and groups
-
LDAP Link Sync: Mapping LDAP users and groups to their equivalents in Vertica
Query the system table LDAP_LINK_DRYRUN_EVENTS to view the results of each dry run.
For more information on dry runs and configuring LDAP Link, see Configuring LDAP link with dry runs.
Enable LDAP link
Enable LDAP Link as shown:
=> ALTER DATABASE dbname SET PARAMETER LDAPLinkURL='ldap://example.dc.com',
    LDAPLinkSearchBase='dc=DC,dc=com', LDAPLinkBindDN='CN=jsmith,OU=QA,DC=dc,DC=com,
    LDAPLinkBindPswd='password',LDAPLinkFilterUser='(objectClass=inetOrgPerson)', LDAPLinkFilterGroup='(objectClass=group)', LDAPLinkOn=1;
=> SELECT ldap_link_sync_start();
See LDAP link parameters.
LDAP link workflow
After you enable LDAP Link, synchronization occurs according to this workflow:
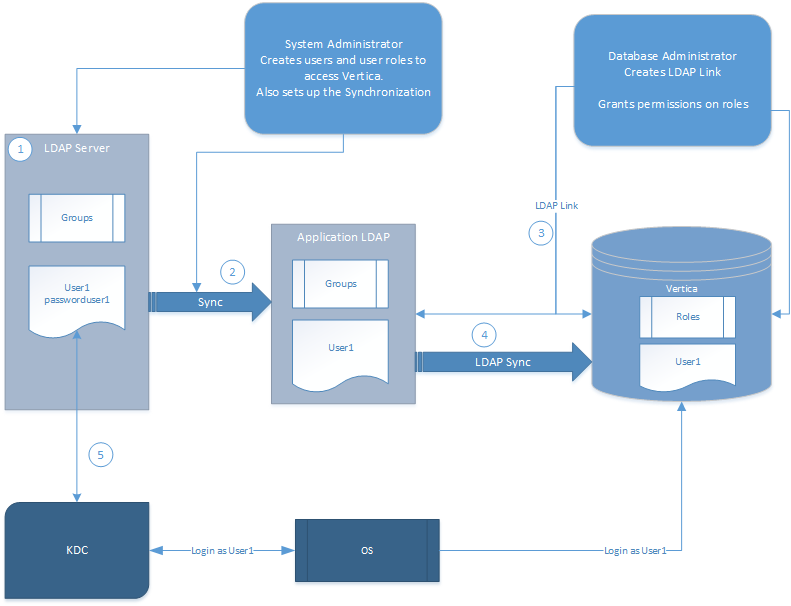
-
The System Administrator creates users and user groups on the LDAP server.
-
The System Administrator sets up LDAP Link service parameters as required and enables the service.
-
Using the LDAP Link service, Vertica Analytic Database replicates the users and user groups from the Application LDAP to the Vertica database, creating Vertica users and roles.
-
The LDAP server uses Kerberos (KDC) to authenticate the user logging in to Vertica.
-
The LDAP user can log in to Vertica if assigned the appropriate authentication type.
-
After logging in, you can grant users privileges using GRANT statements or as part of a Group.
Note
After synchronization, the Vertica user does not have an associated authentication method. To allow the user to log in, you must assign an authentication method to the user. See
Configuring client authentication.
4.1 - Configuring LDAP link with dry runs
Vertica supports several meta-functions that let you tweak LDAP Link settings before syncing with Vertica.
Vertica supports several meta-functions that let you tweak LDAP Link settings before syncing with Vertica. Each meta-function takes LDAP Link parameters as arguments and tests a separate part of LDAP Link:
These meta-functions should be used and tested in succession, and their arguments are cumulative. That is, the parameters you use to configure LDAP_LINK_DRYRUN_CONNECT are used for LDAP_LINK_DRYRUN_SEARCH, and the arguments for those functions are used for LDAP_LINK_DRYRUN_SYNC.
The dryrun and LDAP_LINK_SYNC_START functions must be run from the clerk node. To determine the clerk node, query NODE_RESOURCES:
=> SELECT node_name, dbclerk FROM node_resources WHERE dbclerk='t';
    node_name     | dbclerk
------------------+---------
 v_vmart_node0001 | t
(1 row)
Be sure to query the LDAP_LINK_DRYRUN_EVENTS system table to verify the results of each dry run before moving to the next meta-function.
Configuring TLS for dry runs
Like the standard LDAP Link functions, LDAP Link dry-run functions pull from the 'LDAPLink' TLS Configuration for managing TLS connections. Query the TLS_CONFIGURATIONS system table to view existing TLS Configurations.
=> SELECT * FROM tls_configurations WHERE name='LDAPLink';
   name   |  owner  | certificate | ca_certificate | cipher_suites |  mode
----------+---------+-------------+----------------+---------------+---------
 LDAPLink | dbadmin | client_cert | ldap_ca        |               | DISABLE
(1 row)
For instructions on configuring TLS for LDAP Link and its dry run functions, see TLS for LDAP link.
Configuring LDAP link bind
Before configuring LDAP users and importing them to Vertica, you must first connect or "bind," with the LDAP server. Connections are managed with several parameters. For more information on each parameter, related functions, options, and default values, see LDAP link parameters.
LDAP_LINK_DRYRUN_CONNECT requires a Distinguished Name (DN), a password to authenticate with the LDAP server, and the URL to the LDAP server.
To encrypt the connection, configure the LDAPLink TLS Configuration.
By providing an empty string for the LDAPLinkBindPswd argument, you can also perform an anonymous bind if your LDAP server allows unauthenticated binds.
=> SELECT LDAP_LINK_DRYRUN_CONNECT('LDAPLinkURL','LDAPLinkBindDN','LDAPLinkBindPswd');
Dry run bind example
This tests the connection to an LDAP server at ldap://example.dc.com with the DN CN=amir,OU=QA,DC=dc,DC=com.
=> SELECT LDAP_LINK_DRYRUN_CONNECT('ldap://example.dc.com','CN=amir,OU=QA,DC=dc,DC=com','password');

                ldap_link_dryrun_connect
---------------------------------------------------------------------------------
Dry Run Connect Completed. Query v_monitor.ldap_link_dryrun_events for results.
To check the results of the bind, query the system table LDAP_LINK_DRYRUN_EVENTS.
=> SELECT event_timestamp, event_type, entry_name, role_name, link_scope, search_base from LDAP_LINK_DRYRUN_EVENTS;
        event_timestamp       |       event_type      |      entry_name      | link_scope | search_base
------------------------------+-----------------------+----------------------+------------+-------------
2019-12-09 15:41:43.589398-05 | BIND_STARTED          | -------------------- | ---------- | -----------
2019-12-09 15:41:43.590504-05 | BIND_FINISHED         | -------------------- | ---------- | -----------
Configuring LDAP link search
After a successful connection between Vertica and the LDAP server, you should configure and test your user and group search space for correctness and efficiency.
To search for users and groups on the LDAP server to import to your database, pass both the connection and search parameters to the LDAP_LINK_DRYRUN_SEARCH meta-function. The LDAP server responds with a list of users and groups that would be imported into Vertica with the given parameters.
By providing an empty string for the LDAPLinkBindPswd argument, you can also perform an anonymous search if your LDAP server's Access Control List (ACL) is configured to allow unauthenticated searches. The settings for allowing anonymous binds are different from the ACL settings for allowing anonymous searches.
=> SELECT LDAP_LINK_DRYRUN_SEARCH('LDAPLinkURL','LDAPLinkBindDN','LDAPLinkBindPswd','LDAPLinkSearchBase',
'LDAPLinkScope','LDAPLinkFilterUser','LDAPLinkFilterGroup','LDAPLinkUserName','LDAPLinkGroupName',
'LDAPLinkGroupMembers',[LDAPLinkSearchTimeout],['LDAPLinkJoinAttr']);
Dry run search example
This searches for users and groups in the LDAP server. In this case, the LDAPLinkSearchBase parameter specifies the dc.com domain and a sub scope, which replicates the entire subtree under the DN.
To further filter results, the function checks for users and groups with the person and group objectClass attributes. It then searches the group attribute cn, identifying members of that group with the member attribute, and then identifying those individual users with the attribute uid.
=> SELECT LDAP_LINK_DRYRUN_SEARCH('ldap://example.dc.com','CN=amir,OU=QA,DC=dc,DC=com','$vertica$','dc=DC,dc=com','sub',
'(objectClass=person)','(objectClass=group)','uid','cn','member',10,'dn');

                ldap_link_dryrun_search
--------------------------------------------------------------------------------
Dry Run Search Completed. Query v_monitor.ldap_link_dryrun_events for results.
To check the results of the search, query the system table LDAP_LINK_DRYRUN_EVENTS.
=> SELECT event_timestamp, event_type, entry_name, ldapurihash, link_scope, search_base from LDAP_LINK_DRYRUN_EVENTS;
        event_timestamp          |    event_type    |       entry_name       | ldapurihash | link_scope | search_base
---------------------------------+------------------+------------------------+-------------+------------+--------------
2020-01-03 21:03:26.411753+05:30 | BIND_STARTED     | ---------------------- |           0 | sub        | dc=DC,dc=com
2020-01-03 21:03:26.422188+05:30 | BIND_FINISHED    | ---------------------- |           0 | sub        | dc=DC,dc=com
2020-01-03 21:03:26.422223+05:30 | SYNC_STARTED     | ---------------------- |           0 | sub        | dc=DC,dc=com
2020-01-03 21:03:26.422229+05:30 | SEARCH_STARTED   | **********             |           0 | sub        | dc=DC,dc=com
2020-01-03 21:03:32.043107+05:30 | LDAP_GROUP_FOUND | Account Operators      |           0 | sub        | dc=DC,dc=com
2020-01-03 21:03:32.04312+05:30  | LDAP_GROUP_FOUND | Administrators         |           0 | sub        | dc=DC,dc=com
2020-01-03 21:03:32.043182+05:30 | LDAP_USER_FOUND  | user1                  |           0 | sub        | dc=DC,dc=com
2020-01-03 21:03:32.043186+05:30 | LDAP_USER_FOUND  | user2                  |           0 | sub        | dc=DC,dc=com
2020-01-03 21:03:32.04319+05:30  | SEARCH_FINISHED  | **********             |           0 | sub        | dc=DC,dc=com
Configuring LDAP link sync
After configuring the search space, you'll have a list of users and groups. LDAP sync maps LDAP users and groups to their equivalents in Vertica. The LDAPLinkUserName maps to the Vertica usernames and the LDAPLinkGroupName maps to Vertica roles.
=> SELECT LDAP_LINK_DRYRUN_SYNC('LDAPLinkURL','LDAPLinkBindDN','LDAPLinkBindPswd','LDAPLinkSearchBase',
'LDAPLinkScope','LDAPLinkFilterUser','LDAPLinkFilterGroup','LDAPLinkUserName','LDAPLinkGroupName',
'LDAPLinkGroupMembers',[LDAPLinkSearchTimeout],['LDAPLinkJoinAttr']);
Dry run sync example
To perform a dry run to map the users and groups returned from LDAP_LINK_DRYRUN_SEARCH, pass the same parameters as arguments to LDAP_LINK_DRYRUN_SYNC.
=> SELECT LDAP_LINK_DRYRUN_SYNC('ldap://example.dc.com','CN=amir,OU=QA,DC=dc,DC=com','$vertica$','dc=DC,dc=com','sub',
'(objectClass=person)','(objectClass=group)','uid','cn','member',10,'dn');

                          LDAP_LINK_DRYRUN_SYNC
------------------------------------------------------------------------------------------
Dry Run Connect and Sync Completed. Query v_monitor.ldap_link_dryrun_events for results.
To check the results of the sync, query the system table LDAP_LINK_DRYRUN_EVENTS.
=> SELECT event_timestamp, event_type, entry_name, ldapurihash, link_scope, search_base from LDAP_LINK_DRYRUN_EVENTS;
        event_timestamp          |     event_type      |       entry_name       | ldapurihash | link_scope | search_base
---------------------------------+---------------------+------------------------+-------------+------------+--------------
2020-01-03 21:08:30.883783+05:30 | BIND_STARTED        | ---------------------- |           0 | sub        | dc=DC,dc=com
2020-01-03 21:08:30.890574+05:30 | BIND_FINISHED       | ---------------------- |           0 | sub        | dc=DC,dc=com
2020-01-03 21:08:30.890602+05:30 | SYNC_STARTED        | ---------------------- |           0 | sub        | dc=DC,dc=com
2020-01-03 21:08:30.890605+05:30 | SEARCH_STARTED      | **********             |           0 | sub        | dc=DC,dc=com
2020-01-03 21:08:31.939369+05:30 | LDAP_GROUP_FOUND    | Account Operators      |           0 | sub        | dc=DC,dc=com
2020-01-03 21:08:31.939395+05:30 | LDAP_GROUP_FOUND    | Administrators         |           0 | sub        | dc=DC,dc=com
2020-01-03 21:08:31.939461+05:30 | LDAP_USER_FOUND     | user1                  |           0 | sub        | dc=DC,dc=com
2020-01-03 21:08:31.939463+05:30 | LDAP_USER_FOUND     | user2                  |           0 | sub        | dc=DC,dc=com
2020-01-03 21:08:31.939468+05:30 | SEARCH_FINISHED     | **********             |           0 | sub        | dc=DC,dc=com
2020-01-03 21:08:31.939718+05:30 | PROCESSING_STARTED  | **********             |           0 | sub        | dc=DC,dc=com
2020-01-03 21:08:31.939887+05:30 | USER_CREATED        | user1                  |           0 | sub        | dc=DC,dc=com
2020-01-03 21:08:31.939895+05:30 | USER_CREATED        | user2                  |           0 | sub        | dc=DC,dc=com
2020-01-03 21:08:31.939949+05:30 | ROLE_CREATED        | Account Operators      |           0 | sub        | dc=DC,dc=com
2020-01-03 21:08:31.939959+05:30 | ROLE_CREATED        | Administrators         |           0 | sub        | dc=DC,dc=com
2020-01-03 21:08:31.940603+05:30 | PROCESSING_FINISHED | **********             |           0 | sub        | dc=DC,dc=com
2020-01-03 21:08:31.940613+05:30 | SYNC_FINISHED       | ---------------------- |           0 | sub        | dc=DC,dc=com
4.2 - Using LDAP link
When you use LDAP Link, the following are directly affected and help you manage and monitor the LDAP Link - Vertica Analytic Database synchronization:.
When you use LDAP Link, the following are directly affected and help you manage and monitor the LDAP Link - Vertica Analytic Database synchronization:
To cancel an in-progress synchronization, use LDAP_LINK_SYNC_CANCEL.
User and group management
Users and groups created on the LDAP server have a specific relationship with those users and roles replicated to the Vertica server:
-
The user-group relationship on the LDAP server is maintained when those users and groups (roles) are synchronized with Vertica Analytic Database.
-
If a user or group name exists on the Vertica database and a user or group with the same names is synchronized from the LDAP Server using LDAP Link, the users or groups become conflicted. Vertica cannot support multiple users with the same name. To resolve this, see User Conflicts.
-
If the LDAP server contains a circular relationship, Vertica accepts and creates roles for the first non-circular part of the relationship returned by the LDAP server and ignores the rest.
For example, suppose the LDAP server contains groups A and B, where A contains B, and B contains A, creating a circular relationship.
If the LDAP server first returns that A contains B, Vertica creates roles A and B, and grants role A to role B. Vertica then ignores the fact that group B also contains A.
LDAP Link uses the entries in the dn: section of the LDAP configuration file as the unique user identifier when synchronizing a user to the Vertica Analytic Database:
dn: cn=user1,ou=dev,dc=example,dc=com
cn: user1
ou: dev
id: user1
The uid parameter in the LDAP configuration file indicates the LDAP user name.
uid: user1
Upon synchronization, the dn: entry gets mapped to the uid: to identify the Vertica Analytic Database user.
If you change a setting in the dn: and do not change the uid:, LDAP Link interprets the user as a new user when re-synchronizing with the Vertica Analytic Database. In this case, the existing Vertica Analytic Database user with that uid: gets deleted from Vertica and a new Vertica Analytic Database user is created.
If you change the uid: and not the dn: on LDAP, the uid on the Vertica Analytic Database gets updated to the new uid. Since you did not change the dn: LDAP Link does not interpret the user as a new user.
LDAP link user flag
As a dbadmin user, you can access the vs_users table to monitor user behavior on the Vertica Analytic Database. The users table contains an ldap_dn field that identifies whether or not the Vertica Analytic Database user is also an LDAP Link user. This example shows the ldap_dn field set to dn indicating the Vertica Analytic Database user is also an LDAP Link user:
=> SELECT * FROM vs_users;
-[ RECORD 1 ]---------+--------------------------------------------------
user_id               | 45035996273704962
user_name             | dbadmin
is_super_user         | t
profile_name          | default
is_locked             | f
lock_time             |
resource_pool         | general
memory_cap_kb         | unlimited
temp_space_cap_kb     | unlimited
run_time_cap          | unlimited
max_connections       | unlimited
connection_limit_mode | database
idle_session_timeout  | unlimited
all_roles             | dbduser*, dbadmin*, pseudosuperuser*
default_roles         | dbduser*, dbadmin*, pseudosuperuser*
search_path           |
ldap_dn               | dn
ldap_uri_hash         | 0
is_orphaned_from_ldap | f
Blocked commands
Be aware that the following SQL statements are blocked for Vertica users with ldapdn set to dn in the vs_users table:
Client authentication types
LDAP user and groups cannot log in to Vertica if client authentication is not assigned to the user or group. You can use the following valid authentication types for LDAP users and groups:
-
GSS
-
Ident
-
LDAP
-
Reject
-
Trust
4.3 - LDAP link parameters
Use LDAP Link parameters to determine:.
Use LDAP Link parameters to determine:
-
LDAP Link operations, such as enabling or disabling LDAP Link and how often to perform replication
-
Authentication parameters, including SSL authentication parameters
-
Users and groups that inherit unowned objects
-
How to resolve conflicts
To configure TLS for LDAP Link, see TLS for LDAP link.
Set LDAP link parameters
This example shows how you can set:
-
LDAPLinkURL, the URL of the LDAP server.
-
LDAPLinkSearchBase, the base DN from which to start replication.
You also see how to set the LDAP Link Bind authentication parameters (LDAPLinkBindDN and LDAPLinkBindPswd) and enables LDAP Link (LDAPLinkOn).
=> ALTER DATABASE myDB1 SET PARAMETER LDAPLinkURL='ldap://10.60.55.128',
LDAPLinkSearchBase='dc=corp,dc=com',LDAPLinkBindDN='dc=corp,dc=com',LDAPLinkBindPswd='password';

=> ALTER DATABASE myDB1 SET PARAMETER LDAPLinkOn = '1';
General and connection parameters
|
Parameter |
Description |
LDAPLinkOn |
Enables or disables LDAP Link.
Valid Values:
0—LDAP Link disabled
1—LDAP Link enabled
Default: 0
|
LDAPLinkURL |
The LDAP server URL.
To use a plaintext connection between Vertica and the LDAP server, begin the LDAPLinkURL with ldap:// and set the TLSMODE of LDAPLink to DISABLE.
To use StartTLS, begin the LDAPLinkURL with ldap:// and set the TLSMODE of LDAPLink to ENABLE or higher.
To use LDAPS, begin the LDAPLinkURL with ldaps:// and set the TLSMODE of LDAPLink to ENABLE or higher.
Example:
=> SET PARAMETER LDAPLinkURL='ldap://example.dc.com';
|
LDAPLinkInterval |
The time interval, in seconds, by which the LDAP Server and Vertica server synchronize.
Default: 86400 (one day).
|
LDAPLinkFirstInterval |
The first interval, in seconds, for LDAP/Vertica synchronization after the clerk node joins the cluster.
Default: 120
|
LDAPLinkRetryInterval |
The time, in seconds, the system waits to retry a failed synchronization.
Default: 10
|
LDAPLinkRetryNumber |
The number of retry attempts if synchronization failed.
Default: 10.
|
LDAPLinkSearchBase |
The base dn from where to start replication.
Example:
=> SET PARAMETER LDAPLinkSearchBase='ou=vertica,dc=mycompany,dc=com';
Vertica recommends using a separate OU for database users.
|
LDAPLinkSearchTimeout |
The timeout length, in seconds, for the LDAP search operation during an LDAP Link Service run.
Default: 10
|
LDAPLinkScope |
Indicates what dn level to replicate.
Valid Values:
-
sub—Replicate entire subtree under baseDN
-
one—Replicate to one level under baseDN
-
base —Replicate only the baseDN level
If you decrease the scope (for example, sub to one), some users may not be recognized during the next synchronization.
Default: sub
|
LDAPLinkFilterUser |
Determines how to filter users to be replicated.
Default: "(objectClass=inetOrgPerson)"
|
LDAPLinkFilterGroup |
Determines how to filter groups to be replicated.
Default: "(objectClass=groupofnames)"
|
LDAPLinkGroupName |
[Optional] The LDAP field to use when creating a role name in Vertica.
Default: cn
|
LDAPLinkGroupMembers |
The LDAP group that identifies the members of an LDAP group. This attribute returns a Fully Qualified Domain Name (FQDN).
Default: member
|
LDAPLinkUserName |
The LDAP field to use when creating a user name in Vertica.
Default: uid
|
LDAPLinkJoinAttr |
Specifies the attribute on which you want to join to assign users to their roles.
Default: dn
Example:
POSIX groups associate users and groups with the uid attribute instead of dn.
=> SET PARAMETER LDAPLinkJoinAttr='uid';
|
LDAPLinkAddRolesAsDefault |
Specifies whether the users synchronized through LDAP Link should have their groups set as default roles. If LDAPLinkAddRolesAsDefault is disabled (default), then the users are granted their groups as non-default roles, which must be manually enabled with SET ROLE.
Default: 0 (disabled)
Example:
To enable:
=> ALTER DATABASE DEFAULT SET LDAPLinkAddRolesAsDefault = 1;
To disable:
=> ALTER DATABASE DEFAULT SET LDAPLinkAddRolesAsDefault = 0;
|
Authentication parameters
|
Parameter |
Description |
LDAPLinkBindDN |
The LDAP Bind DN used for authentication.
Example:
=> SET PARAMETER LDAPLinkBindDN='CN=amir,OU=QA,DC=dc,DC=com';
|
LDAPLinkBindPswd |
The valid password for the LDAP Bind DN to access the server. Only accessible by the dbadmin user.
Example:
=> SET PARAMETER LDAPLinkBindPswd='password';
|
Miscellaneous parameters
|
Parameter |
Description |
LDAPLinkConflictPolicy |
Determines how to resolve a user conflict.
Valid Values:
IGNORE—Ignores the incoming LDAP user and maintains the existing Vertica user.
MERGE—Converts the existing user to an LDAP user.
Default: MERGE
|
LDAPLinkStopIfZeroUsers |
Enables or disables the shutdown of LDAPLink synchronization if no users are found in LDAP.
Valid values:
0 - Disables the LDAPLink synchronization shutdown if no users are found. This may lead to inadvertent dropping of Vertica users.
1 - Enables the LDAPLink synchronization shutdown if no users are found. This prevents inadvertent dropping of Vertica users.
|
LDAPLinkDryRun |
[Optional] Tests the connection to the LDAP server and logs the response without doing a synchronization. Also tests if parameters are correctly set.
Note that this parameter is not the preferred dry run method. Instead, the LDAP_Link_Dryrun family of meta-functions provides more granular control over configurations and is the preferred way to perform LDAP Link dry runs.
Valid Values:
0 - Disables LDAPLinkDryRun
1 - Enables LDAPLinkDryRun
Default: 0
|
LDAPLinkConfigFile |
[Optional] If this parameter is set with the path to a .LDIF file, the LDAP Link service will use the file as the source tree instead of connecting to the LDAP server. |
See Configuration parameter management for information on setting LDAP Link parameters.
Note
When you change any Connection or Authentication parameter, LDAP Link reconnects and re-initializes the synchronization.
4.4 - TLS for LDAP link
This page covers the LDAP Link service context.
Vertica establishes a connection to an LDAP server in two contexts, and each context has a corresponding TLS Configuration that controls if each connection should use TLS:
-
LDAPLink: using the LDAPLink service or its dry run functions to synchronize users and groups between Vertica and the LDAP server.
-
LDAPAuth: when a user with an ldap authentication method attempts to log into Vertica, Vertica attempts to bind the user to a matching user in the LDAP server. If the bind succeeds, Vertica allows the user to log in.
Query TLS_CONFIGURATIONS to view existing TLS Configurations:
=> SELECT * FROM tls_configurations WHERE name IN ('LDAPLink', 'LDAPAuth');
   name   |  owner  | certificate | ca_certificate | cipher_suites |  mode
----------+---------+-------------+----------------+---------------+----------
 LDAPLink | dbadmin | client_cert | ldap_ca        |               | VERIFY_CA
 LDAPAuth | dbadmin | client_cert | ldap_ca        |               | DISABLE
(2 rows)
This page covers the LDAP Link service context. For details on the LDAP authentication context, see TLS for LDAP authentication.
Configuring LDAP link TLS
Vertica uses the LDAP Link service to retrieve users and groups from the LDAP server and to create corresponding users and roles in the database. To configure TLS for LDAP Link and its dry run functions, use the following procedure.
This procedure uses the predefined TLS Configuration LDAPLink. To create a custom TLS Configuration, see TLS configurations.
For details on key and certificate generation, see Generating TLS certificates and keys.
-
If you want Vertica to verify the LDAP server's certificate before establishing the connection, generate or import a CA certificate and add it to the LDAPLink TLS Configuration.
For example, to import the existing CA certificate LDAP_CA.crt:
=> \set ldap_ca '\''`cat ldap_ca.crt`'\''
=> CREATE CA CERTIFICATE ldap_ca AS :ldap_ca;
CREATE CERTIFICATE
Then, to add the ldap_ca CA certificate to LDAPLink:
ALTER TLS CONFIGURATION LDAPLink ADD CA CERTIFICATES ldap_ca;
-
If your LDAP server verifies client certificates, you must generate or import a client certificate and its key and add it to the LDAPLink TLS Configuration. Vertica presents this certificate to the LDAP server for verification by its CA.
For example, to import the existing certificate client.crt (signed by the imported CA) and key client.key:
=> \set client_key '\''`cat client.key`'\''
=> CREATE KEY client_key TYPE 'RSA' AS :client_key;
CREATE KEY

=> \set client_cert '\''`cat client.crt`'\''
=> CREATE CERTIFICATE client_cert AS :client_cert SIGNED BY ldap_ca KEY client_key;
CREATE CERTIFICATE
Then, to add client_cert to LDAPLink:
=> ALTER TLS CONFIGURATION LDAPLink CERTIFICATE client_cert;
-
Enable TLS or LDAPS (the exact protocol used depends on the value of host in the AUTHENTICATION object) by setting the TLSMODE to one of the following. TRY_VERIFY or higher requires a CA certificate:
-
ENABLE: Enables TLS. Vertica does not check the LDAP server's certificate.
-
TRY_VERIFY: Establishes a TLS connection if one of the following is true:
If the LDAP server presents an invalid certificate, a plaintext connection is used.
-
VERIFY_CA: Connection succeeds if Vertica verifies that the LDAP server's certificate is from a trusted CA. Using this TLSMODE forces all connections without a certificate to use plaintext.
-
VERIFY_FULL: Connection succeeds if Vertica verifies that the LDAP server's certificate is from a trusted CA and the cn (Common Name) or subjectAltName attribute matches the hostname or IP address of the LDAP server.
The cn is used for the username, so subjectAltName must match the hostname or IP address of the LDAP server.
For example:
=> ALTER TLS CONFIGURATION LDAPLink TLSMODE 'verify_ca';
ALTER TLS CONFIGURATION
-
Verify that the LDAPLinkTLSConfig parameter is using the TLS Configuration:
=> SHOW CURRENT LDAPLinkTLSConfig;
  level  |       name        | setting
---------+-------------------+----------
 DEFAULT | LDAPLinkTLSConfig | LDAPLink
(1 row)
-
Set the LDAP Link Parameters according to your use case.
4.5 - Troubleshooting LDAP link issues
Various issues can arise with LDAP Link service, including:.
Various issues can arise with LDAP Link service, including:
Disconnected (orphaned) users and roles
Vertica users and roles synchronized through LDAP Link can become disconnected, or orphaned, if an issue arises with the LDAP Link service. For example, users and roles become orphaned when you change the connection to the LDAP server as the following scenario describes:
-
Create an LDAP connection as follows:
=> ALTER DATABASE MyDB1 SET PARAMETER LDAPLinkURL='ldap://ebuser',
LDAPLinkSearchBase='dc=example,dc=com', LDAPLinkBindDN='mega',
LDAPLinkBindPswd='$megapassword$';
=> ALTER DATABASE MyDB1 SET PARAMETER LDAPLinkOn = '1';
-
Run an LDAP Link session to synchronize LDAP and Vertica users.
-
Change one or more connection parameters from Step 1. You can change the connection only if you change one of the LDAPLinkURL or LDAPLinkSearchBase parameters. Users will not be orphaned if the new and old LDAPLinkURL and LDAPLinkSearchBase contain the same set of users.
-
Run another LDAP Link session. The system attempts to re-synchronize LDAP and Vertica users. Because the connection has changed, the existing Vertica users cannot be synchronized with the LDAP users from the new connection. These Vertica users become orphaned.
As the dbadmin, you can identify orphaned users by checking the is_orphaned_from_ldap column in the USERS system table:
=> SELECT is_orphaned_from_ldap FROM users;
A field value of t indicates that the user is an orphaned user. Orphaned Vertica users cannot connect to the LDAP server and cannot login to Vertica using LDAP authentication (however, other authentication methods assigned to the user still work). In this case, you can delete the orphaned Vertica user and run the LDAP Link service to resynchronize users.
Re-parented objects
When you delete users or groups from the LDAP server, the LDAP Link service removes the same users and roles from Vertica, but does not delete objects owned by the deleted users and roles. To give these unowned objects a new owner, use the GlobalHeirUsername parameter, which specifies a user as the new parent for all objects originally owned by deleted users.
For example, to give ownership of unowned objects to user1, creating the user if it does not already exist:
=> ALTER DATABASE example_db SET PARAMETER GlobalHeirUsername=user1;
By default, this parameter is set to <auto> which re-parents objects to the dbadmin user.
If GlobalHeirUsername is empty, objects are not re-parented to another user.
For details, see Security Parameters.
User conflicts
Vertica users and roles synchronized using LDAP Link can become conflicted. Such conflicts can occur, for example, when you create a new user or group on the LDAP server and another user or role with the same name exists on the Vertica.
As the dbadmin, use one of the following parameters to resolve user conflicts:
-
LDAPLinkConflictPolicy
-
LDAPLinkStopIfZeroUsers
LDAPLinkConflictPolicy
LDAPLinkConflictPolicy controls how Vertica behaves when it encounters a conflict. Changes to this parameter take effect during the next synchronization.
-
LDAPLinkConflictPolicy=IGNORE ignores the incoming LDAP users and retains the existing Vertica user
-
LDAPLinkConflictPolicy=MERGE (default) merges the incoming LDAP user with the Vertica user and converts the database user to an LDAP user, retaining the database user's objects.
For example, to set the parameter:
=> ALTER DATABASE example_db SET PARAMETER LDAPLinkConflictPolcy='MERGE';
LDAPLinkStopIfZeroUsers
LDAPLinkStopIfZeroUsers controls how Vertica behaves when the LDAP server has zero users during synchronization.
-
LDAPLinkStopIfZeroUsers=0 does not stop the synchronization if no users are found in the LDAP server and all Vertica users with are dropped.
-
LDAPLinkStopIfZeroUsers=1 stops the synchronization if no users are found in the LDAP server and returns an error. No Vertica users are dropped.
LDAP_LINK_DRYRUN and LDAP_LINK_SYNC_START do not populate tables
The dryrun and LDAP_LINK_SYNC_START functions must be run from the clerk node. To determine the clerk node, query NODE_RESOURCES:
=> SELECT node_name, dbclerk FROM node_resources WHERE dbclerk='t';
    node_name     | dbclerk
------------------+---------
 v_vmart_node0001 | t
(1 row)
Monitoring LDAP link
Use the ldap_link_events table to monitor LDAP Link synchronization:
=> SELECT transaction_id, event_type, entry_name, entry_oid FROM ldap_link_events;
   transaction_id |    event_type      | entry_name | entry_oid
------------------+--------------------+------------+-----------
45035996273705317 | SYNC_STARTED       |            |         0
45066962732553589 | SYNC_FINISHED      |            |         0
45066988112255317 | PROCESSING_STARTED |            |         0
23411234566789765 | USER_CREATED       | tuser      | 234548899
(4 rows)
5 - Connector framework service
The Connector Framework Service (CFS) allows secure indexing of documents from IDOL to the Vertica Analytic Database.
The Connector Framework Service (CFS) allows secure indexing of documents from IDOL to the Vertica Analytic Database. Access control lists determine which users have permissions to access documents. Documents transferred from IDOL are stored in a flex table (Flex tables).
Important
Vertica 9.1.1 does not support the IdolLib function library. If you have the IdolLib function library installed and are upgrading to Vertica 9.1.1, you see an error and you cannot access the IdolLib function library.
To determine if the IdolLib library is installed, run the following script:
$ /opt/vertica/packages/idol/ddl/isinstalled.sql
To uninstall the IdolLib library, run the following script:
$ /opt/vertica/packages/idol/ddl/uninstall.sql
CFS components
Use the following CFS components to implement the service on the Vertica:
-
IDOL document metadata
-
CFS Configuration file
For detailed information, see Implementing CFS.
Vertica Analytic Database stores IDOL document metadata in a flex table. Set the name of the flex table with the TableName parameter in the CFS configuration file (see Implementing CFS). The metadata includes the following:
-
AUTONOMYMETADATA (Mandatory): An alphanumeric designation for the ACL designated for the document.
-
DREFIELD: Assigns permission levels to users and groups for accessing IDOL documents.
-
DRETITLE: The document title.
CFS configuration file
You must index IDOL metadata in Vertica Analytic Database to be available for queries. See Implementing CFS.
5.1 - Implementing CFS
After Vertica ingests documents from IDOL into flex tables, you can implement CFS to secure those documents.
After Vertica ingests documents from IDOL into flex tables, you can implement CFS to secure those documents. Implementing the security requires that the Vertica database administrator modify the CFS configuration file.
Modify the CFS configuration file
The database administrator must modify the following in the CFS configuration file to have CFS automatically index the metadata:
-
In the [Indexing] section, set the IndexerSections parameter to vertica:
[Indexing]
IndexerSections=vertica
IndexBathSize=1
IndexTimeInterval=30
-
Create a new section with the same name you entered in the IndexerSections parameter and enter the following parameters and keywords:
[vertica]
IndexerType=Library
ConnectionString=Driver=Vertica;Server=123.456.478.900;Databaswe=myDb;UID=dbadmin;PWD=password
TableName=myFlexTable
LibraryDirectory= ./shared_library_indexers
LibraryName=VerticaIndexer
The VerticaIndexer (LibraryName above) is part of CFS. To use this tool, you must install and configure the Vertica ODBC drivers on the same machine as CFS. CFS sends JSON-formatted data to the Flex table using ODBC.
For more information, see Installing the ODBC client driver.
Query the IDOL data
To query the IDOL data in a flex table, run a simple SELECT query. In this example, idol_table is the name of the flex table:
=> SELECT * FROM idol_table;
6 - Federal information processing standard
When running on a FIPS-compliant operating system that supports, Vertica uses a certified OpenSSL FIPS 140-2 cryptographic module.
When running on a FIPS-compliant operating system that Vertica supports, Vertica uses a certified OpenSSL FIPS 140-2 cryptographic module. This meets the security standards set by the National Institute of Standards and Technology (NIST) for Federal Agencies in the United States or other countries.
The standard specifies the security requirements that a cryptographic module needs in a system protecting sensitive information. For details on the standard see the Computer Security Resource Center.
Note
Vertica itself is not FIPS compliant but it is compatible with running on a FIPS-enabled system using FIPS resources.
For a list of FIPS prerequisites, see FIPS 140-2 supported platforms.
6.1 - OpenSSL behavior
Dynamic OpenSSL linking is a requirement for a FIPS implementation on the client and server.
Dynamic OpenSSL linking is a requirement for a FIPS implementation on the client and server. The Vertica server uses the OpenSSL that resides on the host system (as indicated in FIPS 140-2 supported platforms). OpenSSL dynamically links with LDAP and Kerberos.
For more information see Locate OpenSSL Libraries.
Libraries on CentOS systems
On a FIPS-compliant CentOS system, Vertica runs only with the OpenSSL libraries listed in FIPS 140-2 supported platforms. Other versions of these libraries do not run on a FIPS system. This incompatibility occurs because the FIPS security policy checksums the library to which an application is linked and verifies that the library the application executes with the same checksum.
Library versioning on Non-FIPS systems
Be aware that on some non-FIPS systems, versioning anomalies can occur when you install a new version of OpenSSL. Sometimes, the default OpenSSL build procedure produces libraries with versions named 1.0.0. For Vertica to recognize that a library has a higher version number, you must provide the library name with a higher version number. For example, when installing OpenSSL version 1.0.1t, name the libraries libcrypto.so.1.0.1t or libssl.1.0.1t (symbolic links with these names are sufficient).
6.2 - FIPS-Enabled databases: limitations
FIPS-enabled databases have the following limitations:.
FIPS-enabled databases have the following limitations:
-
You cannot create a FIPS-enabled database on a non-FIPS machine.
-
You cannot create a non-FIPS database on a FIPS-enabled machine.
-
The Management Console and its daemon, Agent, are not available on FIPS-enabled databases.
-
Copying data generated with the MD5 hashing algorithm from a non-FIPS machine to a FIPS-enabled machine results in data corruption.
-
Due to limitations in the FIPS cryptographic module, Vertica does not recommend enabling internode encryption in FIPS environments. If you use FIPS and internode encryption, you may experience occasional query failure due to socket closure in workloads that send a high volume of data across the network.
6.3 - Implementing FIPS 140-2
Implementing FIPS 140-2 on your Vertica Analytic Database requires configuration on the server and client.
Implementing FIPS 140-2 on your Vertica Analytic Database requires configuration on the server and client. While Vertica server uses FIPS-approved algorithms, Vertica clients may be running on non-FIPS-approved systems. Therefore, you must implement FIPS 140-2 compliance from end to end.
For more information on implementing FIPS, see:
6.3.1 - FIPS compliance for the Vertica server
To make Vertica FIPS-compliant, you must:.
To make Vertica FIPS-compliant, you must:
-
Set the RequireFIPS parameter to 1.
-
Hash your passwords with SHA-512. See Hash authentication for details.
-
Generate a signed TLS certificate to establish a secure connection to the client.
RequireFIPS parameter
Vertica sets the RequireFIPS configuration parameter on the server on startup to reflect the state of FIPS on the system: 1 if FIPS is enabled and 0 if FIPS is disabled.
The value of RequireFIPS matches the value of crypto.fips_enabled file.
Vertica sets the RequireFIPS parameter based on the contents of crypto.fips_enabled:
-
If the file /proc/sys/crypto/fips_enabled exists and contains a 1 (FIPS-enabled), Vertica sets RequireFIPS to 1.
-
If the file /proc/sys/crypto/fips_enabled does not exist, or exists and contains a 0 (non-FIPS), Vertica automatically sets RequireFIPS to 0.
-
If the FIPS state of a node, as determined from the existence of /proc/sys/crypto/fips_enabled, differs from the state received from the cluster initiator, the node fails. This behavior prevents the creation of clusters of mixed FIPS and non-FIPS systems.
Important
If you attempt to restore a FIPS-enabled node to a non-FIPS cluster, the restore will fail.
Secure client-server connection
It's important to secure client-server connections with TLS. For instructions on setting up client-server TLS, see Configuring client-server TLS.
FIPS-Compliant AWS endpoints
To configure AWS to use a FIPS-compliant S3 Endpoint, set the following S3 parameters:
AWSEndpoint = s3-fips.dualstack.us-east-1.amazonaws.com
S3EnableVirtualAddressing = 1
6.3.2 - Implement FIPS on the client
Vertica provides a FIPS-compliant client driver, which you can install on a FIPS-enabled system.
Vertica provides a FIPS-compliant client driver, which you can install on a FIPS-enabled system. The 64-bit client includes vsql and ODBC drivers.
For information about installing the FIPS client, and installation, refer to the following
6.4 - FIPS 140-2 compliance statement
Contents
1. Summary
2. Overview
a. About Vertica
b. About FIPS 140-2
3. Vertica and FIPS 140-2
1. summary
Vertica complies with Federal Information Processing Standard 140-2 (FIPS 140-2), which defines the technical requirements to be used by Federal Agencies when these organizations specify cryptographic-based security systems for protection of sensitive or valuable data. The compliance of Vertica with FIPS 140-2 is ensured by: 1) Integrating validated and NIST-certified third party cryptographic module(s), and using the module(s) as the only provider(s) of cryptographic services; 2) Using FIPS-approved cryptographic functions; 3) Using FIPS-approved and NIST-validated technologies applicable for Vertica design, implementation and operation.
2. overview
a. About Vertica
-
Vertica is a high performance relational database management system used for advanced analytics applications. Its performance and scale is achieved through a columnar storage and execution architecture that offers a massively parallel processing solution. Aggressive encoding and compression allows Vertica analytics to perform by reducing CPU, memory and disk I/O Processing times.
-
For more details about Vertica and its usage, see Architecture.
b. About FIPS 140-2
FIPS (Federal Information Processing Standard) 140-2, Security requirements for cryptographic modules, is the Federal standard for proper cryptography for computer systems purchased by the government.
The Federal Information Processing Standards Publication (FIPS) 140-2, “Security Requirements for Cryptographic Modules,” was issued by the National Institute of Standards and Technology (NIST) in May, 2001.
The benefits of using FIPS 140-2 validated crypto module is that the crypto algorithms are deemed appropriate and that they perform the encrypt/decrypt/hash functions correctly. The standard specifies the security requirements for cryptographic modules utilized within a security system that protects sensitive or valuable data. The requirements can be found in the following documents:
3. Vertica and FIPS 140-2
FIPS 140-2 validated third party module
Vertica conforms with FIPS 140-2 Level 1 compliance by dynamically linking to the FIPS 140-2 approved OpenSSL cryptographic module provided by the Operating System, which in our initial release is Red Hat Enterprise Linux 6.6 OpenSSL Module.
Vertica can be configured to operate in FIPS-compliant mode ensuring its functions and procedures like SSL/TLS connections, which require cryptography (secure hash, encryption, digital signatures, etc.) makes use of the crypto services provided by RedHat Enterprise Linux 6.6 OpenSSL Module v3.0 which is validated for FIPS 140-2. If you are not running on a FIPS-compliant operating system that Vertica supports, you will not be able to run Vertica on FIPS mode. The assurance that Vertica is using the right FIPS 140-2 encryption modules is managed at the operating system level by RedHat’s implementation.
Vertica checks the OS level flag setting /proc/sys/crypto/fips_enabled to kick off Vertica’s FIPS mode installation. Further details about how to install and configure Vertica and its components to conform to FIPS 140-2 standard appear in the installation and security guides:
Modes of Operation
Vertica Server operates in one of two modes determined by the OS configuration.
-
FIPS-compliant mode – supports FIPS 140-2 compliant cryptographic functions. In this mode, all cryptographic functions, default algorithms and key lengths are bound to those allowed by FIPS 140-2.
-
Standard mode – non-FIPS 140-2 compliant mode which utilizes all existing Vertica cryptography functions.
TLS/SSL3.x
All the Vertica client/server communications can be secured with FIPS-compliant Transport Layer Security TLS1.2/SSL3.1 or higher. It is relying on FIPS 140-2 approved hash algorithms and ciphers.
-
TLS handshake, key negotiation and authentication provides data integrity and uses secure hash and FIPS 140-2 approved cryptography and digital signature.
-
TLS encryption of data in transit provides confidentiality and making use of FIPS 140-2 approved cryptography.
Secure Hash
Per FIPS 140-2 standards, Vertica, in the FIPS 140-2 compliant mode, can be configured to use only the SHA-512 algorithm.
FIPS 140-2 Architecture
Vertica is a relational database system that is comprised of a client component and a server component. On the Client Side, we offer a suite of drivers for host clients to access the Vertica Server Side component. Both client and server Vertica components conform to FIPS 140-2 Level 1 compliance by dynamically linking to the FIPS 140-2 approved OpenSSL cryptographic module provided by RedHat Enterprise Linux 6.6 OpenSSL Module.
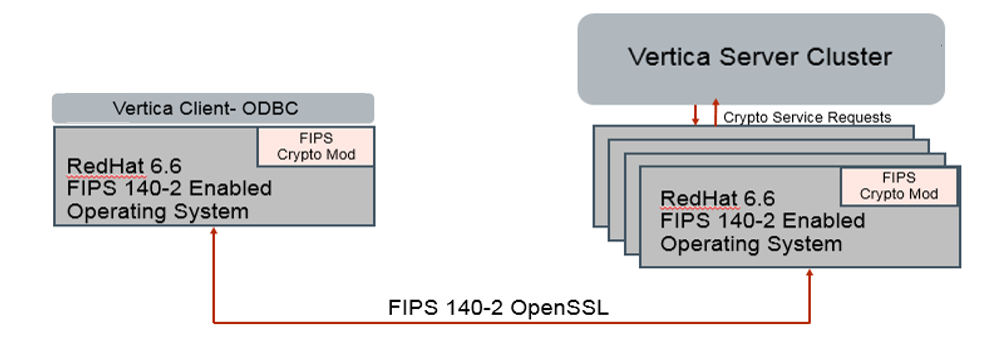
Supported Platforms
See FIPS 140-2 supported platforms for information about FIPS-compliant operating systems and client drivers that Vertica supports.
Design Assurance
Vertica uses the security provider Red Hat Enterprise Linux 6.6 OpenSSL Module v3.0. This is the only supported security provider for FIPS 140-2.
Once you have configured Vertica to be compliant with FIPS 140-2, you cannot revert back to the standard configuration unless you disable FIPS 140-2 at the operating system level. Please reference the following documentation section for considerations:
7 - Database auditing
Database auditing often involves observing a database to be aware of the actions the database users are taking.
Database auditing often involves observing a database to be aware of the actions the database users are taking. Auditing can help with security, for example, to ensure that a user does not change information to which they should not have access. Audit categories make it easier to track changes within the database. You can see system tables that will bring together logged queries, tables, and changes to configuration parameters.
For example, the authentication audit category tracks queries, system tables, and configuration parameters related to security and authentication, such as:
-
DROP AUTHENTICATION statement
-
GRANT/REVOKE authentication statements
-
LDAP Link related configuration parameters
You can also use the authentication audit category for weekly security reports to better understand attempts to gain access to data or to view unauthorized changes.
There are three system tables that can be used to track changes for queries, parameters, and tables as follows:
There is also a system table for tracking changes to privileges for users:
8 - System table restriction and access
Two functions let you restrict and open access to system tables for a given session:.
Two functions let you restrict and open access to system tables for a given session: