This is the multi-page printable view of this section.
Click here to print.
Return to the regular view of this page.
Apache Kafka integration
Vertica provides a high-performance mechanism for integrating with Apache Kafka, an open-source distributed real-time streaming platform.
Vertica provides a high-performance mechanism for integrating with Apache Kafka, an open-source distributed real-time streaming platform. Because Vertica can both consume data from and produce data for Kafka, you can use Vertica as part of an automated analytics workflow: Vertica can retrieve data from Kafka, perform analytics on the data, and then send the results back to Kafka for consumption by other applications.
Prerequisites
Architecture overview
The Vertica and Kafka integration provides the following features:
-
A UDx library containing functions that load and parse data from Kafka topics into Vertica
-
A job scheduler that uses the UDL library to continuously consume data from Kafka with exactly-once semantics
-
Push-based notifiers that send data collector messages from Vertica to Kafka
-
A KafkaExport function that sends Vertica data to Kafka

Vertica as a Kafka consumer
A Kafka consumer reads messages written to Kafka by other data streams. Because Vertica can read messages from Kafka, you can store and analyze data from any application that sends data to Kafka without configuring each individual application to connect to Vertica. Vertica provides tools to automatically or manually consume data loads from Kafka.
Manual loads
Manually load a finite amount of data from Kafka by directly executing a COPY statement. This is useful if you want to analyze, test, or perform additional processing on a set of messages.
For more information, see Consuming data from Kafka.
Automatic loads
Automatically load data from Kafka with a job scheduler. A scheduler constantly loads data and ensures that each Kafka message is loaded exactly once.
You must install Java 8 on each Vertica node that runs the scheduler. For more information, see Automatically consume data from Kafka with the scheduler.
Vertica as a Kafka producer
A Kafka producer sends data to Kafka, which is then available to Kafka consumers for processing. You can send the following types of data to Kafka:
-
Vertica anayltics results. Use KafkaExport to export Vertica tables and queries.
-
Health and performance data from Data Collector tables. Create push-based notifiers to send this data for consumption for third-party monitoring tools.
-
Ad hoc messages. Use NOTIFY to signal that tasks such as stored procedures are complete.
For more information, see Producing data for Kafka.
1 - Data streaming integration terms
Vertica uses the following terms to describe its streaming feature.
Vertica uses the following terms to describe its streaming feature. These are general terms, which may differ from each specific streaming platform's terminology.
Terminology
- Host
- A data streaming server.
- Source
- A feed of messages in a common category which streams into the same Vertica target tables. In Apache Kafka, a source is known as a topic.
- Partition
- Unit of parallelism within data streaming. Data streaming splits a source into multiple partitions, which can each be served in parallel to consumers such as a Vertica database. Within a partition, messages are usually ordered chronologically.
- Offset
- An index into a partition. This index is the position within an ordered queue of messages, not an index into an opaque byte stream.
- Message
- A unit of data within data streaming. The data is typically in JSON or Avro format. Messages are loaded as rows into Vertica tables, and are uniquely identified by their source, partition, and offset.
Data loader terminology
- Scheduler
- An external tool that schedules data loads from a streaming data source into Vertica.
- Microbatch
- A microbatch represents a single segment of a data load from a streaming data source. It encompasses all of the information the scheduler needs to perform a load from a streaming data source into Vertica.
- Frame
- The window of time during which a Scheduler executes microbatches to load data. This window controls the duration of each COPY statement the scheduler runs as a part of the microbatch. During the frame, the scheduler gives an active microbatch from each source an opportunity to load data. It gives priority to microbatches that need more time to load data based on the history of previous microbatches.
- Stream
- A feed of messages that is identified by a source and partition.
The offset uniquely identifies the position within a particular source-partition stream.
- Lane
- A thread within a job scheduler instance that issues microbatches to perform the load.
The number of lanes available is based on the PlannedConcurrency of the job scheduler's resource pool. Multiple lanes allow the scheduler to run microbatches for different sources in parallel during a frame.
2 - Configuring Vertica and Kafka
Both Vertica and Kafka have settings you can use to optimize your streaming data loads.
Both Vertica and Kafka have settings you can use to optimize your streaming data loads. The topics in this section explain these settings.
2.1 - Kafka and Vertica configuration settings
You can fine-tune configuration settings for Vertica and Kafka that optimize performance.
You can fine-tune configuration settings for Vertica and Kafka that optimize performance.
The Vertica and Kafka integration uses rdkafka version 0.11.6. Unless otherwise noted, the following configuration settings use the default librdkafka configuration properties values. For instructions on how to override the default values, see Directly setting Kafka library options.
Vertica producer settings
These settings change how Vertica produces data for Kafka with the KafkaExport function and notifiers.
queue.buffering.max.messages- Size of the Vertica producer queue. If Vertica generates too many messages too quickly, the queue can fill, resulting in dropped messages. Increasing this value consumes more memory, but reduces the chance of lost messages.
Defaults:
-
KafkaExport: 1000
-
Notifiers: 10000
queue.buffering.max.ms- Frequency with which Vertica flushes the producer message queue. Lower values decrease latency at the cost of throughput. Higher values increase throughput, but can cause the producer queue (set by queue.buffering.max.messages) to fill more frequently, resulting in dropped messages.
Default: 100 ms
message.max.bytes- Maximum size of a Kafka protocol request message batch. This value should be the same on your sources, brokers, and producers.
message.send.max.retries- Number of attempts the producer makes to deliver the message to a broker. Higher values increase the chance of success.
retry.backoff.ms- Interval Vertica waits before resending a failed message.
request.required.acks- Number of broker replica acknowledgments Kafka requires before it considers message delivery successful. Requiring acknowledgments increases latency. Removing acknowledgments increases the risk of message loss.
request.timeout.ms- Interval that the producer waits for a response from the broker. Broker response time is affected by server load and the number of message acknowledgments you require.
Higher values increase latency.
compression.type- Compression algorithm used to encode data before sending it to a broker. Compression helps to reduce the network footprint of your Vertica producers and increase disk utilization. Vertica supports
gzip and snappy.
Kafka broker settings
Kafka brokers receive messages from producers and distribute them among Kafka consumers. Configure these settings on the brokers themselves. These settings function independently of your producer and consumer settings. For detailed information on Apache Kafka broker settings, refer to the Apache Kafka documentation.
message.max.bytes- Maximum size of a Kafka protocol request message batch.This value should be the same on your sources, brokers, and producers.
num.io.threads- Number of network threads the broker uses to receive and process requests. More threads can increase your concurrency.
num.network.threads- Number of network threads the broker uses to accept network requests. More threads can increase your concurrency.
Vertica consumer settings
The following settings changes how Vertica acts when it consumes data from Kafka. You can set this value using the kafka_conf parameter on the KafkaSource UDL when directly executing a COPY statement. For schedulers, use the --message_max_bytes settings in the scheduler tool.
message.max.bytes- Maximum size of a Kafka protocol request message batch. Set this value to a high enough value to prevent the overhead of fetching batches of messages interfering with loading data. Defaults to 24MB for newly-created load specs.
2.2 - Directly setting Kafka library options
Vertica relies on the open source rdkafka library to communicate with Apache Kafka.
Vertica relies on the open source rdkafka library to communicate with Apache Kafka. This library contains many options for controlling how Vertica and Kafka interact. You set the most common rdkafka library options through the settings in the vkconfig utility and the Kafka integration functions such as KafkaSource.
There are some rdkafka settings that cannot be directly set from within the Vertica. Under normal circumstances, you do not need to change them. However, if you find that you need to set a specific rdkafka setting that is not directly available from Vertica, you can directly pass options to the rdkafka library through the kafka_conf options.
The kafka_conf argument is supported when using a scheduler to load data from Kafka. You can set the values in the following ways (listed in order of lower to higher precedence):
-
The Linux environment variable VERTICA_RDKAFKA_CONF set on the host where you run the vkconfig utility.
-
The Linux environment variable VERTICA_RDKAFKA_CONF_KAFKA_CLUSTER set on the host where you run the vkconfig utility. The KAFKA_CLUSTER portion of the variable name is the name of a Kafka cluster you have defined using vkconfig's cluster utility. The settings in this environment variable only affect the specific Kafka cluster you name in KAFKA_CLUSTER.
-
The --kafka_conf option of the vkconfig utility. This option can be set in the cluster, source, launch, and sync tools. Note that the setting only applies to each vkconfig utility call—it does not carry over to other vkconfig utility calls. For example, if you need to supply an option to the cluster and source tool, you must supply the kafka_conf option to both of them.
Note
Using an environment variable to set your rdkafka options helps to keep your settings consistent. It is easy to forget to set the --kafka_conf option for each call to the vkconfig script.
All of these options cascade, so setting an option using the --kafka_conf argument to the cluster tool overrides the same option that was set in the environment variables.
You can also directly set rdkafka options when directly calling KafkaExport, KafkaSource, and several other Kafka integration functions. These functions accept a parameter named kafka_conf.
The kafka_conf option settings
The kafka_conf vkconfig option accepts a JSON object with settings in the following formats:
-
One or more option/value pairs:
--kafka_conf '{"option1":value1[, "option2":value2...]}'
-
A single option with multiple values:
--kafka_conf '{"option1":"value1[;value2...]"}'
Vertica provides the kafka_conf_secret parameter to pass sensitive configuration settings. This parameter accepts values in the same format as kafka_conf. Values passed to kafka_conf_secret are not logged or stored in system tables.
See the rdkafka project on GitHub for a list of the configuration options supported by the rdkafka library.
Important
Arbitrarily setting options via kafka_conf can result in errors or unpredictable behavior. If you encounter a problem loading messages after setting an rdkafka option using the kafka_conf option, roll back your change to see if that was the source of the problem.
To prevent confusion, never set options via the kafka_conf parameter that can be set directly through scheduler options. For example, do not use the kafka_conf option to set Kafka's message.max.bytes setting. Instead, use the load-spec tool's --message-max-bytes option.
Example
The following example demonstrates disabling rdkafka's api.version.request option when manually loading messages using KafkaSource. You should always disable this option when accessing Kafka cluster running version 0.9 or earlier. See Configuring Vertica for Apache Kafka version 0.9 and earlier for more information.
=> CREATE FLEX TABLE iot_data();
CREATE TABLE
=> COPY public.iot_data SOURCE KafkaSource(stream='iot_json|0|-2',
                                           brokers='kafka-01.example.com:9092',
                                           stop_on_eof=True,
                                           kafka_conf='{"api.version.request":false}')
        PARSER KafkaJSONParser();
 Rows Loaded
-------------
        5000
(1 row)
This example demonstrates setting two options with a JSON object when calling the cluster tool. It disables the api.version.request option and enables CRC checks of messages from Kafka using the check.crcs option:
$ vkconfig cluster --create --cluster StreamCluster1 \
                   --hosts kafka01.example.com:9092,kafka02.example.com:9092 \
                   --conf myscheduler.config \
                   --kafka_conf '{"api.version.request":false, "check.crcs":true}'
The following example demonstrates setting the same options using an environment variable:
$ export VERTICA_RDKAFKA_CONF='{"api.version.request":false, "check.crcs":true}'
$ vkconfig cluster --create --cluster StreamCluster1 \
                   --hosts kafka01.example.com:9092,kafka02.example.com:9092 \
                   --conf myscheduler.config
Important
Setting the check.crc option is just an example. Vertica does not suggest you enable the CRC check in your schedulers under normal circumstances. It adds additional overhead and can result in slower performance.
2.3 - Configuring Vertica for Apache Kafka version 0.9 and earlier
Apache Kafka version 0.10 introduced a new feature that allows consumers to determine which version of the Kafka API the Kafka brokers support.
Apache Kafka version 0.10 introduced a new feature that allows consumers to determine which version of the Kafka API the Kafka brokers support. Consumers that support this feature send an initial API version query to the Kafka broker to determine the API version to use when communicating with them. Kafka brokers running version 0.9.0 or earlier cannot respond to the API query. If the consumer does not receive a reply from the Kafka broker within a timeout period (set to 10 seconds by default) the consumer can assume the Kafka broker is running Kafka version 0.9.0 or earlier.
The Vertica integration with Kafka supports this API query feature starting in version 9.1.1. This API check can cause problems if you are connecting Vertica to a Kafka cluster running 0.9.0 or earlier. You may notice poorer performance loading messages from Kafka and may experience errors as the 10 second API request timeout can cause parts of the Kafka integration feature to time out and report errors.
For example, if you run the vkconfig source utility to configure a source on a Kafka 0.9 cluster, you may get the following error:
$ vkconfig source --create --conf weblog.conf --cluster kafka_weblog --source web_hits
Exception in thread "main" com.vertica.solutions.kafka.exception.ConfigurationException:
ERROR: [[Vertica][VJDBC](5861) ERROR: Error calling processPartition() in
User Function KafkaListTopics at [/data/build-centos6/qb/buildagent/workspace/jenkins2/PrimaryBuilds/build_master/build/udx/supported/kafka/KafkaUtil.cpp:173],
error code: 0, message: Error getting metadata: [Local: Broker transport failure]]
at com.vertica.solutions.kafka.model.StreamSource.validateConfiguration(StreamSource.java:184)
at com.vertica.solutions.kafka.model.StreamSource.setFromMapAndValidate(StreamSource.java:130)
at com.vertica.solutions.kafka.model.StreamModel.<init>(StreamModel.java:89)
at com.vertica.solutions.kafka.model.StreamSource.<init>(StreamSource.java:39)
at com.vertica.solutions.kafka.cli.SourceCLI.getNewModel(SourceCLI.java:53)
at com.vertica.solutions.kafka.cli.SourceCLI.getNewModel(SourceCLI.java:15)
at com.vertica.solutions.kafka.cli.CLI.run(CLI.java:56)
at com.vertica.solutions.kafka.cli.CLI._main(CLI.java:132)
at com.vertica.solutions.kafka.cli.SourceCLI.main(SourceCLI.java:25)
Caused by: java.sql.SQLNonTransientException: [Vertica][VJDBC](5861)
ERROR: Error calling processPartition() in User Function KafkaListTopics at [/data/build-centos6/qb/buildagent/workspace/jenkins2/PrimaryBuilds/build_master/build/udx/supported/kafka/KafkaUtil.cpp:173],
error code: 0, message: Error getting metadata: [Local: Broker transport failure]
at com.vertica.util.ServerErrorData.buildException(Unknown Source)
                           . . .
Disabling the API version request when using the streaming job scheduler
To avoid these problems, you must disable the API version request feature in the rdkafka library that Vertica uses to communicate with Kafka. The easiest way to disable this setting when using the scheduler is to set a Linux environment variable on the host on which you run the vkconfig script. Using the environment variable ensures that each call to vkconfig includes the setting to disable the API version request. The vkconfig script checks two variables:
-
VERTICA_RDKAFKA_CONF applies to all Kafka clusters that the scheduler running on the host communicates with.
-
VERTICA_RDKAFKA_CONF_CLUSTER_NAME applies to just the Kafka cluster named CLUSTER_NAME. Use this variable if your scheduler communicates with several Kafka clusters, some of which are not running version 0.9 or earlier.
If you set both variables, the cluster-specific one takes precedence. This feature is useful if most of the clusters your scheduler connects to are running Kafka 0.9 or earlier, but a few run 0.10 or later. This case, you can disable the API version check for most clusters using the VERTICA_RDKAFKA_CONF variable and re-enable the check for specific clusters using VERTICA_RDKAFKA_CONF_CLUSTER_NAME.
If just a few of your Kafka clusters run version 0.9 or earlier, you can just set the cluster-specific variables for them, and leave the default values in place for the majority of your clusters.
The contents of the environment variable is a JSON object that tells the rdkafka library whether to query the Kafka cluster for the API version it supports:
'{"api.version.request":false}'
To set the environment variable in BASH, use the export command:
$ export VERTICA_RDKAFKA_CONF='{"api.version.request":false}'
If you wanted the setting to just affect a cluster named kafka_weblog, the command is:
$ export VERTICA_RDKAFKA_CONF_kafka_weblog='{"api.version.request":false}'
You can add the command to any of the common user environment configuration files such as ~/.bash_profile or the system-wide files such as /etc/profile. You must ensure that the same setting is used for all users who may run the vkconfig script, including any calls made by daemon processes such as init. You can also directly include this command in any script you use to set configure or start your scheduler.
Disabling the API version request when directly loading messages
You can disable the API request when you directly call KafkaSource to load messages by using the kafka_conf parameter:
=> CREATE FLEX TABLE iot_data();
CREATE TABLE
=> COPY public.iot_data SOURCE KafkaSource(stream='iot_json|0|-2',
                                           brokers='kafka-01.example.com:9092',
                                           stop_on_eof=True,
                                           kafka_conf='{"api.version.request":false}')
        PARSER KafkaJSONParser();
 Rows Loaded
-------------
        5000
(1 row)
See also
3 - Vertica Eon Mode and Kafka
You can use the Vertica integration with Apache Kafka when Vertica is running in.
You can use the Vertica integration with Apache Kafka when Vertica is running in Eon Mode. For Eon Mode running in a cloud environment, consider using a larger frame duration for schedulers in clusters. Cloud infrastructures lead to larger latencies overall, especially when storage layers are separated from compute layers. If you do not account for the added latency, you can experience a lower data throughput, as more of the frame's time is lost to overhead caused by the cloud environment. Using a longer frame length can also help prevent Vertica from creating many small ROS containers when loading data from Kafka. The trade off when you use a larger frame length is that your data load experiences more latency. See Choosing a frame duration for more information.
4 - Consuming data from Kafka
A Kafka consumer subscribes to one or more topics managed by a Kafka cluster.
A Kafka consumer subscribes to one or more topics managed by a Kafka cluster. Each topic is a data stream, an unbounded dataset that is represented as an ordered sequence of messages. Vertica can manually or automatically consume Kafka topics to perform analytics on your streaming data.
Manually consume data
Manually consume data from Kafka with a COPY statement that calls a KafkaSource function and parser. Manual loads are helpful when you want to:
-
Populate a table one time with the messages currently in Kafka.
-
Analyze a specific set of messages. You can choose the subset of data to load from the Kafka stream.
-
Explore the data in a Kafka stream before you set up a scheduler to continuously stream the data into Vertica.
-
Control the data load in ways not possible with the scheduler. For example, you cannot perform business logic or custom rejection handling during the data load from Kafka because the scheduler does not support additional processing during its transactions. Instead, you can periodically run a transaction that executes a COPY statement to load data from Kafka, and then perform additional processing.
For a detailed example, see Manually consume data from Kafka.
Automatically consume data
Automatically consume streaming data from Kafka into Vertica with a scheduler, a command-line tool that loads data as it arrives. The scheduler loads data in segments defined by a microbatch, a unit of work that processes the partitions of a single Kafka topic for a specified duration of time. You can manage scheduler configuration and options using the vkconfig tool.
For details, see Automatically consume data from Kafka with the scheduler.
Monitoring consumption
You must monitor message consumption to ensure that Kafka and Vertica are communicating effectively. You can use native Kafka tools to monitor consumer groups, or you can use vkconfig tool to view consumption details.
For additional information, see Monitoring message consumption.
Parsing data with Kafka filters
Your data stream might encode data that the Kafka parser functions cannot parse by default. Use Kafka filters to delimit messages in your stream to improve data consumption.
For details, see Parsing custom formats.
4.1 - Manually consume data from Kafka
You can manually load streaming data from Kafka into Vertica using a COPY statement, just as you can load a finite set of data from a file or other source.
You can manually load streaming data from Kafka into Vertica using a COPY statement, just as you can load a finite set of data from a file or other source. Unlike a standard data source, Kafka data arrives continuously as a stream of messages that you must parse before loading into Vertica. Use Kafka functions in the COPY statement to prepare the data stream.
This example incrementally builds a COPY statement that manually loads JSON-encoded data from a Kafka topic named web_hits. The web_hits topic streams server logs of web site requests.
For information about loading data into Vertica, see Data load.
Creating the target table
To determine the target table schema, you must identify the message structure. The following is a sample of the web_hits stream:
{"url": "list.jsp", "ip": "144.177.38.106", "date": "2017/05/02 20:56:00",
"user-agent": "Mozilla/5.0 (compatible; MSIE 6.0; Windows NT 6.0; Trident/5.1)"}
{"url": "search/wp-content.html", "ip": "215.141.172.28", "date": "2017/05/02 20:56:01",
"user-agent": "Opera/9.53.(Windows NT 5.2; sl-SI) Presto/2.9.161 Version/10.00"}
This topic streams JSON-encoded data. Because JSON data is inconsistent and might contain unpredictable added values, store this data stream in a flex table. Flex tables dynamically accept additional fields that appear in the data.
The following statement creates a flex table named web_table to store the data stream:
=> CREATE FLEX TABLE web_table();
To begin the COPY statement, add the web_table as the target table:
COPY web_table
For more information about flex tables, see Flex tables.
Note
If you are copying data containing default values into a flex table, you must identify the default value column as
__raw__. For more information, see
Bulk Loading Data into Flex Tables.
Defining KafkaSource
The source of your COPY statement is always KafkaSource. KafkaSource accepts details about the data stream, Kafka brokers, and additional processing options to continuously load data until an end condition is met.
Stream details
The stream parameter defines the data segment that you want to load from one or more topic partitions. Each Kafka topic splits its messages into different partitions to get scalable throughput. Kafka keeps a backlog of messages for each topic according to rules set by the Kafka administrator. You can choose to load some or all of the messages in the backlog, or just load the currently streamed messages.
For each partition, the stream parameter requires the topic name, topic partition, and the partition offset as a list delimited by a pipe character (|). Optionally, you can provide and end offset as an end condition to stop loading from the data stream:
'stream='topic_name|partition|start_offset[|end_offset]'
To load the entire backlog from a single partition of the web_hits topic, use the SOURCE keyword to append KafkaSource with the following stream parameter values:
COPY ...
SOURCE KafkaSource(stream='web_hits|0|-2', ...
In the previous example:
-
web_hits is the name of the topic to load data from.
-
0 is the topic partition to load data from. Topic partitions are 0-indexed, and web_hits contains only one partition.
-
-2 loads the entire backlog. This is a special offset value that tells KafkaSource to start loading at the earliest available message offset.
Loading multiple partitions
This example loads from only one partition, but it is important to understand how to load from multiple partitions in a single COPY statement.
To load from additional partitions in the same topic, or even additional topics, supply a comma-separated list of topic name, partition number, and offset values delimited by pipe characters. For example, the following stream argument loads the entire message backlog from partitions 0 through 2 of the web_hits topic:
KafkaSource(stream='web_hits|0|-2,web_hits|1|-2,web_hits|2|-2'...
Note
While you can load messages from different Kafka topics in the same COPY statement, you must ensure the data from the different topics is compatible with the target table's schema. The schema is less of a concern if you are loading data into a flex table, which can accommodate almost any data you want to load.
When you load multiple partitions in the same COPY statement, you can set the executionparallelism parameter to define the number of threads created for the COPY statement. Ideally, you want to use one thread per partition. You can choose to not specify a value and let Vertica determine the number of threads based on the number of partitions and the resources available in the resource pool. In this example, there is only one partition, so there's no need for additional threads to load data.
Note
The EXECUTIONPARALLELISM setting on the resource pool assigned is the upper limit on the number of threads your COPY statement can use. Setting executionparallelism on the KafkaSource function call to a value that is higher than that of the resource pool's EXECUTIONPARALLELISM setting does not increase the number of threads Vertica uses beyond the limits of the resource pool.
Adding the Kafka brokers
KafkaSource requires the host names (or IP addresses) and port numbers of the brokers in your Kafka cluster. The Kafka brokers are the service Vertica accesses in order to retrieve the Kafka data. In this example, the Kafka cluster has one broker named kafka01.example.com, running on port 9092. Append the brokers parameter and value to the COPY statement:
COPY ...
SOURCE KafkaSource(stream='web_hits|0|-2',
                   brokers='kafka01.example.com:9092', ...
Choosing the end condition
Because data continuously arrives from Kafka, manual loads from Kafka require that you define an end condition that indicates when to stop loading data. In addition to the end offset described in Stream Details, you can choose to:
-
Copy as much data as possible for a set duration of time.
-
Load data until no new data arrives within a timeout period.
-
Load all available data, and not wait for any further data to arrive.
This example runs COPY for 10000 milliseconds (10 seconds) to get a sample of the data. If the COPY statement is able to load the entire backlog of data in under 10 seconds, it spends the remaining time loading streaming data as it arrives. This values is set in the duration parameter. Append the duration value to complete the KafkaSource definition:
COPY ...
SOURCE KafkaSource(stream='web_hits|0|-2',
                    brokers='kafka01.example.com:9092',
                    duration=interval '10000 milliseconds')
If you start a long-duration COPY statement from Kafka and need to stop it, you can call one of the functions that closes its session, such as CLOSE_ALL_SESSIONS.
Important
The duration that you set for your data load is not exact. The duration controls how long the KafkaSource process runs.
Selecting a parser
Kafka does not enforce message formatting on its data streams. Messages are often in Avro or JSON format, but they could be in any format. Your COPY statement usually uses one of three Kafka-specific parsers:
Because the Kafka parsers can recognize record boundaries in streaming data, the other parsers (such as the Flex parsers) are not directly compatible with the output of KafkaSource. You must alter the KafkaSource output using filters before other parsers can process the data. See Parsing custom formats for more information.
In this example, the data in the web_hits is encoded in JSON format, so it uses the KafkaJSONParser. This value is set in the COPY statement's PARSER clause:
COPY ...
SOURCE ...
PARSER KafkaJSONParser()
Storing rejected data
Vertica saves raw Kafka messages that the parser cannot parse to a rejects table, along with information on why it was rejected. This table is created by the COPY statement. This example saves rejects to the table named web_hits_rejections. This value is set in the COPY statement's REJECTED DATA AS TABLE clause:
COPY ...
SOURCE ...
PARSER ...
REJECTED DATA AS TABLE public.web_hits_rejections;
Loading the data stream into Vertica
The following steps load JSON data from the web_hits topic for 10 seconds using the COPY statement that was incrementally built in the previous sections:
-
Execute the COPY statement:
=> COPY web_table
   SOURCE KafkaSource(stream='web_hits|0|-2',
                      brokers='kafka01.example.com:9092',
                      duration=interval '10000 milliseconds')
   PARSER KafkaJSONParser()
   REJECTED DATA AS TABLE public.web_hits_rejections;
 Rows Loaded
-------------
         800
(1 row)
-
Compute the flex table keys:
=> SELECT compute_flextable_keys('web_table');
              compute_flextable_keys
--------------------------------------------------
 Please see public.web_table_keys for updated keys
(1 row)
For additional details, see Computing flex table keys.
-
Query web_table_keys to return the keys:
=> SELECT * FROM web_table_keys;
  key_name  | frequency | data_type_guess
------------+-----------+-----------------
 date       |       800 | Timestamp
 user_agent |       800 | Varchar(294)
 ip         |       800 | Varchar(30)
 url        |       800 | Varchar(88)
(4 rows)
-
Query web_table to return the data loaded from the web_hits Kafka topic:
=> SELECT date, url, ip FROM web_table LIMIT 10;
        date         |                url                 |       ip
---------------------+------------------------------------+-----------------
 2021-10-15 02:33:31 | search/index.htm                   | 192.168.210.61
 2021-10-17 16:58:27 | wp-content/about.html              | 10.59.149.131
 2021-10-05 09:10:06 | wp-content/posts/category/faq.html | 172.19.122.146
 2021-10-01 08:05:39 | blog/wp-content/home.jsp           | 192.168.136.207
 2021-10-10 07:28:39 | main/main.jsp                      | 172.18.192.9
 2021-10-22 12:41:33 | tags/categories/about.html         | 10.120.75.17
 2021-10-17 09:41:09 | explore/posts/main/faq.jsp         | 10.128.39.196
 2021-10-13 06:45:36 | category/list/home.jsp             | 192.168.90.200
 2021-10-27 11:03:50 | category/posts/posts/index.php     | 10.124.166.226
 2021-10-26 01:35:12 | categories/search/category.htm     | 192.168.76.40
(10 rows)
4.2 - Automatically consume data from Kafka with the scheduler
Vertica offers a scheduler that loads streamed messages from one or more Kafka topics.
Vertica offers a scheduler that loads streamed messages from one or more Kafka topics. Automatically loading streaming data has a number of advantages over manually using COPY:
-
The streamed data automatically appears in your database. The frequency with which new data appears in your database is governed by the scheduler's frame duration.
-
The scheduler provides an exactly-once consumption process. The schedulers manage offsets for you so that each message sent by Kafka is consumed once.
-
You can configure backup schedulers to provide high-availability. Should the primary scheduler fail for some reason, the backup scheduler automatically takes over loading data.
-
The scheduler manages resources for the data load. You control its resource usage through the settings on the resource pool you assign to it . When loading manually, you must take into account the resources your load consumes.
There are a few drawbacks to using a scheduler which may make it unsuitable for your needs. You may find that schedulers do not offer the flexibility you need for your load process. For example, schedulers cannot perform business logic during the load transaction. If you need to perform this sort of processing, you are better off creating your own load process. This process would periodically run COPY statements to load data from Kafka. Then it would perform the business logic processing you need before committing the transaction.
For information on job scheduler requirements, refer to Apache Kafka integrations.
What the job scheduler does
The scheduler is responsible for scheduling loads of data from Kafka. The scheduler's basic unit of processing is a frame, which is a period of time. Within each frame, the scheduler assigns a slice of time for each active microbatch to run. Each microbatch is responsible for loading data from a single source. Once the frame ends, the scheduler starts the next frame. The scheduler continues this process until you stop it.
The anatomy of a scheduler
Each scheduler has several groups of settings, each of which control an aspect of the data load. These groups are:
-
The scheduler itself, which defines the configuration schema, frame duration, and resource pool.
-
Clusters, which define the hosts in the Kafka cluster that the scheduler contacts to load data. Each scheduler can contain multiple clusters, allowing you to load data from multiple Kafka clusters with a single scheduler.
-
Sources, which define the Kafka topics and partitions in those topics to read data from.
-
Targets, which define the tables in Vertica that will receive the data. These tables can be traditional Vertica database tables, or they can be flex tables.
-
Load specs, which define setting Vertica uses while loading the data. These settings include the parsers and filters Vertica needs to use to load the data. For example, if you are reading a Kafka topic that is in Avro format, your load spec needs to specify the Avro parser and schema.
-
Microbatches, which represent an individual segment of a data load from a Kafka stream. They combine the definitions for your cluster, source, target, and load spec that you create using the other vkconfig tools. The scheduler uses all of the information in the microbatch to execute COPY statements using the KafkaSource UDL function to transfer data from Kafka to Vertica. The statistics on each microbatch's load is stored in the stream_microbatch_history table.
The vkconfig script
You use a Linux command-line script named vkconfig to create, configure, and run schedulers. This script is installed on your Vertica hosts along with the Vertica server in the following path:
/opt/vertica/packages/kafka/bin/vkconfig
Note
You can install and use the vkconfig utility on a non-Vertica host. You may want to do this if:
The easiest way to install vkconfig on a host is to install the Vertica server RPM. You must use the RPM that matches the version of Vertica installed on your database cluster. Do not create a database after installing the RPM. The vkconfig utility and its associated files will be in the /opt/vertica/packages/kafka/bin directory on the host.
The vkconfig script contains multiple tools. The first argument to the vkconfig script is always the tool you want to use. Each tool performs one function, such as changing one group of settings (such as clusters or sources) or starting and stopping the scheduler. For example, to create or configure a scheduler, you use the command:
$ /opt/vertica/packages/kafka/bin/vkconfig scheduler other options...
What happens when you create a scheduler
When you create a new scheduler, the vkconfig script takes the following steps:
-
Creates a new Vertica schema using the name you specified for the scheduler. You use this name to identify the scheduler during configuration.
-
Creates the tables needed to manage the Kafka data load in the newly-created schema. See Data streaming schema tables for more information.
Validating schedulers
When you create or configure a scheduler, it validates the following settings:
-
Confirms that all brokers in the specified cluster exist.
-
Connects to the specified host or hosts and retrieves the list of all brokers in the Kafka cluster. Getting this list always ensures that the scheduler has an up-to-date list of all the brokers. If the host is part of a cluster that has already been defined, the scheduler cancels the configuration.
-
Confirms that the specified source exists. If the source no longer exists, the source is disabled.
-
Retrieves the number of partitions in the source. If the number of partitions retrieved from the source is different than the partitions value saved by the scheduler, Vertica updates the scheduler with the number of partitions retrieved from the source in the cluster.
You can disable validation using the --validation-type option in the vkconfig script's scheduler tool. See Scheduler tool options for more information.
Synchronizing schedulers
By default, the scheduler automatically synchronizes its configuration and source information with Kafka host clusters. You can configure the synchronization interval using the --config-refresh scheduler utility option. Each interval, the scheduler:
You can configure synchronization settings using the --auto-sync option using the vkconfig script's scheduler tool. Scheduler tool options for details.
Launching a scheduler
You use the vkconfig script's launch tool to launch a scheduler.
When you launch a scheduler, it collects data from your sources, starting at the specified offset. You can view the stream_microbatch_history table to see what the scheduler is doing at any given time.
To learn how to create, configure, and launch a scheduler, see Setting up a scheduler in this guide.
You can also choose to bypass the scheduler. For example, you might want to do a single load with a specific range of offsets. For more information, see Manually consume data from Kafka in this guide.
If the Vertica cluster goes down, the scheduler attempts to reconnect and fails. You must relaunch the scheduler when the cluster is restarted.
Managing a running scheduler
When you launch a scheduler from the command line, it runs in the foreground. It will run until you kill it (or the host shuts down). Usually, you want to start the scheduler as a daemon process that starts it when the host operating system starts, or after the Vertica database has started.
You shut down a running scheduler using the vkconfig script's shutdown tool. See Shutdown tool options for details.
You can change most of a scheduler's settings (adding or altering clusters, sources, targets, and microbatches for example) while it is running. The scheduler automatically acts on the configuration updates.
Launching multiple job schedulers for high availability
For high availability, you can launch two or more identical schedulers that target the same configuration schema. You differentiate the schedulers using the launch tool's --instance-name option (see Launch tool options).
The active scheduler loads data and maintains an S lock on the stream_lock table. The scheduler not in use remains in stand-by mode until the active scheduler fails or is disabled. If the active scheduler fails, the backup scheduler immediately obtains the lock on the stream_lock table, and takes over loading data from Kafka where the failed scheduler left off.
Managing messages rejected during automatic loads
Vertica rejects messages during automatic loads using the parser definition, which is required in the microbatch load spec.
The scheduler creates a rejection table to store rejected messages for each microbatch automatically. To manually specify a rejection table, use the --rejection-schema and --rejection-table microbatch utility options when creating the microbatch. Query the stream_microbatches table to return the rejection schema and table for a microbatch.
For additional details about how Vertica handles rejected data, see Handling messy data.
Passing options to the scheduler's JVM
The scheduler uses a Java Virtual Machine to connect to Vertica via JDBC. You can pass command-line options to the JVM through a Linux environment variable named VKCONFIG_JVM_OPTS. This option is useful when configuring a scheduler to use TLS/SSL encryption when connecting to Vertica. See Configuring your scheduler for TLS connections for more information.
Viewing schedulers from the MC
You can view the status of Kafka jobs from the MC. For more information, refer to Viewing load history.
4.2.1 - Setting up a scheduler
You set up a scheduler using the Linux command line.
You set up a scheduler using the Linux command line. Usually you perform the configuration on the host where you want your scheduler to run. It can be one of your Vertica hosts, or a separate host where you have installed the vkconfig utility (see The vkconfig Script for more information).
Follow these steps to set up and start a scheduler to stream data from Kafka to Vertica:
-
Create a Config File (Optional)
-
Add the Kafka Bin Directory to Your Path (Optional)
-
Create a Resource Pool for Your Scheduler
-
Create the Scheduler
-
Create a Cluster
-
Create a Data Table
-
Create a Source
-
Create a Target
-
Create a Load-Spec
-
Create a Microbatch
-
Launch the Scheduler
These steps are explained in the following sections. These sections will use the example of loading web log data (hits on a web site) from Kafka into a Vertica table.
Create a config file (optional)
Many of the arguments you supply to the vkconfig script while creating a scheduler do not change. For example, you often need to pass a username and password to Vertica to authorize the changes to be made in the database. Adding the username and password to each call to vkconfig is tedious and error-prone.
Instead, you can pass the vkconfig utility a configuration file using the --conf option that specifies these arguments for you. It can save you a lot of typing and frustration.
The config file is a text file with a keyword=value pair on each line. Each keyword is a vkconfig command-line option, such as the ones listed in Common vkconfig script options.
The following example shows a config file named weblog.conf that will be used to define a scheduler named weblog_sched. This config file is used throughout the rest of this example.
# The configuraton options for the weblog_sched scheduler.
username=dbadmin
password=mypassword
dbhost=vertica01.example.com
dbport=5433
config-schema=weblog_sched
Add the vkconfig directory to your path (optional)
The vkconfig script is located in the /opt/vertica/packages/kafka/bin directory. Typing this path for each call to vkconfig is tedious. You can add vkconfig to your search path for your current Linux session using the following command:
$ export PATH=/opt/vertica/packages/kafka/bin:$PATH
For the rest of your session, you are able to call vkconfig without specifying its entire path:
$ vkconfig
Invalid tool
Valid options are scheduler, cluster, source, target, load-spec, microbatch, sync, launch,
shutdown, help
If you want to make this setting permanent, add the export statement to your ~/.profile file. The rest of this example assumes that you have added this directory to your shell's search path.
Create a resource pool for your scheduler
Vertica recommends that you always create a resource pool specifically for each scheduler. Schedulers assume that they have exclusive use of their assigned resource pool. Using a separate pool for a scheduler lets you fine-tune its impact on your Vertica cluster's performance. You create resource pools with CREATE RESOURCE POOL.
The following resource pool settings play an important role when creating your scheduler's resource pool:
-
PLANNEDCONCURRENCY determines the number of microbatches (COPY statements) that the scheduler sends to Vertica simultaneously.
-
EXECUTIONPARALLELISM determines the maximum number of threads that each node creates to process a microbatch's partitions.
-
QUEUETIMEOUT provides manual control over resource timings. Set this to 0 to allow the scheduler to manage timings.
See Managing scheduler resources and performance for detailed information about these settings and how to fine-tune a resource pool for your scheduler.
The following CREATE RESOURCE POOL statement creates a resource pool that loads 1 microbatch and processes 1 partition:
=> CREATE RESOURCE POOL weblog_pool
    MEMORYSIZE '10%'
    PLANNEDCONCURRENCY 1
    EXECUTIONPARALLELISM 1
    QUEUETIMEOUT 0;
If you do not create and assign a resource pool for your scheduler, it uses a portion of the GENERAL resource pool. Vertica recommends that you do not use the GENERAL pool for schedulers in production environments. This fallback to the GENERAL pool is intended as a convenience when you test your scheduler configuration. When you are ready to deploy your scheduler, create a resource pool that you tuned to its specific needs. Each time that you start a scheduler that is using the GENERAL pool, the vkconfig utility displays a warning message.
Not allocating enough resources to your schedulers can result in errors. For example, you might get OVERSHOT DEADLINE FOR FRAME errors if the scheduler is unable to load data from all topics in a data frame.
See Resource pool architecture for more information about resource pools.
Create the scheduler
Vertica includes a default scheduler named stream_config. You can use this scheduler or create a new scheduler using the vkconfig script's scheduler tool with the --create and --config-schema options:
$ vkconfig scheduler --create --config-schema scheduler_name --conf conf_file
The --create and --config-schema options are the only ones required to add a scheduler with default options. This command creates a new schema in Vertica that holds the scheduler's configuration. See What Happens When You Create a Scheduler for details on the creation of the scheduler's schema.
You can use additional configuration parameters to further customize your scheduler. See Scheduler tool options for more information.
The following example:
-
Creates a scheduler named weblog_sched using the --config-schema option.
-
Grants privileges to configure and run the scheduler to the Vertica user named kafka_user with the --operator option. The dbadmin user must specify additional privileges separately.
-
Specifies a frame duration of seven minutes with the --frame-duration option. For more information about picking a frame duration, see Choosing a frame duration.
-
Sets the resource pool that the scheduler uses to the weblog_pool created earlier:
$ vkconfig scheduler --create --config-schema weblog_sched --operator kafka_user \
  --frame-duration '00:07:00' --resource-pool weblog_pool --conf weblog.conf
Note
Technically, the previous example doesn't need to supply the --config-schema argument because it is set in the weblog.conf file. It appears in this example for clarity. There's no harm in supplying it on the command line as well as in the configuration file, as long as the values match. If they do not match, the value given on the command line takes priority.
Create a cluster
You must associate at least one Kafka cluster with your scheduler. Schedulers can access more than one Kafka cluster. To create a cluster, you supply a name for the cluster and host names and ports the Kafka cluster's brokers.
When you create a cluster, the scheduler attempts to validate it by connecting to the Kafka cluster. If it successfully connects, the scheduler automatically retrieves the list of all brokers in the cluster. Therefore, you do not have to list every single broker in the --hosts parameter.
The following example creates a cluster named kafka_weblog, with two Kafka broker hosts: kafka01 and kafka03 in the example.com domain. The Kafka brokers are running on port 9092.
$ vkconfig cluster --create --cluster kafka_weblog \
  --hosts kafka01.example.com:9092,kafka03.example.com:9092 --conf weblog.conf
See Cluster tool options for more information.
Create a source
Next, create at least one source for your scheduler to read. The source defines the Kafka topic the scheduler loads data from as well as the number of partitions the topic contains.
To create and associate a source with a configured scheduler, use the source tool. When you create a source, Vertica connects to the Kafka cluster to verify that the topic exists. So, before you create the source, make sure that the topic already exists in your Kafka cluster. Because Vertica verifies the existence of the topic, you must supply the previously-defined cluster name using the --cluster option.
The following example creates a source for the Kafka topic named web_hits on the cluster created in the previous step. This topic has a single partition.
$ vkconfig source --create --cluster kafka_weblog --source web_hits --partitions 1 --conf weblog.conf
Note
The --partitions parameter is the number of partitions to load, not a list of individual partitions. For example, if you set this parameter to 3, the scheduler will load data from partitions 0, 1, and 2.
See Source tool options for more information.
Create a data table
Before you can create a target for your scheduler, you must create a target table in your Vertica database. This is the table Vertica uses to store the data the scheduler loads from Kafka. You must decide which type of table to create for your target:
-
A standard Vertica database table, which you create using the CREATE TABLE statement. This type of table stores data efficiently. However, you must ensure that its columns match the data format of the messages in Kafka topic you are loading. You cannot load complex types of data into a standard Vertica table.
-
A flex table, which you create using CREATE FLEXIBLE TABLE. A flex table is less efficient than a standard Vertica database table. However, it is flexible enough to deal with data whose schema varies and changes. It also can load most complex data types that (such as maps and lists) that standard Vertica tables cannot.
Important
Avoid having columns with primary key restrictions in your target table. The scheduler stops loading data if it encounters a row that has a value which violates this restriction. If you must have a primary key restricted column, try to filter out any redundant values for that column in the streamed data before is it loaded by the scheduler.
The data in this example is in a set format, so the best table to use is a standard Vertica table. The following example creates a table named web_hits to hold four columns of data. This table is located in the public schema.
=> CREATE TABLE web_hits (ip VARCHAR(16), url VARCHAR(256), date DATETIME, user_agent VARCHAR(1024));
Note
You do not need to create a rejection table to store rejected messages. The scheduler creates the rejection table automatically.
Create a target
Once you have created your target table, you can create your scheduler's target. The target tells your scheduler where to store the data it retrieves from Kafka. This table must exist when you create your target. You use the vkconfig script's target tool with the --target-schema and --target_table options to specify the Vertica target table's schema and name. The following example adds a target for the table created in the previous step.
$ vkconfig target --create --target-schema public --target-table web_hits --conf weblog.conf
See Target tool options for more information.
Create a load spec
The scheduler's load spec provides parameters that Vertica uses when parsing the data loaded from Kafka. The most important option is --parser which sets the parser that Vertica uses to parse the data. You have three parser options:
In this example, the data being loaded from Kafka is in JSON format. The following command creates a load spec named weblog_load and sets the parser to KafkaJSONParser.
$ vkconfig load-spec --create --parser KafkaJSONParser --load-spec weblog_load --conf weblog.conf
See Load spec tool options for more information.
Create a microbatch
The microbatch combines all of the settings added to the scheduler so far to define the individual COPY statements that the scheduler uses to load data from Kafka.
The following example uses all of the settings created in the previous examples to create a microbatch called weblog.
$ vkconfig microbatch --create --microbatch weblog --target-schema public --target-table web_hits \
           --add-source web_hits --add-source-cluster kafka_weblog --load-spec weblog_load \
           --conf weblog.conf
For microbatches that might benefit from a reduced transaction size, consider using the --max-parallelism option when creating the microbatch. This option splits a single microbatch with multiple partitions into the specified number of simultaneous COPY statements consisting of fewer partitions.
See Microbatch tool options for more information about --max-parallelism and other options.
Launch the scheduler
Once you've created at least one microbatch, you can run your scheduler. You start your scheduler using the launch tool, passing it the name of the scheduler's schema. The scheduler begins scheduling microbatch loads for every enabled microbatch defined in its schema.
The following example launches the weblog scheduler defined in the previous steps. It uses the nohup command to prevent the scheduler being killed when the user logs out, and redirects stdout and stderr to prevent a nohup.out file from being created.
$ nohup vkconfig launch --conf weblog.conf >/dev/null 2>&1 &
Important
Vertica does not recommend specifying a password on the command line. Passwords on the command line can be exposed by the system's list of processes, which shows the command line for each process. Instead, put the password in a configuration file. Make sure the configuration file's permissions only allow it to be read by the user.
See Launch tool options for more information.
Checking that the scheduler is running
Once you have launched your scheduler, you can verify that it is running by querying the stream_microbatch_history table in the scheduler's schema. This table lists the results of each microbatch the scheduler has run.
For example, this query lists the microbatch name, the start and end times of the microbatch, the start and end offset of the batch, and why the batch ended. The results are ordered to start from when the scheduler was launched:
=> SELECT microbatch, batch_start, batch_end, start_offset,
          end_offset, end_reason
          FROM weblog_sched.stream_microbatch_history
          ORDER BY batch_start DESC LIMIT 10;

 microbatch |        batch_start         |         batch_end          | start_offset | end_offset |  end_reason
------------+----------------------------+----------------------------+--------------+------------+---------------
 weblog     | 2017-10-04 09:30:19.100752 | 2017-10-04 09:30:20.455739 |           -2 |      34931 | END_OF_STREAM
 weblog     | 2017-10-04 09:30:49.161756 | 2017-10-04 09:30:49.873389 |        34931 |      34955 | END_OF_STREAM
 weblog     | 2017-10-04 09:31:19.25731  | 2017-10-04 09:31:22.203173 |        34955 |      35274 | END_OF_STREAM
 weblog     | 2017-10-04 09:31:49.299119 | 2017-10-04 09:31:50.669889 |        35274 |      35555 | END_OF_STREAM
 weblog     | 2017-10-04 09:32:19.43153  | 2017-10-04 09:32:20.7519   |        35555 |      35852 | END_OF_STREAM
 weblog     | 2017-10-04 09:32:49.397684 | 2017-10-04 09:32:50.091675 |        35852 |      36142 | END_OF_STREAM
 weblog     | 2017-10-04 09:33:19.449274 | 2017-10-04 09:33:20.724478 |        36142 |      36444 | END_OF_STREAM
 weblog     | 2017-10-04 09:33:49.481563 | 2017-10-04 09:33:50.068068 |        36444 |      36734 | END_OF_STREAM
 weblog     | 2017-10-04 09:34:19.661624 | 2017-10-04 09:34:20.639078 |        36734 |      37036 | END_OF_STREAM
 weblog     | 2017-10-04 09:34:49.612355 | 2017-10-04 09:34:50.121824 |        37036 |      37327 | END_OF_STREAM
(10 rows)
4.2.2 - Choosing a frame duration
One key setting for your scheduler is its frame duration.
One key setting for your scheduler is its frame duration. The duration sets the amount of time the scheduler has to run all of the microbatches you have defined for it. This setting has significant impact on how data is loaded from Apache Kafka.
What happens during each frame
To understand the right frame duration, you first need to understand what happens during each frame.
The frame duration is split among the microbatches you add to your scheduler. In addition, there is some overhead in each frame that takes some time away from processing the microbatches. Within each microbatch, there is also some overhead which reduces the time the microbatch spends loading data from Kafka. The following diagram shows roughly how each frame is divided:

As you can see, only a portion of the time in the frame is spent actually loading the streaming data.
How the scheduler prioritizes microbatches
To start with, the scheduler evenly divides the time in the frame among the microbatches. It then runs each microbatch in turn.
In each microbatch, the bulk of the time is dedicated to loading data using a COPY statement. This statement loads data using the KafkaSource UDL. It runs until one of two conditions occurs:
-
It reaches the ends of the data streams for the topics and partitions you defined for the microbatch. In this case, the microbatch completes processing early.
-
It reaches a timeout set by the scheduler.
As the scheduler processes frames, it notes which microbatches finish early. It then schedules them to run first in the next frame. Arranging the microbatches in this manner lets the scheduler allocate more of the time in the frame to the microbatches that are spending the most time loading data (and perhaps have not had enough time to reach the end of their data streams).
For example, consider the following diagram. During the first frame, the scheduler evenly divides the time between the microbatches. Microbatch #2 uses all of the time allocated to it (as indicated by the filled-in area), while the other microbatches do not. In the next frame, the scheduler rearranges the microbatches so that microbatches that finished early go first. It also allocates less time to the microbatches that ran for a shorter period. Assuming these microbatches finish early again, the scheduler is able to give the rest of the time in the frame to microbatch #2. This shifting of priorities continues while the scheduler runs. If one topic sees a spike in traffic, the scheduler compensates by giving the microbatch reading from that topic more time.

What happens if the frame duration is too short
If you make the scheduler's frame duration too short, microbatches may not have enough time to load all of the data in the data streams they are responsible for reading. In the worst case, a microbatch could fall further behind when reading a high-volume topic during each frame. If left unaddressed, this issue could result in messages never being loaded, as they age out of the data stream before the microbatch has a chance to read them.
In extreme cases, the scheduler may not be able to run each microbatch during each frame. This problem can occur if the frame duration is so short that much of is spent in overhead tasks such committing data and preparing to run microbatches. The COPY statement that each microbatch runs to load data from Kafka has a minimum duration of 1 second. Add to this the overhead of processing data loads. In general, if the frame duration is shorter than 2 seconds times the number of microbatches in the scheduler, then some microbatches may not get a chance to run in each frame.
If the scheduler runs out of time during a frame to run each microbatch, it compensates during the next frame by giving priority to the microbatches that didn't run in the prior frame. This strategy makes sure each microbatch gets a chance to load data. However, it cannot address the root cause of the problem. Your best solution is to increase the frame duration to give each microbatch enough time to load data during each frame.
What happens if the frame duration is too long
One downside of a long frame duration is increased data latency. This latency is the time between when Kafka sends data out and when that data becomes available for queries in your database. A longer frame duration means that there is more time between each execution of a microbatch. That translates into more time between the data in your database being updated.
Depending on your application, this latency may not be important. When determining your frame duration, consider whether having the data potentially delayed up to the entire length of the frame duration will cause an issue.
Another issue to consider when using a long frame duration is the time it takes to shut down the scheduler. The scheduler does not shut down until the current COPY statement completes. Depending on the length of your frame duration, this process might take a few minutes.
The minimum frame duration
At a minimum, allocate two seconds for each microbatch you add to your scheduler. The vkconfig utility warns you if your frame duration is shorter than this lower limit. In most cases, you want your frame duration to be longer. Two seconds per microbatch leaves little time for data to actually load.
Balancing frame duration requirements
To determine the best frame duration for your deployment, consider how sensitive you are to data latency. If you are not performing time-sensitive queries against the data streaming in from Kafka, you can afford to have the default 5 minute or even longer frame duration. If you need a shorter data latency, then consider the volume of data being read from Kafka. High volumes of data, or data that has significant spikes in traffic can cause problems if you have a short frame duration.
Using different schedulers for different needs
Suppose you are loading streaming data from a few Kafka topics that you want to query with low latency and other topics that have a high volume but which you can afford more latency. Choosing a "middle of the road" frame duration in this situation may not meet either need. A better solution is to use multiple schedulers: create one scheduler with a shorter frame duration that reads just the topics that you need to query with low latency. Then create another scheduler that has a longer frame duration to load data from the high-volume topics.
For example, suppose you are loading streaming data from an Internet of Things (IOT) sensor network via Kafka into Vertica. You use the most of this data to periodically generate reports and update dashboard displays. Neither of these use cases are particularly time sensitive. However, three of the topics you are loading from do contain time-sensitive data (system failures, intrusion detection, and loss of connectivity) that must trigger immediate alerts.
In this case, you can create one scheduler with a frame duration of 5 minutes or more to read most of the topics that contain the non-critical data. Then create a second scheduler with a frame duration of at least 6 seconds (but preferably longer) that loads just the data from the three time-sensitive topics. The volume of data in these topics is hopefully low enough that having a short frame duration will not cause problems.
4.2.3 - Managing scheduler resources and performance
Your scheduler's performance is impacted by the number of microbatches in your scheduler, partitions in each microbatch, and nodes in your Vertica cluster.
Your scheduler's performance is impacted by the number of microbatches in your scheduler, partitions in each microbatch, and nodes in your Vertica cluster. Use resource pools to allocate a subset of system resources for your scheduler, and fine-tune those resources to optimize automatic loads into Vertica.
The following sections provide details about scheduler resource pool configurations and processing scenarios.
Schedulers and resource pools
Vertica recommends that you always create a resource pool specifically for each scheduler. Schedulers assume that they have exclusive use of their assigned resource pool. Using a separate pool for a scheduler lets you fine-tune its impact on your Vertica cluster's performance. You create resource pools with CREATE RESOURCE POOL.
If you do not create and assign a resource pool for your scheduler, it uses a portion of the GENERAL resource pool. Vertica recommends that you do not use the GENERAL pool for schedulers in production environments. This fallback to the GENERAL pool is intended as a convenience when you test your scheduler configuration. When you are ready to deploy your scheduler, create a resource pool that you tuned to its specific needs. Each time that you start a scheduler that is using the GENERAL pool, the vkconfig utility displays a warning message.
Not allocating enough resources to your schedulers can result in errors. For example, you might get OVERSHOT DEADLINE FOR FRAME errors if the scheduler is unable to load data from all topics in a data frame.
See Resource pool architecture for more information about resource pools.
Key resource pool settings
A microbatch is a unit of work that processes the partitions of a single Kafka topic within the duration of a frame. The following resource pool settings play an important role in how Vertica loads microbatches and processes partitions:
- PLANNEDCONCURRENCY determines the number of microbatches (COPY statements) the scheduler sends to Vertica simultaneously. At the start of each frame, the scheduler creates the number of scheduler threads specified by PLANNEDCONCURRENCY. Each scheduler thread connects to Vertica and loads one microbatch at a time. If there are more microbatches than scheduler threads, the scheduler queues the extra microbatches and loads them as threads become available.
- EXECUTIONPARALLELISM determines the maximum number of threads each node creates to process a microbatch's partitions. When a microbatch is loaded into Vertica, its partitions are distributed evenly among the nodes in the cluster. During each frame, a node creates a maximum of one thread for each partition. Each thread reads from one partition at a time until processing completes, or the frame ends. If there are more partitions than threads across all nodes, remaining partitions are processed as threads become available.
- QUEUETIMEOUT provides manual control over resource timings. Set the resource pool parameter QUEUETIMEOUT to 0 to allow the scheduler to manage timings. After all of the microbatches are processed, the scheduler waits for the remainder of the frame to process the next microbatch. A properly sized configuration includes rest time to plan for traffic surges. See Choosing a frame duration for information about the impacts of frame duration size.
For example, the following CREATE RESOURCE POOL statement creates a resource pool named weblogs_pool that loads 2 microbatches simultaneously. Each node in the Vertica cluster creates 10 threads per microbatch to process partitions:
=> CREATE RESOURCE POOL weblogs_pool
    MEMORYSIZE '10%'
    PLANNEDCONCURRENCY 2
    EXECUTIONPARALLELISM 10
    QUEUETIMEOUT 0;
For a three-node Vertica cluster, weblogs_pool provides resources for each node to create up to 10 threads to process partitions, or 30 total threads per microbatch.
Loading multiple microbatches concurrently
In some circumstances, you might have more microbatches in your scheduler than available PLANNEDCONCURRENCY. The following images illustrate how the scheduler loads microbatches into a single Vertica node when there are not enough scheduler threads to load each microbatch simultaneously. The resource pool's PLANNEDCONCURRENCY (PC) is set to 2, but the scheduler must load three microbatches: A, B, and C. For simplicity, EXECUTIONPARALLELISM (EP) is set to 1.
To begin, the scheduler loads microbatch A and microbatch B while microbatch C waits:
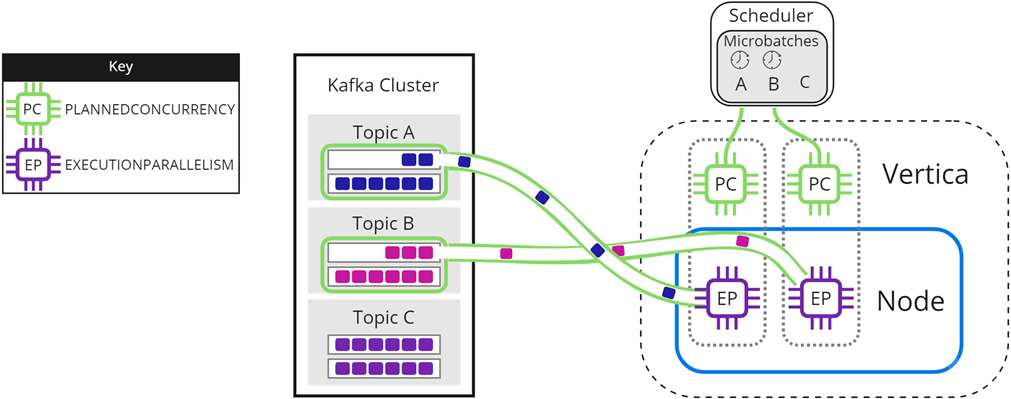
When either microbatch finishes loading, the scheduler loads any remaining microbatches. In the following image, microbatch A is completely loaded into Vertica. The scheduler continues to load microbatch B, and uses the newly available scheduler thread to load microbatch C:
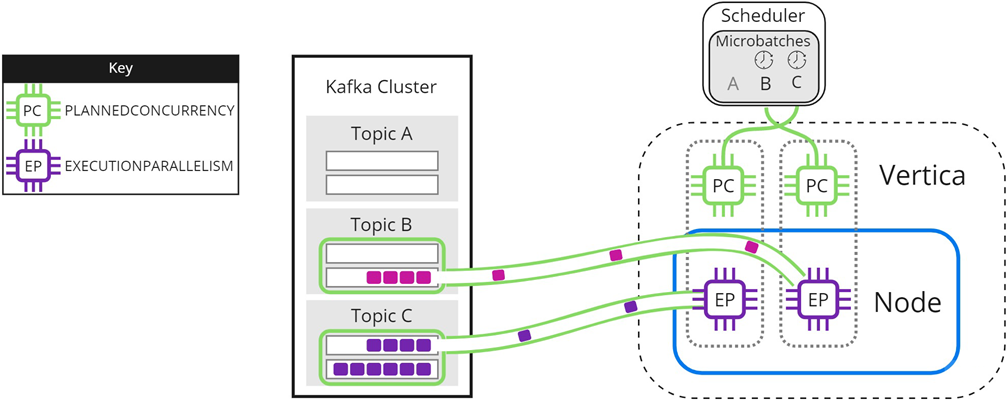
The scheduler continues sending data until all microbatches are loaded into Vertica, or the frame ends.
Experiment with PLANNEDCONCURRENCY to optimize performance. Note that setting it too high might create too many connections at the beginning of each frame, resulting in scalability stress on Vertica or Kafka. Setting PLANNEDCONCURRENCY too low does not take full advantage of the multiprocessing power of Vertica.
Parallel processing within Vertica
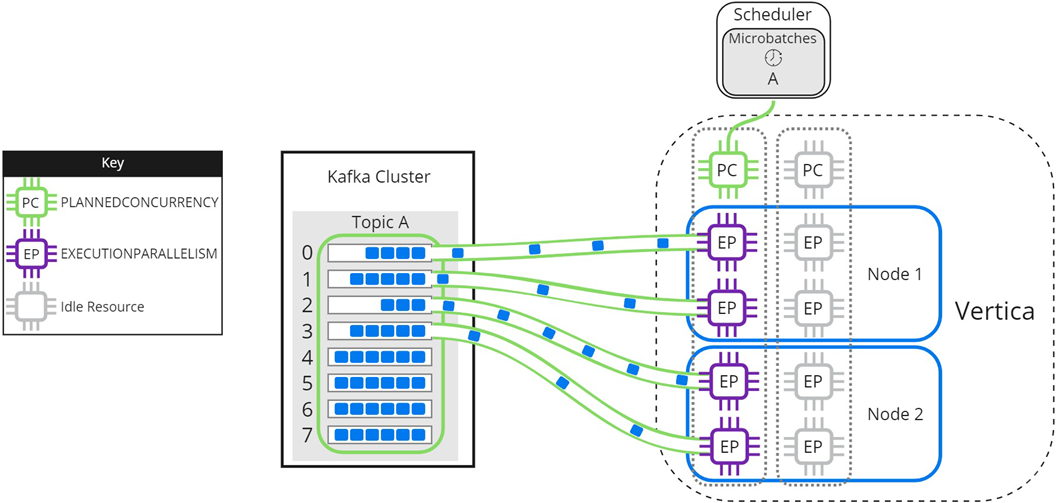
The resource pool setting EXECUTIONPARALLELISM limits the number of threads each Vertica node creates to process partitions. The following image illustrates how a three-node Vertica cluster processes a topic with nine partitions, when there is not enough EXECUTIONPARALLELISM to create one thread per partition. The partitions are distributed evenly among Node 1, Node 2, and Node 3 in the Vertica cluster. The scheduler's resource pool has PLANNEDCONCURRENCY (PC) set to 1 and EXECUTIONPARALLELISM (EP) set to 2, so each node creates a maximum of 2 threads when the scheduler loads microbatch A. Each thread reads from one partition at a time. Partitions that are not assigned a thread must wait for processing:
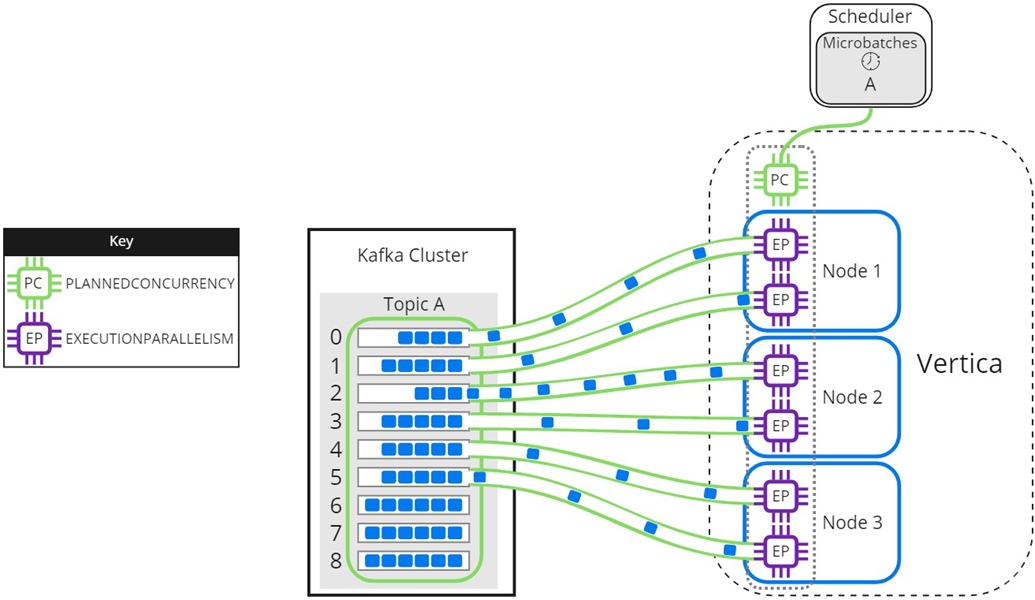
As threads finish processing their assigned partitions, the remaining partitions are distributed to threads as they become available:
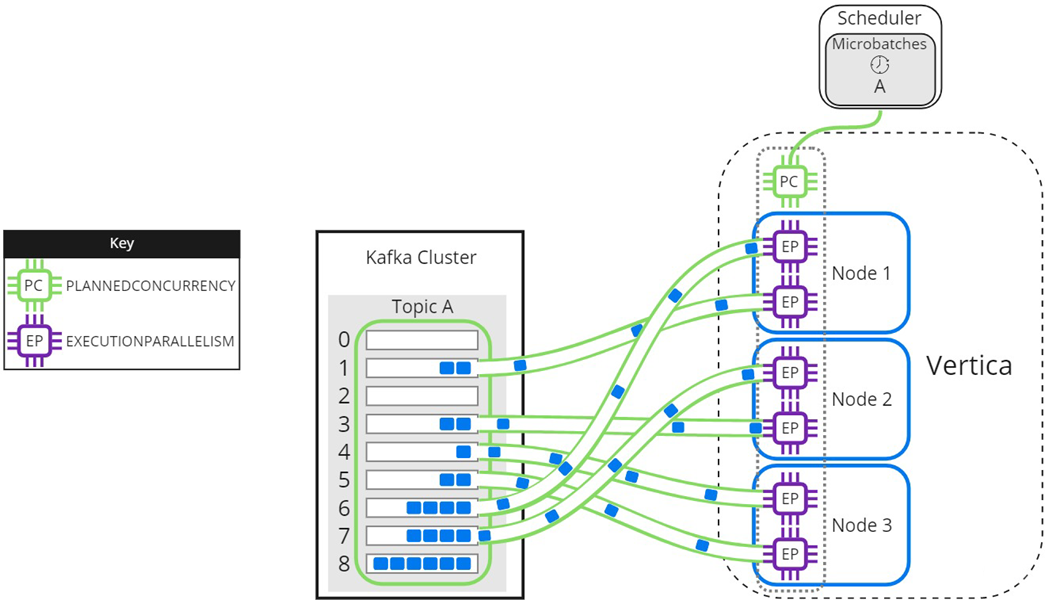
When setting the EXECUTIONPARALLELISM on your scheduler's resource pool, consider the number of partitions across all microbatches in the scheduler.
Loading partitioned topics concurrently
Single topics with multiple partitions might benefit from increased parallel loading or a reduced transaction size. The --max-parallelism microbatch utility option enables you to dynamically split a topic with multiple partitions into multiple, load-balanced microbatches that each consist of a subset of the original microbatch's partitions. The scheduler loads the dynamically split microbatches simultaneously using the PLANNEDCONCURRENCY available in its resource pool.
The EXECUTIONPARALLELISM setting in the scheduler's resource pool determines the maximum number of threads each node creates to process its portion of a single microbatch's partitions. Splitting a microbatch enables each node to create more threads for the same unit of work. When there is enough PLANNEDCONCURRENCY and the number of partitions assigned per node is greater than the EXECUTIONPARALLELISM setting in the scheduler's resource pool, use --max-parallelism to split the microbatch and create more threads per node to process more partitions in parallel.
The following image illustrates how a two-node Vertica cluster loads and processes microbatch A using a resource pool with PLANNEDCONCURRENCY (PC) set to 2, and EXECUTIONPARALLELISM (EP) set to 2. Because the scheduler is loading only one microbatch, there is 1 scheduler thread left unused. Each node creates 2 threads per scheduler thread to process its assigned partitions:
Setting microbatch A's --max-parallelism option to 2 enables the scheduler to dynamically split microbatch A into 2 smaller microbatches, A1 and A2. Because there are 2 available scheduler threads, the subset microbatches are loaded into Vertica simultaneously. Each node creates 2 threads per scheduler thread to process partitions for microbatches A1 and A2:
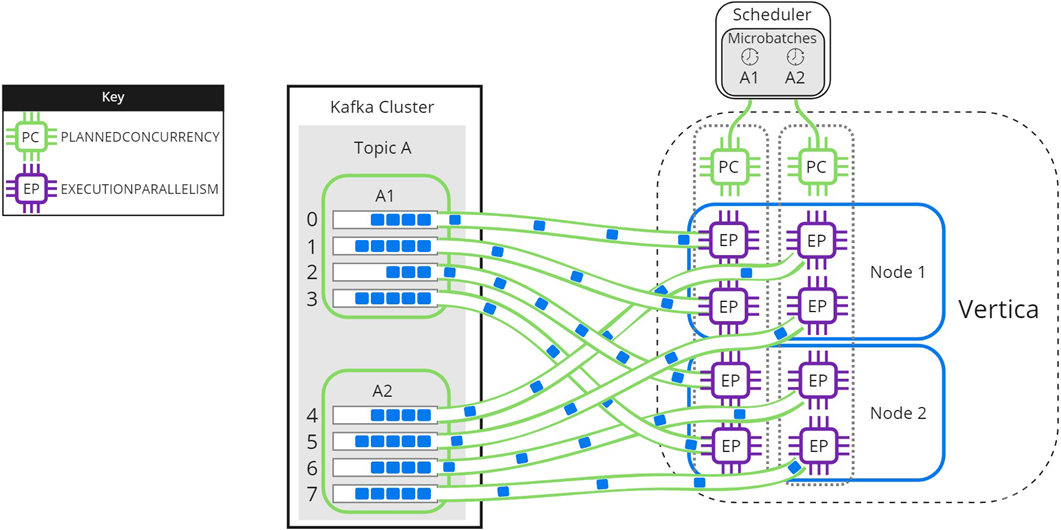
Use --max-parallelism to prevent bottlenecks in microbatches consisting of high-volume Kafka topics. It also provides faster loads for microbatches that require additional processing, such as text indexing.
4.2.4 - Using connection load balancing with the Kafka scheduler
You supply the scheduler with the name of a Vertica node in the --dbhost option or the dbhost entry in your configuration file.
You supply the scheduler with the name of a Vertica node in the --dbhost option or the dbhost entry in your configuration file. The scheduler connects to this node to initiate all of the statements it executes to load data from Kafka. For example, each time it executes a microbatch, the scheduler connects to the same node to run the COPY statement. Having a single node act as the initiator node for all of the scheduler's actions can affect the performance of the node, and in turn the database as a whole.
To avoid a single node becoming a bottleneck, you can use connection load balancing to spread the load of running the scheduler's statements across multiple nodes in your database. Connection load balancing distributes client connections among the nodes in a load balancing group. See About native connection load balancing for an overview of this feature.
Enabling connection load balancing for a scheduler is a two-step process:
-
Choose or create a load balancing policy for your scheduler.
-
Enable load balancing in the scheduler.
Choosing or creating a load balancing policy for the scheduler
A connecting load balancing policy redirects incoming connections in from a specific set of network addresses to a group of nodes. If your database already defines a suitable load balancing policy, you can use it instead of creating one specifically for your scheduler.
If your database does not have a suitable policy, create one. Have your policy redirect connections coming from the IP addresses of hosts running Kafka schedulers to a group of nodes in your database. The group of nodes that you select will act as the initiators for the statements that the scheduler executes.
Important
In an
Eon Mode database, only include nodes that are part of a
primary subcluster in the scheduler's load balancing group. These nodes are the most efficient for loading data.
The following example demonstrates setting up a load balancing policy for all three nodes in a three-node database. The scheduler runs on node 1 in the database, so the source address range (192.168.110.0/24) of the routing rule covers the IP addresses of the nodes in the database. The last step of the example verifies that connections from the first node (IP address 10.20.110.21) are load balanced.
=> SELECT node_name,node_address,node_address_family FROM v_catalog.nodes;
    node_name     | node_address | node_address_family
------------------+--------------+----------------------
 v_vmart_node0001 | 10.20.110.21 | ipv4
 v_vmart_node0002 | 10.20.110.22 | ipv4
 v_vmart_node0003 | 10.20.110.23 | ipv4
(4 rows)


=> CREATE NETWORK ADDRESS node01 ON v_vmart_node0001 WITH '10.20.110.21';
CREATE NETWORK ADDRESS
=> CREATE NETWORK ADDRESS node02 ON v_vmart_node0002 WITH '10.20.110.22';
CREATE NETWORK ADDRESS
=> CREATE NETWORK ADDRESS node03 on v_vmart_node0003 WITH '10.20.110.23';
CREATE NETWORK ADDRESS
=> CREATE LOAD BALANCE GROUP kafka_scheduler_group WITH ADDRESS node01,node02,node03;
CREATE LOAD BALANCE GROUP
=> CREATE ROUTING RULE kafka_scheduler_rule ROUTE
   '10.20.110.0/24' TO kafka_scheduler_group;
CREATE ROUTING RULE
=> SELECT describe_load_balance_decision('10.20.110.21');
                     describe_load_balance_decision
--------------------------------------------------------------------------------
  Describing load balance decision for address [10.20.110.21]
Load balance cache internal version id (node-local): [2]
Considered rule [kafka_scheduler_rule] source ip filter [10.20.110.0/24]...
input address matches this rule
Matched to load balance group [kafka_scheduler_group] the group has policy [ROUNDROBIN]
number of addresses [3]
(0) LB Address: [10.20.110.21]:5433
(1) LB Address: [10.20.110.22]:5433
(2) LB Address: [10.20.110.23]:5433
Chose address at position [1]
Routing table decision: Success. Load balance redirect to: [10.20.110.23] port [5433]

(1 row)
Important
Be careful if you run your scheduler on a Vertica node and have either set its dbhost name to localhost or are not specifying a value (which means dbhost defaults to localhost). Connections to localhost use the loopback IP address 127.0.0.1 instead of the node's primary network address. If you create a load balancing routing rule that redirects incoming connections from the node's IP address range, it will not apply to connections made using localhost. The best solution is to use the node's IP address or FQDN as the dbhost setting.
If your scheduler connects to Vertica from an IP address that no routing rule applies to, you will see messages similar to the following in the vertica.log:
[Session] <INFO> Load balance request from client address ::1 had decision:
    Classic load balancing considered, but either the policy was NONE or no target was
    available. Details: [NONE or invalid]
 <LOG> @v_vmart_node0001: 00000/5789: Connection load balance request
    refused by server
Enabling load balancing in the scheduler
Clients must opt-in to load balancing for Vertica to apply the connection load balancing policies to the connection. For example, you must pass the -C flag to the vsql command for your interactive session to be load balanced.
The scheduler uses the Java JDBC library to connect to Vertica. To have the scheduler opt-in to load balancing, you must set the JDBC library's ConnectionLoadBalance option to 1. See Load balancing in JDBC for details.
Use the vkconfig script's --jdbc-opt option, or add the jdbc-opt option to your configuration file to set the ConnectionLoadBalance option. For example, to start the scheduler from the command line using a configuration file named weblog.conf, use the command:
$ nohup vkconfig launch --conf weblog.conf --jdbc-opt ConnectionLoadBalance=1 >/dev/null 2>&1 &
To permanently enable load balancing, you can add the load balancing option to your configuration file. The following example shows the weblog.conf file from the example in Setting up a scheduler configured to use connection load balancing.
username=dbadmin
password=mypassword
dbhost=10.20.110.21
dbport=5433
config-schema=weblog_sched
jdbc-opt=ConnectionLoadBalance=1
You can check whether the scheduler's connections are being load balanced by querying the SESSIONS table:
=> SELECT node_name, user_name, client_label FROM V_MONITOR.SESSIONS;
    node_name     | user_name |               client_label
------------------+-----------+-------------------------------------------
 v_vmart_node0001 | dbadmin   | vkstream_weblog_sched_leader_persistent_4
 v_vmart_node0001 | dbadmin   |
 v_vmart_node0002 | dbadmin   | vkstream_weblog_sched_lane-worker-0_0_8
 v_vmart_node0003 | dbadmin   | vkstream_weblog_sched_VDBLogger_0_9
(4 rows)
In the client_labels column, the scheduler's connections have labels starting with vkstream (the row without a client label is an interactive session). You can see that the three connections the scheduler has opened all go to different nodes.
4.2.5 - Limiting loads using offsets
Kafka maintains a user-configurable backlog of messages.
Kafka maintains a user-configurable backlog of messages. By default, a newly-created scheduler reads all of the messages in a Kafka topic, including all of the messages in the backlog, not just the messages that are streamed out after the scheduler starts. Often, this is what you want.
In some cases, however, you may want to stream just a section of a source into a table. For example, suppose you want to analyze the web traffic of your e-commerce site starting at specific date and time. However, your Kafka topic contains web access records from much further back in time than you want to analyze. In this case, you can use an offset to stream just the data you want into Vertica for analysis.
Another common use case is when you have already loaded data some from Kafka manually (see Manually consume data from Kafka). Now you want to stream all of the newly-arriving data. By default, your scheduler ill reload all of the previously loaded data (assuming it is still available from Kafka). You can use an offset to tell your scheduler to start automatically loading data at the point where your manual data load left off.
Configuring a scheduler to start streaming from an offset
The vkconfig script's microbatch tool has an --offset option that lets you specify the index of the message in the source where you want the scheduler to begin loading. This option accepts a comma-separated list of index values. You must supply one index value for each partition in the source unless you use the --partition option. This option lets you choose the partitions the offsets apply to. The scheduler cannot be running when you set an offset in the microbatch.
If your microbatch defines more than one cluster, use the --cluster option to select which one the offset option applies to. Similarly, if your microbatch has more than one source, you must select one using the --source option.
For example, suppose you want to load just the last 1000 messages from a source named web_hits. To make things easy, suppose the source contains just a single partition, and the microbatch defines just a single cluster and single topic.
Your first task is to determine the current offset of the end of the stream. You can do this on one of the Kafka nodes by calling the GetOffsetShell class with the time parameter set to -1 (the end of the topic):
$ path to kafka/bin/kafka-run-class.sh kafka.tools.GetOffsetShell \
                                          --broker-list kafka01:9092,kafka03:9092 --time -1 \
                                          --topic web_hits

{metadata.broker.list=kafka01:9092,kafka03:9092, request.timeout.ms=1000,
 client.id=GetOffsetShell, security.protocol=PLAINTEXT}
web_hits:0:8932
You can also use GetOffsetShell to find the offset in the stream that occurs before a timestamp.
In the above example, the web_hits topic's single partition has an ending offset of 8932. If we want to load the last 1000 messages from the source, we need to set the microbatch's offset to 8932 - 1001 or 7931.
Note
The start of an offset is inclusive in the Vertica COPY statement. Kafka's native starting offset is exclusive. Therefore, you must add one to the offset to get the correct number of messages.
With the offset calculated, you are ready to set it in the microbatch's configuration. The following example:
$ vkconfig shutdown --conf weblog.conf
$ vkconfig microbatch --microbatch weblog --update --conf weblog.conf --offset 7931
$ nohup vkconfig launch --conf weblog.conf >/dev/null 2>&1 &
If the target table was empty or truncated before the scheduler started, it will have 1000 rows in the table in it (until more messages are streamed through the source):
=> select count(*) from web_hits;
 count
-------
  1000
(1 row)
Note
The last example assumes that the offset values for the last 1000 messages in the Kafka topic were assigned consecutively. This assumption is not always be true. A Kafka topic can have gaps in its offset numbering for a variety of reasons. Offsets refer to the key value assigned to a message by Kafka, not its position in the topic.
4.2.6 - Updating schedulers after Vertica upgrades
A scheduler is only compatible with the version of Vertica that created it.
A scheduler is only compatible with the version of Vertica that created it. Between Vertica versions, the scheduler's configuration schema or the UDx function the scheduler calls may change. After you upgrade Vertica, you must update your schedulers to account for these changes.
When you upgrade Vertica to a new major version or service pack, use the vkconfig scheduler tool's --upgrade option to update your scheduler. If you do not update a scheduler, you receive an error message if you try to launch it. For example:
$ nohup vkconfig launch --conf weblog.conf >/dev/null 2>&1 &
com.vertica.solutions.kafka.exception.FatalException: Configured scheduler schema and current
scheduler configuration schema version do not match. Upgrade configuration by running:
vkconfig scheduler --upgrade
    at com.vertica.solutions.kafka.scheduler.StreamCoordinator.assertVersion(StreamCoordinator.java:64)
    at com.vertica.solutions.kafka.scheduler.StreamCoordinator.run(StreamCoordinator.java:125)
    at com.vertica.solutions.kafka.Launcher.run(Launcher.java:205)
    at com.vertica.solutions.kafka.Launcher.main(Launcher.java:258)
Scheduler instance failed. Check log file. Check log file.
$ vkconfig scheduler --upgrade --conf weblog.conf
Checking if UPGRADE necessary...
UPGRADE required, running UPGRADE...
UPGRADE completed successfully, now the scheduler configuration schema version is v8.1.1
$ nohup vkconfig launch --conf weblog.conf >/dev/null 2>&1 &
                   .  .  .
4.3 - Monitoring message consumption
You can monitor the progress of your data streaming from Kafka several ways:.
You can monitor the progress of your data streaming from Kafka several ways:
-
Monitoring the consumer groups to which Vertica reports its progress. This technique is best if the tools you want to use to monitor your data load work with Kafka.
-
Use the monitoring APIs built into the vkconfig tool. These APIs report the configuration and consumption of your streaming scheduler in JSON format. These APIs are useful if you are developing your own monitoring scripts, or your monitoring tools can consume status information in JSON format.
4.3.1 - Monitoring Vertica message consumption with consumer groups
Apache Kafka has a feature named consumer groups that helps distribute message consumption loads across sets of consumers.
Apache Kafka has a feature named consumer groups that helps distribute message consumption loads across sets of consumers. When using consumer groups, Kafka evenly divides up messages based on the number of consumers in the group. Consumers report back to the Kafka broker which messages it read successfully. This reporting helps Kafka to manage message offsets in the topic's partitions, so that no consumer in the group is sent the same message twice.
Vertica does not rely on Kafka's consumer groups to manage load distribution or preventing duplicate loads of messages. The streaming job scheduler manages topic partition offsets on its own.
Even though Vertica does not need consumer groups to manage offsets, it does report back to the Kafka brokers which messages it consumed. This feature lets you use third-party tools to monitor the Vertica cluster's progress as it loads messages. By default, Vertica reports its progress to a consumer group named vertica-databaseName, where databaseName is the name of the Vertica database. You can change the name of the consumer group that Vertica reports its progress to when defining a scheduler or during manual loads of data. Third party tools can query the Kafka brokers to monitor the Vertica cluster's progress when loading data.
For example, you can use Kafka's kafka-consumer-groups.sh script (located in the bin directory of your Kafka installation) to view the status of the Vertica consumer group. The following example demonstrates listing the consumer groups available defined in the Kafka cluster and showing the details of the Vertica consumer group:
$ cd /path/to/kafka/bin
$ ./kafka-consumer-groups.sh --list --bootstrap-server localhost:9092
Note: This will not show information about old Zookeeper-based consumers.

vertica-vmart
$ ./kafka-consumer-groups.sh --describe --group vertica-vmart \
   --bootstrap-server localhost:9092
Note: This will not show information about old Zookeeper-based consumers.

Consumer group 'vertica-vmart' has no active members.

TOPIC                          PARTITION  CURRENT-OFFSET  LOG-END-OFFSET  LAG        CONSUMER-ID                                       HOST                           CLIENT-ID
web_hits                       0          24500           30000           5500       -                                                 -                              -
From the output, you can see that Vertica reports its consumption of messages back to the vertica-vmart consumer group. This group is the default consumer group when Vertica has the example VMart database loaded. The second command lists the topics being consumed by the vertica-vmart consumer group. You can see that the Vertica cluster has read 24500 of the 30000 messages in the topic's only partition. Later, running the same command will show the Vertica cluster's progress:
$ cd /path/to/kafka/bin
$ ./kafka-consumer-groups.sh --describe --group vertica-vmart \
    --bootstrap-server localhost:9092
Note: This will not show information about old Zookeeper-based consumers.

Consumer group 'vertica-vmart' has no active members.

TOPIC                          PARTITION  CURRENT-OFFSET  LOG-END-OFFSET  LAG        CONSUMER-ID                                       HOST                           CLIENT-ID
web_hits                       0          30000           30000           0          -
Changing the consumer group where Vertica reports its progress
You can change the consumer group that Vertica reports its progress to when consuming messages.
Changing for automatic loads with the scheduler
When using a scheduler, you set the consumer group by setting the --consumer-group-id argument to the vkconfig script's scheduler or microbatch utilities. For example, suppose you want the example scheduler shown in Setting up a scheduler to report its consumption to the consumer group name vertica-database. Then you could use the command:
$ /opt/vertica/packages/kafka/bin/vkconfig microbatch --update \
    --conf weblog.conf --microbatch weblog --consumer-group-id vertica-database
When the scheduler begins loading data, it will start updating the new consumer group. You can see this on a Kafka node using kafka-consumer-groups.sh.
Use the --list option to return the consumer groups:
$ /path/to/kafka/bin/kafka-consumer-groups.sh --list --bootstrap-server localhost:9092
Note: This will not show information about old Zookeeper-based consumers.

vertica-database
vertica-vmart
Use the --describe and --group options to return details about a specific consumer group:
$ /path/to/kafka/bin/kafka-consumer-groups.sh --describe --group vertica-database \
                                          --bootstrap-server localhost:9092
Note: This will not show information about old Zookeeper-based consumers.

Consumer group 'vertica-database' has no active members.

TOPIC                          PARTITION  CURRENT-OFFSET  LOG-END-OFFSET  LAG        CONSUMER-ID                                       HOST                           CLIENT-ID
web_hits                       0          30300           30300           0          -                                                 -                              -
Changing for manual loads
To change the consumer group when manually loading data, use the group_id parameter of KafkaSource function:
=> COPY web_hits SOURCE KafkaSource(stream='web_hits|0|-2',
                                    brokers='kafka01.example.com:9092',
                                    stop_on_eof=True,
                                    group_id='vertica_database')
                 PARSER KafkaJSONParser();
 Rows Loaded
-------------
       50000
(1 row)
Using consumer group offsets when loading messages
You can choose to have your scheduler, manual load, or custom loading script start loading messages from the consumer group's offset. To load messages from the last offset stored in the consumer group, use the special -3 offset.
Automatic load with the scheduler example
To instruct your scheduler to load messages from the consumer group's saved offset, use the vkconfig script microbatch tool's --offset argument.
-
Stop the scheduler using the shutdown command and the configuration file that you used to create the scheduler:
$ /opt/vertica/packages/kafka/bin/vkconfig microbatch shutdown --conf weblog.conf
-
Set the microbatch --offset option to -3:
$ /opt/vertica/packages/kafka/bin/vkconfig microbatch --update --conf weblog.conf --microbatch weblog --offset -3
This sets the offset to -3 for all topic partitions that your scheduler reads from. The scheduler begins the next load with the consumer group's saved offset, and all subsequent loads use the offset saved in stream_microbatch_history.
Manual load example
This example loads messages from the web_hits topic that has one partition consisting of 51,000 messages. For details about manual loads with KafkaSource, see Manually consume data from Kafka.
-
The first COPY statement creates a consumer group named vertica_manual, and loads the first 50,000 messages from the first partition in the web_hits topic:
=> COPY web_hits
   SOURCE KafkaSource(stream='web_hits|0|0|50000',
                              brokers='kafka01.example.com:9092',
                              stop_on_eof=True,
                              group_id='vertica_manual')
   PARSER KafkaJSONParser()
   REJECTED DATA AS TABLE public.web_hits_rejections;
 Rows Loaded
-------------
       50000
(1 row)
-
The next COPY statement passes -3 as the start_offset stream parameter to load from the consumer group's saved offset:
=> COPY web_hits
   SOURCE KafkaSource(stream='web_hits|0|-3',
                              brokers='kafka01.example.com:9092',
                              stop_on_eof=True,
                              group_id='vertica_manual')
   PARSER KafkaJSONParser()
   REJECTED DATA AS TABLE public.web_hits_rejections;
 Rows Loaded
-------------
        1000
(1 row)
Disabling consumer group reporting
Vertica reports the offsets of the messages it consumes to Kafka by default. If you do not specifically configure a consumer group for Vertica, it still reports its offsets to a consumer group named vertica_database-name (where database-name is the name of the database Vertica is currently running).
If you want to completely disable having Vertica report its consumption back to Kafka, you can set the consumer group to an empty string or NULL. For example:
=> COPY web_hits SOURCE KafkaSource(stream='web_hits|0|-2',
                                    brokers='kafka01.example.com:9092',
                                    stop_on_eof=True,
                                    group_id=NULL)
                 PARSER KafkaJsonParser();
 Rows Loaded
-------------
       60000
(1 row)
4.3.2 - Getting configuration and statistics information from vkconfig
The vkconfig tool has two features that help you examine your scheduler's configuration and monitor your data load:.
The vkconfig tool has two features that help you examine your scheduler's configuration and monitor your data load:
-
The vkconfig tools that configure your scheduler (scheduler, cluster, source, target, load-spec, and microbatch) have a --read argument that has them output their current settings in the scheduler.
-
The vkconfig statistics tool lets you get statistics on your microbatches. You can filter the microbatch records based on a date and time range, cluster, partition, and other criteria.
Both of these features output their data in JSON format. You can use third-party tools that can consume JSON data or write your own scripts to process the configuration and statics data.
You can also access the data provided by these vkconfig options by querying the configuration tables in the scheduler's schema. However, you may find these options easier to use as they do not require you to connect to the Vertica database.
You pass the --read option to vkconfig's configuration tools to get the current settings for the options that the tool can set. This output is in JSON format. This example demonstrates getting the configuration information from the scheduler and cluster tools for the scheduler defined in the weblog.conf configuration file:
$ vkconfig scheduler --read --conf weblog.conf
{"version":"v9.2.0", "frame_duration":"00:00:10", "resource_pool":"weblog_pool",
 "config_refresh":"00:05:00", "new_source_policy":"FAIR",
 "pushback_policy":"LINEAR", "pushback_max_count":5, "auto_sync":true,
 "consumer_group_id":null}

$ vkconfig cluster --read --conf weblog.conf
{"cluster":"kafka_weblog", "hosts":"kafak01.example.com:9092,kafka02.example.com:9092"}
The --read option lists all of values created by the tool in the scheduler schema. For example, if you have defined multiple targets in your scheduler, the --read option lists all of them.
$ vkconfig target --list --conf weblog.conf
{"target_schema":"public", "target_table":"health_data"}
{"target_schema":"public", "target_table":"iot_data"}
{"target_schema":"public", "target_table":"web_hits"}
You can filter the --read option output using the other arguments that the vkconfig tools accept. For example, in the cluster tool, you can use the --host argument to limit the output to just show clusters that contain a specific host. These arguments support LIKE-predicate wildcards, so you can match partial values. See LIKE for more information about using wildcards.
The following example demonstrates how you can filter the output of the --read option of the cluster tool using the --host argument. The first call shows the unfiltered output. The second call filters the output to show only those clusters that start with "kafka":
$ vkconfig cluster --read --conf weblog.conf
{"cluster":"some_cluster", "hosts":"host01.example.com"}
{"cluster":"iot_cluster",
 "hosts":"kafka-iot01.example.com:9092,kafka-iot02.example.com:9092"}
{"cluster":"weblog",
 "hosts":"web01.example.com.com:9092,web02.example.com:9092"}
{"cluster":"streamcluster1",
 "hosts":"kafka-a-01.example.com:9092,kafka-a-02.example.com:9092"}
{"cluster":"test_cluster",
 "hosts":"test01.example.com:9092,test02.example.com:9092"}

$ vkconfig cluster --read --conf weblog.conf --hosts kafka%
{"cluster":"iot_cluster",
 "hosts":"kafka-iot01.example.com:9092,kafka-iot02.example.com:9092"}
{"cluster":"streamcluster1",
 "hosts":"kafka-a-01.example.com:9092,kafka-a-02.example.com:9092"}
See the Cluster tool options, Load spec tool options, Microbatch tool options, Scheduler tool options, Target tool options, and Source tool options for more information.
Getting streaming data load statistics
The vkconfig script's statistics tool lets you view the history of your scheduler's microbatches. You can filter the results using any combination of the following criteria:
-
The name of the microbatch
-
The Kafka cluster that was the source of the data load
-
The name of the topic
-
The partition within the topic
-
The Vertica schema and table targeted by the data load
-
A date and time range
-
The latest microbatches
See Statistics tool options for all of the options available in this tool.
This example gets the last two microbatches that the scheduler ran:
$ vkconfig statistics --last 2 --conf weblog.conf
{"microbatch":"weblog", "target_schema":"public", "target_table":"web_hits",
 "source_name":"web_hits", "source_cluster":"kafka_weblog", "source_partition":0,
 "start_offset":73300, "end_offset":73399, "end_reason":"END_OF_STREAM",
 "end_reason_message":null, "partition_bytes":19588, "partition_messages":100,
 "timeslice":"00:00:09.807000", "batch_start":"2018-11-02 13:22:07.825295",
 "batch_end":"2018-11-02 13:22:08.135299", "source_duration":"00:00:00.219619",
 "consecutive_error_count":null, "transaction_id":45035996273976123,
 "frame_start":"2018-11-02 13:22:07.601", "frame_end":null}
{"microbatch":"weblog", "target_schema":"public", "target_table":"web_hits",
 "source_name":"web_hits", "source_cluster":"kafka_weblog", "source_partition":0,
 "start_offset":73200, "end_offset":73299, "end_reason":"END_OF_STREAM",
 "end_reason_message":null, "partition_bytes":19781, "partition_messages":100,
 "timeslice":"00:00:09.561000", "batch_start":"2018-11-02 13:21:58.044698",
 "batch_end":"2018-11-02 13:21:58.335431", "source_duration":"00:00:00.214868",
 "consecutive_error_count":null, "transaction_id":45035996273976095,
 "frame_start":"2018-11-02 13:21:57.561", "frame_end":null}
This example gets the microbatches from the source named web_hits between 13:21:00 and 13:21:20 on November 2nd 2018:
$ vkconfig statistics --source "web_hits" --from-timestamp \
           "2018-11-02 13:21:00" --to-timestamp "2018-11-02 13:21:20"  \
           --conf weblog.conf
{"microbatch":"weblog", "target_schema":"public", "target_table":"web_hits",
 "source_name":"web_hits", "source_cluster":"kafka_weblog", "source_partition":0,
 "start_offset":72800, "end_offset":72899, "end_reason":"END_OF_STREAM",
 "end_reason_message":null, "partition_bytes":19989, "partition_messages":100,
 "timeslice":"00:00:09.778000", "batch_start":"2018-11-02 13:21:17.581606",
 "batch_end":"2018-11-02 13:21:18.850705", "source_duration":"00:00:01.215751",
 "consecutive_error_count":null, "transaction_id":45035996273975997,
 "frame_start":"2018-11-02 13:21:17.34", "frame_end":null}
{"microbatch":"weblog", "target_schema":"public", "target_table":"web_hits",
 "source_name":"web_hits", "source_cluster":"kafka_weblog", "source_partition":0,
 "start_offset":72700, "end_offset":72799, "end_reason":"END_OF_STREAM",
 "end_reason_message":null, "partition_bytes":19640, "partition_messages":100,
 "timeslice":"00:00:09.857000", "batch_start":"2018-11-02 13:21:07.470834",
 "batch_end":"2018-11-02 13:21:08.737255", "source_duration":"00:00:01.218932",
 "consecutive_error_count":null, "transaction_id":45035996273975978,
 "frame_start":"2018-11-02 13:21:07.309", "frame_end":null}
See Statistics tool options for more examples of using this tool.
4.4 - Parsing custom formats
To process a Kafka data stream, the parser must identify the boundary between each message.
To process a Kafka data stream, the parser must identify the boundary between each message. Vertica provides Kafka parsers that can identify boundaries for Avro, JSON, and raw data formats, but your data stream might use a custom format. To parse custom formats, Vertica provides filters that insert boundary information in the data stream before it reaches the parser.
Kafka filters
Vertica provides the following filters:
-
KafkaInsertDelimiters: Inserts a user-specified delimiter between each message in the data stream. The delimiter can contain any characters and be of any length. This parser uses the following syntax:
KafkaInsertDelimiters(delimiter = 'delimiter')
-
KafkaInsertLengths: Inserts the message length in bytes at the beginning of the message. Vertica writes the length as a 4-byte uint32 value in big-endian network byte order. For example, a 100-byte message is preceded by 0x00000064. This parser uses the following syntax:
KafkaInsertLengths()
Note
Because each Kafka filter requires input from a stream source and outputs a non-stream source, you cannot use both Kafka filters in the same COPY statement to process a Kafka data stream.
In addition to one of the Kafka filters, you can include one or more user-defined filters in a single COPY statement. Specify multiple filters as a comma-separated list, and list the Vertica filter first. If you use a non-Kafka parser, you must use at least one filter to prepare the data stream for the parser, or the parser fails and returns an error.
Examples
The following COPY statement loads comma-separated values from two partitions in a topic named iot-data. The load exits after it processes all messages in both partitions. The KafkaInsertDelimiters filter inserts newlines between the Kafka messages to convert them into traditional rows of data. The statement uses the standard COPY parser to delimit CSV values with a comma:
=> COPY kafka_iot SOURCE KafkaSource(stream='iot-data|0|-2,iot-data|1|-2',
                                     brokers='kafka01:9092',
                                     stop_on_eof=True)
                  FILTER KafkaInsertDelimiters(delimiter = E'\n')
                  DELIMITER ',';
 Rows Loaded
-------------
        3430
(1 row)
5 - Avro Schema Registry
Vertica supports the use of a Confluent schema registry for Avro schemas with the KafkaAvroParser.
Vertica supports the use of a Confluent schema registry for Avro schemas with the KafkaAvroParser. By using a schema registry, you enable the Avro parser to parse and decode messages written by the registry and to retrieve schemas stored in the registry. In addition, a schema registry enables Vertica to process streamed data without sending a copy of the schema with each record. Vertica can access a schema registry in the following ways:
- schema ID
- subject and version
Note
If you use the compatibility config resource in your schema registry, you should specify a value of at least BACKWARD. You may also choose to use a stricter compatibility setting. For more information on installing and configuring a schema registry, refer to the
Confluent documentation.
Schema ID Loading
In schema ID based loading, the Avro parser checks the schema ID associated with each message to identify the correct schema to use. A single COPY statement can reference multiple schemas. Because each message is not validated, Vertica recommends that you use a flex table as the target table for schema ID based loading.
The following example shows a COPY statement that refers to a schema registry located on the same host:
=> COPY logs source kafkasource(stream='simple|0|0', stop_on_eof=true,
duration=interval '10 seconds') parser
KafkaAvroParser(schema_registry_url='http://localhost:8081/');
Subject and Version Loading
In subject and version loading, you specify a subject and version in addition to the schema registry URL. The addition of the subject and version identifies a single schema to use for all messages in the COPY. If any message in the statement is incompatible with the schema, the COPY fails. Because all messages are validated prior to loading, Vertica recommends that you use a standard Vertica table as the target for subject and version loading.
The following example shows a COPY statement that identifies a schema subject and schema version as well as a schema registry.
=> COPY t source kafkasource(stream='simpleEvolution|0|0',
stop_on_eof=true, duration=interval '10 seconds') parser
KafkaAvroParser(schema_registry_url='http://repository:8081/schema-repo/',
schema_registry_subject='simpleEvolution-value',schema_registry_version='1')
REJECTED DATA AS TABLE "t_rejects";
6 - Producing data for Kafka
In addition to consuming data from Kafka, Vertica can produce data for Kafka.
In addition to consuming data from Kafka, Vertica can produce data for Kafka. Stream the following data from Vertica for consumption by other Kafka consumers:
-
Vertica anayltics results. Use KafkaExport to export Vertica tables and queries.
-
Health and performance data from Data Collector tables. Create push-based notifiers to send this data for consumption for third-party monitoring tools.
-
Ad hoc messages. Use NOTIFY to signal that tasks such as stored procedures are complete.
6.1 - Producing data using KafkaExport
The KafkaExport function lets you stream data from Vertica to Kafka.
The KafkaExport function lets you stream data from Vertica to Kafka. You pass this function three arguments and two or three parameters:
SELECT KafkaExport(partitionColumn, keyColumn, valueColumn
    USING PARAMETERS brokers='host[:port][,host...]',
    topic='topicname'
    [,kafka_conf='kafka_configuration_setting']
    [,fail_on_conf_parse_error=Boolean])
OVER (partition_clause) FROM table;
The partitionColumn and keyColumn arguments set the Kafka topic's partition and key value, respectively. You can set either or both of these values to NULL. If you set the partition to NULL, Kafka uses its default partitioning scheme (either randomly assigning partitions if the key value is NULL, or based on the key value if it is not).
The valueColumn argument is a LONG VARCHAR containing message data that you want to send to Kafka. Kafka does not impose structure on the message content. Your only restriction on the message format is what the consumers of the data are able to parse.
You are free to convert your data into a string in any way you like. For simple messages (such as a comma-separated list), you can use functions such as CONCAT to assemble your values into a message. If you need a more complex data format, such as JSON, consider writing a UDx function that accepts columns of data and outputs a LONG VARCHAR containing the data in the format you require. See Developing user-defined extensions (UDxs) for more information.
See KafkaExport for detailed information about KafkaExport's syntax.
Export example
This example shows you how to perform a simple export of several columns of a table. Suppose you have the following table containing a simple set of Internet of things (IOT) data:
=> SELECT * FROM iot_report LIMIT 10;
 server |        date         |       location        |    id
--------+---------------------+-----------------------+----------
      1 | 2016-10-11 04:09:28 | -14.86058, 112.75848  | 70982027
      1 | 2017-07-02 12:37:48 | -21.42197, -127.17672 | 49494918
      1 | 2017-10-19 14:04:33 | -71.72156, -36.27381  | 94328189
      1 | 2018-07-11 19:35:18 | -9.41315, 102.36866   | 48366610
      1 | 2018-08-30 08:09:45 | 83.97962, 162.83848   |   967212
      2 | 2017-01-20 03:05:24 | 37.17372, 136.14026   | 36670100
      2 | 2017-07-29 11:38:37 | -38.99517, 171.72671  | 52049116
      2 | 2018-04-19 13:06:58 | 69.28989, 133.98275   | 36059026
      2 | 2018-08-28 01:09:51 | -59.71784, -144.97142 | 77310139
      2 | 2018-09-14 23:16:15 | 58.07275, 111.07354   |  4198109
(10 rows)

=> \d iot_report
                                       List of Fields by Tables
 Schema |   Table    |  Column  |    Type     | Size | Default | Not Null | Primary Key | Foreign Key
--------+------------+----------+-------------+------+---------+----------+-------------+-------------
 public | iot_report | server   | int         |    8 |         | f        | f           |
 public | iot_report | date     | timestamp   |    8 |         | f        | f           |
 public | iot_report | location | varchar(40) |   40 |         | f        | f           |
 public | iot_report | id       | int         |    8 |         | f        | f           |
(4 rows)
You want to send the data in this table to a Kafka topic named iot_results for consumption by other applications. Looking at the data and the structure of the iot_report, you may decide the following:
-
The server column is a good match for the partitions in iot_report. There are three partitions in the Kafka topic, and the values in server column are between 1 and 3. Suppose the partition column had a larger range of values (for example, between 1 and 100). Then you could use the modulo operator (%) to coerce the values into the same range as the number of partitions (server % 3).
A complication with these values is that the values in the server are 1-based (the lowest value in the column is 1). Kafka's partition numbering scheme is zero-based. So, you must adjust the values in the server column by subtracting 1 from them.
-
The id column can act as the key. This column has a data type of INTEGER. The KafkaExport function expects the key value to be a VARCHAR. Vertica does not automatically cast INTEGER values to VARCHAR, so you must explicitly cast the value in your function call.
-
The consumers of the iot_report topic expect values in comma-separated format. You can combine the values from the date and location columns into a single VARCHAR using nested calls to the CONCAT function.
The final piece of information you need to know is the host names and port numbers of the brokers in your Kafka cluster. In this example, there are two brokers named kafka01 and kafka03, running on port 6667 (the port that Hortonworks clusters use). Once you have all of this information, you are ready to export your data.
The following example shows how you might export the contents of iot_report:
=> SELECT KafkaExport(server - 1, id::VARCHAR,
   CONCAT(CONCAT(date, ', '), location)
   USING PARAMETERS brokers='kafka01:6667,kafka03:6667',
   topic='iot_results') OVER (PARTITION BEST) FROM iot_report;
 partition | key | message | failure_reason
-----------+-----+---------+----------------
(0 rows)
KafkaExport returned 0 rows which means Vertica was able to send all of your data to Kafka without any errors.
Other things to note about the example:
-
The CONCAT function automatically converts the date column's DATETIME value to a VARCHAR for you, so you do not need to explicitly cast it.
-
Two nested CONCAT functions are necessary to concatenate the date field with a comma, and the resulting string with the location field.
-
Adding a third column to the message field would require two additional CONCAT function calls (one to concatenate a comma after the location column, and one to concatenate the additional column's value). Using CONCAT becomes messy after just a few column's worth of data.
On the Kafka side, you will see whatever you sent as the valueColumn (third) argument of the KafkaExport function. In the above example, this is a CSV list. If you started a console consumer for iot_results topic before running the example query, you would see the following output when the query runs:
$ /opt/kafka/bin/kafka-console-consumer.sh --topic iot_results --zookeeper localhost
2017-10-10 12:08:33, 78.84883, -137.56584
2017-12-06 16:50:57, -25.33024, -157.91389
2018-01-12 21:27:39, 82.34027, 116.66703
2018-08-19 00:02:18, 13.00436, 85.44815
2016-10-11 04:09:28, -14.86058, 112.75848
2017-07-02 12:37:48, -21.42197, -127.17672
2017-10-19 14:04:33, -71.72156, -36.27381
2018-07-11 19:35:18, -9.41315, 102.36866
2018-08-30 08:09:45, 83.97962, 162.83848
2017-01-20 03:05:24, 37.17372, 136.14026
2017-07-29 11:38:37, -38.99517, 171.72671
2018-04-19 13:06:58, 69.28989, 133.98275
2018-08-28 01:09:51, -59.71784, -144.97142
2018-09-14 23:16:15, 58.07275, 111.07354
KafkaExport's return value
KafkaExport outputs any rows that Kafka rejected. For example, suppose you forgot to adjust the partition column to be zero-based in the previous example. Then some of the rows exported to Kafka would specify a partition that does not exist. In this case, Kafka rejects these rows, and KafkaExport reports them in table format:
=> SELECT KafkaExport(server, id::VARCHAR,
   CONCAT(CONCAT(date, ', '), location)
   USING PARAMETERS brokers='kafka01:6667,kafka03:6667',
   topic='iot_results') OVER (PARTITION BEST) FROM iot_report;
 partition |   key    |                  message                    |      failure_reason
-----------+----------+---------------------------------------------+--------------------------
         3 | 40492866 | 2017-10-10 12:08:33, 78.84883, -137.56584,  | Local: Unknown partition
         3 | 73846006 | 2017-12-06 16:50:57, -25.33024, -157.91389, | Local: Unknown partition
         3 | 45020829 | 2018-01-12 21:27:39, 82.34027, 116.66703,   | Local: Unknown partition
         3 | 27462612 | 2018-08-19 00:02:18, 13.00436, 85.44815,    | Local: Unknown partition
(4 rows)
Note
Another common reason for Kafka rejecting a row is that its message value is longer than Kafka's message.max.bytessetting.
You can capture this output by creating a table to hold the rejects. Then use an INSERT statement to insert KafkaExport's results:
=> CREATE TABLE export_rejects (partition INTEGER, key VARCHAR, message LONG VARCHAR, failure_reason VARCHAR);
CREATE TABLE
=> INSERT INTO export_rejects SELECT KafkaExport(server, id::VARCHAR,
   CONCAT(CONCAT(date, ', '), location)
   USING PARAMETERS brokers='kafka01:6667,kafka03:6667',
   topic='iot_results') OVER (PARTITION BEST) FROM iot_report;
 OUTPUT
--------
      4
(1 row)
=> SELECT * FROM export_rejects;
 partition |   key    |                  message                   |      failure_reason
-----------+----------+--------------------------------------------+--------------------------
         3 | 27462612 | 2018-08-19 00:02:18, 13.00436, 85.44815    | Local: Unknown partition
         3 | 40492866 | 2017-10-10 12:08:33, 78.84883, -137.56584  | Local: Unknown partition
         3 | 73846006 | 2017-12-06 16:50:57, -25.33024, -157.91389 | Local: Unknown partition
         3 | 45020829 | 2018-01-12 21:27:39, 82.34027, 116.66703   | Local: Unknown partition
(4 rows)
6.2 - Producing Kafka messages using notifiers
You can use notifiers to help you monitor your Vertica database using third-party Kafka-aware tools by producing messages to a Kafka topic.
You can use notifiers to help you monitor your Vertica database using third-party Kafka-aware tools by producing messages to a Kafka topic. You can directly publish messages (for example, from a SQL script to indicate a long-running query has finished). Notifiers can also automatically send messages when a component in the data collector tables is updated.
6.2.1 - Creating a Kafka notifier
The following procedure creates a Kafka notifier.
The following procedure creates a Kafka notifier. At a minimum, a notifier defines:
-
A unique name.
-
A message protocol. This is kafka:// when sending messages to Kafka.
-
The server to communicate with. For Kafka, this is the address and port number of a Kafka broker.
-
The maximum message buffer size. If the queue of messages to be sent via the notifier exceed this limit, messages are dropped.
You create the notifier with CREATE NOTIFIER. This example creates a notifier named load_progress_notifier that sends messages via the Kafka broker running on kafka01.example.com on port 9092:
=> CREATE NOTIFIER load_progress_notifier
    ACTION 'kafka://kafka01.example.com:9092'
    MAXMEMORYSIZE '10M';
While not required, it is best practice to create notifiers that use an encrypted connection. The following example creates a notifier that uses an encrypted connection and verifies the Kafka server's certificate with the provided TLS configurations:
=> CREATE NOTIFIER encrypted_notifier
    ACTION 'kafka://127.0.0.1:9092'
    MAXMEMORYSIZE '10M'
    TLS CONFIGURATION 'notifier_tls_config'
Follow this procedure to create or alter notifiers for Kafka endpoints that use SASL_SSL. Note that you must repeat this procedure whenever you change the TLSMODE, certificates, or CA bundle for a given notifier.
-
Create a TLS Configuration with the desired TLS mode, certificate, and CA certificates.
-
Use CREATE or ALTER to disable the notifier and set the TLS Configuration:
=> ALTER NOTIFIER encrypted_notifier
    DISABLE
    TLS CONFIGURATION kafka_tls_config;
-
ALTER the notifier and set the proper rdkafka adapter parameters for SASL_SSL:
=> ALTER NOTIFIER encrypted_notifier PARAMETERS
    'sasl.username=user;sasl.password=password;sasl.mechanism=PLAIN;security.protocol=SASL_SSL';
-
Enable the notifier:
=> ALTER NOTIFIER encrypted_notifier ENABLE;
6.2.2 - Sending individual messages via a Kafka notifier
You can send an individual message via a Kafka notifier using the NOTIFY function.
You can send an individual message via a Kafka notifier using the NOTIFY function. This feature is useful for reporting the progress of SQL scripts such as ETL tasks to third-party reporting tools.
You pass this function three string values:
For example, suppose you want to send the message "Daily load finished" to the vertica_notifications topic of the Kafka cluster defined in the load_progress_notifier notifier created earlier. Then you could execute the following statement:
=> SELECT NOTIFY('Daily load finished.',
                 'load_progress_notifier',
                 'vertica_notifications');
 NOTIFY
--------
 OK
(1 row)
The message the notifier sends to Kafka is in JSON format. You can see the resulting message by using the console consumer on a Kafka node. For example:
$ /opt/kafka/bin/kafka-console-consumer.sh --bootstrap-server localhost:9092 \
                                           --from-beginning \
                                           --topic vertica_notifications \
                                           --max-messages 1

{"_db":"vmart","_schema":"v_internal","_table":"dc_notifications",
"channel":"vertica_notifications","message":"Daily load finished.",
"node_name":"v_vmart_node0001","notifier":"load_progress_notifier",
"request_id":2,"session_id":"v_vmart_node0001-463079:0x4ba6f",
"statement_id":-1,"time":"2018-06-19 09:48:42.314181-04",
"transaction_id":45035996275565458,"user_id":45035996273704962,
"user_name":"dbadmin"}

Processed a total of 1 messages
6.2.3 - Monitoring DC tables with Kafka notifiers
The Vertica (DC) tables monitor many different database functions.
The Vertica Data collector (DC) tables monitor many different database functions. You can have a notifier automatically send a message to a Kafka endpoint when a DC component updates. You can query the DATA_COLLECTOR table to get a list of the DC components.
You configure the notifier to send DC component updates to Kafka using the function SET_DATA_COLLECTOR_NOTIFY_POLICY.
To be notified of failed login attempts, you can create a notifier that sends a notification when the DC component LoginFailures updates. The TLSMODE 'verify-ca' verifies that the server's certificate is signed by a trusted CA.
=> CREATE NOTIFIER vertica_stats ACTION 'kafka://kafka01.example.com:9092' MAXMEMORYSIZE '10M' TLSMODE 'verify-ca';
CREATE NOTIFIER
=> SELECT SET_DATA_COLLECTOR_NOTIFY_POLICY('LoginFailures','vertica_stats', 'vertica_notifications', true);
SET_DATA_COLLECTOR_NOTIFY_POLICY
----------------------------------
 SET
(1 row)
Like the messages sent via the NOTIFY function, the data sent to Kafka from the DC components is in JSON format. The previous example results in messages like the following being sent to the vertica_notifications Kafka topic:
{"_db":"vmart","_schema":"v_internal","_table":"dc_login_failures",
"authentication_method":"Reject","client_authentication_name":"",
"client_hostname":"::1","client_label":"","client_os_user_name":"dbadmin",
"client_pid":481535,"client_version":"","database_name":"alice",
"effective_protocol":"3.8","node_name":"v_vmart_node0001",
"reason":"INVALID USER","requested_protocol":"3.8","ssl_client_fingerprint":"",
"time":"2018-06-19 14:51:22.437035-04","user_name":"alice"}
Viewing notification policies for a DC component
Use the GET_DATA_COLLECTOR_NOTIFY_POLICY function to list the policies set for a DC component.
=> SELECT GET_DATA_COLLECTOR_NOTIFY_POLICY('LoginFailures');
                   GET_DATA_COLLECTOR_NOTIFY_POLICY
----------------------------------------------------------------------
 Notifiable;  Notifier: vertica_stats; Channel: vertica_notifications
(1 row)
Disabling a notification policy
You can call SET_DATA_COLLECTOR_NOTIFY_POLICY function with its fourth argument set to FALSE to disable a notification policy. The following example disables the notify policy for the LoginFailures component:
=> SELECT SET_DATA_COLLECTOR_NOTIFY_POLICY('LoginFailures','vertica_stats', 'vertica_notifications', false);
 SET_DATA_COLLECTOR_NOTIFY_POLICY
----------------------------------
 SET
(1 row)
=> SELECT GET_DATA_COLLECTOR_NOTIFY_POLICY('LoginFailures');
 GET_DATA_COLLECTOR_NOTIFY_POLICY
----------------------------------
 Not notifiable;
(1 row)
7 - TLS/SSL encryption with Kafka
You can use TLS/SSL encryption between Vertica, your scheduler, and Kakfa.
You can use TLS/SSL encryption between Vertica, your scheduler, and Kakfa. This encryption prevents others from accessing the data that is sent between Kafka and Vertica. It can also verify the identity of all parties involved in data streaming, so no impostor can pose as your Vertica cluster or a Kafka broker.
Note
Many people often confuse the terms TLS and SSL. SSL is an older encryption protocol that has been largely replace with the newer and more secure TLS standard. However, many people still use the term SSL to refer to encryption between servers and applications , even when that encryption is actually TLS. For example, Java and Kafka use the term SSL exclusively, even when dealing with TLS. This document uses SSL/TLS and SSL interchangeably.
Some common cases where you want to use SSL encryption between Vertica and Kafka are:
-
Your Vertica database and Kafka communicate over an insecure network. For example, suppose your Kafka cluster is located in a cloud service and your Vertica cluster is within your internal network. In this case, any data you read from Kafka travels over an insecure connection across the Internet.
-
You are required by security policies, laws, or other requirements to encrypt all of your network traffic.
For more information about TLS/SSL encryption in Vertica, see TLS protocol.
Using TLS/SSL between the scheduler and Vertica
The scheduler connects to Vertica the same way other client applications do. There are two ways you can configure Vertica to use SSL/TLS authentication and encryption with clients:
-
If Vertica is configured to use SSL/TLS server authentication, you can choose to have your scheduler confirm the identity of the Vertica server.
-
If Vertica is configured to use mutual SSL/TLS authentication, you can configure your scheduler identify itself to Vertica as well as have it verify the identity of the Vertica server. Depending on your database's configuration, the Vertica server may require your scheduler to use TLS when connecting. See Client authentication with TLS for more information.
For information on encrypted client connections with Vertica, refer to TLS protocol.
The scheduler runs on a Java Virtual Machine (JVM) and uses JDBC to connect to Vertica. It acts like any other JDBC client when connecting to Vertica. To use TLS/SSL encryption for the scheduler's connection to Vertica, use the Java keystore and truststore mechanism to hold the keys and certificates the scheduler uses to identify itself and Vertica.
-
The keystore contains your scheduler's private encryption key and its certificate (public key).
-
The truststore contains CAs that you trust. If you enable authentication, the scheduler uses these CAs to verify the identity of the Vertica cluster it connects to. If one of the CAs in the trust store was used to sign the server's certificate, then the Scheduler knows it can trust the identity of the Vertica server.
You can pass options to the JVM that executes the scheduler through the Linux environment variable named VKCONFIG_JVM_OPTS. You add the parameters to this variable that alter the scheduler's JDBC settings (such as the truststore and keystore for the scheduler's JDBC connection). See Step 2: Set the VKCONFIG_JVM_OPTS Environment Variable for an example.
You can also use the --jdbc-url scheduler option to alter the JDBC configuration. See Common vkconfig script options for more information about the scheduler options and JDBC connection properties for more information about the properties they can alter.
Using TLS/SSL between Vertica and Kafka
You can stream data from Kafka into Vertica two ways: manually using a COPY statement and the KafkaSource UD source function, or automatically using the scheduler.
To directly copy data from Kafka via an SSL connection, you set session variables containing an SSL key and certificate. When KafkaSource finds that you have set these variables, it uses the key and certificate to create a secure connection to Kafka. See Kafka TLS/SSL Example Part 4: Loading Data Directly From Kafka for details.
When automatically streaming data from Kafka to Vertica, you configure the scheduler the same way you do to use an SSL connection to Vertica. When the scheduler executes COPY statements to load data from Kafka, it uses its own keystore and truststore to create an SSL connection to Kafka.
To use an SSL connection when producing data from Vertica to Kafka, you set the same session variables you use when directly streaming data from Kafka via an SSL connection. The KafkaExport function uses these variables to establish a secure connection to Kafka.
Note
Notifiers do not currently support using TLS/SSL connections.
See the Apache Kafka documentation for more information about using SSL/TLS authentication with Kafka.
7.1 - Planning TLS/SSL encryption between Vertica and Kafka
Some things to consider before you begin configuring TLS/SSL:.
Some things to consider before you begin configuring TLS/SSL:
-
Which connections between the scheduler, Vertica, and Kafka needs to be encrypted? In some cases, you may only need to enable encryption between Vertica and Kafka. This scenario is common when Vertica and the Kafka cluster are on different networks. For example, suppose Kafka is hosted in a cloud provider and Vertica is hosted in your internal network. Then the data must travel across the unsecured Internet between the two. However, if Vertica and the scheduler are both in your local network, you may decide that configuring them to use SSL/TLS is unnecessary. In other cases, you will want all parts of the system to be encrypted. For example, you want to encrypt all traffic when Kafka, Vertica, and the scheduler are all hosted in a cloud provider whose network may not be secure.
-
Which connections between the scheduler, Vertica, and Kafka require trust? You can opt to have any of these connections fail if one system cannot verify the identity of another. See Verifying Identities below.
-
Which CAs will you be using to sign each certificate? The simplest way to configure the scheduler, Kafka, and Vertica is to use the same CA to sign all of the certificates you will use when setting up TLS/SSL. Using the same root CA to sign the certificates requires you to be able to edit the configuration of Kafka, Vertica, and the scheduler. If you cannot use the same CA to sign all certificates, all truststores must contain the entire chain of CAs used to sign the certificates, all the way up to the root CA. Including the entire chain of trust ensures each system can verify each other's identities.
Verifying identities
Your primary challenge when configuring TLS/SSL encryption between Vertica, the scheduler, and Kafka is making sure the scheduler, Kafka, and Vertica can all verify each other's identity. The most common problem people have encountered when setting up TLS/SSL encryption is ensuring the remote system can verify the authenticity of a system's certificate. The best way to prevent this problem is to ensure that the all systems have their certificates signed by a CA that all of the systems explicitly trust.
When a system attempts to start an encrypted connection with another system, it sends its certificate to the remote system. This certificate can be signed by one or more Certificate Authorities (CA) that help identify the system making the connection. These signatures form a "chain of trust." A certificate is signed by a CA. That CA, in turn, could have been signed by another CA, and so forth. Often, the chain ends with a CA (referred to as the root CA) from a well-known commercial provider of certificates, such as Comodo SSL or DigiCert, that are trusted by default on many platforms such as operating systems and web browsers.
If the remote system finds a CA in the chain that it trusts, it verifies the identity of the system making the connection, and the connection can continue. If the remote system cannot find the signature of a CA it trusts, it may block the connection, depending on its configuration. Systems can be configured to only allow connections from systems whose identity has been verified.
Note
Verifying the identity of another system making a TLE/SSL connection is often referred to as "authentication." Do not confuse this use of authentication with other forms of authentication used with Vertica. For example, TLS/SSL's authentication of a client connection has nothing to do with Vertica user authentication. Even if you successfully establish a TLS/SSL connection to Vertica using a client, Vertica still requires you to provide a user name and password before you can interact with it.
7.2 - Configuring your scheduler for TLS connections
The scheduler can use TLS for two different connections: the one it makes to Vertica, and the connection it creates when running COPY statements to retrieve data from Kafka.
The scheduler can use TLS for two different connections: the one it makes to Vertica, and the connection it creates when running COPY statements to retrieve data from Kafka. Because the scheduler is a Java application, you supply the TLS key and the certificate used to sign it in a keystore. You also supply a truststore that contains in the certificates that the scheduler should trust. Both the connection to Vertica and to Kafka can use the same keystore and truststore. You can also choose to use separate keystores and truststores for these two connections by setting different JDBC settings for the scheduler. See JDBC connection properties for a list of these settings.
See Kafka TLS-SSL Example Part 5: Configure the Scheduler for detailed steps on configuring your scheduler to use SSL.
Important
If you choose to use a file format other than the standard Java Keystore (JKS) format for your keystore or truststore files, you must use the correct file extension in the filename. For example, suppose you choose to use a keystore and truststore saved in PKCS#12 format. Then your keystore and trustore files must end with the .pfx or .p12 extension.
If the scheduler does not recognize the file's extension (or there is no extension in the file name), it assumes that the file is in JKS format. If the file is not in JKS format, you will see an error message when starting the scheduler, similar to "Failed to create an SSLSocketFactory when setting up TLS: keystore not found."
Note that if the Kafka server's parameter client.ssl.auth is set to none or requested, you do not need to create a keystore.
7.3 - Using TLS/SSL when directly loading data from Kafka
You can manually load data from Kafka using the COPY statement and the KafkaSource user-defined load function (see Manually Copying Data From Kafka).
You can manually load data from Kafka using the COPY statement and the KafkaSource user-defined load function (see Manually consume data from Kafka). To have KafkaSource open a secure connection to Kafka, you must supply it with an SSL key and other information.
When starting, the KafkaSource function checks if several user session variables are defined. These variables contain the SSL key, the certificate used to sign the key, and other information that the function needs to create the SSL connection. See Kafka user-defined session parameters for a list of these variables. If KafkaSource finds these variables are defined, it uses them to create an SSL connection to Kafka.
See Kafka TLS/SSL Example Part 4: Loading Data Directly From Kafka for a step-by-step guide on configuring and using an SSL connection when directly copying data from Kafka.
These variables are also used by the KafkaExport function to establish a secure connection to Kafka when exporting data.
7.4 - Configure Kafka for TLS
This page covers procedures for configuring TLS connections Vertica, Kafka, and the scheduler.
This page covers procedures for configuring TLS connections Vertica, Kafka, and the scheduler.
Note that the following example configures TLS for a Kafka server where ssl.client.auth=required, which requires the following:
-
kafka_SSL_Certificate
-
kafka_SSL_PrivateKey_secret
-
kafka_SSL_PrivateKeyPassword_secret
-
A keystore for the Scheduler
If your configuration uses ssl.client.auth=none or ssl.client.auth=requested, these parameters and the scheduler keystore are optional.
Creating certificates for Vertica and clients
The CA certificate in this example is self-signed. In a production environment, you should instead use a trusted CA.
This example uses the same self-signed root CA to sign all of the certificates used by the scheduler, Kafka brokers, and Vertica. If you cannot use the same CA to sign the keys for all of these systems, make sure you include the entire chain of trust in your keystores.
For more information, see Generating TLS certificates and keys.
-
Generate a private key, root.key.
$ openssl genrsa -out root.key
Generating RSA private key, 2048 bit long modulus
..............................................................................
............................+++
...............+++
e is 65537 (0x10001)
-
Generate a self-signed CA certificate.
$ openssl req -new -x509 -key root.key -out root.crt
You are about to be asked to enter information that will be incorporated
into your certificate request.
What you are about to enter is what is called a Distinguished Name or a DN.
There are quite a few fields but you can leave some blank
For some fields there will be a default value,
If you enter '.', the field will be left blank.
-----
Country Name (2 letter code) [AU]:US
State or Province Name (full name) [Some-State]:MA
Locality Name (eg, city) []:Cambridge
Organization Name (eg, company) [Internet Widgits Pty Ltd]:My Company
Organizational Unit Name (eg, section) []:
Common Name (e.g. server FQDN or YOUR name) []:*.mycompany.com
Email Address []:myemail@mycompany.com
-
Restrict to the owner read/write permissions for root.key and root.crt. Grant read permissions to other groups for root.crt.
$ ls
root.crt  root.key
$ chmod 600 root.key
$ chmod 644 root.crt
-
Generate the server private key, server.key.
$ openssl genrsa -out server.key
Generating RSA private key, 2048 bit long modulus
....................................................................+++
......................................+++
e is 65537 (0x10001)
-
Create a certificate signing request (CSR) for your CA. Be sure to set the "Common Name" field to a wildcard (asterisk) so the certificate is accepted for all Vertica nodes in the cluster:
$ openssl req -new -key server.key -out server_reqout.txt
You are about to be asked to enter information that will be incorporated
into your certificate request.
What you are about to enter is what is called a Distinguished Name or a DN.
There are quite a few fields but you can leave some blank
For some fields there will be a default value,
If you enter '.', the field will be left blank.
-----
Country Name (2 letter code) [AU]:US
State or Province Name (full name) [Some-State]:MA
Locality Name (eg, city) []:Cambridge
Organization Name (eg, company) [Internet Widgits Pty Ltd]:My Company
Organizational Unit Name (eg, section) []:
Common Name (e.g. server FQDN or YOUR name) []:*.mycompany.com
Email Address []:myemail@mycompany.com

Please enter the following 'extra' attributes
to be sent with your certificate request
A challenge password []: server_key_password
An optional company name []:
-
Sign the server certificate with your CA. This creates the server certificate server.crt.
$ openssl x509 -req -in server_reqout.txt -days 3650 -sha1 -CAcreateserial -CA root.crt \
    -CAkey root.key -out server.crt
    Signature ok
    subject=/C=US/ST=MA/L=Cambridge/O=My Company/CN=*.mycompany.com/emailAddress=myemail@mycompany.com
    Getting CA Private Key
-
Set the appropriate permissions for the key and certificate.
$ chmod 600 server.key
$ chmod 644 server.crt
Create a client key and certificate (mutual mode only)
In Mutual Mode, clients and servers verify each other's certificates before establishing a connection. The following procedure creates a client key and certificate to present to Vertica. The certificate must be signed by a CA that Vertica trusts.
The steps for this are identical to those above for creating a server key and certificate for Vertica.
$ openssl genrsa -out client.key
Generating RSA private key, 2048 bit long modulus
................................................................+++
..............................+++
e is 65537 (0x10001)

$ openssl req -new -key client.key -out client_reqout.txt
You are about to be asked to enter information that will be incorporated
into your certificate request.
What you are about to enter is what is called a Distinguished Name or a DN.
There are quite a few fields but you can leave some blank
For some fields there will be a default value,
If you enter '.', the field will be left blank.
-----
Country Name (2 letter code) [AU]:US
State or Province Name (full name) [Some-State]:MA
Locality Name (eg, city) []:Cambridge
Organization Name (eg, company) [Internet Widgits Pty Ltd]:My Company
Organizational Unit Name (eg, section) []:
Common Name (e.g. server FQDN or YOUR name) []:*.mycompany.com
Email Address []:myemail@mycompany.com

Please enter the following 'extra' attributes
to be sent with your certificate request
A challenge password []: server_key_password
An optional company name []:

$ openssl x509 -req -in client_reqout.txt -days 3650 -sha1 -CAcreateserial -CA root.crt \
  -CAkey root.key -out client.crt
Signature ok
subject=/C=US/ST=MA/L=Cambridge/O=My Company/CN=*.mycompany.com/emailAddress=myemail@mycompany.com
Getting CA Private Key

$ chmod 600 client.key
$ chmod 644 client.crt
Set up mutual mode client-server TLS
The following keys and certificates must be imported and then distributed to the nodes on your Vertica cluster with TLS Configuration for Mutual Mode:
-
root.key
-
root.crt
-
server.key
-
server.crt
You can view existing keys and certificates by querying CRYPTOGRAPHIC_KEYS and CERTIFICATES.
-
Import the server and root keys and certificates into Vertica with CREATE KEY and CREATE CERTIFICATE. See Generating TLS certificates and keys for details.
=> CREATE KEY imported_key TYPE 'RSA' AS '-----BEGIN PRIVATE KEY-----...-----END PRIVATE KEY-----';
=> CREATE CA CERTIFICATE imported_ca AS '-----BEGIN CERTIFICATE-----...-----END CERTIFICATE-----';
=> CREATE CERTIFICATE imported_cert AS '-----BEGIN CERTIFICATE-----...-----END CERTIFICATE-----';
In this example, \set is used to retrieve the contents of root.key, root.crt, server.key, and server.crt.
=> \set ca_cert ''''`cat root.crt`''''
=> \set serv_key ''''`cat server.key`''''
=> \set serv_cert ''''`cat server.crt`''''

=> CREATE CA CERTIFICATE root_ca AS :ca_cert;
CREATE CERTIFICATE
=> CREATE KEY server_key TYPE 'RSA' AS :serv_key;
CREATE KEY
=> CREATE CERTIFICATE server_cert AS :serv_cert;
CREATE CERTIFICATE
-
Follow the steps for Mutual Mode in Configuring client-server TLS to set the proper TLSMODE and TLS Configuration parameters.
Clients must have their private key, certificate, and CA certificate. The certificate will be presented to Vertica when establishing a connection, and the CA certificate will be used to verify the server certificate from Vertica.
This example configures the vsql client for mutual mode.
-
Create a .vsql directory in the user's home directory.
$ mkdir ~/.vsql
-
Copy client.key, client.crt, and root.crt to the vsql directory.
$ cp client.key client.crt root.crt ~/.vsql
-
Log into Vertica with vsql and query the SESSIONS system table to verify that the connection is using mutual mode:
$ vsql
Password: user-password
Welcome to vsql, the Vertica Analytic Database interactive terminal.

Type:  \h or \? for help with vsql commands
       \g or terminate with semicolon to execute query
       \q to quit

SSL connection (cipher: DHE-RSA-AES256-GCM-SHA384, bits: 256, protocol: TLSv1.2)

=> select user_name,ssl_state from sessions;
 user_name | ssl_state
-----------+-----------
 dbadmin   | Mutual
(1 row)
This procedure configures Kafka to use TLS with client connections. You can also configure Kafka to use TLS to communicate between brokers. However, inter-broker TLS has no impact on establishing an encrypted connection between Vertica and Kafka.
-
Create a truststore file for all of your Kafka brokers, importing your CA certificate. This example uses the self-signed root.crt created above.
=> $ keytool -keystore kafka.truststore.jks -alias CARoot -import \
               -file root.crt
Enter keystore password: some_password
Re-enter new password: some_password
Owner: EMAILADDRESS=myemail@mycompany.com, CN=*.mycompany.com, O=MyCompany, L=Cambridge, ST=MA, C=US
Issuer: EMAILADDRESS=myemail@mycompany.com, CN=*.mycompany.com, O=MyCompany, L=Cambridge, ST=MA, C=US
Serial number: c3f02e87707d01aa
Valid from: Fri Mar 22 13:37:37 EDT 2019 until: Sun Apr 21 13:37:37 EDT 2019
Certificate fingerprints:
         MD5:  73:B1:87:87:7B:FE:F1:6E:94:55:FD:AF:5D:D0:C3:0C
         SHA1: C0:69:1C:93:54:21:87:C7:03:93:FE:39:45:66:DE:22:18:7E:CD:94
         SHA256: 23:03:BB:B7:10:12:50:D9:C5:D0:B7:58:97:41:1E:0F:25:A0:DB:
                 D0:1E:7D:F9:6E:60:8F:79:A6:1C:3F:DD:D5
Signature algorithm name: SHA256withRSA
Subject Public Key Algorithm: 2048-bit RSA key
Version: 3

Extensions:

#1: ObjectId: 2.5.29.35 Criticality=false
AuthorityKeyIdentifier [
KeyIdentifier [
0000: 50 69 11 64 45 E9 CC C5   09 EE 26 B5 3E 71 39 7C  Pi.dE.....&.>q9.
0010: E5 3D 78 16                                        .=x.
]
]

#2: ObjectId: 2.5.29.19 Criticality=false
BasicConstraints:[
  CA:true
  PathLen:2147483647
]

#3: ObjectId: 2.5.29.14 Criticality=false
SubjectKeyIdentifier [
KeyIdentifier [
0000: 50 69 11 64 45 E9 CC C5   09 EE 26 B5 3E 71 39 7C  Pi.dE.....&.>q9.
0010: E5 3D 78 16                                        .=x.
]
]

Trust this certificate? [no]:  yes
Certificate was added to keystore
-
Create a keystore file for the Kafka broker named kafka01. Each broker's keystore should be unique.
The keytool command adds the a Subject Alternative Name (SAN) used as a fallback when establishing a TLS connection. Use your Kafka' broker's fully-qualified domain name (FQDN) as the value for the SAN and "What is your first and last name?" prompt.
In this example, the FQDN is kafka01.example.com. The alias for keytool is set to localhost, so local connections to the broker use TLS.
$ keytool -keystore kafka01.keystore.jks -alias localhost -validity 365 -genkey -keyalg RSA \
      -ext SAN=DNS:kafka01.mycompany.com
Enter keystore password: some_password
Re-enter new password: some_password
What is your first and last name?
  [Unknown]:  kafka01.mycompany.com
What is the name of your organizational unit?
  [Unknown]:
What is the name of your organization?
  [Unknown]: MyCompany
What is the name of your City or Locality?
  [Unknown]:  Cambridge
What is the name of your State or Province?
  [Unknown]:  MA
What is the two-letter country code for this unit?
  [Unknown]:  US
Is CN=Database Admin, OU=MyCompany, O=Unknown, L=Cambridge, ST=MA, C=US correct?
  [no]:  yes

Enter key password for <localhost>
        (RETURN if same as keystore password):
-
Export the Kafka broker's certificate. In this example, the certificate is exported as kafka01.unsigned.crt.
$ keytool -keystore kafka01.keystore.jks -alias localhost \
                -certreq -file kafka01.unsigned.crt
 Enter keystore password: some_password
-
Sign the broker's certificate with the CA certificate.
$ openssl x509 -req -CA root.crt -CAkey root.key -in kafka01.unsigned.crt \
             -out kafka01.signed.crt -days 365 -CAcreateserial
Signature ok
subject=/C=US/ST=MA/L=Cambridge/O=Unknown/OU=MyCompany/CN=Database Admin
Getting CA Private Key
-
Import the CA certificate into the broker's keystore.
Note
If you use different CAs to sign the certificates in your environment, you must add the entire chain of CAs you used to sign your certificate to the keystore, all the way up to the root CA. Including the entire chain of trust helps other systems verify the identity of your Kafka broker.
$ keytool -keystore kafka01.keystore.jks -alias CARoot -import -file root.crt
Enter keystore password: some_password
Owner: EMAILADDRESS=myemail@mycompany.com, CN=*.mycompany.com, O=MyCompany, L=Cambridge, ST=MA, C=US
Issuer: EMAILADDRESS=myemail@mycompany.com, CN=*.mycompany.com, O=MyCompany, L=Cambridge, ST=MA, C=US
Serial number: c3f02e87707d01aa
Valid from: Fri Mar 22 13:37:37 EDT 2019 until: Sun Apr 21 13:37:37 EDT 2019
Certificate fingerprints:
         MD5:  73:B1:87:87:7B:FE:F1:6E:94:55:FD:AF:5D:D0:C3:0C
         SHA1: C0:69:1C:93:54:21:87:C7:03:93:FE:39:45:66:DE:22:18:7E:CD:94
         SHA256: 23:03:BB:B7:10:12:50:D9:C5:D0:B7:58:97:41:1E:0F:25:A0:DB:D0:1E:7D:F9:6E:60:8F:79:A6:1C:3F:DD:D5
Signature algorithm name: SHA256withRSA
Subject Public Key Algorithm: 2048-bit RSA key
Version: 3

Extensions:

#1: ObjectId: 2.5.29.35 Criticality=false
AuthorityKeyIdentifier [
KeyIdentifier [
0000: 50 69 11 64 45 E9 CC C5   09 EE 26 B5 3E 71 39 7C  Pi.dE.....&.>q9.
0010: E5 3D 78 16                                        .=x.
]
]

#2: ObjectId: 2.5.29.19 Criticality=false
BasicConstraints:[
  CA:true
  PathLen:2147483647
]

#3: ObjectId: 2.5.29.14 Criticality=false
SubjectKeyIdentifier [
KeyIdentifier [
0000: 50 69 11 64 45 E9 CC C5   09 EE 26 B5 3E 71 39 7C  Pi.dE.....&.>q9.
0010: E5 3D 78 16                                        .=x.
]
]

Trust this certificate? [no]:  yes
Certificate was added to keystore
-
Import the signed Kafka broker certificate into the keystore.
$ keytool -keystore kafka01.keystore.jks -alias localhost \
                -import -file kafka01.signed.crt
Enter keystore password: some_password
Owner: CN=Database Admin, OU=MyCompany, O=Unknown, L=Cambridge, ST=MA, C=US
Issuer: EMAILADDRESS=myemail@mycompany.com, CN=*.mycompany.com, O=MyCompany, L=Cambridge, ST=MA, C=US
Serial number: b4bba9a1828ecaaf
Valid from: Tue Mar 26 12:26:34 EDT 2019 until: Wed Mar 25 12:26:34 EDT 2020
Certificate fingerprints:
            MD5:  17:EA:3E:15:B4:15:E9:93:67:EE:59:C0:4F:D1:4C:01
            SHA1: D5:35:B7:F7:44:7C:D6:B4:56:6F:38:2D:CD:3A:16:44:19:C1:06:B7
            SHA256: 25:8C:46:03:60:A7:4C:10:A8:12:8E:EA:4A:FA:42:1D:A8:C5:FB:65:81:74:CB:46:FD:B1:33:64:F2:A3:46:B0
Signature algorithm name: SHA256withRSA
Subject Public Key Algorithm: 2048-bit RSA key
Version: 1
Trust this certificate? [no]:  yes
Certificate was added to keystore
-
If you are not logged into the Kafka broker for which you prepared the keystore, copy the truststore and keystore to it using scp. If you have already decided where to store the keystore and truststore files in the broker's filesystem, you can directly copy them to their final destination. This example just copies them to the root user's home directory temporarily. The next step moves them into their final location.
$ scp kafka.truststore.jks kafka01.keystore.jks root@kafka01.mycompany.com:
root@kafka01.mycompany.com's password: root_password
kafka.truststore.jks                              100% 1048     1.0KB/s   00:00
kafka01.keystore.jks                              100% 3277     3.2KB/s   00:00
-
Repeat steps 2 through 7 for the remaining Kafka brokers.
Allow Kafka to read the keystore and truststore
If you did not copy the truststore and keystore to directory where Kafka can read them in the previous step, you must copy them to a final location on the broker. You must also allow the user account you use to run Kafka to read these files. The easiest way to ensure the user's access is to give this user ownership of these files.
In this example, Kafka is run by a Linux user kafka. If you use another user to run Kafka, be sure to set the permissions on the truststore and keystore files appropriately.
-
Log into the Kafka broker as root.
-
Copy the truststore and keystore to a directory where Kafka can access them. There is no set location for these files: you can choose a directory under /etc, or some other location where configuration files are usually stored. This example copies them from root's home directory to Kafka's configuration directory named /opt/kafka/config/. In your own system, this configuration directory may be in a different location depending on how you installed Kafka.
~# cd /opt/kafka/config/
/opt/kafka/config# cp /root/kafka01.keystore.jks /root/kafka.truststore.jks .
-
If you aren't logged in as a user account that runs Kafka, change the ownership of the truststore and keystore files. This example changes the ownership from root (which is the user currently logged in) to the kafka user:
/opt/kafka/config# ls -l
total 80
...
-rw-r--r-- 1 kafka nogroup 1221 Feb 21  2018 consumer.properties
-rw------- 1 root  root    3277 Mar 27 08:03 kafka01.keystore.jks
-rw-r--r-- 1 root  root    1048 Mar 27 08:03 kafka.truststore.jks
-rw-r--r-- 1 kafka nogroup 4727 Feb 21  2018 log4j.properties
...
/opt/kafka/config# chown kafka kafka01.keystore.jks kafka.truststore.jks
/opt/kafka/config# ls -l
total 80
...
-rw-r--r-- 1 kafka nogroup 1221 Feb 21  2018 consumer.properties
-rw------- 1 kafka root    3277 Mar 27 08:03 kafka01.keystore.jks
-rw-r--r-- 1 kafka root    1048 Mar 27 08:03 kafka.truststore.jks
-rw-r--r-- 1 kafka nogroup 4727 Feb 21  2018 log4j.properties
...
-
Repeat steps 1 through 3 for the remaining Kafka brokers.
With the truststore and keystore in place, your next step is to edit the Kafka's server.properties configuration file to tell Kafka to use TLS/SSL encryption. This file is usually stored in the Kafka config directory. The location of this directory depends on how you installed Kafka. In this example, the file is located in /opt/kafka/config.
When editing the files, be sure you do not change their ownership. The best way to ensure Linux does not change the file's ownership is to use su to become the user account that runs Kafka, assuming you are not already logged in as that user:
$ /opt/kafka/config# su -s /bin/bash kafka
Note
The previous command lets you start a shell as the kafka system user even if that user cannot log in.
The server.properties file contains Kafka broker settings in a property=value format. To configure the Kafka broker to use SSL, alter or add the following property settings:
listeners- Host names and ports on which the Kafka broker listens. If you are not using SSL for connections between brokers, you must supply both a PLANTEXT and SSL option. For example:
listeners=PLAINTEXT://hostname:9092,SSL://hostname:9093
ssl.keystore.location- Absolute path to the keystore file.
ssl.keystore.password- Password for the keystore file.
ssl.key.password- Password for the Kafka broker's key in the keystore. You can make this password different than the keystore password if you choose.
ssl.truststore.location- Location of the truststore file.
ssl.truststore.password- Password to access the truststore.
ssl.enabled.protocols- TLS/SSL protocols that Kafka allows clients to use.
ssl.client.auth- Specifies whether SSL authentication is required or optional. The most secure setting for this setting is required to verify the client's identity.
Important
These settings vary depending on your version of Kafka. Always consult the
Apache Kafka documentation for your version of Kafka before making changes to
server.properties. In particular, be aware that Kafka version 2.0 and later enables host name verification for clients and inter-broker communications by default.
This example configures Kafka to verify client identities via SSL authentication. It does not use SSL to communicate with other brokers, so the server.properties file defines both SSL and PLAINTEXT listener ports. It does not supply a host name for listener ports which tells Kafka to listen on the default network interface.
The lines added to the kafka01 broker's copy of server.properties for this configuration are:
listeners=PLAINTEXT://:9092,SSL://:9093
ssl.keystore.location=/opt/kafka/config/kafka01.keystore.jks
ssl.keystore.password=vertica
ssl.key.password=vertica
ssl.truststore.location=/opt/kafka/config/kafka.truststore.jks
ssl.truststore.password=vertica
ssl.enabled.protocols=TLSv1.2,TLSv1.1,TLSv1
ssl.client.auth=required
You must make these changes to the server.properties file on all of your brokers.
After making your changes to your broker's server.properties files, restart Kafka. How you restart Kafka depends on your installation:
-
If Kafka is running as part of a Hadoop cluster, you can usually restart it from within whatever interface you use to control Hadoop (such as Ambari).
-
If you installed Kafka directly, you can restart it either by directly running the kafka-server-stop.sh and kafka-server-start.sh scripts or via the Linux system's service control commands (such as systemctl). You must run this command on each broker.
Test the configuration
If you have not configured client authentication, you can quickly test whether Kafka can access its keystore by running the command:
$ openssl s_client -debug -connect broker_host_name:9093 -tls1
If Kafka is able to access its keystore, this command will output a dump of the broker's certificate (exit with CTRL+C):
=> # openssl s_client -debug -connect kafka01.mycompany.com:9093 -tls1
CONNECTED(00000003)
write to 0xa4e4f0 [0xa58023] (197 bytes => 197 (0xC5))
0000 - 16 03 01 00 c0 01 00 00-bc 03 01 76 85 ed f0 fe   ...........v....
0010 - 60 60 7e 78 9d d4 a8 f7-e6 aa 5c 80 b9 a7 37 61   ``~x......\...7a
0020 - 8e 04 ac 03 6d 52 86 f5-84 4b 5c 00 00 62 c0 14   ....mR...K\..b..
0030 - c0 0a 00 39 00 38 00 37-00 36 00 88 00 87 00 86   ...9.8.7.6......
0040 - 00 85 c0 0f c0 05 00 35-00 84 c0 13 c0 09 00 33   .......5.......3
0050 - 00 32 00 31 00 30 00 9a-00 99 00 98 00 97 00 45   .2.1.0.........E
0060 - 00 44 00 43 00 42 c0 0e-c0 04 00 2f 00 96 00 41   .D.C.B...../...A
0070 - c0 11 c0 07 c0 0c c0 02-00 05 00 04 c0 12 c0 08   ................
0080 - 00 16 00 13 00 10 00 0d-c0 0d c0 03 00 0a 00 ff   ................
0090 - 01 00 00 31 00 0b 00 04-03 00 01 02 00 0a 00 1c   ...1............
00a0 - 00 1a 00 17 00 19 00 1c-00 1b 00 18 00 1a 00 16   ................
00b0 - 00 0e 00 0d 00 0b 00 0c-00 09 00 0a 00 23 00 00   .............#..
00c0 - 00 0f 00 01 01                                    .....
read from 0xa4e4f0 [0xa53ad3] (5 bytes => 5 (0x5))
0000 - 16 03 01 08 fc                                    .....
             . . .
The above method is not conclusive, however; it only tells you if Kafka is able to find its keystore.
The best test of whether Kafka is able to accept TLS connections is to configure the command-line Kafka producer and consumer. In order to configure these tools, you must first create a client keystore. These steps are identical to creating a broker keystore.
Note
This example assumes that Kafka has a topic named test that you can send test messages to.
-
Create the client keystore:
keytool -keystore client.keystore.jks -alias localhost -validity 365 -genkey -keyalg RSA -ext SAN=DNS:fqdn_of_client_system
-
Respond to the "What is your first and last name?" with the FQDN of the system you will use to run the producer and/or consumer. Answer the rest of the prompts with the details of your organization.
-
Export the client certificate so it can be signed:
keytool -keystore client.keystore.jks -alias localhost -certreq -file client.unsigned.cert
-
Sign the client certificate with the root CA:
openssl x509 -req -CA root.crt -CAkey root.key -in client.unsigned.cert -out client.signed.cert \
        -days 365 -CAcreateserial
-
Add the root CA to keystore:
keytool -keystore client.keystore.jks -alias CARoot -import -file root.crt
-
Add the signed client certificate to the keystore:
keytool -keystore client.keystore.jks -alias localhost -import -file client.signed.cert
-
Copy the keystore to a location where you will use it. For example, you could choose to copy it to the same directory where you copied the keystore for the Kafka broker. If you choose to copy it to some other location, or intend to use some other user to run the command-line clients, be sure to add a copy of the truststore file you created for the brokers. Clients can reuse this truststore file for authenticating the Kafka brokers because the same CA is used to sign all of the certificates. Also set the file's ownership and permissions accordingly.
Next, you must create a properties file (similar to the broker's server.properties file) that configures the command-line clients to use TLS. For a client running on the Kafka broker named kafka01, your configuration file could would look like this:
security.protocol=SSL
ssl.truststore.location=/opt/kafka/config/kafka.truststore.jks
ssl.truststore.password=trustore_password
ssl.keystore.location=/opt/kafka/config/client.keystore.jks
ssl.keystore.password=keystore_password
ssl.key.password=key_password
ssl.enabled.protocols=TLSv1.2,TLSv1.1,TLSv1
ssl.client.auth=required
This property file assumes the keystore file is located in the Kafka configuration directory.
Finally, you can run the command line producer or consumer to ensure they can connect and process data. You supply these clients the properties file you just created. The following example assumes you stored the properties file in the Kafka configuration directory, and that Kafka is installed in /opt/kafka:
~# cd /opt/kafka


/opt/kafka# bin/kafka-console-producer.sh --broker-list kafka01.mycompany.com:9093  \
                                          --topic test --producer.config config/client.properties
>test
>test again
>More testing. These messages seem to be getting through!
^D
/opt/kafka# bin/kafka-console-consumer.sh --bootstrap-server kafaka01.mycompany.com:9093  --topic test \
                                          --consumer.config config/client.properties --from-beginning
test
test again
More testing. These messages seem to be getting through!
^C
Processed a total of 3 messages
Loading data from Kafka
After you configure Kafka to accept TLS connections, verify that you can directly load data from it into Vertica. You should perform this step even if you plan to create a scheduler to automatically stream data.
You can choose to create a separate key and certificate for directly loading data from Kafka. This example re-uses the key and certificate created for the Vertica server in part 2 of this example.
You directly load data from Kafka by using the KafkaSource data source function with the COPY statement (see Manually consume data from Kafka). The KafkaSource function creates the connection to Kafka, so it needs a key, certificate, and related passwords to create an encrypted connection. You pass this information via session parameters. See Kafka user-defined session parameters for a list of these parameters.
The easiest way to get the key and certificate into the parameters is by first reading them into vsql variables. You get their contents by using back quotes to read the file contents via the Linux shell. Then you set the session parameters from the variables. Before setting the session parameters, increase the MaxSessionUDParameterSize session parameter to add enough storage space in the session variables for the key and the certificates. They can be larger than the default size limit for session variables (1000 bytes).
The following example reads the server key and certificate and the root CA from the a directory named /home/dbadmin/SSL. Because the server's key password is not saved in a file, the example sets it in a Linux environment variable named KVERTICA_PASS before running vsql. The example sets MaxSessionUDParameterSize to 100000 before setting the session variables. Finally, it enables TLS for the Kafka connection and streams data from the topic named test.
$ export KVERTICA_PASS=server_key_password
$ vsql
Password:
Welcome to vsql, the Vertica Analytic Database interactive terminal.

Type:  \h or \? for help with vsql commands
       \g or terminate with semicolon to execute query
       \q to quit

SSL connection (cipher: DHE-RSA-AES256-GCM-SHA384, bits: 256, protocol: TLSv1.2)

=> \set cert '\''`cat /home/dbadmin/SSL/server.crt`'\''
=> \set pkey '\''`cat /home/dbadmin/SSL/server.key`'\''
=> \set ca '\''`cat /home/dbadmin/SSL/root.crt`'\''
=> \set pass '\''`echo $KVERTICA_PASS`'\''
=> alter session set MaxSessionUDParameterSize=100000;
ALTER SESSION
=> ALTER SESSION SET UDPARAMETER kafka_SSL_Certificate=:cert;
ALTER SESSION
=> ALTER SESSION SET UDPARAMETER kafka_SSL_PrivateKey_secret=:pkey;
ALTER SESSION
=> ALTER SESSION SET UDPARAMETER kafka_SSL_PrivateKeyPassword_secret=:pass;
ALTER SESSION
=> ALTER SESSION SET UDPARAMETER kafka_SSL_CA=:ca;
ALTER SESSION
=> ALTER SESSION SET UDPARAMETER kafka_Enable_SSL=1;
ALTER SESSION
=> CREATE TABLE t (a VARCHAR);
CREATE TABLE
=> COPY t SOURCE KafkaSource(brokers='kafka01.mycompany.com:9093',
                             stream='test|0|-2', stop_on_eof=true,
                             duration=interval '5 seconds')
          PARSER KafkaParser();
 Rows Loaded
-------------
           3
(1 row)

=> SELECT * FROM t;
                            a
---------------------------------------------------------
 test again
 More testing. These messages seem to be getting through!
 test

(3 rows)
The final piece of the configuration is to set up the scheduler to use SSL when communicating with Kafka (and optionally with Vertica). When the scheduler runs a COPY command to get data from Kafka, it uses its own key and certificate to authenticate with Kafka. If you choose to have the scheduler use TLS/SSL to connect to Vertica, it can reuse the same keystore and truststore to make this connection.
Create a truststore and keystore for the scheduler
Because the scheduler is a separate component, it must have its own key and certificate. The scheduler runs in Java and uses the JDBC interface to connect to Vertica. Therefore, you must create a keystore (when ssl.client.auth=required ) and truststore for it to use when making a TLS-encrypted connection to Vertica.
Keep in mind that creating a keystore is optional if your Kafka server sets ssl.client.auth to none or requested.
This process is similar to creating the truststores and keystores for Kafka brokers. The main difference is using the the -dname option for keytool to set the Common Name (CN) for the key to a domain wildcard. Using this setting allows the key and certificate to match any host in the network. This option is especially useful if you run multiple schedulers on different servers to provide redundancy. The schedulers can use the same key and certificate, no matter which server they are running on in your domain.
-
Create a truststore file for the scheduler. Add the CA certificate that you used to sign the keystore of the Kafka cluster and Vertica cluster. If you are using more than one CA to sign your certificates, add all of the CAs you used.
$ keytool -keystore scheduler.truststore.jks -alias CARoot -import \
               -file root.crt
Enter keystore password: some_password
Re-enter new password: some_password
Owner: EMAILADDRESS=myemail@mycompany.com, CN=*.mycompany.com, O=MyCompany, L=Cambridge, ST=MA, C=US
Issuer: EMAILADDRESS=myemail@mycompany.com, CN=*.mycompany.com, O=MyCompany, L=Cambridge, ST=MA, C=US
Serial number: c3f02e87707d01aa
Valid from: Fri Mar 22 13:37:37 EDT 2019 until: Sun Apr 21 13:37:37 EDT 2019
Certificate fingerprints:
         MD5:  73:B1:87:87:7B:FE:F1:6E:94:55:FD:AF:5D:D0:C3:0C
         SHA1: C0:69:1C:93:54:21:87:C7:03:93:FE:39:45:66:DE:22:18:7E:CD:94
         SHA256: 23:03:BB:B7:10:12:50:D9:C5:D0:B7:58:97:41:1E:0F:25:A0:DB:
                 D0:1E:7D:F9:6E:60:8F:79:A6:1C:3F:DD:D5
Signature algorithm name: SHA256withRSA
Subject Public Key Algorithm: 2048-bit RSA key
Version: 3

Extensions:

#1: ObjectId: 2.5.29.35 Criticality=false
AuthorityKeyIdentifier [
KeyIdentifier [
0000: 50 69 11 64 45 E9 CC C5   09 EE 26 B5 3E 71 39 7C  Pi.dE.....&.>q9.
0010: E5 3D 78 16                                        .=x.
]
]

#2: ObjectId: 2.5.29.19 Criticality=false
BasicConstraints:[
  CA:true
  PathLen:2147483647
]

#3: ObjectId: 2.5.29.14 Criticality=false
SubjectKeyIdentifier [
KeyIdentifier [
0000: 50 69 11 64 45 E9 CC C5   09 EE 26 B5 3E 71 39 7C  Pi.dE.....&.>q9.
0010: E5 3D 78 16                                        .=x.
]
]

Trust this certificate? [no]:  yes
Certificate was added to keystore
-
Initialize the keystore, passing it a wildcard host name as the Common Name. The alias parameter in this command is important, as you use it later to identify the key the scheduler must use when creating SSL conections:
keytool -keystore scheduler.keystore.jks -alias vsched -validity 365 -genkey \
        -keyalg RSA  -dname CN=*.mycompany.com
Important
If you choose to use a file format other than the standard Java Keystore (JKS) format for your keystore or truststore files, you must use the correct file extension in the filename. For example, suppose you choose to use a keystore and truststore saved in PKCS#12 format. Then your keystore and trustore files must end with the .pfx or .p12 extension.
If the scheduler does not recognize the file's extension (or there is no extension in the file name), it assumes that the file is in JKS format. If the file is not in JKS format, you will see an error message when starting the scheduler, similar to "Failed to create an SSLSocketFactory when setting up TLS: keystore not found."
-
Export the scheduler's key so you can sign it with the root CA:
$ keytool -keystore scheduler.keystore.jks -alias vsched -certreq \
        -file scheduler.unsigned.cert
-
Sign the scheduler key with the root CA:
$ openssl x509 -req -CA root.crt -CAkey root.key -in scheduler.unsigned.cert \
        -out scheduler.signed.cert -days 365 -CAcreateserial
-
Re-import the scheduler key into the keystore:
$ keytool -keystore scheduler.keystore.jks -alias localhost -import -file scheduler.signed.cert
Set environment variable VKCONFIG_JVM_OPTS
You must pass several settings to the JDBC interface of the Java Virtual Machine (JVM) that runs the scheduler. These settings tell the JDBC driver where to find the keystore and truststore, as well as the key's password. The easiest way to pass in these settings is to set a Linux environment variable named VKCONFIG_JVM_OPTS. As it starts, the scheduler checks this environment variable and passes any properties defined in it to the JVM.
The properties that you need to set are:
-
javax.net.ssl.keystore: the absolute path to the keystore file to use.
-
javax.net.ssl.keyStorePassword: the password for the scheduler's key.
-
javax.net.ssl.trustStore: The absolute path to the truststore file.
The Linux command line to set the environment variable is:
export VKCONFIG_JVM_OPTS="$VKCONFIG_JVM_OPTS -Djavax.net.ssl.trustStore=/path/to/truststore \
                          -Djavax.net.ssl.keyStore=/path/to/keystore \
                          -Djavax.net.ssl.keyStorePassword=keystore_password"
Note
The previous command preserves any existing contents of the VKCONFIG_JVM_OPTS variable. If you find the variable has duplicate settings, remove the $VKCONFIG_JVM_OPTS from your statement so you override the existing values in the variable.
For example, suppose the scheduler's truststore and keystore are located in the directory /home/dbadmin/SSL. Then you could use the following command to set the VKCONFIG_JVM_OPTS variable:
$ export VKCONFIG_JVM_OPTS="$VKCONFIG_JVM_OPTS \
                           -Djavax.net.ssl.trustStore=/home/dbadmin/SSL/scheduler.truststore.jks \
                           -Djavax.net.ssl.keyStore=/home/dbadmin/SSL/scheduler.keystore.jks \
                           -Djavax.net.ssl.keyStorePassword=key_password"
Important
The Java property names are case sensitive.
To ensure that this variable is always set, add the command to the ~/.bashrc or other startup file of the user account that runs the scheduler.
If you require TLS on the JDBC connection to Vertica, add TLSmode=require to the JDBC URL that the scheduler uses. The easiest way to add this is to use the scheduler's --jdbc-url option. Assuming that you use a configuration file for your scheduler, you can add this line to it:
--jdbc-url=jdbc:vertica://VerticaHost:portNumber/databaseName?user=username&password=password&TLSmode=require
For more information about using the JDBC with Vertica, see Java.
Enable TLS in the scheduler configuration
Lastly, enable TLS. Every time you run vkconfig, you must pass it the following options:
--enable-ssltrue, to enable the scheduler to use SSL when connecting to Kafka.--ssl-ca-alias- Alias for the CA you used to sign your Kafka broker's keys. This must match the value you supplied to the
-alias argument of the keytool command to import the CA into the truststore.
Note
If you used more than one CA to sign keys, omit this option to import all of the CAs into the truststore.
--ssl-key-alias- Alias assigned to the schedule key. This value must match the value you supplied to the -alias you supplied to the keytool command when creating the scheduler's keystore.
--ssl-key-password- Password for the scheduler key.
See Common vkconfig script options for details of these options. For convenience and security, add these options to a configuration file that you pass to vkconfig. Otherwise, you run the risk of exposing the key password via the process list which can be viewed by other users on the same system. See Configuration File Format for more information on setting up a configuration file.
Add the following to the scheduler configuration file to allow it to use the keystore and truststore and enable TLS when connecting to Vertica:
enable-ssl=true
ssl-ca-alias=CAroot
ssl-key-alias=vsched
ssl-key-password=vertica
jdbc-url=jdbc:vertica://VerticaHost:portNumber/databaseName?user=username&password=password&TLSmode=require
Start the scheduler
Once you have configured the scheduler to use SSL, start it and verify that it can load data. For example, to start the scheduler with a configuration file named weblog.conf, use the command:
$ nohup vkconfig launch --conf weblog.conf >/dev/null 2>&1 &
7.5 - Troubleshooting Kafka TLS/SSL connection issues
After configuring Vertica, Kafka, and your scheduler to use TLS/SSL authentication and encryption, you may encounter issues with data streaming.
After configuring Vertica, Kafka, and your scheduler to use TLS/SSL authentication and encryption, you may encounter issues with data streaming. This section explains some of the more common errors you may encounter, and how to trouble shoot them.
Errors when launching the scheduler
You may see errors like this when launching the scheduler:
$ vkconfig launch --conf weblog.conf
java.sql.SQLNonTransientException: com.vertica.solutions.kafka.exception.ConfigurationException:
       No keystore system property found: null
    at com.vertica.solutions.kafka.util.SQLUtilities.getConnection(SQLUtilities.java:181)
    at com.vertica.solutions.kafka.cli.CLIUtil.assertDBConnectionWorks(CLIUtil.java:40)
    at com.vertica.solutions.kafka.Launcher.run(Launcher.java:135)
    at com.vertica.solutions.kafka.Launcher.main(Launcher.java:263)
Caused by: com.vertica.solutions.kafka.exception.ConfigurationException: No keystore system property found: null
    at com.vertica.solutions.kafka.security.KeyStoreUtil.loadStore(KeyStoreUtil.java:77)
    at com.vertica.solutions.kafka.security.KeyStoreUtil.<init>(KeyStoreUtil.java:42)
    at com.vertica.solutions.kafka.util.SQLUtilities.getConnection(SQLUtilities.java:179)
    ... 3 more
The scheduler throws these errors when it cannot locate or read the keystore or truststore files. To resolve this issue:
-
Verify you have set the VKCONFIG_JVM_OPTS Linux environment variable. Without this variable, the scheduler will not know where to find the truststore and keystore to use when creating TLS/SSL connections. See Step 2: Set the VKCONFIG_JVM_OPTS Environment Variable for more information.
-
Verify that the keystore and truststore files are located in the path you set in the VKCONFIG_JVM_OPTS environment variable.
-
Verify that the user account that runs the scheduler has read access to the trustore and keystore files.
-
Verify that the key password you provide in the scheduler configuration is correct. Note that you must supply the password for the key, not the keystore.
Another possible error message is a failure to set up a TLS Keystore:
Exception in thread "main" java.sql.SQLRecoverableException: [Vertica][VJDBC](100024) IOException while communicating with server: java.io.IOException: Failed to create an SSLSocketFactory when setting up TLS: keystore not found.
        at com.vertica.io.ProtocolStream.logAndConvertToNetworkException(Unknown Source)
        at com.vertica.io.ProtocolStream.enableSSL(Unknown Source)
        at com.vertica.io.ProtocolStream.initSession(Unknown Source)
        at com.vertica.core.VConnection.tryConnect(Unknown Source)
        at com.vertica.core.VConnection.connect(Unknown Source)
        . . .
This error can be caused by using a keystore or truststore file in a format other than JKS and not supplying the correct file extension. If the scheduler does not recognize the file extension of your keystore or truststore file name, it assumes the file is in JKS format. If the file isn't in this format, the scheduler will exit with the error message shown above. To correct this error, rename the keystore and truststore files to use the correct file extension. For example, if your files are in PKCS 12 filemat, change their file extension to .p12 or .pks.
Data does not load
If you find that scheduler is not loading data into your database, you should first query the stream_microbatch_history table to determine whether the scheduler is executing microbatches, and if so, what their results are. A faulty TLS/SSL configuration usually results in a status of NETWORK_ISSUE:
=> SELECT frame_start, end_reason, end_reason_message FROM weblog_sched.stream_microbatch_history;
       frame_start       |  end_reason   | end_reason_message
-------------------------+---------------+--------------------
 2019-04-05 11:35:18.365 | NETWORK_ISSUE |
 2019-04-05 11:35:38.462 | NETWORK_ISSUE |
If you suspect an SSL issue, you can verify that Vertica is establishing a connection to Kafka by looking at Kafka's server.log file. Failed SSL connection attempts can appear in this log like this example:
java.io.IOException: Unexpected status returned by SSLEngine.wrap, expected
        CLOSED, received OK. Will not send close message to peer.
        at org.apache.kafka.common.network.SslTransportLayer.close(SslTransportLayer.java:172)
        at org.apache.kafka.common.utils.Utils.closeAll(Utils.java:703)
        at org.apache.kafka.common.network.KafkaChannel.close(KafkaChannel.java:61)
        at org.apache.kafka.common.network.Selector.doClose(Selector.java:739)
        at org.apache.kafka.common.network.Selector.close(Selector.java:727)
        at org.apache.kafka.common.network.Selector.pollSelectionKeys(Selector.java:520)
        at org.apache.kafka.common.network.Selector.poll(Selector.java:412)
        at kafka.network.Processor.poll(SocketServer.scala:551)
        at kafka.network.Processor.run(SocketServer.scala:468)
        at java.lang.Thread.run(Thread.java:748)
If you do not see errors of this sort, you likely have a network problem between Kafka and Vertica. If you do see these errors, consider the following debugging steps:
-
Verify that the configuration of your Kafka cluster is uniform. For example, you may see connection errors if some Kafka nodes are set to require client authentication and others aren't.
-
Verify that the Common Names (CN) in the certificates and keys match the host name of the system.
-
Verify that the Kafka cluster is accepting connections on the ports and host names you specify in the server.properties file's listeners property. For example, suppose you use IP addresses in this setting, but use host names when defining the cluster in the scheduler's configuration. Then Kafka may reject the connection attempt by Vertica or Vertica may reject the Kafka node's identity.
-
If you are using client authentication in Kafka, try turning it off to see if the scheduler can connect. If disabling authentication allows the scheduler to stream data, then you can isolate the problem to client authentication. In this case, review the certificates and CAs of both the Kafka cluster and the scheduler. Ensure that the truststores include all of the CAs used to sign the key, up to and including the root CA.
Avro schema registry and KafkaAvroParser
At minimum, the KafkaAvroParser requires the following parameters to create a TLS connection between the Avro Schema Registry and Vertica:
If and only if TLS access fails, determine what TLS schema registry information Vertica requires from the following:
Provide only the necessary TLS schema registry information with KafkaAvroParser parameters. The TLS information must be accessible in the filesystem of each Vertica node that processes Avro data.
The following example shows how to pass these parameters to KafkaAvroParser:
KafkaAvroParser(
    schema_registry_url='https://localhost:8081'
    schema_registry_ssl_ca_path='path/to/certificate-authority',
    schema_registry_ssl_cert_path='path/to/tls-server-certificate',
    schema_registry_ssl_key_path='path/to/private-tls-key',
    schema_registry_ssl_key_password_path='path/to/private-tls-key-password'
)
8 - Authenticating with Kafka using SASL
Kafka supports using Simple Authentication and Security Layer (SASL) to authenticate producers and consumers.
Kafka supports using Simple Authentication and Security Layer (SASL) to authenticate producers and consumers. You can use SASL to authenticate Vertica with Kafka when using most of the Kafka-related functions such as KafkaSource.
Vertica supports using the SASL_PLAINTEXT and SASL_SSL protocols with the following authentication mechanisms:
-
PLAIN
-
SCRAM-SHA-256
-
SCRAM-SHA-512
You must configure your Kafka cluster to enable SASL authentication. See the Kafka documentation for your Kafka version to learn how to configure SASL authentication.
Note
KafkaExport does not support using TLS/SSL with SASL authentication at this time.
To use SASL authentication between Vertica and Kafka, directly set SASL-related configuration options in the rdkafka library using the kafka_conf parameter. Vertica uses this library to connect to Kafka. See Directly setting Kafka library options for more information on directly setting configuration options in the rdkafka library.
Among the relevant configuration options are:
-
security.protocol sets the security protocol to use to authenticate with Kafka.
-
sasl.mechanism sets the security mechanism.
-
sasl.username sets the SASL user to use for authentication.
-
sasl.password sets the password to use for SASL authentication.
See the rdkafka configuration documentation for a list of all the SASL-related settings.
The following example demonstrates calling KafkaCheckBrokers using the SASL_PLAINTEXT security protocol:
=> SELECT KafkaCheckBrokers(USING PARAMETERS
      brokers='kafka01.example.com:9092',
      kafka_conf='{"sasl.username":"dbadmin", "sasl.mechanism":"PLAIN", "security.protocol":"SASL_PLAINTEXT"}',
      kafka_conf_secret='{"sasl.password":"password"}'
   ) OVER ();
This example demonstrates using SASL authentication when copying data from Kafka via an SSL connection. This example assumes that Vertica and Kafka have been configures to use TLS/SSL encryption as described in TLS/SSL encryption with Kafka:
=> COPY mytopic_table
      SOURCE KafkaSource(
        stream='mytopic|0|-2',
        brokers='kafka01.example.com:9092',
        stop_on_eof=true,
        kafka_conf='{"sasl.username":"dbadmin", "sasl.password":"pword", "sasl.mechanism":"PLAIN", "security.protocol":"SASL_SSL"}'
      )
      FILTER KafkaInsertDelimiters(delimiter = E'\n')
      DELIMITER ','
      ENCLOSED BY '"';
For more information about using SASL with the rfkafka library, see Using SASL with librdkafka on the rdkafka github site.
9 - Troubleshooting Kafka integration issues
The following topics can help you troubleshoot issues integrating Vertica with Apache Kafka.
The following topics can help you troubleshoot issues integrating Vertica with Apache Kafka.
9.1 - Using kafkacat to troubleshoot Kafka integration issues
Kafkacat is a third-party open-source utility that lets you connect to Kafka from the Linux command line.
Kafkacat is a third-party open-source utility that lets you connect to Kafka from the Linux command line. It uses the same underlying library that the Vertica integration for Apache Kafka uses to connect to Kafka. This shared library makes kafkcat a useful tool for testing and debugging your Vertica integration with Kafka.
You may find kafkacat useful for:
-
Testing connectivity between your Vertica and Kafka clusters.
-
Examining Kafka data for anomalies that may prevent some of it from loading into Vertica.
-
Producing data for test loads into Vertica.
-
Listing details about a Kafka topic.
For more information about kafkacat, see its project page at Github.
Running kafkacat on Vertica nodes
The kafkacat utility is bundled in the Vertica install package, so it is available on all nodes of your Vertica cluster in the /opt/vertica/packages/kafka/bin directory. This is the same directory containing the vkconfig utility, so if you have added it to your path, you can use the kafkacat utility without specifying its full path. Otherwise, you can add this path to your shell's environment variable using the command:
set PATH=/opt/vertica/packages/kafka/bin:$PATH
Note
On Debian and Ubuntu systems, you must tell kafkacat to use Vertica's own copy of the SSL libraries by setting the LD_LIBRARY_PATH environment variable:
$ export LD_LIBRARY_PATH=/opt/vertica/lib
If you do not set this environment variable, the kafkcat utility exits with the error:
kafkacat: error while loading shared libraries: libcrypto.so.10:
          cannot open shared object file: No such file or directory
Executing kafkacat without any arguments gives you a basic help message:
$ kafkacat
Error: -b <broker,..> missing

Usage: kafkacat <options> [file1 file2 .. | topic1 topic2 ..]]
kafkacat - Apache Kafka producer and consumer tool
https://github.com/edenhill/kafkacat
Copyright (c) 2014-2015, Magnus Edenhill
Version releases/VER_8_1_RELEASE_BUILD_1_555_20170615-4931-g3fb918 (librdkafka releases/VER_8_1_RELEASE_BUILD_1_555_20170615-4931-g3fb918)


General options:
  -C | -P | -L       Mode: Consume, Produce or metadata List
  -G <group-id>      Mode: High-level KafkaConsumer (Kafka 0.9 balanced consumer groups)
                     Expects a list of topics to subscribe to
  -t <topic>         Topic to consume from, produce to, or list
  -p <partition>     Partition
  -b <brokers,..>    Bootstrap broker(s) (host[:port])
  -D <delim>         Message delimiter character:
                     a-z.. | \r | \n | \t | \xNN
                     Default: \n
  -K <delim>         Key delimiter (same format as -D)
  -c <cnt>           Limit message count
  -X list            List available librdkafka configuration properties
  -X prop=val        Set librdkafka configuration property.
                     Properties prefixed with "topic." are
                     applied as topic properties.
  -X dump            Dump configuration and exit.
  -d <dbg1,...>      Enable librdkafka debugging:
                     all,generic,broker,topic,metadata,queue,msg,protocol,cgrp,security,fetch,feature
  -q                 Be quiet (verbosity set to 0)
  -v                 Increase verbosity
  -V                 Print version

Producer options:
  -z snappy|gzip     Message compression. Default: none
  -p -1              Use random partitioner
  -D <delim>         Delimiter to split input into messages
  -K <delim>         Delimiter to split input key and message
  -l                 Send messages from a file separated by
                     delimiter, as with stdin.
                     (only one file allowed)
  -T                 Output sent messages to stdout, acting like tee.
  -c <cnt>           Exit after producing this number of messages
  -Z                 Send empty messages as NULL messages
  file1 file2..      Read messages from files.
                     With -l, only one file permitted.
                     Otherwise, the entire file contents will
                     be sent as one single message.

Consumer options:
  -o <offset>        Offset to start consuming from:
                     beginning | end | stored |
                     <value>  (absolute offset) |
                     -<value> (relative offset from end)
  -e                 Exit successfully when last message received
  -f <fmt..>         Output formatting string, see below.
                     Takes precedence over -D and -K.
  -D <delim>         Delimiter to separate messages on output
  -K <delim>         Print message keys prefixing the message
                     with specified delimiter.
  -O                 Print message offset using -K delimiter
  -c <cnt>           Exit after consuming this number of messages
  -Z                 Print NULL messages and keys as "NULL"(instead of empty)
  -u                 Unbuffered output

Metadata options:
  -t <topic>         Topic to query (optional)


Format string tokens:
  %s                 Message payload
  %S                 Message payload length (or -1 for NULL)
  %R                 Message payload length (or -1 for NULL) serialized
                     as a binary big endian 32-bit signed integer
  %k                 Message key
  %K                 Message key length (or -1 for NULL)
  %t                 Topic
  %p                 Partition
  %o                 Message offset
  \n \r \t           Newlines, tab
  \xXX \xNNN         Any ASCII character
 Example:
  -f 'Topic %t [%p] at offset %o: key %k: %s\n'


Consumer mode (writes messages to stdout):
  kafkacat -b <broker> -t <topic> -p <partition>
 or:
  kafkacat -C -b ...

High-level KafkaConsumer mode:
  kafkacat -b <broker> -G <group-id> topic1 top2 ^aregex\d+

Producer mode (reads messages from stdin):
  ... | kafkacat -b <broker> -t <topic> -p <partition>
 or:
  kafkacat -P -b ...

Metadata listing:
  kafkacat -L -b <broker> [-t <topic>]
One basic troubleshooting step you often need to perform is verifying that Vertica nodes can connect to the Kafka cluster. Successfully executing just about any kafkacat command will prove the Vertica node you are logged into is able to reach the Kafka cluster. One simple command you can execute to verify connectivity is to get the metadata for all of the topics the Kafka cluster has defined. The following example demonstrates using kafkacat's metadata listing command to connect to the broker named kafka01 running on port 6667 (the Kafka broker port used by Hortonworks Hadoop clusters).
$ kafkacat -L -b kafka01:6667
Metadata for all topics (from broker -1: kafka01:6667/bootstrap):
 2 brokers:
  broker 1001 at kafka03.example.com:6667
  broker 1002 at kafka01.example.com:6667
 4 topics:
  topic "iot-data" with 3 partitions:
    partition 2, leader 1002, replicas: 1002, isrs: 1002
    partition 1, leader 1001, replicas: 1001, isrs: 1001
    partition 0, leader 1002, replicas: 1002, isrs: 1002
  topic "__consumer_offsets" with 50 partitions:
    partition 23, leader 1001, replicas: 1002,1001, isrs: 1001,1002
    partition 41, leader 1001, replicas: 1002,1001, isrs: 1001,1002
    partition 32, leader 1002, replicas: 1002,1001, isrs: 1001,1002
    partition 8, leader 1002, replicas: 1002,1001, isrs: 1001,1002
    partition 17, leader 1001, replicas: 1002,1001, isrs: 1001,1002
    partition 44, leader 1002, replicas: 1002,1001, isrs: 1001,1002
    partition 35, leader 1001, replicas: 1002,1001, isrs: 1001,1002
    partition 26, leader 1002, replicas: 1002,1001, isrs: 1001,1002
    partition 11, leader 1001, replicas: 1002,1001, isrs: 1001,1002
    partition 29, leader 1001, replicas: 1002,1001, isrs: 1001,1002
    partition 38, leader 1002, replicas: 1002,1001, isrs: 1001,1002
    partition 47, leader 1001, replicas: 1002,1001, isrs: 1001,1002
    partition 20, leader 1002, replicas: 1002,1001, isrs: 1001,1002
    partition 2, leader 1002, replicas: 1002,1001, isrs: 1001,1002
    partition 5, leader 1001, replicas: 1002,1001, isrs: 1001,1002
    partition 14, leader 1002, replicas: 1002,1001, isrs: 1001,1002
    partition 46, leader 1002, replicas: 1002,1001, isrs: 1001,1002
    partition 49, leader 1001, replicas: 1002,1001, isrs: 1001,1002
    partition 40, leader 1002, replicas: 1002,1001, isrs: 1001,1002
    partition 4, leader 1002, replicas: 1002,1001, isrs: 1001,1002
    partition 13, leader 1001, replicas: 1002,1001, isrs: 1001,1002
    partition 22, leader 1002, replicas: 1002,1001, isrs: 1001,1002
    partition 31, leader 1001, replicas: 1002,1001, isrs: 1001,1002
    partition 16, leader 1002, replicas: 1002,1001, isrs: 1001,1002
    partition 7, leader 1001, replicas: 1002,1001, isrs: 1001,1002
    partition 43, leader 1001, replicas: 1002,1001, isrs: 1001,1002
    partition 25, leader 1001, replicas: 1002,1001, isrs: 1001,1002
    partition 34, leader 1002, replicas: 1002,1001, isrs: 1001,1002
    partition 10, leader 1002, replicas: 1002,1001, isrs: 1001,1002
    partition 37, leader 1001, replicas: 1002,1001, isrs: 1001,1002
    partition 1, leader 1001, replicas: 1002,1001, isrs: 1001,1002
    partition 19, leader 1001, replicas: 1002,1001, isrs: 1001,1002
    partition 28, leader 1002, replicas: 1002,1001, isrs: 1001,1002
    partition 45, leader 1001, replicas: 1002,1001, isrs: 1001,1002
    partition 36, leader 1002, replicas: 1002,1001, isrs: 1001,1002
    partition 27, leader 1001, replicas: 1002,1001, isrs: 1001,1002
    partition 9, leader 1001, replicas: 1002,1001, isrs: 1001,1002
    partition 18, leader 1002, replicas: 1002,1001, isrs: 1001,1002
    partition 21, leader 1001, replicas: 1002,1001, isrs: 1001,1002
    partition 48, leader 1002, replicas: 1002,1001, isrs: 1001,1002
    partition 12, leader 1002, replicas: 1002,1001, isrs: 1001,1002
    partition 3, leader 1001, replicas: 1002,1001, isrs: 1001,1002
    partition 30, leader 1002, replicas: 1002,1001, isrs: 1001,1002
    partition 39, leader 1001, replicas: 1002,1001, isrs: 1001,1002
    partition 15, leader 1001, replicas: 1002,1001, isrs: 1001,1002
    partition 42, leader 1002, replicas: 1002,1001, isrs: 1001,1002
    partition 24, leader 1002, replicas: 1002,1001, isrs: 1001,1002
    partition 33, leader 1001, replicas: 1002,1001, isrs: 1001,1002
    partition 6, leader 1002, replicas: 1002,1001, isrs: 1001,1002
    partition 0, leader 1002, replicas: 1002,1001, isrs: 1001,1002
  topic "web_hits" with 1 partitions:
    partition 0, leader 1001, replicas: 1001, isrs: 1001
  topic "ambari_kafka_service_check" with 1 partitions:
    partition 0, leader 1002, replicas: 1002, isrs: 1002
You can also use this output to verify the topics defined by your Kafka cluster, as well as the number of partitions each topic defines. You need this information when copying data between Kafka and Vertica.
Retrieving messages from a Kafka topic
When you are troubleshooting issues with streaming messages from Kafka in Vertica, you often want to look at the raw data that Kafka sent. For example, you may want to verify that the messages are in the format that your expect. Or, you may want to review specific messages to see if some of them weren't in the right format for Vertica to parse. You can use kafkacat to read messages from a topic using its consume command (-C). At the very least, you must pass kafkacat the brokers (-b argument) and the topic you want to read from (-t). You can also choose to read messages from a specific offset (-o) and partition (-p). You will usually also want kafkacat to exit after completing the data read (-e) instead continuing to wait for more messages.
This example gets the last message in the topic named web_hits. The offset argument uses a negative value, which tells kafkacat to read from the end of the topic.
$ kafkacat -C -b kafka01:6667 -t web_hits -o -1 -e
{"url": "wp-content/list/search.php", "ip": "132.74.240.52",
"date": "2018/03/28 14:12:34",
"user_agent": "Mozilla/5.0 (iPod; U; CPU iPhone OS 4_2 like
Mac OS X; sl-SI) AppleWebKit/532.22.4 (KHTML, like Gecko) Version/3.0.5
Mobile/8B117 Safari/6532.22.4"}
% Reached end of topic web_hits [0] at offset 54932: exiting
You can also read a specific range of messages by specifying an offset and a limit (-c argument). For example, you may want to look at a specific range of data to determine why Vertica could not load it. The following example reads 10 messages from the topic iot-data starting at offset 3280:
$ kafkacat -C -b kafka01:6667 -t iot-data -o 3280 -c 10 -e
63680, 19, 24.439323, 26.0128725
43510, 71, 162.319805, -37.4924025
91113, 53, 139.764857, -74.735731
88508, 14, -85.821967, -7.236280
20419, 31, -129.583988, 13.995481
79365, 79, 153.184594, 51.1583485
26283, 25, -168.911020, 35.331027
32111, 56, -157.930451, 82.2676385
56808, 17, 19.603286, -0.7698495
9118, 73, 97.365445, -74.8593245
Generating data for a Kafka topic
If you are preparing to stream data from a Kafka topic that is not yet active, you may want a way to stream test messages. You can then verify that the topic's messages load into Vertica without worrying that you will miss actual data.
To send data to Kafka, use kafkacat's produce command (-P). The easiest way to supply it with messages is to pipe them in via STDIN, one message per line. You can choose a specific partition for the data, or have kafkacat randomly assign each message to a random partition by setting the partition number to -1. For example, suppose you have a file named iot-data.csv that you wanted to produce to random partitions of a Kafka topic named iot-data. Then you could use the following command:
$ cat iot_data.csv | kafkacat -P -p -1 -b kafka01:6667 -t iot-data
9.2 - Troubleshooting slow load speeds
Here are some potential issues that could cause messages to load slowly from Kafka.
Here are some potential issues that could cause messages to load slowly from Kafka.
Verify you have disabled the API version check when communicating with Kafka 0.9 or earlier
If your Kafka cluster is running 0.9 or earlier, be sure you have disable the rdkafka library's api.version.request option. If you do not, every Vertica connection to Kafka will pause for 10 seconds until the API version request times out. Depending on the frame size of your load or other timeout settings, this delay can either reduce the throughput of your data loads. It can even totally prevent messages from being loaded. See Configuring Vertica for Apache Kafka version 0.9 and earlier for more information.
Eon Mode and cloud latency
Eon Mode separates compute from storage in a Vertica cluster, which can cause a small amount of latency when Vertica loads and saves data. Cloud computing infrastructure can also cause latency. This latency can eat into the frame duration for your schedulers, causing them to load less data in each frame. For this reason, you should consider increasing frame durations when loading data from Kafka in an Eon Mode database. See Vertica Eon Mode and Kafka for more information.
9.3 - Troubleshooting missing messages
Kafka producers that emit a high data volume might overwhelm Vertica, possibly resulting in messages expiring in Kafka before the scheduler loads them into Vertica.
Kafka producers that emit a high data volume might overwhelm Vertica, possibly resulting in messages expiring in Kafka before the scheduler loads them into Vertica. This is more common when Vertica performs additional processing on the loaded messages, such as text indexing.
If you see that you are missing messages from a topic with multiple partitions, consider configuring the --max-parallelism microbatch utility option. The --max-parallelism option splits a microbatch into multiple subset microbatches. This enables you to use PLANNEDCONCURRENCY available in the scheduler's resource pool to create more scheduler threads for simultaneous loads of a single microbatch. Each node uses the resource pool EXECUTIONPARALLELISM setting to determine the number of threads created to process partitions. Because EXECUTIONPARALLELISM threads are created per scheduler thread, using more PLANNEDCONCURRENCY per microbatch enables you to process more partitions in parallel for a single unit of work.
For details, see Managing scheduler resources and performance.
10 - vkconfig script options
Vertica includes the vkconfig script that lets you configure your schedulers.
Vertica includes the vkconfig script that lets you configure your schedulers. This script contains multiple tools that set groups of options in the scheduler, as well as starting and shutting it down. You supply the tool you want to use as the first argument in your call to the vkconfig script.
The topics in this section explain each of the tools available in the vkconfig script as well as their options. You can use the options in the Common vkconfig script options topic with any of the utilities. Utility-specific options appear in their respective tables.
10.1 - Common vkconfig script options
These options are available across the different tools available in the vkconfig script.
These options are available across the different tools available in the vkconfig script.
--conf filename- A text file containing configuration options for the vkconfig script. See Configuration File Format below.
--config-schema schema_name- The name of the scheduler's Vertica schema. This value is the same as the name of the scheduler. You use this name to identify the scheduler during configuration.
Default:
stream_config
--dbhost host name- The host name or IP address of the Vertica node acting as the initiator node for the scheduler.
Default:
localhost
--dbport port_number- The port to use to connect to a Vertica database.
Default:
5433
--enable-ssl- Enables the vkconfig script to use SSL to connect to Vertica or between Vertica and Kafka. See Configuring your scheduler for TLS connections for more information.
--help- Prints out a help menu listing available options with a description.
--jdbc-opt option=value[&option2=value2...]- One or more options to add to the standard JDBC URL that vkconfig uses to connect to Vertica. Cannot be combined with
--jdbc-url.
--jdbc-url url- A complete JDBC URL that vkconfig uses instead of standard JDBC URL string to connect to Vertica.
--password password- Password for the database user.
--ssl-ca-alias alias_name- The alias of the root certificate authority in the truststore. When set, the scheduler loads only the certificate associated with the specified alias. When omitted, the scheduler loads all certificates into the truststore.
--ssl-key-alias alias_name- The alias of the key and certificate pairs within the keystore. Must be set when Vertica uses SSL to connect to Kafka.
--ssl-key-password password- The password for the SSL key. Must be set when Vertica uses SSL to connect to Kafka.
Caution
Specifying this option on the command line can expose it to other users logged into the host. Always use a configuration file to set this option.
--username username- The Vertica database user used to alter the configuration of the scheduler. This use must have create privileges on the scheduler's schema.
Default:
Current user
--version- Displays the version number of the scheduler.
You can use a configuration file to store common parameters you use in your calls to the vkconfig utility. The configuration file is a text file containing one option setting per line in the format:
option=value
You can also include comments in the option file by prefixing them with a hash mark (#).
#config.properties:
username=myuser
password=mypassword
dbhost=localhost
dbport=5433
You tell vkconfig to use the configuration file using the --conf option:
$ /opt/vertica/packages/kafka/bin/vkconfig source --update --conf config.properties
You can override any stored parameter from the command line:
$ /opt/vertica/packages/kafka/bin/vkconfig source --update --conf config.properties --dbhost otherVerticaHost
Examples
These examples show how you can use the shared utility options.
Display help for the scheduler utility:
$ vkconfig scheduler --help
This command configures a Scheduler, which can run and load data from configured
sources and clusters into Vertica tables. It provides options for changing the
'frame duration' (time given per set of batches to resolve), as well as the
dedicated Vertica resource pool the Scheduler will use while running.

Available Options:
PARAMETER               #ARGS    DESCRIPTION
conf                    1        Allow the use of a properties file to associate
                                 parameter keys and values. This file enables
                                 command string reuse and cleaner command strings.
help                    0        Outputs a help context for the given subutility.
version                 0        Outputs the current Version of the scheduer.
skip-validation         0        [Depricated] Use --validation-type.
validation-type         1        Determine what happens when there are
                                 configuration errors. Accepts: ERROR - errors
                                 out, WARN - prints out a message and continues,
                                 SKIP - skip running validations
dbhost                  1        The Vertica database hostname that contains
                                 metadata and configuration information. The
                                 default value is 'localhost'.
dbport                  1        The port at the hostname to connect to the
                                 Vertica database. The default value is '5433'.
username                1        The user to connect to Vertica. The default
                                 value is the current system user.
password                1        The password for the user connecting to Vertica.
                                 The default value is empty.
jdbc-url                1        A JDBC URL that can override Vertica connection
                                 parameters and provide additional JDBC options.
jdbc-opt                1        Options to add to the JDBC URL used to connect
                                 to Vertica ('&'-separated key=value list).
                                 Used with generated URL (i.e. not with
                                 '--jdbc-url' set).
enable-ssl              1        Enable SSL between JDBC and Vertica and/or
                                 Vertica and Kafka.
ssl-ca-alias            1        The alias of the root CA within the provided
                                 truststore used when connecting between
                                 Vertica and Kafka.
ssl-key-alias           1        The alias of the key and certificate pair
                                 within the provided keystore used when
                                 connecting between Vertica and Kafka.
ssl-key-password        1        The password for the key used when connecting
                                 between Vertica and Kafka. Should be hidden
                                 with file access (see --conf).
config-schema           1        The schema containing the configuration details
                                 to be used, created or edited. This parameter
                                 defines the scheduler. The default value is
                                 'stream_config'.
create                  0        Create a new instance of the supplied type.
read                    0        Read an instance of the supplied type.
update                  0        Update an instance of the supplied type.
delete                  0        Delete an instance of the supplied type.
drop                    0        Drops the specified configuration schema.
                                 CAUTION: this command will completely delete
                                 and remove all configuration and monitoring
                                 data for the specified scheduler.
dump                    0        Dump the config schema query string used to
                                 answer this command in the output.
operator                1        Specifies a user designated as an operator for
                                 the created configuration. Used with --create.
add-operator            1        Add a user designated as an operator for the
                                 specified configuration. Used with --update.
remove-operator         1        Removes a user designated as an operator for
                                 the specified configuration. Used with
                                 --update.
upgrade                 0        Upgrade the current scheduler configuration
                                 schema to the current version of this
                                 scheduler. WARNING: if upgrading between
                                 EXCAVATOR and FRONTLOADER be aware that the
                                 Scheduler is not backwards compatible. The
                                 upgrade procedure will translate your kafka
                                 model into the new stream model.
upgrade-to-schema       1        Used with upgrade: will upgrade the
                                 configuration to a new given schema instead of
                                 upgrading within the same schema.
fix-config              0        Attempts to fix the configuration (ex: dropped
                                 tables) before doing any other updates. Used
                                 with --update.
frame-duration          1        The duration of the Scheduler's frame, in
                                 which every configured Microbatch runs. Default
                                 is 300 seconds: '00:05:00'
resource-pool           1        The Vertica resource pool to run the Scheduler
                                 on. Default is 'general'.
config-refresh          1        The interval of time between Scheduler
                                 configuration refreshes. Default is 5 minutes:
                                 '00:05'
new-source-policy       1        The policy for new Sources to be scheduled
                                 during a frame. Options are: START, END, and
                                 FAIR. Default is 'FAIR'.
pushback-policy         1
pushback-max-count      1
auto-sync               1        Automatically update configuration based on
                                 metadata from the Kafka cluster
consumer-group-id       1        The Kafka consumer group id to report offsets
                                 to.
eof-timeout-ms          1        [DEPRECATED] This option has no effect.
10.2 - Scheduler tool options
The vkconfig script's scheduler tool lets you configure schedulers that continuously loads data from Kafka into Vertica.
The vkconfig script's scheduler tool lets you configure schedulers that continuously loads data from Kafka into Vertica. Use the scheduler tool to create, update, or delete a scheduler, defined by config-schema. If you do not specify a scheduler, commands apply to the default stream_config scheduler.
Syntax
vkconfig scheduler {--create | --read | --update | --drop} other_options...
--create- Creates a new scheduler. Cannot be used with
--delete, --read, or --update.
--read- Outputs the current setting of the scheduler in JSON format. Cannot be used with
--create, --delete, or --update.
--update- Updates the settings of the scheduler. Cannot be used with
--create, --delete, or --read.
--drop- Drops the scheduler's schema. Dropping its schema deletes the scheduler. After you drop the scheduler's schema, you cannot recover it.
--add-operator user_name- Grants a Vertica user account or role access to use and alter the scheduler. Requires the
--update shared utility option.
--auto-sync {TRUE|FALSE}- When TRUE, Vertica automatically synchronizes scheduler source information at the interval specified in
--config-refresh.
For details about what the scheduler synchronizes at each interval, see the "Validating Schedulers" and "Synchronizing Schedulers" sections in Automatically consume data from Kafka with the scheduler.
Default: TRUE
--config-refresh HH:MM:SS - The interval of time that the scheduler runs before synchronizing its settings and updating its cached metadata (such as changes made by using the
--update option).
Default: 00:05:00
--consumer-group-id id_nameThe name of the Kafka consumer group to which Vertica reports its progress consuming messages. Set this value to disable progress reports to a Kafka consumer group. For details, see Monitoring Vertica message consumption with consumer groups.
Default: vertica_database-name
--dumpWhen you use this option along with the --read option, vkconfig outputs the Vertica query it would use to retrieve the data, rather than outputting the data itself. This option is useful if you want to access the data from within Vertica without having to go through vkconfig. This option has no effect if not used with --read.
--eof-timeout-ms number of milliseconds - If a COPY command does not receive any messages within the eof-timeout-ms interval, Vertica responds by ending that COPY statement.
See Manually consume data from Kafka for more information.
Default: 1 second
--fix-config- Repairs the configuration and re-creates any missing tables. Valid only with the
--update shared configuration option.
--frame-duration HH:MM:SS - The interval of time that all individual frames last with this scheduler. The scheduler must have enough time to run each microbatch (each of which execute a COPY statement). You can approximate the average available time per microbatch using the following equation:
TimePerMicrobatch=(FrameDuration*Parallelism)/Microbatches
This is just a rough estimate as there are many factors that impact the amount of time that each microbatch will be able to run.
The vkconfig utility warns you if the time allocated per microbatch is below 2 seconds. You usually should allocate more than two seconds per microbatch to allow the scheduler to load all of the data in the data stream.
Note
In versions of Vertica earlier than 10.0, the default frame duration was 10 seconds. In version 10.0, this default value was increased to 5 minutes in part to compensate for the removal of WOS. If you created your scheduler with the default frame duration in a version prior to 10.0, the frame duration is not updated to the new default value. In this case, consider adjusting the frame duration manually. See
Choosing a frame duration for more information.
Default: 00:05:00
--message_max_bytes max_message_sizeSpecifies the maximum size, in bytes, of a Kafka protocol batch message.
Default: 25165824
--new-source-policy {FAIR|START|END}- Determines how Vertica allocates resources to the newly added source, one of the following:
-
FAIR: Takes the average length of time from the previous batches and schedules itself appropriately.
-
START: All new sources start at the beginning of the frame. The batch receives the minimal amount of time to run.
-
END: All new sources start at the end of the frame. The batch receives the maximum amount of time to run.
Default: FAIR
--operator username- Allows the dbadmin to grant privileges to a previously created Vertica user or role.
This option gives the specified user all privileges on the scheduler instance and EXECUTE privileges on the libkafka library and all its UDxs.
Granting operator privileges gives the user the right to read data off any source in any cluster that can be reached from the Vertica node.
The dbadmin must grant the user separate permission for them to have write privileges on the target tables.
Requires the --create shared utility option. Use the --add-operator option to grant operate privileges after the scheduler has been created.
To revoke privileges, use the --remove-operator option.
--remove-operator user_name- Removes access to the scheduler from a Vertica user account. Requires the
--update shared utility option.
--resource-pool pool_name- The resource pool to be used by all queries executed by this scheduler. You must create this pool in advance.
Default: GENERAL pool
--upgrade- Upgrades the existing scheduler and configuration schema to the current Vertica version. The upgraded version of the scheduler is not backwards compatible with earlier versions. To upgrade a scheduler to an alternate schema, use the
upgrade-to-schema parameter. See Updating schedulers after Vertica upgrades for more information.
--upgrade-to-schema schema name- Copies the scheduler's schema to a new schema specified by
schema name and then upgrades it to be compatible with the current version of Vertica. Vertica does not alter the old schema. Requires the --upgrade scheduler utility option.
--validation-type {ERROR|WARN|SKIP}- Renamed from
--skip-validation, specifies the level of validation performed on the scheduler. Invalid SQL syntax and other errors can cause invalid microbatches. Vertica supports the following validation types:
-
ERROR: Cancel configuration or creation if validation fails.
-
WARN: Proceed with task if validation fails, but display a warning.
-
SKIP: Perform no validation.
For more information on validation, refer to Automatically consume data from Kafka with the scheduler.
Default: ERROR
See Common vkconfig script options for options that are available in all of the vkconfig tools.
Examples
These examples show how you can use the scheduler utility options.
Give a user, Jim, privileges on the StreamConfig scheduler. Specify that you are making edits to the stream_config scheduler with the --config-schema option:
$ /opt/vertica/packages/kafka/bin/vkconfig scheduler --update --config-schema stream_config --add-operator Jim
Edit the default stream_config scheduler so that every microbatch waits for data for one second before ending:
$ /opt/vertica/packages/kafka/bin/vkconfig scheduler --update --eof-timeout-ms 1000
Upgrade the scheduler named iot_scheduler_8.1 to a new scheduler named iot_scheduler_9.0 that is compatible with the current version of Vertica:
$ /opt/vertica/packages/kafka/bin/vkconfig scheduler --upgrade --config-schema iot_scheduler_8.1 \
                                           --upgrade-to-schema iot_scheduler_9.0
Drop the schema scheduler219a:
$ /opt/vertica/packages/kafka/bin/vkconfig scheduler --drop --config-schema scheduler219a --username dbadmin
Read the current setting of the options you can set using the scheduler tool for the scheduler defined in weblogs.conf.
$ vkconfig scheduler --read --conf weblog.conf
{"version":"v9.2.0", "frame_duration":"00:00:10", "resource_pool":"weblog_pool",
"config_refresh":"00:05:00", "new_source_policy":"FAIR",
"pushback_policy":"LINEAR", "pushback_max_count":5, "auto_sync":true,
"consumer_group_id":null}
10.3 - Cluster tool options
The vkconfig script's cluster tool lets you define the streaming hosts your scheduler connects to.
The vkconfig script's cluster tool lets you define the streaming hosts your scheduler connects to.
Syntax
vkconfig cluster {--create | --read | --update | --delete} \
         [--cluster cluster_name] [other_options...]
--create- Creates a new cluster. Cannot be used with
--delete, --read, or --update.
--read- Outputs the settings of all clusters defined in the scheduler. This output is in JSON format. Cannot be used with
--create, --delete, or --update.
You can limit the output to specific clusters by supplying one or more cluster names in the --cluster option. You an also limit the output to clusters that contain one or more specific hosts using the --hosts option. Use commas to separate multiple values.
You can use LIKE wildcards in these options. See LIKE for more information about using wildcards.
--update- Updates the settings of
cluster_name. Cannot be used with --create, --delete, or --read.
--delete- Deletes the cluster
cluster_name. Cannot be used with --create, --read, or --update.
--dumpWhen you use this option along with the --read option, vkconfig outputs the Vertica query it would use to retrieve the data, rather than outputting the data itself. This option is useful if you want to access the data from within Vertica without having to go through vkconfig. This option has no effect if not used with --read.
--cluster cluster_name- A unique, case-insensitive name for the cluster to operate on. This option is required for
--create, --update, and --delete.
--hosts b1:port[,b2:port...]- Identifies the broker hosts that you want to add, edit, or remove from a Kafka cluster. To identify multiple hosts, use a comma delimiter.
--kafka_conf 'kafka_configuration_setting'
A JSON-formatted object of option/value pairs to pass directly to the rdkafka library. This is the library Vertica uses to communicate with Kafka. You can use this parameter to directly set configuration options that are not available through the Vertica integration with Kafka. See Directly setting Kafka library options for details.
--kafka_conf_secret 'kafka_configuration_setting'Conceals sensitive configuration data that you must pass directly to the rdkafka library, such as passwords. This parameter accepts settings in the same format as kafka_conf.
Values passed to this parameter are not logged or stored in system tables.
--new-cluster cluster_name- The updated name for the cluster. Requires the
--update shared utility option.
--validation-type {ERROR|WARN|SKIP}- Specifies the level of validation performed on a created or updated cluster:
-
ERROR - Cancel configuration or creation if vkconfig cannot validate that the cluster exists. This is the default setting.
-
WARN - Proceed with task if validation fails, but display a warning.
-
SKIP - Perform no validation.
Renamed from --skip-validation.
See Common vkconfig script options for options that are available in all of the vkconfig tools.
Examples
This example shows how you can create the cluster, StreamCluster1, and assign two hosts:
$ /opt/vertica/packages/kafka/bin/vkconfig cluster --create --cluster StreamCluster1 \
                                           --hosts 10.10.10.10:9092,10.10.10.11:9092
                                           --conf myscheduler.config
This example shows how you can list all of the clusters associated with the scheduler defined in the weblogs.conf file:
$ vkconfig cluster --read --conf weblog.conf
{"cluster":"kafka_weblog",
"hosts":"kafka01.example.com:9092,kafka02.example.com:9092"}
10.4 - Source tool options
Use the vkconfig script's source tool to create, update, or delete a source.
Use the vkconfig script's source tool to create, update, or delete a source.
Syntax
vkconfig source {--create | --read | --update | --delete} \
         --source source_name [other_options...]
--create- Creates a new source. Cannot be used with
--delete, --read, or --update.
--read- Outputs the current setting of the sources defined in the scheduler. The output is in JSON format. Cannot be used with
--create, --delete, or --update.
By default this option outputs all of the sources defined in the scheduler. You can limit the output by using the --cluster, --enabled, --partitions, and --source options. The output will only contain sources that match the values in these options. The --enabled option can only have a true or false value. The --source option is case-sensitive.
You can use LIKE wildcards in these options. See LIKE for more information about using wildcards.
--update- Updates the settings of
source_name. Cannot be used with --create, --delete, or --read.
--delete- Deletes the source named
source_name. Cannot be used with --create, --read, or --update.
--source source_name- Identifies the source to create or alter in the scheduler's configuration. This option is case-sensitive. You can use any name you like for a new source. Most people use the name of the Kafka topic the scheduler loads its data from. This option is required for
--create, --update, and --delete.
--cluster cluster_name- Identifies the cluster containing the source that you want to create or edit. You must have already defined this cluster in the scheduler.
--dumpWhen you use this option along with the --read option, vkconfig outputs the Vertica query it would use to retrieve the data, rather than outputting the data itself. This option is useful if you want to access the data from within Vertica without having to go through vkconfig. This option has no effect if not used with --read.
--enabled TRUE|FALSE- When TRUE, the source is available for use.
--new-cluster cluster_name- Changes the cluster this source belongs to.
All sources referencing the old cluster source now target this cluster.
Requires:--update and --source options
--new-source source_name- Updates the name of an existing source to the name specified by this parameter.
Requires: --update shared utility option
--partitions count- Sets the number of partitions in the source.
Default:
The number of partitions defined in the cluster.
Requires:--create and --source options
You must keep this consistent with the number of partitions in the Kafka topic.
Renamed from --num-partitions.
--validation-typERROR|WARN|SKIP}- Controls the validation performed on a created or updated source:
-
ERROR - Cancel configuration or creation if vkconfig cannot validate the source. This is the default setting.
-
WARN - Proceed with task if validation fails, but display a warning.
-
SKIP - Perform no validation.
Renamed from --skip-validation.
See Common vkconfig script options for options that are available in all of the vkconfig tools.
Examples
The following examples show how you can create or update SourceFeed.
Create the source SourceFeed and assign it to the cluster, StreamCluster1 in the scheduler defined by the myscheduler.conf config file:
$ /opt/vertica/packages/kafka/bin/vkconfig source --create --source SourceFeed \
                                           --cluster StreamCluster1 --partitions 3
                                           --conf myscheduler.conf
Update the existing source SourceFeed to use the existing cluster, StreamCluster2 in the scheduler defined by the myscheduler.conf config file:
$ /opt/vertica/packages/kafka/bin/vkconfig source --update --source SourceFeed \
                                           --new-cluster StreamCluster2
                                           --conf myscheduler.conf
The following example reads the sources defined in the scheduler defined by the weblogs.conf file.
$ vkconfig source --read --conf weblog.conf
{"source":"web_hits", "partitions":1, "src_enabled":true,
"cluster":"kafka_weblog",
"hosts":"kafka01.example.com:9092,kafka02.example.com:9092"}
10.5 - Target tool options
Use the target tool to configure a Vertica table to receive data from your streaming data application.
Use the target tool to configure a Vertica table to receive data from your streaming data application.
Syntax
vkconfig target {--create | --read | --update | --delete} \
                [--target-table table --table_schema schema] \
                [other_options...]
--create- Adds a new target table for the scheduler. Cannot be used with
--delete, --read, or --update.
--read- Outputs the targets defined in the scheduler. This output is in JSON format. Cannot be used with
--create, --delete, or --update.
By default this option outputs all of the targets defined in the configuration schema. You can limit the output to specific targets by using the --target-schema and --target-table options. The vkconfig script only outputs targets that match the values you set in these options.
You can use LIKE wildcards in these options. See LIKE for more information about using wildcards.
--update- Updates the settings for the targeted table. Use with the
--new-target-schema and --new-target-table options. Cannot be used with --create, --delete, or --read.
--delete- Removes the scheduler's association with the target table
table. Cannot be used with --create, --read, or --update.
--target-table table- The existing Vertica table for the scheduler to target. This option is required for
--create, --update, and --delete.
--target-schema schema- The existing Vertica schema containing the target table. This option is required for
--create, --update, and --delete.
--dumpWhen you use this option along with the --read option, vkconfig outputs the Vertica query it would use to retrieve the data, rather than outputting the data itself. This option is useful if you want to access the data from within Vertica without having to go through vkconfig. This option has no effect if not used with --read.
--new-target-schema schema_name- Changes the schema containing the target table to a another existing schema.
Requires: --update option.
--new-target-table table_name- Changes the Vertica target table associated with this schema to a another existing table.
Requires: --update option.
--validation-type {ERROR|WARN|SKIP}- Controls validation performed on a created or updated target:
-
ERROR - Cancel configuration or creation if vkconfig cannot validate that the table exists. This is the default setting.
-
WARN - Creates or updates the target if validation fails, but display a warning.
-
SKIP - Perform no validation.
Renamed from --skip-validation.
Important
Avoid having columns with primary key restrictions in your target table. The scheduler stops loading data if it encounters a row that has a value which violates this restriction. If you must have a primary key restricted column, try to filter out any redundant values for that column in the streamed data before is it loaded by the scheduler.
See Common vkconfig script options for options that are available in all of the vkconfig tools.
Examples
This example shows how you can create a target for the scheduler defined in the myscheduler.conf configuration file from public.streamtarget table:
$ /opt/vertica/packages/kafka/bin/vkconfig target --create \
            --target-table streamtarget --conf myscheduler.conf
This example lists all of the targets in the scheduler defined in the weblogs.conf configuration file.
$ vkconfig target --read --conf weblog.conf
{"target_schema":"public", "target_table":"web_hits"}
10.6 - Load spec tool options
The vkconfig script's load spec tool lets you provide parameters for a COPY statement that loads streaming data.
The vkconfig script's load spec tool lets you provide parameters for a COPY statement that loads streaming data.
Syntax
$ vkconfig load-spec {--create | --read | --update | --delete} \
           [--load-spec spec-name] [other-options...]
--create- Creates a new load spec. Cannot be used with
--delete, --read, or --update.
--read- Outputs the current settings of the load specs defined in the scheduler. This output is in JSON format. Cannot be used with
--create, --delete, or --update.
By default, this option outputs all load specs defined in the scheduler. You can limit the output by supplying a single value or a comma-separated list of values to these options:
-
--load-spec
-
--filters
-
--uds-kv-parameters
-
--parser
-
--message-max-bytes
-
--parser-parameters
The vkconfig script only outputs the configuration of load specs that match the values you supply.
You can use LIKE wildcards in these options. See LIKE for more information about using wildcards.
--update- Updates the settings of
spec-name. Cannot be used with --create, --delete, or --read.
--delete- Deletes the load spec named
spec-name. Cannot be used with --create, --read, or --update.
--load-spec spec-name- A unique name for copy load spec to operate on. This option is required for
--create, --update, and --delete.
--dumpWhen you use this option along with the --read option, vkconfig outputs the Vertica query it would use to retrieve the data, rather than outputting the data itself. This option is useful if you want to access the data from within Vertica without having to go through vkconfig. This option has no effect if not used with --read.
--filters "filter-name"- A Vertica FILTER chain containing all of the UDFilters to use in the COPY statement. For more information on filters, refer to Parsing custom formats.
--message-max-bytes max-sizeSpecifies the maximum size, in bytes, of a Kafka protocol batch message.
Default: 25165824
--new-load-spec new-name- A new, unique name for an existing load spec. Requires the
--update parameter.
-
--parser-parameters "key=value[,...]`"`
- A list of parameters to provide to the parser specified in the
--parser parameter. When you use a Vertica native parser, the scheduler passes these parameters to the COPY statement where they are in turn passed to the parser.
--parser parser-name- Identifies a Vertica UDParser to use with a specified target.This parser is used within the COPY statement that the scheduler runs to load data. If you are using a Vertica native parser, the values supplied to the
--parser-parameters option are passed through to the COPY statement.
**Default:**KafkaParser
--uds-kv-parameters key=value[,...]- A comma separated list of key value pairs for the user-defined source.
--validation-type {ERROR|WARN|SKIP}- Specifies the validation performed on a created or updated load spec, to one of the following:
-
ERROR: Cancel configuration or creation if vkconfig cannot validate the load spec. This is the default setting.
-
WARN: Proceed with task if validation fails, but display a warning.
-
SKIP: Perform no validation.
Renamed from --skip-validation.
See Common vkconfig script options for options that are available in all of the vkconfig tools.
Examples
These examples show how you can use the Load Spec utility options.
Create load spec Streamspec1:
$ /opt/vertica/packages/kafka/bin/vkconfig load-spec --create --load-spec Streamspec1 --conf myscheduler.conf
Rename load spec Streamspec1 to Streamspec2:
$ /opt/vertica/packages/kafka/bin/vkconfig load-spec --update --load-spec Streamspec1 \
                                                     --new-load-spec Streamspec2 \
                                                     --conf myscheduler.conf
Update load spec Filterspec to use the KafkaInsertLengths filter and a custom decryption filter:
$ /opt/vertica/packages/kafka/bin/vkconfig load-spec --update --load-spec Filterspec \
                                                     --filters "KafkaInsertLengths() DecryptFilter(parameter=Key)" \
                                                     --conf myscheduler.conf
Read the current settings for load spec streamspec1:
$ vkconfig load-spec --read --load-spec streamspec1 --conf weblog.conf
{"load_spec":"streamspec1", "filters":null, "parser":"KafkaParser",
"parser_parameters":null, "load_method":"TRICKLE", "message_max_bytes":null,
"uds_kv_parameters":null}
10.7 - Microbatch tool options
The vkconfig script's microbatch tool lets you configure a scheduler's microbatches.
The vkconfig script's microbatch tool lets you configure a scheduler's microbatches.
Syntax
vkconfig microbatch {--create | --read | --update | --delete} \
         [--microbatch microbatch_name] [other_options...]
--create- Creates a new microbatch. Cannot be used with
--delete, --read, or --update.
--read- Outputs the current settings of all microbatches defined in the scheduler. This output is in JSON format. Cannot be used with
--create, --delete, or --update.
You can limit the output to specific microbatches by using the --consumer-group-id, --enabled, --load-spec, --microbatch, --rejection-schema, --rejection-table, --target-schema, --target-table, and --target-columns options. The --enabled option only accepts a true or false value.
You can use LIKE wildcards in these options. See LIKE for more information about using wildcards.
--update- Updates the settings of
microbatch_name. Cannot be used with --create, --delete, or --read.
--delete- Deletes the microbatch named
microbatch_name. Cannot be used with --create, --read, or --update.
--microbatch microbatch_name- A unique, case insensitive name for the microbatch. This option is required for
--create, --update, and --delete.
--add-source-cluster cluster_name- The name of a cluster to assign to the microbatch you specify with the
--microbatch option. You can use this parameter once per command. You can also use it with --update to add sources to a microbatch. You can only add sources from the same cluster to a single microbatch. Requires --add-source.
--add-source source_name- The name of a source to assign to this microbatch. You can use this parameter once per command. You can also use it with
--update to add sources to a microbatch. Requires --add-source-cluster.
--cluster cluster_name- The name of the cluster to which the
--offset option applies. Only required if the microbatch defines more than one cluster or the --source parameter is supplied. Requires the --offset option.
--consumer-group-id id_nameThe name of the Kafka consumer group to which Vertica reports its progress consuming messages. Set this value to disable progress reports to a Kafka consumer group. For details, see Monitoring Vertica message consumption with consumer groups.
Default: vertica_database-name
--dumpWhen you use this option along with the --read option, vkconfig outputs the Vertica query it would use to retrieve the data, rather than outputting the data itself. This option is useful if you want to access the data from within Vertica without having to go through vkconfig. This option has no effect if not used with --read.
--enabled TRUE|FALSE- When TRUE, allows the microbatch to execute.
--load-spec loadspec_name- The load spec to use while processing this microbatch.
--max-parallelism max_num_loads- The maximum number of simultaneous COPY statements created for the microbatch. The scheduler dynamically splits a single microbatch with multiple partitions into
max_num_loads COPY statements with fewer partitions.
This option allows you to:
--new-microbatch updated_name- The updated name for the microbatch. Requires the
--update option.
--offset partition_offset[,...]- The offset of the message in the source where the microbatch starts its load. If you use this parameter, you must supply an offset value for each partition in the source or each partition you list in the
--partition option.
You can use this option to skip some messages in the source or reload previously read messages.
See Special Starting Offset Values below for more information.
Important
You cannot set an offset for a microbatch while the scheduler is running. If you attempt to do so, the vkconfig utility returns an error. Use the shutdown utility to shut the scheduler down before setting an offset for a microbatch.
--partition partition[,...]- One or more partitions to which the offsets given in the
--offset option apply. If you supply this option, then the offset values given in the --offset option applies to the partitions you specify. Requires the --offset option.
--rejection-schema schema_name- The existing Vertica schema that contains a table for storing rejected messages.
--rejection-table table_name- The existing Vertica table that stores rejected messages.
--remove-source-cluster cluster_name- The name of a cluster to remove from this microbatch. You can use this parameter once per command. Requires
--remove-source.
--remove-source source_name- The name of a source to remove from this microbatch. You can use this parameter once per command. You can also use it with
--update to remove multiple sources from a microbatch. Requires --remove-source-cluster.
--source source_name- The name of the source to which the offset in the
--offset option applies. Required when the microbatch defines more than one source or the --cluster parameter is given. Requires the --offset option.
--target-columns column_expression- A column expression for the target table, where
column_expression can be a comma-delimited list of columns or a complete expression.
See the COPY statement Parameters for a description of column expressions.
--target-schema schema_name- The existing Vertica target schema associated with this microbatch.
--target-table table_name- The name of a Vertica table corresponding to the target. This table must belong to the target schema.
--validation-type {ERROR|WARN|SKIP}- Controls the validation performed on a created or updated microbatch:
-
ERROR - Cancel configuration or creation if vkconfig cannot validate the microbatch. This is the default setting.
-
WARN - Proceed with task if validation fails, but display a warning.
-
SKIP - Perform no validation.
Renamed from --skip-validation.
See Common vkconfig script options for options that are available in all of the vkconfig tools.
Special starting offset values
The start_offset portion of the stream parameter lets you start loading messages from a specific point in the topic's partition. It also accepts one of two special offset values:
-
-2 tells the scheduler to start loading at the earliest available message in the topic's partition. This value is useful when you want to load as many messages as you can from the Kafka topic's partition.
-
-3 tells the scheduler to start loading from the consumer group's saved offset. If the consumer group does not have a saved offset, it starts loading from the earliest available message in the topic partition. See Monitoring Vertica message consumption with consumer groups for more information.
Examples
This example shows how you can create the microbatch, mbatch1. This microbatch identifies the schema, target table, load spec, and source for the microbatch:
$ /opt/vertica/packages/kafka/bin/vkconfig microbatch --create --microbatch mbatch1 \
                                                    --target-schema public \
                                                    --target-table BatchTarget \
                                                    --load-spec Filterspec \
                                                    --add-source SourceFeed \
                                                    --add-source-cluster StreamCluster1 \
                                                    --conf myscheduler.conf
This example demonstrates listing the current settings for the microbatches in the scheduler defined in the weblog.conf configuration file.
$ vkconfig microbatch --read --conf weblog.conf
{"microbatch":"weblog", "target_columns":null, "rejection_schema":null,
"rejection_table":null, "enabled":true, "consumer_group_id":null,
"load_spec":"weblog_load", "filters":null, "parser":"KafkaJSONParser",
"parser_parameters":null, "load_method":"TRICKLE", "message_max_bytes":null,
"uds_kv_parameters":null, "target_schema":"public", "target_table":"web_hits",
"source":"web_hits", "partitions":1, "src_enabled":true, "cluster":"kafka_weblog",
"hosts":"kafka01.example.com:9092,kafka02.example.com:9092"}
10.8 - Launch tool options
Use the vkconfig script's launch tool to assign a name to a scheduler instance.
Use the vkconfig script's launch tool to assign a name to a scheduler instance.
Syntax
vkconfig launch [options...]
--enable-ssl {true|false}- (Optional) Enables SSL authentication
between Kafka and Vertica . For more information, refer to TLS/SSL encryption with Kafka.
--ssl-ca-alias alias- The user-defined alias of the root certifying authority you are using to authenticate communication between Vertica and Kafka. This parameter is used only when SSL is enabled.
--ssl-key-alias alias- The user-defined alias of the key/certificate pair you are using to authenticate communication between Vertica and Kafka. This parameter is used only when SSL is enabled.
--ssl-key-password password- The password used to create your SSL key. This parameter is used only when SSL is enabled.
--instance-name name- (Optional) Allows you to name the process running the scheduler. You can use this command when viewing the scheduler_history table, to find which instance is currently running.
--refresh-interval hours- (Optional) The time interval at which the connection between Vertica and Kafka is refreshed (24 hours by default).
--kafka_conf 'kafka_configuration_setting'
A JSON-formatted object of option/value pairs to pass directly to the rdkafka library. This is the library Vertica uses to communicate with Kafka. You can use this parameter to directly set configuration options that are not available through the Vertica integration with Kafka. See Directly setting Kafka library options for details.
--kafka_conf_secret 'kafka_configuration_setting'Conceals sensitive configuration data that you must pass directly to the rdkafka library, such as passwords. This parameter accepts settings in the same format as kafka_conf.
Values passed to this parameter are not logged or stored in system tables.
See Common vkconfig script options for options that are available in all of the vkconfig tools.
Examples
This example shows how you can launch the scheduler defined in the myscheduler.conf config file and give it the instance name PrimaryScheduler:
$ nohup /opt/vertica/packages/kafka/bin/vkconfig launch --instance-name PrimaryScheduler \
  --conf myscheduler.conf >/dev/null 2>&1 &
This example shows how you can launch an instance named SecureScheduler with SSL enabled:
$ nohup /opt/vertica/packages/kafka/bin/vkconfig launch --instance-name SecureScheduler --enable-SSL true \
                                                  --ssl-ca-alias authenticcert --ssl-key-alias ourkey \
                                                  --ssl-key-password secret \
                                                  --conf myscheduler.conf \
                                                  >/dev/null 2>&1 &
10.9 - Shutdown tool options
Use the vkconfig script's shutdown tool to terminate one or all Vertica schedulers running on a host.
Use the vkconfig script's shutdown tool to terminate one or all Vertica schedulers running on a host. Always run this command before restarting a scheduler to ensure the scheduler has shutdown correctly.
Syntax
vkconfig shutdown [options...]
See Common vkconfig script options for options that are available in all vkconfig tools.
Examples
To terminate all schedulers running on a host, use the shutdown command with no options:
$ /opt/vertica/packages/kafka/bin/vkconfig shutdown
Use the --conf or --config-schema option to specify a scheduler to shut down. The following command terminates the scheduler that was launched with the same --conf myscheduler.conf option:
$ /opt/vertica/packages/kafka/bin/vkconfig shutdown --conf myscheduler.conf
10.10 - Statistics tool options
The statistics tool lets you access the history of microbatches that your scheduler has run.
The statistics tool lets you access the history of microbatches that your scheduler has run. This tool outputs the log of the microbatches in JSON format to the standard output. You can use its options to filter the list of microbatches to get just the microbatches that interest you.
Note
The statistics tool can sometimes produce confusing output if you have altered the scheduler configuration over time. For example, suppose you have microbatch-a target a table. Later, you change the scheduler's configuration so that microbatch-b targets the table. Afterwards, you run the statistics tool and filter the microbatch log based on target table. Then the log output will show entries from both microbatch-a and microbatch-b.
Syntax
vkconfig statistics [options]
--cluster "cluster"[,"cluster2"...]- Only return microbatches that retrieved data from a cluster whose name matches one in the list you supply.
--dump- Instead of returning microbatch data, return the SQL query that vkconfig would execute to extract the data from the scheduler tables. You can use this option if you want use a Vertica client application to get the microbatch log instead of using vkconfig's JSON output.
--from-timestamp "timestamp"- Only return microbatches that began after
timestamp. The timestamp value is in yyyy-[m]m-[d]d hh:mm:ss format.
Cannot be used in conjunction with --last.
--last number- Returns the number most recent microbatches that meet all other filters. Cannot be used in conjunction with
--from-timestamp or --to-timestamp.
--microbatch "name"[,"name2"...]- Only return microbatches whose name matches one of the names in the comma-separated list.
--partition partition#[,partition#2...]- Only return microbatches that accessed data from the topic partition that matches ones of the values in the partition list.
--source "source"[,"source2"...]- Only return microbatches that accessed data from a source whose name matches one of the names in the list you supply to this argument.
--target-schema "schema"[,"schema2"...]- Only return microbatches that wrote data to the Vertica schemas whose name matches one of the names in the target schema list argument.
--target-table "table"[,"table2"...]- Only return microbatches that wrote data to Vertica tables whose name match one of the names in the target schema list argument.
--to-timestamp "timestamp"- Only return microbatches that began before
timestamp. The timestamp value is in yyyy-[m]m-[d]d hh:mm:ss format.
Cannot be used in conjunction with --last.
See Common vkconfig script options for options that are available in all of the vkconfig tools.
Usage considerations
-
You can use LIKE wildcards in the values you supply to the --cluster, --microbatch, --source, --target-schema, and --target-table arguments. This feature lets you match partial strings in the microbatch data. See LIKE for more information about using wildcards.
-
The string comparisons for the --cluster, --microbatch, --source, --target-schema, and --target-table arguments are case-insensitive.
-
The date and time values you supply to the --from-timestamp and --to-timestamp arguments use the java.sql.timestamp format for parsing the value. This format's parsing can accept values that you may consider invalid and would expect it to reject. For example, if you supply a timestamp of 01-01-2018 24:99:99, the Java timestamp parser silently converts the date to 2018-01-02 01:40:39 instead of returning an error.
Examples
This example gets the last microbatch that the scheduler defined in the weblog.conf file ran:
$ /opt/vertica/packages/kafka/bin/vkconfig statistics --last 1 --conf weblog.conf
{"microbatch":"weblog", "target_schema":"public", "target_table":"web_hits",
"source_name":"web_hits", "source_cluster":"kafka_weblog", "source_partition":0,
"start_offset":80000, "end_offset":79999, "end_reason":"END_OF_STREAM",
"end_reason_message":null, "partition_bytes":0, "partition_messages":0,
"timeslice":"00:00:09.793000", "batch_start":"2018-11-06 09:42:00.176747",
"batch_end":"2018-11-06 09:42:00.437787", "source_duration":"00:00:00.214314",
"consecutive_error_count":null, "transaction_id":45035996274513069,
"frame_start":"2018-11-06 09:41:59.949", "frame_end":null}
If your scheduler is reading from more than partition, the --last 1 option lists the last microbatch from each partition:
$ /opt/vertica/packages/kafka/bin/vkconfig statistics --last 1 --conf iot.conf
{"microbatch":"iotlog", "target_schema":"public", "target_table":"iot_data",
"source_name":"iot_data", "source_cluster":"kafka_iot", "source_partition":0,
"start_offset":-2, "end_offset":-2, "end_reason":"DEADLINE",
"end_reason_message":null, "partition_bytes":0, "partition_messages":0,
"timeslice":"00:00:09.842000", "batch_start":"2018-11-06 12:52:49.387567",
"batch_end":"2018-11-06 12:52:59.400219", "source_duration":"00:00:09.950127",
"consecutive_error_count":null, "transaction_id":45035996274537015,
"frame_start":"2018-11-06 12:52:49.213", "frame_end":null}
{"microbatch":"iotlog", "target_schema":"public", "target_table":"iot_data",
"source_name":"iot_data", "source_cluster":"kafka_iot", "source_partition":1,
"start_offset":1604, "end_offset":1653, "end_reason":"END_OF_STREAM",
"end_reason_message":null, "partition_bytes":4387, "partition_messages":50,
"timeslice":"00:00:09.842000", "batch_start":"2018-11-06 12:52:49.387567",
"batch_end":"2018-11-06 12:52:59.400219", "source_duration":"00:00:00.220329",
"consecutive_error_count":null, "transaction_id":45035996274537015,
"frame_start":"2018-11-06 12:52:49.213", "frame_end":null}
{"microbatch":"iotlog", "target_schema":"public", "target_table":"iot_data",
"source_name":"iot_data", "source_cluster":"kafka_iot", "source_partition":2,
"start_offset":1603, "end_offset":1652, "end_reason":"END_OF_STREAM",
"end_reason_message":null, "partition_bytes":4383, "partition_messages":50,
"timeslice":"00:00:09.842000", "batch_start":"2018-11-06 12:52:49.387567",
"batch_end":"2018-11-06 12:52:59.400219", "source_duration":"00:00:00.318997",
"consecutive_error_count":null, "transaction_id":45035996274537015,
"frame_start":"2018-11-06 12:52:49.213", "frame_end":null}
{"microbatch":"iotlog", "target_schema":"public", "target_table":"iot_data",
"source_name":"iot_data", "source_cluster":"kafka_iot", "source_partition":3,
"start_offset":1604, "end_offset":1653, "end_reason":"END_OF_STREAM",
"end_reason_message":null, "partition_bytes":4375, "partition_messages":50,
"timeslice":"00:00:09.842000", "batch_start":"2018-11-06 12:52:49.387567",
"batch_end":"2018-11-06 12:52:59.400219", "source_duration":"00:00:00.219543",
"consecutive_error_count":null, "transaction_id":45035996274537015,
"frame_start":"2018-11-06 12:52:49.213", "frame_end":null}
You can use the --partition argument to get just the partitions you want:
$ /opt/vertica/packages/kafka/bin/vkconfig statistics --last 1 --partition 2 --conf iot.conf
{"microbatch":"iotlog", "target_schema":"public", "target_table":"iot_data",
"source_name":"iot_data", "source_cluster":"kafka_iot", "source_partition":2,
"start_offset":1603, "end_offset":1652, "end_reason":"END_OF_STREAM",
"end_reason_message":null, "partition_bytes":4383, "partition_messages":50,
"timeslice":"00:00:09.842000", "batch_start":"2018-11-06 12:52:49.387567",
"batch_end":"2018-11-06 12:52:59.400219", "source_duration":"00:00:00.318997",
"consecutive_error_count":null, "transaction_id":45035996274537015,
"frame_start":"2018-11-06 12:52:49.213", "frame_end":null}
If your scheduler reads from more than one source, the --last 1 option outputs the last microbatch from each source:
$ /opt/vertica/packages/kafka/bin/vkconfig statistics --last 1 --conf weblog.conf
{"microbatch":"weberrors", "target_schema":"public", "target_table":"web_errors",
"source_name":"web_errors", "source_cluster":"kafka_weblog",
"source_partition":0, "start_offset":10000, "end_offset":9999,
"end_reason":"END_OF_STREAM", "end_reason_message":null,
"partition_bytes":0, "partition_messages":0, "timeslice":"00:00:04.909000",
"batch_start":"2018-11-06 10:58:02.632624",
"batch_end":"2018-11-06 10:58:03.058663", "source_duration":"00:00:00.220618",
"consecutive_error_count":null, "transaction_id":45035996274523991,
"frame_start":"2018-11-06 10:58:02.394", "frame_end":null}
{"microbatch":"weblog", "target_schema":"public", "target_table":"web_hits",
"source_name":"web_hits", "source_cluster":"kafka_weblog", "source_partition":0,
"start_offset":80000, "end_offset":79999, "end_reason":"END_OF_STREAM",
"end_reason_message":null, "partition_bytes":0, "partition_messages":0,
"timeslice":"00:00:09.128000", "batch_start":"2018-11-06 10:58:03.322852",
"batch_end":"2018-11-06 10:58:03.63047", "source_duration":"00:00:00.226493",
"consecutive_error_count":null, "transaction_id":45035996274524004,
"frame_start":"2018-11-06 10:58:02.394", "frame_end":null}
You can use wildcards to enable partial matches. This example demonstrates getting the last microbatch for all microbatches whose names end with "log":
~$ /opt/vertica/packages/kafka/bin/vkconfig statistics --microbatch "%log" \
                                            --last 1 --conf weblog.conf
{"microbatch":"weblog", "target_schema":"public", "target_table":"web_hits",
"source_name":"web_hits", "source_cluster":"kafka_weblog", "source_partition":0,
"start_offset":80000, "end_offset":79999, "end_reason":"END_OF_STREAM",
"end_reason_message":null, "partition_bytes":0, "partition_messages":0,
"timeslice":"00:00:04.874000", "batch_start":"2018-11-06 11:37:16.17198",
"batch_end":"2018-11-06 11:37:16.460844", "source_duration":"00:00:00.213129",
"consecutive_error_count":null, "transaction_id":45035996274529932,
"frame_start":"2018-11-06 11:37:15.877", "frame_end":null}
To get microbatches from a specific period of time, use the --from-timestamp and --to-timestamp arguments. This example gets the microbatches that read from partition #2 between 12:52:30 and 12:53:00 on 2018-11-06 for the scheduler defined in iot.conf.
$ /opt/vertica/packages/kafka/bin/vkconfig statistics  --partition 1 \
                        --from-timestamp "2018-11-06 12:52:30" \
                        --to-timestamp "2018-11-06 12:53:00" --conf iot.conf
{"microbatch":"iotlog", "target_schema":"public", "target_table":"iot_data",
"source_name":"iot_data", "source_cluster":"kafka_iot", "source_partition":1,
"start_offset":1604, "end_offset":1653, "end_reason":"END_OF_STREAM",
"end_reason_message":null, "partition_bytes":4387, "partition_messages":50,
"timeslice":"00:00:09.842000", "batch_start":"2018-11-06 12:52:49.387567",
"batch_end":"2018-11-06 12:52:59.400219", "source_duration":"00:00:00.220329",
"consecutive_error_count":null, "transaction_id":45035996274537015,
"frame_start":"2018-11-06 12:52:49.213", "frame_end":null}
{"microbatch":"iotlog", "target_schema":"public", "target_table":"iot_data",
"source_name":"iot_data", "source_cluster":"kafka_iot", "source_partition":1,
"start_offset":1554, "end_offset":1603, "end_reason":"END_OF_STREAM",
"end_reason_message":null, "partition_bytes":4371, "partition_messages":50,
"timeslice":"00:00:09.788000", "batch_start":"2018-11-06 12:52:38.930428",
"batch_end":"2018-11-06 12:52:48.932604", "source_duration":"00:00:00.231709",
"consecutive_error_count":null, "transaction_id":45035996274536981,
"frame_start":"2018-11-06 12:52:38.685", "frame_end":null}
This example demonstrates using the --dump argument to get the SQL statement vkconfig executed to retrieve the output from the previous example:
$ /opt/vertica/packages/kafka/bin/vkconfig statistics  --dump --partition 1 \
                       --from-timestamp "2018-11-06 12:52:30" \
                       --to-timestamp "2018-11-06 12:53:00" --conf iot.conf
SELECT microbatch, target_schema, target_table, source_name, source_cluster,
source_partition, start_offset, end_offset, end_reason, end_reason_message,
partition_bytes, partition_messages, timeslice, batch_start, batch_end,
last_batch_duration AS source_duration, consecutive_error_count, transaction_id,
frame_start, frame_end FROM "iot_sched".stream_microbatch_history WHERE
(source_partition = '1') AND (frame_start >= '2018-11-06 12:52:30.0') AND
(frame_start < '2018-11-06 12:53:00.0') ORDER BY frame_start DESC, microbatch,
source_cluster, source_name, source_partition;
10.11 - Sync tool options
The sync utility immediately updates all source definitions by querying the Kafka cluster's brokers defined by the source.
The sync utility immediately updates all source definitions by querying the Kafka cluster's brokers defined by the source. By default, it updates all of the sources defined in the target schema. To update just specific sources, use the --source and --cluster options to specify which sources to update.
Syntax
vkconfig sync [options...]
--source source_name- The name of the source sync. This source must already exist in the target schema.
--cluster cluster_name- Identifies the cluster containing the source that you want to sync. You must have already defined this cluster in the scheduler.
--kafka_conf 'kafka_configuration_setting'
A JSON-formatted object of option/value pairs to pass directly to the rdkafka library. This is the library Vertica uses to communicate with Kafka. You can use this parameter to directly set configuration options that are not available through the Vertica integration with Kafka. See Directly setting Kafka library options for details.
--kafka_conf_secret 'kafka_configuration_setting'Conceals sensitive configuration data that you must pass directly to the rdkafka library, such as passwords. This parameter accepts settings in the same format as kafka_conf.
Values passed to this parameter are not logged or stored in system tables.
See the Common vkconfig script options for options available in all of the vkconfig tools..
11 - Kafka function reference
This section lists the functions that make up Vertica's Kafka integration feature.
This section lists the functions that make up Vertica's Kafka integration feature.
11.1 - KafkaAvroParser
The KafkaAvroParser parses Avro-formatted Kafka messages and loads them into a regular Vertica table or a Vertica flex table.
The KafkaAvroParser parses Avro-formatted Kafka messages and loads them into a regular Vertica table or a Vertica flex table.
Syntax
KafkaAvroParser(param=value[,...])
enforce_length- When set to TRUE, rejects the row if any value is too wide to fit into its column. When using the default setting (FALSE) , the parser truncates any value that is too wide to fit within the column's maximum width.
reject_on_materialized_type_error- When set to TRUE, rejects the row if it contains a materialized column value that cannot be mapped into the materialized column's data type.
flatten_maps- If set to TRUE, flattens all Avro maps.
flatten_arrays- If set to TRUE, flattens Avro arrays.
flatten_records- If set to TRUE, flattens all Avro records.
external_schema- The schema of the Avro file as a JSON string. If this parameter is not specified, the parser assumes that each message has the schema on it. If you are using a schema registry, do not use this parameter.
codec- The codec in which the Avro file was written. Valid values are:
-
default: Data is not compressed and codec is not needed
-
deflate: Data is compressed using the deflate codec
-
snappy: Snappy compression
Note
This option is mainly provided for backwards compatibility. You usually have Kafka compress data at the message level, and have KafkaSource decompress the message for you.
with_metadata- If set to TRUE, messages include Avro datum, schema, and object metadata. By default, the KafkaAvroParser parses messages without including schema and metadata. If you enable this parameter, write your messages using the Avro API and confirm they contain only Avro datum. The default value is FALSE.
schema_registry_url- Required, the URL of the Confluent schema registry. This parameter is required to load data based on a schema registry version. If you are using an external schema, do not use this parameter. For more information, refer to Avro Schema Registry.
Note
TLS connections must use the HTTPS protocol.
schema_registry_ssl_ca_path- Required for TLS connections, the path on the Vertica node's file system to a directory containing one or more hashed certificate authority (CA) certificates that signed the schema registry's server certificate. Each Vertica node must store hashed CA certificates on the same path.
-
Important
In some circumstances, you might receive a validation error stating that the KafkaAvroParser cannot locate your CA certificate. To correct this error, store your CA certificate in your operating system's default bundle. For example, store the CA certificate in /etc/pki/tls/certs/ca-bundle.crt on Red Hat operating systems.
For details on hashed CA certificates, see Hashed CA Certificates.
schema_registry_ssl_cert_path- Path on the Vertica node's file system to a client certificate issued by a certificate authority (CA) that the schema registry trusts.
schema_registry_ssl_key_path- Path on the Vertica server file system to the private key for the client certificate defined with
schema_registry_ssl_cert_path.
schema_registry_ssl_key_password_path- Path on the Vertica server file system to the optional password for the private key defined with
schema_registry_ssl_key_path.
schema_registry_subject- In the schema registry, the subject of the schema to use for data loading.
schema_registry_version- In the schema registry, the version of the schema to use for data loading.
key_separator- Sets the character to use as the separator between keys.
Data types
KafkaAvroParser supports the same data types as the favroparser. For details, see Avro data.
Example
The following example demonstrates loading data from Kafka in an Avro format. The statement:
-
Loads data into an existing flex table named weather_logs.
-
Copies data from the default Kafka broker (running on the local system on port 9092).
-
The source is named temperature.
-
The source has a single partition.
-
The load starts from offset 0.
-
The load ends either after 10 seconds or the load reaches the end of the source, whichever occurs first.
-
The KafkaAvroParser does not flatten any arrays, maps, or records it finds in the source.
-
The schema for the data is provided in the statement as a JSON string. It defines a record type named Weather that contains fields for a station name, a time, and a temperature.
-
Rejected rows of data are saved to a table named t_rejects1.
=> COPY weather_logs
   SOURCE KafkaSource(stream='temperature|0|0', stop_on_eof=true,
                      duration=interval '10 seconds')
   PARSER KafkaAvroParser(flatten_arrays=False, flatten_maps=False, flatten_records=False,
                          external_schema=E'{"type":"record","name":"Weather","fields":'
                                           '[{"name":"station","type":"string"},'
                                           '{"name":"time","type":"long"},'
                                           '{"name":"temp","type":"int"}]}')
   REJECTED DATA AS TABLE "t_rejects1";
Hashed CA certificates
Some parameters like schema_registry_ssl_ca_path require hashed CA certificates rather than the CA certificates themselves. A hashed CA certificate is a symbolic link to the original CA certificate. This symbolic link must have the following naming scheme:
CA_hash.0
For example, if the hash for ca_cert.pem is 9741086f, the hashed CA certificate would be 9741086f.0, a symbolic link to ca_cert.pem.
For details, see the OpenSSL 1.1 or 1.0 documentation.
Hashing CA certificates
The procedure for hashing CA certificates varies between versions of openssl. You can find your version of openssl with:
$ openssl version
For openssl 1.1 or higher, use openssl rehash. For example, if the directory /my_ca_certs/ contains ca_cert.pem, you can hash and symbolically link to it with:
$ openssl rehash /my_ca_certs/
This adds the hashed CA certificate to the directory:
$ ls -l
total 8
lrwxrwxrwx 1 ver ver    8 Mar 13 14:41 9da13359.0 -> ca_cert.pem
-rw-r--r-- 1 ver ver 1245 Mar 13 14:41 ca_cert.pem
For openssl 1.0, you can use openssl x509 -hash -noout -in ca_cert.pem to retrieve the hash and then create a symbolic link to the CA certificate. For example:
-
Run the following command to retrieve the hash of the CA certificate ca_cert.pem:
$ openssl x509 -hash -noout -in /my_ca_certs/ca_cert.pem
9741086f
-
Create a symbolic link to /my_ca_certs/ca_cert.pem:
$ ln /my_ca_certs/ca_cert.pem /my_ca_certs/9741086f.0
This adds the hashed CA certificate to the directory:
$ ls -l
total 8
-rw-r--r-- 2 ver ver 1220 Mar 13 13:41 9741086f.0 -> ca_cert.pem
-rw-r--r-- 2 ver ver 1220 Mar 13 13:41 ca_cert.pem
11.2 - KafkaCheckBrokers
Retrieves information about the brokers in a Kafka cluster.
Retrieves information about the brokers in a Kafka cluster. This function is intended mainly for internal use—it used by the streaming job scheduler to get the list of brokers in the Kafka cluster. You can call the function to determine which brokers Vertica knows about.
Syntax
KafkaCheckBrokers(USING PARAMETERS brokers='hostname:port[,hostname2:port...]'
                                   [, kafka_conf='kafka_configuration_setting']
                                   [, timeout=timeout_sec])
brokers- The host name and port number of a broker in the Kafka cluster used to retrieve the list of brokers. You can supply more than one broker as a comma-separated list. If the list includes brokers from more than one Kafka cluster, the cluster containing the last host in the list is queried.
kafka_confA JSON-formatted object of option/value pairs to pass directly to the rdkafka library. This is the library Vertica uses to communicate with Kafka. You can use this parameter to directly set configuration options that are not available through the Vertica integration with Kafka. See Directly setting Kafka library options for details.
kafka_conf_secretConceals sensitive configuration data that you must pass directly to the rdkafka library, such as passwords. This parameter accepts settings in the same format as kafka_conf.
Values passed to this parameter are not logged or stored in system tables.
timeoutInteger number of seconds to wait for a response from the Kafka cluster.
Example
=> SELECT KafkaCheckBrokers(USING PARAMETERS brokers='kafka01.example.com:9092')
          OVER ();
 broker_id |        hostname     | port
-----------+---------------------+------
         2 | kafka03.example.com | 9092
         1 | kafka02.example.com | 9092
         3 | kafka04.example.com | 9092
         0 | kafka01.example.com | 9092
(4 rows)
11.3 - KafkaExport
Sends Vertica data to Kafka.
Sends Vertica data to Kafka.
If Vertica successfully exports all of the rows of data to Kafka, this function returns zero rows. You can use the output of this function to copy failed messages to a secondary table for evaluation and reprocessing.
Syntax
SELECT KafkaExport(partitionColumn, keyColumn, valueColumn
    USING PARAMETERS brokers='host[:port][,host...]',
    topic='topicname'
    [,kafka_conf='kafka_configuration_setting']
    [,fail_on_conf_parse_error=Boolean])
OVER (partition_clause) FROM table;
Parameters
partitionColumn- The target partition for the export. If you set this value to NULL, Vertica uses the default partitioning scheme. You can use the partition argument to send messages to partitions that map to Vertica segments.
keyColumn- The user defined key value associated with the valueColumn. Use NULL to skip this argument.
valueColumn- The message itself. The column is a LONG VARCHAR, allowing you to send up to 32MB of data to Kafka. However, Kafka may impose its own limits on message size.
brokers- A string containing a comma-separated list of one or more host names or IP addresses (with optional port number) of brokers in the Kafka cluster.
topic- The Kafka topic to which you are exporting.
kafka_confA JSON-formatted object of option/value pairs to pass directly to the rdkafka library. This is the library Vertica uses to communicate with Kafka. You can use this parameter to directly set configuration options that are not available through the Vertica integration with Kafka. See Directly setting Kafka library options for details.
kafka_conf_secretConceals sensitive configuration data that you must pass directly to the rdkafka library, such as passwords. This parameter accepts settings in the same format as kafka_conf.
Values passed to this parameter are not logged or stored in system tables.
fail_on_conf_parse_errorDetermines whether the function fails when kafka_conf contains incorrectly formatted options and values, or invalid configuration properties.
Default Value: FALSE
For accepted option and value formats, see Directly setting Kafka library options.
For a list of valid configuration properties, see the rdkafka GitHub repository.
Example
The following example converts each row from the iot_report table into a JSON object, and exports it to a Kafka topic named iot-report.
The iot_report table contains the following columns and data:
=> SELECT * FROM iot_report;
 server |        date         |        location         |    id
--------+---------------------+-------------------------+----------
      1 | 2016-10-11 04:09:28 |  -14.86058, 112.75848   | 70982027
      1 | 2017-07-02 12:37:48 |  -21.42197, -127.17672  | 49494918
      2 | 2017-01-20 03:05:24 |  37.17372, 136.14026    | 36670100
      2 | 2017-07-29 11:38:37 |  -38.99517, 171.72671   | 52049116
      1 | 2017-10-19 14:04:33 |  -71.72156, -36.27381   | 94328189
(5 rows)
To build the KafkaExport function, provide the following values to define the Kafka message:
-
partitionColumn: Use the server column. Because the server column values are one-based and Kafka partitions are zero-based, subtract 1 from the server value.
-
keyColumn: Use the id column. This requires that you explicitly cast the id value to a VARCHAR type.
-
valueColumn: Each message formats the date and location columns as the key/value pairs in the exported JSON object.
To convert these rows to JSON format, use the ROW function to convert the date and location columns to structured data. Then, pass the ROW function to the TO_JSON function to encode the data structure as a JSON object.
Complete the remaining required function arguments and execute the KafkaExport function. If it succeeds, it returns 0 rows:
=> SELECT KafkaExport(server - 1, id::VARCHAR, TO_JSON(ROW(date, location))
                      USING PARAMETERS brokers='broker01:9092,broker02:9092',
                      topic='iot-results')
   OVER (PARTITION BEST)
   FROM iot_report;
 partition | key | message | failure_reason
-----------+-----+---------+----------------
(0 rows)
Use kafkacat to verify that the consumer contains the JSON-formatted data in the iot-results topic:
$ /opt/vertica/packages/kafka/bin/kafkacat -C -t iot-results -b broker01:9092,broker02:9092
{"date":"2017-01-20 03:05:24","location":" 37.17372, 136.14026   "}
{"date":"2017-07-29 11:38:37","location":" -38.99517, 171.72671  "}
{"date":"2016-10-11 04:09:28","location":" -14.86058, 112.75848  "}
{"date":"2017-10-19 14:04:33","location":" -71.72156, -36.27381  "}
{"date":"2017-07-02 12:37:48","location":" -21.42197, -127.17672 "}
See also
Producing data using KafkaExport
11.4 - KafkaJSONParser
The KafkaJSONParser parses JSON-formatted Kafka messages and loads them into a regular Vertica table or a Vertica flex table.
The KafkaJSONParser parses JSON-formatted Kafka messages and loads them into a regular Vertica table or a Vertica flex table.
Syntax
KafkaJSONParser(
        [enforce_length=Boolean]
        [, flatten_maps=Boolean]
        [, flatten_arrays=Boolean]
        [, start_point=string]
        [, start_point_occurrence=integer]
        [, omit_empty_keys=Boolean]
        [, reject_on_duplicate=Boolean]
        [, reject_on_materialized_type_error=Boolean]
        [, reject_on_empty_key=Boolean]
        [, key_separator=char]
        [, suppress_nonalphanumeric_key_chars=Boolean]
        )
enforce_length- If set to TRUE, rejects the row if data being loaded is too wide to fit into its column. Defaults to FALSE, which truncates any data that is too wide to fit into its column.
flatten_maps- If set to TRUE, flattens all JSON maps.
flatten_arrays- If set to TRUE, flattens JSON arrays.
start_point- Specifies the key in the JSON data that the parser should parse. The parser only extracts data that is within the value associated with the
start_point key. It parses the values of all instances of the start_point key within the data.
start_point_occurrence- Integer value indicating which the occurrence of the key specified by the
start_point parameter where the parser should begin parsing. For example, if you set this value to 4, the parser will only begin loading data from the fifth occurrence of the start_point key. Only has an effect if you also supply the start_point parameter.
omit_empty_keys- If set to TRUE, omits any key from the load data that does not have a value set.
reject_on_duplicate- If set to TRUE, rejects the row that contains duplicate key names. Key names are case-insensitive, so the keys "mykey" and "MyKey" are considered duplicates.
reject_on_materialized_type_error- If set to TRUE, rejects the row if the data includes keys matching an existing materialized column and has a key that cannot be mapped into the materialized column's data type.
reject_on_empty_key- If set to TRUE, rejects any row containing a key without a value.
key_separator- A single character to use as the separator between key values instead of the default period (
.) character.
suppress_nonalphanumeric_key_chars- If set to TRUE, replaces all non-alphanumeric characters in JSON key values with an underscore (_) character.
See JSON data for more information.
The following example demonstrates loading JSON data from Kafka. The parameters in the statement define to the load to:
-
Load data into the pre-existing table named logs.
-
The KafkaSource streams the data from a single partition in the source called server_log.
-
The Kafka broker for the data load is running on the host named kafka01 on port 9092.
-
KafkaSource stops loading data after either 10 seconds or on reaching the end of the stream, whichever happens first.
-
The KafkJSONParser flattens any arrays or maps in the JSON data.
=> COPY logs SOURCE KafkaSource(stream='server_log|0|0',
                                stop_on_eof=true,
                                duration=interval '10 seconds',
                                brokers='kafka01:9092')
   PARSER KafkaJSONParser(flatten_arrays=True, flatten_maps=True);
11.5 - KafkaListManyTopics
Retrieves information about all topics from a Kafka broker.
Retrieves information about all topics from a Kafka broker. This function lists all of the topics defined in the Kafka cluster as well the number of partitions it contains and which brokers serve the topic.
Syntax
KafkaListManyTopics('broker:port[;...]'
                    [USING PARAMETERS
                        [kafka_conf='kafka_configuration_setting'
                        [, timeout=timeout_sec]])
broker- The hostname (or ip address) of a broker in the Kafka cluster
port- The port number on which the broker is running.
kafka_confA JSON-formatted object of option/value pairs to pass directly to the rdkafka library. This is the library Vertica uses to communicate with Kafka. You can use this parameter to directly set configuration options that are not available through the Vertica integration with Kafka. See Directly setting Kafka library options for details.
kafka_conf_secretConceals sensitive configuration data that you must pass directly to the rdkafka library, such as passwords. This parameter accepts settings in the same format as kafka_conf.
Values passed to this parameter are not logged or stored in system tables.
timeoutInteger number of seconds to wait for a response from the Kafka cluster.
Example
=> \x
Expanded display is on.
=> SELECT KafkaListManyTopics('kafka01.example.com:9092')
   OVER (PARTITION AUTO);
-[ RECORD 1 ]--+--------------------------------------------------
brokers        | kafka01.example.com:9092,kafka02.example.com:9092
topic          | __consumer_offsets
num_partitions | 50
-[ RECORD 2 ]--+--------------------------------------------------
brokers        | kafka01.example.com:9092,kafka02.example.com:9092
topic          | iot_data
num_partitions | 1
-[ RECORD 3 ]--+--------------------------------------------------
brokers        | kafka01.example.com:9092,kafka02.example.com:9092
topic          | test
num_partitions | 1
11.6 - KafkaListTopics
Gets the list of topics available from a Kafka broker.
Gets the list of topics available from a Kafka broker.
Syntax
KafkaListTopics(USING PARAMETERS brokers='hostname:port[,hostname2:port2...]'
                                 [, kafka_conf='kafka_configuration_setting']
                                 [, timeout=timeout_sec])
brokers- The host name and port number of the broker to query for a topic list. You can supply more than one broker as a comma-separated list. However, the returned list will only contains the topics served by the last broker in the list.
kafka_confA JSON-formatted object of option/value pairs to pass directly to the rdkafka library. This is the library Vertica uses to communicate with Kafka. You can use this parameter to directly set configuration options that are not available through the Vertica integration with Kafka. See Directly setting Kafka library options for details.
kafka_conf_secretConceals sensitive configuration data that you must pass directly to the rdkafka library, such as passwords. This parameter accepts settings in the same format as kafka_conf.
Values passed to this parameter are not logged or stored in system tables.
timeoutInteger number of seconds to wait for a response from the Kafka cluster.
Example
=> SELECT KafkaListTopics(USING PARAMETERS brokers='kafka1-01.example.com:9092')
          OVER ();
         topic         | num_partitions
-----------------------+----------------
 test                  |              1
 iot_data              |              1
 __consumer_offsets    |             50
 vertica_notifications |              1
 web_hits              |              1
(5 rows)
11.7 - KafkaOffsets
The KafkaOffsets user-defined transform function returns load operation statistics generated by the most recent invocation of KafkaSource.
The KafkaOffsets user-defined transform function returns load operation statistics generated by the most recent invocation of KafkaSource. Query KafkaOffsets to see the metadata produced by your most recent load operation. You can query KafkaOffsets after each KafkaSource invocation to view information about that load. If you are using the scheduler, you can also view historical load information in the stream_microbatch_history table.
For each load operation, KafkaOffsets returns the following:
The following example demonstrates calling KafkaOffsets to show partition information that was loaded using KafkaSource:
=> SELECT kpartition, start_offset, end_offset, msg_count, ending FROM (select KafkaOffsets() over()) AS stats ORDER BY kpartition;
 kpartition | start_offset | end_offset | msg_count |   ending
------------+--------------+------------+-----------+------------
          0 |           -2 |       9999 |      1068 | END_OFFSET
The output shows that KafkaSource loaded 1068 messages (rows) from Kafka in a single partition. The KafkaSource ended the data load because it reached the ending offset.
Note
The values shown in the start_offset column are exclusive (the message with the shown offset was not loaded) and the values in the end_offset column are inclusive (the message with the shown offset was loaded). This is the opposite of the values specified in the KafkaSource's stream parameter. The difference between the inclusiveness of KafkaSource's and KafkaOffset's start and end offsets are based on the needs of the job scheduler. KafkaOffset is primarily intended for the job scheduler's use, so the start and end offset values are defined so the scheduler can easily start streaming from where left off.
11.8 - KafkaParser
The KafkaParser does not parse data loaded from Kafka.
The KafkaParser does not parse data loaded from Kafka. Instead, it passes the messages through as LONG VARCHAR values. Use this parser when you want to load raw Kafka messages into Vertica for further processing. You can use this parser as a catch-all for unsupported formats.
KafkaParser does not take any parameters.
Example
The following example loads raw messages from a Kafka topic named iot-data into a table named raw_iot.
=> CREATE TABLE raw_iot(message LONG VARCHAR);
CREATE TABLE
=> COPY raw_iot SOURCE KafkaSource(stream='iot-data|0|-2,iot-data|1|-2,iot-data|2|-2',
                                   brokers='docd01:6667,docd03:6667', stop_on_eof=TRUE)
                PARSER KafkaParser();
 Rows Loaded
-------------
        5000
(1 row)

=> select * from raw_iot limit 10;
              message
------------------------------------
 10039, 59, -68.951406, -19.270126
 10042, 40, -82.688712, 4.7187705
 10054, 6, -153.805268, -10.5173935
 10054, 71, -135.613150, 58.286458
 10081, 44, 130.288419, -77.344405
 10104, -5, 77.882598, -56.600744
 10132, 87, 103.530616, -69.672863
 10135, 6, -121.420382, 15.3229855
 10166, 77, -179.592211, 42.0477075
 10183, 62, 17.225394, -55.6644765
(10 rows)
11.9 - KafkaSource
The KafkaSource UDL accesses data from a Kafka cluster.
The KafkaSource UDL accesses data from a Kafka cluster. All Kafka parsers must use KafkaSource. Messages processed by KafkaSource must be at least one byte in length. KafkaSource writes an error message to vertica.log for zero-length messages.
The output of KafkaSource does not work directly with any of the non-Kafka parsers in Vertica (such as the FCSVPARSER). The KafkaParser produces additional metadata about the stream that parsers need to use in order to correctly parse the data. You must use filters such as KafkaInsertDelimiters to transform the data into a format that can be processed by other parsers. See Parsing custom formats for more an example.
You can cancel a running KafkaSource data load by using a close session function such as CLOSE_ALL_SESSIONS.
Syntax
KafkaSource(stream='topic_name|partition|start_offset[|end_offset]'[, param=value [,...] ] )
stream- Required. Defines the data to be loaded as a comma-separated list of one or more partitions. Each partition is defined by three required values and one optional value separated by pipe characters (|) :
-
topic_name: the name of the Kafka topic to load data from. You can read from different Kafka topics in the same stream parameter, with some limitations. See Loading from Multiple Topics in the Same Stream Parameter below for more information.
-
partition: the partition in the Kafka topic to copy.
-
start_offset: the offset in the Kafka topic where the load will begin. This offset is inclusive (the message with the offset start_offset is loaded). See Special Starting Offset Values below for additional options.
-
end_offset: the optional offset where the load should end. This offset is exclusive (the message with the offset end_offset will not be loaded).
To end a load using end_offset, you must supply an ending offset value for all partitions in the stream parameter. Attempting to set an ending offset for some partitions and not set offset values for others results in an error.
If you do not specify an ending offset, you must supply at least one other ending condition using stop_on_eof or duration.
brokers- A comma-separated list of host:port pairs of the brokers in the Kafka cluster. Vertica recommends running Kafka on a different machine than Vertica.
Default: localhost:9092
duration- An INTERVAL that specifies the duration of the frame. After this specified amount of time, KafkaSource terminates the COPY statements. If this parameter is not set, you must set at least one other ending condition by using stop_on_eof or specify an ending offset instead. See Duration Note below for more information.
executionparallelism- The number of threads to use when loading data. Normally, you set this to an integer value between 1 and the number of partitions the node is loading from. Setting this parameter to a reduced value limits the number of threads used to process any COPY statement. It also increases the throughput of short queries issued in the pool, especially if the queries are executed concurrently.
If you do not specify this parameter, Vertica automatically creates a thread for every partition, up to the limit allowed by the resource pool.
If the value you specify for the KafkaSource is lower than the value specified for the scheduler resource pool, the KafkaSource value applies. This value cannot exceed the value specified for the scheduler's resource pool.
stop_on_eof- Determines whether KafkaSource should terminate the COPY statement after it reaches the end of a file. If this value is not set, you must set at least one other ending condition using
duration or by supplying ending offsets instead.
Default: FALSE
group_idThe name of the Kafka consumer group to which Vertica reports its progress consuming messages. Set this value to disable progress reports to a Kafka consumer group. For details, see Monitoring Vertica message consumption with consumer groups.
Default: vertica_database-name
kafka_confA JSON-formatted object of option/value pairs to pass directly to the rdkafka library. This is the library Vertica uses to communicate with Kafka. You can use this parameter to directly set configuration options that are not available through the Vertica integration with Kafka. See Directly setting Kafka library options for details.
kafka_conf_secretConceals sensitive configuration data that you must pass directly to the rdkafka library, such as passwords. This parameter accepts settings in the same format as kafka_conf.
Values passed to this parameter are not logged or stored in system tables.
fail_on_conf_parse_errorDetermines whether the function fails when kafka_conf contains incorrectly formatted options and values, or invalid configuration properties.
Default Value: FALSE
For accepted option and value formats, see Directly setting Kafka library options.
For a list of valid configuration properties, see the rdkafka GitHub repository.
Special starting offset values
The start_offset portion of the stream parameter lets you start loading messages from a specific point in the topic's partition. It also accepts one of two special offset values:
-
-2 tells KafkaSource to start loading at the earliest available message in the topic's partition. This value is useful when you want to load as many messages as you can from the Kafka topic's partition.
-
-3 tells KafkaSource to start loading from the consumer group's saved offset. If the consumer group does not have a saved offset, it starts loading from the earliest available message in the topic partition. See Monitoring Vertica message consumption with consumer groups for more information.
Loading from multiple topics in the same stream parameter
You can load from multiple Kafka topics in a single stream parameter as long as you follow these guidelines:
-
The data for the topics must be in the same format because you pass the data from KafkaSource to a single parser. For example, you cannot load data from one topic that is in Avro format and another in JSON format.
-
Similarly, you need to be careful if you are loading Avro data and specifying an external schema from a registry. The Avro parser accepts a single schema per data load. If the data from the separate topics have different schemas, then all of the data from one of the topics will be rejected.
-
The data in the different topics should have the same (or very similar) schemas, especially if you are loading data into a traditional Vertica table. While you can load data with different schemas into a flex table, there are only a few scenarios where it makes sense to combine dissimilar data into a single table.
Duration note
The duration parameter applies to the length of time that Vertica allows the KafkaSource function to run. It usually reflects the amount of time the overall load statement takes. However, if KafkaSource is loading a large volume of data or the data needs extensive processing and parsing, the overall runtime of the query can exceed the amount of time specified in duration.
Example
The following example demonstrates calling KafkaSource to load data from Kafka into an existing flex table named web_table with the following options:
-
The stream is named web_hits which has a single partition.
-
The load starts at the earliest message in the stream (identified by passing -2 as the start offset).
-
The load ends when it reaches the message with offset 1000.
-
The Kafka cluster's brokers are kafka01 and kafka03 in the example.com domain.
-
The brokers are listening on port 9092.
-
The load ends if it reaches the end of the stream before reaching the message with offset 1000. If you do not supply this option, the connector waits until Kafka sends a message with offset 1000.
-
The loaded data is sent to the KafkaJSONParser for processing.
=> COPY web_table
   SOURCE KafkaSource(stream='web_hits|0|-2|1000',
                      brokers='kafka01.example.com:9092,kafka03.example.com:9092',
                      stop_on_eof=true)
   PARSER KafkaJSONParser();
 Rows Loaded
-------------
        1000
(1 row)
To view details about this load operation, query KafkaOffsets. KafkaOffsets returns metadata about the messages that Vertica consumed from Kafka during the most recent KafkaSource invocation:
=> SELECT KafkaOffsets() OVER();
  ktopic  | kpartition | start_offset | end_offset | msg_count | bytes_read |    duration     |   ending   |      end_msg
----------+------------+--------------+------------+-----------+------------+-----------------+------------+-------------------
 web_hits |          0 |            0 |        999 |      1000 |     197027 | 00:00:00.385365 | END_OFFSET | Last message read
(1 row)
The msg_count column verifies that Vertica loaded 1000 messages, and the ending column indicates that Vertica stopped consuming messages when it reached the message with the offset 1000.
11.10 - KafkaTopicDetails
Retrieves information about the specified topic from one or more Kafka brokers.
Retrieves information about the specified topic from one or more Kafka brokers. This function lists details about the topic partitions, and the Kafka brokers that serve each partition in the Kafka cluster.
Syntax
KafkaTopicDetails(USING PARAMETERS brokers='hostname:port[,hostname2:port2...]'
                                  , topic=topic_name
                                 [, kafka_conf='option=value[;option2=value2...]']
                                 [, timeout=timeout_sec])
- brokers
- The hostname (or IP address) of a broker in the Kafka cluster.
- port
- The port number on which the broker is running.
topic- Kafka topic that you want details for.
kafka_conf- A semicolon-delimited list of option=value pairs to pass directly to the rdkafka library. This is the library Vertica uses to communicate with Kafka. You can use this parameter to directly set configuration options that are not available through the Vertica integration with Kafka. See Directly setting Kafka library options for details.
kafka_conf_secretConceals sensitive configuration data that you must pass directly to the rdkafka library, such as passwords. This parameter accepts settings in the same format as kafka_conf.
Values passed to this parameter are not logged or stored in system tables.
timeout- Integer number of seconds to wait for a response from the Kafka cluster.
Example
=> SELECT KafkaTopicDetails(USING PARAMETERS brokers='kafka1-01.example.com:9092',topic='iot_data') OVER();
 partition_id | lead_broker | replica_brokers | in_sync_replica_brokers
--------------+-------------+-----------------+-------------------------
            0 |           0 | 0               | 0
            1 |           1 | 1               | 1
            2 |           0 | 0               | 0
            3 |           1 | 1               | 1
            4 |           0 | 0               | 0
(5 rows)
12 - Data streaming schema tables
Every time you create a scheduler (--create), Vertica creates a schema for that scheduler with the name you specify or the default stream_config.
Every time you create a scheduler (--create), Vertica creates a schema for that scheduler with the name you specify or the default stream_config. Each schema has the following tables:
Caution
Vertica recommends that you do not alter these tables except in consultation with support.
12.1 - stream_clusters
This table lists clusters and hosts.
This table lists clusters and hosts. You change settings in this table using the vkconfig cluster tool. See Cluster tool options for more information.
|
Column |
Data Type |
Description |
|
id |
INTEGER |
The identification number assigned to the cluster. |
|
cluster |
VARCHAR |
The name of the cluster. |
|
hosts |
VARCHAR |
A comma-separated list of hosts associated with the cluster. |
Examples
This example shows a cluster and its associated hosts.
=> SELECT * FROM stream_config.stream_clusters;

    id    |    cluster     |               hosts
 ---------+----------------+-----------------------------------
  2250001 | streamcluster1 | 10.10.10.10:9092,10.10.10.11:9092
(1 rows)
12.2 - stream_events
This table logs microbatches and other important events from the scheduler in an internal log table.
This table logs microbatches and other important events from the scheduler in an internal log table.
This table was renamed from kafka_config.kafka_events.
|
Column |
Data Type |
Description |
|
event_time |
TIMESTAMP |
The time the event was logged. |
|
log_level |
VARCHAR |
The type of event that was logged.
Valid Values:
-
TRACE
-
DEBUG
-
FATAL
-
ERROR
-
WARN
-
INFO
Default: INFO
|
|
frame_start |
TIMESTAMP |
The time when the frame executed. |
|
frame_end |
TIMESTAMP |
The time when the frame completed. |
|
microbatch |
INTEGER |
The identification number of the associated microbatch. |
|
message |
VARCHAR |
A description of the event. |
|
exception |
VARCHAR |
If this log is in the form of a stack trace, this column lists the exception. |
Examples
This example shows typical rows from the stream_events table.
=> SELECT * FROM stream_config.stream_events;
-[ RECORD 1 ]-+-------------
event_time    | 2016-07-17 13:28:35.548-04
log_level     | INFO
frame_start   |
frame_end     |
microbatch    |
message       | New leader registered for schema stream_config. New ID: 0, new Host: 10.20.30.40
exception     |
-[ RECORD 2 ]-+-------------
event_time    | 2016-07-17 13:28:45.643-04
log_level     | INFO
frame_start   | 2015-07-17 12:28:45.633
frame_end     | 2015-07-17 13:28:50.701-04
microbatch    |
message       | Generated tuples: test3|2|-2,test3|1|-2,test3|0|-2
exception     |
-[ RECORD 3 ]-+----------------
event_time    | 2016-07-17 14:28:50.701-04
log_level     | INFO
frame_start   | 2016-07-17 13:28:45.633
frame_end     | 2016-07-17 14:28:50.701-04
microbatch    |
message       | Total rows inserted: 0
exception     |
12.3 - stream_load_specs
This table describes user-created load specs.
This table describes user-created load specs. You change the entries in this table using the vkconfig utility's load spec tool.
|
Column |
Data Type |
Description |
|
id |
INTEGER |
The identification number assigned to the cluster. |
|
load_spec |
VARCHAR |
The name of the load spec. |
|
filters |
VARCHAR |
A comma-separated list of UDFilters for the scheduler to include in the COPY statement it uses to load data from Kafka. |
|
parser |
VARCHAR |
A Vertica UDParser to use with a specified target. If you are using a Vertica native parser, parser parameters serve as a COPY statement parameters. |
|
parser_parameters |
VARCHAR |
A list of parameters to provide to the parser. |
|
load_method |
VARCHAR |
The COPY load method to use for all loads with this scheduler.
Deprecated
In Vertica 10.0, load methods are no longer used due to the removal of the WOS. The value shown in this column has no effect.
|
|
message_max_bytes |
INTEGER |
The maximum size, in bytes, of a message. |
|
uds_kv_parameters |
VARCHAR |
A list of parameters that are supplied to the KafkaSource statement. If the value in this column is in the format key=value, the scheduler it to the COPY statement's KafkaSource call. |
Examples
This example shows the load specs that you can use with a Vertica instance.
SELECT * FROM stream_config.stream_load_specs;
-[ RECORD 1 ]-----+------------
id                | 1
load_spec         | loadspec2
filters           |
parser            | KafkaParser
parser_parameters |
load_method       | direct
message_max_bytes | 1048576
uds_kv_parameters |
-[ RECORD 2 ]-----+------------
id                | 750001
load_spec         | streamspec1
filters           |
parser            | KafkaParser
parser_parameters |
load_method       | TRICKLE
message_max_bytes | 1048576
uds_kv_parameters |
12.4 - stream_lock
This table is locked by the scheduler.
This table is locked by the scheduler. This locks prevent multiple schedulers from running at the same time. The scheduler that locks this table updates it with its own information.
Important
Do not use this table in a serializable transaction that locks this table. Locking this table can interfere with the operation of the scheduler.
|
Column |
Data Type |
Description |
|
scheduler_id |
INTEGER |
A unique ID for the scheduler instance that is currently running. |
|
update_time |
TIMESTAMP |
The time the scheduler took ownership of writing to the schema. |
|
process_info |
VARCHAR |
Information about the scheduler process. Currently unused. |
Example
=> SELECT * FROM weblog_sched.stream_lock;
 scheduler_id |       update_time       | process_info
--------------+-------------------------+--------------
            2 | 2018-11-08 10:12:36.033 |
(1 row)
12.5 - stream_microbatch_history
This table contains a history of every microbatch executed within this scheduler configuration.
This table contains a history of every microbatch executed within this scheduler configuration.
|
Column |
Data Type |
Description |
|
source_name |
VARCHAR |
The name of the source. |
|
source_cluster |
VARCHAR |
The name of the source cluster. The clusters are defined in stream_clusters. |
|
source_partition |
INTEGER |
The number of the data streaming partition. |
|
start_offset |
INTEGER |
The starting offset of the microbatch. |
|
end_offset |
INTEGER |
The ending offset of the microbatch. |
|
end_reason |
VARCHAR |
An explanation for why the batch ended.The following are valid end reasons:
-
DEADLINE - The batch ran out of time.
-
END_OFFSET - The load reached the ending offset specified in the KafkaSource. This reason is never used by the scheduler, as it does specify an end offset.
-
END_OF_STREAM - There are no messages available to the scheduler or the eof_timeout has been reached.
-
NETWORK_ERROR - The scheduler could not connect to Kafka.
-
RESET_OFFSET - The start offset was changed using the --update and --offset parameters to the KafkaSource. This state does not occur during normal scheduler operations.
-
SOURCE_ISSUE - The Kafka service returned an error.
-
UNKNOWN - The batch ended for an unknown reason.
|
|
end_reason_message |
VARCHAR |
If the end reason is a network or source issue, this column contains a brief description of the issue. |
|
partition_bytes |
INTEGER |
The number of bytes transferred from a source partition to a Vertica target table. |
|
partition_messages |
INTEGER |
The number of messages transferred from a source partition to a Vertica target table. |
|
microbatch_id |
INTEGER |
The Vertica transaction id for the batch session. |
|
microbatch |
VARCHAR |
The name of the microbatch. |
|
target_schema |
VARCHAR |
The name of the target schema. |
|
target_table |
VARCHAR |
The name of the target table. |
|
timeslice |
INTERVAL |
The amount of time spent in the KafkaSource operator. |
|
batch_start |
TIMESTAMP |
The time the batch executed. |
|
batch_end |
TIMESTAMP |
The time the batch completed. |
|
last_batch_duration |
INTERVAL |
The length of time required to run the complete COPY statement. |
|
last_batch_parallelism |
INTEGER |
The number of parallel COPY statements generated to process the microbatch during the last frame. |
|
microbatch_sub_id |
INTEGER |
The identifier for the COPY statement that processed the microbatch. |
|
consecutive_error_count |
INTEGER |
(Currently not used.) The number of times a microbatch has encountered an error on an attempt to load. This value increases over multiple attempts. |
|
transaction_id |
INTEGER |
The identifier for the transaction within the session. |
|
frame_start |
TIMESTAMP |
The time the frame started. A frame can contain multiple microbatches. |
|
frame_end |
TIMESTAMP |
The time the frame completed. |
Examples
This example shows typical rows from the stream_microbatch_history table.
=> SELECT * FROM stream_config.stream_microbatch_history;

-[ RECORD 1 ]--+---------------------------
source_name             | streamsource1
source_cluster          | kafka-1
source_partition        | 0
start_offset            | 196
end_offset              | 196
end_reason              | END_OF_STREAM
partition_bytes         | 0
partition_messages      | 0
microbatch_id           | 1
microbatch              | mb_0
target_schema           | public
target_table            | kafka_flex_0
timeslice               | 00:00:09.892
batch_start             | 2016-07-28 11:31:25.854221
batch_end               | 2016-07-28 11:31:26.357942
last_batch_duration     | 00:00:00.379826
last_batch_parallelism  | 1
microbatch_sub_id       | 0
consecutive_error_count |
transaction_id          | 45035996275130064
frame_start             | 2016-07-28 11:31:25.751
frame_end               |
end_reason_message      |

-[ RECORD 2 ]--+---------------------------
source_name             | streamsource1
source_cluster          | kafka-1
source_partition        | 1
start_offset            | 197
end_offset              | 197
end_reason              | NETWORK_ISSUE
partition_bytes         | 0
partition_messages      | 0
microbatch_id           | 1
microbatch              | mb_0
target_schema           | public
target_table            | kafka_flex_0
timeslice               | 00:00:09.897
batch_start             | 2016-07-28 11:31:45.84898
batch_end               | 2016-07-28 11:31:46.253367
last_batch_duration     | 000:00:00.377796
last_batch_parallelism  | 1
microbatch_sub_id       | 0
consecutive_error_count |
transaction_id          | 45035996275130109
frame_start             | 2016-07-28 11:31:45.751
frame_end               |
end_reason_message      | Local: All brokers are down
12.6 - stream_microbatch_source_map
This table maps microbatches to the their associated sources.
This table maps microbatches to the their associated sources.
|
Column |
Data Type |
Description |
|
microbatch |
INTEGER |
The identification number of the microbatch. |
|
source |
INTEGER |
The identification number of the associated source. |
Examples
This example shows typical rows from the stream_microbatch table.
SELECT * FROM stream_config.stream_microbatch_source_map;
microbatch | source
-----------+--------
         1 |      4
         3 |      2
(2 rows)
12.7 - stream_microbatches
This table contains configuration data related to microbatches.
This table contains configuration data related to microbatches.
|
Column |
Data Type |
Description |
|
id |
INTEGER |
The identification number of the microbatch. |
|
microbatch |
VARCHAR |
The name of the microbatch. |
|
target |
INTEGER |
The identification number of the target associated with the microbatch. |
|
load_spec |
INTEGER |
The identification number of the load spec associated with the microbatch. |
|
target_columns |
VARCHAR |
The table columns associated with the microbatch. |
|
rejection_schema |
VARCHAR |
The schema that contains the rejection table. |
|
rejection_table |
VARCHAR |
The table where Vertica stores messages that are rejected by the database. |
|
max_parallelism |
INTEGER |
The number of parallel COPY statements the scheduler uses to process the microbatch. |
|
enabled |
BOOLEAN |
When TRUE, the microbatch is enabled for use. |
|
consumer_group_id |
VARCHAR |
The name of the Kafka consumer group to report loading progress to. This value is NULL if the microbatch reports its progress to the default consumer group for the scheduler. See Monitoring Vertica message consumption with consumer groups for more information. |
Examples
This example shows a row from a typical stream_microbatches table.
=> select * from weblog_sched.stream_microbatches;
-[ RECORD 1 ]-----+----------
id                | 750001
microbatch        | weberrors
target            | 750001
load_spec         | 2250001
target_columns    |
rejection_schema  |
rejection_table   |
max_parallelism   | 1
enabled           | t
consumer_group_id |
-[ RECORD 2 ]-----+----------
id                | 1
microbatch        | weblog
target            | 1
load_spec         | 1
target_columns    |
rejection_schema  |
rejection_table   |
max_parallelism   | 1
enabled           | t
consumer_group_id | weblog_group
12.8 - stream_scheduler
This table contains metadata related to a single scheduler.
This table contains metadata related to a single scheduler.
This table was renamed from kafka_config.kafka_scheduler. This table used to contain a column named eof_timeout_ms. It has been removed.
|
Column |
Data Type |
Description |
|
version |
VARCHAR |
The version of the scheduler. |
|
frame_duration |
INTERVAL |
The length of time of the frame. The default is 00:00:10. |
|
resource_pool |
VARCHAR |
The resource pool associated with this scheduler. |
|
config_refresh |
INTERVAL |
The interval of time that the scheduler runs before applying any changes to its metadata, such as, changes made using the --update option.
For more information, refer to --config-refresh inScheduler tool options.
|
|
new_source_policy |
VARCHAR |
When during the frame that the source runs. Set this value with the --new-source-policy in Source tool options.
Valid Values:
-
FAIR: Takes the average length of time from the previous batches and schedules itself appropriately.
-
START: Runs all new sources at the beginning of the frame. In this case, Vertica gives the minimal amount of time to run.
-
END: Runs all new sources starting at the end of the frame. In this case, Vertica gives the maximum amount of time to run.
Default:
FAIR
|
|
pushback_policy |
VARCHAR |
(Not currently used.) How Vertica handles delays for microbatches that continually fail.
Valid Values:
Default:
LINEAR
|
|
pushback_max_count |
INTEGER |
(Currently not used.) The maximum number of times a microbatch can fail before Vertica terminates it. |
|
auto_sync |
BOOLEAN |
When TRUE, the scheduler automatically synchronizes source information with host clusters. For more information, refer to Automatically consume data from Kafka with the scheduler.
Default:
TRUE
|
|
consumer_group_id |
VARCHAR |
The name of the Kafka consumer group to which the scheduler reports its progress in consuming messages. This value is NULL if the scheduler reports to the default consumer group named vertica-database_name. See Monitoring Vertica message consumption with consumer groups for more information. |
Examples
This example shows a typical row in the stream_scheduler table.
=> SELECT * FROM weblog_sched.stream_scheduler;
-[ RECORD 1 ]------+-----------------------
version            | v9.2.1
frame_duration     | 00:05:00
resource_pool      | weblog_pool
config_refresh     | 00:05
new_source_policy  | FAIR
pushback_policy    | LINEAR
pushback_max_count | 5
auto_sync          | t
consumer_group_id  | vertica-consumer-group
12.9 - stream_scheduler_history
This table shows the history of launched scheduler instances.
This table shows the history of launched scheduler instances.
This table was renamed from kafka_config.kafka_scheduler_history.
|
Column |
Data Type |
Description |
|
elected_leader_time |
TIMESTAMP |
The time when this instance took began scheduling operations. |
|
host |
VARCHAR |
The host name of the machine running the scheduler instance. |
|
launcher |
VARCHAR |
The name of the currently active scheduler instance.
Default: NULL
|
|
scheduler_id |
INTEGER |
The identification number of the scheduler. |
|
version |
VARCHAR |
The version of the scheduler. |
Examples
This example shows typical rows from the stream_scheduler_history table.
 SELECT * FROM stream_config.stream_scheduler_history;
   elected_leader_time   |     host     |     launcher      | scheduler_id | version
-------------------------+--------------+-------------------+--------------+---------
 2016-07-26 13:19:42.692 | 10.20.100.62 |                   |            0 | v8.0.0
 2016-07-26 13:54:37.715 | 10.20.100.62 |                   |            1 | v8.0.0
 2016-07-26 13:56:06.785 | 10.20.100.62 |                   |            2 | v8.0.0
 2016-07-26 13:56:56.033 | 10.20.100.62 | SchedulerInstance |            3 | v8.0.0
 2016-07-26 15:51:20.513 | 10.20.100.62 | SchedulerInstance |            4 | v8.0.0
 2016-07-26 15:51:35.111 | 10.20.100.62 | SchedulerInstance |            5 | v8.0.0
    (6 rows)
12.10 - stream_sources
This table contains metadata related to data streaming sources.
This table contains metadata related to data streaming sources.
This table was formerly named kafka_config.kafka_scheduler.
|
Column |
Data Type |
Description |
|
id |
INTEGER |
The identification number of the source |
|
source |
VARCHAR |
The name of the source. |
|
cluster |
INTEGER |
The identification number of the cluster associated with the source. |
|
partitions |
INTEGER |
The number of partitions in the source. |
|
enabled |
BOOLEAN |
When TRUE, the source is enabled for use. |
Examples
This example shows a typical row from the stream_sources table.
select * from  stream_config.stream_sources;
-[ RECORD 1 ]--------------
   id         | 1
   source     | SourceFeed1
   cluster    | 1
   partitions | 1
   enabled    | t
-[ RECORD 2 ]--------------
   id         | 250001
   source     | SourceFeed2
   cluster    | 1
   partitions | 1
   enabled    | t
12.11 - stream_targets
This table contains the metadata for all Vertica target tables.
This table contains the metadata for all Vertica target tables.
The table was formerly named kafka_config.kafka_targets.
|
Column |
Data Type |
Description |
|
id |
INTEGER |
The identification number of the target table |
|
target_schema |
VARCHAR |
The name of the schema for the target table. |
|
target_table |
VARCHAR |
The name of the target table. |
Examples
This example shows typical rows from the stream_tables table.
=> SELECT * FROM stream_config.stream_targets;
-[ RECORD 1 ]-----+---------------------
id                | 1
target_schema     | public
target_table      | stream_flex1
-[ RECORD 2 ]-----+---------------------
id                | 2
target_schema     | public
target_table      | stream_flex2