This is the multi-page printable view of this section.
Click here to print.
Return to the regular view of this page.
Working with native tables
You can create two types of native tables in Vertica (ROS format), columnar and flexible.
You can create two types of native tables in Vertica (ROS format), columnar and flexible. You can create both types as persistent or temporary. You can also create views that query a specific set of table columns.
The tables described in this section store their data in and are managed by the Vertica database. Vertica also supports external tables, which are defined in the database and store their data externally. For more information about external tables, see Working with external data.
1 - Creating tables
Use the CREATE TABLE statement to create a native table in the Vertica.
Use the CREATE TABLE statement to create a native table in the Vertica logical schema. You can specify the columns directly, as in the following example, or you can derive a table definition from another table using a LIKE or AS clause. You can specify constraints, partitioning, segmentation, and other factors. For details and restrictions, see the reference page.
The following example shows a basic table definition:
=> CREATE TABLE orders(
    orderkey    INT,
    custkey     INT,
    prodkey     ARRAY[VARCHAR(10)],
    orderprices ARRAY[DECIMAL(12,2)],
    orderdate   DATE
);
Table data storage
Unlike traditional databases that store data in tables, Vertica physically stores table data in projections, which are collections of table columns. Projections store data in a format that optimizes query execution. Similar to materialized views, they store result sets on disk rather than compute them each time they are used in a query.
In order to query or perform any operation on a Vertica table, the table must have one or more projections associated with it. For more information, see Projections.
Deriving a table definition from the data
You can use the INFER_TABLE_DDL function to inspect Parquet, ORC, JSON, or Avro data and produce a starting point for a table definition. This function returns a CREATE TABLE statement, which might require further editing. For columns where the function could not infer the data type, the function labels the type as unknown and emits a warning. For VARCHAR and VARBINARY columns, you might need to adjust the length. Always review the statement the function returns, but especially for tables with many columns, using this function can save time and effort.
Parquet, ORC, and Avro files include schema information, but JSON files do not. For JSON, the function inspects the raw data to produce one or more candidate table definitions. See the function reference page for JSON examples.
In the following example, the function infers a complete table definition from Parquet input, but the VARCHAR columns use the default size and might need to be adjusted:
=> SELECT INFER_TABLE_DDL('/data/people/*.parquet'
        USING PARAMETERS format = 'parquet', table_name = 'employees');
WARNING 9311:  This generated statement contains one or more varchar/varbinary columns which default to length 80
                    INFER_TABLE_DDL
-------------------------------------------------------------------------
 create table "employees"(
  "employeeID" int,
  "personal" Row(
    "name" varchar,
    "address" Row(
      "street" varchar,
      "city" varchar,
      "zipcode" int
    ),
    "taxID" int
  ),
  "department" varchar
 );
(1 row)
For Parquet files, you can use the GET_METADATA function to inspect a file and report metadata including information about columns.
See also
2 - Creating temporary tables
CREATE TEMPORARY TABLE creates a table whose data persists only during the current session.
CREATE TEMPORARY TABLE creates a table whose data persists only during the current session. Temporary table data is never visible to other sessions.
By default, all temporary table data is transaction-scoped—that is, the data is discarded when a COMMIT statement ends the current transaction. If CREATE TEMPORARY TABLE includes the parameter ON COMMIT PRESERVE ROWS, table data is retained until the current session ends.
Temporary tables can be used to divide complex query processing into multiple steps. Typically, a reporting tool holds intermediate results while reports are generated—for example, the tool first gets a result set, then queries the result set, and so on.
When you create a temporary table, Vertica automatically generates a default projection for it. For more information, see Auto-projections.
Global versus local tables
CREATE TEMPORARY TABLE can create tables at two scopes, global and local, through the keywords GLOBAL and LOCAL, respectively:
|
Global temporary tables |
Vertica creates global temporary tables in the public schema. Definitions of these tables are visible to all sessions, and persist across sessions until they are explicitly dropped. Multiple users can access the table concurrently. Table data is session-scoped, so it is visible only to the session user, and is discarded when the session ends. |
|
Local temporary tables |
Vertica creates local temporary tables in the V_TEMP_SCHEMA namespace and inserts them transparently into the user's search path. These tables are visible only to the session where they are created. When the session ends, Vertica automatically drops the table and its data. |
Data retention
You can specify whether temporary table data is transaction- or session-scoped:
-
ON COMMIT DELETE ROWS (default): Vertica automatically removes all table data when each transaction ends.
-
ON COMMIT PRESERVE ROWS: Vertica preserves table data across transactions in the current session. Vertica automatically truncates the table when the session ends.
Note
If you create a temporary table with ON COMMIT PRESERVE ROWS, you cannot add projections for that table if it contains data. You must first remove all data from that table with TRUNCATE TABLE.
You can create projections for temporary tables created with ON COMMIT DELETE ROWS, whether populated with data or not. However, CREATE PROJECTION ends any transaction where you might have added data, so projections are always empty.
ON COMMIT DELETE ROWS
By default, Vertica removes all data from a temporary table, whether global or local, when the current transaction ends.
For example:
=> CREATE TEMPORARY TABLE tempDelete (a int, b int);
CREATE TABLE
=> INSERT INTO tempDelete VALUES(1,2);
 OUTPUT
--------
      1
(1 row)

=> SELECT * FROM tempDelete;
 a | b
---+---
 1 | 2
(1 row)

=> COMMIT;
COMMIT

=> SELECT * FROM tempDelete;
 a | b
---+---
(0 rows)
If desired, you can use DELETE within the same transaction multiple times, to refresh table data repeatedly.
ON COMMIT PRESERVE ROWS
You can specify that a temporary table retain data across transactions in the current session, by defining the table with the keywords ON COMMIT PRESERVE ROWS. Vertica automatically removes all data from the table only when the current session ends.
For example:
=> CREATE TEMPORARY TABLE tempPreserve (a int, b int) ON COMMIT PRESERVE ROWS;
CREATE TABLE
=> INSERT INTO tempPreserve VALUES (1,2);
 OUTPUT
--------
      1
(1 row)

=> COMMIT;
COMMIT
=> SELECT * FROM tempPreserve;
 a | b
---+---
 1 | 2
(1 row)

=> INSERT INTO tempPreserve VALUES (3,4);
 OUTPUT
--------
      1
(1 row)

=> COMMIT;
COMMIT
=> SELECT * FROM tempPreserve;
 a | b
---+---
 1 | 2
 3 | 4
(2 rows)
Eon restrictions
The following Eon Mode restrictions apply to temporary tables:
3 - Creating a table from other tables
You can create a table from other tables in two ways:.
You can create a table from other tables in two ways:
Important
You can also copy one table to another with the Vertica function
COPY_TABLE.
3.1 - Replicating a table
You can create a table from an existing one using CREATE TABLE with the LIKE clause:.
You can create a table from an existing one using
CREATE TABLE with the LIKE clause:
CREATE TABLE [schema.]table-name LIKE [schema.]existing-table
   [ {INCLUDING | EXCLUDING} PROJECTIONS ]
   [ {INCLUDE | EXCLUDE} [SCHEMA] PRIVILEGES ]
Creating a table with LIKE replicates the source table definition and any storage policy associated with it. It does not copy table data or expressions on columns.
Copying constraints
CREATE TABLE...LIKE copies all table constraints, with the following exceptions:
-
Foreign key constraints.
-
Any column that obtains its values from a sequence, including IDENTITY columns. Vertica copies the column values into the new table, but removes the original constraint. For example, the following table definition sets an IDENTITY constraint on column ID:
CREATE TABLE public.Premium_Customer
(
    ID IDENTITY ,
    lname varchar(25),
    fname varchar(25),
    store_membership_card int
);
The following CREATE TABLE...LIKE statement replicates this table as All_Customers. Vertica removes the IDENTITY constraint from All_Customers.ID, changing it to an integer column with a NOT NULL constraint:
=> CREATE TABLE All_Customers like Premium_Customer;
CREATE TABLE
=> select export_tables('','All_Customers');
                   export_tables
---------------------------------------------------
CREATE TABLE public.All_Customers
(
    ID int NOT NULL,
    lname varchar(25),
    fname varchar(25),
    store_membership_card int
);

(1 row)
Including projections
You can qualify the LIKE clause with INCLUDING PROJECTIONS or EXCLUDING PROJECTIONS, which specify whether to copy projections from the source table:
-
EXCLUDING PROJECTIONS (default): Do not copy projections from the source table.
-
INCLUDING PROJECTIONS: Copy current projections from the source table. Vertica names the new projections according to Vertica naming conventions, to avoid name conflicts with existing objects.
Including schema privileges
You can specify default inheritance of schema privileges for the new table:
For more information see Setting privilege inheritance on tables and views.
Restrictions
The following restrictions apply to the source table:
Example
-
Create the table states:
=> CREATE TABLE states (
     state char(2) NOT NULL, bird varchar(20), tree varchar (20), tax float, stateDate char (20))
     PARTITION BY state;
-
Populate the table with data:
INSERT INTO states VALUES ('MA', 'chickadee', 'american_elm', 5.675, '07-04-1620');
INSERT INTO states VALUES ('VT', 'Hermit_Thrasher', 'Sugar_Maple', 6.0, '07-04-1610');
INSERT INTO states VALUES ('NH', 'Purple_Finch', 'White_Birch', 0, '07-04-1615');
INSERT INTO states VALUES ('ME', 'Black_Cap_Chickadee', 'Pine_Tree', 5, '07-04-1615');
INSERT INTO states VALUES ('CT', 'American_Robin', 'White_Oak', 6.35, '07-04-1618');
INSERT INTO states VALUES ('RI', 'Rhode_Island_Red', 'Red_Maple', 5, '07-04-1619');
-
View the table contents:
=> SELECT * FROM states;


 state |        bird         |     tree     |  tax  |      stateDate
-------+---------------------+--------------+-------+----------------------
 VT    | Hermit_Thrasher     | Sugar_Maple  |     6 | 07-04-1610
 CT    | American_Robin      | White_Oak    |  6.35 | 07-04-1618
 RI    | Rhode_Island_Red    | Red_Maple    |     5 | 07-04-1619
 MA    | chickadee           | american_elm | 5.675 | 07-04-1620
 NH    | Purple_Finch        | White_Birch  |     0 | 07-04-1615
 ME    | Black_Cap_Chickadee | Pine_Tree    |     5 | 07-04-1615
(6 rows
-
Create a sample projection and refresh:
=> CREATE PROJECTION states_p AS SELECT state FROM states;

=> SELECT START_REFRESH();
-
Create a table like the states table and include its projections:
=> CREATE TABLE newstates LIKE states INCLUDING PROJECTIONS;
-
View projections for the two tables. Vertica has copied projections from states to newstates:
=> \dj
                                                      List of projections
            Schema             |                   Name                    |  Owner  |       Node       | Comment
-------------------------------+-------------------------------------------+---------+------------------+---------
 public                        | newstates_b0                              | dbadmin |                  |
 public                        | newstates_b1                              | dbadmin |                  |
 public                        | newstates_p_b0                            | dbadmin |                  |
 public                        | newstates_p_b1                            | dbadmin |                  |
 public                        | states_b0                                 | dbadmin |                  |
 public                        | states_b1                                 | dbadmin |                  |
 public                        | states_p_b0                               | dbadmin |                  |
 public                        | states_p_b1                               | dbadmin |                  |
-
View the table newstates, which shows columns copied from states:
=> SELECT * FROM newstates;


 state | bird | tree | tax | stateDate
-------+------+------+-----+-----------
(0 rows)
When you use the CREATE TABLE...LIKE statement, storage policy objects associated with the table are also copied. Data added to the new table use the same labeled storage location as the source table, unless you change the storage policy. For more information, see Working With Storage Locations.
See also
3.2 - Creating a table from a query
CREATE TABLE can specify an AS clause to create a table from a query, as follows:.
CREATE TABLE can specify an AS clause to create a table from a query, as follows:
CREATE [TEMPORARY] TABLE [schema.]table-name
    [ ( column-name-list ) ]
    [ {INCLUDE | EXCLUDE} [SCHEMA] PRIVILEGES ]
AS  [  /*+ LABEL */ ] [ AT epoch ] query [ ENCODED BY column-ref-list ]
Vertica creates a table from the query results and loads the result set into it. For example:
=> CREATE TABLE cust_basic_profile AS SELECT
     customer_key, customer_gender, customer_age, marital_status, annual_income, occupation
     FROM customer_dimension WHERE customer_age>18 AND customer_gender !='';
CREATE TABLE
=> SELECT customer_age, annual_income, occupation FROM cust_basic_profile
     WHERE customer_age > 23 ORDER BY customer_age;
 customer_age | annual_income |     occupation
--------------+---------------+--------------------
           24 |        469210 | Hairdresser
           24 |        140833 | Butler
           24 |        558867 | Lumberjack
           24 |        529117 | Mechanic
           24 |        322062 | Acrobat
           24 |        213734 | Writer
           ...
AS clause options
You can qualify an AS clause with one or both of the following options:
Labeling the AS clause
You can embed a LABEL hint in an AS clause in two places:
-
Immediately after the keyword AS:
CREATE TABLE myTable AS /*+LABEL myLabel*/...
-
In the SELECT statement:
CREATE TABLE myTable AS SELECT /*+LABEL myLabel*/
If the AS clause contains a LABEL hint in both places, the first label has precedence.
Note
Labels are invalid for external tables.
Loading historical data
You can qualify a CREATE TABLE AS query with an AT epoch clause, to specify that the query return historical data, where epoch is one of the following:
-
EPOCH LATEST: Return data up to but not including the current epoch. The result set includes data from the latest committed DML transaction.
-
EPOCH integer: Return data up to and including the integer-specified epoch.
-
TIME 'timestamp': Return data from the timestamp-specified epoch.
Note
These options are ignored if used to query temporary or external tables.
See Epochs for additional information about how Vertica uses epochs.
For details, see Historical queries.
Zero-width column handling
If the query returns a column with zero width, Vertica automatically converts it to a VARCHAR(80) column. For example:
=> CREATE TABLE example AS SELECT '' AS X;
CREATE TABLE
=> SELECT EXPORT_TABLES ('', 'example');
                       EXPORT_TABLES
----------------------------------------------------------
CREATE TEMPORARY TABLE public.example
(
    X varchar(80)
);
Requirements and restrictions
-
If you create a temporary table from a query, you must specify ON COMMIT PRESERVE ROWS in order to load the result set into the table. Otherwise, Vertica creates an empty table.
-
If the query output has expressions other than simple columns, such as constants or functions, you must specify an alias for that expression, or list all columns in the column name list.
-
You cannot use CREATE TABLE AS SELECT with a SELECT that returns values of complex types. You can, however, use CREATE TABLE LIKE.
See also
4 - Immutable tables
Many secure systems contain records that must be provably immune to change.
Many secure systems contain records that must be provably immune to change. Protective strategies such as row and block checksums incur high overhead. Moreover, these approaches are not foolproof against unauthorized changes, whether deliberate or inadvertent, by database administrators or other users with sufficient privileges.
Immutable tables are insert-only tables in which existing data cannot be modified, regardless of user privileges. Updating row values and deleting rows are prohibited. Certain changes to table metadata—for example, renaming table columns—are also prohibited, in order to prevent attempts to circumvent these restrictions. Flattened or external tables, which obtain their data from outside sources, cannot be set to be immutable.
You define an existing table as immutable with ALTER TABLE:
ALTER TABLE table SET IMMUTABLE ROWS;
Once set, table immutability cannot be reverted, and is immediately applied to all existing table data, and all data that is loaded thereafter. In order to modify the data of an immutable table, you must copy the data to a new table—for example, with COPY, CREATE TABLE...AS, or COPY_TABLE.
When you execute ALTER TABLE...SET IMMUTABLE ROWS on a table, Vertica sets two columns for that table in the system table TABLES. Together, these columns show when the table was made immutable:
- immutable_rows_since_timestamp: Server system time when immutability was applied. This is valuable for long-term timestamp retrieval and efficient comparison.
- immutable_rows_since_epoch: The epoch that was current when immutability was applied. This setting can help protect the table from attempts to pre-insert records with a future timestamp, so that row's epoch is less than the table's immutability epoch.
Enforcement
The following operations are prohibited on immutable tables:
The following partition management functions are disallowed when the target table is immutable:
Allowed operations
In general, you can execute any DML operation on an immutable table that does not affect existing row data—for example, add rows with COPY or INSERT. After you add data to an immutable table, it cannot be changed.
Tip
A table's immutability can render meaningless certain operations that are otherwise permitted on an immutable table. For example, you can add a column to an immutable table with
ALTER TABLE...ADD COLUMN. However, all values in the new column are set to NULL (unless the column is defined with a
DEFAULT value), and they cannot be updated.
Other allowed operations fall generally into two categories:
-
Changes to a table's DDL that have no effect on its data:
-
Block operations on multiple table rows, or the entire table:
5 - Disk quotas
By default, schemas and tables are limited only by available disk space and license capacity.
By default, schemas and tables are limited only by available disk space and license capacity. You can set disk quotas for schemas or individual tables, for example, to support multi-tenancy. Setting, modifying, or removing a disk quota requires superuser privileges.
Most user operations that increase storage size enforce disk quotas. A table can temporarily exceed its quota during some operations such as recovery. If you lower a quota below the current usage, no data is lost but you cannot add more. Treat quotas as advisory, not as hard limits
A schema quota, if set, must be larger than the largest table quota within it.
A disk quota is a string composed of an integer and a unit of measure (K, M, G, or T), such as '15G' or '1T'. Do not use a space between the number and the unit. No other units of measure are supported.
To set a quota at creation time, use the DISK_QUOTA option for CREATE SCHEMA or CREATE TABLE:
=> CREATE SCHEMA internal DISK_QUOTA '10T';
CREATE SCHEMA

=> CREATE TABLE internal.sales (...) DISK_QUOTA '5T';
CREATE TABLE

=> CREATE TABLE internal.leads (...) DISK_QUOTA '12T';
ROLLBACK 0:  Table can not have a greater disk quota than its Schema
To modify, add, or remove a quota on an existing schema or table, use ALTER SCHEMA or ALTER TABLE:
=> ALTER SCHEMA internal DISK_QUOTA '20T';
ALTER SCHEMA

=> ALTER TABLE internal.sales DISK_QUOTA SET NULL;
ALTER TABLE
You can set a quota that is lower than the current usage. The ALTER operation succeeds, the schema or table is temporarily over quota, and you cannot perform operations that increase data usage.
Data that is counted
In Eon Mode, disk usage is an aggregate of all space used by all shards for the schema or table. This value is computed for primary subscriptions only.
In Enterprise Mode, disk usage is the sum space used by all storage containers on all nodes for the schema or table. This sum excludes buddy projections but includes all other projections.
Disk usage is calculated based on compressed size.
When quotas are applied
Quotas, if present, affect most DML and ILM operations, including:
The following example shows a failure caused by exceeding a table's quota:
=> CREATE TABLE stats(score int) DISK_QUOTA '1k';
CREATE TABLE

=> COPY stats FROM STDIN;
1
2
3
4
5
\.
ERROR 0: Disk Quota Exceeded for the Table object public.stats
HINT: Delete data and PURGE or increase disk quota at the table level
DELETE does not free space, because deleted data is still preserved in the storage containers. The delete vector that is added by a delete operation does not count against a quota, so deleting is a quota-neutral operation. Disk space for deleted data is reclaimed when you purge it; see Removing table data.
Some uncommon operations, such as ADD COLUMN, RESTORE, and SWAP PARTITION, can create new storage containers during the transaction. These operations clean up the extra locations upon completion, but while the operation is in progress, a table or schema could exceed its quota. If you get disk-quota errors during these operations, you can temporarily increase the quota, perform the operation, and then reset it.
Quotas do not affect recovery, rebalancing, or Tuple Mover operations.
Monitoring
The DISK_QUOTA_USAGES system table shows current disk usage for tables and schemas that have quotas. This table does not report on objects that do not have quotas.
You can use this table to monitor usage and make decisions about adjusting quotas:
=> SELECT * FROM DISK_QUOTA_USAGES;
    object_oid     | object_name | is_schema | total_disk_usage_in_bytes | disk_quota_in_bytes
-------------------+-------------+-----------+---------------------+---------------------
 45035996273705100 | s           | t         |                 307 |               10240
 45035996273705104 | public.t    | f         |                 614 |                1024
 45035996273705108 | s.t         | f         |                 307 |                2048
(3 rows)
6 - Managing table columns
After you define a table, you can use ALTER TABLE to modify existing table columns.
After you define a table, you can use
ALTER TABLE to modify existing table columns. You can perform the following operations on a column:
6.1 - Renaming columns
You rename a column with ALTER TABLE as follows:.
You rename a column with ALTER TABLE as follows:
ALTER TABLE [schema.]table-name RENAME [ COLUMN ] column-name TO new-column-name
The following example renames a column in the Retail.Product_Dimension table from Product_description to Item_description:
=> ALTER TABLE Retail.Product_Dimension
    RENAME COLUMN Product_description TO Item_description;
If you rename a column that is referenced by a view, the column does not appear in the result set of the view even if the view uses the wild card (*) to represent all columns in the table. Recreate the view to incorporate the column's new name.
6.2 - Changing scalar column data type
In general, you can change a column's data type with ALTER TABLE if doing so does not require storage reorganization.
In general, you can change a column's data type with ALTER TABLE if doing so does not require storage reorganization. After you modify a column's data type, data that you load conforms to the new definition.
The sections that follow describe requirements and restrictions associated with changing a column with a scalar (primitive) data type. For information on modifying complex type columns, see Adding a new field to a complex type column.
Supported data type conversions
Vertica supports conversion for the following data types:
|
Data Types |
Supported Conversions |
|
Binary |
Expansion and contraction. |
|
Character |
All conversions between CHAR, VARCHAR, and LONG VARCHAR. |
|
Exact numeric |
All conversions between the following numeric data types: integer data types—INTEGER, INT, BIGINT, TINYINT, INT8, SMALLINT—and NUMERIC values of scale <=18 and precision 0.
You cannot modify the scale of NUMERIC data types; however, you can change precision in the ranges (0-18), (19-37), and so on.
|
|
Collection |
The following conversions are supported:
- Collection of one element type to collection of another element type, if the source element type can be coerced to the target element type.
- Between arrays and sets.
- Collection type to the same type (array to array or set to set), to change bounds or binary size.
For details, see Changing Collection Columns.
|
Unsupported data type conversions
Vertica does not allow data type conversion on types that require storage reorganization:
You also cannot change a column's data type if the column is one of the following:
You can work around some of these restrictions. For details, see Working with column data conversions.
6.2.1 - Changing column width
You can expand columns within the same class of data type.
You can expand columns within the same class of data type. Doing so is useful for storing larger items in a column. Vertica validates the data before it performs the conversion.
In general, you can also reduce column widths within the data type class. This is useful to reclaim storage if the original declaration was longer than you need, particularly with strings. You can reduce column width only if the following conditions are true:
Otherwise, Vertica returns an error and the conversion fails. For example, if you try to convert a column from varchar(25) to varchar(10)Vertica allows the conversion as long as all column data is no more than 10 characters.
In the following example, columns y and z are initially defined as VARCHAR data types, and loaded with values 12345 and 654321, respectively. The attempt to reduce column z's width to 5 fails because it contains six-character data. The attempt to reduce column y's width to 5 succeeds because its content conforms with the new width:
=> CREATE TABLE t (x int, y VARCHAR, z VARCHAR);
CREATE TABLE
=> CREATE PROJECTION t_p1 AS SELECT * FROM t SEGMENTED BY hash(x) ALL NODES;
CREATE PROJECTION
=> INSERT INTO t values(1,'12345','654321');
 OUTPUT
--------
      1
(1 row)

=> SELECT * FROM t;
 x |   y   |   z
---+-------+--------
 1 | 12345 | 654321
(1 row)

=> ALTER TABLE t ALTER COLUMN z SET DATA TYPE char(5);
ROLLBACK 2378:  Cannot convert column "z" to type "char(5)"
HINT:  Verify that the data in the column conforms to the new type
=> ALTER TABLE t ALTER COLUMN y SET DATA TYPE char(5);
ALTER TABLE
Changing collection columns
If a column is a collection data type, you can use ALTER TABLE to change either its bounds or its maximum binary size. These properties are set at table creation time and can then be altered.
You can make a collection bounded, setting its maximum number of elements, as in the following example.
=> ALTER TABLE test.t1 ALTER COLUMN arr SET DATA TYPE array[int,10];
ALTER TABLE

=> \d test.t1
                                     List of Fields by Tables
 Schema | Table | Column |      Type       | Size | Default | Not Null | Primary Key | Foreign Key
--------+-------+--------+-----------------+------+---------+----------+-------------+-------------
  test  |  t1   | arr    | array[int8, 10] |   80 |         | f        | f           |
(1 row)
Alternatively, you can set the binary size for the entire collection instead of setting bounds. Binary size is set either explicitly or from the DefaultArrayBinarySize configuration parameter. The following example creates an array column from the default, changes the default, and then uses ALTER TABLE to change it to the new default.
=> SELECT get_config_parameter('DefaultArrayBinarySize');
 get_config_parameter
----------------------
 100
(1 row)

=> CREATE TABLE test.t1 (arr array[int]);
CREATE TABLE

=> \d test.t1
                                     List of Fields by Tables
 Schema | Table | Column |      Type       | Size | Default | Not Null | Primary Key | Foreign Key
--------+-------+--------+-----------------+------+---------+----------+-------------+-------------
  test  |  t1   | arr    | array[int8](96) |   96 |         | f        | f           |
(1 row)

=> ALTER DATABASE DEFAULT SET DefaultArrayBinarySize=200;
ALTER DATABASE

=> ALTER TABLE test.t1 ALTER COLUMN arr SET DATA TYPE array[int];
ALTER TABLE

=> \d test.t1
                                     List of Fields by Tables
 Schema | Table | Column |      Type       | Size | Default | Not Null | Primary Key | Foreign Key
--------+-------+--------+-----------------+------+---------+----------+-------------+-------------
  test  |  t1   | arr    | array[int8](200)|  200 |         | f        | f           |
(1 row)
Alternatively, you can set the binary size explicitly instead of using the default value.
=> ALTER TABLE test.t1 ALTER COLUMN arr SET DATA TYPE array[int](300);
Purging historical data
You cannot reduce a column's width if Vertica retains any historical data that exceeds the new width. To reduce the column width, first remove that data from the table:
-
Advance the AHM to an epoch more recent than the historical data that needs to be removed from the table.
-
Purge the table of all historical data that precedes the AHM with the function
PURGE_TABLE.
For example, given the previous example, you can update the data in column t.z as follows:
=> UPDATE t SET z = '54321';
 OUTPUT
--------
      1
(1 row)

=> SELECT * FROM t;
 x |   y   |   z
---+-------+-------
 1 | 12345 | 54321
(1 row)
Although no data in column z now exceeds 5 characters, Vertica retains the history of its earlier data, so attempts to reduce the column width to 5 return an error:
=> ALTER TABLE t ALTER COLUMN z SET DATA TYPE char(5);
ROLLBACK 2378:  Cannot convert column "z" to type "char(5)"
HINT:  Verify that the data in the column conforms to the new type
You can reduce the column width by purging the table's historical data as follows:
=> SELECT MAKE_AHM_NOW();
         MAKE_AHM_NOW
-------------------------------
 AHM set (New AHM Epoch: 6350)
(1 row)

=> SELECT PURGE_TABLE('t');
                                                     PURGE_TABLE
----------------------------------------------------------------------------------------------------------------------
 Task: purge operation
(Table: public.t) (Projection: public.t_p1_b0)
(Table: public.t) (Projection: public.t_p1_b1)

(1 row)

=> ALTER TABLE t ALTER COLUMN z SET DATA TYPE char(5);
ALTER TABLE
6.2.2 - Working with column data conversions
Vertica conforms to the SQL standard by disallowing certain data conversions for table columns.
Vertica conforms to the SQL standard by disallowing certain data conversions for table columns. However, you sometimes need to work around this restriction when you convert data from a non-SQL database. The following examples describe one such workaround, using the following table:
=> CREATE TABLE sales(id INT, price VARCHAR) UNSEGMENTED ALL NODES;
CREATE TABLE
=> INSERT INTO sales VALUES (1, '$50.00');
 OUTPUT
--------
      1
(1 row)

=> INSERT INTO sales VALUES (2, '$100.00');
 OUTPUT
--------
      1
(1 row)

=> COMMIT;
COMMIT
=> SELECT * FROM SALES;
 id |  price
----+---------
  1 | $50.00
  2 | $100.00
(2 rows)
To convert the price column's existing data type from VARCHAR to NUMERIC, complete these steps:
-
Add a new column for temporary use. Assign the column a NUMERIC data type, and derive its default value from the existing price column.
-
Drop the original price column.
-
Rename the new column to the original column.
Add a new column for temporary use
-
Add a column temp_price to table sales. You can use the new column temporarily, setting its data type to what you want (NUMERIC), and deriving its default value from the price column. Cast the default value for the new column to a NUMERIC data type and query the table:
=> ALTER TABLE sales ADD COLUMN temp_price NUMERIC(10,2) DEFAULT
SUBSTR(sales.price, 2)::NUMERIC;
ALTER TABLE

=> SELECT * FROM SALES;
 id |  price  | temp_price
----+---------+------------
  1 | $50.00  |      50.00
  2 | $100.00 |     100.00
(2 rows)
-
Use ALTER TABLE to drop the default expression from the new column temp_price. Vertica retains the values stored in this column:
=> ALTER TABLE sales ALTER COLUMN temp_price DROP DEFAULT;
ALTER TABLE
Drop the original price column
Drop the extraneous price column. Before doing so, you must first advance the AHM to purge historical data that would otherwise prevent the drop operation:
-
Advance the AHM:
=> SELECT MAKE_AHM_NOW();
         MAKE_AHM_NOW
-------------------------------
 AHM set (New AHM Epoch: 6354)
(1 row)
-
Drop the original price column:
=> ALTER TABLE sales DROP COLUMN price CASCADE;
ALTER COLUMN
Rename the new column to the original column
You can now rename the temp_price column to price:
-
Use ALTER TABLE to rename the column:
=> ALTER TABLE sales RENAME COLUMN temp_price to price;
-
Query the sales table again:
=> SELECT * FROM sales;
 id | price
----+--------
  1 |  50.00
  2 | 100.00
(2 rows)
6.3 - Adding a new field to a complex type column
You can add new fields to columns of complex types (any combination or nesting of arrays and structs) in native tables.
You can add new fields to columns of complex types (any combination or nesting of arrays and structs) in native tables. To add a field to an existing table's column, use a single ALTER TABLE statement.
Requirements and restrictions
The following are requirements and restrictions associated with adding a new field to a complex type column:
- New fields can only be added to rows/structs.
- The new type definition must contain all of the existing fields in the complex type column. Dropping existing fields from the complex type is not allowed. All of the existing fields in the new type must exactly match their definitions in the old type.This requirement also means that existing fields cannot be renamed.
- New fields can only be added to columns of native (non-external) tables.
- New fields can be added at any level within a nested complex type. For example, if you have a column defined as
ROW(id INT, name ROW(given_name VARCHAR(20), family_name VARCHAR(20)), you can add a middle_name field to the nested ROW.
- New fields can be of any type, either complex or primitive.
- Blank field names are not allowed when adding new fields. Note that blank field names in complex type columns are allowed when creating the table. Vertica automatically assigns a name to each unnamed field.
- If you change the ordering of existing fields using ALTER TABLE, the change affects existing data in addition to new data. This means it is possible to reorder existing fields.
- When you call ALTER COLUMN ... SET DATA TYPE to add a field to a complex type column, Vertica will place an O lock on the table preventing DELETE, UPDATE, INSERT, and COPY statements from accessing the table and blocking SELECT statements issued at SERIALIZABLE isolation level, until the operation completes.
- Performance is slower when adding a field to an array element than when adding a field to an element not nested in an array.
Examples
Adding a field
Consider a company storing customer data:
=> CREATE TABLE customers(id INT, name VARCHAR, address ROW(street VARCHAR, city VARCHAR, zip INT));
CREATE TABLE
The company has just decided to expand internationally, so now needs to add a country field:
=> ALTER TABLE customers ALTER COLUMN address
SET DATA TYPE ROW(street VARCHAR, city VARCHAR, zip INT, country VARCHAR);
ALTER TABLE
You can view the table definition to confirm the change:
=> \d customers
List of Fields by Tables
 Schema |   Table   | Column  |                                 Type                                 | Size | Default | Not Null | Primary Key | Foreign Key
--------+-----------+---------+----------------------------------------------------------------------+------+---------+----------+-------------+-------------
 public | customers | id      | int                                                                  |    8 |         | f        | f           |
 public | customers | name    | varchar(80)                                                          |   80 |         | f        | f           |
 public | customers | address | ROW(street varchar(80),city varchar(80),zip int,country varchar(80)) |   -1 |         | f        | f           |
 (3 rows)
You can also see that the country field remains null for existing customers:
=> SELECT * FROM customers;
 id | name |                                    address
----+------+--------------------------------------------------------------------------------
  1 | mina | {"street":"1 allegheny square east","city":"hamden","zip":6518,"country":null}
 (1 row)
Common error messages
While you can add one or more fields with a single ALTER TABLE statement, existing fields cannot be removed. The following example throws an error because the city field is missing:
=> ALTER TABLE customers ALTER COLUMN address SET DATA TYPE ROW(street VARCHAR, state VARCHAR, zip INT, country VARCHAR);
ROLLBACK 2377:  Cannot convert column "address" from "ROW(varchar(80),varchar(80),int,varchar(80))" to type "ROW(varchar(80),varchar(80),int,varchar(80))"
Similarly, you cannot alter the type of an existing field. The following example will throw an error because the zip field's type cannot be altered:
=> ALTER TABLE customers ALTER COLUMN address SET DATA TYPE ROW(street VARCHAR, city VARCHAR, zip VARCHAR, country VARCHAR);
ROLLBACK 2377:  Cannot convert column "address" from "ROW(varchar(80),varchar(80),int,varchar(80))" to type "ROW(varchar(80),varchar(80),varchar(80),varchar(80))"
Additional properties
A complex type column's field order follows the order specified in the ALTER command, allowing you to reorder a column's existing fields. The following example reorders the fields of the address column:
=> ALTER TABLE customers ALTER COLUMN address
SET DATA TYPE ROW(street VARCHAR, country VARCHAR, city VARCHAR, zip INT);
ALTER TABLE
The table definition shows the address column's fields have been reordered:
=> \d customers
List of Fields by Tables
 Schema |   Table   | Column  |                                 Type                                 | Size | Default | Not Null | Primary Key | Foreign Key
--------+-----------+---------+----------------------------------------------------------------------+------+---------+----------+-------------+-------------
 public | customers | id      | int                                                                  |    8 |         | f        | f           |
 public | customers | name    | varchar(80)                                                          |   80 |         | f        | f           |
 public | customers | address | ROW(street varchar(80),country varchar(80),city varchar(80),zip int) |   -1 |         | f        | f           |
 (3 rows)
Note that you cannot add new fields with empty names. When creating a complex table, however, you can omit field names, and Vertica automatically assigns a name to each unnamed field:
=> CREATE TABLE products(name VARCHAR, description ROW(VARCHAR));
CREATE TABLE
Because the field created in the description column has not been named, Vertica assigns it a default name. This default name can be checked in the table definition:
=> \d products
List of Fields by Tables
 Schema |  Table   |   Column    |        Type         | Size | Default | Not Null | Primary Key | Foreign Key
--------+----------+-------------+---------------------+------+---------+----------+-------------+-------------
 public | products | name        | varchar(80)         |   80 |         | f        | f           |
 public | products | description | ROW(f0 varchar(80)) |   -1 |         | f        | f           |
(2 rows)
Above, we see that the VARCHAR field in the description column was automatically assigned the name f0. When adding new fields, you must specify the existing Vertica-assigned field name:
=> ALTER TABLE products ALTER COLUMN description
SET DATA TYPE ROW(f0 VARCHAR(80), expanded_description VARCHAR(200));
ALTER TABLE
6.4 - Defining column values
You can define a column so Vertica automatically sets its value from an expression through one of the following clauses:.
You can define a column so Vertica automatically sets its value from an expression through one of the following clauses:
-
DEFAULT
-
SET USING
-
DEFAULT USING
DEFAULT
The DEFAULT option sets column values to a specified value. It has the following syntax:
DEFAULT default-expression
Default values are set when you:
-
Load new rows into a table, for example, with INSERT or COPY. Vertica populates DEFAULT columns in new rows with their default values. Values in existing rows, including columns with DEFAULT expressions, remain unchanged.
-
Execute UPDATE on a table and set the value of a DEFAULT column to DEFAULT:
=> UPDATE table-name SET column-name=DEFAULT;
-
Add a column with a DEFAULT expression to an existing table. Vertica populates the new column with its default values when it is added to the table.
Note
Altering an existing table column to specify a DEFAULT expression has no effect on existing values in that column. Vertica applies the DEFAULT expression only on new rows when they are added to the table, through load operations such as INSERT and COPY. To refresh all values in a column with the column's DEFAULT expression, update the column as shown above.
Restrictions
DEFAULT expressions cannot specify volatile functions with ALTER TABLE...ADD COLUMN. To specify volatile functions, use CREATE TABLE or ALTER TABLE...ALTER COLUMN statements.
SET USING
The SET USING option sets the column value to an expression when the function REFRESH_COLUMNS is invoked on that column. This option has the following syntax:
SET USING using-expression
This approach is useful for large denormalized (flattened) tables, where multiple columns get their values by querying other tables.
Restrictions
SET USING has the following restrictions:
DEFAULT USING
The DEFAULT USING option sets DEFAULT and SET USING constraints on a column, equivalent to using DEFAULT and SET USING separately with the same expression on the same column. It has the following syntax:
DEFAULT USING expression
For example, the following column definitions are effectively identical:
=> ALTER TABLE public.orderFact ADD COLUMN cust_name varchar(20)
     DEFAULT USING (SELECT name FROM public.custDim WHERE (custDim.cid = orderFact.cid));
=> ALTER TABLE public.orderFact ADD COLUMN cust_name varchar(20)
     DEFAULT (SELECT name FROM public.custDim WHERE (custDim.cid = orderFact.cid))
     SET USING (SELECT name FROM public.custDim WHERE (custDim.cid = orderFact.cid));
DEFAULT USING supports the same expressions as SET USING and is subject to the same restrictions.
Supported expressions
DEFAULT and SET USING generally support the same expressions. These include:
-
Queries
-
Other columns in the same table
-
Literals (constants)
-
All operators supported by Vertica
-
The following categories of functions:
Expression restrictions
The following restrictions apply to DEFAULT and SET USING expressions:
-
The return value data type must match or be cast to the column data type.
-
The expression must return a value that conforms to the column bounds. For example, a column that is defined as a VARCHAR(1) cannot be set to a default string of abc.
-
In a temporary table, DEFAULT and SET USING do not support subqueries. If you try to create a temporary table where DEFAULT or SET USING use subquery expressions, Vertica returns an error.
-
A column's SET USING expression cannot specify another column in the same table that also sets its value with SET USING. Similarly, a column's DEFAULT expression cannot specify another column in the same table that also sets its value with DEFAULT, or whose value is automatically set to a sequence. However, a column's SET USING expression can specify another column that sets its value with DEFAULT.
Note
You can set a column's DEFAULT expression from another column in the same table that sets its value with SET USING. However, the DEFAULT column is typically set to NULL, as it is only set on load operations that initially set the SET USING column to NULL.
-
DEFAULT and SET USING expressions only support one SELECT statement; attempts to include multiple SELECT statements in the expression return an error. For example, given table t1:
=> SELECT * FROM t1;
 a |    b
---+---------
 1 | hello
 2 | world
(2 rows)
Attempting to create table t2 with the following DEFAULT expression returns with an error:
=> CREATE TABLE t2 (aa int, bb varchar(30) DEFAULT (SELECT 'I said ')||(SELECT b FROM t1 where t1.a = t2.aa));
ERROR 9745:  Expressions with multiple SELECT statements cannot be used in 'set using' query definitions
Disambiguating predicate columns
If a SET USING or DEFAULT query expression joins two columns with the same name, the column names must include their table names. Otherwise, Vertica assumes that both columns reference the dimension table, and the predicate always evaluates to true.
For example, tables orderFact and custDim both include column cid. Flattened table orderFact defines column cust_name with a SET USING query expression. Because the query predicate references columns cid from both tables, the column names are fully qualified:
=> CREATE TABLE public.orderFact
(
    ...
    cid int REFERENCES public.custDim(cid),
    cust_name varchar(20) SET USING (
        SELECT name FROM public.custDim WHERE (custDIM.cid = orderFact.cid)),
    ...
)
Examples
Derive a column's default value from another column
-
Create table t with two columns, date and state, and insert a row of data:
=> CREATE TABLE t (date DATE, state VARCHAR(2));
CREATE TABLE
=> INSERT INTO t VALUES (CURRENT_DATE, 'MA');
 OUTPUT
--------
      1
(1 row)

=> COMMIT;
COMMMIT
SELECT * FROM t;
    date    | state
------------+-------
 2017-12-28 | MA
(1 row)
-
Use ALTER TABLE to add a third column that extracts the integer month value from column date:
=> ALTER TABLE t ADD COLUMN month INTEGER DEFAULT date_part('month', date);
ALTER TABLE
-
When you query table t, Vertica returns the number of the month in column date:
=> SELECT * FROM t;
    date    | state | month
------------+-------+-------
 2017-12-28 | MA    |    12
(1 row)
Update default column values
-
Update table t by subtracting 30 days from date:
=> UPDATE t SET date = date-30;
 OUTPUT
--------
      1
(1 row)

=> COMMIT;
COMMIT
=> SELECT * FROM t;
    date    | state | month
------------+-------+-------
 2017-11-28 | MA    |    12
(1 row)
The value in month remains unchanged.
-
Refresh the default value in month from column date:
=> UPDATE t SET month=DEFAULT;
 OUTPUT
--------
      1
(1 row)

=> COMMIT;
COMMIT
=> SELECT * FROM t;
    date    | state | month
------------+-------+-------
 2017-11-28 | MA    |    11
(1 row)
Derive a default column value from user-defined scalar function
This example shows a user-defined scalar function that adds two integer values. The function is called add2ints and takes two arguments.
-
Develop and deploy the function, as described in Scalar functions (UDSFs).
-
Create a sample table, t1, with two integer columns:
=> CREATE TABLE t1 ( x int, y int );
CREATE TABLE
-
Insert some values into t1:
=> insert into t1 values (1,2);
OUTPUT
--------
      1
(1 row)
=> insert into t1 values (3,4);
 OUTPUT
--------
      1
(1 row)
-
Use ALTER TABLE to add a column to t1, with the default column value derived from the UDSF add2ints:
alter table t1 add column z int default add2ints(x,y);
ALTER TABLE
-
List the new column:
select z from t1;
 z
----
  3
  7
(2 rows)
Table with a SET USING column that queries another table for its values
-
Define tables t1 and t2. Column t2.b is defined to get its data from column t1.b, through the query in its SET USING clause:
=> CREATE TABLE t1 (a INT PRIMARY KEY ENABLED, b INT);
CREATE TABLE

=> CREATE TABLE t2 (a INT, alpha VARCHAR(10),
      b INT SET USING (SELECT t1.b FROM t1 WHERE t1.a=t2.a))
      ORDER BY a SEGMENTED BY HASH(a) ALL NODES;
CREATE TABLE
Important
The definition for table t2 includes SEGMENTED BY and ORDER BY clauses that exclude SET USING column b. If these clauses are omitted, Vertica creates an auto-projection for this table that specifies column b in its SEGMENTED BY and ORDER BY clauses . Inclusion of a SET USING column in any projection's segmentation or sort order prevents function REFRESH_COLUMNS from populating this column. Instead, it returns with an error.
For details on this and other restrictions, see REFRESH_COLUMNS.
-
Populate the tables with data:
=> INSERT INTO t1 VALUES(1,11),(2,22),(3,33),(4,44);
=> INSERT INTO t2 VALUES (1,'aa'),(2,'bb');
=> COMMIT;
COMMIT
-
View the data in table t2: Column in SET USING column b is empty, pending invocation of Vertica function REFRESH_COLUMNS:
=> SELECT * FROM t2;
 a | alpha | b
---+-------+---
 1 | aa    |
 2 | bb    |
(2 rows)
-
Refresh the column data in table t2 by calling function REFRESH_COLUMNS:
=> SELECT REFRESH_COLUMNS ('t2','b', 'REBUILD');
      REFRESH_COLUMNS
---------------------------
 refresh_columns completed
(1 row)
In this example, REFRESH_COLUMNS is called with the optional argument REBUILD. This argument specifies to replace all data in SET USING column b. It is generally good practice to call REFRESH_COLUMNS with REBUILD on any new SET USING column. For details, see REFRESH_COLUMNS.
-
View data in refreshed column b, whose data is obtained from table t1 as specified in the column's SET USING query:
=> SELECT * FROM t2 ORDER BY a;
  a | alpha | b
---+-------+----
 1 | aa    | 11
 2 | bb    | 22
(2 rows)
DEFAULT and SET USING expressions support subqueries that can obtain values from other tables, and use those with values in the current table to compute column values. The following example adds a column gmt_delivery_time to fact table customer_orders. The column specifies a DEFAULT expression to set values in the new column as follows:
-
Calls meta-function NEW_TIME, which performs the following tasks:
-
Populates the gmt_delivery_time column with the converted values.
=> CREATE TABLE public.customers(
    customer_key int,
    customer_name varchar(64),
    customer_address varchar(64),
    customer_tz varchar(5),
    ...);

=> CREATE TABLE public.customer_orders(
    customer_key int,
    order_number int,
    product_key int,
    product_version int,
    quantity_ordered int,
    store_key int,
    date_ordered date,
    date_shipped date,
    expected_delivery_date date,
    local_delivery_time timestamptz,
    ...);

=> ALTER TABLE customer_orders ADD COLUMN gmt_delivery_time timestamp
   DEFAULT NEW_TIME(customer_orders.local_delivery_time,
      (SELECT c.customer_tz FROM customers c WHERE (c.customer_key = customer_orders.customer_key)),
      'GMT');
7 - Altering table definitions
You can modify a table's definition with ALTER TABLE, in response to evolving database schema requirements.
You can modify a table's definition with
ALTER TABLE, in response to evolving database schema requirements. Changing a table definition is often more efficient than staging data in a temporary table, consuming fewer resources and less storage.
For information on making column-level changes, see Managing table columns. For details about changing and reorganizing table partitions, see Partitioning existing table data.
7.1 - Adding table columns
You add a column to a persistent table with ALTER TABLE..ADD COLUMN:.
You add a column to a persistent table with ALTER TABLE..ADD COLUMN:
ALTER TABLE
...
ADD COLUMN [IF NOT EXISTS] column datatype
  [column-constraint]
  [ENCODING encoding-type]
  [PROJECTIONS (projections-list) | ALL PROJECTIONS ]
Note
Before you add columns to a table, verify that all its superprojections are up to date.
Table locking
When you use ADD COLUMN to alter a table, Vertica takes an O lock on the table until the operation completes. The lock prevents DELETE, UPDATE, INSERT, and COPY statements from accessing the table. The lock also blocks SELECT statements issued at SERIALIZABLE isolation level, until the operation completes.
Adding a column to a table does not affect K-safety of the physical schema design.
You can add columns when nodes are down.
Adding new columns to projections
When you add a column to a table, Vertica automatically adds the column to superprojections of that table. The ADD..COLUMN clause can also specify to add the column to one or more non-superprojections, with one of these options:
-
PROJECTIONS (projections-list): Adds the new column to one or more projections of this table, specified as a comma-delimted list of projection base names. Vertica adds the column to all buddies of each projection. The projection list cannot include projections with pre-aggregated data such as live aggregate projections; otherwise, Vertica rolls back the ALTER TABLE statement.
-
ALL PROJECTIONS adds the column to all projections of this table, excluding projections with pre-aggregated data.
For example, the store_orders table has two projections—superprojection store_orders_super, and user-created projection store_orders_p. The following ALTER TABLE..ADD COLUMN statement adds column expected_ship_date to the store_orders table. Because the statement omits the PROJECTIONS option, Vertica adds the column only to the table's superprojection:
=> ALTER TABLE public.store_orders ADD COLUMN expected_ship_date date;
ALTER TABLE
=> SELECT projection_column_name, projection_name FROM projection_columns WHERE table_name ILIKE 'store_orders'
     ORDER BY projection_name , projection_column_name;
 projection_column_name |  projection_name
------------------------+--------------------
 order_date             | store_orders_p_b0
 order_no               | store_orders_p_b0
 ship_date              | store_orders_p_b0
 order_date             | store_orders_p_b1
 order_no               | store_orders_p_b1
 ship_date              | store_orders_p_b1
 expected_ship_date     | store_orders_super
 order_date             | store_orders_super
 order_no               | store_orders_super
 ship_date              | store_orders_super
 shipper                | store_orders_super
(11 rows)
The following ALTER TABLE...ADD COLUMN statement includes the PROJECTIONS option. This specifies to include projection store_orders_p in the add operation. Vertica adds the new column to this projection and the table's superprojection:
=> ALTER TABLE public.store_orders ADD COLUMN delivery_date date PROJECTIONS (store_orders_p);
=> SELECT projection_column_name, projection_name FROM projection_columns WHERE table_name ILIKE 'store_orders'
     ORDER BY projection_name, projection_column_name;
 projection_column_name |  projection_name
------------------------+--------------------
 delivery_date          | store_orders_p_b0
 order_date             | store_orders_p_b0
 order_no               | store_orders_p_b0
 ship_date              | store_orders_p_b0
 delivery_date          | store_orders_p_b1
 order_date             | store_orders_p_b1
 order_no               | store_orders_p_b1
 ship_date              | store_orders_p_b1
 delivery_date          | store_orders_super
 expected_ship_date     | store_orders_super
 order_date             | store_orders_super
 order_no               | store_orders_super
 ship_date              | store_orders_super
 shipper                | store_orders_super
(14 rows)
Updating associated table views
Adding new columns to a table that has an associated view does not update the view's result set, even if the view uses a wildcard (*) to represent all table columns. To incorporate new columns, you must recreate the view.
7.2 - Dropping table columns
ALTER TABLE...DROP COLUMN drops the specified table column and the ROS containers that correspond to the dropped column:.
ALTER TABLE...DROP COLUMN drops the specified table column and the ROS containers that correspond to the dropped column:
ALTER TABLE [schema.]table DROP [ COLUMN ] [IF EXISTS] column [CASCADE | RESTRICT]
After the drop operation completes, data backed up from the current epoch onward recovers without the column. Data recovered from a backup that precedes the current epoch re-add the table column. Because drop operations physically purge object storage and catalog definitions (table history) from the table, AT EPOCH (historical) queries return nothing for the dropped column.
The altered table retains its object ID.
Note
Drop column operations can be fast because these catalog-level changes do not require data reorganization, so Vertica can quickly reclaim disk storage.
Restrictions
-
You cannot drop or alter a primary key column or a column that participates in the table partitioning clause.
-
You cannot drop the first column of any projection sort order, or columns that participate in a projection segmentation expression.
-
In Enterprise Mode, all nodes must be up. This restriction does not apply to Eon mode.
-
You cannot drop a column associated with an access policy. Attempts to do so produce the following error:
ERROR 6482: Failed to parse Access Policies for table "t1"
Using CASCADE to force a drop
If the table column to drop has dependencies, you must qualify the DROP COLUMN clause with the CASCADE option. For example, the target column might be specified in a projection sort order. In this and other cases, DROP COLUMN...CASCADE handles the dependency by reorganizing catalog definitions or dropping a projection. In all cases, CASCADE performs the minimal reorganization required to drop the column.
Use CASCADE to drop a column with the following dependencies:
|
Dropped column dependency |
CASCADE behavior |
|
Any constraint |
Vertica drops the column when a FOREIGN KEY constraint depends on a UNIQUE or PRIMARY KEY constraint on the referenced columns. |
|
Specified in projection sort order |
Vertica truncates projection sort order up to and including the projection that is dropped without impact on physical storage for other columns and then drops the specified column. For example if a projection's columns are in sort order (a,b,c), dropping column b causes the projection's sort order to be just (a), omitting column (c). |
|
Specified in a projection segmentation expression |
The column to drop is integral to the projection definition. If possible, Vertica drops the projection as long as doing so does not compromise K-safety; otherwise, the transaction rolls back. |
|
Referenced as default value of another column |
See Dropping a Column Referenced as Default, below. |
Dropping a column referenced as default
You might want to drop a table column that is referenced by another column as its default value. For example, the following table is defined with two columns, a and b:, where b gets its default value from column a:
=> CREATE TABLE x (a int) UNSEGMENTED ALL NODES;
CREATE TABLE
=> ALTER TABLE x ADD COLUMN b int DEFAULT a;
ALTER TABLE
In this case, dropping column a requires the following procedure:
-
Remove the default dependency through ALTER COLUMN..DROP DEFAULT:
=> ALTER TABLE x ALTER COLUMN b DROP DEFAULT;
-
Create a replacement superprojection for the target table if one or both of the following conditions is true:
-
The target column is the table's first sort order column. If the table has no explicit sort order, the default table sort order specifies the first table column as the first sort order column. In this case, the new superprojection must specify a sort order that excludes the target column.
-
If the table is segmented, the target column is specified in the segmentation expression. In this case, the new superprojection must specify a segmentation expression that excludes the target column.
Given the previous example, table x has a default sort order of (a,b). Because column a is the table's first sort order column, you must create a replacement superprojection that is sorted on column b:
=> CREATE PROJECTION x_p1 as select * FROM x ORDER BY b UNSEGMENTED ALL NODES;
-
Run
START_REFRESH:
=> SELECT START_REFRESH();
              START_REFRESH
----------------------------------------
 Starting refresh background process.

(1 row)
-
Run MAKE_AHM_NOW:
=> SELECT MAKE_AHM_NOW();
         MAKE_AHM_NOW
-------------------------------
 AHM set (New AHM Epoch: 1231)
(1 row)
-
Drop the column:
=> ALTER TABLE x DROP COLUMN a CASCADE;
Vertica implements the CASCADE directive as follows:
Examples
The following series of commands successfully drops a BYTEA data type column:
=> CREATE TABLE t (x BYTEA(65000), y BYTEA, z BYTEA(1));
CREATE TABLE
=> ALTER TABLE t DROP COLUMN y;
ALTER TABLE
=> SELECT y FROM t;
ERROR 2624:  Column "y" does not exist
=> ALTER TABLE t DROP COLUMN x RESTRICT;
ALTER TABLE
=> SELECT x FROM t;
ERROR 2624:  Column "x" does not exist
=> SELECT * FROM t;
 z
---
(0 rows)
=> DROP TABLE t CASCADE;
DROP TABLE
The following series of commands tries to drop a FLOAT(8) column and fails because there are not enough projections to maintain K-safety.
=> CREATE TABLE t (x FLOAT(8),y FLOAT(08));
CREATE TABLE
=> ALTER TABLE t DROP COLUMN y RESTRICT;
ALTER TABLE
=> SELECT y FROM t;
ERROR 2624:  Column "y" does not exist
=> ALTER TABLE t DROP x CASCADE;
ROLLBACK 2409:  Cannot drop any more columns in t
=> DROP TABLE t CASCADE;
7.3 - Altering constraint enforcement
ALTER TABLE...ALTER CONSTRAINT can enable or disable enforcement of primary key, unique, and check constraints.
ALTER TABLE...ALTER CONSTRAINT can enable or disable enforcement of primary key, unique, and check constraints. You must qualify this clause with the keyword ENABLED or DISABLED:
For example:
ALTER TABLE public.new_sales ALTER CONSTRAINT C_PRIMARY ENABLED;
For details, see Constraint enforcement.
7.4 - Renaming tables
ALTER TABLE...RENAME TO renames one or more tables.
ALTER TABLE...RENAME TO renames one or more tables. Renamed tables retain their original OIDs.
You rename multiple tables by supplying two comma-delimited lists. Vertica maps the names according to their order in the two lists. Only the first list can qualify table names with a schema. For example:
=> ALTER TABLE S1.T1, S1.T2 RENAME TO U1, U2;
The RENAME TO parameter is applied atomically: all tables are renamed, or none of them. For example, if the number of tables to rename does not match the number of new names, none of the tables is renamed.
Caution
If a table is referenced by a view, renaming it causes the view to fail, unless you create another table with the previous name to replace the renamed table.
Using rename to swap tables within a schema
You can use ALTER TABLE...RENAME TO to swap tables within the same schema, without actually moving data. You cannot swap tables across schemas.
The following example swaps the data in tables T1 and T2 through intermediary table temp:
-
t1 to temp
-
t2 to t1
-
temp to t2
=> DROP TABLE IF EXISTS temp, t1, t2;
DROP TABLE
=> CREATE TABLE t1 (original_name varchar(24));
CREATE TABLE
=> CREATE TABLE t2 (original_name varchar(24));
CREATE TABLE
=> INSERT INTO t1 VALUES ('original name t1');
 OUTPUT
--------
      1
(1 row)

=> INSERT INTO t2 VALUES ('original name t2');
 OUTPUT
--------
      1
(1 row)

=> COMMIT;
COMMIT
=> ALTER TABLE t1, t2, temp RENAME TO temp, t1, t2;
ALTER TABLE
=> SELECT * FROM t1, t2;
  original_name   |  original_name
------------------+------------------
 original name t2 | original name t1
(1 row)
7.5 - Moving tables to another schema
ALTER TABLE...SET SCHEMA moves a table from one schema to another.
ALTER TABLE...SET SCHEMA moves a table from one schema to another. Vertica automatically moves all projections that are anchored to the source table to the destination schema. It also moves all IDENTITY columns to the destination schema.
Moving a table across schemas requires that you have USAGE privileges on the current schema and CREATE privileges on destination schema. You can move only one table between schemas at a time. You cannot move temporary tables across schemas.
Name conflicts
If a table of the same name or any of the projections that you want to move already exist in the new schema, the statement rolls back and does not move either the table or any projections. To work around name conflicts:
-
Rename any conflicting table or projections that you want to move.
-
Run
ALTER TABLE...SET SCHEMA again.
Note
Vertica lets you move system tables to system schemas. Moving system tables could be necessary to support designs created through the
Database Designer.
Example
The following example moves table T1 from schema S1 to schema S2. All projections that are anchored on table T1 automatically move to schema S2:
=> ALTER TABLE S1.T1 SET SCHEMA S2;
7.6 - Changing table ownership
As a superuser or table owner, you can reassign table ownership with ALTER TABLE...OWNER TO, as follows:.
As a superuser or table owner, you can reassign table ownership with ALTER TABLE...OWNER TO, as follows:
ALTER TABLE [schema.]table-name OWNER TO owner-name
Changing table ownership is useful when moving a table from one schema to another. Ownership reassignment is also useful when a table owner leaves the company or changes job responsibilities. Because you can change the table owner, the tables won't have to be completely rewritten, you can avoid loss in productivity.
Changing table ownership automatically causes the following changes:
-
Grants on the table that were made by the original owner are dropped and all existing privileges on the table are revoked from the previous owner. Changes in table ownership has no effect on schema privileges.
-
Ownership of dependent IDENTITY sequences are transferred with the table. However, ownership does not change for named sequences created with CREATE SEQUENCE. To transfer ownership of these sequences, use ALTER SEQUENCE.
-
New table ownership is propagated to its projections.
Example
In this example, user Bob connects to the database, looks up the tables, and transfers ownership of table t33 from himself to user Alice.
=> \c - Bob
You are now connected as user "Bob".
=> \d
 Schema |  Name  | Kind  |  Owner  | Comment
--------+--------+-------+---------+---------
 public | applog | table | dbadmin |
 public | t33    | table | Bob     |
(2 rows)
=> ALTER TABLE t33 OWNER TO Alice;
ALTER TABLE
When Bob looks up database tables again, he no longer sees table t33:
=> \d                List of tables
               List of tables
 Schema |  Name  | Kind  |  Owner  | Comment
--------+--------+-------+---------+---------
 public | applog | table | dbadmin |
(1 row)
When user Alice connects to the database and looks up tables, she sees she is the owner of table t33.
=> \c - Alice
You are now connected as user "Alice".
=> \d
             List of tables
 Schema | Name | Kind  | Owner | Comment
--------+------+-------+-------+---------
 public | t33  | table | Alice |
(2 rows)
Alice or a superuser can transfer table ownership back to Bob. In the following case a superuser performs the transfer.
=> \c - dbadmin
You are now connected as user "dbadmin".
=> ALTER TABLE t33 OWNER TO Bob;
ALTER TABLE
=> \d
                List of tables
 Schema |   Name   | Kind  |  Owner  | Comment
--------+----------+-------+---------+---------
 public | applog   | table | dbadmin |
 public | comments | table | dbadmin |
 public | t33      | table | Bob     |
 s1     | t1       | table | User1   |
(4 rows)
You can also query system table TABLES to view table and owner information. Note that a change in ownership does not change the table ID.
In the below series of commands, the superuser changes table ownership back to Alice and queries the TABLES system table.
=> ALTER TABLE t33 OWNER TO Alice;
ALTER TABLE
=> SELECT table_schema_id, table_schema, table_id, table_name, owner_id, owner_name FROM tables;
  table_schema_id  | table_schema |     table_id      | table_name |     owner_id      | owner_name
-------------------+--------------+-------------------+------------+-------------------+------------
 45035996273704968 | public       | 45035996273713634 | applog     | 45035996273704962 | dbadmin
 45035996273704968 | public       | 45035996273724496 | comments   | 45035996273704962 | dbadmin
 45035996273730528 | s1           | 45035996273730548 | t1         | 45035996273730516 | User1
 45035996273704968 | public       | 45035996273795846 | t33        | 45035996273724576 | Alice
(5 rows)
Now the superuser changes table ownership back to Bob and queries the TABLES table again. Nothing changes but the owner_name row, from Alice to Bob.
=> ALTER TABLE t33 OWNER TO Bob;
ALTER TABLE
=> SELECT table_schema_id, table_schema, table_id, table_name, owner_id, owner_name FROM tables;
  table_schema_id  | table_schema |     table_id      | table_name |     owner_id      | owner_name
-------------------+--------------+-------------------+------------+-------------------+------------
 45035996273704968 | public       | 45035996273713634 | applog     | 45035996273704962 | dbadmin
 45035996273704968 | public       | 45035996273724496 | comments   | 45035996273704962 | dbadmin
 45035996273730528 | s1           | 45035996273730548 | t1         | 45035996273730516 | User1
 45035996273704968 | public       | 45035996273793876 | foo        | 45035996273724576 | Alice
 45035996273704968 | public       | 45035996273795846 | t33        | 45035996273714428 | Bob
(5 rows)
8 - Sequences
Sequences can be used to set the default values of columns to sequential integer values.
Sequences can be used to set the default values of columns to sequential integer values. Sequences guarantee uniqueness, and help avoid constraint enforcement problems and overhead. Sequences are especially useful for primary key columns.
While sequence object values are guaranteed to be unique, they are not guaranteed to be contiguous. For example, two nodes can increment a sequence at different rates. The node with a heavier processing load increments the sequence, but the values are not contiguous with those being incremented on a node with less processing. For details, see Distributing sequences.
Vertica supports the following sequence types:
- Named sequences are database objects that generates unique numbers in sequential ascending or descending order. Named sequences are defined independently through CREATE SEQUENCE statements, and are managed independently of the tables that reference them. A table can set the default values of one or more columns to named sequences.
- IDENTITY column sequences increment or decrement column's value as new rows are added. Unlike named sequences, IDENTITY sequence types are defined in a table's DDL, so they do not persist independently of that table. A table can contain only one IDENTITY column.
8.1 - Sequence types compared
The following table lists the differences between the two sequence types:.
The following table lists the differences between the two sequence types:
|
Supported Behavior |
Named Sequence |
IDENTITY |
|
Default cache value 250K |
• |
• |
|
Set initial cache |
• |
• |
|
Define start value |
• |
• |
|
Specify increment unit |
• |
• |
|
Exists as an independent object |
• |
|
|
Exists only as part of table |
|
• |
|
Create as column constraint |
|
• |
|
Requires name |
• |
|
|
Use in expressions |
• |
|
|
Unique across tables |
• |
|
|
Change parameters |
• |
|
|
Move to different schema |
• |
|
|
Set to increment or decrement |
• |
|
|
Grant privileges to object |
• |
|
|
Specify minimum value |
• |
|
|
Specify maximum value |
• |
|
8.2 - Named sequences
Named sequences are sequences that are defined by CREATE SEQUENCE.
Named sequences are sequences that are defined by CREATE SEQUENCE. Unlike IDENTITY sequences, which are defined in a table's DDL, you create a named sequence as an independent object, and then set it as the default value of a table column.
Named sequences are used most often when an application requires a unique identifier in a table or an expression. After a named sequence returns a value, it never returns the same value again in the same session.
8.2.1 - Creating and using named sequences
You create a named sequence with CREATE SEQUENCE.
You create a named sequence with
CREATE SEQUENCE. The statement requires only a sequence name; all other parameters are optional. To create a sequence, a user must have CREATE privileges on a schema that contains the sequence.
The following example creates an ascending named sequence, my_seq, starting at the value 100:
=> CREATE SEQUENCE my_seq START 100;
CREATE SEQUENCE
Incrementing and decrementing a sequence
When you create a named sequence object, you can also specify its increment or decrement value by setting its INCREMENT parameter. If you omit this parameter, as in the previous example, the default is set to 1.
You increment or decrement a sequence by calling the function
NEXTVAL on it—either directly on the sequence itself, or indirectly by adding new rows to a table that references the sequence. When called for the first time on a new sequence, NEXTVAL initializes the sequence to its start value. Vertica also creates a cache for the sequence. Subsequent NEXTVAL calls on the sequence increment its value.
The following call to NEXTVAL initializes the new my_seq sequence to 100:
=> SELECT NEXTVAL('my_seq');
 nextval
---------
     100
(1 row)
Getting a sequence's current value
You can obtain the current value of a sequence by calling
CURRVAL on it. For example:
=> SELECT CURRVAL('my_seq');
 CURRVAL
---------
     100
(1 row)
Note
CURRVAL returns an error if you call it on a new sequence that has not yet been initialized by NEXTVAL, or an existing sequence that has not yet been accessed in a new session. For example:
=> CREATE SEQUENCE seq2;
CREATE SEQUENCE
=> SELECT currval('seq2');
ERROR 4700:  Sequence seq2 has not been accessed in the session
Referencing sequences in tables
A table can set the default values of any column to a named sequence. The table creator must have the following privileges: SELECT on the sequence, and USAGE on its schema.
In the following example, column id gets its default values from named sequence my_seq:
=> CREATE TABLE customer(id INTEGER DEFAULT my_seq.NEXTVAL,
  lname VARCHAR(25),
  fname VARCHAR(25),
  membership_card INTEGER
);
For each row that you insert into table customer, the sequence invokes the NEXTVAL function to set the value of the id column. For example:
=> INSERT INTO customer VALUES (default, 'Carr', 'Mary', 87432);
=> INSERT INTO customer VALUES (default, 'Diem', 'Nga', 87433);
=> COMMIT;
For each row, the insert operation invokes NEXTVAL on the sequence my_seq, which increments the sequence to 101 and 102, and sets the id column to those values:
=> SELECT * FROM customer;
 id  | lname | fname | membership_card
-----+-------+-------+-----------------
 101 | Carr  | Mary  |           87432
 102 | Diem  | Nga   |           87433
(1 row)
8.2.2 - Distributing sequences
When you create a sequence, its CACHE parameter determines the number of sequence values each node maintains during a session.
When you create a sequence, its CACHE parameter determines the number of sequence values each node maintains during a session. The default cache value is 250K, so each node reserves 250,000 values per session for each sequence. The default cache size provides an efficient means for large insert or copy operations.
If sequence caching is set to a low number, nodes are liable to request a new set of cache values more frequently. While it supplies a new cache, Vertica must lock the catalog. Until Vertica releases the lock, other database activities such as table inserts are blocked, which can adversely affect overall performance.
When a new session starts, node caches are initially empty. By default, the initiator node requests and reserves cache for all nodes in a cluster. You can change this default so each node requests its own cache, by setting configuration parameter ClusterSequenceCacheMode to 0.
For information on how Vertica requests and distributes cache among all nodes in a cluster, refer to Sequence caching.
Effects of distributed sessions
Vertica distributes a session across all nodes. The first time a cluster node calls the function NEXTVAL on a sequence to increment (or decrement) its value, the node requests its own cache of sequence values. The node then maintains that cache for the current session. As other nodes call NEXTVAL, they too create and maintain their own cache of sequence values.
During a session, nodes call NEXTVAL independently and at different frequencies. Each node uses its own cache to populate the sequence. All sequence values are guaranteed to be unique, but can be out of order with a NEXTVAL statement executed on another node. As a result, sequence values are often non-contiguous.
In all cases, increments a sequence only once per row. Thus, if the same sequence is referenced by multiple columns, NEXTVAL sets all columns in that row to the same value. This applies to rows of joined tables.
Calculating sequences
Vertica calculates the current value of a sequence as follows:
-
At the end of every statement, the state of all sequences used in the session is returned to the initiator node.
-
The initiator node calculates the maximum
CURRVAL of each sequence across all states on all nodes.
-
This maximum value is used as CURRVAL in subsequent statements until another NEXTVAL is invoked.
Losing sequence values
Sequence values in cache can be lost in the following situations:
-
If a statement fails after NEXTVAL is called (thereby consuming a sequence value from the cache), the value is lost.
-
If a disconnect occurs (for example, dropped session), any remaining values in cache that have not been returned through NEXTVAL are lost.
-
When the initiator node distributes a new block of cache to each node where one or more nodes has not used up its current cache allotment. For information on this scenario, refer to Sequence caching.
You can recover lost sequence values by using ALTER SEQUENCE...RESTART, which resets the sequence to the specified value in the next session.
Caution
Using ALTER SEQUENCE to set a sequence start value below its
current value can result in duplicate keys.
8.2.3 - Altering sequences
ALTER SEQUENCE can change sequences in two ways:.
ALTER SEQUENCE can change sequences in two ways:
- Resets parameters that control sequence behavior—for example, its start value, and range of minimum and maximum values. These changes take effect only when you start a new database session.
- Resets sequence name, schema, or ownership. These changes take effect immediately.
Note
The same ALTER SEQUENCE statement cannot make both types of changes.
Changing sequence behavior
ALTER SEQUENCE can change one or more sequence attributes through the following parameters:
|
These parameters... |
Control... |
INCREMENT |
How much to increment or decrement the sequence on each call to NEXTVAL. |
MINVALUE/MAXVALUE |
Range of valid integers. |
RESTART |
Sequence value on its next call to NEXTVAL. |
CACHE/NO CACHE |
How many sequence numbers are pre-allocated and stored in memory for faster access. |
CYCLE/NO CYCLE |
Whether the sequence wraps when its minimum or maximum values are reached. |
These changes take effect only when you start a new database session. For example, if you create a named sequence my_sequence that starts at 10 and increments by 1 (the default), each sequence call to NEXTVAL increments its value by 1:
=> CREATE SEQUENCE my_sequence START 10;
=> SELECT NEXTVAL('my_sequence');
 nextval
---------
      10
(1 row)
=> SELECT NEXTVAL('my_sequence');
 nextval
---------
      11
(1 row)
The following ALTER SEQUENCE statement specifies to restart the sequence at 50:
=>ALTER SEQUENCE my_sequence RESTART WITH 50;
However, this change has no effect in the current session. The next call to NEXTVAL increments the sequence to 12:
=> SELECT NEXTVAL('my_sequence');
 NEXTVAL
---------
      12
(1 row)
The sequence restarts at 50 only after you start a new database session:
=> \q
$ vsql
Welcome to vsql, the Vertica Analytic Database interactive terminal.

=> SELECT NEXTVAL('my_sequence');
 NEXTVAL
---------
      50
(1 row)
Changing sequence name, schema, and ownership
You can use ALTER SEQUENCE to make the following changes to a sequence:
Each of these changes requires separate ALTER SEQUENCE statements. These changes take effect immediately.
For example, the following statement renames a sequence from my_seq to serial:
=> ALTER SEQUENCE s1.my_seq RENAME TO s1.serial;
This statement moves sequence s1.serial to schema s2:
=> ALTER SEQUENCE s1.my_seq SET SCHEMA TO s2;
The following statement reassigns ownership of s2.serial to another user:
=> ALTER SEQUENCE s2.serial OWNER TO bertie;
Note
Only a superuser or the sequence owner can change its ownership. Reassignment does not transfer grants from the original owner to the new owner. Grants made by the original owner are dropped.
8.2.4 - Dropping sequences
Use DROP SEQUENCE to remove a named sequence.
Use
DROP SEQUENCE to remove a named sequence. For example:
=> DROP SEQUENCE my_sequence;
You cannot drop a sequence if one of the following conditions is true:
-
Other objects depend on the sequence. DROP SEQUENCE does not support cascade operations.
-
A column's DEFAULT expression references the sequence. Before dropping the sequence, you must remove all column references to it.
8.3 - IDENTITY sequences
IDENTITY (synonymous with AUTO_INCREMENT) columns are defined with a sequence that automatically increments column values as new rows are added.
IDENTITY (synonymous with AUTO_INCREMENT) columns are defined with a sequence that automatically increments column values as new rows are added. You define an IDENTITY column in a table as follows:
CREATE TABLE table-name...
  (column-name {IDENTITY | AUTO_INCREMENT}
      ( [ cache-size | start, increment [, cache-size ] ] )
Settings
start |
First value to set for this column.
Default: 1
|
increment |
Positive or negative integer that specifies how much to increment or decrement the sequence on each new row insertion from the previous row value, by default set to 1. To decrement sequence values, specify a negative value.
Note
The actual amount by which column values are incremented or decremented might be larger than the increment setting, unless sequence caching is disabled.
Default: 1
|
cache-size |
How many unique numbers each node caches per session. A value of 0 or 1 disables sequence caching. For details, see Sequence caching.
Default: 250,000
|
Managing settings
Like named sequences, you can manage an IDENTITY column with ALTER SEQUENCE—for example, reset its start integer. Two exceptions apply: because the sequence is defined as part of a table column, you cannot change the sequence name or schema. You can query the SEQUENCES system table for the name of an IDENTITY column's sequence. This name is automatically created when you define the table, and conforms to the following convention:
table-name_col-name_seq
For example, you can change the maximum value of an IDENTITY column that is defined in the testAutoId table:
=> SELECT * FROM sequences WHERE identity_table_name  = 'testAutoId';
-[ RECORD 1 ]-------+-------------------------
sequence_schema     | public
sequence_name       | testAutoId_autoIdCol_seq
owner_name          | dbadmin
identity_table_name | testAutoId
session_cache_count | 250000
allow_cycle         | f
output_ordered      | f
increment_by        | 1
minimum             | 1
maximum             | 1000
current_value       | 1
sequence_schema_id  | 45035996273704980
sequence_id         | 45035996274278950
owner_id            | 45035996273704962
identity_table_id   | 45035996274278948

=> ALTER SEQUENCE testAutoId_autoIdCol_seq maxvalue 10000;
ALTER SEQUENCE
This change, like other changes to a sequence, take effect only when you start a new database session. One exception applies: changes to the sequence owner take effect immediately.
You can obtain the last value generated for an IDENTITY column by calling LAST_INSERT_ID.
Restrictions
The following restrictions apply to IDENTITY columns:
- A table can contain only one IDENTITY column.
- IDENTITY column values automatically increment before the current transaction is committed; rolling back the transaction does not revert the change.
- You cannot change the value of an IDENTITY column.
Examples
The following example shows how to use the IDENTITY column-constraint to create a table with an ID column. The ID column has an initial value of 1. It is incremented by 1 every time a row is inserted.
-
Create table Premium_Customer:
=> CREATE TABLE Premium_Customer(
     ID IDENTITY(1,1),
     lname VARCHAR(25),
     fname VARCHAR(25),
     store_membership_card INTEGER
);
=> INSERT INTO Premium_Customer (lname, fname, store_membership_card )
     VALUES ('Gupta', 'Saleem', 475987);
The IDENTITY column has a seed of 1, which specifies the value for the first row loaded into the table, and an increment of 1, which specifies the value that is added to the IDENTITY value of the previous row.
-
Confirm the row you added and see the ID value:
=> SELECT * FROM Premium_Customer;
 ID | lname | fname  | store_membership_card
----+-------+--------+-----------------------
  1 | Gupta | Saleem |                475987
(1 row)
-
Add another row:
=> INSERT INTO Premium_Customer (lname, fname, store_membership_card)
   VALUES ('Lee', 'Chen', 598742);
-
Call the Vertica function LAST_INSERT_ID. The function returns value 2 because you previously inserted a new customer (Chen Lee), and this value is incremented each time a row is inserted:
=> SELECT LAST_INSERT_ID();
 last_insert_id
----------------
               2
(1 row)
-
View all the ID values in the Premium_Customer table:
=> SELECT * FROM Premium_Customer;
 ID | lname | fname  | store_membership_card
----+-------+--------+-----------------------
  1 | Gupta | Saleem |                475987
  2 | Lee   | Chen   |                598742
(2 rows)
The next three examples illustrate the three valid ways to use IDENTITY arguments.
The first example uses a cache of 100, and the defaults for start value (1) and increment value (1):
=> CREATE TABLE t1(x IDENTITY(100), y INT);
The next example specifies the start and increment values as 1, and defaults to a cache value of 250,000:
=> CREATE TABLE t2(y IDENTITY(1,1), x INT);
The third example specifies start and increment values of 1, and a cache value of 100:
=> CREATE TABLE t3(z IDENTITY(1,1,100), zx INT);
8.4 - Sequence caching
Caching is similar for all sequence types: named sequences and IDENTITY column sequences.
Caching is similar for all sequence types: named sequences and IDENTITY column sequences. To allocate cache among the nodes in a cluster for a given sequence, Vertica uses the following process.
- By default, when a session begins, the cluster initiator node requests cache for itself and other nodes in the cluster.
- The initiator node distributes cache to other nodes when it distributes the execution plan.
- Because the initiator node requests caching for all nodes, only the initiator locks the global catalog for the cache request.
This approach is optimal for handling large INSERT-SELECT and COPY operations. The following figure shows how the initiator request and distributes cache for a named sequence in a three-node cluster, where caching for that sequence is set to 250 K:
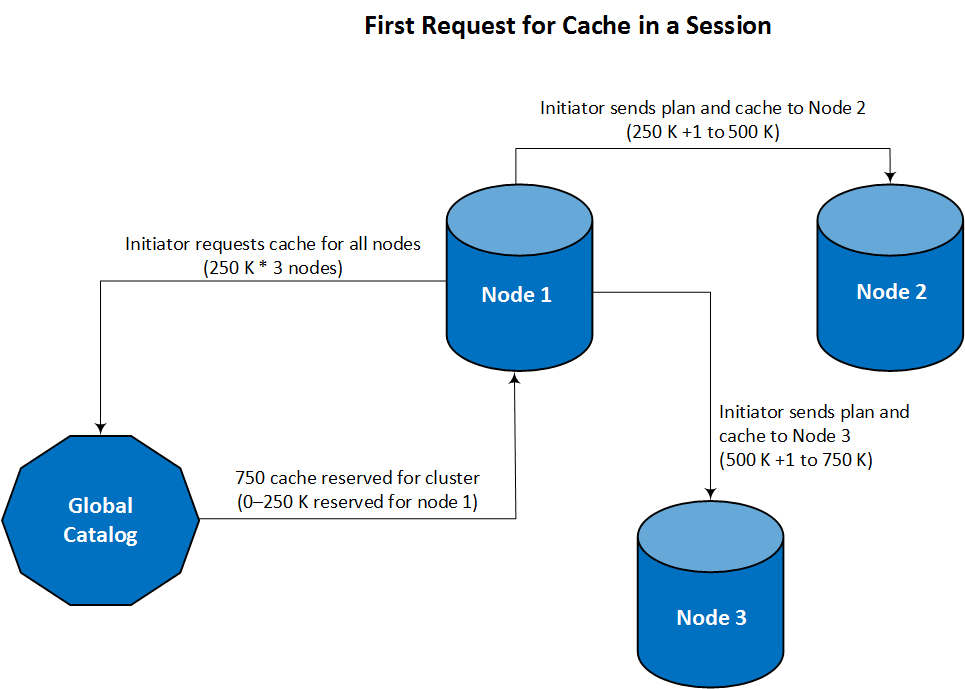
Nodes run out of cache at different times. While executing the same query, nodes individually request additional cache as needed.
For new queries in the same session, the initiator might have an empty cache if it used all of its cache to execute the previous query execution. In this case, the initiator requests cache for all nodes.
Configuring sequence caching
You can change how nodes obtain sequence caches by setting the configuration parameter ClusterSequenceCacheMode to 0 (disabled). When this parameter is set to 0, all nodes in the cluster request their own cache and catalog lock. However, for initial large INSERT-SELECT and COPY operations, when the cache is empty for all nodes, each node requests cache at the same time. These multiple requests result in simultaneous locks on the global catalog, which can adversely affect performance. For this reason, ClusterSequenceCacheMode should remain set to its default value of 1 (enabled).
The following example compares how different settings of ClusterSequenceCacheMode affect how Vertica manages sequence caching. The example assumes a three-node cluster, 250 K caches for each node (the default), and sequence ID values that increment by 1.
|
Workflow step |
ClusterSequenceCacheMode = 1 |
ClusterSequenceCacheMode = 0 |
|
1 |
Cache is empty for all nodes.
Initiator node requests 250 K cache for each node.
|
Cache is empty for all nodes.
Each node, including initiator, requests its own 250 K cache.
|
|
2 |
Blocks of cache are distributed to each node as follows:
Each node begins to use its cache as it processes sequence updates.
|
|
3 |
Initiator node and node 3 run out of cache.
Node 2 only uses 250 K +1 to 400 K, 100 K of cache remains from 400 K +1 to 500 K.
|
|
4 |
Executing same statement:
-
As each node uses up its cache, it requests a new cache allocation.
-
If node 2 never uses its cache, the 100-K unused cache becomes a gap in sequence IDs.
Executing a new statement in same session, if initiator node cache is empty:
-
It requests and distributes new cache blocks for all nodes.
-
Nodes receive a new cache before the old cache is used, creating a gap in ID sequencing.
|
Executing same or new statement:
-
As each node uses up its cache, it requests a new cache allocation.
-
If node 2 never uses its cache, the 100 K unused cache becomes a gap in sequence IDs.
|
9 - Merging table data
MERGE statements can perform update and insert operations on a target table based on the results of a join with a source data set.
MERGE statements can perform update and insert operations on a target table based on the results of a join with a source data set. The join can match a source row with only one target row; otherwise, Vertica returns an error.
MERGE has the following syntax:
MERGE INTO target-table USING source-dataset ON  join-condition
matching-clause[ matching-clause ]
Merge operations have at least three components:
9.1 - Basic MERGE example
In this example, a merge operation involves two tables:.
In this example, a merge operation involves two tables:
-
visits_daily logs daily restaurant traffic, and is updated with each customer visit. Data in this table is refreshed every 24 hours.
-
visits_history stores the history of customer visits to various restaurants, accumulated over an indefinite time span.
Each night, you merge the daily visit count from visits_daily into visits_history. The merge operation modifies the target table in two ways:
One MERGE statement executes both operations as a single (upsert) transaction.
Source and target tables
The source and target tables visits_daily and visits_history are defined as follows:
CREATE TABLE public.visits_daily
(
    customer_id int,
    location_name varchar(20),
    visit_time time(0) DEFAULT (now())::timetz(6)
);

CREATE TABLE public.visits_history
(
    customer_id int,
    location_name varchar(20),
    visit_count int
);
Table visits_history contains rows of three customers who between them visited two restaurants, Etoile and LaRosa:
=> SELECT * FROM visits_history ORDER BY customer_id, location_name;
 customer_id | location_name | visit_count
-------------+---------------+-------------
        1001 | Etoile        |           2
        1002 | La Rosa       |           4
        1004 | Etoile        |           1
(3 rows)
By close of business, table visits_daily contains three rows of restaurant visits:
=> SELECT * FROM visits_daily ORDER BY customer_id, location_name;
 customer_id | location_name | visit_time
-------------+---------------+------------
        1001 | Etoile        | 18:19:29
        1003 | Lux Cafe      | 08:07:00
        1004 | La Rosa       | 11:49:20
(3 rows)
Table data merge
The following MERGE statement merges visits_daily data into visits_history:
-
For matching customers, MERGE updates the occurrence count.
-
For non-matching customers, MERGE inserts new rows.
=> MERGE INTO visits_history h USING visits_daily d
    ON (h.customer_id=d.customer_id AND h.location_name=d.location_name)
    WHEN MATCHED THEN UPDATE SET visit_count = h.visit_count  + 1
    WHEN NOT MATCHED THEN INSERT (customer_id, location_name, visit_count)
    VALUES (d.customer_id, d.location_name, 1);
 OUTPUT
--------
      3
(1 row)
MERGE returns the number of rows updated and inserted. In this case, the returned value specifies three updates and inserts:
-
Customer 1001's third visit to Etoile
-
New customer 1003's first visit to new restaurant Lux Cafe
-
Customer 1004's first visit to La Rosa
If you now query table visits_history, the result set shows the merged (updated and inserted) data. Updated and new rows are highlighted:
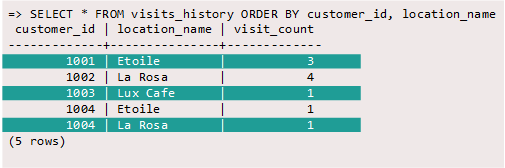
9.2 - MERGE source options
A MERGE operation joins the target table to one of the following data sources:.
A MERGE operation joins the target table to one of the following data sources:
-
Another table
-
View
-
Subquery result set
Merging from table and view data
You merge data from one table into another as follows:
MERGE INTO target-table USING { source-table | source-view } join-condition
   matching-clause[ matching-clause ]
If you specify a view, Vertica expands the view name to the query that it encapsulates, and uses the result set as the merge source data.
For example, the VMart table public.product_dimension contains current and discontinued products. You can move all discontinued products into a separate table public.product_dimension_discontinued, as follows:
=> CREATE TABLE public.product_dimension_discontinued (
     product_key int,
     product_version int,
     sku_number char(32),
     category_description char(32),
     product_description varchar(128));

=> MERGE INTO product_dimension_discontinued tgt
     USING product_dimension src ON tgt.product_key = src.product_key
                                AND tgt.product_version = src.product_version
     WHEN NOT MATCHED AND src.discontinued_flag='1' THEN INSERT VALUES
       (src.product_key,
        src.product_version,
        src.sku_number,
        src.category_description,
        src.product_description);
 OUTPUT
--------
   1186
(1 row)
Source table product_dimension uses two columns, product_key and product_version, to identify unique products. The MERGE statement joins the source and target tables on these columns in order to return single instances of non-matching rows. The WHEN NOT MATCHED clause includes a filter (src.discontinued_flag='1'), which reduces the result set to include only discontinued products. The remaining rows are inserted into target table product_dimension_discontinued.
Merging from a subquery result set
You can merge into a table the result set that is returned by a subquery, as follows:
MERGE INTO target-table USING (subquery) sq-alias join-condition
   matching-clause[ matching-clause ]
For example, the VMart table public.product_dimension is defined as follows (DDL truncated):
CREATE TABLE public.product_dimension
(
    product_key int NOT NULL,
    product_version int NOT NULL,
    product_description varchar(128),
    sku_number char(32),
    ...
)
ALTER TABLE public.product_dimension
    ADD CONSTRAINT C_PRIMARY PRIMARY KEY (product_key, product_version) DISABLED;
Columns product_key and product_version comprise the table's primary key. You can modify this table so it contains a single column that concatenates the values of these two columns. This column can be used to uniquely identify each product, while also maintaining the original values from product_key and product_version.
You populate the new column with a MERGE statement that queries the other two columns:
=> ALTER TABLE public.product_dimension ADD COLUMN product_ID numeric(8,2);
ALTER TABLE

=> MERGE INTO product_dimension tgt
     USING (SELECT (product_key||'.0'||product_version)::numeric(8,2) AS pid, sku_number
     FROM product_dimension) src
     ON tgt.product_key||'.0'||product_version::numeric=src.pid
     WHEN MATCHED THEN UPDATE SET product_ID = src.pid;
 OUTPUT
--------
  60000
(1 row)
The following query verifies that the new column values correspond to the values in product_key and product_version:
=> SELECT product_ID, product_key, product_version, product_description
   FROM product_dimension
   WHERE category_description = 'Medical'
     AND product_description ILIKE '%diabetes%'
     AND discontinued_flag = 1 ORDER BY product_ID;
 product_ID | product_key | product_version |           product_description
------------+-------------+-----------------+-----------------------------------------
    5836.02 |        5836 |               2 | Brand #17487 diabetes blood testing kit
   14320.02 |       14320 |               2 | Brand #43046 diabetes blood testing kit
   18881.01 |       18881 |               1 | Brand #56743 diabetes blood testing kit
(3 rows)
9.3 - MERGE matching clauses
MERGE supports one instance of the following matching clauses:.
MERGE supports one instance of the following matching clauses:
Each matching clause can specify an additional filter, as described in Update and insert filters.
WHEN MATCHED THEN UPDATE SET
Updates all target table rows that are joined to the source table, typically with data from the source table:
WHEN MATCHED [ AND update-filter ] THEN UPDATE
   SET { target-column = expression }[,...]
Vertica can execute the join only on unique values in the source table's join column. If the source table's join column contains more than one matching value, the MERGE statement returns with a run-time error.
WHEN NOT MATCHED THEN INSERT
WHEN NOT MATCHED THEN INSERT inserts into the target table a new row for each source table row that is excluded from the join:
WHEN NOT MATCHED [ AND insert-filter ] THEN INSERT
   [ ( column-list ) ] VALUES ( values-list )
column-list is a comma-delimited list of one or more target columns in the target table, listed in any order. MERGE maps column-list columns to values-list values in the same order, and each column-value pair must be compatible. If you omit column-list, Vertica maps values-list values to columns according to column order in the table definition.
For example, given the following source and target table definitions:
CREATE TABLE t1 (a int, b int, c int);
CREATE TABLE t2 (x int, y int, z int);
The following WHEN NOT MATCHED clause implicitly sets the values of the target table columns a, b, and c in the newly inserted rows:
MERGE INTO t1 USING t2 ON t1.a=t2.x
   WHEN NOT MATCHED THEN INSERT VALUES (t2.x, t2.y, t2.z);
In contrast, the following WHEN NOT MATCHED clause excludes columns t1.b and t2.y from the merge operation. The WHEN NOT MATCHED clause explicitly pairs two sets of columns from the target and source tables: t1.a to t2.x, and t1.c to t2.z. Vertica sets excluded column t1.b. to null:
MERGE INTO t1 USING t2 ON t1.a=t2.x
   WHEN NOT MATCHED THEN INSERT (a, c) VALUES (t2.x, t2.z);
9.4 - Update and insert filters
Each WHEN MATCHED and WHEN NOT MATCHED clause in a MERGE statement can optionally specify an update filter and insert filter, respectively:.
Each WHEN MATCHED and WHEN NOT MATCHED clause in a MERGE statement can optionally specify an update filter and insert filter, respectively:
WHEN MATCHED AND update-filter THEN UPDATE ...
WHEN NOT MATCHED AND insert-filter THEN INSERT ...
Vertica also supports Oracle syntax for specifying update and insert filters:
WHEN MATCHED THEN UPDATE SET column-updates WHERE update-filter
WHEN NOT MATCHED THEN INSERT column-values WHERE insert-filter
Each filter can specify multiple conditions. Vertica handles the filters as follows:
-
An update filter is applied to the set of matching rows in the target table that are returned by the MERGE join. For each row where the update filter evaluates to true, Vertica updates the specified columns.
-
An insert filter is applied to the set of source table rows that are excluded from the MERGE join. For each row where the insert filter evaluates to true, Vertica adds a new row to the target table with the specified values.
For example, given the following data in tables t11 and t22:
=> SELECT * from t11 ORDER BY pk;
 pk | col1 | col2 | SKIP_ME_FLAG
----+------+------+--------------
  1 |    2 |    3 | t
  2 |    3 |    4 | t
  3 |    4 |    5 | f
  4 |      |    6 | f
  5 |    6 |    7 | t
  6 |      |    8 | f
  7 |    8 |      | t
(7 rows)

=> SELECT * FROM t22 ORDER BY pk;
 pk | col1 | col2
----+------+------
  1 |    2 |    4
  2 |    4 |    8
  3 |    6 |
  4 |    8 |   16
(4 rows)
You can merge data from table t11 into table t22 with the following MERGE statement, which includes update and insert filters:
=> MERGE INTO t22 USING t11 ON ( t11.pk=t22.pk )
   WHEN MATCHED
       AND t11.SKIP_ME_FLAG=FALSE AND (
         COALESCE (t22.col1<>t11.col1, (t22.col1 is null)<>(t11.col1 is null))
       )
   THEN UPDATE SET col1=t11.col1, col2=t11.col2
   WHEN NOT MATCHED
      AND t11.SKIP_ME_FLAG=FALSE
   THEN INSERT (pk, col1, col2) VALUES (t11.pk, t11.col1, t11.col2);
 OUTPUT
--------
      3
(1 row)

=> SELECT * FROM t22 ORDER BY pk;
 pk | col1 | col2
----+------+------
  1 |    2 |    4
  2 |    4 |    8
  3 |    4 |    5
  4 |      |    6
  6 |      |    8
(5 rows)
Vertica uses the update and insert filters as follows:
-
Evaluates all matching rows against the update filter conditions. Vertica updates each row where the following two conditions both evaluate to true:
-
Evaluates all non-matching rows in the source table against the insert filter. For each row where column t11.SKIP_ME_FLAG is set to false, Vertica inserts a new row in the target table.
9.5 - MERGE optimization
You can improve MERGE performance in several ways:.
You can improve MERGE performance in several ways:
Projections for MERGE operations
The Vertica query optimizer automatically chooses the best projections to implement a merge operation. A good projection design strategy provides projections that help the query optimizer avoid extra sort and data transfer operations, and facilitate MERGE performance.
For example, the following MERGE statement fragment joins source and target tables tgt and src, respectively, on columns tgt.a and src.b:
=> MERGE INTO tgt USING src ON tgt.a = src.b ...
Vertica can use a local merge join if projections for tables tgt and src use one of the following projection designs, where inputs are presorted by projection ORDER BY clauses:
Optimizing MERGE query plans
Vertica prepares an optimized query plan if the following conditions are all true:
-
The MERGE statement contains both matching clauses
WHEN MATCHED THEN UPDATE SET and
WHEN NOT MATCHED THEN INSERT. If the MERGE statement contains only one matching clause, it uses a non-optimized query plan.
-
The MERGE statement excludes update and insert filters.
-
The target table join column has a unique or primary key constraint. This requirement does not apply to the source table join column.
-
Both matching clauses specify all columns in the target table.
-
Both matching clauses specify identical source values.
For details on evaluating an
EXPLAIN-generated query plan, see MERGE path.
The examples that follow use a simple schema to illustrate some of the conditions under which Vertica prepares or does not prepare an optimized query plan for MERGE:
CREATE TABLE target(a INT PRIMARY KEY, b INT, c INT) ORDER BY b,a;
CREATE TABLE source(a INT, b INT, c INT) ORDER BY b,a;
INSERT INTO target VALUES(1,2,3);
INSERT INTO target VALUES(2,4,7);
INSERT INTO source VALUES(3,4,5);
INSERT INTO source VALUES(4,6,9);
COMMIT;
Optimized MERGE statement
Vertica can prepare an optimized query plan for the following MERGE statement because:
-
The target table's join column t.a has a primary key constraint.
-
All columns in the target table (a,b,c) are included in the UPDATE and INSERT clauses.
-
The UPDATE and INSERT clauses specify identical source values: s.a, s.b, and s.c.
MERGE INTO target t USING source s ON t.a = s.a
  WHEN MATCHED THEN UPDATE SET a=s.a, b=s.b, c=s.c
  WHEN NOT MATCHED THEN INSERT(a,b,c) VALUES(s.a, s.b, s.c);

 OUTPUT
--------
2
(1 row)
The output value of 2 indicates success and denotes the number of rows updated/inserted from the source into the target.
Non-optimized MERGE statement
In the next example, the MERGE statement runs without optimization because the source values in the UPDATE/INSERT clauses are not identical. Specifically, the UPDATE clause includes constants for columns s.a and s.c and the INSERT clause does not:
MERGE INTO target t USING source s ON t.a = s.a
  WHEN MATCHED THEN UPDATE SET a=s.a + 1, b=s.b, c=s.c - 1
  WHEN NOT MATCHED THEN INSERT(a,b,c) VALUES(s.a, s.b, s.c);
To make the previous MERGE statement eligible for optimization, rewrite the statement so that the source values in the UPDATE and INSERT clauses are identical:
MERGE INTO target t USING source s ON t.a = s.a
  WHEN MATCHED THEN UPDATE SET a=s.a + 1, b=s.b, c=s.c -1
  WHEN NOT MATCHED THEN INSERT(a,b,c) VALUES(s.a + 1, s.b, s.c - 1);
9.6 - MERGE restrictions
The following restrictions apply to updating and inserting table data with MERGE.
The following restrictions apply to updating and inserting table data with
MERGE.
Constraint enforcement
If primary key, unique key, or check constraints are enabled for automatic enforcement in the target table, Vertica enforces those constraints when you load new data. If a violation occurs, Vertica rolls back the operation and returns an error.
Caution
If you run MERGE multiple times using the same target and source table, each iteration is liable to introduce duplicate values into the target columns and return with an error.
Columns prohibited from merge
The following columns cannot be specified in a merge operation; attempts to do so return with an error:
-
IDENTITY columns, or columns whose default value is set to a named sequence.
-
Vmap columns such as __raw__ in flex tables.
-
Columns of complex types ARRAY, SET, or ROW.
10 - Removing table data
Vertica provides several ways to remove data from a table:.
Vertica provides several ways to remove data from a table:
|
Delete operation |
Description |
|
Drop a table |
Permanently remove a table and its definition, optionally remove associated views and projections. |
|
Delete table rows |
Mark rows with delete vectors and store them so data can be rolled back to a previous epoch. The data must be purged to reclaim disk space. |
|
Truncate table data |
Remove all storage and history associated with a table. The table structure is preserved for future use. |
|
Purge data |
Permanently remove historical data from physical storage and free disk space for reuse. |
|
Drop partitions |
Remove one more partitions from a table. Each partition contains a related subset of data in the table. Dropping partitioned data is efficient, and provides query performance benefits. |
10.1 - Data removal operations compared
/need to include purge operations? or is that folded into DELETE operations?/.
The following table summarizes differences between various data removal operations.
|
Operations and options |
Performance |
Auto commits |
Saves history |
DELETE FROM ``table |
Normal |
No |
Yes |
DELETE FROM ``temp-table |
High |
No |
No |
DELETE FROM table where-clause |
Normal |
No |
Yes |
DELETE FROM temp-table where-clause |
Normal |
No |
Yes |
DELETE FROM temp-table where-clause
ON COMMIT PRESERVE ROWS
|
Normal |
No |
Yes |
DELETE FROM temp-table where-clause
ON COMMIT DELETE ROWS
|
High |
Yes |
No |
DROP table |
High |
Yes |
No |
TRUNCATE table |
High |
Yes |
No |
TRUNCATE temp-table |
High |
Yes |
No |
SELECT DROP_PARTITIONS (...) |
High |
Yes |
No |
Choosing the best operation
The following table can help you decide which operation is best for removing table data:
|
If you want to... |
Use... |
|
Delete both table data and definitions and start from scratch. |
DROP TABLE |
|
Quickly drop data while preserving table definitions, and reload data. |
TRUNCATE TABLE |
|
Regularly perform bulk delete operations on logical sets of data. |
DROP_PARTITIONS |
|
Occasionally perform small deletes with the option to roll back or review history. |
DELETE |
10.2 - Optimizing DELETE and UPDATE
Vertica is optimized for query-intensive workloads, so DELETE and UPDATE queries might not achieve the same level of performance as other queries.
Vertica is optimized for query-intensive workloads, so DELETE and UPDATE queries might not achieve the same level of performance as other queries. A DELETE and UPDATE operation must update all projections, so the operation can only be as fast as the slowest projection.
To improve the performance of DELETE and UPDATE queries, consider the following issues:
- Query performance after large DELETE operations: Vertica's implementation of DELETE differs from traditional databases: it does not delete data from disk storage; rather, it marks rows as deleted so they are available for historical queries. Deletion of 10% or more of the total rows in a table can adversely affect queries on that table. In that case, consider purging those rows to improve performance.
- Recovery performance: Recovery is the action required for a cluster to restore K-safety after a crash. Large numbers of deleted records can degrade the performance of a recovery. To improve recovery performance, purge the deleted rows.
- Concurrency: DELETE and UPDATE take exclusive locks on the table. Only one DELETE or UPDATE transaction on a table can be in progress at a time and only when no load operations are in progress. Delete and update operations on different tables can run concurrently.
Projection column requirements for optimized delete
A projection is optimized for delete and update operations if it contains all columns required by the query predicate. In general, DML operations are significantly faster when performed on optimized projections than on non-optimized projections.
For example, consider the following table and projections:
=> CREATE TABLE t (a INTEGER, b INTEGER, c INTEGER);
=> CREATE PROJECTION p1 (a, b, c) AS SELECT * FROM t ORDER BY a;
=> CREATE PROJECTION p2 (a, c) AS SELECT a, c FROM t ORDER BY c, a;
In the following query, both p1 and p2 are eligible for DELETE and UPDATE optimization because column a is available:
=> DELETE from t WHERE a = 1;
In the following example, only projection p1 is eligible for DELETE and UPDATE optimization because the b column is not available in p2:
=> DELETE from t WHERE b = 1;
Optimized DELETE in subqueries
To be eligible for DELETE optimization, all target table columns referenced in a DELETE or UPDATE statement's WHERE clause must be in the projection definition.
For example, the following simple schema has two tables and three projections:
=> CREATE TABLE tb1 (a INT, b INT, c INT, d INT);
=> CREATE TABLE tb2 (g INT, h INT, i INT, j INT);
The first projection references all columns in tb1 and sorts on column a:
=> CREATE PROJECTION tb1_p AS SELECT a, b, c, d FROM tb1 ORDER BY a;
The buddy projection references and sorts on column a in tb1:
=> CREATE PROJECTION tb1_p_2 AS SELECT a FROM tb1 ORDER BY a;
This projection references all columns in tb2 and sorts on column i:
=> CREATE PROJECTION tb2_p AS SELECT g, h, i, j FROM tb2 ORDER BY i;
Consider the following DML statement, which references tb1.a in its WHERE clause. Since both projections on tb1 contain column a, both are eligible for the optimized DELETE:
=> DELETE FROM tb1 WHERE tb1.a IN (SELECT tb2.i FROM tb2);
Restrictions
Optimized DELETE operations are not supported under the following conditions:
-
With replicated projections if subqueries reference the target table. For example, the following syntax is not supported:
=> DELETE FROM tb1 WHERE tb1.a IN (SELECT e FROM tb2, tb2 WHERE tb2.e = tb1.e);
-
With subqueries that do not return multiple rows. For example, the following syntax is not supported:
=> DELETE FROM tb1 WHERE tb1.a = (SELECT k from tb2);
Projection sort order for optimizing DELETE
Design your projections so that frequently-used DELETE or UPDATE predicate columns appear in the sort order of all projections for large DELETE and UPDATE operations.
For example, suppose most of the DELETE queries you perform on a projection look like the following:
=> DELETE from t where time_key < '1-1-2007'
To optimize the delete operations, make time_key appear in the ORDER BY clause of all projections. This schema design results in better performance of the delete operation.
In addition, add sort columns to the sort order such that each combination of the sort key values uniquely identifies a row or a small set of rows. For more information, see Choosing sort order: best practices. To analyze projections for sort order issues, use the EVALUATE_DELETE_PERFORMANCE function.
10.3 - Purging deleted data
In Vertica, delete operations do not remove rows from physical storage.
In Vertica, delete operations do not remove rows from physical storage. DELETE marks rows as deleted, as does UPDATE, which combines delete and insert operations. In both cases, Vertica retains discarded rows as historical data, which remains accessible to historical queries until it is purged.
The cost of retaining historical data is twofold:
-
Disk space is allocated to deleted rows and delete markers.
-
Typical (non-historical) queries must read and skip over deleted data, which can impact performance.
A purge operation permanently removes historical data from physical storage and frees disk space for reuse. Only historical data that precedes the Ancient History Mark (AHM) is eligible to be purged.
You can purge data in two ways:
In both cases, Vertica purges all historical data up to and including the AHM epoch and resets the AHM. See Epochs for additional information about how Vertica uses epochs.
Caution
Large delete and purge operations can take a long time to complete, so use them sparingly. If your application requires deleting data on a regular basis, such as by month or year, consider designing tables that take advantage of
table partitioning. If partitioning is not suitable, consider
rebuilding the table.
10.3.1 - Setting a purge policy
The preferred method for purging data is to establish a policy that determines which deleted data is eligible to be purged.
The preferred method for purging data is to establish a policy that determines which deleted data is eligible to be purged. Eligible data is automatically purged when the Tuple Mover performs mergeout operations.
Vertica provides two methods for determining when deleted data is eligible to be purged:
Specifying the time for which delete data is saved
Specifying the time for which delete data is saved is the preferred method for determining which deleted data can be purged. By default, Vertica saves historical data only when nodes are down.
To change the specified time for saving deleted data, use the HistoryRetentionTime configuration parameter:
=> ALTER DATABASE DEFAULT SET HistoryRetentionTime = {seconds | -1};
In the above syntax:
-
seconds is the amount of time (in seconds) for which to save deleted data.
-
-1 indicates that you do not want to use the HistoryRetentionTime configuration parameter to determine which deleted data is eligible to be purged. Use this setting if you prefer to use the other method (HistoryRetentionEpochs) for determining which deleted data can be purged.
The following example sets the history epoch retention level to 240 seconds:
=> ALTER DATABASE DEFAULT SET HistoryRetentionTime = 240;
Specifying the number of epochs that are saved
Unless you have a reason to limit the number of epochs, Vertica recommends that you specify the time over which delete data is saved.
To specify the number of historical epoch to save through the HistoryRetentionEpochs configuration parameter:
-
Turn off the HistoryRetentionTime configuration parameter:
=> ALTER DATABASE DEFAULT SET HistoryRetentionTime = -1;
-
Set the history epoch retention level through the HistoryRetentionEpochs configuration parameter:
=> ALTER DATABASE DEFAULT SET HistoryRetentionEpochs = {num_epochs | -1};
-
num_epochs is the number of historical epochs to save.
-
-1 indicates that you do not want to use the HistoryRetentionEpochs configuration parameter to trim historical epochs from the epoch map. By default, HistoryRetentionEpochs is set to -1.
The following example sets the number of historical epochs to save to 40:
=> ALTER DATABASE DEFAULT SET HistoryRetentionEpochs = 40;
Modifications are immediately implemented across all nodes within the database cluster. You do not need to restart the database.
Note
If both HistoryRetentionTime and HistoryRetentionEpochs are specified, HistoryRetentionTime takes precedence.
See Epoch management parameters for additional details. See Epochs for information about how Vertica uses epochs.
Disabling purge
If you want to preserve all historical data, set the value of both historical epoch retention parameters to -1, as follows:
=> ALTER DABABASE mydb SET HistoryRetentionTime = -1;
=> ALTER DATABASE DEFAULT SET HistoryRetentionEpochs = -1;
10.3.2 - Manually purging data
You manually purge deleted data as follows:.
You manually purge deleted data as follows:
-
Set the cut-off date for purging deleted data. First, call one of the following functions to verify the current ancient history mark (AHM):
-
Set the AHM to the desired cut-off date with one of the following functions:
If you call SET_AHM_TIME, keep in mind that the timestamp you specify is mapped to an epoch, which by default has a three-minute granularity. Thus, if you specify an AHM time of 2008-01-01 00:00:00.00, Vertica might purge data from the first three minutes of 2008, or retain data from last three minutes of 2007.
Note
You cannot advance the AHM beyond a point where Vertica is unable to recover data for a down node.
-
Purge deleted data from the desired projections with one of the following functions:
The tuple mover performs a mergeout operation to purge the data. Vertica periodically invokes the tuple mover to perform mergeout operations, as configured by tuple mover parameters. You can manually invoke the tuple mover by calling the function
DO_TM_TASK.
Caution
Manual purge operations can take a long time.
See Epochs for additional information about how Vertica uses epochs.
10.4 - Truncating tables
TRUNCATE TABLE removes all storage associated with the target table and its projections.
TRUNCATE TABLE removes all storage associated with the target table and its projections. Vertica preserves the table and the projection definitions. If the truncated table has out-of-date projections, those projections are cleared and marked up-to-date when TRUNCATE TABLE returns.
TRUNCATE TABLE commits the entire transaction after statement execution, even if truncating the table fails. You cannot roll back a TRUNCATE TABLE statement.
Use TRUNCATE TABLE for testing purposes. You can use it to remove all data from a table and load it with fresh data, without recreating the table and its projections.
Table locking
TRUNCATE TABLE takes an O (owner) lock on the table until the truncation process completes. The savepoint is then released.
If the operation cannot obtain an O lock on the target table, Vertica tries to close any internal Tuple Mover sessions that are running on that table. If successful, the operation can proceed. Explicit Tuple Mover operations that are running in user sessions do not close. If an explicit Tuple Mover operation is running on the table, the operation proceeds only when the operation is complete.
Restrictions
You cannot truncate an external table.
Examples
=> INSERT INTO sample_table (a) VALUES (3);
=> SELECT * FROM sample_table;
a
---
3
(1 row)
=> TRUNCATE TABLE sample_table;
TRUNCATE TABLE
=> SELECT * FROM sample_table;
a
---
(0 rows)
11 - Rebuilding tables
You can reclaim disk space on a large scale by rebuilding tables, as follows:.
You can reclaim disk space on a large scale by rebuilding tables, as follows:
-
Create a table with the same (or similar) definition as the table to rebuild.
-
Create projections for the new table.
-
Copy data from the target table into the new one with
INSERT...SELECT.
-
Drop the old table and its projections.
Note
Rather than dropping the old table, you can rename it and use it as a backup copy. Before doing so, verify that you have sufficient disk space for both the new and old tables.
-
Rename the new table with
ALTER TABLE...RENAME, using the name of the old table.
Caution
When you rebuild a table, Vertica purges the table of all delete vectors that precede the AHM. This prevents historical queries on any older epoch.
Projection considerations
-
You must have enough disk space to contain the old and new projections at the same time. If necessary, you can drop some of the old projections before loading the new table. You must, however, retain at least one superprojection of the old table (or two buddy superprojections to maintain K-safety) until the new table is loaded. (See Prepare disk storage locations for disk space requirements.)
-
You can specify different names for the new projections or use ALTER TABLE...RENAME to change the names of the old projections.
-
The relationship between tables and projections does not depend on object names. Instead, it depends on object identifiers that are not affected by rename operations. Thus, if you rename a table, its projections continue to work normally.
12 - Dropping tables
DROP TABLE drops a table from the database catalog.
DROP TABLE drops a table from the database catalog. If any projections are associated with the table, DROP TABLE returns an error message unless it also includes the CASCADE option. One exception applies: the table only has an auto-generated superprojection (auto-projection) associated with it.
Using CASCADE
In the following example, DROP TABLE tries to remove a table that has several projections associated with it. Because it omits the CASCADE option, Vertica returns an error:
=> DROP TABLE d1;
NOTICE: Constraint - depends on Table d1
NOTICE: Projection d1p1 depends on Table d1
NOTICE: Projection d1p2 depends on Table d1
NOTICE: Projection d1p3 depends on Table d1
NOTICE: Projection f1d1p1 depends on Table d1
NOTICE: Projection f1d1p2 depends on Table d1
NOTICE: Projection f1d1p3 depends on Table d1
ERROR: DROP failed due to dependencies: Cannot drop Table d1 because other objects depend on it
HINT: Use DROP ... CASCADE to drop the dependent objects too.
=> DROP TABLE d1 CASCADE;
DROP TABLE
=> CREATE TABLE mytable (a INT, b VARCHAR(256));
CREATE TABLE
=> DROP TABLE IF EXISTS mytable;
DROP TABLE
=> DROP TABLE IF EXISTS mytable; -- Doesn't exist
NOTICE:  Nothing was dropped
DROP TABLE
The next attempt includes the CASCADE option and succeeds:
=> DROP TABLE d1 CASCADE;
DROP TABLE
=> CREATE TABLE mytable (a INT, b VARCHAR(256));
CREATE TABLE
=> DROP TABLE IF EXISTS mytable;
DROP TABLE
=> DROP TABLE IF EXISTS mytable; -- Doesn't exist
NOTICE:  Nothing was dropped
DROP TABLE
Using IF EXISTS
In the following example, DROP TABLE includes the option IF EXISTS. This option specifies not to report an error if one or more of the tables to drop does not exist. This clause is useful in SQL scripts—for example, to ensure that a table is dropped before you try to recreate it:
=> DROP TABLE IF EXISTS mytable;
DROP TABLE
=> DROP TABLE IF EXISTS mytable; -- Table doesn't exist
NOTICE:  Nothing was dropped
DROP TABLE
Dropping and restoring view tables
Views that reference a table that is dropped and then replaced by another table with the same name continue to function and use the contents of the new table. The new table must have the same column definitions.