Before reading the topics in this section, you should be familiar with the material in Getting started and are familiar with creating and configuring a fully-functioning example database.
This is the multi-page printable view of this section. Click here to print.
Configuring the database
Before reading the topics in this section, you should be familiar with the material in [%=Vertica.GETTING_STARTED_GUIDE%] and are familiar with creating and configuring a fully-functioning example database.
- 1: Configuration procedure
- 1.1: Prepare disk storage locations
- 1.1.1: Specifying disk storage location during database creation
- 1.1.2: Specifying disk storage location on MC
- 1.1.3: Configuring disk usage to optimize performance
- 1.1.4: Using shared storage with Vertica
- 1.1.5: Viewing database storage information
- 1.1.6: Anti-virus scanning exclusions
- 1.2: Disk space requirements for Vertica
- 1.3: Disk space requirements for Management Console
- 1.4: Prepare the logical schema script
- 1.5: Prepare data files
- 1.6: Prepare load scripts
- 1.7: Create an optional sample query script
- 1.8: Create an empty database
- 1.9: Create the logical schema
- 1.10: Perform a partial data load
- 1.11: Test the database
- 1.12: Optimize query performance
- 1.13: Complete the data load
- 1.14: Test the optimized database
- 1.15: Implement locales for international data sets
- 1.15.1: Specify the default locale for the database
- 1.15.2: Override the default locale for a session
- 1.15.3: Server versus client locale settings
- 1.16: Using time zones with Vertica
- 1.17: Change transaction isolation levels
- 2: Configuration parameter management
- 3: Designing a logical schema
- 3.1: Using multiple schemas
- 3.1.1: Multiple schema examples
- 3.1.2: Creating schemas
- 3.1.3: Specifying objects in multiple schemas
- 3.1.4: Setting search paths
- 3.1.5: Creating objects that span multiple schemas
- 3.2: Tables in schemas
- 4: Creating a database design
- 4.1: About Database Designer
- 4.2: How Database Designer creates a design
- 4.3: Database Designer access requirements
- 4.4: Logging projection data for Database Designer
- 4.4.1: Enabling logging for Database Designer
- 4.4.2: Viewing Database Designer logs
- 4.4.3: Database Designer logs: example data
- 4.5: General design settings
- 4.6: Building a design
- 4.7: Resetting a design
- 4.8: Deploying a design
- 4.9: How to create a design
- 4.10: Running Database Designer programmatically
- 4.10.1: Database Designer function categories
- 4.10.2: Workflow for running Database Designer programmatically
- 4.10.3: Privileges for running Database Designer functions
- 4.10.4: Resource pool for Database Designer users
- 4.11: Creating custom designs
- 4.11.1: Custom design process
- 4.11.2: Planning your design
- 4.11.2.1: Design requirements
- 4.11.2.2: Determining the number of projections to use
- 4.11.2.3: Designing for K-safety
- 4.11.2.3.1: Requirements for a K-safe physical schema design
- 4.11.2.3.2: Requirements for a physical schema design with no K-safety
- 4.11.2.3.3: Designing segmented projections for K-safety
- 4.11.2.3.4: Designing unsegmented projections for K-Safety
- 4.11.2.4: Designing for segmentation
- 4.11.3: Design fundamentals
- 4.11.3.1: Writing and deploying custom projections
- 4.11.3.2: Designing superprojections
- 4.11.3.3: Sort order benefits
- 4.11.3.4: Choosing sort order: best practices
- 4.11.3.5: Prioritizing column access speed
1 - Configuration procedure
This section describes the tasks required to set up a Vertica database.
This section describes the tasks required to set up a Vertica database. It assumes that you have a valid license key file, installed the Vertica rpm package, and ran the installation script as described.
You complete the configuration procedure using:
-
Administration tools
If you are unfamiliar with Dialog-based user interfaces, read Using the administration tools interface before you begin. See also the Administration tools reference for details.
-
vsql interactive interface
-
Database Designer, described in Creating a database design
Note
You can also perform certain tasks using Management Console. Those tasks point to the appropriate topic.Continuing configuring
Follow the configuration procedure sequentially as this section describes.
Vertica strongly recommends that you first experiment with creating and configuring a database.
You can use this generic configuration procedure several times during the development process, modifying it to fit your changing goals. You can omit steps such as preparing actual data files and sample queries, and run the Database Designer without optimizing for queries. For example, you can create, load, and query a database several times for development and testing purposes, then one final time to create and load the production database.
1.1 - Prepare disk storage locations
You must create and specify directories in which to store your catalog and data files ().
You must create and specify directories in which to store your catalog and data files (physical schema). You can specify these locations when you install or configure the database, or later during database operations. Both the catalog and data directories must be owned by the database superuser.
The directory you specify for database catalog files (the catalog path) is used across all nodes in the cluster. For example, if you specify /home/catalog as the catalog directory, Vertica uses that catalog path on all nodes. The catalog directory should always be separate from any data file directories.
Note
Do not use a shared directory for more than one node. Data and catalog directories must be distinct for each node. Multiple nodes must not be allowed to write to the same data or catalog directory.The data path you designate is also used across all nodes in the cluster. Specifying that data should be stored in /home/data, Vertica uses this path on all database nodes.
Do not use a single directory to contain both catalog and data files. You can store the catalog and data directories on different drives, which can be either on drives local to the host (recommended for the catalog directory) or on a shared storage location, such as an external disk enclosure or a SAN.
Before you specify a catalog or data path, be sure the parent directory exists on all nodes of your database. Creating a database in admintools also creates the catalog and data directories, but the parent directory must exist on each node.
You do not need to specify a disk storage location during installation. However, you can do so by using the --data-dir parameter to the install_vertica script. See Specifying disk storage location during installation.
1.1.1 - Specifying disk storage location during database creation
When you invoke the Create Database command in the , a dialog box allows you to specify the catalog and data locations.
When you invoke the Create Database command in the Administration tools, a dialog box allows you to specify the catalog and data locations. These locations must exist on each host in the cluster and must be owned by the database administrator.
When you click OK, Vertica automatically creates the following subdirectories:
catalog-pathname/database-name/node-name_catalog/data-pathname/database-name/node-name_data/
For example, if you use the default value (the database administrator's home directory) of
/home/dbadmin for the Stock Exchange example database, the catalog and data directories are created on each node in the cluster as follows:
/home/dbadmin/Stock_Schema/stock_schema_node1_host01_catalog/home/dbadmin/Stock_Schema/stock_schema_node1_host01_data
Notes
-
Catalog and data path names must contain only alphanumeric characters and cannot have leading space characters. Failure to comply with these restrictions will result in database creation failure.
-
Vertica refuses to overwrite a directory if it appears to be in use by another database. Therefore, if you created a database for evaluation purposes, dropped the database, and want to reuse the database name, make sure that the disk storage location previously used has been completely cleaned up. See Managing storage locations for details.
1.1.2 - Specifying disk storage location on MC
You can use the MC interface to specify where you want to store database metadata on the cluster in the following ways:.
You can use the MC interface to specify where you want to store database metadata on the cluster in the following ways:
-
When you configure MC the first time
-
When you create new databases using on MC
See also
1.1.3 - Configuring disk usage to optimize performance
Once you have created your initial storage location, you can add additional storage locations to the database later.
Once you have created your initial storage location, you can add additional storage locations to the database later. Not only does this provide additional space, it lets you control disk usage and increase I/O performance by isolating files that have different I/O or access patterns. For example, consider:
-
Isolating execution engine temporary files from data files by creating a separate storage location for temp space.
-
Creating labeled storage locations and storage policies, in which selected database objects are stored on different storage locations based on measured performance statistics or predicted access patterns.
See also
Managing storage locations1.1.4 - Using shared storage with Vertica
If using shared SAN storage, ensure there is no contention among the nodes for disk space or bandwidth.
If using shared SAN storage, ensure there is no contention among the nodes for disk space or bandwidth.
-
Each host must have its own catalog and data locations. Hosts cannot share catalog or data locations.
-
Configure the storage so that there is enough I/O bandwidth for each node to access the storage independently.
1.1.5 - Viewing database storage information
You can view node-specific information on your Vertica cluster through the.
You can view node-specific information on your Vertica cluster through the Management Console. See Monitoring Vertica Using Management Console for details.
1.1.6 - Anti-virus scanning exclusions
You should exclude the Vertica catalog and data directories from anti-virus scanning.
You should exclude the Vertica catalog and data directories from anti-virus scanning. Certain anti-virus products have been identified as targeting Vertica directories, and sometimes lock or delete files in them. This can adversely affect Vertica performance and data integrity.
Identified anti-virus products include the following:
-
ClamAV
-
SentinelOne
-
Sophos
-
Symantec
-
Twistlock
Important
This list is not comprehensive.1.2 - Disk space requirements for Vertica
In addition to actual data stored in the database, Vertica requires disk space for several data reorganization operations, such as and managing nodes in the cluster.
In addition to actual data stored in the database, Vertica requires disk space for several data reorganization operations, such as mergeout and managing nodes in the cluster. For best results, Vertica recommends that disk utilization per node be no more than sixty percent (60%) for a K-Safe=1 database to allow such operations to proceed.
In addition, disk space is temporarily required by certain query execution operators, such as hash joins and sorts, in the case when they cannot be completed in memory (RAM). Such operators might be encountered during queries, recovery, refreshing projections, and so on. The amount of disk space needed (known as temp space) depends on the nature of the queries, amount of data on the node and number of concurrent users on the system. By default, any unused disk space on the data disk can be used as temp space. However, Vertica recommends provisioning temp space separate from data disk space.
See also
1.3 - Disk space requirements for Management Console
You can install Management Console on any node in the cluster, so it has no special disk requirements other than disk space you allocate for your database cluster.
You can install Management Console on any node in the cluster, so it has no special disk requirements other than disk space you allocate for your database cluster.
1.4 - Prepare the logical schema script
Designing a logical schema for a Vertica database is no different from designing one for any other SQL database.
Designing a logical schema for a Vertica database is no different from designing one for any other SQL database. Details are described more fully in Designing a logical schema.
To create your logical schema, prepare a SQL script (plain text file, typically with an extension of .sql) that:
-
Creates additional schemas (as necessary). See Using multiple schemas.
-
Creates the tables and column constraints in your database using the CREATE TABLE command.
-
Defines the necessary table constraints using the ALTER TABLE command.
-
Defines any views on the table using the CREATE VIEW command.
You can generate a script file using:
-
A schema designer application.
-
A schema extracted from an existing database.
-
A text editor.
-
One of the example database
example-name_define_schema.sqlscripts as a template. (See the example database directories in/opt/vertica/examples.)
In your script file, make sure that:
-
Each statement ends with a semicolon.
-
You use data types supported by Vertica, as described in the SQL Reference Manual.
Once you have created a database, you can test your schema script by executing it as described in Create the logical schema. If you encounter errors, drop all tables, correct the errors, and run the script again.
1.5 - Prepare data files
Prepare two sets of data files:.
Prepare two sets of data files:
-
Test data files. Use test files to test the database after the partial data load. If possible, use part of the actual data files to prepare the test data files.
-
Actual data files. Once the database has been tested and optimized, use your data files for your initial Data load.
How to name data files
Name each data file to match the corresponding table in the logical schema. Case does not matter.
Use the extension .tbl or whatever you prefer. For example, if a table is named Stock_Dimension, name the corresponding data file stock_dimension.tbl. When using multiple data files, append _nnn (where nnn is a positive integer in the range 001 to 999) to the file name. For example, stock_dimension.tbl_001, stock_dimension.tbl_002, and so on.
1.6 - Prepare load scripts
You can postpone this step if your goal is to test a logical schema design for validity.
Note
You can postpone this step if your goal is to test a logical schema design for validity.Prepare SQL scripts to load data directly into physical storage using COPY on vsql, or through ODBC.
You need scripts that load:
-
Large tables
-
Small tables
Vertica recommends that you load large tables using multiple files. To test the load process, use files of 10GB to 50GB in size. This size provides several advantages:
-
You can use one of the data files as a sample data file for the Database Designer.
-
You can load just enough data to Perform a partial data load before you load the remainder.
-
If a single load fails and rolls back, you do not lose an excessive amount of time.
-
Once the load process is tested, for multi-terabyte tables, break up the full load in file sizes of 250–500GB.
See also
Tip
You can use the load scripts included in the example databases as templates.1.7 - Create an optional sample query script
The purpose of a sample query script is to test your schema and load scripts for errors.
The purpose of a sample query script is to test your schema and load scripts for errors.
Include a sample of queries your users are likely to run against the database. If you don't have any real queries, just write simple SQL that collects counts on each of your tables. Alternatively, you can skip this step.
1.8 - Create an empty database
Two options are available for creating an empty database:.
Two options are available for creating an empty database:
-
Using the Management Console. For details, see Creating a database using MC.
-
Using Administration tools .
Although you can create more than one database (for example, one for production and one for testing), there can be only one active database for each installation of Vertica Analytic Database.
1.8.1 - Creating a database name and password
Database names must conform to the following rules:.
Database names
Database names must conform to the following rules:
-
Be between 1-30 characters
-
Begin with a letter
-
Follow with any combination of letters (upper and lowercase), numbers, and/or underscores.
Database names are case sensitive; however, Vertica strongly recommends that you do not create databases with names that differ only in case. For example, do not create a database called mydatabase and another called MyDataBase.
Database passwords
Database passwords can contain letters, digits, and special characters listed in the next table. Passwords cannot include non-ASCII Unicode characters.
The allowed password length is between 0-100 characters. The database superuser can change a Vertica user's maximum password length using ALTER PROFILE.
You use Profiles to specify and control password definitions. For instance, a profile can define the maximum length, reuse time, and the minimum number or required digits for a password, as well as other details.
The following special (ASCII) characters are valid in passwords. Special characters can appear anywhere in a password string. For example, mypas$word or $mypassword are both valid, while ±mypassword is not. Using special characters other than the ones listed below can cause database instability.
-
# -
? -
= -
_ -
' -
) -
( -
@ -
\ -
/ -
! -
, -
~ -
: -
% -
; -
` -
^ -
+ -
. -
- -
space
-
& -
< -
> -
[ -
] -
{ -
} -
| -
* -
$ -
"
See also
1.8.2 - Create a database using administration tools
Run the from your as follows:.
-
Run the Administration tools from your Administration host as follows:
$ /opt/vertica/bin/admintoolsIf you are using a remote terminal application, such as PuTTY or a Cygwin bash shell, see Notes for remote terminal users.
-
Accept the license agreement and specify the location of your license file. For more information see Managing licenses for more information.
This step is necessary only if it is the first time you have run the Administration Tools
-
On the Main Menu, click Configuration Menu, and click OK.
-
On the Configuration Menu, click Create Database, and click OK.
-
Enter the name of the database and an optional comment, and click OK. See Creating a database name and password for naming guidelines and restrictions.
-
Establish the superuser password for your database.
-
To provide a password enter the password and click OK. Confirm the password by entering it again, and then click OK.
-
If you don't want to provide the password, leave it blank and click OK. If you don't set a password, Vertica prompts you to verify that you truly do not want to establish a superuser password for this database. Click Yes to create the database without a password or No to establish the password.
Caution
If you do not enter a password at this point, the superuser password is set to empty. Unless the database is for evaluation or academic purposes, Vertica strongly recommends that you enter a superuser password. See Creating a database name and password for guidelines. -
-
Select the hosts to include in the database from the list of hosts specified when Vertica was installed (
install_vertica -s), and click OK. -
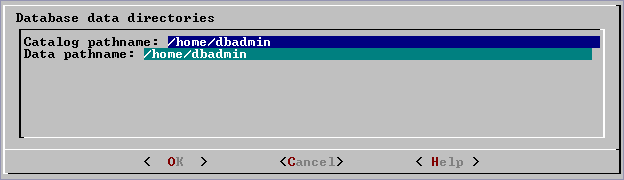
Specify the directories in which to store the data and catalog files, and click OK.
Note
Do not use a shared directory for more than one node. Data and catalog directories must be distinct for each node. Multiple nodes must not be allowed to write to the same data or catalog directory. -
Catalog and data path names must contain only alphanumeric characters and cannot have leading spaces. Failure to comply with these restrictions results in database creation failure.
For example:
Catalog pathname: /home/dbadmin
Data Pathname: /home/dbadmin
-
Review the Current Database Definition screen to verify that it represents the database you want to create, and then click Yes to proceed or No to modify the database definition.
-
If you click Yes, Vertica creates the database you defined and then displays a message to indicate that the database was successfully created.
Note
For databases created with 3 or more nodes, Vertica automatically sets K-safety to 1 to ensure that the database is fault tolerant in case a node fails. For more information, see Failure recovery in the Administrator's Guide and MARK_DESIGN_KSAFE. -
Click OK to acknowledge the message.
1.9 - Create the logical schema
Connect to the database.
-
Connect to the database.
In the Administration Tools Main Menu, click Connect to Database and click OK.
See Connecting to the Database for details.
The vsql welcome script appears:
Welcome to vsql, the Vertica Analytic Database interactive terminal. Type: \h or \? for help with vsql commands \g or terminate with semicolon to execute query \q to quit => -
Run the logical schema script
Using the \i meta-command in vsql to run the SQL logical schema script that you prepared earlier.
-
Disconnect from the database
Use the
\qmeta-command in vsql to return to the Administration Tools.
1.10 - Perform a partial data load
Vertica recommends that for large tables, you perform a partial data load and then test your database before completing a full data load.
Vertica recommends that for large tables, you perform a partial data load and then test your database before completing a full data load. This load should load a representative amount of data.
-
Load the small tables.
Load the small table data files using the SQL load scripts and data files you prepared earlier.
-
Partially load the large tables.
Load 10GB to 50GB of table data for each table using the SQL load scripts and data files that you prepared earlier.
For more information about projections, see Projections.
1.11 - Test the database
Test the database to verify that it is running as expected.
Test the database to verify that it is running as expected.
Check queries for syntax errors and execution times.
-
Use the vsql \timing meta-command to enable the display of query execution time in milliseconds.
-
Execute the SQL sample query script that you prepared earlier.
-
Execute several ad hoc queries.
1.12 - Optimize query performance
Optimizing the database consists of optimizing for compression and tuning for queries.
Optimizing the database consists of optimizing for compression and tuning for queries. (See Creating a database design.)
To optimize the database, use the Database Designer to create and deploy a design for optimizing the database. See Using Database Designer to create a comprehensive design.
After you run the Database Designer, use the techniques described in Query optimization to improve the performance of certain types of queries.
Note
The database response time depends on factors such as type and size of the application query, database design, data size and data types stored, available computational power, and network bandwidth. Adding nodes to a database cluster does not necessarily improve the system response time for every query, especially if the response time is already short, e.g., less then 10 seconds, or the response time is not hardware bound.1.13 - Complete the data load
To complete the load:.
To complete the load:
-
Monitor system resource usage.
Continue to run the
top,free, anddfutilities and watch them while your load scripts are running (as described in Monitoring Linux resource usage). You can do this on any or all nodes in the cluster. Make sure that the system is not swapping excessively (watchkswapdintop) or running out of swap space (watch for a large amount of used swap space in free).Note
Vertica requires a dedicated server. If your loader or other processes take up significant amounts of RAM, it can result in swapping. -
Complete the large table loads.
Run the remainder of the large table load scripts.
1.14 - Test the optimized database
Check query execution times to test your optimized design:.
Check query execution times to test your optimized design:
-
Use the vsql
\timingmeta-command to enable the display of query execution time in milliseconds.Execute a SQL sample query script to test your schema and load scripts for errors.
Note
Include a sample of queries your users are likely to run against the database. If you don't have any real queries, just write simple SQL that collects counts on each of your tables. Alternatively, you can skip this step. -
Execute several ad hoc queries
-
Run Administration tools and select Connect to Database.
-
Use the \i meta-command to execute the query script; for example:
vmartdb=> \i vmart_query_03.sql  customer_name   | annual_income
------------------+---------------
 James M. McNulty |        999979
 Emily G. Vogel   |        999998
(2 rows)
Time: First fetch (2 rows): 58.411 ms. All rows formatted: 58.448 ms
vmartdb=> \i vmart_query_06.sql
 store_key | order_number | date_ordered
-----------+--------------+--------------
        45 |       202416 | 2004-01-04
       113 |        66017 | 2004-01-04
       121 |       251417 | 2004-01-04
        24 |       250295 | 2004-01-04
         9 |       188567 | 2004-01-04
       166 |        36008 | 2004-01-04
        27 |       150241 | 2004-01-04
       148 |       182207 | 2004-01-04
       198 |        75716 | 2004-01-04
(9 rows)
Time: First fetch (9 rows): 25.342 ms. All rows formatted: 25.383 ms
-
Once the database is optimized, it should run queries efficiently. If you discover queries that you want to optimize, you can modify and update the design incrementally.
1.15 - Implement locales for international data sets
Vertica uses the ICU library for locale support; you must specify locale using the ICU locale syntax.
Locale specifies the user's language, country, and any special variant preferences, such as collation. Vertica uses locale to determine the behavior of certain string functions. Locale also determines the collation for various SQL commands that require ordering and comparison, such as aggregate GROUP BY and ORDER BY clauses, joins, and the analytic ORDER BY clause.
The default locale for a Vertica database is en_US@collation=binary (English US). You can define a new default locale that is used for all sessions on the database. You can also override the locale for individual sessions. However, projections are always collated using the default en_US@collation=binary collation, regardless of the session collation. Any locale-specific collation is applied at query time.
If you set the locale to null, Vertica sets the locale to en_US_POSIX. You can set the locale back to the default locale and collation by issuing the vsql meta-command \locale. For example:
Note
=> set locale to '';
INFO 2567:  Canonical locale: 'en_US_POSIX'
Standard collation: 'LEN'
English (United States, Computer)
SET
=> \locale en_US@collation=binary;
INFO 2567:  Canonical locale: 'en_US'
Standard collation: 'LEN_KBINARY'
English (United States)
=>  \locale
en_US@collation-binary;
You can set locale through ODBC, JDBC, and ADO.net.
ICU locale support
Vertica uses the ICU library for locale support; you must specify locale using the ICU locale syntax. The locale used by the database session is not derived from the operating system (through the LANG variable), so Vertica recommends that you set the LANG for each node running vsql, as described in the next section.
While ICU library services can specify collation, currency, and calendar preferences, Vertica supports only the collation component. Any keywords not relating to collation are rejected. Projections are always collated using the en_US@collation=binary collation regardless of the session collation. Any locale-specific collation is applied at query time.
The SET DATESTYLE TO ... command provides some aspects of the calendar, but Vertica supports only dollars as currency.
Changing DB locale for a session
This examples sets the session locale to Thai.
-
At the operating-system level for each node running vsql, set the
LANGvariable to the locale language as follows:export LANG=th_TH.UTF-8Note
If setting theLANG=as shown does not work, the operating system support for locales may not be installed. -
For each Vertica session (from ODBC/JDBC or vsql) set the language locale.
From vsql:
\locale th_TH -
From ODBC/JDBC:
"SET LOCALE TO th_TH;" -
In PUTTY (or ssh terminal), change the settings as follows:
settings > window > translation > UTF-8 -
Click Apply and then click Save.
All data loaded must be in UTF-8 format, not an ISO format, as described in Delimited data. Character sets like ISO 8859-1 (Latin1), which are incompatible with UTF-8, are not supported, so functions like SUBSTRING do not work correctly for multibyte characters. Thus, settings for locale should not work correctly. If the translation setting ISO-8859-11:2001 (Latin/Thai) works, the data is loaded incorrectly. To convert data correctly, use a utility program such as Linux
iconv.
Note
The maximum length parameter for VARCHAR and CHAR data type refers to the number of octets (bytes) that can be stored in that field, not the number of characters. When using multi-byte UTF-8 characters, make sure to size fields to accommodate from 1 to 4 bytes per character, depending on the data.See also
1.15.1 - Specify the default locale for the database
After you start the database, the default locale configuration parameter, DefaultSessionLocale, sets the initial locale.
After you start the database, the default locale configuration parameter, DefaultSessionLocale, sets the initial locale. You can override this value for individual sessions.
To set the locale for the database, use the configuration parameter as follows:
=> ALTER DATABASE DEFAULT SET DefaultSessionLocale = 'ICU-locale-identifier';
For example:
=> ALTER DATABASE DEFAULT SET DefaultSessionLocale = 'en_GB';
1.15.2 - Override the default locale for a session
You can override the default locale for the current session in two ways:.
You can override the default locale for the current session in two ways:
-
VSQL command
\locale. For example:=> \locale en_GBINFO: INFO 2567: Canonical locale: 'en_GB' Standard collation: 'LEN' English (United Kingdom) -
SQL statement
SET LOCALE. For example:=> SET LOCALE TO en_GB; INFO 2567: Canonical locale: 'en_GB' Standard collation: 'LEN' English (United Kingdom)
Both methods accept locale short and long forms. For example:
=> SET LOCALE TO LEN;
INFO 2567:  Canonical locale: 'en'
Standard collation: 'LEN'
English
=> \locale LEN
INFO 2567:  Canonical locale: 'en'
Standard collation: 'LEN'
English
See also
1.15.3 - Server versus client locale settings
Vertica differentiates database server locale settings from client application locale settings:.
Vertica differentiates database server locale settings from client application locale settings:
-
Server locale settings only impact collation behavior for server-side query processing.
-
Client applications verify that locale is set appropriately in order to display characters correctly.
The following sections describe best practices to ensure predictable results.
Server locale
The server session locale should be set as described in Specify the default locale for the database. If locales vary across different sessions, set the server locale at the start of each session from your client.
vsql client
-
If the database does not have a default session locale, set the server locale for the session to the desired locale.
-
The locale setting in the terminal emulator where the vsql client runs should be set to be equivalent to session locale setting on the server side (ICU locale). By doing so, the data is collated correctly on the server and displayed correctly on the client.
-
All input data for vsql should be in UTF-8, and all output data is encoded in UTF-8
-
Vertica does not support non UTF-8 encodings and associated locale values; .
-
For instructions on setting locale and encoding, refer to your terminal emulator documentation.
ODBC clients
-
ODBC applications can be either in ANSI or Unicode mode. If the user application is Unicode, the encoding used by ODBC is UCS-2. If the user application is ANSI, the data must be in single-byte ASCII, which is compatible with UTF-8 used on the database server. The ODBC driver converts UCS-2 to UTF-8 when passing to the Vertica server and converts data sent by the Vertica server from UTF-8 to UCS-2.
-
If the user application is not already in UCS-2, the application must convert the input data to UCS-2, or unexpected results could occur. For example:
-
For non-UCS-2 data passed to ODBC APIs, when it is interpreted as UCS-2, it could result in an invalid UCS-2 symbol being passed to the APIs, resulting in errors.
-
The symbol provided in the alternate encoding could be a valid UCS-2 symbol. If this occurs, incorrect data is inserted into the database.
-
-
If the database does not have a default session locale, ODBC applications should set the desired server session locale using
SQLSetConnectAttr(if different from database wide setting). By doing so, you get the expected collation and string functions behavior on the server.
JDBC and ADO.NET clients
-
JDBC and ADO.NET applications use a UTF-16 character set encoding and are responsible for converting any non-UTF-16 encoded data to UTF-16. The same cautions apply as for ODBC if this encoding is violated.
-
The JDBC and ADO.NET drivers convert UTF-16 data to UTF-8 when passing to the Vertica server and convert data sent by Vertica server from UTF-8 to UTF-16.
-
If there is no default session locale at the database level, JDBC and ADO.NET applications should set the correct server session locale by executing the SET LOCALE TO command in order to get the expected collation and string functions behavior on the server. For more information, see SET LOCALE.
1.16 - Using time zones with Vertica
Vertica uses the public-domain tz database (time zone database), which contains code and data that represent the history of local time for locations around the globe.
Vertica uses the public-domain tz database (time zone database), which contains code and data that represent the history of local time for locations around the globe. This database organizes time zone and daylight saving time data by partitioning the world into timezones whose clocks all agree on timestamps that are later than the POSIX Epoch (1970-01-01 00:00:00 UTC). Each timezone has a unique identifier. Identifiers typically follow the convention area/location, where area is a continent or ocean, and location is a specific location within the area—for example, Africa/Cairo, America/New_York, and Pacific/Honolulu.
Important
IANA acknowledge that 1970 is an arbitrary cutoff. They note the problems that face moving the cutoff earlier "due to the wide variety of local practices before computer timekeeping became prevalent." IANA's own description of the tz database suggests that users should regard historical dates and times, especially those that predate the POSIX epoch date, with a healthy measure of skepticism. For details, see Theory and pragmatics of the tz code and data.Vertica uses the TZ environment variable (if set) on each node for the default current time zone. Otherwise, Vertica uses the operating system time zone.
The TZ variable can be set by the operating system during login (see /etc/profile, /etc/profile.d, or /etc/bashrc) or by the user in .profile, .bashrc or .bash-profile. TZ must be set to the same value on each node when you start Vertica.
The following command returns the current time zone for your database:
=> SHOW TIMEZONE;
   name   |     setting
----------+------------------
 timezone | America/New_York
(1 row)
You can also set the time zone for a single session with SET TIME ZONE.
Conversion and storage of date/time data
There is no database default time zone. TIMESTAMPTZ (TIMESTAMP WITH TIMEZONE) data is converted from the current local time and stored as GMT/UTC (Greenwich Mean Time/Coordinated Universal Time).
When TIMESTAMPTZ data is used, data is converted back to the current local time zone, which might be different from the local time zone where the data was stored. This conversion takes into account daylight saving time (summer time), depending on the year and date to determine when daylight saving time begins and ends.
TIMESTAMP WITHOUT TIMEZONE data stores the timestamp as given, and retrieves it exactly as given. The current time zone is ignored. The same is true for TIME WITHOUT TIMEZONE. For TIME WITH TIMEZONE (TIMETZ), however, the current time zone setting is stored along with the given time, and that time zone is used on retrieval.
Note
Vertica recommends that you use TIMESTAMPTZ, not TIMETZ.Querying data/time data
TIMESTAMPTZ uses the current time zone on both input and output, as in the following example:
=> CREATE TEMP TABLE s (tstz TIMESTAMPTZ);=> SET TIMEZONE TO 'America/New_York';
=> INSERT INTO s VALUES ('2009-02-01 00:00:00');
=> INSERT INTO s VALUES ('2009-05-12 12:00:00');
=> SELECT tstz AS 'Local timezone', tstz AT TIMEZONE 'America/New_York' AS 'America/New_York',
   tstz AT TIMEZONE 'GMT' AS 'GMT' FROM s;
     Local timezone     |  America/New_York   |         GMT
------------------------+---------------------+---------------------
 2009-02-01 00:00:00-05 | 2009-02-01 00:00:00 | 2009-02-01 05:00:00
 2009-05-12 12:00:00-04 | 2009-05-12 12:00:00 | 2009-05-12 16:00:00
(2 rows)
The -05 in the Local time zone column shows that the data is displayed in EST, while -04 indicates EDT. The other two columns show the TIMESTAMP WITHOUT TIMEZONE at the specified time zone.
The next example shows what happens if the current time zone is changed to GMT:
=> SET TIMEZONE TO 'GMT';=> SELECT tstz AS 'Local timezone', tstz AT TIMEZONE 'America/New_York' AS
   'America/New_York', tstz AT TIMEZONE 'GMT' as 'GMT' FROM s;
     Local timezone     |  America/New_York   |         GMT
------------------------+---------------------+---------------------
 2009-02-01 05:00:00+00 | 2009-02-01 00:00:00 | 2009-02-01 05:00:00
 2009-05-12 16:00:00+00 | 2009-05-12 12:00:00 | 2009-05-12 16:00:00
(2 rows)
The +00 in the Local time zone column indicates that TIMESTAMPTZ is displayed in GMT.
The approach of using TIMESTAMPTZ fields to record events captures the GMT of the event, as expressed in terms of the local time zone. Later, it allows for easy conversion to any other time zone, either by setting the local time zone or by specifying an explicit AT TIMEZONE clause.
The following example shows how TIMESTAMP WITHOUT TIMEZONE fields work in Vertica.
=> CREATE TEMP TABLE tnoz (ts TIMESTAMP);=> INSERT INTO tnoz VALUES('2009-02-01 00:00:00');
=> INSERT INTO tnoz VALUES('2009-05-12 12:00:00');
=> SET TIMEZONE TO 'GMT';
=> SELECT ts AS 'No timezone', ts AT TIMEZONE 'America/New_York' AS
   'America/New_York', ts AT TIMEZONE 'GMT' AS 'GMT' FROM tnoz;
      No timezone    |    America/New_York    |          GMT
---------------------+------------------------+------------------------
 2009-02-01 00:00:00 | 2009-02-01 05:00:00+00 | 2009-02-01 00:00:00+00
 2009-05-12 12:00:00 | 2009-05-12 16:00:00+00 | 2009-05-12 12:00:00+00
(2 rows)
The +00 at the end of a timestamp indicates that the setting is TIMESTAMP WITH TIMEZONE in GMT (the current time zone). The America/New_York column shows what the GMT setting was when you recorded the time, assuming you read a normal clock in the America/New_York time zone. What this shows is that if it is midnight in the America/New_York time zone, then it is 5 am GMT.
Note
00:00:00 Sunday February 1, 2009 in America/New_York converts to 05:00:00 Sunday February 1, 2009 in GMT.The GMT column displays the GMT time, assuming the input data was captured in GMT.
If you don't set the time zone to GMT, and you use another time zone, for example America/New_York, then the results display in America/New_York with a -05 and -04, showing the difference between that time zone and GMT.
=> SET TIMEZONE TO 'America/New_York';
=> SHOW TIMEZONE;
    name   |     setting
 ----------+------------------
  timezone | America/New_York
 (1 row)
=> SELECT ts AS 'No timezone', ts AT TIMEZONE 'America/New_York' AS
   'America/New_York', ts AT TIMEZONE 'GMT' AS 'GMT' FROM tnoz;
      No timezone    |    America/New_York    |          GMT
---------------------+------------------------+------------------------
 2009-02-01 00:00:00 | 2009-02-01 00:00:00-05 | 2009-01-31 19:00:00-05
 2009-05-12 12:00:00 | 2009-05-12 12:00:00-04 | 2009-05-12 08:00:00-04
(2 rows)
In this case, the last column is interesting in that it returns the time in New York, given that the data was captured in GMT.
See also
1.17 - Change transaction isolation levels
By default, Vertica uses the READ COMMITTED isolation level for all sessions.
By default, Vertica uses the READ COMMITTED isolation level for all sessions. You can change the default isolation level for the database or for a given session.
A transaction retains its isolation level until it completes, even if the session's isolation level changes during the transaction. Vertica internal processes (such as the Tuple Mover and refresh operations) and DDL operations always run at the SERIALIZABLE isolation level to ensure consistency.
Database isolation level
The configuration parameter
TransactionIsolationLevel specifies the database isolation level, and is used as the default for all sessions. Use
ALTER DATABASE to change the default isolation level.For example:
=> ALTER DATABASE DEFAULT SET TransactionIsolationLevel = 'SERIALIZABLE';
ALTER DATABASE
=> ALTER DATABASE DEFAULT SET TransactionIsolationLevel = 'READ COMMITTED';
ALTER DATABASE
Changes to the database isolation level only apply to future sessions. Existing sessions and their transactions continue to use their original isolation level.
Use
SHOW CURRENT to view the database isolation level:
=> SHOW CURRENT TransactionIsolationLevel;
  level   |           name            |    setting
----------+---------------------------+----------------
 DATABASE | TransactionIsolationLevel | READ COMMITTED
(1 row)
Session isolation level
SET SESSION CHARACTERISTICS AS TRANSACTION changes the isolation level for a specific session. For example:
=> SET SESSION CHARACTERISTICS AS TRANSACTION ISOLATION LEVEL SERIALIZABLE;
SET
Use
SHOW to view the current session's isolation level:
=> SHOW TRANSACTION_ISOLATION;
See also
Transactions2 - Configuration parameter management
For details about individual configuration parameters grouped by category, see Configuration Parameters.
Vertica supports a wide variety of configuration parameters that affect many facets of database behavior. These parameters can be set with the appropriate ALTER statements at one or more levels, listed here in descending order of precedence:
-
User (ALTER USER)
-
Session (ALTER SESSION)
-
Node (ALTER NODE)
-
Database (ALTER DATABASE)
You can query system table CONFIGURATION_PARAMETERS to obtain the current settings for all user-accessible parameters. For example, the following query obtains settings for partitioning parameters: their current and default values, which levels they can be set at, and whether changes require a database restart to take effect:
=> SELECT parameter_name, current_value, default_value, allowed_levels, change_requires_restart
      FROM configuration_parameters  WHERE parameter_name ILIKE '%partitioncount%';
    parameter_name    | current_value | default_value | allowed_levels | change_requires_restart
----------------------+---------------+---------------+----------------+-------------------------
 MaxPartitionCount    | 1024          | 1024          | NODE, DATABASE | f
 ActivePartitionCount | 1             | 1             | NODE, DATABASE | f
(2 rows)
For details about individual configuration parameters grouped by category, see Configuration parameters.
Setting and clearing configuration parameters
You change specific configuration parameters with the appropriate ALTER statements; the same statements also let you reset configuration parameters to their default values. For example, the following ALTER statements change ActivePartitionCount at the database level from 1 to 2 , and DisablePartitionCount at the session level from 0 to 1:
=> ALTER DATABASE DEFAULT SET ActivePartitionCount = 2;
ALTER DATABASE
=> ALTER SESSION SET DisableAutopartition = 1;
ALTER SESSION
=> SELECT parameter_name, current_value, default_value FROM configuration_parameters
      WHERE parameter_name IN ('ActivePartitionCount', 'DisableAutopartition');
    parameter_name    | current_value | default_value
----------------------+---------------+---------------
 ActivePartitionCount | 2             | 1
 DisableAutopartition | 1             | 0
(2 rows)
You can later reset the same configuration parameters to their default values:
=> ALTER DATABASE DEFAULT CLEAR ActivePartitionCount;
ALTER DATABASE
=> ALTER SESSION CLEAR DisableAutopartition;
ALTER DATABASE
=> SELECT parameter_name, current_value, default_value FROM configuration_parameters
      WHERE parameter_name IN ('ActivePartitionCount', 'DisableAutopartition');
    parameter_name    | current_value | default_value
----------------------+---------------+---------------
 DisableAutopartition | 0             | 0
 ActivePartitionCount | 1             | 1
(2 rows)
Caution
Vertica is designed to operate with minimal configuration changes. Be careful to change configuration parameters according to documented guidelines.2.1 - Viewing configuration parameter values
You can view active configuration parameter values in two ways:.
You can view active configuration parameter values in two ways:
SHOW statements
Use the following SHOW statements to view active configuration parameters:
-
SHOW CURRENT: Returns settings of active configuration parameter values. Vertica checks settings at all levels, in the following ascending order of precedence:
-
session
-
node
-
database
If no values are set at any scope, SHOW CURRENT returns the parameter's default value.
-
-
SHOW DATABASE: Displays configuration parameter values set for the database.
-
SHOW USER: Displays configuration parameters set for the specified user, and for all users.
-
SHOW SESSION: Displays configuration parameter values set for the current session.
-
SHOW NODE: Displays configuration parameter values set for a node.
If a configuration parameter requires a restart to take effect, the values in a SHOW CURRENT statement might differ from values in other SHOW statements. To see which parameters require restart, query the CONFIGURATION_PARAMETERS system table.
System tables
You can query several system tables for configuration parameters:
-
SESSION_PARAMETERS returns session-scope parameters.
-
CONFIGURATION_PARAMETERS returns parameters for all scopes: database, node, and session.
-
USER_CONFIGURATION_PARAMETERS provides information about user-level configuration parameters that are in effect for database users.
3 - Designing a logical schema
Designing a logical schema for a Vertica database is the same as designing for any other SQL database.
Designing a logical schema for a Vertica database is the same as designing for any other SQL database. A logical schema consists of objects such as schemas, tables, views and referential Integrity constraints that are visible to SQL users. Vertica supports any relational schema design that you choose.
3.1 - Using multiple schemas
Using a single schema is effective if there is only one database user or if a few users cooperate in sharing the database.
Using a single schema is effective if there is only one database user or if a few users cooperate in sharing the database. In many cases, however, it makes sense to use additional schemas to allow users and their applications to create and access tables in separate namespaces. For example, using additional schemas allows:
-
Many users to access the database without interfering with one another.
Individual schemas can be configured to grant specific users access to the schema and its tables while restricting others.
-
Third-party applications to create tables that have the same name in different schemas, preventing table collisions.
Unlike other RDBMS, a schema in a Vertica database is not a collection of objects bound to one user.
3.1.1 - Multiple schema examples
This section provides examples of when and how you might want to use multiple schemas to separate database users.
This section provides examples of when and how you might want to use multiple schemas to separate database users. These examples fall into two categories: using multiple private schemas and using a combination of private schemas (i.e. schemas limited to a single user) and shared schemas (i.e. schemas shared across multiple users).
Using multiple private schemas
Using multiple private schemas is an effective way of separating database users from one another when sensitive information is involved. Typically a user is granted access to only one schema and its contents, thus providing database security at the schema level. Database users can be running different applications, multiple copies of the same application, or even multiple instances of the same application. This enables you to consolidate applications on one database to reduce management overhead and use resources more effectively. The following examples highlight using multiple private schemas.
Using multiple schemas to separate users and their unique applications
In this example, both database users work for the same company. One user (HRUser) uses a Human Resource (HR) application with access to sensitive personal data, such as salaries, while another user (MedUser) accesses information regarding company healthcare costs through a healthcare management application. HRUser should not be able to access company healthcare cost information and MedUser should not be able to view personal employee data.
To grant these users access to data they need while restricting them from data they should not see, two schemas are created with appropriate user access, as follows:
-
HRSchema—A schema owned by HRUser that is accessed by the HR application.
-
HealthSchema—A schema owned by MedUser that is accessed by the healthcare management application.
Using multiple schemas to support multitenancy
This example is similar to the last example in that access to sensitive data is limited by separating users into different schemas. In this case, however, each user is using a virtual instance of the same application.
An example of this is a retail marketing analytics company that provides data and software as a service (SaaS) to large retailers to help them determine which promotional methods they use are most effective at driving customer sales.
In this example, each database user equates to a retailer, and each user only has access to its own schema. The retail marketing analytics company provides a virtual instance of the same application to each retail customer, and each instance points to the user’s specific schema in which to create and update tables. The tables in these schemas use the same names because they are created by instances of the same application, but they do not conflict because they are in separate schemas.
Example of schemas in this database could be:
-
MartSchema—A schema owned by MartUser, a large department store chain.
-
PharmSchema—A schema owned by PharmUser, a large drug store chain.
Using multiple schemas to migrate to a newer version of an application
Using multiple schemas is an effective way of migrating to a new version of a software application. In this case, a new schema is created to support the new version of the software, and the old schema is kept as long as necessary to support the original version of the software. This is called a “rolling application upgrade.”
For example, a company might use a HR application to store employee data. The following schemas could be used for the original and updated versions of the software:
-
HRSchema—A schema owned by HRUser, the schema user for the original HR application.
-
V2HRSchema—A schema owned by V2HRUser, the schema user for the new version of the HR application.
Combining private and shared schemas
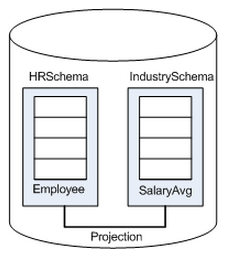
The previous examples illustrate cases in which all schemas in the database are private and no information is shared between users. However, users might want to share common data. In the retail case, for example, MartUser and PharmUser might want to compare their per store sales of a particular product against the industry per store sales average. Since this information is an industry average and is not specific to any retail chain, it can be placed in a schema on which both users are granted USAGE privileges.
Example of schemas in this database might be:
-
MartSchema—A schema owned by MartUser, a large department store chain.
-
PharmSchema—A schema owned by PharmUser, a large drug store chain.
-
IndustrySchema—A schema owned by DBUser (from the retail marketing analytics company) on which both MartUser and PharmUser have USAGE privileges. It is unlikely that retailers would be given any privileges beyond USAGE on the schema and SELECT on one or more of its tables.
3.1.2 - Creating schemas
You can create as many schemas as necessary for your database.
You can create as many schemas as necessary for your database. For example, you could create a schema for each database user. However, schemas and users are not synonymous as they are in Oracle.
By default, only a superuser can create a schema or give a user the right to create a schema. (See GRANT (database) in the SQL Reference Manual.)
To create a schema use the CREATE SCHEMA statement, as described in the SQL Reference Manual.
3.1.3 - Specifying objects in multiple schemas
Once you create two or more schemas, each SQL statement or function must identify the schema associated with the object you are referencing.
Once you create two or more schemas, each SQL statement or function must identify the schema associated with the object you are referencing. You can specify an object within multiple schemas by:
-
Qualifying the object name by using the schema name and object name separated by a dot. For example, to specify
MyTable, located inSchema1, qualify the name asSchema1.MyTable. -
Using a search path that includes the desired schemas when a referenced object is unqualified. By Setting search paths, Vertica will automatically search the specified schemas to find the object.
3.1.4 - Setting search paths
Each user session has a search path of schemas.
Each user session has a search path of schemas. Vertica uses this search path to find tables and user-defined functions (UDFs) that are unqualified by their schema name. A session search path is initially set from the user's profile. You can change the session's search path at any time by calling
SET SEARCH_PATH. This search path remains in effect until the next SET SEARCH_PATH statement, or the session ends.
Viewing the current search path
SHOW SEARCH_PATH returns the session's current search path. For example:
=> SHOW SEARCH_PATH;
    name     |                      setting
-------------+---------------------------------------------------
 search_path | "$user", public, v_catalog, v_monitor, v_internal
Schemas are listed in descending order of precedence. The first schema has the highest precedence in the search order. If this schema exists, it is also defined as the current schema, which is used for tables that are created with unqualified names. You can identify the current schema by calling the function
CURRENT_SCHEMA:
=> SELECT CURRENT_SCHEMA;
 current_schema
----------------
 public
(1 row)
Setting the user search path
A session search path is initially set from the user's profile. If the search path in a user profile is not set by
CREATE USER or
ALTER USER, it is set to the database default:
=> CREATE USER agent007;
CREATE USER
=> \c - agent007
You are now connected as user "agent007".
=> SHOW SEARCH_PATH;
    name     |                      setting
-------------+---------------------------------------------------
 search_path | "$user", public, v_catalog, v_monitor, v_internal
$user resolves to the session user name—in this case, agent007—and has the highest precedence. If a schema agent007, exists, Vertica begins searches for unqualified tables in that schema. Also, calls to
CURRENT_SCHEMA return this schema. Otherwise, Vertica uses public as the current schema and begins searches in it.
Use
ALTER USER to modify an existing user's search path. These changes overwrite all non-system schemas in the search path, including $USER. System schemas are untouched. Changes to a user's search path take effect only when the user starts a new session; current sessions are unaffected.
Important
After modifying the user's search path, verify that the user has access privileges to all schemas that are on the updated search path.For example, the following statements modify agent007's search path, and grant access privileges to schemas and tables that are on the new search path:
=> ALTER USER agent007 SEARCH_PATH store, public;
ALTER USER
=> GRANT ALL ON SCHEMA store, public TO agent007;
GRANT PRIVILEGE
=> GRANT SELECT ON ALL TABLES IN SCHEMA store, public TO agent007;
GRANT PRIVILEGE
=> \c - agent007
You are now connected as user "agent007".
=> SHOW SEARCH_PATH;
    name     |                     setting
-------------+-------------------------------------------------
 search_path | store, public, v_catalog, v_monitor, v_internal
(1 row)
To verify a user's search path, query the system table
USERS:
=> SELECT search_path FROM USERS WHERE user_name='agent007';
                   search_path
-------------------------------------------------
 store, public, v_catalog, v_monitor, v_internal
(1 row)
To revert a user's search path to the database default settings, call ALTER USER and set the search path to DEFAULT. For example:
=> ALTER USER agent007 SEARCH_PATH DEFAULT;
ALTER USER
=> SELECT search_path FROM USERS WHERE user_name='agent007';
                    search_path
---------------------------------------------------
 "$user", public, v_catalog, v_monitor, v_internal
(1 row)
Ignored search path schemas
Vertica only searches among existing schemas to which the current user has access privileges. If a schema in the search path does not exist or the user lacks access privileges to it, Vertica silently excludes it from the search. For example, if agent007 lacks SELECT privileges to schema public, Vertica silently skips this schema. Vertica returns with an error only if it cannot find the table anywhere on the search path.
Setting session search path
Vertica initially sets a session's search path from the user's profile. You can change the current session's search path with
SET SEARCH_PATH. You can use SET SEARCH_PATH in two ways:
-
Explicitly set the session search path to one or more schemas. For example:
=> \c - agent007 You are now connected as user "agent007". dbadmin=> SHOW SEARCH_PATH; name | setting -------------+--------------------------------------------------- search_path | "$user", public, v_catalog, v_monitor, v_internal (1 row) => SET SEARCH_PATH TO store, public; SET => SHOW SEARCH_PATH; name | setting -------------+------------------------------------------------- search_path | store, public, v_catalog, v_monitor, v_internal (1 row) -
Set the session search path to the database default:
=> SET SEARCH_PATH TO DEFAULT;
SET
=> SHOW SEARCH_PATH;
    name     |                      setting
-------------+---------------------------------------------------
 search_path | "$user", public, v_catalog, v_monitor, v_internal
(1 row)
SET SEARCH_PATH overwrites all non-system schemas in the search path, including $USER. System schemas are untouched.
3.1.5 - Creating objects that span multiple schemas
Vertica supports that reference tables across multiple schemas.
Vertica supports views that reference tables across multiple schemas. For example, a user might need to compare employee salaries to industry averages. In this case, the application queries two schemas:
-
Shared schema
IndustrySchemafor salary averages -
Private schema
HRSchemafor company-specific salary information
Best Practice: When creating objects that span schemas, use qualified table names. This naming convention avoids confusion if the query path or table structure within the schemas changes at a later date.
3.2 - Tables in schemas
In Vertica you can create persistent and temporary tables, through CREATE TABLE and CREATE TEMPORARY TABLE, respectively.
In Vertica you can create persistent and temporary tables, through
CREATE TABLE and
CREATE TEMPORARY TABLE, respectively.
For detailed information on both types, see Creating Tables and Creating temporary tables.
Persistent tables
CREATE TABLE creates a table in the Vertica logical schema. For example:
CREATE TABLE vendor_dimension (
   vendor_key        INTEGER      NOT NULL PRIMARY KEY,
   vendor_name       VARCHAR(64),
   vendor_address    VARCHAR(64),
   vendor_city       VARCHAR(64),
   vendor_state      CHAR(2),
   vendor_region     VARCHAR(32),
   deal_size         INTEGER,
   last_deal_update  DATE

);
For detailed information, see Creating Tables.
Temporary tables
CREATE TEMPORARY TABLE creates a table whose data persists only during the current session. Temporary table data is never visible to other sessions.
Temporary tables can be used to divide complex query processing into multiple steps. Typically, a reporting tool holds intermediate results while reports are generated—for example, the tool first gets a result set, then queries the result set, and so on.
CREATE TEMPORARY TABLE can create tables at two scopes, global and local, through the keywords GLOBAL and LOCAL, respectively:
-
GLOBAL(default): The table definition is visible to all sessions. However, table data is session-scoped. -
LOCAL: The table definition is visible only to the session in which it is created. When the session ends, Vertica automatically drops the table.
For detailed information, see Creating temporary tables.
4 - Creating a database design
A is a physical storage plan that optimizes query performance.
A design is a physical storage plan that optimizes query performance. Data in Vertica is physically stored in projections. When you initially load data into a table using INSERT, COPY (or COPY LOCAL), Vertica creates a default superprojection for the table. This superprojection ensures that all of the data is available for queries. However, these superprojections might not optimize database performance, resulting in slow query performance and low data compression.
To improve performance, create a design for your Vertica database that optimizes query performance and data compression. You can create a design in several ways:
-
Use Database Designer, a toolthat recommends a design for optimal performance.
-
Use Database Designer to create an initial design and then manually modify it.
Database Designer can help you minimize how much time you spend on manual database tuning. You can also use Database Designer to redesign the database incrementally as requirements such as workloads change over time.
Database Designer runs as a background process. This is useful if you have a large design that you want to run overnight. An active SSH session is not required, so design and deploy operations continue to run uninterrupted if the session ends.
Tip
Vertica recommends that you first globally optimize your database using the Comprehensive setting in Database Designer. If the performance of the comprehensive design is not adequate, you can design custom projections using an incremental design and manually, as described in Creating custom designs.4.1 - About Database Designer
Vertica Database Designer uses sophisticated strategies to create a design that provides excellent performance for ad-hoc queries and specific queries while using disk space efficiently.
Vertica Database Designer uses sophisticated strategies to create a design that provides excellent performance for ad-hoc queries and specific queries while using disk space efficiently.
During the design process, Database Designer analyzes the logical schema definition, sample data, and sample queries, and creates a physical schema (projections) in the form of a SQL script that you deploy automatically or manually. This script creates a minimal set of superprojections to ensure K-safety.
In most cases, the projections that Database Designer creates provide excellent query performance within physical constraints while using disk space efficiently.
General design options
When you run Database Designer, several general options are available:
-
Create a comprehensive or incremental design.
-
Optimize for query execution, load, or a balance of both.
-
Require K-safety.
-
Recommend unsegmented projections when feasible.
-
Analyze statistics before creating the design.
Design input
Database Designer bases its design on the following information that you provide:
-
Design queries that you typically run during normal database operations.
-
Design tables that contain sample data.
Output
Database Designer yields the following output:
-
Design script that creates the projections for the design in a way that meets the optimization objectives and distributes data uniformly across the cluster.
-
Deployment script that creates and refreshes the projections for your design. For comprehensive designs, the deployment script contains commands that remove non-optimized projections. The deployment script includes the full design script.
-
Backup script that contains SQL statements to deploy the design that existed on the system before deployment. This file is useful in case you need to revert to the pre-deployment design.
Design restrictions
Database Designer-generated designs:
-
Exclude live aggregate or Top-K projections. You must create these manually. See CREATE PROJECTION.
-
Do not sort, segment, or partition projections on LONG VARBINARY and LONG VARCHAR columns.
-
Do not support operations on complex types.
Post-design options
While running Database Designer, you can choose to deploy your design automatically after the deployment script is created, or to deploy it manually, after you have reviewed and tested the design. Vertica recommends that you test the design on a non-production server before deploying the design to your production server.
4.2 - How Database Designer creates a design
Database Designer-generated designs can include the following recommendations:.
Design recommendations
Database Designer-generated designs can include the following recommendations:
-
Sort buddy projections in the same order, which can significantly improve load, recovery, and site node performance. All buddy projections have the same base name so that they can be identified as a group.
Note
If you manually create projections, Database Designer recommends a buddy with the same sort order, if one does not already exist. By default, Database Designer recommends both super and non-super segmented projections with a buddy of the same sort order and segmentation. -
Accepts unlimited queries for a comprehensive design.
-
Identifies similar design queries and assigns them a signature.
For queries with the same signature, Database Designer weights the queries, depending on how many queries have that signature. It then considers the weighted query when creating a design.
-
Recommends and creates projections in a way that minimizes data skew by distributing data uniformly across the cluster.
-
Produces higher quality designs by considering UPDATE, DELETE, and SELECT statements.
4.3 - Database Designer access requirements
By default, only users with the DBADMIN role can run Database Designer.
By default, only users with the DBADMIN role can run Database Designer. Non-DBADMIN users can run Database Designer only if they are granted the necessary privileges and DBDUSER role, as described below. You can also enable users to run Database Designer on the Management Console (see Enabling Users to run Database Designer on Management Console).
-
Add a temporary folder to all cluster nodes with CREATE LOCATION:
=> CREATE LOCATION '/tmp/dbd' ALL NODES; -
Grant the desired user CREATE privileges to create schemas on the current (DEFAULT) database, with GRANT DATABASE:
=> GRANT CREATE ON DATABASE DEFAULT TO dbd-user; -
Grant the DBDUSER role to
dbd-userwith GRANT ROLE:=> GRANT DBDUSER TO dbd-user; -
On all nodes in the cluster, grant
dbd-useraccess to the temporary folder with GRANT LOCATION:=> GRANT ALL ON LOCATION '/tmp/dbd' TO dbd-user; -
Grant
dbd-userprivileges on one or more database schemas and their tables, with GRANT SCHEMA and GRANT TABLE, respectively:=> GRANT ALL ON SCHEMA this-schema[,...] TO dbd-user; => GRANT ALL ON ALL TABLES IN SCHEMA this-schema[,...] TO dbd-user; -
Enable the DBDUSER role on
dbd-userin one of the following ways:-
As
dbd-user, enable the DBDUSER role with SET ROLE:=> SET ROLE DBDUSER; -
As DBADMIN, automatically enable the DBDUSER role for
dbd-useron each login, with ALTER USER:=> ALTER USER dbd-user DEFAULT ROLE DBDUSER;
-
Important
When you grant the DBDUSER role, be sure to associate a resource pool with that user to manage resources while Database Designer runs.
Multiple users can run Database Designer concurrently without interfering with each other or exhausting cluster resources. When a user runs Database Designer, either with Management Console or programmatically, execution is generally contained by the user's resource pool, but might spill over into system resource pools for less-intensive tasks.
Enabling users to run Database Designer on Management Console
Users who are already granted the DBDUSER role and required privileges, as described above, can also be enabled to run Database Designer on Management Console:
-
Log in as a superuser to Management Console.
-
Click MC Settings.
-
Click User Management.
-
Specify an MC user:
-
To create an MC user, click Add.
-
To use an existing MC user, select the user and click Edit.
-
-
Next to the DB access level window, click Add.
-
In the Add Permissions window:
-
From the Choose a database drop-down list, select the database on which to create a design.
-
In the Database username field, enter the
dbd-useruser name that you created earlier. -
In the Database password field, enter the database password.
-
In the Restrict access drop-down list, select the level of MC user for this user.
-
-
Click OK to save your changes.
-
Log out of the MC Super user account.
The MC user is now mapped to dbd-user. Log in as the MC user and use Database Designer to create an optimized design for your database.
DBDUSER capabilities and limitations
As a DBDUSER, the following constraints apply:
-
Designs must set K-safety to be equal to system K-safety. If a design violates K-safety by lacking enough buddy projections for tables, the design does not complete.
-
You cannot explicitly advance the ancient history mark (AHM)—for example, call MAKE_AHM_NOW—until after deploying the design.
When you create a design, you automatically have privileges to manipulate that design. Other tasks might require additional privileges:
| Task | Required privileges |
|---|---|
| Submit design tables |
|
| Submit a single design query |
|
| Submit a file of design queries |
|
| Submit design queries from results of a user query |
|
| Create design and deployment scripts |
|
4.4 - Logging projection data for Database Designer
When you run Database Designer, the Optimizer proposes a set of ideal projections based on the options that you specify.
When you run Database Designer, the Optimizer proposes a set of ideal projections based on the options that you specify. When you deploy the design, Database Designer creates the design based on these projections. However, space or budget constraints may prevent Database Designer from creating all the proposed projections. In addition, Database Designer may not be able to implement the projections using ideal criteria.
To get information about the projections, first enable the Database Designer logging capability. When enabled, Database Designer stores information about the proposed projections in two Data Collector tables. After Database Designer deploys the design, these logs contain information about which proposed projections were actually created. After deployment, the logs contain information about:
-
Projections that the Optimizer proposed
-
Projections that Database Designer actually created when the design was deployed
-
Projections that Database Designer created, but not with the ideal criteria that the Optimizer identified.
-
The DDL used to create all the projections
-
Column optimizations
If you do not deploy the design immediately, review the log to determine if you want to make any changes. If the design has been deployed, you can still manually create some of the projections that Database Designer did not create.
To enable the Database Designer logging capability, see Enabling logging for Database Designer.
To view the logged information, see Viewing Database Designer logs.
4.4.1 - Enabling logging for Database Designer
By default, Database Designer does not log information about the projections that the Optimizer proposed and the Database Designer deploys.
By default, Database Designer does not log information about the projections that the Optimizer proposed and the Database Designer deploys.
To enable Database Designer logging, enter the following command:
=> ALTER DATABASE DEFAULT SET DBDLogInternalDesignProcess = 1;
To disable Database Designer logging, enter the following command:
=> ALTER DATABASE DEFAULT SET DBDLogInternalDesignProcess = 0;
See also
4.4.2 - Viewing Database Designer logs
You can find data about the projections that Database Designer considered and deployed in two Data Collector tables:.
You can find data about the projections that Database Designer considered and deployed in two Data Collector tables:
-
DC_DESIGN_PROJECTION_CANDIDATES
-
DC_DESIGN_QUERY_PROJECTION_CANDIDATES
DC_DESIGN_PROJECTION_CANDIDATES
The DC_DESIGN_PROJECTION_CANDIDATES table contains information about all the projections that the Optimizer proposed. This table also includes the DDL that creates them. The is_a_winner field indicates if that projection was part of the actual deployed design. To view the DC_DESIGN_PROJECTION_CANDIDATES table, enter:
=> SELECT * FROM DC_DESIGN_PROJECTION_CANDIDATES;
DC_DESIGN_QUERY_PROJECTION_CANDIDATES
The DC_DESIGN_QUERY_PROJECTION_CANDIDATES table lists plan features for all design queries.
Possible features are:
-
FULLY DISTRIBUTED JOIN
-
MERGE JOIN
-
GROUPBY PIPE
-
FULLY DISTRIBUTED GROUPBY
-
RLE PREDICATE
-
VALUE INDEX PREDICATE
-
LATE MATERIALIZATION
For all design queries, the DC_DESIGN_QUERY_PROJECTION_CANDIDATES table includes the following plan feature information:
-
Optimizer path cost.
-
Database Designer benefits.
-
Ideal plan feature and its description, which identifies how the referenced projection should be optimized.
-
If the design was deployed, the actual plan feature and its description is included in the table. This information identifies how the referenced projection was actually optimized.
Because most projections have multiple optimizations, each projection usually has multiple rows.To view the DC_DESIGN_QUERY_PROJECTION_CANDIDATES table, enter:
=> SELECT * FROM DC_DESIGN_QUERY_PROJECTION_CANDIDATES;
To see example data from these tables, see Database Designer logs: example data.
4.4.3 - Database Designer logs: example data
In the following example, Database Designer created the logs after creating a comprehensive design for the VMart sample database.
In the following example, Database Designer created the logs after creating a comprehensive design for the VMart sample database. The output shows two records from the DC_DESIGN_PROJECTION_CANDIDATES table.
The first record contains information about the customer_dimension_dbd_1_sort_$customer_gender$__$annual_income$ projection. The record includes the CREATE PROJECTION statement that Database Designer used to create the projection. The is_a_winner column is t, indicating that Database Designer created this projection when it deployed the design.
The second record contains information about the product_dimension_dbd_2_sort_$product_version$__$product_key$ projection. For this projection, the is_a_winner column is f. The Optimizer recommended that Database Designer create this projection as part of the design. However, Database Designer did not create the projection when it deployed the design. The log includes the DDL for the CREATE PROJECTION statement. If you want to add the projection manually, you can use that DDL. For more information, see Creating a design manually.
=> SELECT * FROM dc_design_projection_candidates;
-[ RECORD 1 ]--------+---------------------------------------------------------------
time                 | 2014-04-11 06:30:17.918764-07
node_name            | v_vmart_node0001
session_id           | localhost.localdoma-931:0x1b7
user_id              | 45035996273704962
user_name            | dbadmin
design_id            | 45035996273705182
design_table_id      | 45035996273720620
projection_id        | 45035996273726626
iteration_number     | 1
projection_name      | customer_dimension_dbd_1_sort_$customer_gender$__$annual_income$
projection_statement | CREATE PROJECTION v_dbd_sarahtest_sarahtest."customer_dimension_dbd_1_
            sort_$customer_gender$__$annual_income$"
(
customer_key ENCODING AUTO,
customer_type ENCODING AUTO,
customer_name ENCODING AUTO,
customer_gender ENCODING RLE,
title ENCODING AUTO,
household_id ENCODING AUTO,
customer_address ENCODING AUTO,
customer_city ENCODING AUTO,
customer_state ENCODING AUTO,
customer_region ENCODING AUTO,
marital_status ENCODING AUTO,
customer_age ENCODING AUTO,
number_of_children ENCODING AUTO,
annual_income ENCODING AUTO,
occupation ENCODING AUTO,
largest_bill_amount ENCODING AUTO,
store_membership_card ENCODING AUTO,
customer_since ENCODING AUTO,
deal_stage ENCODING AUTO,
deal_size ENCODING AUTO,
last_deal_update ENCODING AUTO
)
AS
SELECT customer_key,
customer_type,
customer_name,
customer_gender,
title,
household_id,
customer_address,
customer_city,
customer_state,
customer_region,
marital_status,
customer_age,
number_of_children,
annual_income,
occupation,
largest_bill_amount,
store_membership_card,
customer_since,
deal_stage,
deal_size,
last_deal_update
FROM public.customer_dimension
ORDER BY customer_gender,
annual_income
UNSEGMENTED ALL NODES;
is_a_winner          | t
-[ RECORD 2 ]--------+-------------------------------------------------------------
time                 | 2014-04-11 06:30:17.961324-07
node_name            | v_vmart_node0001
session_id           | localhost.localdoma-931:0x1b7
user_id              | 45035996273704962
user_name            | dbadmin
design_id            | 45035996273705182
design_table_id      | 45035996273720624
projection_id        | 45035996273726714
iteration_number     | 1
projection_name      | product_dimension_dbd_2_sort_$product_version$__$product_key$
projection_statement | CREATE PROJECTION v_dbd_sarahtest_sarahtest."product_dimension_dbd_2_
        sort_$product_version$__$product_key$"
(
product_key ENCODING AUTO,
product_version ENCODING RLE,
product_description ENCODING AUTO,
sku_number ENCODING AUTO,
category_description ENCODING AUTO,
department_description ENCODING AUTO,
package_type_description ENCODING AUTO,
package_size ENCODING AUTO,
fat_content ENCODING AUTO,
diet_type ENCODING AUTO,
weight ENCODING AUTO,
weight_units_of_measure ENCODING AUTO,
shelf_width ENCODING AUTO,
shelf_height ENCODING AUTO,
shelf_depth ENCODING AUTO,
product_price ENCODING AUTO,
product_cost ENCODING AUTO,
lowest_competitor_price ENCODING AUTO,
highest_competitor_price ENCODING AUTO,
average_competitor_price ENCODING AUTO,
discontinued_flag ENCODING AUTO
)
AS
SELECT product_key,
product_version,
product_description,
sku_number,
category_description,
department_description,
package_type_description,
package_size,
fat_content,
diet_type,
weight,
weight_units_of_measure,
shelf_width,
shelf_height,
shelf_depth,
product_price,
product_cost,
lowest_competitor_price,
highest_competitor_price,
average_competitor_price,
discontinued_flag
FROM public.product_dimension
ORDER BY product_version,
product_key
UNSEGMENTED ALL NODES;
is_a_winner          | f
.
.
.
The next example shows the contents of two records in the DC_DESIGN_QUERY_PROJECTION_CANDIDATES. Both of these rows apply to projection id 45035996273726626.
In the first record, the Optimizer recommends that Database Designer optimize the customer_gender column for the GROUPBY PIPE algorithm.
In the second record, the Optimizer recommends that Database Designer optimize the public.customer_dimension table for late materialization. Late materialization can improve the performance of joins that might spill to disk.
=> SELECT * FROM dc_design_query_projection_candidates;
-[ RECORD 1 ]-----------------+------------------------------------------------------------
time                           | 2014-04-11 06:30:17.482377-07
node_name                      | v_vmart_node0001
session_id                     | localhost.localdoma-931:0x1b7
user_id                        | 45035996273704962
user_name                      | dbadmin
design_id                      | 45035996273705182
design_query_id                | 3
iteration_number               | 1
design_table_id                | 45035996273720620
projection_id                  | 45035996273726626
ideal_plan_feature             | GROUP BY PIPE
ideal_plan_feature_description | Group-by pipelined on column(s) customer_gender
dbd_benefits                   | 5
opt_path_cost                  | 211
-[ RECORD 2 ]-----------------+------------------------------------------------------------
time                           | 2014-04-11 06:30:17.48276-07
node_name                      | v_vmart_node0001
session_id                     | localhost.localdoma-931:0x1b7
user_id                        | 45035996273704962
user_name                      | dbadmin
design_id                      | 45035996273705182
design_query_id                | 3
iteration_number               | 1
design_table_id                | 45035996273720620
projection_id                  | 45035996273726626
ideal_plan_feature             | LATE MATERIALIZATION
ideal_plan_feature_description | Late materialization on table public.customer_dimension
dbd_benefits                   | 4
opt_path_cost                  | 669
.
.
.
You can view the actual plan features that Database Designer implemented for the projections it created. To do so, query the V_INTERNAL.DC_DESIGN_QUERY_PROJECTIONS table:
=> select * from v_internal.dc_design_query_projections;
-[ RECORD 1 ]-------------------+-------------------------------------------------------------
time                            | 2014-04-11 06:31:41.19199-07
node_name                       | v_vmart_node0001
session_id                      | localhost.localdoma-931:0x1b7
user_id                         | 45035996273704962
user_name                       | dbadmin
design_id                       | 45035996273705182
design_query_id                 | 1
projection_id                   | 2
design_table_id                 | 45035996273720624
actual_plan_feature             | RLE PREDICATE
actual_plan_feature_description | RLE on predicate column(s) department_description
dbd_benefits                    | 2
opt_path_cost                   | 141
-[ RECORD 2 ]-------------------+-------------------------------------------------------------
time                            | 2014-04-11 06:31:41.192292-07
node_name                       | v_vmart_node0001
session_id                      | localhost.localdoma-931:0x1b7
user_id                         | 45035996273704962
user_name                       | dbadmin
design_id                       | 45035996273705182
design_query_id                 | 1
projection_id                   | 2
design_table_id                 | 45035996273720624
actual_plan_feature             | GROUP BY PIPE
actual_plan_feature_description | Group-by pipelined on column(s) fat_content
dbd_benefits                    | 5
opt_path_cost                   | 155
4.5 - General design settings
Before you run Database Designer, you must provide specific information on the design to create.
Before you run Database Designer, you must provide specific information on the design to create.
Design name
All designs that you create with Database Designer must have unique names that conform to the conventions described in Identifiers, and are no more than 32 characters long (16 characters if you use Database Designer in Administration Tools or Management Console).
The design name is incorporated into the names of files that Database Designer generates, such as its deployment script. This can help you differentiate files that are associated with different designs.
Design type
Database Designer can create two distinct design types: comprehensive or incremental.
Comprehensive design
A comprehensive design creates an initial or replacement design for all the tables in the specified schemas. Create a comprehensive design when you are creating a new database.
To help Database Designer create an efficient design, load representative data into the tables before you begin the design process. When you load data into a table, Vertica creates an unoptimized superprojection so that Database Designer has projections to optimize. If a table has no data, Database Designer cannot optimize it.
Optionally, supply Database Designer with representative queries that you plan to use so Database Designer can optimize the design for them. If you do not supply any queries, Database Designer creates a generic optimization of the superprojections that minimizes storage, with no query-specific projections.
During a comprehensive design, Database Designer creates deployment scripts that:
-
Create projections to optimize query performance.
-
Create replacement buddy projections when Database Designer changes the encoding of existing projections that it decides to keep.
Incremental design
After you create and deploy a comprehensive database design, your database is likely to change over time in various ways. Consider using Database Designer periodically to create incremental designs that address these changes. Changes that warrant an incremental design can include:
-
Significant data additions or updates
-
New or modified queries that you run regularly
-
Performance issues with one or more queries
-
Schema changes
Optimization objective
Database Designer can optimize the design for one of three objectives:
- Load: Designs that are optimized for loads minimize database size, potentially at the expense of query performance.
- Query: Designs that are optimized for query performance. These designs typically favor fast query execution over load optimization, and thus result in a larger storage footprint.
- Balanced: Designs that are balanced between database size and query performance.
A fully optimized query has an optimization ratio of 0.99. Optimization ratio is the ratio of a query's benefits achieved in the design produced by the Database Designer to that achieved in the ideal plan. The optimization ratio is set in the OptRatio parameter in designer.log.
Design tables
Database Designer needs one or more tables with a moderate amount of sample data—approximately 10 GB—to create optimal designs. Design tables with large amounts of data adversely affect Database Designer performance. Design tables with too little data prevent Database Designer from creating an optimized design. If a design table has no data, Database Designer ignores it.
Note
If you drop a table after adding it to the design, Database Designer cannot build or deploy the design.Design queries
A database design that is optimized for query performance requires a set of representative queries, or design queries. Design queries are required for incremental designs, and optional for comprehensive designs. You list design queries in a SQL file that you supply as input to Database Designer. Database Designer checks the validity of the queries when you add them to your design, and again when it builds the design. If a query is invalid, Database Designer ignores it.
If you use Management Console to create a database design, you can submit queries either from an input file or from the system table QUERY_REQUESTS. For details, see Creating a design manually.
The maximum number of design queries depends on the design type: ≤200 queries for a comprehensive design, ≤100 queries for an incremental design. Optionally, you can assign weights to the design queries that signify their relative importance. Database Designer uses those weights to prioritize the queries in its design.
Segmented and unsegmented projections
When creating a comprehensive design, Database Designer creates projections based on data statistics and queries. It also reviews the submitted design tables to decide whether projections should be segmented (distributed across the cluster nodes) or unsegmented (replicated on all cluster nodes).
By default, Database Designer recommends only segmented projections. You can enable Database Designer to recommend unsegmented projections . In this case, Database Designer recommends segmented superprojections for large tables when deploying to multi-node clusters, and unsegmented superprojections for smaller tables.
Database Designer uses the following algorithm to determine whether to recommend unsegmented projections. Assuming that largest-row-count equals the number of rows in the design table with the largest number of rows, Database Designer recommends unsegmented projections if any of the following conditions is true:
-
largest-row-count< 1,000,000 ANDnumber-table-rows≤10%-largest-row-count -
largest-row-count≥ 10,000,000 ANDnumber-table-rows≤1%-largest-row-count -
1,000,000 ≤largest-row-count< 10,000,000 ANDnumber-table-rows≤ 100,000
Database Designer does not segment projections on:
-
Single-node clusters
-
LONG VARCHAR and LONG VARBINARY columns
For more information, see High availability with projections.
Statistics analysis
By default, Database Designer analyzes statistics for design tables when they are added to the design. Accurate statistics help Database Designer optimize compression and query performance.
Analyzing statistics takes time and resources. If you are certain that design table statistics are up to date, you can specify to skip this step and avoid the overhead otherwise incurred.
For more information, see Collecting Statistics.
4.6 - Building a design
After you have created design tables and loaded data into them, and then specified the parameters you want Database Designer to use when creating the physical schema, direct Database Designer to create the scripts necessary to build the design.
After you have created design tables and loaded data into them, and then specified the parameters you want Database Designer to use when creating the physical schema, direct Database Designer to create the scripts necessary to build the design.
Note
You cannot stop a running database if Database Designer is building a database design.When you build a database design, Vertica generates two scripts:
-
Deployment script:
design-name_deploy.sql—Contains the SQL statements that create projections for the design you are deploying, deploy the design, and drop unused projections. When the deployment script runs, it creates the optimized design. For details about how to run this script and deploy the design, see Deploying a Design. -
Design script:
design-name_design.sql—Contains theCREATE PROJECTIONstatements that Database Designeruses to create the design. Review this script to make sure you are happy with the design.The design script is a subset of the deployment script. It serves as a backup of the DDL for the projections that the deployment script creates.
When you create a design using Management Console:
-
If you submit a large number of queries to your design and build it right immediately, a timing issue could cause the queries not to load before deployment starts. If this occurs, you might see one of the following errors:
-
No queries to optimize for -
No tables to design projections for
To accommodate this timing issue, you may need to reset the design, check the Queries tab to make sure the queries have been loaded, and then rebuild the design. Detailed instructions are in:
-
-
The scripts are deleted when deployment completes. To save a copy of the deployment script after the design is built but before the deployment completes, go to the Output window and copy and paste the SQL statements to a file.
4.7 - Resetting a design
You must reset a design when:.
You must reset a design when:
-
You build a design and the output scripts described in Building a Design are not created.
-
You build a design but Database Designer cannot complete the design because the queries it expects are not loaded.
Resetting a design discards all the run-specific information of the previous Database Designer build, but retains its configuration (design type, optimization objectives, K-safety, etc.) and tables and queries.
After you reset a design, review the design to see what changes you need to make. For example, you can fix errors, change parameters, or check for and add additional tables or queries. Then you can rebuild the design.
You can only reset a design in Management Console or by using the DESIGNER_RESET_DESIGN function.
4.8 - Deploying a design
After running Database Designer to generate a deployment script, Vertica recommends that you test your design on a non-production server before you deploy it to your production server.
After running Database Designer to generate a deployment script, Vertica recommends that you test your design on a non-production server before you deploy it to your production server.
Both the design and deployment processes run in the background. This is useful if you have a large design that you want to run overnight. Because an active SSH session is not required, the design/deploy operations continue to run uninterrupted, even if the session is terminated.
Note
You cannot stop a running database if Database Designer is building or deploying a database design.Database Designer runs as a background process. Multiple users can run Database Designer concurrently without interfering with each other or using up all the cluster resources. However, if multiple users are deploying a design on the same tables at the same time, Database Designer may not be able to complete the deployment. To avoid problems, consider the following:
-
Schedule potentially conflicting Database Designer processes to run sequentially overnight so that there are no concurrency problems.
-
Avoid scheduling Database Designer runs on the same set of tables at the same time.
There are two ways to deploy your design:
4.8.1 - Deploying designs using Database Designer
OpenText recommends that you run Database Designer and deploy optimized projections right after loading your tables with sample data because Database Designer provides projections optimized for the current state of your database.
OpenText recommends that you run Database Designer and deploy optimized projections right after loading your tables with sample data because Database Designer provides projections optimized for the current state of your database.
If you choose to allow Database Designer to automatically deploy your script during a comprehensive design and are running Administrative Tools, Database Designer creates a backup script of your database's current design. This script helps you re-create the design of projections that may have been dropped by the new design. The backup script is located in the output directory you specified during the design process.
If you choose not to have Database Designer automatically run the deployment script (for example, if you want to maintain projections from a pre-existing deployment), you can manually run the deployment script later. See Deploying designs manually.
To deploy a design while running Database Designer, do one of the following:
-
In Management Console, select the design and click Deploy Design.
-
In the Administration Tools, select Deploy design in the Design Options window.
If you are running Database Designer programmatically, use DESIGNER_RUN_POPULATE_DESIGN_AND_DEPLOY and set the deploy parameter to 'true'.
Once you have deployed your design, query the DEPLOY_STATUS system table to see the steps that the deployment took:
vmartdb=> SELECT * FROM V_MONITOR.DEPLOY_STATUS;
4.8.2 - Deploying designs manually
If you choose not to have Database Designer deploy your design at design time, you can deploy the design later using the deployment script:.
If you choose not to have Database Designer deploy your design at design time, you can deploy the design later using the deployment script:
-
Make sure that the target database contains the same tables and projections as the database where you ran Database Designer. The database should also contain sample data.
-
To deploy the projections to a test or production environment, execute the deployment script in vsql with the meta-command
\ias follows, wheredesign-nameis the name of the database design:=> \i design-name_deploy.sql -
For a K-safe database, call Vertica meta-function
GET_PROJECTIONSon tables of the new projections. Check the output to verify that all projections have enough buddies to be identified as safe. -
If you create projections for tables that already contains data, call
REFRESHorSTART_REFRESHto update new projections. Otherwise, these projections are not available for query processing. -
Call
MAKE_AHM_NOWto set the Ancient History Mark (AHM) to the most recent epoch. -
Call
DROP PROJECTIONon projections that are no longer needed, and would otherwise waste disk space and reduce load speed. -
Call
ANALYZE_STATISTICSon all database projections:=> SELECT ANALYZE_STATISTICS ('');This function collects and aggregates data samples and storage information from all nodes on which a projection is stored, and then writes statistics into the catalog.
4.9 - How to create a design
There are three ways to create a design using Database Designer:.
There are three ways to create a design using Database Designer:
-
From Management Console, open a database and select the Design page at the bottom of the window.
For details about using Management Console to create a design, see Creating a database design in Management Console
-
Programmatically, using the techniques described in About Running Database Designer Programmatically. To run Database Designer programmatically, you must be a DBADMIN or have been granted the DBDUSER role and enabled that role.
-
From the Administration Tools menu, by selecting Configuration Menu > Run Database Designer. You must be a DBADMIN user to run Database Designer from the Administration Tools.
For details about using Administration Tools to create a design, see Using administration tools to create a design.
The following table shows what Database Designer capabilities are available in each tool:
| Database Designer Capability | Management Console | Running Database Designer Programmatically | Administrative Tools |
|---|---|---|---|
| Create design | Yes | Yes | Yes |
| Design name length (# of characters) | 16 | 32 | 16 |
| Build design (create design and deployment scripts) | Yes | Yes | Yes |
| Create backup script | Yes | ||
| Set design type (comprehensive or incremental) | Yes | Yes | Yes |
| Set optimization objective | Yes | Yes | Yes |
| Add design tables | Yes | Yes | Yes |
| Add design queries file | Yes | Yes | Yes |
| Add single design query | Yes | ||
| Use query repository | Yes | Yes | |
| Set K-safety | Yes | Yes | Yes |
| Analyze statistics | Yes | Yes | Yes |
| Require all unsegmented projections | Yes | Yes | |
| View event history | Yes | Yes | |
| Set correlation analysis mode (Default = 0) | Yes |
4.9.1 - Using administration tools to create a design
To use the Administration Tools interface to create an optimized design for your database, you must be a DBADMIN user.
To use the Administration Tools interface to create an optimized design for your database, you must be a DBADMIN user. Follow these steps:
-
Log in as the dbadmin user and start Administration Tools.
-
From the main menu, start the database for which you want to create a design. The database must be running before you can create a design for it.
-
On the main menu, select Configuration Menu and click OK.
-
On the Configuration Menu, select Run Database Designer and click OK.
-
On the Select a database to design window, enter the name of the database for which you are creating a design and click OK.
-
On the Enter the directory for Database Designer output window, enter the full path to the directory to contain the design script, deployment script, backup script, and log files, and click OK.
For information about the scripts, see Building a design.
-
On the Database Designer window, enter a name for the design and click OK.
-
On the Design Type window, choose which type of design to create and click OK.
For details, see Design Types.
-
The Select schema(s) to add to query search path window lists all the schemas in the database that you selected. Select the schemas that contain representative data that you want Database Designer to consider when creating the design and click OK.
For details about choosing schema and tables to submit to Database Designer, see Design Tables with Sample Data.
-
On the Optimization Objectives window, select the objective you want for the database optimization:
-
The final window summarizes the choices you have made and offers you two choices:
-
Proceed with building the design, and deploying it if you specified to deploy it immediately. If you did not specify to deploy, you can review the design and deployment scripts and deploy them manually, as described in Deploying designs manually.
-
Cancel the design and go back to change some of the parameters as needed.
-
-
Creating a design can take a long time.To cancel a running design from the Administration Tools window, enter Ctrl+C.
To create a design for the VMart example database, see Using Database Designer to create a comprehensive design in Getting Started.
4.10 - Running Database Designer programmatically
Vertica provides a set of meta-functions that enable programmatic access to Database Designer functionality.
Vertica provides a set of meta-functions that enable programmatic access to Database Designer functionality. Run Database Designer programmatically to perform the following tasks:
-
Optimize performance on tables that you own.
-
Create or update a design without requiring superuser or DBADMIN intervention.
-
Add individual queries and tables, or add data to your design, and then rerun Database Designer to update the design based on this new information.
-
Customize the design.
-
Use recently executed queries to set up your database to run Database Designer automatically on a regular basis.
-
Assign each design query a query weight that indicates the importance of that query in creating the design. Assign a higher weight to queries that you run frequently so that Database Designer prioritizes those queries in creating the design.
For more details about Database Designer functions, see Database Designer function categories.
4.10.1 - Database Designer function categories
Database Designer functions perform the following operations, generally performed in the following order:
Important
You can also use meta-function DESIGNER_SINGLE_RUN, which encapsulates all of these steps with a single call. The meta-function iterates over all queries within a specified timespan, and returns with a design ready for deployment.For detailed information, see Workflow for running Database Designer programmatically. For information on required privileges, see Privileges for running Database Designer functions
Caution
Before running Database Designer functions on an existing schema, back up the current design by calling EXPORT_CATALOG.Create a design
DESIGNER_CREATE_DESIGN directs Database Designer to create a design.
Set design properties
The following functions let you specify design properties:
-
DESIGNER_SET_DESIGN_TYPE: Specifies whether the design is comprehensive or incremental.
-
DESIGNER_DESIGN_PROJECTION_ENCODINGS: Analyzes encoding in the specified projections and creates a script that implements encoding recommendations.
-
DESIGNER_SET_DESIGN_KSAFETY: Sets the K-safety value for a comprehensive design.
-
DESIGNER_SET_OPTIMIZATION_OBJECTIVE: Specifies whether the design optimizes for query or load performance.
-
DESIGNER_SET_PROPOSE_UNSEGMENTED_PROJECTIONS: Enables inclusion of unsegmented projections in the design.
Populate a design
The following functions let you add tables and queries to your Database Designer design:
-
DESIGNER_ADD_DESIGN_TABLES: Adds the specified tables to a design.
-
DESIGNER_ADD_DESIGN_QUERY, DESIGNER_ADD_DESIGN_QUERIES, DESIGNER_ADD_DESIGN_QUERIES_FROM_RESULTS: Adds queries to the design and weights them.
Create design and deployment scripts
The following functions populate the Database Designer workspace and create design and deployment scripts. You can also analyze statistics, deploy the design automatically, and drop the workspace after the deployment:
-
DESIGNER_RUN_POPULATE_DESIGN_AND_DEPLOY: Populates the design and creates design and deployment scripts.
-
DESIGNER_WAIT_FOR_DESIGN: Waits for a currently running design to complete.
Reset a design
DESIGNER_RESET_DESIGN discards all the run-specific information of the previous Database Designer build or deployment of the specified design but retains its configuration.
Get design data
The following functions display information about projections and scripts that the Database Designer created:
-
DESIGNER_OUTPUT_ALL_DESIGN_PROJECTIONS: Sends to standard output DDL statements that define design projections.
-
DESIGNER_OUTPUT_DEPLOYMENT_SCRIPT: Sends to standard output a design's deployment script.
Cleanup
The following functions cancel any running Database Designer operation or drop a Database Designer design and all its contents:
-
DESIGNER_CANCEL_POPULATE_DESIGN: Cancels population or deployment operation for the specified design if it is currently running.
-
DESIGNER_DROP_DESIGN: Removes the schema associated with the specified design and all its contents.
-
DESIGNER_DROP_ALL_DESIGNS: Removes all Database Designer-related schemas associated with the current user.
4.10.2 - Workflow for running Database Designer programmatically
The following example shows the steps you take to create a design by running Database Designer programmatically.
The following example shows the steps you take to create a design by running Database Designer programmatically.
Important
Before running Database Designer functions on an existing schema, back up the current design by calling function EXPORT_CATALOG.Before you run this example, you should have the DBDUSER role, and you should have enabled that role using the SET ROLE DBDUSER command:
-
Create a table in the public schema:
=> CREATE TABLE T( x INT, y INT, z INT, u INT, v INT, w INT PRIMARY KEY ); -
Add data to the table:
\! perl -e 'for ($i=0; $i<100000; ++$i) {printf("%d, %d, %d, %d, %d, %d\n", $i/10000, $i/100, $i/10, $i/2, $i, $i);}' | vsql -c "COPY T FROM STDIN DELIMITER ',' DIRECT;" -
Create a second table in the public schema:
=> CREATE TABLE T2( x INT, y INT, z INT, u INT, v INT, w INT PRIMARY KEY ); -
Copy the data from table
T1to tableT2and commit the changes:=> INSERT /*+DIRECT*/ INTO T2 SELECT * FROM T; => COMMIT; -
Create a new design:
=> SELECT DESIGNER_CREATE_DESIGN('my_design');This command adds information to the DESIGNS system table in the V_MONITOR schema.
-
Add tables from the public schema to the design :
=> SELECT DESIGNER_ADD_DESIGN_TABLES('my_design', 'public.t');
=> SELECT DESIGNER_ADD_DESIGN_TABLES('my_design', 'public.t2');
These commands add information to the DESIGN_TABLES system table.
-
Create a file named
queries.txtin/tmp/examples, or another directory where you have READ and WRITE privileges. Add the following two queries in that file and save it. Database Designer uses these queries to create the design:SELECT DISTINCT T2.u FROM T JOIN T2 ON T.z=T2.z-1 WHERE T2.u > 0; SELECT DISTINCT w FROM T; -
Add the queries file to the design and display the results—the numbers of accepted queries, non-design queries, and unoptimizable queries:
=> SELECT DESIGNER_ADD_DESIGN_QUERIES
     ('my_design',
     '/tmp/examples/queries.txt',
     'true'
     );
The results show that both queries were accepted:
Number of accepted queries                      =2
Number of queries referencing non-design tables =0
Number of unsupported queries                   =0
Number of illegal queries                       =0
The DESIGNER_ADD_DESIGN_QUERIES function populates the DESIGN_QUERIES system table.
-
Set the design type to comprehensive. (This is the default.) A comprehensive design creates an initial or replacement design for all the design tables:
=> SELECT DESIGNER_SET_DESIGN_TYPE('my_design', 'comprehensive'); -
Set the optimization objective to query. This setting creates a design that focuses on faster query performance, which might recommend additional projections. These projections could result in a larger database storage footprint:
=> SELECT DESIGNER_SET_OPTIMIZATION_OBJECTIVE('my_design', 'query'); -
Create the design and save the design and deployment scripts in
/tmp/examples, or another directory where you have READ and WRITE privileges. The following command:-
Analyzes statistics
-
Doesn't deploy the design.
-
Doesn't drop the design after deployment.
-
Stops if it encounters an error.
=> SELECT DESIGNER_RUN_POPULATE_DESIGN_AND_DEPLOY
   ('my_design',
    '/tmp/examples/my_design_projections.sql',
    '/tmp/examples/my_design_deploy.sql',
    'True',
    'False',
    'False',
    'False'
    );
This command adds information to the following system tables:
-
-
Examine the status of the Database Designer run to see what projections Database Designer recommends. In the
deployment_projection_namecolumn:-
repindicates a replicated projection -
superindicates a superprojectionThe
deployment_statuscolumn ispendingbecause the design has not yet been deployed.For this example, Database Designer recommends four projections:
=> \x
Expanded display is on.
=> SELECT * FROM OUTPUT_DEPLOYMENT_STATUS;
-[ RECORD 1 ]--------------+-----------------------------
deployment_id              | 45035996273795970
deployment_projection_id   | 1
deployment_projection_name | T_DBD_1_rep_my_design
deployment_status          | pending
error_message              | N/A
-[ RECORD 2 ]--------------+-----------------------------
deployment_id              | 45035996273795970
deployment_projection_id   | 2
deployment_projection_name | T2_DBD_2_rep_my_design
deployment_status          | pending
error_message              | N/A
-[ RECORD 3 ]--------------+-----------------------------
deployment_id              | 45035996273795970
deployment_projection_id   | 3
deployment_projection_name | T_super
deployment_status          | pending
error_message              | N/A
-[ RECORD 4 ]--------------+-----------------------------
deployment_id              | 45035996273795970
deployment_projection_id   | 4
deployment_projection_name | T2_super
deployment_status          | pending
error_message              | N/A
-
-
View the script
/tmp/examples/my_design_deploy.sqlto see how these projections are created when you run the deployment script. In this example, the script also assigns the encoding schemes RLE and COMMONDELTA_COMP to columns where appropriate. -
Deploy the design from the directory where you saved it:
=> \i /tmp/examples/my_design_deploy.sql -
Now that the design is deployed, delete the design:
=> SELECT DESIGNER_DROP_DESIGN('my_design');
4.10.3 - Privileges for running Database Designer functions
Non-DBADMIN users with the DBDUSER role can run Database Designer functions.
Non-DBADMIN users with the DBDUSER role can run Database Designer functions. Two steps are required to enable users to run these functions:
-
A DBADMIN or superuser grants the user the DBDUSER role:
=> GRANT DBDUSER TO username;This role persists until the DBADMIN revokes it.
-
Before the DBDUSER can run Database Designer functions, one of the following must occur:
-
The user enables the DBDUSER role:
=> SET ROLE DBDUSER; -
The superuser sets the user's default role to DBDUSER:
=> ALTER USER username DEFAULT ROLE DBDUSER;
-
General DBDUSER limitations
As a DBDUSER, the following restrictions apply:
-
You can set a design's K-safety to a value less than or equal to system K-safety. You cannot change system K-safety.
-
You cannot explicitly change the ancient history mark (AHM), even during design deployment.
Design dependencies and privileges
Individual design tasks are likely to have dependencies that require specific privileges:
| Task | Required privileges |
|---|---|
| Add tables to a design |
|
| Add a single design query to the design |
|
| Add a query file to the design |
|
| Add queries from the result of a user query to the design |
|
| Create design and deployment scripts |
|
4.10.4 - Resource pool for Database Designer users
When you grant a user the DBDUSER role, be sure to associate a resource pool with that user to manage resources during Database Designer runs.
When you grant a user the DBDUSER role, be sure to associate a resource pool with that user to manage resources during Database Designer runs. This allows multiple users to run Database Designer concurrently without interfering with each other or using up all cluster resources.
Note
When a user runs Database Designer, execution is mostly contained in the user's resource pool. However, Vertica might also use other system resource pools to perform less-intensive tasks.4.11 - Creating custom designs
Vertica strongly recommends that you use the physical schema design produced by , which provides , excellent query performance, and efficient use of storage space.
Vertica strongly recommends that you use the physical schema design produced by Database Designer, which provides K-safety, excellent query performance, and efficient use of storage space. If any queries run less as efficiently than you expect, consider using the Database Designer incremental design process to optimize the database design for the query.
If the projections created by Database Designer still do not meet your needs, you can write custom projections, from scratch or based on projection designs created by Database Designer.
If you are unfamiliar with writing custom projections, start by modifying an existing design generated by Database Designer.
4.11.1 - Custom design process
To create a custom design or customize an existing one:.
To create a custom design or customize an existing one:
-
Plan the new design or modifications to an existing one. See Planning your design.
-
Create or modify projections. See Design fundamentals and CREATE PROJECTION for more detail.
-
Deploy projections to a test environment. See Writing and deploying custom projections.
-
Test and modify projections as needed.
-
After you finalize the design, deploy projections to the production environment.
4.11.2 - Planning your design
The syntax for creating a design is easy for anyone who is familiar with SQL.
The syntax for creating a design is easy for anyone who is familiar with SQL. As with any successful project, however, a successful design requires some initial planning. Before you create your first design:
-
Become familiar with standard design requirements and plan your design to include them. See Design requirements.
-
Determine how many projections you need to include in the design. See Determining the number of projections to use.
-
Determine the type of compression and encoding to use for columns. See Architecture.
-
Determine whether or not you want the database to be K-safe. Vertica recommends that all production databases have a minimum K-safety of one (K=1). Valid K-safety values are 0, 1, and 2. See Designing for K-safety.
4.11.2.1 - Design requirements
A physical schema design is a script that contains CREATE PROJECTION statements.
A physical schema design is a script that contains CREATE PROJECTION statements. These statements determine which columns are included in projections and how they are optimized.
If you use Database Designer as a starting point, it automatically creates designs that meet all fundamental design requirements. If you intend to create or modify designs manually, be aware that all designs must meet the following requirements:
-
Every design must create at least one superprojection for every table in the database that is used by the client application. These projections provide complete coverage that enables users to perform ad-hoc queries as needed. They can contain joins and they are usually configured to maximize performance through sort order, compression, and encoding.
-
Query-specific projections are optional. If you are satisfied with the performance provided through superprojections, you do not need to create additional projections. However, you can maximize performance by tuning for specific query work loads.
-
Vertica recommends that all production databases have a minimum K-safety of one (K=1) to support high availability and recovery. (K-safety can be set to 0, 1, or 2.) See High availability with projections and Designing for K-safety.
-
Vertica recommends that if you have more than 20 nodes, but small tables, do not create replicated projections. If you create replicated projections, the catalog becomes very large and performance may degrade. Instead, consider segmenting those projections.
4.11.2.2 - Determining the number of projections to use
In many cases, a design that consists of a set of superprojections (and their buddies) provides satisfactory performance through compression and encoding.
In many cases, a design that consists of a set of superprojections (and their buddies) provides satisfactory performance through compression and encoding. This is especially true if the sort orders for the projections have been used to maximize performance for one or more query predicates (WHERE clauses).
However, you might want to add additional query-specific projections to increase the performance of queries that run slowly, are used frequently, or are run as part of business-critical reporting. The number of additional projections (and their buddies) that you create should be determined by:
-
Your organization's needs
-
The amount of disk space you have available on each node in the cluster
-
The amount of time available for loading data into the database
As the number of projections that are tuned for specific queries increases, the performance of these queries improves. However, the amount of disk space used and the amount of time required to load data increases as well. Therefore, you should create and test designs to determine the optimum number of projections for your database configuration. On average, organizations that choose to implement query-specific projections achieve optimal performance through the addition of a few query-specific projections.
4.11.2.3 - Designing for K-safety
Vertica recommends that all production databases have a minimum K-safety of one (K=1).
Vertica recommends that all production databases have a minimum K-safety of one (K=1). Valid K-safety values for production databases are 1 and 2. Non-production databases do not have to be K-safe and can be set to 0.
A K-safe database must have at least three nodes, as shown in the following table:
| K-safety level | Number of required nodes |
|---|---|
| 1 | 3+ |
| 2 | 5+ |
Note
Vertica only supports K-safety levels 1 and 2.You can set K-safety to 1 or 2 only when the physical schema design meets certain redundancy requirements. See Requirements for a K-safe physical schema design.
Using Database Designer
To create designs that are K-safe, Vertica recommends that you use the Database Designer. When creating projections with Database Designer, projection definitions that meet K-safe design requirements are recommended and marked with a K-safety level. Database Designer creates a script that uses the
MARK_DESIGN_KSAFE function to set the K-safety of the physical schema to 1. For example:
=> \i VMart_Schema_design_opt_1.sql
CREATE PROJECTION
CREATE PROJECTION
mark_design_ksafe
----------------------
Marked design 1-safe
(1 row)
By default, Vertica creates K-safe superprojections when database K-safety is greater than 0.
Monitoring K-safety
Monitoring tables can be accessed programmatically to enable external actions, such as alerts. You monitor the K-safety level by querying the
SYSTEM table for settings in columns DESIGNED_FAULT_TOLERANCE and CURRENT_FAULT_TOLERANCE.
Loss of K-safety
When K nodes in your cluster fail, your database continues to run, although performance is affected. Further node failures could potentially cause the database to shut down if the failed node's data is not available from another functioning node in the cluster.
See also
K-safety in an Enterprise Mode database4.11.2.3.1 - Requirements for a K-safe physical schema design
Database Designer automatically generates designs with a K-safety of 1 for clusters that contain at least three nodes.
Database Designer automatically generates designs with a K-safety of 1 for clusters that contain at least three nodes. (If your cluster has one or two nodes, it generates designs with a K-safety of 0. You can modify a design created for a three-node (or greater) cluster, and the K-safe requirements are already set.
If you create custom projections, your physical schema design must meet the following requirements to be able to successfully recover the database in the event of a failure:
-
Segmented projections must be segmented across all nodes. Refer to Designing for segmentation and Designing segmented projections for K-safety.
-
Replicated projections must be replicated on all nodes. See Designing unsegmented projections for K-Safety.
-
Segmented projections must have K+1 buddy projections—projections with identical columns and segmentation criteria, where corresponding segments are placed on different nodes.
You can use the
MARK_DESIGN_KSAFE function to find out whether your schema design meets requirements for K-safety.
4.11.2.3.2 - Requirements for a physical schema design with no K-safety
If you use Database Designer to generate an comprehensive design that you can modify and you do not want the design to be K-safe, set K-safety level to 0 (zero).
If you use Database Designer to generate an comprehensive design that you can modify and you do not want the design to be K-safe, set K-safety level to 0 (zero).
If you want to start from scratch, do the following to establish minimal projection requirements for a functioning database with no K-safety (K=0):
-
Define at least one superprojection for each table in the logical schema.
-
Replicate (define an exact copy of) each dimension table superprojection on each node.
4.11.2.3.3 - Designing segmented projections for K-safety
Projections must comply with database K-safety requirements.
Projections must comply with database K-safety requirements. In general, you must create buddy projections for each segmented projection, where the number of buddy projections is K+1. Thus, if system K-safety is set to 1, each projection segment must be duplicated by one buddy; if K-safety is set to 2, each segment must be duplicated by two buddies.
Automatic creation of buddy projections
You can use
CREATE PROJECTION so it automatically creates the number of buddy projections required to satisfy K-safety, by including SEGMENTED BY ... ALL NODES. If CREATE PROJECTION specifies K-safety (KSAFE=n), Vertica uses that setting; if the statement omits KSAFE, Vertica uses system K-safety.
In the following example, CREATE PROJECTION creates segmented projection ttt_p1 for table ttt. Because system K-safety is set to 1, Vertica requires a buddy projection for each segmented projection. The CREATE PROJECTION statement omits KSAFE, so Vertica uses system K-safety and creates two buddy projections: ttt_p1_b0 and ttt_p1_b1:
=> SELECT mark_design_ksafe(1);

  mark_design_ksafe
----------------------
 Marked design 1-safe
(1 row)

=> CREATE TABLE ttt (a int, b int);
WARNING 6978:  Table "ttt" will include privileges from schema "public"
CREATE TABLE

=> CREATE PROJECTION ttt_p1 as SELECT * FROM ttt SEGMENTED BY HASH(a) ALL NODES;
CREATE PROJECTION

=> SELECT projection_name from projections WHERE anchor_table_name='ttt';
 projection_name
-----------------
 ttt_p1_b0
 ttt_p1_b1
(2 rows)
Vertica automatically names buddy projections by appending the suffix _bn to the projection base name—for example ttt_p1_b0.
Manual creation of buddy projections
If you create a projection on a single node, and system K-safety is greater than 0, you must manually create the number of buddies required for K-safety. For example, you can create projection xxx_p1 for table xxx on a single node, as follows:
=> CREATE TABLE xxx (a int, b int);
WARNING 6978:  Table "xxx" will include privileges from schema "public"
CREATE TABLE

=> CREATE PROJECTION xxx_p1 AS SELECT * FROM xxx SEGMENTED BY HASH(a) NODES v_vmart_node0001;
CREATE PROJECTION
Because K-safety is set to 1, a single instance of this projection is not K-safe. Attempts to insert data into its anchor table xxx return with an error like this:
=> INSERT INTO xxx VALUES (1, 2);
ERROR 3586:  Insufficient projections to answer query
DETAIL:  No projections that satisfy K-safety found for table xxx
HINT:  Define buddy projections for table xxx
In order to comply with K-safety, you must create a buddy projection for projection xxx_p1. For example:
=> CREATE PROJECTION xxx_p1_buddy AS SELECT * FROM xxx SEGMENTED BY HASH(a) NODES v_vmart_node0002;
CREATE PROJECTION
Table xxx now complies with K-safety and accepts DML statements such as INSERT:
VMart=> INSERT INTO xxx VALUES (1, 2);
 OUTPUT
--------
      1
(1 row)
See also
For general information about segmented projections and buddies, see Segmented projections. For information about designing for K-safety, see Designing for K-safety and Designing for segmentation.
4.11.2.3.4 - Designing unsegmented projections for K-Safety
In many cases, dimension tables are relatively small, so you do not need to segment them.
In many cases, dimension tables are relatively small, so you do not need to segment them. Accordingly, you should design a K-safe database so projections for its dimension tables are replicated without segmentation on all cluster nodes. You create these projections with a
CREATE PROJECTION statement that includes the keywords UNSEGMENTED ALL NODES. These keywords specify to create identical instances of the projection on all cluster nodes.
The following example shows how to create an unsegmented projection for the table store.store_dimension:
=> CREATE PROJECTION store.store_dimension_proj (storekey, name, city, state)
             AS SELECT store_key, store_name, store_city, store_state
             FROM store.store_dimension
             UNSEGMENTED ALL NODES;
CREATE PROJECTION
Vertica uses the same name to identify all instances of the unsegmented projection—in this example, store.store_dimension_proj. The keyword ALL NODES specifies to replicate the projection on all nodes:
=> \dj store.store_dimension_proj
                         List of projections
 Schema |         Name         |  Owner  |       Node       | Comment
--------+----------------------+---------+------------------+---------
 store  | store_dimension_proj | dbadmin | v_vmart_node0001 |
 store  | store_dimension_proj | dbadmin | v_vmart_node0002 |
 store  | store_dimension_proj | dbadmin | v_vmart_node0003 |
(3 rows)
For more information about projection name conventions, see Projection naming.
4.11.2.4 - Designing for segmentation
You segment projections using hash segmentation.
You segment projections using hash segmentation. Hash segmentation allows you to segment a projection based on a built-in hash function that provides even distribution of data across multiple nodes, resulting in optimal query execution. In a projection, the data to be hashed consists of one or more column values, each having a large number of unique values and an acceptable amount of skew in the value distribution. Primary key columns that meet the criteria could be an excellent choice for hash segmentation.
Note
For detailed information about using hash segmentation in a projection, see CREATE PROJECTION in the SQL Reference Manual.When segmenting projections, determine which columns to use to segment the projection. Choose one or more columns that have a large number of unique data values and acceptable skew in their data distribution. Primary key columns are an excellent choice for hash segmentation. The columns must be unique across all the tables being used in a query.
4.11.3 - Design fundamentals
Although you can write custom projections from scratch, Vertica recommends that you use Database Designer to create a design to use as a starting point.
Although you can write custom projections from scratch, Vertica recommends that you use Database Designer to create a design to use as a starting point. This ensures that you have projections that meet basic requirements.
4.11.3.1 - Writing and deploying custom projections
Before you write custom projections, review the topics in Planning Your Design carefully.
Before you write custom projections, review the topics in Planning your design carefully. Failure to follow these considerations can result in non-functional projections.
To manually modify or create a projection:
-
Write a script with
CREATE PROJECTIONstatements to create the desired projections. -
Run the script in vsql with the meta-command
\i.Note
You must have a database loaded with a logical schema. -
For a K-safe database, call Vertica meta-function
GET_PROJECTIONSon tables of the new projections. Check the output to verify that all projections have enough buddies to be identified as safe. -
If you create projections for tables that already contains data, call
REFRESHorSTART_REFRESHto update new projections. Otherwise, these projections are not available for query processing. -
Call
MAKE_AHM_NOWto set the Ancient History Mark (AHM) to the most recent epoch. -
Call
DROP PROJECTIONon projections that are no longer needed, and would otherwise waste disk space and reduce load speed. -
Call
ANALYZE_STATISTICSon all database projections:=> SELECT ANALYZE_STATISTICS ('');This function collects and aggregates data samples and storage information from all nodes on which a projection is stored, and then writes statistics into the catalog.
4.11.3.2 - Designing superprojections
Superprojections have the following requirements:.
Superprojections have the following requirements:
-
They must contain every column within the table.
-
For a K-safe design, superprojections must either be replicated on all nodes within the database cluster (for dimension tables) or paired with buddies and segmented across all nodes (for very large tables and medium large tables). See Projections and High availability with projections for an overview of projections and how they are stored. See Designing for K-safety for design specifics.
To provide maximum usability, superprojections need to minimize storage requirements while maximizing query performance. To achieve this, the sort order for columns in superprojections is based on storage requirements and commonly used queries.
4.11.3.3 - Sort order benefits
Column sort order is an important factor in minimizing storage requirements, and maximizing query performance.
Column sort order is an important factor in minimizing storage requirements, and maximizing query performance.
Minimize storage requirements
Minimizing storage saves on physical resources and increases performance by reducing disk I/O. You can minimize projection storage by prioritizing low-cardinality columns in its sort order. This reduces the number of rows Vertica stores and accesses to retrieve query results.
After identifying projection sort columns, analyze their data and choose the most effective encoding method. The Vertica optimizer gives preference to columns with run-length encoding (RLE), so be sure to use it whenever appropriate. Run-length encoding replaces sequences (runs) of identical values with a single pair that contains the value and number of occurrences. Therefore, it is especially appropriate to use it for low-cardinality columns whose run length is large.
Maximize query performance
You can facilitate query performance through column sort order as follows:
-
Where possible, sort order should prioritize columns with the lowest cardinality.
-
Do not sort projections on columns of type LONG VARBINARY and LONG VARCHAR.
See also
Choosing sort order: best practices4.11.3.4 - Choosing sort order: best practices
When choosing sort orders for your projections, Vertica has several recommendations that can help you achieve maximum query performance, as illustrated in the following examples.
When choosing sort orders for your projections, Vertica has several recommendations that can help you achieve maximum query performance, as illustrated in the following examples.
Combine RLE and sort order
When dealing with predicates on low-cardinality columns, use a combination of RLE and sorting to minimize storage requirements and maximize query performance.
Suppose you have a students table contain the following values and encoding types:
| Column | # of Distinct Values | Encoded With |
|---|---|---|
gender |
2 (M or F) | RLE |
pass_fail |
2 (P or F) | RLE |
class |
4 (freshman, sophomore, junior, or senior) | RLE |
name |
10000 (too many to list) | Auto |
You might have queries similar to this one:
SELECT name FROM studentsWHERE gender = 'M' AND pass_fail = 'P' AND class = 'senior';
The fastest way to access the data is to work through the low-cardinality columns with the smallest number of distinct values before the high-cardinality columns. The following sort order minimizes storage and maximizes query performance for queries that have equality restrictions on gender, class, pass_fail, and name. Specify the ORDER BY clause of the projection as follows:
ORDER BY students.gender, students.pass_fail, students.class, students.name
In this example, the gender column is represented by two RLE entries, the pass_fail column is represented by four entries, and the class column is represented by 16 entries, regardless of the cardinality of the students table. Vertica efficiently finds the set of rows that satisfy all the predicates, resulting in a huge reduction of search effort for RLE encoded columns that occur early in the sort order. Consequently, if you use low-cardinality columns in local predicates, as in the previous example, put those columns early in the projection sort order, in increasing order of distinct cardinality (that is, in increasing order of the number of distinct values in each column).
If you sort this table with student.class first, you improve the performance of queries that restrict only on the student.class column, and you improve the compression of the student.class column (which contains the largest number of distinct values), but the other columns do not compress as well. Determining which projection is better depends on the specific queries in your workload, and their relative importance.
Storage savings with compression decrease as the cardinality of the column increases; however, storage savings with compression increase as the number of bytes required to store values in that column increases.
Maximize the advantages of RLE
To maximize the advantages of RLE encoding, use it only when the average run length of a column is greater than 10 when sorted. For example, suppose you have a table with the following columns, sorted in order of cardinality from low to high:
address.country, address.region, address.state, address.city, address.zipcode
The zipcode column might not have 10 sorted entries in a row with the same zip code, so there is probably no advantage to run-length encoding that column, and it could make compression worse. But there are likely to be more than 10 countries in a sorted run length, so applying RLE to the country column can improve performance.
Put lower cardinality column first for functional dependencies
In general, put columns that you use for local predicates (as in the previous example) earlier in the join order to make predicate evaluation more efficient. In addition, if a lower cardinality column is uniquely determined by a higher cardinality column (like city_id uniquely determining a state_id), it is always better to put the lower cardinality, functionally determined column earlier in the sort order than the higher cardinality column.
For example, in the following sort order, the Area_Code column is sorted before the Number column in the customer_info table:
ORDER BY = customer_info.Area_Code, customer_info.Number, customer_info.Address
In the query, put the Area_Code column first, so that only the values in the Number column that start with 978 are scanned.
=> SELECT AddressFROM customer_info WHERE Area_Code='978' AND Number='9780123457';
Sort for merge joins
When processing a join, the Vertica optimizer chooses from two algorithms:
-
Merge join—If both inputs are pre-sorted on the join column, the optimizer chooses a merge join, which is faster and uses less memory.
-
Hash join—Using the hash join algorithm, Vertica uses the smaller (inner) joined table to build an in-memory hash table on the join column. A hash join has no sort requirement, but it consumes more memory because Vertica builds a hash table with the values in the inner table. The optimizer chooses a hash join when projections are not sorted on the join columns.
If both inputs are pre-sorted, merge joins do not have to do any pre-processing, making the join perform faster. Vertica uses the term sort-merge join to refer to the case when at least one of the inputs must be sorted prior to the merge join. Vertica sorts the inner input side but only if the outer input side is already sorted on the join columns.
To give the Vertica query optimizer the option to use an efficient merge join for a particular join, create projections on both sides of the join that put the join column first in their respective projections. This is primarily important to do if both tables are so large that neither table fits into memory. If all tables that a table will be joined to can be expected to fit into memory simultaneously, the benefits of merge join over hash join are sufficiently small that it probably isn't worth creating a projection for any one join column.
Sort on columns in important queries
If you have an important query, one that you run on a regular basis, you can save time by putting the columns specified in the WHERE clause or the GROUP BY clause of that query early in the sort order.
If that query uses a high-cardinality column such as Social Security number, you may sacrifice storage by placing this column early in the sort order of a projection, but your most important query will be optimized.
Sort columns of equal cardinality by size
If you have two columns of equal cardinality, put the column that is larger first in the sort order. For example, a CHAR(20) column takes up 20 bytes, but an INTEGER column takes up 8 bytes. By putting the CHAR(20) column ahead of the INTEGER column, your projection compresses better.
Sort foreign key columns first, from low to high distinct cardinality
Suppose you have a fact table where the first four columns in the sort order make up a foreign key to another table. For best compression, choose a sort order for the fact table such that the foreign keys appear first, and in increasing order of distinct cardinality. Other factors also apply to the design of projections for fact tables, such as partitioning by a time dimension, if any.
In the following example, the table inventory stores inventory data, and product_key and warehouse_key are foreign keys to the product_dimension and warehouse_dimension tables:
=> CREATE TABLE inventory (
 date_key INTEGER NOT NULL,
 product_key INTEGER NOT NULL,
 warehouse_key INTEGER NOT NULL,
 ...
);
=> ALTER TABLE inventory
   ADD CONSTRAINT fk_inventory_warehouse FOREIGN KEY(warehouse_key)
   REFERENCES warehouse_dimension(warehouse_key);
ALTER TABLE inventory
   ADD CONSTRAINT fk_inventory_product FOREIGN KEY(product_key)
   REFERENCES product_dimension(product_key);
The inventory table should be sorted by warehouse_key and then product, since the cardinality of the warehouse_key column is probably lower that the cardinality of the product_key.
4.11.3.5 - Prioritizing column access speed
If you measure and set the performance of storage locations within your cluster, Vertica uses this information to determine where to store columns based on their rank.
If you measure and set the performance of storage locations within your cluster, Vertica uses this information to determine where to store columns based on their rank. For more information, see Setting storage performance.
How columns are ranked
Vertica stores columns included in the projection sort order on the fastest available storage locations. Columns not included in the projection sort order are stored on slower disks. Columns for each projection are ranked as follows:
-
Columns in the sort order are given the highest priority (numbers > 1000).
-
The last column in the sort order is given the rank number 1001.
-
The next-to-last column in the sort order is given the rank number 1002, and so on until the first column in the sort order is given 1000 + # of sort columns.
-
The remaining columns are given numbers from 1000–1, starting with 1000 and decrementing by one per column.
Vertica then stores columns on disk from the highest ranking to the lowest ranking. It places highest-ranking columns on the fastest disks and the lowest-ranking columns on the slowest disks.
Overriding default column ranking
You can modify which columns are stored on fast disks by manually overriding the default ranks for these columns. To accomplish this, set the ACCESSRANK keyword in the column list. Make sure to use an integer that is not already being used for another column. For example, if you want to give a column the fastest access rank, use a number that is significantly higher than 1000 + the number of sort columns. This allows you to enter more columns over time without bumping into the access rank you set.
The following example sets column store_key's access rank to 1500:
CREATE PROJECTION retail_sales_fact_p (
     store_key ENCODING RLE ACCESSRANK 1500,
     pos_transaction_number ENCODING RLE,
     sales_dollar_amount,
     cost_dollar_amount )
AS SELECT
     store_key,
     pos_transaction_number,
     sales_dollar_amount,
     cost_dollar_amount
FROM store.store_sales_fact
ORDER BY store_key
SEGMENTED BY HASH(pos_transaction_number) ALL NODES;