This is the multi-page printable view of this section.
Click here to print.
Return to the regular view of this page.
Consuming data from Kafka
A Kafka consumer subscribes to one or more topics managed by a Kafka cluster.
A Kafka consumer subscribes to one or more topics managed by a Kafka cluster. Each topic is a data stream, an unbounded dataset that is represented as an ordered sequence of messages. Vertica can manually or automatically consume Kafka topics to perform analytics on your streaming data.
Manually consume data
Manually consume data from Kafka with a COPY statement that calls a KafkaSource function and parser. Manual loads are helpful when you want to:
-
Populate a table one time with the messages currently in Kafka.
-
Analyze a specific set of messages. You can choose the subset of data to load from the Kafka stream.
-
Explore the data in a Kafka stream before you set up a scheduler to continuously stream the data into Vertica.
-
Control the data load in ways not possible with the scheduler. For example, you cannot perform business logic or custom rejection handling during the data load from Kafka because the scheduler does not support additional processing during its transactions. Instead, you can periodically run a transaction that executes a COPY statement to load data from Kafka, and then perform additional processing.
For a detailed example, see Manually consume data from Kafka.
Automatically consume data
Automatically consume streaming data from Kafka into Vertica with a scheduler, a command-line tool that loads data as it arrives. The scheduler loads data in segments defined by a microbatch, a unit of work that processes the partitions of a single Kafka topic for a specified duration of time. You can manage scheduler configuration and options using the vkconfig tool.
For details, see Automatically consume data from Kafka with a scheduler.
Monitoring consumption
You must monitor message consumption to ensure that Kafka and Vertica are communicating effectively. You can use native Kafka tools to monitor consumer groups, or you can use vkconfig tool to view consumption details.
For additional information, see Monitoring message consumption.
Parsing data with Kafka filters
Your data stream might encode data that the Kafka parser functions cannot parse by default. Use Kafka filters to delimit messages in your stream to improve data consumption.
For details, see Parsing custom formats.
1 - Manually consume data from Kafka
You can manually load streaming data from Kafka into Vertica using a COPY statement, just as you can load a finite set of data from a file or other source.
You can manually load streaming data from Kafka into Vertica using a COPY statement, just as you can load a finite set of data from a file or other source. Unlike a standard data source, Kafka data arrives continuously as a stream of messages that you must parse before loading into Vertica. Use Kafka functions in the COPY statement to prepare the data stream.
This example incrementally builds a COPY statement that manually loads JSON-encoded data from a Kafka topic named web_hits. The web_hits topic streams server logs of web site requests.
For information about loading data into Vertica, see Data load.
Creating the target table
To determine the target table schema, you must identify the message structure. The following is a sample of the web_hits stream:
{"url": "list.jsp", "ip": "144.177.38.106", "date": "2017/05/02 20:56:00",
"user-agent": "Mozilla/5.0 (compatible; MSIE 6.0; Windows NT 6.0; Trident/5.1)"}
{"url": "search/wp-content.html", "ip": "215.141.172.28", "date": "2017/05/02 20:56:01",
"user-agent": "Opera/9.53.(Windows NT 5.2; sl-SI) Presto/2.9.161 Version/10.00"}
This topic streams JSON-encoded data. Because JSON data is inconsistent and might contain unpredictable added values, store this data stream in a flex table. Flex tables dynamically accept additional fields that appear in the data.
The following statement creates a flex table named web_table to store the data stream:
=> CREATE FLEX TABLE web_table();
To begin the COPY statement, add the web_table as the target table:
COPY web_table
For more information about flex tables, see Flex tables.
Note
If you are copying data containing default values into a flex table, you must identify the default value column as
__raw__. For more information, see
Bulk Loading Data into Flex Tables.
Defining KafkaSource
The source of your COPY statement is always KafkaSource. KafkaSource accepts details about the data stream, Kafka brokers, and additional processing options to continuously load data until an end condition is met.
Stream details
The stream parameter defines the data segment that you want to load from one or more topic partitions. Each Kafka topic splits its messages into different partitions to get scalable throughput. Kafka keeps a backlog of messages for each topic according to rules set by the Kafka administrator. You can choose to load some or all of the messages in the backlog, or just load the currently streamed messages.
For each partition, the stream parameter requires the topic name, topic partition, and the partition offset as a list delimited by a pipe character (|). Optionally, you can provide and end offset as an end condition to stop loading from the data stream:
'stream='topic_name|partition|start_offset[|end_offset]'
To load the entire backlog from a single partition of the web_hits topic, use the SOURCE keyword to append KafkaSource with the following stream parameter values:
COPY ...
SOURCE KafkaSource(stream='web_hits|0|-2', ...
In the previous example:
-
web_hits is the name of the topic to load data from.
-
0 is the topic partition to load data from. Topic partitions are 0-indexed, and web_hits contains only one partition.
-
-2 loads the entire backlog. This is a special offset value that tells KafkaSource to start loading at the earliest available message offset.
Loading multiple partitions
This example loads from only one partition, but it is important to understand how to load from multiple partitions in a single COPY statement.
To load from additional partitions in the same topic, or even additional topics, supply a comma-separated list of topic name, partition number, and offset values delimited by pipe characters. For example, the following stream argument loads the entire message backlog from partitions 0 through 2 of the web_hits topic:
KafkaSource(stream='web_hits|0|-2,web_hits|1|-2,web_hits|2|-2'...
Note
While you can load messages from different Kafka topics in the same COPY statement, you must ensure the data from the different topics is compatible with the target table's schema. The schema is less of a concern if you are loading data into a flex table, which can accommodate almost any data you want to load.
When you load multiple partitions in the same COPY statement, you can set the executionparallelism parameter to define the number of threads created for the COPY statement. Ideally, you want to use one thread per partition. You can choose to not specify a value and let Vertica determine the number of threads based on the number of partitions and the resources available in the resource pool. In this example, there is only one partition, so there's no need for additional threads to load data.
Note
The EXECUTIONPARALLELISM setting on the resource pool assigned is the upper limit on the number of threads your COPY statement can use. Setting executionparallelism on the KafkaSource function call to a value that is higher than that of the resource pool's EXECUTIONPARALLELISM setting does not increase the number of threads Vertica uses beyond the limits of the resource pool.
Adding the Kafka brokers
KafkaSource requires the host names (or IP addresses) and port numbers of the brokers in your Kafka cluster. The Kafka brokers are the service Vertica accesses in order to retrieve the Kafka data. In this example, the Kafka cluster has one broker named kafka01.example.com, running on port 9092. Append the brokers parameter and value to the COPY statement:
COPY ...
SOURCE KafkaSource(stream='web_hits|0|-2',
                   brokers='kafka01.example.com:9092', ...
Choosing the end condition
Because data continuously arrives from Kafka, manual loads from Kafka require that you define an end condition that indicates when to stop loading data. In addition to the end offset described in Stream Details, you can choose to:
-
Copy as much data as possible for a set duration of time.
-
Load data until no new data arrives within a timeout period.
-
Load all available data, and not wait for any further data to arrive.
This example runs COPY for 10000 milliseconds (10 seconds) to get a sample of the data. If the COPY statement is able to load the entire backlog of data in under 10 seconds, it spends the remaining time loading streaming data as it arrives. This values is set in the duration parameter. Append the duration value to complete the KafkaSource definition:
COPY ...
SOURCE KafkaSource(stream='web_hits|0|-2',
                    brokers='kafka01.example.com:9092',
                    duration=interval '10000 milliseconds')
If you start a long-duration COPY statement from Kafka and need to stop it, you can call one of the functions that closes its session, such as CLOSE_ALL_SESSIONS.
Important
The duration that you set for your data load is not exact. The duration controls how long the KafkaSource process runs.
Selecting a parser
Kafka does not enforce message formatting on its data streams. Messages are often in Avro or JSON format, but they could be in any format. Your COPY statement usually uses one of three Kafka-specific parsers:
Because the Kafka parsers can recognize record boundaries in streaming data, the other parsers (such as the Flex parsers) are not directly compatible with the output of KafkaSource. You must alter the KafkaSource output using filters before other parsers can process the data. See Parsing custom formats for more information.
In this example, the data in the web_hits is encoded in JSON format, so it uses the KafkaJSONParser. This value is set in the COPY statement's PARSER clause:
COPY ...
SOURCE ...
PARSER KafkaJSONParser()
Storing rejected data
Vertica saves raw Kafka messages that the parser cannot parse to a rejects table, along with information on why it was rejected. This table is created by the COPY statement. This example saves rejects to the table named web_hits_rejections. This value is set in the COPY statement's REJECTED DATA AS TABLE clause:
COPY ...
SOURCE ...
PARSER ...
REJECTED DATA AS TABLE public.web_hits_rejections;
Loading the data stream into Vertica
The following steps load JSON data from the web_hits topic for 10 seconds using the COPY statement that was incrementally built in the previous sections:
-
Execute the COPY statement:
=> COPY web_table
   SOURCE KafkaSource(stream='web_hits|0|-2',
                      brokers='kafka01.example.com:9092',
                      duration=interval '10000 milliseconds')
   PARSER KafkaJSONParser()
   REJECTED DATA AS TABLE public.web_hits_rejections;
 Rows Loaded
-------------
         800
(1 row)
-
Compute the flex table keys:
=> SELECT compute_flextable_keys('web_table');
              compute_flextable_keys
--------------------------------------------------
 Please see public.web_table_keys for updated keys
(1 row)
For additional details, see Computing flex table keys.
-
Query web_table_keys to return the keys:
=> SELECT * FROM web_table_keys;
  key_name  | frequency | data_type_guess
------------+-----------+-----------------
 date       |       800 | Timestamp
 user_agent |       800 | Varchar(294)
 ip         |       800 | Varchar(30)
 url        |       800 | Varchar(88)
(4 rows)
-
Query web_table to return the data loaded from the web_hits Kafka topic:
=> SELECT date, url, ip FROM web_table LIMIT 10;
        date         |                url                 |       ip
---------------------+------------------------------------+-----------------
 2021-10-15 02:33:31 | search/index.htm                   | 192.168.210.61
 2021-10-17 16:58:27 | wp-content/about.html              | 10.59.149.131
 2021-10-05 09:10:06 | wp-content/posts/category/faq.html | 172.19.122.146
 2021-10-01 08:05:39 | blog/wp-content/home.jsp           | 192.168.136.207
 2021-10-10 07:28:39 | main/main.jsp                      | 172.18.192.9
 2021-10-22 12:41:33 | tags/categories/about.html         | 10.120.75.17
 2021-10-17 09:41:09 | explore/posts/main/faq.jsp         | 10.128.39.196
 2021-10-13 06:45:36 | category/list/home.jsp             | 192.168.90.200
 2021-10-27 11:03:50 | category/posts/posts/index.php     | 10.124.166.226
 2021-10-26 01:35:12 | categories/search/category.htm     | 192.168.76.40
(10 rows)
2 - Automatically consume data from Kafka with a scheduler
Vertica offers a scheduler that loads streamed messages from one or more Kafka topics.
Vertica offers a scheduler that loads streamed messages from one or more Kafka topics. Automatically loading streaming data has a number of advantages over manually using COPY:
-
The streamed data automatically appears in your database. The frequency with which new data appears in your database is governed by the scheduler's frame duration.
-
The scheduler provides an exactly-once consumption process. The schedulers manage offsets for you so that each message sent by Kafka is consumed once.
-
You can configure backup schedulers to provide high-availability. Should the primary scheduler fail for some reason, the backup scheduler automatically takes over loading data.
-
The scheduler manages resources for the data load. You control its resource usage through the settings on the resource pool you assign to it . When loading manually, you must take into account the resources your load consumes.
There are a few drawbacks to using a scheduler which may make it unsuitable for your needs. You may find that schedulers do not offer the flexibility you need for your load process. For example, schedulers cannot perform business logic during the load transaction. If you need to perform this sort of processing, you are better off creating your own load process. This process would periodically run COPY statements to load data from Kafka. Then it would perform the business logic processing you need before committing the transaction.
For information on job scheduler requirements, refer to Apache Kafka integrations.
What the job scheduler does
The scheduler is responsible for scheduling loads of data from Kafka. The scheduler's basic unit of processing is a frame, which is a period of time. Within each frame, the scheduler assigns a slice of time for each active microbatch to run. Each microbatch is responsible for loading data from a single source. Once the frame ends, the scheduler starts the next frame. The scheduler continues this process until you stop it.
The anatomy of a scheduler
Each scheduler has several groups of settings, each of which control an aspect of the data load. These groups are:
-
The scheduler itself, which defines the configuration schema, frame duration, and resource pool.
-
Clusters, which define the hosts in the Kafka cluster that the scheduler contacts to load data. Each scheduler can contain multiple clusters, allowing you to load data from multiple Kafka clusters with a single scheduler.
-
Sources, which define the Kafka topics and partitions in those topics to read data from.
-
Targets, which define the tables in Vertica that will receive the data. These tables can be traditional Vertica database tables, or they can be flex tables.
-
Load specs, which define setting Vertica uses while loading the data. These settings include the parsers and filters Vertica needs to use to load the data. For example, if you are reading a Kafka topic that is in Avro format, your load spec needs to specify the Avro parser and schema.
-
Microbatches, which represent an individual segment of a data load from a Kafka stream. They combine the definitions for your cluster, source, target, and load spec that you create using the other vkconfig tools. The scheduler uses all of the information in the microbatch to execute COPY statements using the KafkaSource UDL function to transfer data from Kafka to Vertica. The statistics on each microbatch's load is stored in the stream_microbatch_history table.
The vkconfig script
You use a Linux command-line script named vkconfig to create, configure, and run schedulers. This script is installed on your Vertica hosts along with the Vertica server in the following path:
/opt/vertica/packages/kafka/bin/vkconfig
Note
You can install and use the vkconfig utility on a non-Vertica host. You may want to do this if:
The easiest way to install vkconfig on a host is to install the Vertica server RPM. You must use the RPM that matches the version of Vertica installed on your database cluster. Do not create a database after installing the RPM. The vkconfig utility and its associated files will be in the /opt/vertica/packages/kafka/bin directory on the host.
The vkconfig script contains multiple tools. The first argument to the vkconfig script is always the tool you want to use. Each tool performs one function, such as changing one group of settings (such as clusters or sources) or starting and stopping the scheduler. For example, to create or configure a scheduler, you use the command:
$ /opt/vertica/packages/kafka/bin/vkconfig scheduler other options...
What happens when you create a scheduler
When you create a new scheduler, the vkconfig script takes the following steps:
-
Creates a new Vertica schema using the name you specified for the scheduler. You use this name to identify the scheduler during configuration.
-
Creates the tables needed to manage the Kafka data load in the newly-created schema. See Data streaming schema tables for more information.
Validating schedulers
When you create or configure a scheduler, it validates the following settings:
-
Confirms that all brokers in the specified cluster exist.
-
Connects to the specified host or hosts and retrieves the list of all brokers in the Kafka cluster. Getting this list always ensures that the scheduler has an up-to-date list of all the brokers. If the host is part of a cluster that has already been defined, the scheduler cancels the configuration.
-
Confirms that the specified source exists. If the source no longer exists, the source is disabled.
-
Retrieves the number of partitions in the source. If the number of partitions retrieved from the source is different than the partitions value saved by the scheduler, Vertica updates the scheduler with the number of partitions retrieved from the source in the cluster.
You can disable validation using the --validation-type option in the vkconfig script's scheduler tool. See Scheduler tool options for more information.
Synchronizing schedulers
By default, the scheduler automatically synchronizes its configuration and source information with Kafka host clusters. You can configure the synchronization interval using the --config-refresh scheduler utility option. Each interval, the scheduler:
You can configure synchronization settings using the --auto-sync option using the vkconfig script's scheduler tool. Scheduler tool options for details.
Launching a scheduler
You use the vkconfig script's launch tool to launch a scheduler.
When you launch a scheduler, it collects data from your sources, starting at the specified offset. You can view the stream_microbatch_history table to see what the scheduler is doing at any given time.
To learn how to create, configure, and launch a scheduler, see Setting up a scheduler in this guide.
You can also choose to bypass the scheduler. For example, you might want to do a single load with a specific range of offsets. For more information, see Manually consume data from Kafka in this guide.
If the Vertica cluster goes down, the scheduler attempts to reconnect and fails. You must relaunch the scheduler when the cluster is restarted.
Managing a running scheduler
When you launch a scheduler from the command line, it runs in the foreground. It will run until you kill it (or the host shuts down). Usually, you want to start the scheduler as a daemon process that starts it when the host operating system starts, or after the Vertica database has started.
You shut down a running scheduler using the vkconfig script's shutdown tool. See Shutdown tool options for details.
You can change most of a scheduler's settings (adding or altering clusters, sources, targets, and microbatches for example) while it is running. The scheduler automatically acts on the configuration updates.
Launching multiple job schedulers for high availability
For high availability, you can launch two or more identical schedulers that target the same configuration schema. You differentiate the schedulers using the launch tool's --instance-name option (see Launch tool options).
The active scheduler loads data and maintains an S lock on the stream_lock table. The scheduler not in use remains in stand-by mode until the active scheduler fails or is disabled. If the active scheduler fails, the backup scheduler immediately obtains the lock on the stream_lock table, and takes over loading data from Kafka where the failed scheduler left off.
Managing messages rejected during automatic loads
Vertica rejects messages during automatic loads using the parser definition, which is required in the microbatch load spec.
The scheduler creates a rejection table to store rejected messages for each microbatch automatically. To manually specify a rejection table, use the --rejection-schema and --rejection-table microbatch utility options when creating the microbatch. Query the stream_microbatches table to return the rejection schema and table for a microbatch.
For additional details about how Vertica handles rejected data, see Handling messy data.
Passing options to the scheduler's JVM
The scheduler uses a Java Virtual Machine to connect to Vertica via JDBC. You can pass command-line options to the JVM through a Linux environment variable named VKCONFIG_JVM_OPTS. This option is useful when configuring a scheduler to use TLS/SSL encryption when connecting to Vertica. See Configuring your scheduler for TLS connections for more information.
Viewing schedulers from the MC
You can view the status of Kafka jobs from the MC. For more information, refer to Viewing load history.
2.1 - Setting up a scheduler
You set up a scheduler using the Linux command line.
Note
This document describes how to create and launch a scheduler in a Linux environment. For details about creating a containerized scheduler, see
Containerized Kafka Scheduler.
You set up a scheduler using the Linux command line. Usually you perform the configuration on the host where you want your scheduler to run. It can be one of your Vertica hosts, or a separate host where you have installed the vkconfig utility (see The vkconfig Script for more information).
The steps to launch a scheduler are explained in the following sections. These sections will use the example of loading web log data (hits on a web site) from Kafka into a Vertica table.
Create a config file (optional)
Many of the arguments you supply to the vkconfig script while creating a scheduler do not change. For example, you often need to pass a username and password to Vertica to authorize the changes to be made in the database. Adding the username and password to each call to vkconfig is tedious and error-prone.
Instead, you can pass the vkconfig utility a configuration file using the --conf option that specifies these arguments for you. It can save you a lot of typing and frustration.
The config file is a text file with a keyword=value pair on each line. Each keyword is a vkconfig command-line option, such as the ones listed in Common vkconfig script options.
The following example shows a config file named weblog.conf that will be used to define a scheduler named weblog_sched. This config file is used throughout the rest of this example.
# The configuraton options for the weblog_sched scheduler.
username=dbadmin
password=mypassword
dbhost=vertica01.example.com
dbport=5433
config-schema=weblog_sched
Add the vkconfig directory to your path (optional)
The vkconfig script is located in the /opt/vertica/packages/kafka/bin directory. Typing this path for each call to vkconfig is tedious. You can add vkconfig to your search path for your current Linux session using the following command:
$ export PATH=/opt/vertica/packages/kafka/bin:$PATH
For the rest of your session, you are able to call vkconfig without specifying its entire path:
$ vkconfig
Invalid tool
Valid options are scheduler, cluster, source, target, load-spec, microbatch, sync, launch,
shutdown, help
If you want to make this setting permanent, add the export statement to your ~/.profile file. The rest of this example assumes that you have added this directory to your shell's search path.
Create a resource pool for your scheduler
Vertica recommends that you always create a resource pool specifically for each scheduler. Schedulers assume that they have exclusive use of their assigned resource pool. Using a separate pool for a scheduler lets you fine-tune its impact on your Vertica cluster's performance. You create resource pools with CREATE RESOURCE POOL.
The following resource pool settings play an important role when creating your scheduler's resource pool:
-
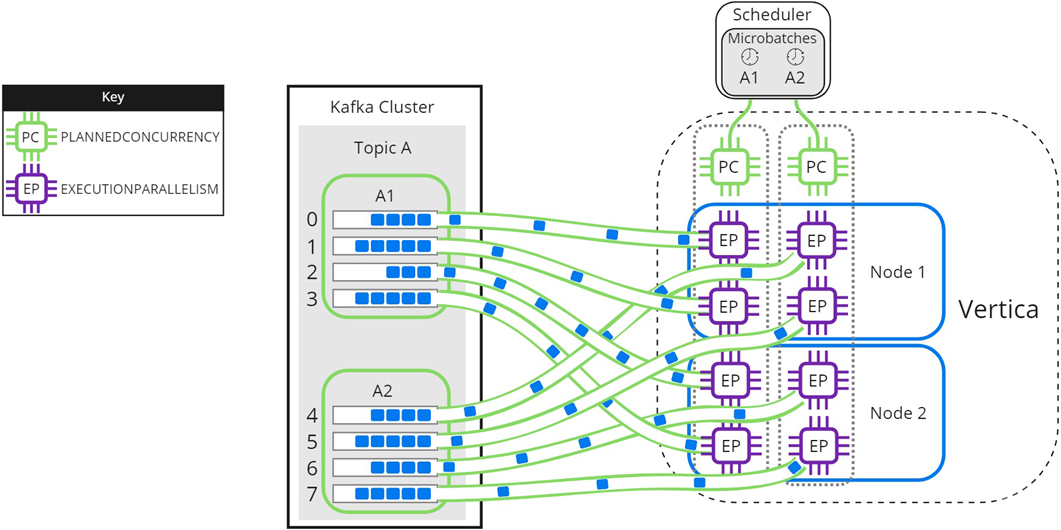
PLANNEDCONCURRENCY determines the number of microbatches (COPY statements) that the scheduler sends to Vertica simultaneously.
-
EXECUTIONPARALLELISM determines the maximum number of threads that each node creates to process a microbatch's partitions.
-
QUEUETIMEOUT provides manual control over resource timings. Set this to 0 to allow the scheduler to manage timings.
See Managing scheduler resources and performance for detailed information about these settings and how to fine-tune a resource pool for your scheduler.
The following CREATE RESOURCE POOL statement creates a resource pool that loads 1 microbatch and processes 1 partition:
=> CREATE RESOURCE POOL weblog_pool
    MEMORYSIZE '10%'
    PLANNEDCONCURRENCY 1
    EXECUTIONPARALLELISM 1
    QUEUETIMEOUT 0;
If you do not create and assign a resource pool for your scheduler, it uses a portion of the GENERAL resource pool. Vertica recommends that you do not use the GENERAL pool for schedulers in production environments. This fallback to the GENERAL pool is intended as a convenience when you test your scheduler configuration. When you are ready to deploy your scheduler, create a resource pool that you tuned to its specific needs. Each time that you start a scheduler that is using the GENERAL pool, the vkconfig utility displays a warning message.
Not allocating enough resources to your schedulers can result in errors. For example, you might get OVERSHOT DEADLINE FOR FRAME errors if the scheduler is unable to load data from all topics in a data frame.
See Resource pool architecture for more information about resource pools.
Create the scheduler
Vertica includes a default scheduler named stream_config. You can use this scheduler or create a new scheduler using the vkconfig script's scheduler tool with the --create and --config-schema options:
$ vkconfig scheduler --create --config-schema scheduler_name --conf conf_file
The --create and --config-schema options are the only ones required to add a scheduler with default options. This command creates a new schema in Vertica that holds the scheduler's configuration. See What Happens When You Create a Scheduler for details on the creation of the scheduler's schema.
You can use additional configuration parameters to further customize your scheduler. See Scheduler tool options for more information.
The following example:
-
Creates a scheduler named weblog_sched using the --config-schema option.
-
Grants privileges to configure and run the scheduler to the Vertica user named kafka_user with the --operator option. The dbadmin user must specify additional privileges separately.
-
Specifies a frame duration of seven minutes with the --frame-duration option. For more information about picking a frame duration, see Choosing a frame duration.
-
Sets the resource pool that the scheduler uses to the weblog_pool created earlier:
$ vkconfig scheduler --create --config-schema weblog_sched --operator kafka_user \
  --frame-duration '00:07:00' --resource-pool weblog_pool --conf weblog.conf
Note
Technically, the previous example doesn't need to supply the --config-schema argument because it is set in the weblog.conf file. It appears in this example for clarity. There's no harm in supplying it on the command line as well as in the configuration file, as long as the values match. If they do not match, the value given on the command line takes priority.
Create a cluster
You must associate at least one Kafka cluster with your scheduler. Schedulers can access more than one Kafka cluster. To create a cluster, you supply a name for the cluster and host names and ports the Kafka cluster's brokers.
When you create a cluster, the scheduler attempts to validate it by connecting to the Kafka cluster. If it successfully connects, the scheduler automatically retrieves the list of all brokers in the cluster. Therefore, you do not have to list every single broker in the --hosts parameter.
The following example creates a cluster named kafka_weblog, with two Kafka broker hosts: kafka01 and kafka03 in the example.com domain. The Kafka brokers are running on port 9092.
$ vkconfig cluster --create --cluster kafka_weblog \
  --hosts kafka01.example.com:9092,kafka03.example.com:9092 --conf weblog.conf
See Cluster tool options for more information.
Create a source
Next, create at least one source for your scheduler to read. The source defines the Kafka topic the scheduler loads data from as well as the number of partitions the topic contains.
To create and associate a source with a configured scheduler, use the source tool. When you create a source, Vertica connects to the Kafka cluster to verify that the topic exists. So, before you create the source, make sure that the topic already exists in your Kafka cluster. Because Vertica verifies the existence of the topic, you must supply the previously-defined cluster name using the --cluster option.
The following example creates a source for the Kafka topic named web_hits on the cluster created in the previous step. This topic has a single partition.
$ vkconfig source --create --cluster kafka_weblog --source web_hits --partitions 1 --conf weblog.conf
Note
The --partitions parameter is the number of partitions to load, not a list of individual partitions. For example, if you set this parameter to 3, the scheduler will load data from partitions 0, 1, and 2.
See Source tool options for more information.
Create a data table
Before you can create a target for your scheduler, you must create a target table in your Vertica database. This is the table Vertica uses to store the data the scheduler loads from Kafka. You must decide which type of table to create for your target:
-
A standard Vertica database table, which you create using the CREATE TABLE statement. This type of table stores data efficiently. However, you must ensure that its columns match the data format of the messages in Kafka topic you are loading. You cannot load complex types of data into a standard Vertica table.
-
A flex table, which you create using CREATE FLEXIBLE TABLE. A flex table is less efficient than a standard Vertica database table. However, it is flexible enough to deal with data whose schema varies and changes. It also can load most complex data types that (such as maps and lists) that standard Vertica tables cannot.
Important
Avoid having columns with primary key restrictions in your target table. The scheduler stops loading data if it encounters a row that has a value which violates this restriction. If you must have a primary key restricted column, try to filter out any redundant values for that column in the streamed data before is it loaded by the scheduler.
The data in this example is in a set format, so the best table to use is a standard Vertica table. The following example creates a table named web_hits to hold four columns of data. This table is located in the public schema.
=> CREATE TABLE web_hits (ip VARCHAR(16), url VARCHAR(256), date DATETIME, user_agent VARCHAR(1024));
Note
You do not need to create a rejection table to store rejected messages. The scheduler creates the rejection table automatically.
Create a target
Once you have created your target table, you can create your scheduler's target. The target tells your scheduler where to store the data it retrieves from Kafka. This table must exist when you create your target. You use the vkconfig script's target tool with the --target-schema and --target_table options to specify the Vertica target table's schema and name. The following example adds a target for the table created in the previous step.
$ vkconfig target --create --target-schema public --target-table web_hits --conf weblog.conf
See Target tool options for more information.
Create a load spec
The scheduler's load spec provides parameters that Vertica uses when parsing the data loaded from Kafka. The most important option is --parser which sets the parser that Vertica uses to parse the data. You have three parser options:
In this example, the data being loaded from Kafka is in JSON format. The following command creates a load spec named weblog_load and sets the parser to KafkaJSONParser.
$ vkconfig load-spec --create --parser KafkaJSONParser --load-spec weblog_load --conf weblog.conf
See Load spec tool options for more information.
Create a microbatch
The microbatch combines all of the settings added to the scheduler so far to define the individual COPY statements that the scheduler uses to load data from Kafka.
The following example uses all of the settings created in the previous examples to create a microbatch called weblog.
$ vkconfig microbatch --create --microbatch weblog --target-schema public --target-table web_hits \
           --add-source web_hits --add-source-cluster kafka_weblog --load-spec weblog_load \
           --conf weblog.conf
For microbatches that might benefit from a reduced transaction size, consider using the --max-parallelism option when creating the microbatch. This option splits a single microbatch with multiple partitions into the specified number of simultaneous COPY statements consisting of fewer partitions.
See Microbatch tool options for more information about --max-parallelism and other options.
Launch the scheduler
Once you've created at least one microbatch, you can run your scheduler. You start your scheduler using the launch tool, passing it the name of the scheduler's schema. The scheduler begins scheduling microbatch loads for every enabled microbatch defined in its schema.
The following example launches the weblog scheduler defined in the previous steps. It uses the nohup command to prevent the scheduler being killed when the user logs out, and redirects stdout and stderr to prevent a nohup.out file from being created.
$ nohup vkconfig launch --conf weblog.conf >/dev/null 2>&1 &
Important
Vertica does not recommend specifying a password on the command line. Passwords on the command line can be exposed by the system's list of processes, which shows the command line for each process. Instead, put the password in a configuration file. Make sure the configuration file's permissions only allow it to be read by the user.
See Launch tool options for more information.
Checking that the scheduler is running
Once you have launched your scheduler, you can verify that it is running by querying the stream_microbatch_history table in the scheduler's schema. This table lists the results of each microbatch the scheduler has run.
For example, this query lists the microbatch name, the start and end times of the microbatch, the start and end offset of the batch, and why the batch ended. The results are ordered to start from when the scheduler was launched:
=> SELECT microbatch, batch_start, batch_end, start_offset,
          end_offset, end_reason
          FROM weblog_sched.stream_microbatch_history
          ORDER BY batch_start DESC LIMIT 10;

 microbatch |        batch_start         |         batch_end          | start_offset | end_offset |  end_reason
------------+----------------------------+----------------------------+--------------+------------+---------------
 weblog     | 2017-10-04 09:30:19.100752 | 2017-10-04 09:30:20.455739 |           -2 |      34931 | END_OF_STREAM
 weblog     | 2017-10-04 09:30:49.161756 | 2017-10-04 09:30:49.873389 |        34931 |      34955 | END_OF_STREAM
 weblog     | 2017-10-04 09:31:19.25731  | 2017-10-04 09:31:22.203173 |        34955 |      35274 | END_OF_STREAM
 weblog     | 2017-10-04 09:31:49.299119 | 2017-10-04 09:31:50.669889 |        35274 |      35555 | END_OF_STREAM
 weblog     | 2017-10-04 09:32:19.43153  | 2017-10-04 09:32:20.7519   |        35555 |      35852 | END_OF_STREAM
 weblog     | 2017-10-04 09:32:49.397684 | 2017-10-04 09:32:50.091675 |        35852 |      36142 | END_OF_STREAM
 weblog     | 2017-10-04 09:33:19.449274 | 2017-10-04 09:33:20.724478 |        36142 |      36444 | END_OF_STREAM
 weblog     | 2017-10-04 09:33:49.481563 | 2017-10-04 09:33:50.068068 |        36444 |      36734 | END_OF_STREAM
 weblog     | 2017-10-04 09:34:19.661624 | 2017-10-04 09:34:20.639078 |        36734 |      37036 | END_OF_STREAM
 weblog     | 2017-10-04 09:34:49.612355 | 2017-10-04 09:34:50.121824 |        37036 |      37327 | END_OF_STREAM
(10 rows)
2.2 - Choosing a frame duration
One key setting for your scheduler is its frame duration.
One key setting for your scheduler is its frame duration. The duration sets the amount of time the scheduler has to run all of the microbatches you have defined for it. This setting has significant impact on how data is loaded from Apache Kafka.
What happens during each frame
To understand the right frame duration, you first need to understand what happens during each frame.
The frame duration is split among the microbatches you add to your scheduler. In addition, there is some overhead in each frame that takes some time away from processing the microbatches. Within each microbatch, there is also some overhead which reduces the time the microbatch spends loading data from Kafka. The following diagram shows roughly how each frame is divided:

As you can see, only a portion of the time in the frame is spent actually loading the streaming data.
How the scheduler prioritizes microbatches
To start with, the scheduler evenly divides the time in the frame among the microbatches. It then runs each microbatch in turn.
In each microbatch, the bulk of the time is dedicated to loading data using a COPY statement. This statement loads data using the KafkaSource UDL. It runs until one of two conditions occurs:
-
It reaches the ends of the data streams for the topics and partitions you defined for the microbatch. In this case, the microbatch completes processing early.
-
It reaches a timeout set by the scheduler.
As the scheduler processes frames, it notes which microbatches finish early. It then schedules them to run first in the next frame. Arranging the microbatches in this manner lets the scheduler allocate more of the time in the frame to the microbatches that are spending the most time loading data (and perhaps have not had enough time to reach the end of their data streams).
For example, consider the following diagram. During the first frame, the scheduler evenly divides the time between the microbatches. Microbatch #2 uses all of the time allocated to it (as indicated by the filled-in area), while the other microbatches do not. In the next frame, the scheduler rearranges the microbatches so that microbatches that finished early go first. It also allocates less time to the microbatches that ran for a shorter period. Assuming these microbatches finish early again, the scheduler is able to give the rest of the time in the frame to microbatch #2. This shifting of priorities continues while the scheduler runs. If one topic sees a spike in traffic, the scheduler compensates by giving the microbatch reading from that topic more time.

What happens if the frame duration is too short
If you make the scheduler's frame duration too short, microbatches may not have enough time to load all of the data in the data streams they are responsible for reading. In the worst case, a microbatch could fall further behind when reading a high-volume topic during each frame. If left unaddressed, this issue could result in messages never being loaded, as they age out of the data stream before the microbatch has a chance to read them.
In extreme cases, the scheduler may not be able to run each microbatch during each frame. This problem can occur if the frame duration is so short that much of is spent in overhead tasks such committing data and preparing to run microbatches. The COPY statement that each microbatch runs to load data from Kafka has a minimum duration of 1 second. Add to this the overhead of processing data loads. In general, if the frame duration is shorter than 2 seconds times the number of microbatches in the scheduler, then some microbatches may not get a chance to run in each frame.
If the scheduler runs out of time during a frame to run each microbatch, it compensates during the next frame by giving priority to the microbatches that didn't run in the prior frame. This strategy makes sure each microbatch gets a chance to load data. However, it cannot address the root cause of the problem. Your best solution is to increase the frame duration to give each microbatch enough time to load data during each frame.
What happens if the frame duration is too long
One downside of a long frame duration is increased data latency. This latency is the time between when Kafka sends data out and when that data becomes available for queries in your database. A longer frame duration means that there is more time between each execution of a microbatch. That translates into more time between the data in your database being updated.
Depending on your application, this latency may not be important. When determining your frame duration, consider whether having the data potentially delayed up to the entire length of the frame duration will cause an issue.
Another issue to consider when using a long frame duration is the time it takes to shut down the scheduler. The scheduler does not shut down until the current COPY statement completes. Depending on the length of your frame duration, this process might take a few minutes.
The minimum frame duration
At a minimum, allocate two seconds for each microbatch you add to your scheduler. The vkconfig utility warns you if your frame duration is shorter than this lower limit. In most cases, you want your frame duration to be longer. Two seconds per microbatch leaves little time for data to actually load.
Balancing frame duration requirements
To determine the best frame duration for your deployment, consider how sensitive you are to data latency. If you are not performing time-sensitive queries against the data streaming in from Kafka, you can afford to have the default 5 minute or even longer frame duration. If you need a shorter data latency, then consider the volume of data being read from Kafka. High volumes of data, or data that has significant spikes in traffic can cause problems if you have a short frame duration.
Using different schedulers for different needs
Suppose you are loading streaming data from a few Kafka topics that you want to query with low latency and other topics that have a high volume but which you can afford more latency. Choosing a "middle of the road" frame duration in this situation may not meet either need. A better solution is to use multiple schedulers: create one scheduler with a shorter frame duration that reads just the topics that you need to query with low latency. Then create another scheduler that has a longer frame duration to load data from the high-volume topics.
For example, suppose you are loading streaming data from an Internet of Things (IOT) sensor network via Kafka into Vertica. You use the most of this data to periodically generate reports and update dashboard displays. Neither of these use cases are particularly time sensitive. However, three of the topics you are loading from do contain time-sensitive data (system failures, intrusion detection, and loss of connectivity) that must trigger immediate alerts.
In this case, you can create one scheduler with a frame duration of 5 minutes or more to read most of the topics that contain the non-critical data. Then create a second scheduler with a frame duration of at least 6 seconds (but preferably longer) that loads just the data from the three time-sensitive topics. The volume of data in these topics is hopefully low enough that having a short frame duration will not cause problems.
2.3 - Managing scheduler resources and performance
Your scheduler's performance is impacted by the number of microbatches in your scheduler, partitions in each microbatch, and nodes in your Vertica cluster.
Your scheduler's performance is impacted by the number of microbatches in your scheduler, partitions in each microbatch, and nodes in your Vertica cluster. Use resource pools to allocate a subset of system resources for your scheduler, and fine-tune those resources to optimize automatic loads into Vertica.
The following sections provide details about scheduler resource pool configurations and processing scenarios.
Schedulers and resource pools
Vertica recommends that you always create a resource pool specifically for each scheduler. Schedulers assume that they have exclusive use of their assigned resource pool. Using a separate pool for a scheduler lets you fine-tune its impact on your Vertica cluster's performance. You create resource pools with CREATE RESOURCE POOL.
If you do not create and assign a resource pool for your scheduler, it uses a portion of the GENERAL resource pool. Vertica recommends that you do not use the GENERAL pool for schedulers in production environments. This fallback to the GENERAL pool is intended as a convenience when you test your scheduler configuration. When you are ready to deploy your scheduler, create a resource pool that you tuned to its specific needs. Each time that you start a scheduler that is using the GENERAL pool, the vkconfig utility displays a warning message.
Not allocating enough resources to your schedulers can result in errors. For example, you might get OVERSHOT DEADLINE FOR FRAME errors if the scheduler is unable to load data from all topics in a data frame.
See Resource pool architecture for more information about resource pools.
Key resource pool settings
A microbatch is a unit of work that processes the partitions of a single Kafka topic within the duration of a frame. The following resource pool settings play an important role in how Vertica loads microbatches and processes partitions:
- PLANNEDCONCURRENCY determines the number of microbatches (COPY statements) the scheduler sends to Vertica simultaneously. At the start of each frame, the scheduler creates the number of scheduler threads specified by PLANNEDCONCURRENCY. Each scheduler thread connects to Vertica and loads one microbatch at a time. If there are more microbatches than scheduler threads, the scheduler queues the extra microbatches and loads them as threads become available.
- EXECUTIONPARALLELISM determines the maximum number of threads each node creates to process a microbatch's partitions. When a microbatch is loaded into Vertica, its partitions are distributed evenly among the nodes in the cluster. During each frame, a node creates a maximum of one thread for each partition. Each thread reads from one partition at a time until processing completes, or the frame ends. If there are more partitions than threads across all nodes, remaining partitions are processed as threads become available.
- QUEUETIMEOUT provides manual control over resource timings. Set the resource pool parameter QUEUETIMEOUT to 0 to allow the scheduler to manage timings. After all of the microbatches are processed, the scheduler waits for the remainder of the frame to process the next microbatch. A properly sized configuration includes rest time to plan for traffic surges. See Choosing a frame duration for information about the impacts of frame duration size.
For example, the following CREATE RESOURCE POOL statement creates a resource pool named weblogs_pool that loads 2 microbatches simultaneously. Each node in the Vertica cluster creates 10 threads per microbatch to process partitions:
=> CREATE RESOURCE POOL weblogs_pool
    MEMORYSIZE '10%'
    PLANNEDCONCURRENCY 2
    EXECUTIONPARALLELISM 10
    QUEUETIMEOUT 0;
For a three-node Vertica cluster, weblogs_pool provides resources for each node to create up to 10 threads to process partitions, or 30 total threads per microbatch.
Loading multiple microbatches concurrently
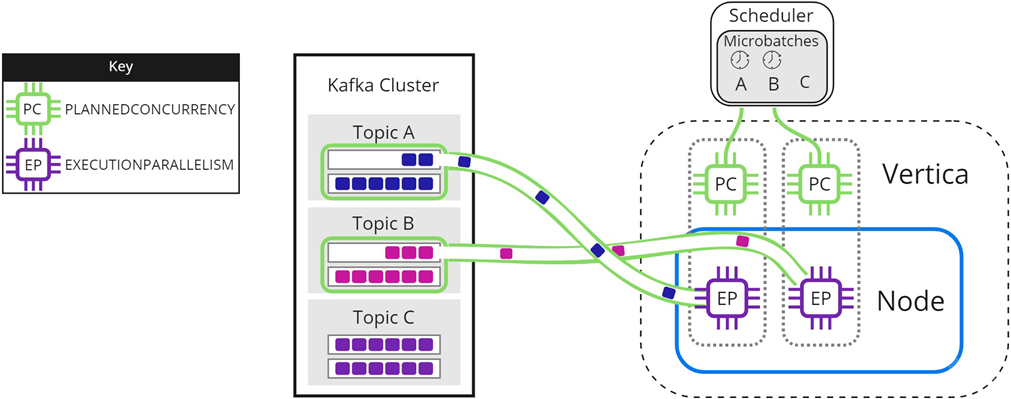
In some circumstances, you might have more microbatches in your scheduler than available PLANNEDCONCURRENCY. The following images illustrate how the scheduler loads microbatches into a single Vertica node when there are not enough scheduler threads to load each microbatch simultaneously. The resource pool's PLANNEDCONCURRENCY (PC) is set to 2, but the scheduler must load three microbatches: A, B, and C. For simplicity, EXECUTIONPARALLELISM (EP) is set to 1.
To begin, the scheduler loads microbatch A and microbatch B while microbatch C waits:
When either microbatch finishes loading, the scheduler loads any remaining microbatches. In the following image, microbatch A is completely loaded into Vertica. The scheduler continues to load microbatch B, and uses the newly available scheduler thread to load microbatch C:
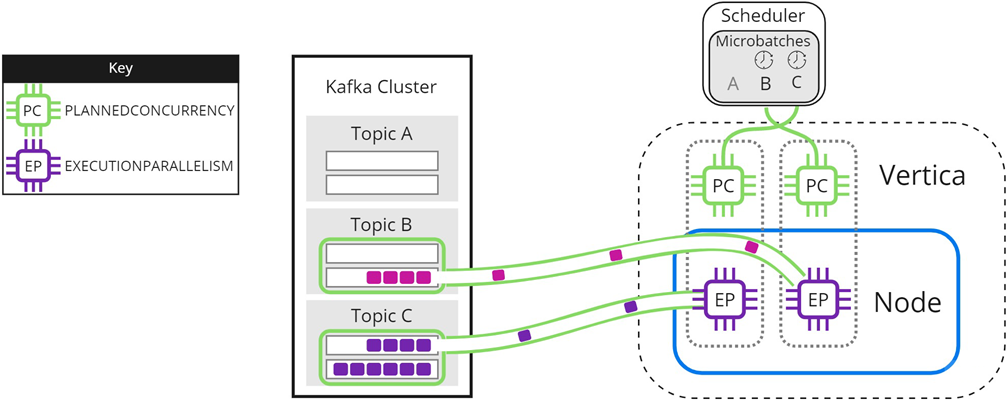
The scheduler continues sending data until all microbatches are loaded into Vertica, or the frame ends.
Experiment with PLANNEDCONCURRENCY to optimize performance. Note that setting it too high might create too many connections at the beginning of each frame, resulting in scalability stress on Vertica or Kafka. Setting PLANNEDCONCURRENCY too low does not take full advantage of the multiprocessing power of Vertica.
Parallel processing within Vertica
The resource pool setting EXECUTIONPARALLELISM limits the number of threads each Vertica node creates to process partitions. The following image illustrates how a three-node Vertica cluster processes a topic with nine partitions, when there is not enough EXECUTIONPARALLELISM to create one thread per partition. The partitions are distributed evenly among Node 1, Node 2, and Node 3 in the Vertica cluster. The scheduler's resource pool has PLANNEDCONCURRENCY (PC) set to 1 and EXECUTIONPARALLELISM (EP) set to 2, so each node creates a maximum of 2 threads when the scheduler loads microbatch A. Each thread reads from one partition at a time. Partitions that are not assigned a thread must wait for processing:
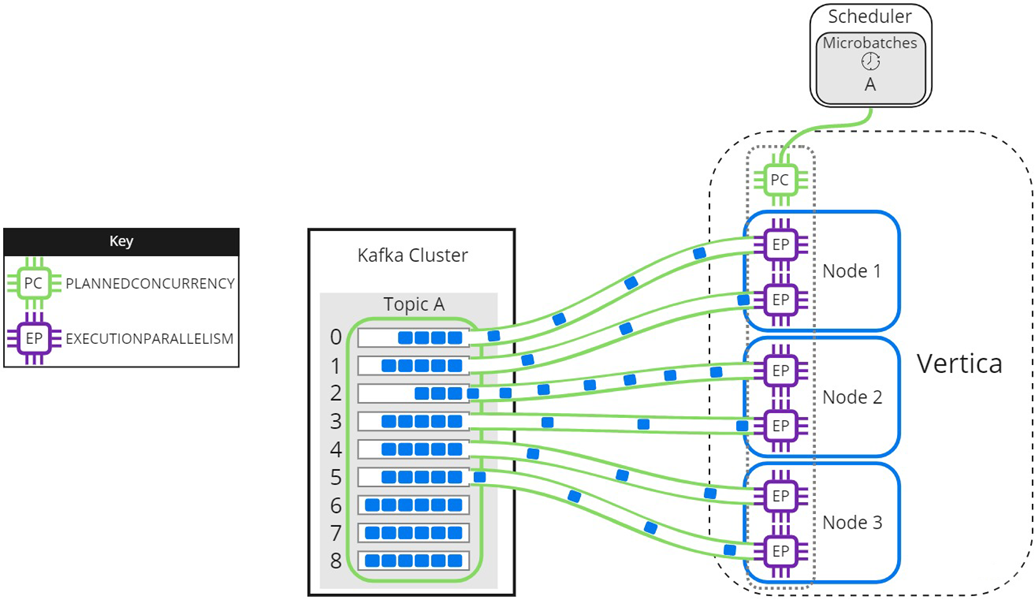
As threads finish processing their assigned partitions, the remaining partitions are distributed to threads as they become available:

When setting the EXECUTIONPARALLELISM on your scheduler's resource pool, consider the number of partitions across all microbatches in the scheduler.
Loading partitioned topics concurrently
Single topics with multiple partitions might benefit from increased parallel loading or a reduced transaction size. The --max-parallelism microbatch utility option enables you to dynamically split a topic with multiple partitions into multiple, load-balanced microbatches that each consist of a subset of the original microbatch's partitions. The scheduler loads the dynamically split microbatches simultaneously using the PLANNEDCONCURRENCY available in its resource pool.
The EXECUTIONPARALLELISM setting in the scheduler's resource pool determines the maximum number of threads each node creates to process its portion of a single microbatch's partitions. Splitting a microbatch enables each node to create more threads for the same unit of work. When there is enough PLANNEDCONCURRENCY and the number of partitions assigned per node is greater than the EXECUTIONPARALLELISM setting in the scheduler's resource pool, use --max-parallelism to split the microbatch and create more threads per node to process more partitions in parallel.
The following image illustrates how a two-node Vertica cluster loads and processes microbatch A using a resource pool with PLANNEDCONCURRENCY (PC) set to 2, and EXECUTIONPARALLELISM (EP) set to 2. Because the scheduler is loading only one microbatch, there is 1 scheduler thread left unused. Each node creates 2 threads per scheduler thread to process its assigned partitions:
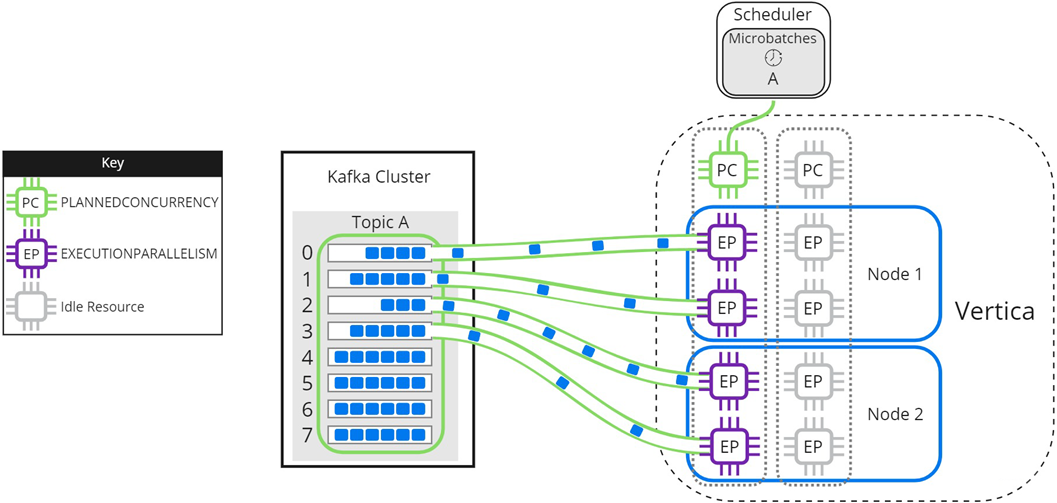
Setting microbatch A's --max-parallelism option to 2 enables the scheduler to dynamically split microbatch A into 2 smaller microbatches, A1 and A2. Because there are 2 available scheduler threads, the subset microbatches are loaded into Vertica simultaneously. Each node creates 2 threads per scheduler thread to process partitions for microbatches A1 and A2:
Use --max-parallelism to prevent bottlenecks in microbatches consisting of high-volume Kafka topics. It also provides faster loads for microbatches that require additional processing, such as text indexing.
2.4 - Using connection load balancing with the Kafka scheduler
You supply the scheduler with the name of a Vertica node in the --dbhost option or the dbhost entry in your configuration file.
You supply the scheduler with the name of a Vertica node in the --dbhost option or the dbhost entry in your configuration file. The scheduler connects to this node to initiate all of the statements it executes to load data from Kafka. For example, each time it executes a microbatch, the scheduler connects to the same node to run the COPY statement. Having a single node act as the initiator node for all of the scheduler's actions can affect the performance of the node, and in turn the database as a whole.
To avoid a single node becoming a bottleneck, you can use connection load balancing to spread the load of running the scheduler's statements across multiple nodes in your database. Connection load balancing distributes client connections among the nodes in a load balancing group. See About native connection load balancing for an overview of this feature.
Enabling connection load balancing for a scheduler is a two-step process:
-
Choose or create a load balancing policy for your scheduler.
-
Enable load balancing in the scheduler.
Choosing or creating a load balancing policy for the scheduler
A connecting load balancing policy redirects incoming connections in from a specific set of network addresses to a group of nodes. If your database already defines a suitable load balancing policy, you can use it instead of creating one specifically for your scheduler.
If your database does not have a suitable policy, create one. Have your policy redirect connections coming from the IP addresses of hosts running Kafka schedulers to a group of nodes in your database. The group of nodes that you select will act as the initiators for the statements that the scheduler executes.
Important
In an
Eon Mode database, only include nodes that are part of a
primary subcluster in the scheduler's load balancing group. These nodes are the most efficient for loading data.
The following example demonstrates setting up a load balancing policy for all three nodes in a three-node database. The scheduler runs on node 1 in the database, so the source address range (192.168.110.0/24) of the routing rule covers the IP addresses of the nodes in the database. The last step of the example verifies that connections from the first node (IP address 10.20.110.21) are load balanced.
=> SELECT node_name,node_address,node_address_family FROM v_catalog.nodes;
    node_name     | node_address | node_address_family
------------------+--------------+----------------------
 v_vmart_node0001 | 10.20.110.21 | ipv4
 v_vmart_node0002 | 10.20.110.22 | ipv4
 v_vmart_node0003 | 10.20.110.23 | ipv4
(4 rows)


=> CREATE NETWORK ADDRESS node01 ON v_vmart_node0001 WITH '10.20.110.21';
CREATE NETWORK ADDRESS
=> CREATE NETWORK ADDRESS node02 ON v_vmart_node0002 WITH '10.20.110.22';
CREATE NETWORK ADDRESS
=> CREATE NETWORK ADDRESS node03 on v_vmart_node0003 WITH '10.20.110.23';
CREATE NETWORK ADDRESS
=> CREATE LOAD BALANCE GROUP kafka_scheduler_group WITH ADDRESS node01,node02,node03;
CREATE LOAD BALANCE GROUP
=> CREATE ROUTING RULE kafka_scheduler_rule ROUTE
   '10.20.110.0/24' TO kafka_scheduler_group;
CREATE ROUTING RULE
=> SELECT describe_load_balance_decision('10.20.110.21');
                     describe_load_balance_decision
--------------------------------------------------------------------------------
  Describing load balance decision for address [10.20.110.21]
Load balance cache internal version id (node-local): [2]
Considered rule [kafka_scheduler_rule] source ip filter [10.20.110.0/24]...
input address matches this rule
Matched to load balance group [kafka_scheduler_group] the group has policy [ROUNDROBIN]
number of addresses [3]
(0) LB Address: [10.20.110.21]:5433
(1) LB Address: [10.20.110.22]:5433
(2) LB Address: [10.20.110.23]:5433
Chose address at position [1]
Routing table decision: Success. Load balance redirect to: [10.20.110.23] port [5433]

(1 row)
Important
Be careful if you run your scheduler on a Vertica node and have either set its dbhost name to localhost or are not specifying a value (which means dbhost defaults to localhost). Connections to localhost use the loopback IP address 127.0.0.1 instead of the node's primary network address. If you create a load balancing routing rule that redirects incoming connections from the node's IP address range, it will not apply to connections made using localhost. The best solution is to use the node's IP address or FQDN as the dbhost setting.
If your scheduler connects to Vertica from an IP address that no routing rule applies to, you will see messages similar to the following in the vertica.log:
[Session] <INFO> Load balance request from client address ::1 had decision:
    Classic load balancing considered, but either the policy was NONE or no target was
    available. Details: [NONE or invalid]
 <LOG> @v_vmart_node0001: 00000/5789: Connection load balance request
    refused by server
Enabling load balancing in the scheduler
Clients must opt-in to load balancing for Vertica to apply the connection load balancing policies to the connection. For example, you must pass the -C flag to the vsql command for your interactive session to be load balanced.
The scheduler uses the Java JDBC library to connect to Vertica. To have the scheduler opt-in to load balancing, you must set the JDBC library's ConnectionLoadBalance option to 1. See Load balancing in JDBC for details.
Use the vkconfig script's --jdbc-opt option, or add the jdbc-opt option to your configuration file to set the ConnectionLoadBalance option. For example, to start the scheduler from the command line using a configuration file named weblog.conf, use the command:
$ nohup vkconfig launch --conf weblog.conf --jdbc-opt ConnectionLoadBalance=1 >/dev/null 2>&1 &
To permanently enable load balancing, you can add the load balancing option to your configuration file. The following example shows the weblog.conf file from the example in Setting up a scheduler configured to use connection load balancing.
username=dbadmin
password=mypassword
dbhost=10.20.110.21
dbport=5433
config-schema=weblog_sched
jdbc-opt=ConnectionLoadBalance=1
You can check whether the scheduler's connections are being load balanced by querying the SESSIONS table:
=> SELECT node_name, user_name, client_label FROM V_MONITOR.SESSIONS;
    node_name     | user_name |               client_label
------------------+-----------+-------------------------------------------
 v_vmart_node0001 | dbadmin   | vkstream_weblog_sched_leader_persistent_4
 v_vmart_node0001 | dbadmin   |
 v_vmart_node0002 | dbadmin   | vkstream_weblog_sched_lane-worker-0_0_8
 v_vmart_node0003 | dbadmin   | vkstream_weblog_sched_VDBLogger_0_9
(4 rows)
In the client_labels column, the scheduler's connections have labels starting with vkstream (the row without a client label is an interactive session). You can see that the three connections the scheduler has opened all go to different nodes.
2.5 - Limiting loads using offsets
Kafka maintains a user-configurable backlog of messages.
Kafka maintains a user-configurable backlog of messages. By default, a newly-created scheduler reads all of the messages in a Kafka topic, including all of the messages in the backlog, not just the messages that are streamed out after the scheduler starts. Often, this is what you want.
In some cases, however, you may want to stream just a section of a source into a table. For example, suppose you want to analyze the web traffic of your e-commerce site starting at specific date and time. However, your Kafka topic contains web access records from much further back in time than you want to analyze. In this case, you can use an offset to stream just the data you want into Vertica for analysis.
Another common use case is when you have already loaded data some from Kafka manually (see Manually consume data from Kafka). Now you want to stream all of the newly-arriving data. By default, your scheduler ill reload all of the previously loaded data (assuming it is still available from Kafka). You can use an offset to tell your scheduler to start automatically loading data at the point where your manual data load left off.
Configuring a scheduler to start streaming from an offset
The vkconfig script's microbatch tool has an --offset option that lets you specify the index of the message in the source where you want the scheduler to begin loading. This option accepts a comma-separated list of index values. You must supply one index value for each partition in the source unless you use the --partition option. This option lets you choose the partitions the offsets apply to. The scheduler cannot be running when you set an offset in the microbatch.
If your microbatch defines more than one cluster, use the --cluster option to select which one the offset option applies to. Similarly, if your microbatch has more than one source, you must select one using the --source option.
For example, suppose you want to load just the last 1000 messages from a source named web_hits. To make things easy, suppose the source contains just a single partition, and the microbatch defines just a single cluster and single topic.
Your first task is to determine the current offset of the end of the stream. You can do this on one of the Kafka nodes by calling the GetOffsetShell class with the time parameter set to -1 (the end of the topic):
$ path to kafka/bin/kafka-run-class.sh kafka.tools.GetOffsetShell \
                                          --broker-list kafka01:9092,kafka03:9092 --time -1 \
                                          --topic web_hits

{metadata.broker.list=kafka01:9092,kafka03:9092, request.timeout.ms=1000,
 client.id=GetOffsetShell, security.protocol=PLAINTEXT}
web_hits:0:8932
You can also use GetOffsetShell to find the offset in the stream that occurs before a timestamp.
In the above example, the web_hits topic's single partition has an ending offset of 8932. If we want to load the last 1000 messages from the source, we need to set the microbatch's offset to 8932 - 1001 or 7931.
Note
The start of an offset is inclusive in the Vertica COPY statement. Kafka's native starting offset is exclusive. Therefore, you must add one to the offset to get the correct number of messages.
With the offset calculated, you are ready to set it in the microbatch's configuration. The following example:
$ vkconfig shutdown --conf weblog.conf
$ vkconfig microbatch --microbatch weblog --update --conf weblog.conf --offset 7931
$ nohup vkconfig launch --conf weblog.conf >/dev/null 2>&1 &
If the target table was empty or truncated before the scheduler started, it will have 1000 rows in the table in it (until more messages are streamed through the source):
=> select count(*) from web_hits;
 count
-------
  1000
(1 row)
Note
The last example assumes that the offset values for the last 1000 messages in the Kafka topic were assigned consecutively. This assumption is not always be true. A Kafka topic can have gaps in its offset numbering for a variety of reasons. Offsets refer to the key value assigned to a message by Kafka, not its position in the topic.
2.6 - Updating schedulers after Vertica upgrades
A scheduler is only compatible with the version of Vertica that created it.
A scheduler is only compatible with the version of Vertica that created it. Between Vertica versions, the scheduler's configuration schema or the UDx function the scheduler calls may change. After you upgrade Vertica, you must update your schedulers to account for these changes.
When you upgrade Vertica to a new major version or service pack, use the vkconfig scheduler tool's --upgrade option to update your scheduler. If you do not update a scheduler, you receive an error message if you try to launch it. For example:
$ nohup vkconfig launch --conf weblog.conf >/dev/null 2>&1 &
com.vertica.solutions.kafka.exception.FatalException: Configured scheduler schema and current
scheduler configuration schema version do not match. Upgrade configuration by running:
vkconfig scheduler --upgrade
    at com.vertica.solutions.kafka.scheduler.StreamCoordinator.assertVersion(StreamCoordinator.java:64)
    at com.vertica.solutions.kafka.scheduler.StreamCoordinator.run(StreamCoordinator.java:125)
    at com.vertica.solutions.kafka.Launcher.run(Launcher.java:205)
    at com.vertica.solutions.kafka.Launcher.main(Launcher.java:258)
Scheduler instance failed. Check log file. Check log file.
$ vkconfig scheduler --upgrade --conf weblog.conf
Checking if UPGRADE necessary...
UPGRADE required, running UPGRADE...
UPGRADE completed successfully, now the scheduler configuration schema version is v8.1.1
$ nohup vkconfig launch --conf weblog.conf >/dev/null 2>&1 &
                   .  .  .
3 - Monitoring message consumption
You can monitor the progress of your data streaming from Kafka several ways:.
You can monitor the progress of your data streaming from Kafka several ways:
-
Monitoring the consumer groups to which Vertica reports its progress. This technique is best if the tools you want to use to monitor your data load work with Kafka.
-
Use the monitoring APIs built into the vkconfig tool. These APIs report the configuration and consumption of your streaming scheduler in JSON format. These APIs are useful if you are developing your own monitoring scripts, or your monitoring tools can consume status information in JSON format.
3.1 - Monitoring Vertica message consumption with consumer groups
Apache Kafka has a feature named consumer groups that helps distribute message consumption loads across sets of consumers.
Apache Kafka has a feature named consumer groups that helps distribute message consumption loads across sets of consumers. When using consumer groups, Kafka evenly divides up messages based on the number of consumers in the group. Consumers report back to the Kafka broker which messages it read successfully. This reporting helps Kafka to manage message offsets in the topic's partitions, so that no consumer in the group is sent the same message twice.
Vertica does not rely on Kafka's consumer groups to manage load distribution or preventing duplicate loads of messages. The streaming job scheduler manages topic partition offsets on its own.
Even though Vertica does not need consumer groups to manage offsets, it does report back to the Kafka brokers which messages it consumed. This feature lets you use third-party tools to monitor the Vertica cluster's progress as it loads messages. By default, Vertica reports its progress to a consumer group named vertica-databaseName, where databaseName is the name of the Vertica database. You can change the name of the consumer group that Vertica reports its progress to when defining a scheduler or during manual loads of data. Third party tools can query the Kafka brokers to monitor the Vertica cluster's progress when loading data.
For example, you can use Kafka's kafka-consumer-groups.sh script (located in the bin directory of your Kafka installation) to view the status of the Vertica consumer group. The following example demonstrates listing the consumer groups available defined in the Kafka cluster and showing the details of the Vertica consumer group:
$ cd /path/to/kafka/bin
$ ./kafka-consumer-groups.sh --list --bootstrap-server localhost:9092
Note: This will not show information about old Zookeeper-based consumers.

vertica-vmart
$ ./kafka-consumer-groups.sh --describe --group vertica-vmart \
   --bootstrap-server localhost:9092
Note: This will not show information about old Zookeeper-based consumers.

Consumer group 'vertica-vmart' has no active members.

TOPIC                          PARTITION  CURRENT-OFFSET  LOG-END-OFFSET  LAG        CONSUMER-ID                                       HOST                           CLIENT-ID
web_hits                       0          24500           30000           5500       -                                                 -                              -
From the output, you can see that Vertica reports its consumption of messages back to the vertica-vmart consumer group. This group is the default consumer group when Vertica has the example VMart database loaded. The second command lists the topics being consumed by the vertica-vmart consumer group. You can see that the Vertica cluster has read 24500 of the 30000 messages in the topic's only partition. Later, running the same command will show the Vertica cluster's progress:
$ cd /path/to/kafka/bin
$ ./kafka-consumer-groups.sh --describe --group vertica-vmart \
    --bootstrap-server localhost:9092
Note: This will not show information about old Zookeeper-based consumers.

Consumer group 'vertica-vmart' has no active members.

TOPIC                          PARTITION  CURRENT-OFFSET  LOG-END-OFFSET  LAG        CONSUMER-ID                                       HOST                           CLIENT-ID
web_hits                       0          30000           30000           0          -
Changing the consumer group where Vertica reports its progress
You can change the consumer group that Vertica reports its progress to when consuming messages.
Changing for automatic loads with the scheduler
When using a scheduler, you set the consumer group by setting the --consumer-group-id argument to the vkconfig script's scheduler or microbatch utilities. For example, suppose you want the example scheduler shown in Setting up a scheduler to report its consumption to the consumer group name vertica-database. Then you could use the command:
$ /opt/vertica/packages/kafka/bin/vkconfig microbatch --update \
    --conf weblog.conf --microbatch weblog --consumer-group-id vertica-database
When the scheduler begins loading data, it will start updating the new consumer group. You can see this on a Kafka node using kafka-consumer-groups.sh.
Use the --list option to return the consumer groups:
$ /path/to/kafka/bin/kafka-consumer-groups.sh --list --bootstrap-server localhost:9092
Note: This will not show information about old Zookeeper-based consumers.

vertica-database
vertica-vmart
Use the --describe and --group options to return details about a specific consumer group:
$ /path/to/kafka/bin/kafka-consumer-groups.sh --describe --group vertica-database \
                                          --bootstrap-server localhost:9092
Note: This will not show information about old Zookeeper-based consumers.

Consumer group 'vertica-database' has no active members.

TOPIC                          PARTITION  CURRENT-OFFSET  LOG-END-OFFSET  LAG        CONSUMER-ID                                       HOST                           CLIENT-ID
web_hits                       0          30300           30300           0          -                                                 -                              -
Changing for manual loads
To change the consumer group when manually loading data, use the group_id parameter of KafkaSource function:
=> COPY web_hits SOURCE KafkaSource(stream='web_hits|0|-2',
                                    brokers='kafka01.example.com:9092',
                                    stop_on_eof=True,
                                    group_id='vertica_database')
                 PARSER KafkaJSONParser();
 Rows Loaded
-------------
       50000
(1 row)
Using consumer group offsets when loading messages
You can choose to have your scheduler, manual load, or custom loading script start loading messages from the consumer group's offset. To load messages from the last offset stored in the consumer group, use the special -3 offset.
Automatic load with the scheduler example
To instruct your scheduler to load messages from the consumer group's saved offset, use the vkconfig script microbatch tool's --offset argument.
-
Stop the scheduler using the shutdown command and the configuration file that you used to create the scheduler:
$ /opt/vertica/packages/kafka/bin/vkconfig microbatch shutdown --conf weblog.conf
-
Set the microbatch --offset option to -3:
$ /opt/vertica/packages/kafka/bin/vkconfig microbatch --update --conf weblog.conf --microbatch weblog --offset -3
This sets the offset to -3 for all topic partitions that your scheduler reads from. The scheduler begins the next load with the consumer group's saved offset, and all subsequent loads use the offset saved in stream_microbatch_history.
Manual load example
This example loads messages from the web_hits topic that has one partition consisting of 51,000 messages. For details about manual loads with KafkaSource, see Manually consume data from Kafka.
-
The first COPY statement creates a consumer group named vertica_manual, and loads the first 50,000 messages from the first partition in the web_hits topic:
=> COPY web_hits
   SOURCE KafkaSource(stream='web_hits|0|0|50000',
                              brokers='kafka01.example.com:9092',
                              stop_on_eof=True,
                              group_id='vertica_manual')
   PARSER KafkaJSONParser()
   REJECTED DATA AS TABLE public.web_hits_rejections;
 Rows Loaded
-------------
       50000
(1 row)
-
The next COPY statement passes -3 as the start_offset stream parameter to load from the consumer group's saved offset:
=> COPY web_hits
   SOURCE KafkaSource(stream='web_hits|0|-3',
                              brokers='kafka01.example.com:9092',
                              stop_on_eof=True,
                              group_id='vertica_manual')
   PARSER KafkaJSONParser()
   REJECTED DATA AS TABLE public.web_hits_rejections;
 Rows Loaded
-------------
        1000
(1 row)
Disabling consumer group reporting
Vertica reports the offsets of the messages it consumes to Kafka by default. If you do not specifically configure a consumer group for Vertica, it still reports its offsets to a consumer group named vertica_database-name (where database-name is the name of the database Vertica is currently running).
If you want to completely disable having Vertica report its consumption back to Kafka, you can set the consumer group to an empty string or NULL. For example:
=> COPY web_hits SOURCE KafkaSource(stream='web_hits|0|-2',
                                    brokers='kafka01.example.com:9092',
                                    stop_on_eof=True,
                                    group_id=NULL)
                 PARSER KafkaJsonParser();
 Rows Loaded
-------------
       60000
(1 row)
3.2 - Getting configuration and statistics information from vkconfig
The vkconfig tool has two features that help you examine your scheduler's configuration and monitor your data load:.
The vkconfig tool has two features that help you examine your scheduler's configuration and monitor your data load:
-
The vkconfig tools that configure your scheduler (scheduler, cluster, source, target, load-spec, and microbatch) have a --read argument that has them output their current settings in the scheduler.
-
The vkconfig statistics tool lets you get statistics on your microbatches. You can filter the microbatch records based on a date and time range, cluster, partition, and other criteria.
Both of these features output their data in JSON format. You can use third-party tools that can consume JSON data or write your own scripts to process the configuration and statics data.
You can also access the data provided by these vkconfig options by querying the configuration tables in the scheduler's schema. However, you may find these options easier to use as they do not require you to connect to the Vertica database.
You pass the --read option to vkconfig's configuration tools to get the current settings for the options that the tool can set. This output is in JSON format. This example demonstrates getting the configuration information from the scheduler and cluster tools for the scheduler defined in the weblog.conf configuration file:
$ vkconfig scheduler --read --conf weblog.conf
{"version":"v9.2.0", "frame_duration":"00:00:10", "resource_pool":"weblog_pool",
 "config_refresh":"00:05:00", "new_source_policy":"FAIR",
 "pushback_policy":"LINEAR", "pushback_max_count":5, "auto_sync":true,
 "consumer_group_id":null}

$ vkconfig cluster --read --conf weblog.conf
{"cluster":"kafka_weblog", "hosts":"kafak01.example.com:9092,kafka02.example.com:9092"}
The --read option lists all of values created by the tool in the scheduler schema. For example, if you have defined multiple targets in your scheduler, the --read option lists all of them.
$ vkconfig target --list --conf weblog.conf
{"target_schema":"public", "target_table":"health_data"}
{"target_schema":"public", "target_table":"iot_data"}
{"target_schema":"public", "target_table":"web_hits"}
You can filter the --read option output using the other arguments that the vkconfig tools accept. For example, in the cluster tool, you can use the --host argument to limit the output to just show clusters that contain a specific host. These arguments support LIKE-predicate wildcards, so you can match partial values. See LIKE for more information about using wildcards.
The following example demonstrates how you can filter the output of the --read option of the cluster tool using the --host argument. The first call shows the unfiltered output. The second call filters the output to show only those clusters that start with "kafka":
$ vkconfig cluster --read --conf weblog.conf
{"cluster":"some_cluster", "hosts":"host01.example.com"}
{"cluster":"iot_cluster",
 "hosts":"kafka-iot01.example.com:9092,kafka-iot02.example.com:9092"}
{"cluster":"weblog",
 "hosts":"web01.example.com.com:9092,web02.example.com:9092"}
{"cluster":"streamcluster1",
 "hosts":"kafka-a-01.example.com:9092,kafka-a-02.example.com:9092"}
{"cluster":"test_cluster",
 "hosts":"test01.example.com:9092,test02.example.com:9092"}

$ vkconfig cluster --read --conf weblog.conf --hosts kafka%
{"cluster":"iot_cluster",
 "hosts":"kafka-iot01.example.com:9092,kafka-iot02.example.com:9092"}
{"cluster":"streamcluster1",
 "hosts":"kafka-a-01.example.com:9092,kafka-a-02.example.com:9092"}
See the Cluster tool options, Load spec tool options, Microbatch tool options, Scheduler tool options, Target tool options, and Source tool options for more information.
Getting streaming data load statistics
The vkconfig script's statistics tool lets you view the history of your scheduler's microbatches. You can filter the results using any combination of the following criteria:
-
The name of the microbatch
-
The Kafka cluster that was the source of the data load
-
The name of the topic
-
The partition within the topic
-
The Vertica schema and table targeted by the data load
-
A date and time range
-
The latest microbatches
See Statistics tool options for all of the options available in this tool.
This example gets the last two microbatches that the scheduler ran:
$ vkconfig statistics --last 2 --conf weblog.conf
{"microbatch":"weblog", "target_schema":"public", "target_table":"web_hits",
 "source_name":"web_hits", "source_cluster":"kafka_weblog", "source_partition":0,
 "start_offset":73300, "end_offset":73399, "end_reason":"END_OF_STREAM",
 "end_reason_message":null, "partition_bytes":19588, "partition_messages":100,
 "timeslice":"00:00:09.807000", "batch_start":"2018-11-02 13:22:07.825295",
 "batch_end":"2018-11-02 13:22:08.135299", "source_duration":"00:00:00.219619",
 "consecutive_error_count":null, "transaction_id":45035996273976123,
 "frame_start":"2018-11-02 13:22:07.601", "frame_end":null}
{"microbatch":"weblog", "target_schema":"public", "target_table":"web_hits",
 "source_name":"web_hits", "source_cluster":"kafka_weblog", "source_partition":0,
 "start_offset":73200, "end_offset":73299, "end_reason":"END_OF_STREAM",
 "end_reason_message":null, "partition_bytes":19781, "partition_messages":100,
 "timeslice":"00:00:09.561000", "batch_start":"2018-11-02 13:21:58.044698",
 "batch_end":"2018-11-02 13:21:58.335431", "source_duration":"00:00:00.214868",
 "consecutive_error_count":null, "transaction_id":45035996273976095,
 "frame_start":"2018-11-02 13:21:57.561", "frame_end":null}
This example gets the microbatches from the source named web_hits between 13:21:00 and 13:21:20 on November 2nd 2018:
$ vkconfig statistics --source "web_hits" --from-timestamp \
           "2018-11-02 13:21:00" --to-timestamp "2018-11-02 13:21:20"  \
           --conf weblog.conf
{"microbatch":"weblog", "target_schema":"public", "target_table":"web_hits",
 "source_name":"web_hits", "source_cluster":"kafka_weblog", "source_partition":0,
 "start_offset":72800, "end_offset":72899, "end_reason":"END_OF_STREAM",
 "end_reason_message":null, "partition_bytes":19989, "partition_messages":100,
 "timeslice":"00:00:09.778000", "batch_start":"2018-11-02 13:21:17.581606",
 "batch_end":"2018-11-02 13:21:18.850705", "source_duration":"00:00:01.215751",
 "consecutive_error_count":null, "transaction_id":45035996273975997,
 "frame_start":"2018-11-02 13:21:17.34", "frame_end":null}
{"microbatch":"weblog", "target_schema":"public", "target_table":"web_hits",
 "source_name":"web_hits", "source_cluster":"kafka_weblog", "source_partition":0,
 "start_offset":72700, "end_offset":72799, "end_reason":"END_OF_STREAM",
 "end_reason_message":null, "partition_bytes":19640, "partition_messages":100,
 "timeslice":"00:00:09.857000", "batch_start":"2018-11-02 13:21:07.470834",
 "batch_end":"2018-11-02 13:21:08.737255", "source_duration":"00:00:01.218932",
 "consecutive_error_count":null, "transaction_id":45035996273975978,
 "frame_start":"2018-11-02 13:21:07.309", "frame_end":null}
See Statistics tool options for more examples of using this tool.
4 - Parsing custom formats
To process a Kafka data stream, the parser must identify the boundary between each message.
To process a Kafka data stream, the parser must identify the boundary between each message. Vertica provides Kafka parsers that can identify boundaries for Avro, JSON, and raw data formats, but your data stream might use a custom format. To parse custom formats, Vertica provides filters that insert boundary information in the data stream before it reaches the parser.
Kafka filters
Vertica provides the following filters:
-
KafkaInsertDelimiters: Inserts a user-specified delimiter between each message in the data stream. The delimiter can contain any characters and be of any length. This parser uses the following syntax:
KafkaInsertDelimiters(delimiter = 'delimiter')
-
KafkaInsertLengths: Inserts the message length in bytes at the beginning of the message. Vertica writes the length as a 4-byte uint32 value in big-endian network byte order. For example, a 100-byte message is preceded by 0x00000064. This parser uses the following syntax:
KafkaInsertLengths()
Note
Because each Kafka filter requires input from a stream source and outputs a non-stream source, you cannot use both Kafka filters in the same COPY statement to process a Kafka data stream.
In addition to one of the Kafka filters, you can include one or more user-defined filters in a single COPY statement. Specify multiple filters as a comma-separated list, and list the Vertica filter first. If you use a non-Kafka parser, you must use at least one filter to prepare the data stream for the parser, or the parser fails and returns an error.
Examples
The following COPY statement loads comma-separated values from two partitions in a topic named iot-data. The load exits after it processes all messages in both partitions. The KafkaInsertDelimiters filter inserts newlines between the Kafka messages to convert them into traditional rows of data. The statement uses the standard COPY parser to delimit CSV values with a comma:
=> COPY kafka_iot SOURCE KafkaSource(stream='iot-data|0|-2,iot-data|1|-2',
                                     brokers='kafka01:9092',
                                     stop_on_eof=True)
                  FILTER KafkaInsertDelimiters(delimiter = E'\n')
                  DELIMITER ',';
 Rows Loaded
-------------
        3430
(1 row)