This is the multi-page printable view of this section.
Click here to print.
Return to the regular view of this page.
Advanced installation
To perform an advanced-but-simple installation, set up the VMart example database environment and then create the database using the Administration Tools or Management Console.
To perform an advanced-but-simple installation, set up the VMart example database environment and then create the database using the Administration Tools or Management Console.
Note
If you installed the VMart database using the quick installation method, you cannot complete the following steps because the database has already been created.
To try the advanced installation, drop the example database (see Restoring the Status of Your Host on this guide) and perform the advanced Installation, or create a new example database with a different name. However, Vertica strongly recommends that you install only one example database at a time to avoid unpredictable results.
The advanced installation requires the following steps:
1 - Step 1: setting up the example environment
Stop all databases running on the same host on which you plan to install your example database.
-
Stop all databases running on the same host on which you plan to install your example database.
If you are unsure if other databases are running, run the Administration Tools and select View Cluster State. The State column should show DOWN values on pre-existing databases.
If databases are running, click Stop Database in the Main Menu of the Administration Tools interface and click OK.
-
In a terminal window, log in as the database administrator:
$ su dbadmin
Password:
-
Change to the /VMart_Schema directory.
$ cd /opt/vertica/examples/VMart_Schema
Do not change directories while following this tutorial. Some steps depend on being in a specific directory.
-
Run the sample data generator.
$ ./vmart_gen
-
Let the program run with the default parameters, which you can review in the README file.
Using default parameters
datadirectory = ./
numfiles = 1
seed = 2
null = ' '
timefile = Time.txt
numfactsalesrows = 5000000
numfactorderrows = 300000
numprodkeys = 60000
numstorekeys = 250
numpromokeys = 1000
numvendkeys = 50
numcustkeys = 50000
numempkeys = 10000
numwarehousekeys = 100
numshippingkeys = 100
numonlinepagekeys = 1000
numcallcenterkeys = 200
numfactonlinesalesrows = 5000000
numinventoryfactrows = 300000
gen_load_script = false
Data Generated successfully !
-
If the vmart_gen executable does not work correctly, recompile it as follows, and run the sample data generator script again.
$ g++ vmart_gen.cpp -o vmart_gen
$ chmod +x vmart_gen
$ ./vmart_gen
2 - Step 2: creating the example database
To create the example database: use the Administration Tools or Management Console, as described in this section.
To create the example database: use the Administration Tools or Management Console, as described in this section.
In this procedure, you create the example database using the Administration Tools. To use the Management Console, go to the next section.
-
Run the Administration Tools.
$ /opt/vertica/bin/admintools
or simply type admintools
-
From the Administration Tools Main Menu, click Configuration Menu and click OK.
-
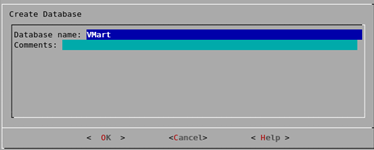
Click Create Database and click OK.
-
Name the database VMart and click OK.
-
Click OK to bypass the password and click Yes to confirm.
There is no need for a database administrator password in this tutorial. When you create a production database, however, always specify an administrator password. Otherwise, the database is permanently set to trust authentication (no passwords).
-
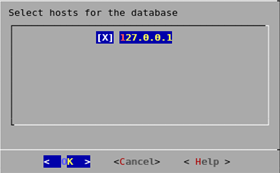
Select the hosts you want to include from your Vertica cluster and click OK.
This example creates the database on a one-host cluster. Vertica recommends a minimum of three hosts in the cluster. If you are using the Vertica Community Edition, you are limited to three nodes.
-
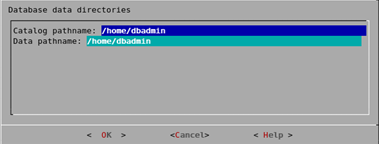
Click OK to select the default paths for the data and catalog directories.
-
Catalog and data paths must contain only alphanumeric characters and cannot have leading space characters. Failure to comply with these restrictions could result in database creation failure.
-
When you create a production database, you’ll likely specify other locations than the default. See Prepare Disk Storage Locations in the Administrator’s Guide for more information.
-
Since this tutorial uses a one-host cluster, a K-safety warning appears. Click OK.

-
Click Yes to create the database.
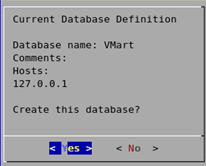
During database creation, Vertica automatically creates a set of node definitions based on the database name and the names of the hosts you selected and returns a success message.
-
Click OK to close the Database VMart created successfully message.
Creating the example database using Management Console
In this procedure, you create the example database using Management Console. To use the Administration Tools, follow the steps in the preceding section.
Note
To use Management Console, the console should already be installed and you should be familiar with its concepts and layout. For details, see
Management Console.
-
Connect to Management Console and log in.
-
On the Home page, click Infrastructure to go to the Databases and Clusters page.
-
Click to select the appropriate existing cluster and click Create Database.
-
Follow the on-screen wizard, which prompts you to provide the following information:
-
Database name, which must be between 3–25 characters, starting with a letter, and followed by any combination of letters, numbers, or underscores.
-
(Optional) database administrator password for the database you want to create and connect to.
-
IP address of a node in your database cluster, typically the IP address of the administration host.
-
Click Next.
3 - Step 3: connecting to the database
Regardless of the installation method you used, follow these steps to connect to the database.
Regardless of the installation method you used, follow these steps to connect to the database.
-
As
dbadmin, run the Administration Tools.
$ /opt/vertica/bin/admintools
or simply type admintools.
-
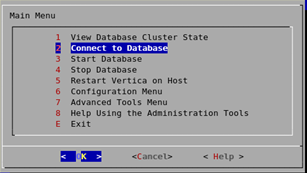
If you are already in the Administration Tools, navigate to the Main Menu page.
-
Select Connect to Database, click OK.
To configure and load data into the VMart database, complete the following steps:
If you installed the VMart database using the Quick Installation method, the schema, tables, and data are already defined. You can choose to drop the example database (see Restoring the Status of Your Host in this guide) and perform the Advanced Installation, or continue straight to Querying Your Data in this guide.
4 - Step 4: defining the database schema
The VMart database installs with sample scripts with SQL commands that are intended to represent queries that might be used in a real business.
The VMart database installs with sample scripts with SQL commands that are intended to represent queries that might be used in a real business. The vmart_define_schema.sql script runs a script that defines the VMart schema and creates tables. You must run this script before you load data into the VMart database.
This script performs the following tasks:
-
Defines two schemas in the VMart database schema: online_sales and store.
-
Defines tables in both schemas.
-
Defines constraints on those tables.
Vmart=> \i vmart_define_schema.sql
CREATE SCHEMA
CREATE SCHEMA
CREATE TABLE
CREATE TABLE
CREATE TABLE
CREATE TABLE
CREATE TABLE
CREATE TABLE
CREATE TABLE
CREATE TABLE
CREATE TABLE
ALTER TABLE
CREATE TABLE
CREATE TABLE
ALTER TABLE
CREATE TABLE
ALTER TABLE
CREATE TABLE
CREATE TABLE
CREATE TABLE
ALTER TABLE
5 - Step 5: loading data
Now that you have created the schemas and tables, you can load data into a table by running the vmart_load_data.sql script.
Now that you have created the schemas and tables, you can load data into a table by running the vmart_load_data.sql script. This script loads data from the 15 .tbl text files in /opt/vertica/examples/VMart_Schema into the tables that vmart_design_schema.sql created.
It might take several minutes to load the data on a typical hardware cluster. Check the load status by monitoring the vertica.log file, as described in Monitoring Log Files in the Administrator’s Guide.
VMart=> \i vmart_load_data.sql
Rows Loaded
-------------
1826
(1 row)
Rows Loaded
-------------
60000
(1 row)
Rows Loaded
-------------
250
(1 row)
Rows Loaded
-------------
1000
(1 row)
Rows Loaded
-------------
50
(1 row)
Rows Loaded
-------------
50000
(1 row)
Rows Loaded
-------------
10000
(1 row)
Rows Loaded
-------------
100
(1 row)
Rows Loaded
-------------
100
(1 row)
Rows Loaded
-------------
1000
(1 row)
Rows Loaded
-------------
200
(1 row)
Rows Loaded
-------------
5000000
(1 row)
Rows Loaded
-------------
300000
(1 row)
VMart=>