This is the multi-page printable view of this section.
Click here to print.
Return to the regular view of this page.
Using the administration tools
The Vertica Administration tools allow you to easily perform administrative tasks.
The Vertica Administration tools allow you to easily perform administrative tasks. You can perform most Vertica database administration tasks with Administration Tools.
Run Administration Tools using the Database Superuser account on the Administration host, if possible. Make sure that no other Administration Tools processes are running.
If the Administration host is unresponsive, run Administration Tools on a different node in the cluster. That node permanently takes over the role of Administration host.
1 - Running the administration tools
Administration tools, or "admintools," supports various commands to manage your database.
Administration tools, or "admintools," supports various commands to manage your database.
To run admintools, you must have SSH and local connections enabled for the dbadmin user.
Syntax
/opt/vertica/bin/admintools [--debug ][
     { -h | --help }
   | { -a | --help_all}
   | { -t | --tool } name_of_tool [options]
]
--debug |
If you include this option, Vertica logs debug information.
Note
You can specify the debug option with or without naming a specific tool. If you specify debug with a specific tool, Vertica logs debug information during tool execution. If you do not specify a tool, Vertica logs debug information when you run tools through the admintools user interface.
|
-h
--help |
Outputs abbreviated help. |
-a
--help_all |
Outputs verbose help, which lists all command-line sub-commands and options. |
{ -t | --tool } name_of_tool [options] |
Specifies the tool to run, where name_of_tool is one of the tools described in the help output, and options are one or more comma-delimited tool arguments.
Note
Enter admintools -h to see the list of tools available. Enter admintools -t name_of_tool --help to review a specific tool's options.
|
An unqualified admintools command displays the Main Menu dialog box.
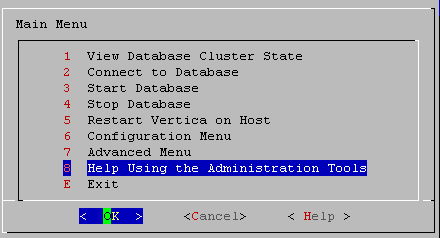
If you are unfamiliar with this type of interface, read Using the administration tools interface.
Privileges
dbadmin user
2 - First login as database administrator
The first time you log in as the and run the Administration Tools, the user interface displays.
The first time you log in as the Database Superuser and run the Administration Tools, the user interface displays.
-
In the end-user license agreement (EULA ) window, type accept to proceed.
A window displays, requesting the location of the license key file you downloaded from the Vertica website. The default path is
/tmp/vlicense.dat.
-
Type the absolute path to your license key (for example,
3 - Using the administration tools interface
The Vertica Administration Tools are implemented using Dialog, a graphical user interface that works in terminal (character-cell) windows.The interface responds to mouse clicks in some terminal windows, particularly local Linux windows, but you might find that it responds only to keystrokes.
The Vertica Administration Tools are implemented using Dialog, a graphical user interface that works in terminal (character-cell) windows.The interface responds to mouse clicks in some terminal windows, particularly local Linux windows, but you might find that it responds only to keystrokes. Thus, this section describes how to use the Administration Tools using only keystrokes.
Note
This section does not describe every possible combination of keystrokes you can use to accomplish a particular task. Feel free to experiment and to use whatever keystrokes you prefer.
Enter [return]
In all dialogs, when you are ready to run a command, select a file, or cancel the dialog, press the Enter key. The command descriptions in this section do not explicitly instruct you to press Enter.
OK - cancel - help
|
The OK, Cancel, and Help buttons are present on virtually all dialogs. Use the tab, space bar, or right and left arrow keys to select an option and then press Enter. The same keystrokes apply to dialogs that present a choice of Yes or No. |
|
|
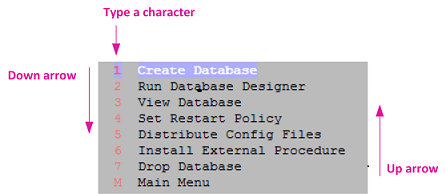
Some dialogs require that you choose one command from a menu. Type the alphanumeric character shown or use the up and down arrow keys to select a command and then press Enter. |
 |
List dialogs
|
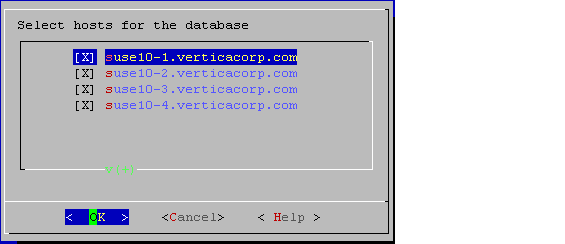
In a list dialog, use the up and down arrow keys to highlight items, then use the space bar to select the items (which marks them with an X). Some list dialogs allow you to select multiple items. When you have finished selecting items, press Enter. |
|
In a form dialog (also referred to as a dialog box), use the tab key to cycle between OK, Cancel, Help, and the form field area. Once the cursor is in the form field area, use the up and down arrow keys to select an individual field (highlighted) and enter information. When you have finished entering information in all fields, press Enter.
Online help is provided in the form of text dialogs. If you have trouble viewing the help, see Notes for remote terminal users.
4 - Notes for remote terminal users
The appearance of the graphical interface depends on the color and font settings used by your terminal window.
The appearance of the graphical interface depends on the color and font settings used by your terminal window. The screen captures in this document were made using the default color and font settings in a PuTTy terminal application running on a Windows platform.
Note
If you are using a remote terminal application, such as PuTTy or a Cygwin bash shell, make sure your window is at least 81 characters wide and 23 characters high.
If you are using PuTTY, you can make the Administration Tools look like the screen captures in this document:
-
In a PuTTY window, right click the title area and select Change Settings.
-
Create or load a saved session.
-
In the Category dialog, click Window > Appearance.
-
In the Font settings, click the Change... button.
-
Select Font: Courier New: Regular Size: 10
-
Click Apply.
Repeat these steps for each existing session that you use to run the Administration Tools.
You can also change the translation to support UTF-8:
-
In a PuTTY window, right click the title area and select Change Settings.
-
Create or load a saved session.
-
In the Category dialog, click Window > Translation.
-
In the "Received data assumed to be in which character set" drop-down menu, select UTF-8.
-
Click Apply.
5 - Using administration tools help
The Help on Using the Administration Tools command displays a help screen about using the Administration Tools.
The Help on Using the Administration Tools command displays a help screen about using the Administration Tools.
Most of the online help in the Administration Tools is context-sensitive. For example, if you use up/down arrows to select a command, press tab to move to the Help button, and press return, you get help on the selected command.
-
Use the up and down arrow keys to choose the command for which you want help.
-
Use the Tab key to move the cursor to the Help button.
-
Press Enter (Return).
In a dialog box
-
Use the up and down arrow keys to choose the field on which you want help.
-
Use the Tab key to move the cursor to the Help button.
-
Press Enter (Return).
Some help files are too long for a single screen. Use the up and down arrow keys to scroll through the text.
6 - Distributing changes made to the administration tools metadata
Administration Tools-specific metadata for a failed node will fall out of synchronization with other cluster nodes if you make the following changes:.
Administration Tools-specific metadata for a failed node will fall out of synchronization with other cluster nodes if you make the following changes:
When you restore the node to the database cluster, you can use the Administration Tools to update the node with the latest Administration Tools metadata:
-
Log on to a host that contains the metadata you want to transfer and start the Administration Tools. (See Using the administration tools.)
-
On the Main Menu in the Administration Tools, select Configuration Menu and click OK.
-
On the Configuration Menu, select Distribute Config Files and click OK.
-
Select AdminTools Meta-Data.
The Administration Tools metadata is distributed to every host in the cluster.
-
Restart the database.
7 - Administration tools and Management Console
You can perform most database administration tasks using the Administration Tools, but you have the additional option of using the more visual and dynamic.
You can perform most database administration tasks using the Administration Tools, but you have the additional option of using the more visual and dynamic Management Console.
The following table compares the functionality available in both interfaces. Continue to use Administration Tools and the command line to perform actions not yet supported by Management Console.
|
Vertica Functionality |
Management Console |
Administration Tools |
|
Use a Web interface for the administration of Vertica |
Yes |
No |
|
Manage/monitor one or more databases and clusters through a UI |
Yes |
No |
|
Manage multiple databases on different clusters |
Yes |
Yes |
|
View database cluster state |
Yes |
Yes |
|
View multiple cluster states |
Yes |
No |
|
Connect to the database |
Yes |
Yes |
|
Start/stop an existing database |
Yes |
Yes |
|
Stop/restart Vertica on host |
Yes |
Yes |
|
Kill a Vertica process on host |
No |
Yes |
|
Create one or more databases |
Yes |
Yes |
|
View databases |
Yes |
Yes |
|
Remove a database from view |
Yes |
No |
|
Drop a database |
Yes |
Yes |
|
Create a physical schema design (Database Designer) |
Yes |
Yes |
|
Modify a physical schema design (Database Designer) |
Yes |
Yes |
|
Set the restart policy |
No |
Yes |
|
Roll back database to the Last Good Epoch |
No |
Yes |
|
Manage clusters (add, replace, remove hosts) |
Yes |
Yes |
|
Rebalance data across nodes in the database |
Yes |
Yes |
|
Configure database parameters dynamically |
Yes |
No |
|
View database activity in relation to physical resource usage |
Yes |
No |
|
View alerts and messages dynamically |
Yes |
No |
|
View current database size usage statistics |
Yes |
No |
|
View database size usage statistics over time |
Yes |
No |
|
Upload/upgrade a license file |
Yes |
Yes |
|
Warn users about license violation on login |
Yes |
Yes |
|
Create, edit, manage, and delete users/user information |
Yes |
No |
|
Use LDAP to authenticate users with company credentials |
Yes |
Yes |
|
Manage user access to MC through roles |
Yes |
No |
|
Map Management Console users to a Vertica database |
Yes |
No |
|
Enable and disable user access to MC and/or the database |
Yes |
No |
|
Audit user activity on database |
Yes |
No |
|
Hide features unavailable to a user through roles |
Yes |
No |
|
Generate new user (non-LDAP) passwords |
Yes |
No |
Management Console Provides some, but Not All of the Functionality Provided By the Administration Tools. MC Also Provides Functionality Not Available in the Administration Tools.
See also
8 - Administration tools reference
Administration Tools, or "admintools," uses the open-source vertica-python client to perform operations on the database.
Administration Tools, or "admintools," uses the open-source vertica-python client to perform operations on the database.
The follow sections explain in detail all the steps you can perform with Vertica Administration Tools:
8.1 - Viewing database cluster state
This tool shows the current state of the nodes in the database.
This tool shows the current state of the nodes in the database.
-
On the Main Menu, select View Database Cluster State, and click OK.
The normal state of a running database is ALL UP. The normal state of a stopped database is ALL DOWN.
-
If some hosts are UP and some DOWN, restart the specific host that is down using Restart Vertica on Host from the Administration Tools, or you can start the database as described in Starting and Stopping the Database (unless you have a known node failure and want to continue in that state.)
Nodes shown as INITIALIZING or RECOVERING indicate that Failure recovery is in progress.
Nodes in other states (such as NEEDS_CATCHUP) are transitional and can be ignored unless they persist.
See also
8.2 - Connecting to the database
This tool connects to a running with.
This tool connects to a running database with vsql. You can use the Administration Tools to connect to a database from any node within the database while logged in to any user account with access privileges. You cannot use the Administration Tools to connect from a host that is not a database node. To connect from other hosts, run vsql as described in Connecting from the command line.
-
On the Main Menu, click Connect to Database, and then click OK.
-
Supply the database password if asked:
Password:
When you create a new user with the CREATE USER command, you can configure the password or leave it empty. You cannot bypass the password if the user was created with a password configured. You can change a user's password using the ALTER USER command.
The Administration Tools connect to the database and transfer control to vsql.
Welcome to vsql, the Vertica Analytic Database interactive terminal.
Type:  \h or \? for help with vsql commands
       \g or terminate with semicolon to execute query
       \q to quit

=>
See Using vsql for more information.
Note
After entering your password, you may be prompted to change your password if it has expired. See
Configuring client authentication for details of password security.
See also
8.3 - Restarting Vertica on host
This tool restarts the Vertica process on one or more hosts in a running database.
This tool restarts the Vertica process on one or more hosts in a running database. Use this tool if the Vertica process stopped or was killed on the host.
-
To view the current state nodes in cluster, on the Main Menu, select View Database Cluster State.
-
Click OK to return to the Main Menu.
-
If one or more nodes are down, select Restart Vertica on Host, and click OK.
-
Select the database that contains the host that you want to restart, and click OK.
-
Select the one or more hosts to restart, and click OK.
-
Enter the database password.
-
Select View Database Cluster State again to verify all nodes are up.
8.4 - Configuration menu options
The Configuration Menu allows you to perform the following tasks:.
The Configuration Menu allows you to perform the following tasks:
8.4.1 - Creating a database
Use the procedures below to create either an Enterprise Mode or Eon Mode database with admintools.
Use the procedures below to create either an Enterprise Mode or Eon Mode database with admintools. To create a database with an in-browser wizard in Management Console, see Creating a database using MC. For details about creating a database with admintools through the command line, see Writing administration tools scripts.
Create an Enterprise Mode database
-
On the Configuration Menu, click Create Database. Click OK.
-
Select Enterprise Mode as your database mode.
-
Enter the name of the database and an optional comment. Click OK.
-
Enter a password. See Creating a database name and password for rules.
If you do not enter a password, you are prompted to confirm: Yes to enter a superuser password, No to create a database without one.
Caution
If you do not enter a password at this point, superuser password is set to empty. Unless the database is for evaluation or academic purposes, Vertica strongly recommends that you enter a superuser password.
-
If you entered a password, enter the password again.
-
Select the hosts to include in the database. The hosts in this list are the ones that were specified at installation time (
install_vertica -s).
-
Specify the directories in which to store the catalog and data files.
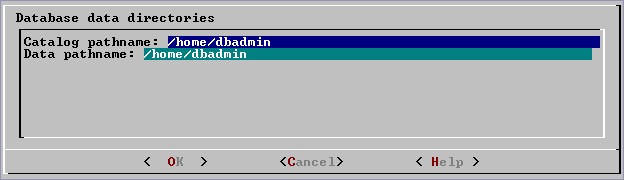
Note
Catalog and data paths must contain only alphanumeric characters and cannot have leading space characters. Failure to comply with these restrictions could result in database creation failure.
Note
Do not use a shared directory for more than one node. Data and catalog directories must be distinct for each node. Multiple nodes must not be allowed to write to the same data or catalog directory.
-
Check the current database definition for correctness. Click Yes to proceed.
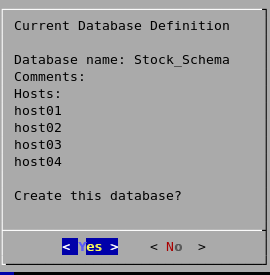
-
A message indicates that you have successfully created a database. Click OK.
You can also create an Enterprise Mode database using admintools through the command line, for example:
$ admintools -t create_db --data_path=/home/dbadmin --catalog_path=/home/dbadmin --database=verticadb --password=password --hosts=localhost
For more information, see Writing administration tools scripts.
Create an Eon Mode database
Note
Currently, the admintools menu interface does not support creating an Eon Mode database on Google Cloud Platform. Use the MC or the admintools command line to create an Eon Mode database instead.
-
On the Configuration Menu, click Create Database. Click OK.
-
Select Eon Mode as your database mode.
-
Enter the name of the database and an optional comment. Click OK.
-
Enter a password. See Creating a database name and password for rules.
AWS only: If you do not enter a password, you are prompted to confirm: Yes to enter a superuser password, No to create a database without one.
Caution
If you do not enter a password at this point, superuser password is set to empty. Unless the database is for evaluation or academic purposes, Vertica strongly recommends that you enter a superuser password.
-
If you entered a password, enter the password again.
-
Select the hosts to include in the database. The hosts in this list are those specified at installation time (
install_vertica -s).
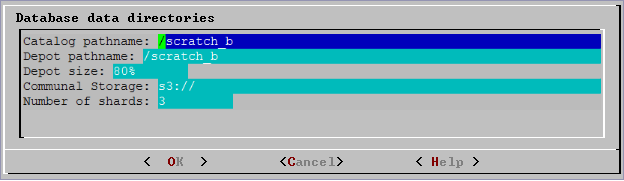
-
Specify the directories in which to store the catalog and depot, depot size, communal storage location, and number of shards.
-
Depot Size: Use an integer followed by %, K, G, or T. Default is 60% of the disk total disk space of the filesystem storing the depot.
-
Communal Storage: Use an existing Amazon S3 bucket in the same region as your instances. Specify a new subfolder name, which Vertica will dynamically create within the existing S3 bucket. For example, s3://existingbucket/newstorage1. You can create a new subfolder within existing ones, but database creation will roll back if you do not specify any new subfolder name.
-
Number of Shards: Use a whole number. The default is equal to the number of nodes. For optimal performance, the number of shards should be no greater than 2x the number of nodes. When the number of nodes is greater than the number of shards (with ETS), the throughput of dashboard queries improves. When the number of shards exceeds the number of nodes, you can expand the cluster in the future to improve the performance of long analytic queries.
Note
Catalog and depot paths must contain only alphanumeric characters and cannot have leading space characters. Failure to comply with these restrictions could result in database creation failure.
-
Check the current database definition for correctness. Click Yes to proceed.
-
A message indicates that you successfully created a database. Click OK.
In on-premises, AWS, and Azure environments, you can create an Eon Mode database using admintools through the command line. For instructions specific to your environment, see Create a database in Eon Mode.
8.4.2 - Dropping a database
This tool drops an existing.
This tool drops an existing database. Only the Database Superuser is allowed to drop a database.
-
Stop the database.
-
On the Configuration Menu, click Drop Database and then click OK.
-
Select the database to drop and click OK.
-
Click Yes to confirm that you want to drop the database.
-
Type yes and click OK to reconfirm that you really want to drop the database.
-
A message indicates that you have successfully dropped the database. Click OK.
When Vertica drops the database, it also automatically drops the node definitions that refer to the database . The following exceptions apply:
-
Another database uses a node definition. If another database refers to any of these node definitions, none of the node definitions are dropped.
-
A node definition is the only node defined for the host. (Vertica uses node definitions to locate hosts that are available for database creation, so removing the only node defined for a host would make the host unavailable for new databases.)
8.4.3 - Viewing a database
This tool displays the characteristics of an existing .
This tool displays the characteristics of an existing database.
-
On the Configuration Menu, select View Database and click OK.
-
Select the database to view.
-
Vertica displays the following information about the database:
-
The name of the database.
-
The name and location of the log file for the database.
-
The hosts within the database cluster.
-
The value of the restart policy setting.
Note: This setting determines whether nodes within a K-Safe database are restarted when they are rebooted. See Setting the restart policy.
-
The database port.
-
The name and location of the catalog directory.
8.4.4 - Setting the restart policy
The Restart Policy enables you to determine whether or not nodes in a K-Safe are automatically restarted when they are rebooted.
The Restart Policy enables you to determine whether or not nodes in a K-Safe database are automatically restarted when they are rebooted. Since this feature does not automatically restart nodes if the entire database is DOWN, it is not useful for databases that are not K-Safe.
To set the Restart Policy for a database:
-
Open the Administration Tools.
-
On the Main Menu, select Configuration Menu, and click OK.
-
In the Configuration Menu, select Set Restart Policy, and click OK.
-
Select the database for which you want to set the Restart Policy, and click OK.
-
Select one of the following policies for the database:
-
Never — Nodes are never restarted automatically.
-
K-Safe — Nodes are automatically restarted if the database cluster is still UP. This is the default setting.
-
Always — Node on a single node database is restarted automatically.
Note
Always does not work if a single node database was not shutdown cleanly or crashed.
-
Click OK.
Best practice for restoring failed hardware
Following this procedure will prevent Vertica from misdiagnosing missing disk or bad mounts as data corruptions, which would result in a time-consuming, full-node recovery.
If a server fails due to hardware issues, for example a bad disk or a failed controller, upon repairing the hardware:
-
Reboot the machine into runlevel 1, which is a root and console-only mode.
Runlevel 1 prevents network connectivity and keeps Vertica from attempting to reconnect to the cluster.
-
In runlevel 1, validate that the hardware has been repaired, the controllers are online, and any RAID recover is able to proceed.
Note
You do not need to initialize RAID recover in runlevel 1; simply validate that it can recover.
-
Once the hardware is confirmed consistent, only then reboot to runlevel 3 or higher.
At this point, the network activates, and Vertica rejoins the cluster and automatically recovers any missing data. Note that, on a single-node database, if any files that were associated with a projection have been deleted or corrupted, Vertica will delete all files associated with that projection, which could result in data loss.
8.4.5 - Installing external procedure executable files
-
Run the Administration tools.
$ /opt/vertica/bin/adminTools
-
On the AdminTools Main Menu, click Configuration Menu, and then click OK.
-
On the Configuration Menu, click Install External Procedure and then click OK.
-
Select the database on which you want to install the external procedure.
-
Either select the file to install or manually type the complete file path, and then click OK.
-
If you are not the superuser, you are prompted to enter your password and click OK.
The Administration Tools automatically create the database-name/procedures directory on each node in the database and installs the external procedure in these directories for you.
-
Click OK in the dialog that indicates that the installation was successful.
8.5 - Advanced menu options
The Advanced Menu options allow you to perform the following tasks:.
The Advanced Menu options allow you to perform the following tasks:
8.5.1 - Rolling back the database to the last good epoch
Vertica provides the ability to roll the entire database back to a specific primarily to assist in the correction of human errors during data loads or other accidental corruptions.
Vertica provides the ability to roll the entire database back to a specific epoch primarily to assist in the correction of human errors during data loads or other accidental corruptions. For example, suppose that you have been performing a bulk load and the cluster went down during a particular COPY command. You might want to discard all epochs back to the point at which the previous COPY command committed and run the one that did not finish again. You can determine that point by examining the log files (see Monitoring the Log Files).
-
On the Advanced Menu, select Roll Back Database to Last Good Epoch.
-
Select the database to roll back. The database must be stopped.
-
Accept the suggested restart epoch or specify a different one.
-
Confirm that you want to discard the changes after the specified epoch.
The database restarts successfully.
Important
The default value of HistoryRetentionTime is 0, which means that Vertica only keeps historical data when nodes are down. This settings prevents the use of the Administration tools 'Roll Back Database to Last Good Epoch' option because the AHM remains close to the current epoch. Vertica cannot roll back to an epoch that precedes the AHM.
If you rely on the Roll Back option to remove recently loaded data, consider setting a day-wide window for removing loaded data. For example:
=> ALTER DATABASE DEFAULT SET HistoryRetentionTime = 86400;
8.5.2 - Stopping Vertica on host
This command attempts to gracefully shut down the Vertica process on a single node.
This command attempts to gracefully shut down the Vertica process on a single node.
Caution
Do not use this command to shut down the entire cluster. Instead,
stop the database to perform a clean shutdown that minimizes data loss.
-
On the Advanced Menu, select Stop Vertica on Host and click OK.
-
Select the hosts to stop.
-
Confirm that you want to stop the hosts.
If the command succeeds View Database Cluster State shows that the selected hosts are DOWN.
If the command fails to stop any selected nodes, proceed to Killing Vertica Process on Host.
8.5.3 - Killing the Vertica process on host
This command sends a kill signal to the Vertica process on a node.
This command sends a kill signal to the Vertica process on a node.
-
On the Advanced menu, select Kill Vertica Process on Host and click OK.
-
Select the hosts on which to kills the Vertica process.
-
Confirm that you want to stop the processes.
-
If the command succeeds, View Database Cluster State shows that the selected hosts are DOWN.
8.5.4 - Upgrading a Vertica license key
The following steps are for licensed Vertica users.
The following steps are for licensed Vertica users. Completing the steps copies a license key file into the database. See Managing licenses for more information.
-
On the Advanced menu select Upgrade License Key . Click OK.
-
Select the database for which to upgrade the license key.
-
Enter the absolute pathname of your downloaded license key file (for example,
/tmp/vlicense.dat). Click OK.
-
Click OK when you see a message indicating that the upgrade succeeded.
Note
If you are using Vertica Community Edition, follow the instructions in
Vertica license changes for instructions to upgrade to a Vertica Premium Edition license key.
8.5.5 - Managing clusters
Cluster Management lets you add, replace, or remove hosts from a database cluster.
Cluster Management lets you add, replace, or remove hosts from a database cluster. These processes are usually part of a larger process of adding, removing, or replacing a database node.
Using cluster management
To use Cluster Management:
-
From the Main Menu, select Advanced Menu, and then click OK.
-
In the Advanced Menu, select Cluster Management, and then click OK.
-
Select one of the following, and then click OK.
8.5.6 - Getting help on administration tools
The Help Using the Administration Tools command displays a help screen about using the Administration Tools.
The Help Using the Administration Tools command displays a help screen about using the Administration Tools.
Most of the online help in the Administration Tools is context-sensitive. For example, if you up the use up/down arrows to select a command, press tab to move to the Help button, and press return, you get help on the selected command.
8.5.7 - Administration tools metadata
The Administration Tools configuration data (metadata) contains information that databases need to start, such as the hostname/IP address of each participating host in the database cluster.
The Administration Tools configuration data (metadata) contains information that databases need to start, such as the hostname/IP address of each participating host in the database cluster.
To facilitate hostname resolution within the Administration Tools, at the command line, and inside the installation utility, Vertica enforces all hostnames you provide through the Administration Tools to use IP addresses:
-
During installation
Vertica immediately converts any hostname you provide through command line options --hosts, -add-hosts or --remove-hosts to its IP address equivalent.
-
If you provide a hostname during installation that resolves to multiple IP addresses (such as in multi-homed systems), the installer prompts you to choose one IP address.
-
Vertica retains the name you give for messages and prompts only; internally it stores these hostnames as IP addresses.
-
Within the Administration Tools
All hosts are in IP form to allow for direct comparisons (for example db = database = database.example.com).
-
At the command line
Vertica converts any hostname value to an IP address that it uses to look up the host in the configuration metadata. If a host has multiple IP addresses that are resolved, Vertica tests each IP address to see if it resides in the metadata, choosing the first match. No match indicates that the host is not part of the database cluster.
Metadata is more portable because Vertica does not require the names of the hosts in the cluster to be exactly the same when you install or upgrade your database.
8.6 - Administration tools connection behavior and requirements
The behavior of admintools when it connects to and performs operations on a database may vary based on your configuration.
The behavior of admintools when it connects to and performs operations on a database may vary based on your configuration. In particular, admintools considers its connection to other nodes, the status of those nodes, and the authentication method used by dbadmin.
Connection requirements and authentication
-
admintools uses passwordless SSH connections between cluster hosts for most operations, which is configured or confirmed during installation with the install_vertica script
-
For most situations, when issuing commands to the database, admintools prefers to uses its SSH connection to a target host and uses a localhost client connection to the Vertica database
-
The incoming IP address determines the authentication method used. That is, a client connection may have different behavior from a local connection, which may be trusted by default
-
dbadmin should have a local trust or password-based authentication method
-
When deciding which host to use for multi-step operations, admintools prefers localhost, and then to reconnect to known-to-be-good nodes
K-safety support
The Administration Tools allow certain operations on a K-Safe database, even if some nodes are unresponsive.
The database must have been marked as K-Safe using the MARK_DESIGN_KSAFE function.
The following management functions within the Administration Tools are operational when some nodes are unresponsive.
-
View database cluster state
-
Connect to database
-
Start database (including manual recovery)
-
Stop database
-
Replace node (assuming node that is down is the one being replaced)
-
View database parameters
-
Upgrade license key
The following management functions within the Administration Tools require that all nodes be UP in order to be operational:
8.7 - Writing administration tools scripts
You can invoke most Administration Tools from the command line or a shell script.
You can invoke most Administration Tools from the command line or a shell script.
Syntax
/opt/vertica/bin/admintools {
     { -h | --help }
   | { -a | --help_all}
   | { [--debug ] { -t | --tool } toolname [ tool-args ] }
}
Note
For convenience, add
/opt/vertica/bin to your search path.
Parameters
-h
-help |
Outputs abbreviated help. |
-a
-help_all |
Outputs verbose help, which lists all command-line sub-commands and options. |
[debug] { -t | -tool }toolname [args] |
Specifies the tool to run, where toolname is one of the tools listed in the help output described below, and args is one or more comma-delimited toolname arguments. If you include the debug option, Vertica logs debug information during tool execution. |
To return a list of all available tools, enter admintools -h at a command prompt.
To display help for a specific tool and its options or commands, qualify the specified tool name with --help or -h, as shown in the example below:
$ admintools -t connect_db --help
Usage: connect_db [options]

Options:
  -h, --help            show this help message and exit
  -d DB, --database=DB  Name of database to connect
  -p DBPASSWORD, --password=DBPASSWORD
                        Database password in single quotes
To list all available tools and their commands and options in individual help text, enter admintools -a.
Usage:
adminTools [-t | --tool] toolName [options]
Valid tools are:
command_host
connect_db
create_db
db_add_node
db_add_subcluster
db_remove_node
db_remove_subcluster
db_replace_node
db_status
distribute_config_files
drop_db
host_to_node
install_package
install_procedure
kill_host
kill_node
license_audit
list_allnodes
list_db
list_host
list_node
list_packages
logrotate
node_map
re_ip
rebalance_data
restart_db
restart_node
restart_subcluster
return_epoch
revive_db
set_restart_policy
set_ssl_params
show_active_db
start_db
stop_db
stop_host
stop_node
stop_subcluster
uninstall_package
upgrade_license_key
view_cluster
-------------------------------------------------------------------------
Usage: command_host [options]
Options:
-h, --help show this help message and exit
-c CMD, --command=CMD
Command to run
-F, --force Provide the force cleanup flag. Only applies to start,
restart, condrestart. For other options it is ignored.
-------------------------------------------------------------------------
Usage: connect_db [options]
Options:
-h, --help show this help message and exit
-d DB, --database=DB Name of database to connect
-p DBPASSWORD, --password=DBPASSWORD
Database password in single quotes
-------------------------------------------------------------------------
Usage: create_db [options]
Options:
-h, --help show this help message and exit
-D DATA, --data_path=DATA
Path of data directory[optional] if not using compat21
-c CATALOG, --catalog_path=CATALOG
Path of catalog directory[optional] if not using
compat21
--compat21 (deprecated) Use Vertica 2.1 method using node names
instead of hostnames
-d DB, --database=DB Name of database to be created
-l LICENSEFILE, --license=LICENSEFILE
Database license [optional]
-p DBPASSWORD, --password=DBPASSWORD
Database password in single quotes [optional]
-P POLICY, --policy=POLICY
Database restart policy [optional]
-s HOSTS, --hosts=HOSTS
comma-separated list of hosts to participate in
database
--shard-count=SHARD_COUNT
[Eon only] Number of shards in the database
--communal-storage-location=COMMUNAL_STORAGE_LOCATION
[Eon only] Location of communal storage
-x COMMUNAL_STORAGE_PARAMS, --communal-storage-params=COMMUNAL_STORAGE_PARAMS
[Eon only] Location of communal storage parameter file
--depot-path=DEPOT_PATH
[Eon only] Path to depot directory
--depot-size=DEPOT_SIZE
[Eon only] Size of depot
--force-cleanup-on-failure
Force removal of existing directories on failure of
command
--force-removal-at-creation
Force removal of existing directories before creating
the database
--timeout=NONINTERACTIVE_TIMEOUT
set a timeout (in seconds) to wait for actions to
complete ('never') will wait forever (implicitly sets
-i)
-i, --noprompts do not stop and wait for user input(default false).
Setting this implies a timeout of 20 min.
-------------------------------------------------------------------------
Usage: db_add_node [options]
Options:
-h, --help show this help message and exit
-d DB, --database=DB Name of the database
-s HOSTS, --hosts=HOSTS
Comma separated list of hosts to add to database
-p DBPASSWORD, --password=DBPASSWORD
Database password in single quotes
-a AHOSTS, --add=AHOSTS
Comma separated list of hosts to add to database
-c SCNAME, --subcluster=SCNAME
Name of subcluster for the new node
--timeout=NONINTERACTIVE_TIMEOUT
set a timeout (in seconds) to wait for actions to
complete ('never') will wait forever (implicitly sets
-i)
-i, --noprompts do not stop and wait for user input(default false).
Setting this implies a timeout of 20 min.
--compat21 (deprecated) Use Vertica 2.1 method using node names
instead of hostnames
-------------------------------------------------------------------------
Usage: db_add_subcluster [options]
Options:
-h, --help show this help message and exit
-d DB, --database=DB Name of database to be modified
-s HOSTS, --hosts=HOSTS
Comma separated list of hosts to add to the subcluster
-p DBPASSWORD, --password=DBPASSWORD
Database password in single quotes
-c SCNAME, --subcluster=SCNAME
Name of the new subcluster for the new node
--is-primary Create primary subcluster
--is-secondary Create secondary subcluster
--control-set-size=CONTROLSETSIZE
Set the number of nodes that will run spread within
the subcluster
--like=CLONESUBCLUSTER
Name of an existing subcluster from which to clone
properties for the new subcluster
--timeout=NONINTERACTIVE_TIMEOUT
set a timeout (in seconds) to wait for actions to
complete ('never') will wait forever (implicitly sets
-i)
-i, --noprompts do not stop and wait for user input(default false).
Setting this implies a timeout of 20 min.
-------------------------------------------------------------------------
Usage: db_remove_node [options]
Options:
-h, --help show this help message and exit
-d DB, --database=DB Name of database to be modified
-s HOSTS, --hosts=HOSTS
Name of the host to remove from the db
-p DBPASSWORD, --password=DBPASSWORD
Database password in single quotes
--timeout=NONINTERACTIVE_TIMEOUT
set a timeout (in seconds) to wait for actions to
complete ('never') will wait forever (implicitly sets
-i)
-i, --noprompts do not stop and wait for user input(default false).
Setting this implies a timeout of 20 min.
--compat21 (deprecated) Use Vertica 2.1 method using node names
instead of hostnames
--skip-directory-cleanup
Caution: this option will force you to do a manual
cleanup. This option skips directory deletion during
remove node. This is best used in a cloud environment
where the hosts being removed will be subsequently
discarded.
-------------------------------------------------------------------------
Usage: db_remove_subcluster [options]
Options:
-h, --help show this help message and exit
-d DB, --database=DB Name of database to be modified
-c SCNAME, --subcluster=SCNAME
Name of subcluster to be removed
-p DBPASSWORD, --password=DBPASSWORD
Database password in single quotes
--timeout=NONINTERACTIVE_TIMEOUT
set a timeout (in seconds) to wait for actions to
complete ('never') will wait forever (implicitly sets
-i)
-i, --noprompts do not stop and wait for user input(default false).
Setting this implies a timeout of 20 min.
--skip-directory-cleanup
Caution: this option will force you to do a manual
cleanup. This option skips directory deletion during
remove subcluster. This is best used in a cloud
environment where the hosts being removed will be
subsequently discarded.
-------------------------------------------------------------------------
Usage: db_replace_node [options]
Options:
-h, --help show this help message and exit
-d DB, --database=DB Name of the database
-o ORIGINAL, --original=ORIGINAL
Name of host you wish to replace
-n NEWHOST, --new=NEWHOST
Name of the replacement host
-p DBPASSWORD, --password=DBPASSWORD
Database password in single quotes
--timeout=NONINTERACTIVE_TIMEOUT
set a timeout (in seconds) to wait for actions to
complete ('never') will wait forever (implicitly sets
-i)
-i, --noprompts do not stop and wait for user input(default false).
Setting this implies a timeout of 20 min.
-------------------------------------------------------------------------
Usage: db_status [options]
Options:
-h, --help show this help message and exit
-s STATUS, --status=STATUS
Database status UP,DOWN or ALL(list running dbs -
UP,list down dbs - DOWN list all dbs - ALL
-------------------------------------------------------------------------
Usage: distribute_config_files
Sends admintools.conf from local host to all other hosts in the cluster
Options:
-h, --help show this help message and exit
-------------------------------------------------------------------------
Usage: drop_db [options]
Options:
-h, --help show this help message and exit
-d DB, --database=DB Database to be dropped
-------------------------------------------------------------------------
Usage: host_to_node [options]
Options:
-h, --help show this help message and exit
-s HOST, --host=HOST comma separated list of hostnames which is to be
converted into its corresponding nodenames
-d DB, --database=DB show only node/host mapping for this database.
-------------------------------------------------------------------------
Usage: admintools -t install_package --package PACKAGE -d DB -p PASSWORD
Examples:
admintools -t install_package -d mydb -p 'mypasswd' --package default
# (above) install all default packages that aren't currently installed
admintools -t install_package -d mydb -p 'mypasswd' --package default --force-reinstall
# (above) upgrade (re-install) all default packages to the current version
admintools -t install_package -d mydb -p 'mypasswd' --package hcat
# (above) install package hcat
See also: admintools -t list_packages
Options:
-h, --help show this help message and exit
-d DBNAME, --dbname=DBNAME
database name
-p PASSWORD, --password=PASSWORD
database admin password
-P PACKAGE, --package=PACKAGE
specify package or 'all' or 'default'
--force-reinstall Force a package to be re-installed even if it is
already installed.
-------------------------------------------------------------------------
Usage: install_procedure [options]
Options:
-h, --help show this help message and exit
-d DBNAME, --database=DBNAME
Name of database for installed procedure
-f PROCPATH, --file=PROCPATH
Path of procedure file to install
-p OWNERPASSWORD, --password=OWNERPASSWORD
Password of procedure file owner
-------------------------------------------------------------------------
Usage: kill_host [options]
Options:
-h, --help show this help message and exit
-s HOSTS, --hosts=HOSTS
comma-separated list of hosts on which the vertica
process is to be killed using a SIGKILL signal
--compat21 (deprecated) Use Vertica 2.1 method using node names
instead of hostnames
-------------------------------------------------------------------------
Usage: kill_node [options]
Options:
-h, --help show this help message and exit
-s HOSTS, --hosts=HOSTS
comma-separated list of hosts on which the vertica
process is to be killed using a SIGKILL signal
--compat21 (deprecated) Use Vertica 2.1 method using node names
instead of hostnames
-------------------------------------------------------------------------
Usage: license_audit --dbname DB_NAME [OPTIONS]
Runs audit and collects audit results.
Options:
-h, --help show this help message and exit
-d DATABASE, --database=DATABASE
Name of the database to retrieve audit results
-p PASSWORD, --password=PASSWORD
Password for database admin
-q, --quiet Do not print status messages.
-f FILE, --file=FILE Output results to FILE.
-------------------------------------------------------------------------
Usage: list_allnodes [options]
Options:
-h, --help show this help message and exit
-------------------------------------------------------------------------
Usage: list_db [options]
Options:
-h, --help show this help message and exit
-d DB, --database=DB Name of database to be listed
-------------------------------------------------------------------------
Usage: list_host [options]
Options:
-h, --help show this help message and exit
-------------------------------------------------------------------------
Usage: list_node [options]
Options:
-h, --help show this help message and exit
-n NODENAME, --node=NODENAME
Name of the node to be listed
-------------------------------------------------------------------------
Usage: admintools -t list_packages [OPTIONS]
Examples:
admintools -t list_packages # lists all available packages
admintools -t list_packages --package all # lists all available packages
admintools -t list_packages --package default # list all packages installed by default
admintools -t list_packages -d mydb --password 'mypasswd' # list the status of all packages in mydb
Options:
-h, --help show this help message and exit
-d DBNAME, --dbname=DBNAME
database name
-p PASSWORD, --password=PASSWORD
database admin password
-P PACKAGE, --package=PACKAGE
specify package or 'all' or 'default'
-------------------------------------------------------------------------
Usage: logrotateconfig [options]
Options:
-h, --help show this help message and exit
-d DBNAME, --dbname=DBNAME
database name
-r ROTATION, --rotation=ROTATION
set how often the log is rotated.[
daily|weekly|monthly ]
-s MAXLOGSZ, --maxsize=MAXLOGSZ
set maximum log size before rotation is forced.
-k KEEP, --keep=KEEP set # of old logs to keep
-------------------------------------------------------------------------
Usage: node_map [options]
Options:
-h, --help show this help message and exit
-d DB, --database=DB List only data for this database.
-------------------------------------------------------------------------
Usage: re_ip [options]
Replaces the IP addresses of hosts and databases in a cluster, or changes the
control messaging mode/addresses of a database.
Options:
-h, --help show this help message and exit
-f MAPFILE, --file=MAPFILE
A text file with IP mapping information. If the -O
option is not used, the command replaces the IP
addresses of the hosts in the cluster and all
databases for those hosts. In this case, the format of
each line in MAPFILE is: [oldIPaddress newIPaddress]
or [oldIPaddress newIPaddress, newControlAddress,
newControlBroadcast]. If the former,
'newControlAddress' and 'newControlBroadcast' would
set to default values. Usage: $ admintools -t re_ip -f
<mapfile>
-O, --db-only Updates the control messaging addresses of a database.
Also used for error recovery (when re_ip encounters
some certain errors, a mapfile is auto-generated).
Format of each line in MAPFILE: [NodeName
AssociatedNodeIPaddress, newControlAddress,
newControlBrodcast]. 'NodeName' and
'AssociatedNodeIPaddress' must be consistent with
admintools.conf. Usage: $ admintools -t re_ip -f
<mapfile> -O -d <db_name>
-i, --noprompts System does not prompt for the validation of the new
settings before performing the re_ip operation. Prompting is on
by default.
-T, --point-to-point Sets the control messaging mode of a database to
point-to-point. Usage: $ admintools -t re_ip -d
<db_name> -T
-U, --broadcast Sets the control messaging mode of a database to
broadcast. Usage: $ admintools -t re_ip -d <db_name>
-U
-d DB, --database=DB Name of a database. Required with the following
options: -O, -T, -U.
-------------------------------------------------------------------------
Usage: rebalance_data [options]
Options:
-h, --help show this help message and exit
-d DBNAME, --dbname=DBNAME
database name
-k KSAFETY, --ksafety=KSAFETY
specify the new k value to use
-p PASSWORD, --password=PASSWORD
--script Don't re-balance the data, just provide a script for
later use.
-------------------------------------------------------------------------
Usage: restart_db [options]
Options:
-h, --help show this help message and exit
-d DB, --database=DB Name of database to be restarted
-e EPOCH, --epoch=EPOCH
Epoch at which the database is to be restarted. If
'last' is given as argument the db is restarted from
the last good epoch.
-p DBPASSWORD, --password=DBPASSWORD
Database password in single quotes
-k, --allow-fallback-keygen
Generate spread encryption key from Vertica. Use under
support guidance only.
--timeout=NONINTERACTIVE_TIMEOUT
set a timeout (in seconds) to wait for actions to
complete ('never') will wait forever (implicitly sets
-i)
-i, --noprompts do not stop and wait for user input(default false).
Setting this implies a timeout of 20 min.
-------------------------------------------------------------------------
Usage: restart_node [options]
Options:
-h, --help show this help message and exit
-s HOSTS, --hosts=HOSTS
comma-separated list of hosts to be restarted
-d DB, --database=DB Name of database whose node is to be restarted
-p DBPASSWORD, --password=DBPASSWORD
Database password in single quotes
--new-host-ips=NEWHOSTS
comma-separated list of new IPs for the hosts to be
restarted
--timeout=NONINTERACTIVE_TIMEOUT
set a timeout (in seconds) to wait for actions to
complete ('never') will wait forever (implicitly sets
-i)
-i, --noprompts do not stop and wait for user input(default false).
Setting this implies a timeout of 20 min.
-F, --force force the node to start and auto recover if necessary
--compat21 (deprecated) Use Vertica 2.1 method using node names
instead of hostnames
--waitfordown-timeout=WAITTIME
Seconds to wait until nodes to be restarted are down
-------------------------------------------------------------------------
Usage: restart_subcluster [options]
Options:
-h, --help show this help message and exit
-d DB, --database=DB Name of database whose subcluster is to be restarted
-c SCNAME, --subcluster=SCNAME
Name of subcluster to be restarted
-p DBPASSWORD, --password=DBPASSWORD
Database password in single quotes
-s NEWHOSTS, --hosts=NEWHOSTS
Comma separated list of new hosts to rebind to the
nodes
--timeout=NONINTERACTIVE_TIMEOUT
set a timeout (in seconds) to wait for actions to
complete ('never') will wait forever (implicitly sets
-i)
-i, --noprompts do not stop and wait for user input(default false).
Setting this implies a timeout of 20 min.
-F, --force Force the nodes in the subcluster to start and auto
recover if necessary
-------------------------------------------------------------------------
Usage: return_epoch [options]
Options:
-h, --help show this help message and exit
-d DB, --database=DB Name of database
-p PASSWORD, --password=PASSWORD
Database password in single quotes
-------------------------------------------------------------------------
Usage: revive_db [options]
Options:
-h, --help show this help message and exit
-s HOSTS, --hosts=HOSTS
comma-separated list of hosts to participate in
database
-n NODEHOST, --node-and-host=NODEHOST
pair of nodename-hostname values delimited by "|" eg:
"v_testdb_node0001|10.0.0.1"Note: Each node-host pair
has to be specified as a new argument
--communal-storage-location=COMMUNAL_STORAGE_LOCATION
Location of communal storage
-x COMMUNAL_STORAGE_PARAMS, --communal-storage-params=COMMUNAL_STORAGE_PARAMS
Location of communal storage parameter file
-d DBNAME, --database=DBNAME
Name of database to be revived
--force Force cleanup of existing catalog directory
--display-only Describe the database on communal storage, and exit
--strict-validation Print warnings instead of raising errors while
validating cluster_config.json
-------------------------------------------------------------------------
Usage: sandbox_subcluster [options]
Options:
-h, --help show this help message and exit
-d DB, --database=DB Name of database to be modified
-p DBPASSWORD, --password=DBPASSWORD
Database password in single quotes
-c SCNAME, --subcluster=SCNAME
Name of subcluster to be sandboxed
-b SBNAME, --sandbox=SBNAME
Name of the sandbox
--timeout=NONINTERACTIVE_TIMEOUT
set a timeout (in seconds) to wait for actions to
complete ('never') will wait forever (implicitly sets
-i)
-i, --noprompts do not stop and wait for user input(default false).
Setting this implies a timeout of 20 min.
-------------------------------------------------------------------------
Usage: set_restart_policy [options]
Options:
-h, --help show this help message and exit
-d DB, --database=DB Name of database for which to set policy
-p POLICY, --policy=POLICY
Restart policy: ('never', 'ksafe', 'always')
-------------------------------------------------------------------------
Usage: set_ssl_params [options]
Options:
-h, --help show this help message and exit
-d DB, --database=DB Name of database whose parameters will be set
-k KEYFILE, --ssl-key-file=KEYFILE
Path to SSL private key file
-c CERTFILE, --ssl-cert-file=CERTFILE
Path to SSL certificate file
-a CAFILE, --ssl-ca-file=CAFILE
Path to SSL CA file
-p DBPASSWORD, --password=DBPASSWORD
Database password in single quotes
-------------------------------------------------------------------------
Usage: show_active_db [options]
Options:
-h, --help show this help message and exit
-------------------------------------------------------------------------
Usage: start_db [options]
Options:
-h, --help show this help message and exit
-d DB, --database=DB Name of database to be started
-p DBPASSWORD, --password=DBPASSWORD
Database password in single quotes
--timeout=NONINTERACTIVE_TIMEOUT
set a timeout (in seconds) to wait for actions to
complete ('never') will wait forever (implicitly sets
-i)
-i, --noprompts do not stop and wait for user input(default false).
Setting this implies a timeout of 20 min.
-F, --force force the database to start at an epoch before data
consistency problems were detected.
-U, --unsafe Start database unsafely, skipping recovery. Use under
support guidance only.
-k, --allow-fallback-keygen
Generate spread encryption key from Vertica. Use under
support guidance only.
-s HOSTS, --hosts=HOSTS
comma-separated list of hosts to be started
--fast Attempt fast startup on un-encrypted eon db. Fast
startup will use startup information from
cluster_config.json
-------------------------------------------------------------------------
Usage: stop_db [options]
Options:
-h, --help show this help message and exit
-d DB, --database=DB Name of database to be stopped
-p DBPASSWORD, --password=DBPASSWORD
Database password in single quotes
-F, --force Force the databases to shutdown, even if users are
connected.
-z, --if-no-users Only shutdown if no users are connected.
If any users are connected, exit with an error.
-n DRAIN_SECONDS, --drain-seconds=DRAIN_SECONDS
Eon db only: seconds to wait for user connections to close.
Default value is 60 seconds.
When the time expires, connections will be forcibly closed
and the db will shut down.
--timeout=NONINTERACTIVE_TIMEOUT
set a timeout (in seconds) to wait for actions to
complete ('never') will wait forever (implicitly sets
-i)
-i, --noprompts do not stop and wait for user input(default false).
Setting this implies a timeout of 20 min.
-------------------------------------------------------------------------
Usage: stop_host [options]
Options:
-h, --help show this help message and exit
-s HOSTS, --hosts=HOSTS
comma-separated list of hosts on which the vertica
process is to be killed using a SIGTERM signal
--compat21 (deprecated) Use Vertica 2.1 method using node names
instead of hostnames
-------------------------------------------------------------------------
Usage: stop_node [options]
Options:
-h, --help show this help message and exit
-s HOSTS, --hosts=HOSTS
comma-separated list of hosts on which the vertica
process is to be killed using a SIGTERM signal
--compat21 (deprecated) Use Vertica 2.1 method using node names
instead of hostnames
-------------------------------------------------------------------------
Usage: stop_subcluster [options]
Options:
-h, --help show this help message and exit
-d DB, --database=DB Name of database whose subcluster is to be stopped
-c SCNAME, --subcluster=SCNAME
Name of subcluster to be stopped
-p DBPASSWORD, --password=DBPASSWORD
Database password in single quotes
-n DRAIN_SECONDS, --drain-seconds=DRAIN_SECONDS
Seconds to wait for user connections to close.
Default value is 60 seconds.
When the time expires, connections will be forcibly closed
and the db will shut down.
-F, --force Force the subcluster to shutdown immediately,
even if users are connected.
--timeout=NONINTERACTIVE_TIMEOUT
set a timeout (in seconds) to wait for actions to
complete ('never') will wait forever (implicitly sets
-i)
-i, --noprompts do not stop and wait for user input(default false).
Setting this implies a timeout of 20 min.
-------------------------------------------------------------------------
Usage: uninstall_package [options]
Options:
-h, --help show this help message and exit
-d DBNAME, --dbname=DBNAME
database name
-p PASSWORD, --password=PASSWORD
database admin password
-P PACKAGE, --package=PACKAGE
specify package or 'all' or 'default'
-------------------------------------------------------------------------
Usage: unsandbox_subcluster [options]
Options:
-h, --help show this help message and exit
-d DB, --database=DB Name of database to be modified
-p DBPASSWORD, --password=DBPASSWORD
Database password in single quotes
-c SCNAME, --subcluster=SCNAME
Name of subcluster to be un-sandboxed
--timeout=NONINTERACTIVE_TIMEOUT
set a timeout (in seconds) to wait for actions to
complete ('never') will wait forever (implicitly sets
-i)
-i, --noprompts do not stop and wait for user input(default false).
Setting this implies a timeout of 20 min.
-------------------------------------------------------------------------
Usage: upgrade_license_key --database mydb --license my_license.key
upgrade_license_key --install --license my_license.key
Updates the vertica license.
Without '--install', updates the license used by the database and
the admintools license cache.
With '--install', updates the license cache in admintools that
is used for creating new databases.
Options:
-h, --help show this help message and exit
-d DB, --database=DB Name of database. Cannot be used with --install.
-l LICENSE, --license=LICENSE
Required - path to the license.
-i, --install When option is included, command will only update the
admintools license cache. Cannot be used with
--database.
-p PASSWORD, --password=PASSWORD
Database password.
-------------------------------------------------------------------------
Usage: view_cluster [options]
Options:
-h, --help show this help message and exit
-x, --xpand show the full cluster state, node by node
-d DB, --database=DB filter the output for a single database