This is the multi-page printable view of this section.
Click here to print.
Return to the regular view of this page.
Unified console
Brief overview of the unified console
Unified Console (UC) is an AI-enabled database management platform that allows you to interact with Vertica database through a single, unified interface. UC combines traditional database operations with AI capabilities to simplify query generation, improve performance, and enhance productivity. UC is designed for database administrators and data professionals who need efficient, secure, and intelligent access to data systems.
What you can do with UC
With UC, you can:
- Write SQL using natural language.
- Validate queries against your database schema.
- Analyze query performance and improve efficiency .
- Understand complex queries with AI-generated explanation.
- Execute queries securely with audit tracking.
- Configure and use AI models for different workloads.
Vertica AI Assist
Vertica AI Assist is a natural language interface that enables you to interact with your database using AI capabilities. It helps you generate, execute, and optimize SQL queries without requiring advanced knowledge of SQL.
With Vertica AI Assist, you can:
- Reduce the time spent writing repetitive SQL queries.
- Generate, execute, and optimize SQL queries.
- Improve productivity when working with databases across teams.
1 - Install UC
Brief overview of UC installation
By default, UC is installed along with MC.
Pre-requisites
Before installing UC, note the following:
- Install cURL (Client URL) which is a powerful, free, and open-source command line tool used to transfer data to or from a server.
- Configure the MCP client.
Install UC
UC is installed along with MC. For information about installing MC, see Install MC.
Reinstall UC
To reinstall UC:
- Backup the configuration folder.
cp -r /opt/vconsole/uc/config/dbconfigs /tmp/uc_backup
- Reinstall UC. For information, see Install MC.
- After reinstallation completes, restore the configuration files from the backup.
cp -r /tmp/uc_backup/* /opt/vconsole/uc/config/dbconfigs/
Troubleshooting installation issues
If you encounter any issues after installation, stop and restart the services:
./scripts/service.sh stop
./scripts/service.sh start
2 - Import the CA certificate
Information about importing the CA certificate.
A CA (Certificate Authority) certificate is a digital document issued by a trusted third-party organization that validates the identity of websites, individuals, or devices. It enables encrypted HTTPS connections by signing SSL/TLS certificates, ensuring that data transmitted online is secure, authentic, and protected from impersonation.
Import the CA certificate
To enable secure HTTPS communication, import the CA certificate into your browser. This section provides information about how you can import the CA certificate into supported browsers and use custom certificates.
Pre-requisites
- Access to the UC host
- CA certificates available in
/opt/vconsole/uc/certs
Certificate trust requirement
Import the internal CA certificate to your browser’s trusted certificate store /opt/vconsole/uc/certs/ca.crt.
Browser configuration
You can configure your web browser settings such as security, privacy, appearance, and performance to tailor the browsing experience, enhance security, or manage resource usage. For information about configuring different browsers, see:
To configure the Google chrome browser settings, do the following:
- Open the Google chrome browser.
- In the address bar, type
chrome://certificate-manager/.
- Choose Local certificates.
- Click the Manage imported certificates from Windows icon.
- Click the Trusted Root Certification Authorities tab.
- Choose ca.crt and click Import.
- In the Import wizard, click Next.
- Click Browse and select the security certificate.
- Click Next.
- Choose Place all certificates in the following store.
- Click Browse.
The Select certificate store dialog opens.
- Choose Trusted Root Certificate Authorities and click OK.
Import the certificate only into Trusted Root Certification Authorities. Failure to import the CA certificate to the correct certificate store results in browser trust errors.
- Click Next.
- Click Finish.
The CA certificate is successfully imported.
To configure the Microsoft edge browser settings, do the following:
- Open the Microsoft edge browser.
- In the address bar, type
edge://certificate-manager/.
- Choose Local certificates.
- Click the Manage imported certificates from Windows icon.
- Click the Trusted Root Certification Authorities tab.
- Choose ca.crt and click Import.
- In the Import wizard, click Next.
- Click Browse and select the security certificate.
- Click Next.
- Choose Place all certificates in the following store.
- Click Browse.
The Select certificate store dialog opens.
- Choose Trusted Root Certificate Authorities and click OK.
Import the certificate only into Trusted Root Certification Authorities. Failure to import the CA certificate to the correct certificate store results in browser trust errors.
- Click Next.
- Click Finish.
The CA certificate is successfully imported.
Custom certificates
You can replace the default CA certificate with your own.
CA certificate example
/opt/vconsole/uc/certs

ca.crt
ca.key

bff.crt
bff.key

metadata.crt
metadata.key

sqlexec.crt
sqlexec.key

auth.crt
auth.key

ai.crt
ai.key

aiassist.crt
aiassist.key

unified-console-ui.crt
unified-console-ui.key
Note
- All services rely on the same internal CA certificate
ca.crt.
- You need to establish browser trust only once per client machine.
- Generate the CA certificates through the command
generate-certs.sh.
- Allow inbound traffic on ports 5450, 8433, and 8090 only if you install both MC and UC in the ec2 instance.
3 - Connect to UC
Brief overview of connecting to UC
This section provides information about how you can access UC from your environment.
Pre-requisistes
- Ensure that MC is installed and accessible.
- Ensure that you have valid MC user credentials.
- Use a supported web browser.
Connect to UC
-
Open a supported web browser.
-
In the address bar, enter the MC URL using either the host IP address or hostname, along with the configured MC port.
- IP address - https://:5450/
- Hostname - https://:5450/
-
In the MC logon dialog, enter your username and password and click Log in.
Note
If you do not have an MC username/password, contact your administrator.
-
Click the user profile icon.
The user account menu is displayed.
-
Select Switch to Unified Console.
You are redirected to the Unified console URL with the default port 8433, where 8433 is the port number for accessing UC.
The Unified console is displayed.
4 - Configure the MCP client
Configuring the MCP client
This section provides information about how you can configure the MCP client to enable secure communication between Vertica AI Assist and the Vertica environment.
About the MCP client
The MCP client is a secure bridge that connects Vertica AI Assist to Vertica ensuring that database credentials are never exposed to the LLM. It provides:
- A secure, controlled interface between Vertica AI Assist and Vertica.
- Support for standardized database operations such as query execution, schema retrieval, and EXPLAIN plans.
- Authentication using JWT tokens, along with connection pooling and secure handling of user credentials.
Pre-requisites
Before configuring the MCP client, ensure that the MCP server is installed and configured. For information about installing and configuring the MCP server, see MCP server.
Configuring the MCP client enables Vertica AI Assist to securely access databases and perform operations such as natural language to SQL (NL2SQL) conversion, query optimization, and query explanation.
The configuration process establishes:
- Secure AI-driven database access
- Support for multiple database connections
- Schema-aware SQL generation
- Authenticated and auditable operations
After configuring the MCP serve, use the configuration script to supply the required connection details.
Configuration script
Configure the MCP client using the mcp_configure.sh script located in /opt/vconsole/uc/scripts. This script prompts for the required inputs and generates a YAML configuration file (a human-readable format for configuration data) in config/dbconfigs/. The MCP client uses this file to establish a connection with the MCP server for AI operations.
Gather the following information before you run the configuration script:
- JWT Token — Authentication token for the MCP server. Generate this token on the Vertica host where the MCP server is installed. For information about obtaining JWT tokens, see MCP server.
- MCP Server Hostname or IP address — The system on which the MCP server is running. Identify the host by checking the node that is running MCP.
- MCP Port — The port used by the MCP server. The default port is 8667.
- Cluster and Database Information — Obtain this information from the MC View infrastructure page:
- MC cluster name
- Vertica database name
Run the configuration script
- Navigate to the scripts directory.
cd /opt/vconsole/uc/scripts
Note
Run the configuration script only from this directory.
- Run the configuration script.
./mcp_configure.sh
The configuration script prompts you to enter the JWT token, MCP server hostname or IP address, MCP port, cluster, and database information.
- Do one of the following:
- Yes - The configuration script generates a configuration file named <cluster_name>_<db_name>_conf.yaml.
- No - The configuration script prompts you to re-enter the MCP configuration details.
- Exit - The configuration script exits without creating a configuration file.
Post configuration
After completing the configuration:
- Restart the AI service.
- Verify connectivity by checking the log file logs/ai.log.
- Look for the message
MCP connected.
View the MCP server status
To view the MCP server status:
- Choose AI preferences under Settings in the home page.
The AI preferences page opens and displays the following information:
- Host - The host name.
- Model - The large language model (LLM) that is used.
- Creator - The person who created the LLM.
- Enabled for - The database for which the LLM is enabled.
- Status - The current status of the LLM.
- Hover over ⋮ and select Edit. All the details of the LLM are displayed.
The MCP server status can be one of the following:
- Active - Indicates successful connection between the MCP server and the Vertica database.
- Inactive - Indicates when the connection could not be established due to errors. The MCP server might be inactive due to one of these reasons:
- Invalid Token
- Token Expired
- MCP Server is not active
- Not supported - Indicates that the Vertica database version is below 26.1, which is not supported by MCP.
Troubleshooting MCP server in inactive status
The MCP server can be in Inactive status due to one of the following issues:
- Missing or invalid configuration
The YAML configuration file may be missing or contain incorrect cluster or database details. Re-run the configuration script with correct values.
- Expired or invalid JWT token
The token may have expired or been entered incorrectly. Generate a new token on the Vertica server and update the configuration.
- MCP server not running
Ensure that the MCP server is running. Restart the service if required.
This configuration ensures that Vertica AI Assist can securely interact with your database environment while maintaining enterprise-grade security, traceability, and performance.
5 - Get started with UC
This topic provides an introduction to the unified console.
UC is a database and data management platform that enables Vertica users to interact with and manage databases through a single interface. Only database administrators have access to UC.
UC UI tour
After logging in to MC and switching to UC, the home page appears. This page presents all accessible databases as interactive widgets. Both AI-enabled and non-AI-enabled databases are visible.
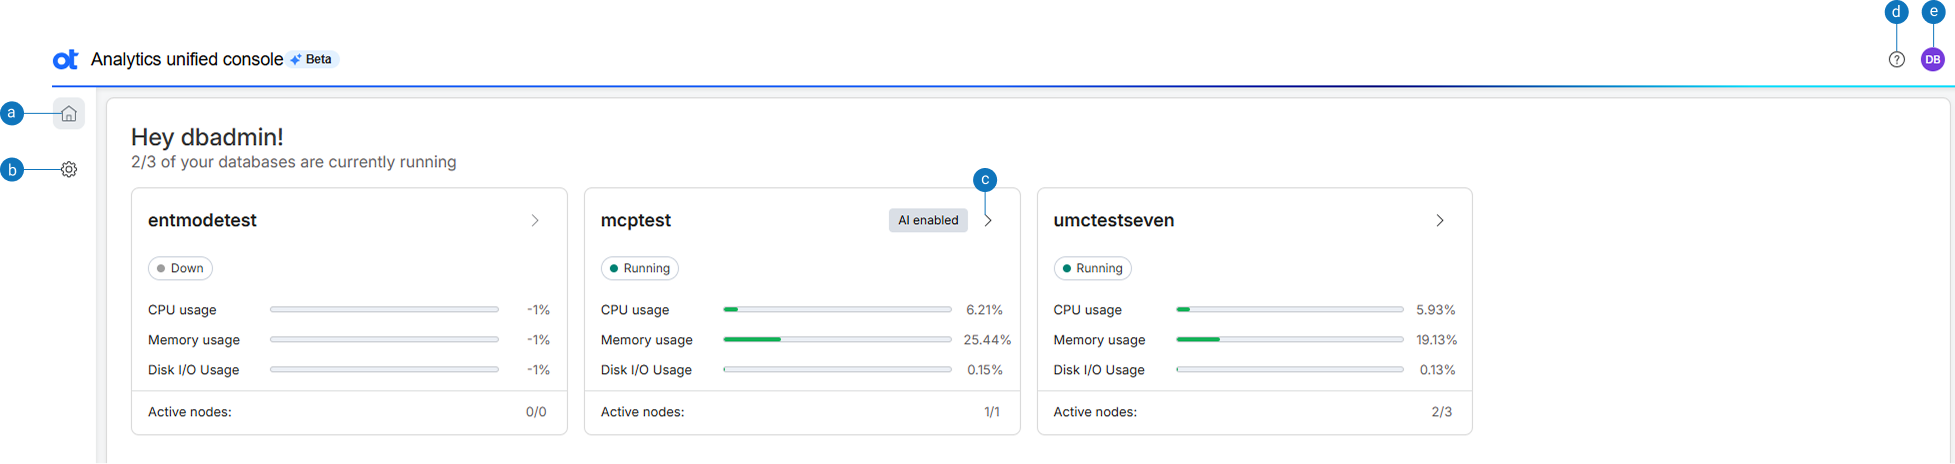
|
Option |
Description |
|
a |
Home: Displays the UC home page with database access options. |
|
b |
Settings: Displays the option to set AI preferences for the database. |
|
c |
>: Displays the SQL editor. |
|
d |
Help: Displays Unified console user documentation. |
|
e |
View profile: Displays the user profile along with options to switch and sign out of MC. |
Enable AI assistance
The Enable AI Assistance banner appears only when none of the available databases have AI enabled. You can enable AI functionality by configuring an AI model. Click Enable in the banner to enable AI assistance for a database. If at least one database in the system is AI enabled, this banner is not displayed.
You can configure or edit the default AI preferences.
- Login to UC.
- Choose AI preferences under Settings in the home page.
The AI preferences page opens and displays the following information:
- Host - The host name.
- Model - The large language model (LLM) that is used.
- Creator - The person who created the LLM.
- Enabled for - The database for which the LLM is enabled.
- Status - The current status of the LLM.
- Hover over ⋮ and select Edit. All the details of the LLM are displayed.
- From the Model provider list, choose the AI model provider that creates, trains, maintains, and hosts AI models. You can choose one among Anthropic, Google Gemini, Amazon Bedrock, or Others.
- From the Model name list, choose the specific LLM to use for inference.
- In the URL of the service hosting the model field, enter the root network address used to send requests to an AI service's API.
- In the Region field, choose the appropriate service region.
Note
This is applicable only if your LLM is Amazon Bedrock.
- In the Secret access key field, enter the credential (secret key) required for secure authentication.
- In the API key field, enter the key used to authenticate API requests.
Note
If your LLM is Amazon Bedrock, enter the **Access Key Id**. Enter the **API key** only if you are using an LLM other than Amazon Bedrock.
- In the Who should have access area, choose the required users depending on the role played by the user in the organization. For more information, see Configuration roles in MC.
- In the Which databases can access this area, choose the databases that can access the LLM. Note that only database versions 26.1 and above are supported.
- Click MCP status to configure the MCP token. For more information, see Configure the MCP client.
- Click Save.
Add a model
You can add a model from the default AI preferences.
- Login to UC.
- Choose AI preferences under Settings in the home page.
The AI preferences page opens.
- Click +Add new model.
Follow steps 4-13 in Configure or edit AI preferences.
SQL Editor
Use the SQL editor to write, edit, and execute SQL statements within UC without using any external tools.
Key features
Use the SQL editor to:
- Execute analytical queries.
- Save and reuse queries.
- View query results and execution details.
- Validate query execution.
- Access schema information.
Working with SQL editor
After logging in to the UC application, the home page appears. To launch the SQL editor, select > in the database widget.
Create an SQL query
You create SQL queries:
- Click + in the SQL editor.
The New query tab opens.
- Enter your query in the SQL editor.
- From the Run list, do one of the following:
- Select Run last query to run the SQL query that was last executed. This option is helpful when you have multiple SQL queries but need to run only the latest SQL query.
- Select Run from cursor to run an SQL query using a database cursor to manage and process the results of a statement one row at a time, rather than as a single set of data.
- Select Run selection to run only the selected SQL query. This option is helpful when you have multiple SQL queries but need to run only one SQL query.
- Select the SQL query in the editor and click Format SQL to arrange and format the SQL query for better readability.
- In the Enter query name field at the top, enter the name of the query.
- To view the schema details of a table, select View Schema.
The table columns display along with the datatypes.
History view
The History view tab stores the queries run previously. When you run a query, it appears in the Query History list. Queries of the last 2 weeks only are displayed.
To run a SQL query:
- Click ….
- Select Run.
To remove a SQL query:
- Click ….
- Select Remove.
Favorite view
You can bookmark SQL queries and run them again later in the Favorite view tab. Saved SQL queries display as a list of favorites next to the History view tab.
To bookmark a SQL query as a favorite:
- Select the SQL query.
- Select Run.
- Select Favorite.
- Enter a name and select Add.
To run a SQL query from the Favorites view:
- Select ….
- Select Run.
After successful execution of the query, the results are displayed in the SQL editor.
To rename a favorite SQL query:
- Select the SQL query.
- Click ….
- Select Rename.
- Enter the new name and select Update.
To remove a favorite SQL query:
- Select the query.
- Click ….
- Select Remove.
- When prompted for confirmation, select Remove.
About Vertica AI Assist
Vertica AI Assist is an AI assistant powered by Model Context Protocol (MCP). It helps database administrators generate, execute, and optimize SQL queries in natural language. AI-generated responses may vary in accuracy and should be validated before use. The following models are supported:
- Anthropic Claude
- Google Gemini
- AWS Bedrock
To get started with Vertica AI Assist:
- In the SQL editor, do one of the following:
- Enter a SQL query or press Ctrl + I keys to generate a query using AI.
<--or-->
- Click Vertica AI Assist at the top.
The list of available LLMs is displayed below the Vertica AI Assist label.
- From the list of LLMs, choose an LLM.
If you are using Vertica AI Assist for the first time, a legal disclaimer is displayed.
- Choose Don't show this message again and click Agree and continue.
A message
Hi! I'm Vertica AI Assist. How can I help you today? is displayed.
- Type your request in the field and click Enter.
Vertica AI Assist analyzes and displays the results of your query.
Optimize SQL queries
Vertica AI Assist can improve query performance by analyzing execution strategies. To optimize your SQL queries:
- In the SQL editor, do one of the following:
- Enter a SQL query or press Ctrl + I keys to generate a SQL query with AI.
<--or-->
- Click Vertica AI Assist at the top.
The list of available LLMs is displayed below the Vertica AI Assist label.
- Select the query.
- Hover over the options and choose Optimize with AI.
The final optimized query with improvements and the summary of the optimization are displayed in the Vertica AI Assist window. Vertica AI Assist optimizes the SQL query and processes the query results quicker than the original query specified.
- Copy and run the query.
Explain queries with AI
You can get detailed information about an SQL query using the Explain with AI option.
- In the SQL editor, do one of the following:
- Enter a SQL query or press Ctrl + I keys to generate a SQL query with AI.
<--or-->
- Click Vertica AI Assist at the top.
The list of available LLMs is displayed below the Vertica AI Assist label.
- Select the query.
- Hover over the options and choose Explain with AI.
Review these insights:
- Execution plan
- Joins and functions
- Performance characteristics
- Optimization recommendations