This is the multi-page printable view of this section.
Click here to print.
Return to the regular view of this page.
Apache Hadoop integration
Apache™ Hadoop™, like Vertica, uses a cluster of nodes for distributed processing.
Apache™ Hadoop™, like Vertica, uses a cluster of nodes for distributed processing. The primary component of interest is HDFS, the Hadoop Distributed File System.
You can use Vertica with HDFS in several ways:
-
You can import HDFS data into locally-stored ROS files.
-
You can access HDFS data in place using external tables. You can define the tables yourself or get schema information from Hive, a Hadoop component.
-
You can use HDFS as a storage location for ROS files.
-
You can export data from Vertica to share with other Hadoop components using a Hadoop columnar format. See File export for more information.
Hadoop file paths are expressed as URLs in the webhdfs or hdfs URL scheme. For more about using these schemes, see HDFS file system.
Hadoop distributions
Vertica can be used with Hadoop distributions from Hortonworks, Cloudera, and MapR. See Hadoop integrations for the specific versions that are supported.
If you are using Cloudera, you can manage your Vertica cluster using Cloudera Manager. See Integrating with Cloudera Manager.
If you are using MapR, see Integrating Vertica with the MapR distribution of Hadoop.
WebHDFS requirement
By default, if you use a URL in the hdfs scheme, Vertica treats it as webhdfs. If you instead use the (deprecated) LibHDFS++ library, you must still have a WebHDFS service available. LibHDFS++ does not support some WebHDFS features, such as encryption zones, wire encryption, or writes, and falls back to WebHDFS when needed.
For some uses, such as Eon Mode communal storage, you must use WebHDFS directly with the webhdfs scheme.
Deprecated
Support for LibHDFS++ is deprecated. You can set the
HDFSUseWebHDFS configuration parameter to 0 (disabled) to use LibHDFS++ until it is removed.
1 - Cluster layout
Vertica supports two cluster architectures for Hadoop integration.
Vertica supports two cluster architectures for Hadoop integration. Which architecture you use affects the decisions you make about integration with HDFS. These options might also be limited by license terms.
-
You can co-locate Vertica on some or all of your Hadoop nodes. Vertica can then take advantage of data locality.
-
You can build a Vertica cluster that is separate from your Hadoop cluster. In this configuration, Vertica can fully use each of its nodes; it does not share resources with Hadoop.
With either architecture, if you are using the hdfs scheme to read ORC or Parquet files, you must do some additional configuration. See Configuring HDFS access.
1.1 - Co-located clusters
With co-located clusters, Vertica is installed on some or all of your Hadoop nodes.
With co-located clusters, Vertica is installed on some or all of your Hadoop nodes. The Vertica nodes use a private network in addition to the public network used by all Hadoop nodes, as the following figure shows:
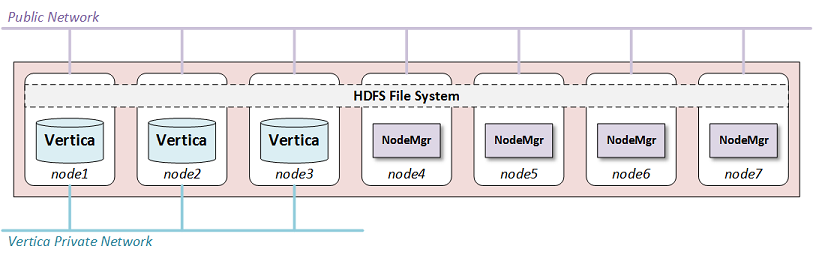
You might choose to place Vertica on all of your Hadoop nodes or only on some of them. If you are using HDFS Storage Locations you should use at least three Vertica nodes, the minimum number for K-safety in an Enterprise Mode database.
Using more Vertica nodes can improve performance because the HDFS data needed by a query is more likely to be local to the node.
You can place Hadoop and Vertica clusters within a single rack, or you can span across many racks and nodes. If you do not co-locate Vertica on every node, you can improve performance by co-locating it on at least one node in each rack. See Configuring rack locality.
Normally, both Hadoop and Vertica use the entire node. Because this configuration uses shared nodes, you must address potential resource contention in your configuration on those nodes. See Configuring Hadoop for co-located clusters for more information. No changes are needed on Hadoop-only nodes.
Hardware recommendations
Hadoop clusters frequently do not have identical provisioning requirements or hardware configurations. However, Vertica nodes should be equivalent in size and capability, per the best-practice standards recommended in Platform and hardware requirements and recommendations.
Because Hadoop cluster specifications do not always meet these standards, Vertica recommends the following specifications for Vertica nodes in your Hadoop cluster.
|
Specifications for... |
Recommendation |
|
Processor |
For best performance, run:
-
Two-socket servers with 8–14 core CPUs, clocked at or above 2.6 GHz for clusters over 10 TB
-
Single-socket servers with 8–12 cores clocked at or above 2.6 GHz for clusters under 10 TB
|
|
Memory |
Distribute the memory appropriately across all memory channels in the server:
-
Minimum—8 GB of memory per physical CPU core in the server
-
High-performance applications—12–16 GB of memory per physical core
-
Type—at least DDR3-1600, preferably DDR3-1866
|
|
Storage |
Read/write:
Storage post RAID: Each node should have 1–9 TB. For a production setting, Vertica recommends RAID 10. In some cases, RAID 50 is acceptable.
Because Vertica performs heavy compression and encoding, SSDs are not required. In most cases, a RAID of more, less-expensive HDDs performs just as well as a RAID of fewer SSDs.
If you intend to use RAID 50 for your data partition, you should keep a spare node in every rack, allowing for manual failover of a Vertica node in the case of a drive failure. A Vertica node recovery is faster than a RAID 50 rebuild. Also, be sure to never put more than 10 TB compressed on any node, to keep node recovery times at an acceptable rate.
|
|
Network |
10 GB networking in almost every case. With the introduction of 10 GB over cat6a (Ethernet), the cost difference is minimal. |
1.2 - Configuring Hadoop for co-located clusters
If you are co-locating Vertica on any HDFS nodes, there are some additional configuration requirements.
If you are co-locating Vertica on any HDFS nodes, there are some additional configuration requirements.
Hadoop configuration parameters
For best performance, set the following parameters with the specified minimum values:
|
Parameter |
Minimum Value |
|
HDFS block size |
512MB |
|
Namenode Java Heap |
1GB |
|
Datanode Java Heap |
2GB |
WebHDFS
Hadoop has two services that can provide web access to HDFS:
For Vertica, you must use the WebHDFS service.
YARN
The YARN service is available in newer releases of Hadoop. It performs resource management for Hadoop clusters. When co-locating Vertica on YARN-managed Hadoop nodes you must make some changes in YARN.
Vertica recommends reserving at least 16GB of memory for Vertica on shared nodes. Reserving more will improve performance. How you do this depends on your Hadoop distribution:
-
If you are using Hortonworks, create a "Vertica" node label and assign this to the nodes that are running Vertica.
-
If you are using Cloudera, enable and configure static service pools.
Consult the documentation for your Hadoop distribution for details. Alternatively, you can disable YARN on the shared nodes.
Hadoop balancer
The Hadoop Balancer can redistribute data blocks across HDFS. For many Hadoop services, this feature is useful. However, for Vertica this can reduce performance under some conditions.
If you are using HDFS storage locations, the Hadoop load balancer can move data away from the Vertica nodes that are operating on it, degrading performance. This behavior can also occur when reading ORC or Parquet files if Vertica is not running on all Hadoop nodes. (If you are using separate Vertica and Hadoop clusters, all Hadoop access is over the network, and the performance cost is less noticeable.)
To prevent the undesired movement of data blocks across the HDFS cluster, consider excluding Vertica nodes from rebalancing. See the Hadoop documentation to learn how to do this.
Replication factor
By default, HDFS stores three copies of each data block. Vertica is generally set up to store two copies of each data item through K-Safety. Thus, lowering the replication factor to 2 can save space and still provide data protection.
To lower the number of copies HDFS stores, set HadoopFSReplication, as explained in Troubleshooting HDFS storage locations.
Disk space for Non-HDFS use
You also need to reserve some disk space for non-HDFS use. To reserve disk space using Ambari, set dfs.datanode.du.reserved to a value in the hdfs-site.xml configuration file.
Setting this parameter preserves space for non-HDFS files that Vertica requires.
1.3 - Configuring rack locality
This feature is supported only for reading ORC and Parquet data on co-located clusters.
Note
This feature is supported only for reading ORC and Parquet data on co-located clusters. It is only meaningful on Hadoop clusters that span multiple racks.
When possible, when planning a query Vertica automatically uses database nodes that are co-located with the HDFS nodes that contain the data. Moving query execution closer to the data reduces network latency and can improve performance. This behavior, called node locality, requires no additional configuration.
When Vertica is co-located on only a subset of HDFS nodes, sometimes there is no database node that is co-located with the data. However, performance is usually better if a query uses a database node in the same rack. If configured with information about Hadoop rack structure, Vertica attempts to use a database node in the same rack as the data to be queried.
For example, the following diagram illustrates a Hadoop cluster with three racks each containing three data nodes. (Typical production systems have more data nodes per rack.) In each rack, Vertica is co-located on one node.
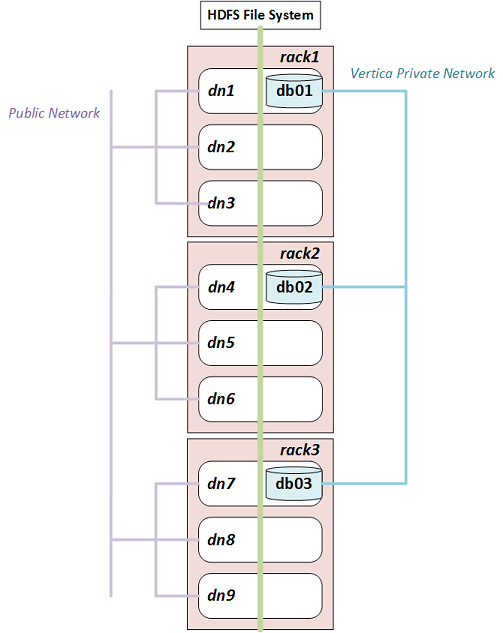
If you configure rack locality, Vertica uses db01 to query data on dn1, dn2, or dn3, and uses db02 and db03 for data on rack2 and rack3 respectively. Because HDFS replicates data, any given data block can exist in more than one rack. If a data block is replicated on dn2, dn3, and dn6, for example, Vertica uses either db01 or db02 to query it.
Hadoop components are rack-aware, so configuration files describing rack structure already exist in the Hadoop cluster. To use this information in Vertica, configure fault groups that describe this rack structure. Vertica uses fault groups in query planning.
Configuring fault groups
Vertica uses Fault groups to describe physical cluster layout. Because your database nodes are co-located on HDFS nodes, Vertica can use the information about the physical layout of the HDFS cluster.
Tip
For best results, ensure that each Hadoop rack contains at least one co-located Vertica node.
Hadoop stores its cluster-layout data in a topology mapping file in HADOOP_CONF_DIR. On HortonWorks the file is typically named topology_mappings.data. On Cloudera it is typically named topology.map. Use the data in this file to create an input file for the fault-group script. For more information about the format of this file, see Creating a fault group input file.
Following is an example topology mapping file for the cluster illustrated previously:
[network_topology]
dn1.example.com=/rack1
10.20.41.51=/rack1
dn2.example.com=/rack1
10.20.41.52=/rack1
dn3.example.com=/rack1
10.20.41.53=/rack1
dn4.example.com=/rack2
10.20.41.71=/rack2
dn5.example.com=/rack2
10.20.41.72=/rack2
dn6.example.com=/rack2
10.20.41.73=/rack2
dn7.example.com=/rack3
10.20.41.91=/rack3
dn8.example.com=/rack3
10.20.41.92=/rack3
dn9.example.com=/rack3
10.20.41.93=/rack3
From this data, you can create the following input file describing the Vertica subset of this cluster:
/rack1 /rack2 /rack3
/rack1 = db01
/rack2 = db02
/rack3 = db03
This input file tells Vertica that the database node "db01" is on rack1, "db02" is on rack2, and "db03" is on rack3. In creating this file, ignore Hadoop data nodes that are not also Vertica nodes.
After you create the input file, run the fault-group tool:
$ python /opt/vertica/scripts/fault_group_ddl_generator.py dbName input_file > fault_group_ddl.sql
The output of this script is a SQL file that creates the fault groups. Execute it following the instructions in Creating fault groups.
You can review the new fault groups with the following statement:
=> SELECT member_name,node_address,parent_name FROM fault_groups
INNER JOIN nodes ON member_name=node_name ORDER BY parent_name;

 member_name  | node_address  | parent_name
-------------------------+--------------+-------------
db01          | 10.20.41.51   | /rack1
db02          | 10.20.41.71   | /rack2
db03          | 10.20.41.91   | /rack3

(3 rows)
Working with multi-level racks
A Hadoop cluster can use multi-level racks. For example, /west/rack-w1, /west/rack-2, and /west/rack-w3 might be served from one data center, while /east/rack-e1, /east/rack-e2, and /east/rack-e3 are served from another. Use the following format for entries in the input file for the fault-group script:
/west /east
/west = /rack-w1 /rack-w2 /rack-w3
/east = /rack-e1 /rack-e2 /rack-e3
/rack-w1 = db01
/rack-w2 = db02
/rack-w3 = db03
/rack-e1 = db04
/rack-e2 = db05
/rack-e3 = db06
Do not create entries using the full rack path, such as /west/rack-w1.
Auditing results
To see how much data can be loaded with rack locality, use EXPLAIN with the query and look for statements like the following in the output:
100% of ORC data including co-located data can be loaded with rack locality.
1.4 - Separate clusters
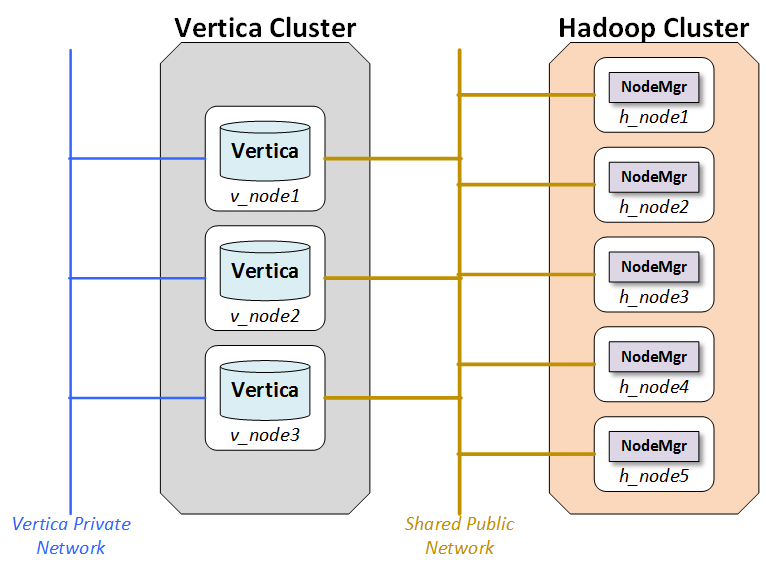
With separate clusters, a Vertica cluster and a Hadoop cluster share no nodes.
With separate clusters, a Vertica cluster and a Hadoop cluster share no nodes. You should use a high-bandwidth network connection between the two clusters.
The following figure illustrates the configuration for separate clusters::
Network
The network is a key performance component of any well-configured cluster. When Vertica stores data to HDFS it writes and reads data across the network.
The layout shown in the figure calls for two networks, and there are benefits to adding a third:
-
Database Private Network: Vertica uses a private network for command and control and moving data between nodes in support of its database functions. In some networks, the command and control and passing of data are split across two networks.
-
Database/Hadoop Shared Network: Each Vertica node must be able to connect to each Hadoop data node and the NameNode. Hadoop best practices generally require a dedicated network for the Hadoop cluster. This is not a technical requirement, but a dedicated network improves Hadoop performance. Vertica and Hadoop should share the dedicated Hadoop network.
-
Optional Client Network: Outside clients may access the clustered networks through a client network. This is not an absolute requirement, but the use of a third network that supports client connections to either Vertica or Hadoop can improve performance. If the configuration does not support a client network, than client connections should use the shared network.
Hadoop configuration parameters
For best performance, set the following parameters with the specified minimum values:
|
Parameter |
Minimum Value |
|
HDFS block size |
512MB |
|
Namenode Java Heap |
1GB |
|
Datanode Java Heap |
2GB |
2 - Configuring HDFS access
Vertica uses information from the Hadoop cluster configuration to support reading data (COPY or external tables).
Vertica uses information from the Hadoop cluster configuration to support reading data (COPY or external tables). In Eon Mode, it also uses this information to access communal storage on HDFS. Vertica nodes therefore must have access to certain Hadoop configuration files.
For both co-located and separate clusters that use Kerberos authentication, configure Vertica for Kerberos as explained in Configure Vertica for Kerberos Authentication.
Vertica requires access to the WebHDFS service and ports on all name nodes and data nodes. For more information about WebHDFS ports, see HDFS Ports in the Cloudera documentation.
Accessing Hadoop configuration files
Your Vertica nodes need access to certain Hadoop configuration files:
- If Vertica is co-located on HDFS nodes, then those configuration files are already present.
- If Vertica is running on a separate cluster, you must copy the required files to all database nodes. A simple way to do so is to configure your Vertica nodes as Hadoop edge nodes. Client applications run on edge nodes; from Hadoop's perspective, Vertica is a client application. You can use Ambari or Cloudera Manager to configure edge nodes. For more information, see the documentation from your Hadoop vendor.
Verify that the value of the HadoopConfDir configuration parameter (see Hadoop parameters) includes a directory containing the core-site.xml and hdfs-site.xml files. If you do not set a value, Vertica looks for the files in /etc/hadoop/conf. For all Vertica users, the directory is accessed by the Linux user under which the Vertica server process runs.
Vertica uses several properties defined in these configuration files. These properties are listed in HDFS file system.
Using a cluster with high availability NameNodes
If your Hadoop cluster uses High Availability (HA) Name Nodes, verify that the dfs.nameservices parameter and the individual name nodes are defined in hdfs-site.xml.
Using more than one Hadoop cluster
In some cases, a Vertica cluster requires access to more than one HDFS cluster. For example, your business might use separate HDFS clusters for separate regions, or you might need data from both test and deployment clusters.
To support multiple clusters, perform the following steps:
-
Copy the configuration files from all HDFS clusters to your database nodes. You can place the copied files in any location readable by Vertica. However, as a best practice, you should place them all in the same directory tree, with one subdirectory per HDFS cluster. The locations must be the same on all database nodes.
-
Set the HadoopConfDir configuration parameter. The value is a colon-separated path containing the directories for all of your HDFS clusters.
-
Use an explicit name node or name service in the URL when creating an external table or copying data. Do not use hdfs:/// because it could be ambiguous. For more information about URLs, see HDFS file system.
Vertica connects directly to a name node or name service; it does not otherwise distinguish among HDFS clusters. Therefore, names of HDFS name nodes and name services must be globally unique.
Verifying the configuration
Use the VERIFY_HADOOP_CONF_DIR function to verify that Vertica can find configuration files in HadoopConfDir.
Use the HDFS_CLUSTER_CONFIG_CHECK function to test access through the hdfs scheme.
For more information about testing your configuration, see Verifying HDFS configuration.
Updating configuration files
If you update the configuration files after starting Vertica, use the following statement to refresh them:
=> SELECT CLEAR_HDFS_CACHES();
The CLEAR_HDFS_CACHES function also flushes information about which name node is active in a High Availability (HA) Hadoop cluster. Therefore, the first request after calling this function is slow, because the initial connection to the name node can take more than 15 seconds.
2.1 - Verifying HDFS configuration
Use the EXTERNAL_CONFIG_CHECK function to test access to HDFS.
Use the EXTERNAL_CONFIG_CHECK function to test access to HDFS. This function calls several others. If you prefer to test individual components, or if some tests do not apply to your configuration, you can instead call the functions individually. For example, if you are not using the HCatalog Connector then you do not need to call that function. The functions are:
To run all tests, call EXTERNAL_CONFIG_CHECK with no arguments:
=> SELECT EXTERNAL_CONFIG_CHECK();
To test only some authorities, nameservices, or Hive schemas, pass a single string argument. The format is a comma-separated list of "key=value" pairs, where keys are "authority", "nameservice", and "schema". The value is passed to all of the sub-functions; see those reference pages for details on how values are interpreted.
The following example tests the configuration of only the nameservice named "ns1":
=> SELECT EXTERNAL_CONFIG_CHECK('nameservice=ns1');
2.2 - Troubleshooting reads from HDFS
You might encounter the following issues when accessing data in HDFS.
You might encounter the following issues when accessing data in HDFS.
Queries using [web]hdfs:/// show unexpected results
If you are using the /// shorthand to query external tables and see unexpected results, such as production data in your test cluster, verify that HadoopConfDir is set to the value you expect. The HadoopConfDir configuration parameter defines a path to search for the Hadoop configuration files that Vertica needs to resolve file locations. The HadoopConfDir parameter can be set at the session level, overriding the permanent value set in the database.
To debug problems with /// URLs, try replacing the URLs with ones that use an explicit nameservice or name node. If the explicit URL works, then the problem is with the resolution of the shorthand. If the explicit URL also does not work as expected, then the problem is elsewhere (such as your nameservice).
Queries take a long time to run when using HA
The High Availability Name Node feature in HDFS allows a name node to fail over to a standby name node. The dfs.client.failover.max.attempts configuration parameter (in hdfs-site.xml) specifies how many attempts to make when failing over. Vertica uses a default value of 4 if this parameter is not set. After reaching the maximum number of failover attempts, Vertica concludes that the HDFS cluster is unavailable and aborts the operation. Vertica uses the dfs.client.failover.sleep.base.millis and dfs.client.failover.sleep.max.millis parameters to decide how long to wait between retries. Typical ranges are 500 milliseconds to 15 seconds, with longer waits for successive retries.
A second parameter, ipc.client.connect.retry.interval, specifies the time to wait between attempts, with typical values being 10 to 20 seconds.
Cloudera and Hortonworks both provide tools to automatically generate configuration files. These tools can set the maximum number of failover attempts to a much higher number (50 or 100). If the HDFS cluster is unavailable (all name nodes are unreachable), Vertica can appear to hang for an extended period (minutes to hours) while trying to connect.
Failover attempts are logged in the QUERY_EVENTS system table. The following example shows how to query this table to find these events:
=> SELECT event_category, event_type, event_description, operator_name,
   event_details, count(event_type) AS count
   FROM query_events
   WHERE event_type ilike 'WEBHDFS FAILOVER RETRY'
   GROUP BY event_category, event_type, event_description, operator_name, event_details;
-[ RECORD 1 ]-----+---------------------------------------
event_category    | EXECUTION
event_type        | WEBHDFS FAILOVER RETRY
event_description | WebHDFS Namenode failover and retry.
operator_name     | WebHDFS FileSystem
event_details     | WebHDFS request failed on ns
count             | 4
You can either wait for Vertica to complete or abort the connection, or set the dfs.client.failover.max.attempts parameter to a lower value.
WebHDFS error when using LibHDFS++
When creating an external table or loading data and using the hdfs scheme, you might see errors from WebHDFS failures. Such errors indicate that Vertica was not able to use the hdfs scheme and fell back to webhdfs, but that the WebHDFS configuration is incorrect.
First verify the value of the HadoopConfDir configuration parameter, which can be set at the session level. Then verify that the HDFS configuration files found there have the correct WebHDFS configuration for your Hadoop cluster. See Configuring HDFS access for information about use of these files. See your Hadoop documentation for information about WebHDFS configuration.
Vertica places too much load on the name node (LibHDFS++)
Large HDFS clusters can sometimes experience heavy load on the name node when clients, including Vertica, need to locate data. If your name node is sensitive to this load and if you are using LibHDFS++, you can instruct Vertica to distribute metadata about block locations to its nodes so that they do not have to contact the name node as often. Distributing this metadata can degrade database performance somewhat in deployments where the name node isn't contended. This performance effect is because the data must be serialized and distributed.
If protecting your name node from load is more important than query performance, set the EnableHDFSBlockInfoCache configuration parameter to 1 (true). Usually this applies to large HDFS clusters where name node contention is already an issue.
This setting applies to access through LibHDFS++ (hdfs scheme). Sometimes LibHDFS++ falls back to WebHDFS, which does not use this setting. If you have enabled this setting and you are still seeing high traffic on your name node from Vertica, check the QUERY_EVENTS system table for LibHDFS++ UNSUPPORTED OPERATION events.
Kerberos authentication errors
Kerberos authentication can fail even though a ticket is valid if Hadoop expires tickets frequently. It can also fail due to clock skew between Hadoop and Vertica nodes. For details, see Troubleshooting Kerberos authentication.
3 - Accessing kerberized HDFS data
If your Hortonworks or Cloudera Hadoop cluster uses Kerberos authentication to restrict access to HDFS, Vertica must be granted access.
If your Hortonworks or Cloudera Hadoop cluster uses Kerberos authentication to restrict access to HDFS, Vertica must be granted access. If you use Kerberos authentication for your Vertica database, and database users have HDFS access, then you can configure Vertica to use the same principals to authenticate. However, not all Hadoop administrators want to grant access to all database users, preferring to manage access in other ways. In addition, not all Vertica databases use Kerberos.
Vertica provides the following options for accessing Kerberized Hadoop clusters:
-
Using Vertica Kerberos principals.
-
Using Hadoop proxy users combined with Vertica users.
-
Using a user-specified delegation token which grants access to HDFS. Delegation tokens are issued by the Hadoop cluster.
Proxy users and delegation tokens both use a session parameter to manage identities. Vertica need not be Kerberized when using either of these methods.
Vertica does not support Kerberos for MapR.
To test your Kerberos configuration, see Verifying HDFS configuration.
3.1 - Using Kerberos with Vertica
If you use Kerberos for your Vertica cluster and your principals have access to HDFS, then you can configure Vertica to use the same credentials for HDFS.
If you use Kerberos for your Vertica cluster and your principals have access to HDFS, then you can configure Vertica to use the same credentials for HDFS.
Vertica authenticates with Hadoop in two ways that require different configurations:
-
User Authentication—On behalf of the user, by passing along the user's existing Kerberos credentials. This method is also called user impersonation. Actions performed on behalf of particular users, like executing queries, generally use user authentication.
-
Vertica Authentication—On behalf of system processes that access ROS data or the catalog, by using a special Kerberos credential stored in a keytab file.
Note
Vertica and Hadoop must use the same Kerberos server or servers (KDCs).
Vertica can interact with more than one Kerberos realm. To configure multiple realms, see Multi-realm Support.
Vertica attempts to automatically refresh Hadoop tokens before they expire. See Token expiration.
User authentication
To use Vertica with Kerberos and Hadoop, the client user first authenticates with one of the Kerberos servers (Key Distribution Center, or KDC) being used by the Hadoop cluster. A user might run kinit or sign in to Active Directory, for example.
A user who authenticates to a Kerberos server receives a Kerberos ticket. At the beginning of a client session, Vertica automatically retrieves this ticket. Vertica then uses this ticket to get a Hadoop token, which Hadoop uses to grant access. Vertica uses this token to access HDFS, such as when executing a query on behalf of the user. When the token expires, Vertica automatically renews it, also renewing the Kerberos ticket if necessary.
The user must have been granted permission to access the relevant files in HDFS. This permission is checked the first time Vertica reads HDFS data.
Vertica can use multiple KDCs serving multiple Kerberos realms, if proper cross-realm trust has been set up between realms.
Vertica authentication
Automatic processes, such as the Tuple Mover or the processes that access Eon Mode communal storage, do not log in the way users do. Instead, Vertica uses a special identity (principal) stored in a keytab file on every database node. (This approach is also used for Vertica clusters that use Kerberos but do not use Hadoop.) After you configure the keytab file, Vertica uses the principal residing there to automatically obtain and maintain a Kerberos ticket, much as in the client scenario. In this case, the client does not interact with Kerberos.
Each Vertica node uses its own principal; it is common to incorporate the name of the node into the principal name. You can either create one keytab per node, containing only that node's principal, or you can create a single keytab containing all the principals and distribute the file to all nodes. Either way, the node uses its principal to get a Kerberos ticket and then uses that ticket to get a Hadoop token.
When creating HDFS storage locations Vertica uses the principal in the keytab file, not the principal of the user issuing the CREATE LOCATION statement. The HCatalog Connector sometimes uses the principal in the keytab file, depending on how Hive authenticates users.
Configuring users and the keytab file
If you have not already configured Kerberos authentication for Vertica, follow the instructions in Configure Vertica for Kerberos authentication. Of particular importance for Hadoop integration:
-
Create one Kerberos principal per node.
-
Place the keytab files in the same location on each database node and set configuration parameter KerberosKeytabFile to that location.
-
Set KerberosServiceName to the name of the principal. (See Inform Vertica about the Kerberos principal.)
If you are using the HCatalog Connector, follow the additional steps in Configuring security in the HCatalog Connector documentation.
If you are using HDFS storage locations, give all node principals read and write permission to the HDFS directory you will use as a storage location.
3.2 - Proxy users and delegation tokens
An alternative to granting HDFS access to individual Vertica users is to use delegation tokens, either directly or with a proxy user.
An alternative to granting HDFS access to individual Vertica users is to use delegation tokens, either directly or with a proxy user. In this configuration, Vertica accesses HDFS on behalf of some other (Hadoop) user. The Hadoop users need not be Vertica users at all.
In Vertica, you can either specify the name of the Hadoop user to act on behalf of (doAs), or you can directly use a Kerberos delegation token that you obtain from HDFS (Bring Your Own Delegation Token). In the doAs case, Vertica obtains a delegation token for that user, so both approaches ultimately use delegation tokens to access files in HDFS.
Use the HadoopImpersonationConfig session parameter to specify a user or delegation token to use for HDFS access. Each session can use a different user and can use either doAs or a delegation token. The value of HadoopImpersonationConfig is a set of JSON objects.
To use delegation tokens of either type (more specifically, when HadoopImpersonationConfig is set), you must access HDFS through WebHDFS.
3.2.1 - User impersonation (doAs)
You can use user impersonation to access data in an HDFS cluster from Vertica.
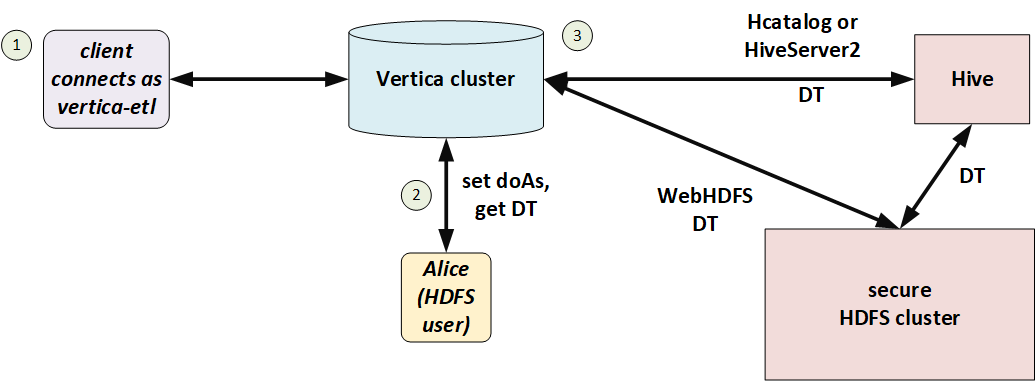
You can use user impersonation to access data in an HDFS cluster from Vertica. This approach is called "doAs" (for "do as") because Vertica uses a single proxy user on behalf of another (Hadoop) user. The impersonated Hadoop user does not need to also be a Vertica user.
In the following illustration, Alice is a Hadoop user but not a Vertica user. She connects to Vertica as the proxy user, vertica-etl. In her session, Vertica obtains a delegation token (DT) on behalf of the doAs user (Alice), and uses that delegation token to access HDFS.
You can use doAs with or without Kerberos, so long as HDFS and Vertica match. If HDFS uses Kerberos then Vertica must too.
User configuration
The Hadoop administrator must create a proxy user and allow it to access HDFS on behalf of other users. Set values in core-site.xml as in the following example:
<name>hadoop.proxyuser.vertica-etl.users</name>
<value>*</value>
<name>hadoop.proxyuser.vertica-etl.hosts</name>
<value>*</value>
In Vertica, create a corresponding user.
Session configuration
To make requests on behalf of a Hadoop user, first set the HadoopImpersonationConfig session parameter to specify the user and HDFS cluster. Vertica will access HDFS as that user until the session ends or you change the parameter.
The value of this session parameter is a collection of JSON objects. Each object specifies an HDFS cluster and a Hadoop user. For the cluster, you can specify either a name service or an individual name node. If you are using HA name node, then you must either use a name service or specify all name nodes. HadoopImpersonationConfig format describes the full JSON syntax.
The following example shows access on behalf of two different users. The users "stephanie" and "bob" are Hadoop users, not Vertica users. "vertica-etl" is a Vertica user.
$ vsql -U vertica-etl

=> ALTER SESSION SET
   HadoopImpersonationConfig = '[{"nameservice":"hadoopNS", "doAs":"stephanie"}]';
=> COPY nation FROM 'webhdfs:///user/stephanie/nation.dat';

=> ALTER SESSION SET
   HadoopImpersonationConfig = '[{"nameservice":"hadoopNS", "doAs":"bob"}, {"authority":"hadoop2:50070", "doAs":"rob"}]';
=> COPY nation FROM 'webhdfs:///user/bob/nation.dat';
Vertica uses Hadoop delegation tokens, obtained from the name node, to impersonate Hadoop users. In a long-running session, a token could expire. Vertica attempts to renew tokens automatically; see Token expiration.
Testing the configuration
You can use the HADOOP_IMPERSONATION_CONFIG_CHECK function to test your HDFS delegation tokens and HCATALOGCONNECTOR_CONFIG_CHECK to test your HCatalog Connector delegation token.
3.2.2 - Bring your own delegation token
Instead of creating a proxy user and giving it access to HDFS for use with doAs, you can give Vertica a Hadoop delegation token to use.
Instead of creating a proxy user and giving it access to HDFS for use with doAs, you can give Vertica a Hadoop delegation token to use. You must obtain this delegation token from the Hadoop name node. In this model, security is handled entirely on the Hadoop side, with Vertica just passing along a token. Vertica may or may not be Kerberized.
A typical workflow is:
-
In an ETL front end, a user submits a query.
-
The ETL system uses authentication and authorization services to verify that the user has sufficient permission to run the query.
-
The ETL system requests a delegation token for the user from the name node.
-
The ETL system makes a client connection to Vertica, sets the delegation token for the session, and runs the query.
When using a delegation token, clients can connect as any Vertica user. No proxy user is required.
In the following illustration, Bob has a Hadoop-issued delegation token. He connects to Vertica and Vertica uses that delegation token to access files in HDFS.
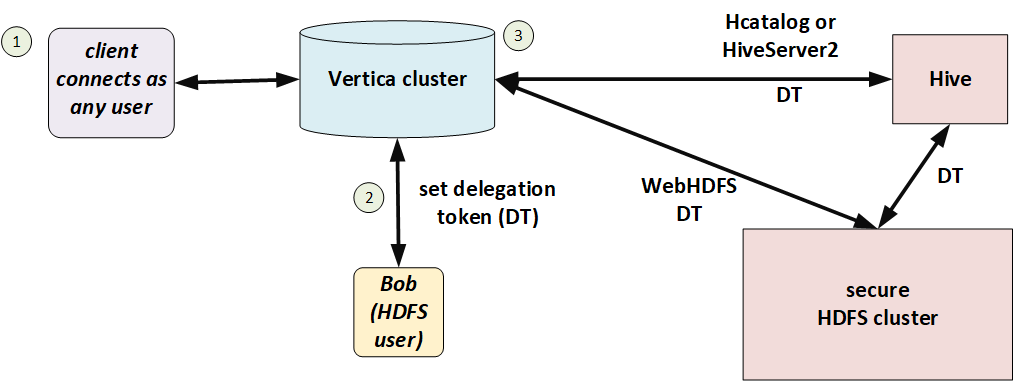
Session configuration
Set the HadoopImpersonationConfig session parameter to specify the delegation token and HDFS cluster. Vertica will access HDFS using that delegation token until the session ends, the token expires, or you change the parameter.
The value of this session parameter is a collection of JSON objects. Each object specifies a delegation token ("token") in WebHDFS format and an HDFS name service or name node. HadoopImpersonationConfig format describes the full JSON syntax.
The following example shows access on behalf of two different users. The users "stephanie" and "bob" are Hadoop users, not Vertica users. "dbuser1" is a Vertica user with no special privileges.
$ vsql -U dbuser1

=> ALTER SESSION SET
   HadoopImpersonationConfig ='[{"authority":"hadoop1:50070","token":"JAAGZGJldGwxBmRiZXRsMQCKAWDXJgB9igFg-zKEfY4gao4BmhSJYtXiWqrhBHbbUn4VScNg58HWQxJXRUJIREZTIGRlbGVnYXRpb24RMTAuMjAuMTAwLjU0OjgwMjA"}]';
=> COPY nation FROM 'webhdfs:///user/stephanie/nation.dat';

=> ALTER SESSION SET
   HadoopImpersonationConfig ='[{"authority":"hadoop1:50070","token":"HgADdG9tA3RvbQCKAWDXJgAoigFg-zKEKI4gaI4BmhRoOUpq_jPxrVhZ1NSMnodAQnhUthJXRUJIREZTIGRlbGVnYXRpb24RMTAuMjAuMTAwLjU0OjgwMjA"}]';
=> COPY nation FROM 'webhdfs:///user/bob/nation.dat';
You can use the WebHDFS REST API to get delegation tokens:
$ curl -s --noproxy "*" --negotiate -u: -X GET "http://hadoop1:50070/webhdfs/v1/?op=GETDELEGATIONTOKEN"
Vertica does not, and cannot, renew delegation tokens when they expire. You must either keep sessions shorter than token lifetime or implement a renewal scheme.
Delegation tokens and the HCatalog Connector
HiveServer2 uses a different format for delegation tokens. To use the HCatalog Connector, therefore, you must set two delegation tokens, one as usual (authority) and one for HiveServer2 (schema). The HCatalog Connector uses the schema token to access metadata and the authority token to access data. The schema name is the same Hive schema you specified in CREATE HCATALOG SCHEMA. The following example shows how to use these two delegation tokens.
$ vsql -U dbuser1

-- set delegation token for user and HiveServer2
=> ALTER SESSION SET
   HadoopImpersonationConfig='[
     {"nameservice":"hadoopNS","token":"JQAHcmVsZWFzZQdyZWxlYXNlAIoBYVJKrYSKAWF2VzGEjgmzj_IUCIrI9b8Dqu6awFTHk5nC-fHB8xsSV0VCSERGUyBkZWxlZ2F0aW9uETEwLjIwLjQyLjEwOTo4MDIw"},
     {"schema":"access","token":"UwAHcmVsZWFzZQdyZWxlYXNlL2hpdmUvZW5nLWc5LTEwMC52ZXJ0aWNhY29ycC5jb21AVkVSVElDQUNPUlAuQ09NigFhUkmyTooBYXZWNk4BjgETFKN2xPURn19Yq9tf-0nekoD51TZvFUhJVkVfREVMRUdBVElPTl9UT0tFThZoaXZlc2VydmVyMkNsaWVudFRva2Vu"}]';

-- uses HiveServer2 token to get metadata
=> CREATE HCATALOG SCHEMA access WITH hcatalog_schema 'access';

-- uses both tokens
=> SELECT * FROM access.t1;

--uses only HiveServer2 token
=> SELECT * FROM hcatalog_tables;
HiveServer2 does not provide a REST API for delegation tokens like WebHDFS does. See Getting a HiveServer2 delegation token for some tips.
Testing the configuration
You can use the HADOOP_IMPERSONATION_CONFIG_CHECK function to test your HDFS delegation tokens and HCATALOGCONNECTOR_CONFIG_CHECK to test your HCatalog Connector delegation token.
3.2.3 - Getting a HiveServer2 delegation token
To acccess Hive metadata using HiveServer2, you need a special delegation token.
To acccess Hive metadata using HiveServer2, you need a special delegation token. (See Bring your own delegation token.) HiveServer2 does not provide an easy way to get this token, unlike the REST API that grants HDFS (data) delegation tokens.
The following utility code shows a way to get this token. You will need to modify this code for your own cluster; in particular, change the value of the connectURL static.
import java.io.FileWriter;
import java.io.PrintStream;
import java.io.PrintWriter;
import java.io.StringWriter;
import java.io.Writer;
import java.security.PrivilegedExceptionAction;
import java.sql.Connection;
import java.sql.DriverManager;
import java.sql.ResultSet;
import java.sql.Statement;
import org.apache.hadoop.conf.Configuration;
import org.apache.hadoop.hive.shims.Utils;
import org.apache.hadoop.security.UserGroupInformation;
import org.apache.hive.jdbc.HiveConnection;
import org.json.simple.JSONArray;
import org.json.simple.JSONObject;

public class JDBCTest {
  public static final String driverName = "org.apache.hive.jdbc.HiveDriver";
  public static String connectURL = "jdbc:hive2://node2.cluster0.example.com:2181,node1.cluster0.example.com:2181,node3.cluster0.example.com:2181/;serviceDiscoveryMode=zooKeeper;zooKeeperNamespace=hiveserver2";
  public static String schemaName = "hcat";
  public static String verticaUser = "condor";
  public static String proxyUser = "condor-2";
  public static String krb5conf = "/home/server/kerberos/krb5.conf";
  public static String realm = "EXAMPLE.COM";
  public static String keytab = "/home/server/kerberos/kt.keytab";

  public static void main(String[] args) {
    if (args.length < 7) {
      System.out.println(
          "Usage: JDBCTest <jdbc_url> <hive_schema> <kerberized_user> <proxy_user> <krb5_conf> <krb_realm> <krb_keytab>");
      System.exit(1);
    }
    connectURL = args[0];
    schemaName = args[1];
    verticaUser = args[2];
    proxyUser = args[3];
    krb5conf = args[4];
    realm = args[5];
    keytab = args[6];

    System.out.println("connectURL: " + connectURL);
    System.out.println("schemaName: " + schemaName);
    System.out.println("verticaUser: " + verticaUser);
    System.out.println("proxyUser: " + proxyUser);
    System.out.println("krb5conf: " + krb5conf);
    System.out.println("realm: " + realm);
    System.out.println("keytab: " + keytab);
    try {
      Class.forName("org.apache.hive.jdbc.HiveDriver");
      System.out.println("Found HiveServer2 JDBC driver");
    } catch (ClassNotFoundException e) {
      System.out.println("Couldn't find HiveServer2 JDBC driver");
    }
    try {
      Configuration conf = new Configuration();
      System.setProperty("java.security.krb5.conf", krb5conf);
      conf.set("hadoop.security.authentication", "kerberos");
      UserGroupInformation.setConfiguration(conf);
      dtTest();
    } catch (Throwable e) {
      Writer stackString = new StringWriter();
      e.printStackTrace(new PrintWriter(stackString));
      System.out.println(e);
      System.out.printf("Error occurred when connecting to HiveServer2 with [%s]: %s\n%s\n",
          new Object[] { connectURL, e.getMessage(), stackString.toString() });
    }
  }

  private static void dtTest() throws Exception {
    UserGroupInformation user = UserGroupInformation.loginUserFromKeytabAndReturnUGI(verticaUser + "@" + realm, keytab);
    user.doAs(new PrivilegedExceptionAction() {
      public Void run() throws Exception {
        System.out.println("In doas: " + UserGroupInformation.getLoginUser());
        Connection con = DriverManager.getConnection(JDBCTest.connectURL);
        System.out.println("Connected to HiveServer2");
        JDBCTest.showUser(con);
        System.out.println("Getting delegation token for user");
        String token = ((HiveConnection) con).getDelegationToken(JDBCTest.proxyUser, "hive/_HOST@" + JDBCTest.realm);
        System.out.println("Got token: " + token);
        System.out.println("Closing original connection");
        con.close();

        System.out.println("Setting delegation token in UGI");
        Utils.setTokenStr(Utils.getUGI(), token, "hiveserver2ClientToken");
        con = DriverManager.getConnection(JDBCTest.connectURL + ";auth=delegationToken");
        System.out.println("Connected to HiveServer2 with delegation token");
        JDBCTest.showUser(con);
        con.close();

        JDBCTest.writeDTJSON(token);

        return null;
      }
    });
  }

  private static void showUser(Connection con) throws Exception {
    String sql = "select current_user()";
    Statement stmt = con.createStatement();
    ResultSet res = stmt.executeQuery(sql);
    StringBuilder result = new StringBuilder();
    while (res.next()) {
      result.append(res.getString(1));
    }
    System.out.println("\tcurrent_user: " + result.toString());
  }

  private static void writeDTJSON(String token) {
    JSONArray arr = new JSONArray();
    JSONObject obj = new JSONObject();
    obj.put("schema", schemaName);
    obj.put("token", token);
    arr.add(obj);
    try {
      FileWriter fileWriter = new FileWriter("hcat_delegation.json");
      fileWriter.write(arr.toJSONString());
      fileWriter.flush();
    } catch (Exception e) {
      e.printStackTrace();
    }
  }
}
Following is an example call and its output:
$ java -cp hs2token.jar JDBCTest 'jdbc:hive2://test.example.com:10000/default;principal=hive/_HOST@EXAMPLE.COM' "default" "testuser" "test" "/etc/krb5.conf" "EXAMPLE.COM" "/test/testuser.keytab"
connectURL: jdbc:hive2://test.example.com:10000/default;principal=hive/_HOST@EXAMPLE.COM
schemaName: default
verticaUser: testuser
proxyUser: test
krb5conf: /etc/krb5.conf
realm: EXAMPLE.COM
keytab: /test/testuser.keytab
Found HiveServer2 JDBC driver
log4j:WARN No appenders could be found for logger (org.apache.hadoop.metrics2.lib.MutableMetricsFactory).
log4j:WARN Please initialize the log4j system properly.
log4j:WARN See http://logging.apache.org/log4j/1.2/faq.html#noconfig for more info.
In doas: testuser@EXAMPLE.COM (auth:KERBEROS)
Connected to HiveServer2
        current_user: testuser
Getting delegation token for user
Got token: JQAEdGVzdARoaXZlB3JlbGVhc2WKAWgvBOwzigFoUxFwMwKOAgMUHfqJ5ma7_27LiePN8C7MxJ682bsVSElWRV9ERUxFR0FUSU9OX1RPS0VOFmhpdmVzZXJ2ZXIyQ2xpZW50VG9rZW4
Closing original connection
Setting delegation token in UGI
Connected to HiveServer2 with delegation token
        current_user: testuser
3.2.4 - HadoopImpersonationConfig format
The value of the HadoopImpersonationConfig session parameter is a set of one or more JSON objects.
The value of the HadoopImpersonationConfig session parameter is a set of one or more JSON objects. Each object describes one doAs user or delegation token for one Hadoop destination. You must use WebHDFS, not LibHDFS++, to use impersonation.
Syntax
[ { ("doAs" | "token"): value,
    ("nameservice" | "authority" | "schema"): value} [,...]
]
Properties
doAs |
The name of a Hadoop user to impersonate. |
token |
A delegation token to use for HDFS access. |
nameservice |
A Hadoop name service. All access to this name service uses the doAs user or delegation token. |
authority |
A name node authority. All access to this authority uses the doAs user or delegation token. If the name node fails over to another name node, the doAs user or delegation token does not automatically apply to the failover name node. If you are using HA name node, use nameservice instead of authority or include objects for every name node. |
schema |
A Hive schema, for use with the HCatalog Connector. Vertica uses this object's doAs user or token to access Hive metadata only. For data access you must also specify a name service or authority object, just like for all other data access. |
Examples
In the following example of doAs, Bob is a Hadoop user and vertica-etl is a Kerberized proxy user.
$ kinit vertica-etl -kt /home/dbadmin/vertica-etl.keytab
$ vsql -U vertica-etl

=> ALTER SESSION SET
   HadoopImpersonationConfig = '[{"nameservice":"hadoopNS", "doAs":"Bob"}]';
=> COPY nation FROM 'webhdfs:///user/bob/nation.dat';
In the following example, the current Vertica user (it doesn't matter who that is) uses a Hadoop delegation token. This token belongs to Alice, but you never specify the user name here. Instead, you use it to get the delegation token from Hadoop.
$ vsql -U dbuser1

=> ALTER SESSION SET
   HadoopImpersonationConfig ='[{"nameservice":"hadoopNS","token":"JAAGZGJldGwxBmRiZXRsMQCKAWDXJgB9igFg-zKEfY4gao4BmhSJYtXiWqrhBHbbUn4VScNg58HWQxJXRUJIREZTIGRlbGVnYXRpb24RMTAuMjAuMTAwLjU0OjgwMjA"}]';
=> COPY nation FROM 'webhdfs:///user/alice/nation.dat';
In the following example, "authority" specifies the (single) name node on a Hadoop cluster that does not use high availability.
$ vsql -U dbuser1

=> ALTER SESSION SET
   HadoopImpersonationConfig ='[{"authority":"hadoop1:50070", "doAs":"Stephanie"}]';
=> COPY nation FROM 'webhdfs://hadoop1:50070/user/stephanie/nation.dat';
To access data in Hive you need to specify two delegation tokens. The first, for a name service or authority, is for data access as usual. The second is for the HiveServer2 metadata for the schema. HiveServer2 requires a delegation token in WebHDFS format. The schema name is the Hive schema you specify with CREATE HCATALOG SCHEMA.
$ vsql -U dbuser1

-- set delegation token for user and HiveServer2
=> ALTER SESSION SET
   HadoopImpersonationConfig='[
     {"nameservice":"hadoopNS","token":"JQAHcmVsZWFzZQdyZWxlYXNlAIoBYVJKrYSKAWF2VzGEjgmzj_IUCIrI9b8Dqu6awFTHk5nC-fHB8xsSV0VCSERGUyBkZWxlZ2F0aW9uETEwLjIwLjQyLjEwOTo4MDIw"},
     {"schema":"access","token":"UwAHcmVsZWFzZQdyZWxlYXNlL2hpdmUvZW5nLWc5LTEwMC52ZXJ0aWNhY29ycC5jb21AVkVSVElDQUNPUlAuQ09NigFhUkmyTooBYXZWNk4BjgETFKN2xPURn19Yq9tf-0nekoD51TZvFUhJVkVfREVMRUdBVElPTl9UT0tFThZoaXZlc2VydmVyMkNsaWVudFRva2Vu"}]';

-- uses HiveServer2 token to get metadata
=> CREATE HCATALOG SCHEMA access WITH hcatalog_schema 'access';

-- uses both tokens
=> SELECT * FROM access.t1;

--uses only HiveServer2 token
=> SELECT * FROM hcatalog_tables;
Each object in the HadoopImpersonationConfig collection specifies one connection to one Hadoop cluster. You can add as many connections as you like, including to more than one Hadoop cluster. The following example shows delegation tokens for two different Hadoop clusters. Vertica uses the correct token for each cluster when connecting.
$ vsql -U dbuser1

=> ALTER SESSION SET
   HadoopImpersonationConfig ='[
    {"nameservice":"productionNS","token":"JAAGZGJldGwxBmRiZXRsMQCKAWDXJgB9igFg-zKEfY4gao4BmhSJYtXiWqrhBHbbUn4VScNg58HWQxJXRUJIREZTIGRlbGVnYXRpb24RMTAuMjAuMTAwLjU0OjgwMjA"},
    {"nameservice":"testNS", "token":"HQAHcmVsZWFzZQdyZWxlYXNlAIoBYVJKrYSKAWF2VzGEjgmzj_IUCIrI9b8Dqu6awFTHk5nC-fHB8xsSV0VCSERGUyBkZWxlZ2F0aW9uETEwLjIwLjQyLjEwOTo4MDIw"}]';

=> COPY clicks FROM 'webhdfs://productionNS/data/clickstream.dat';
=> COPY testclicks FROM 'webhdfs://testNS/data/clickstream.dat';
3.3 - Token expiration
Vertica uses Hadoop tokens when using Kerberos tickets (Using Kerberos from [%=Vertica.DBMS_SHORT%]) or doAs (User Impersonation (doAs)).
Vertica uses Hadoop tokens when using Kerberos tickets (Using Kerberos with Vertica) or doAs (User impersonation (doAs)). Vertica attempts to automatically refresh Hadoop tokens before they expire, but you can also set a minimum refresh frequency if you prefer. Use the HadoopFSTokenRefreshFrequency configuration parameter to specify the frequency in seconds:
=> ALTER DATABASE exampledb SET HadoopFSTokenRefreshFrequency = '86400';
If the current age of the token is greater than the value specified in this parameter, Vertica refreshes the token before accessing data stored in HDFS.
Vertica does not refresh delegation tokens (Bring your own delegation token).
4 - Using HDFS storage locations
Vertica stores data in its native format, ROS, in storage locations.
Vertica stores data in its native format, ROS, in storage locations. You can place storage locations on the local Linux file system or in HDFS. If you place storage locations on HDFS, you must perform additional configuration in HDFS to be able to manage them. These are in addition to the requirements in Vertica for managing storage locations and backup/restore.
If you use HDFS storage locations, the HDFS data must be available when you start Vertica. Your HDFS cluster must be operational, and the ROS files must be present. If you moved data files, or they are corrupted, or your HDFS cluster is not responsive, Vertica cannot start.
4.1 - Hadoop configuration for backup and restore
If your Vertica cluster uses storage locations on HDFS, and you want to be able to back up and restore those storage locations using vbr, you must enable snapshotting in HDFS.
If your Vertica cluster uses storage locations on HDFS, and you want to be able to back up and restore those storage locations using vbr, you must enable snapshotting in HDFS.
The Vertica backup script uses HDFS's snapshotting feature to create a backup of HDFS storage locations. A directory must allow snapshotting before HDFS can take a snapshot. Only a Hadoop superuser can enable snapshotting on a directory. Vertica can enable snapshotting automatically if the database administrator is also a Hadoop superuser.
If HDFS is unsecured, the following instructions apply to the database administrator account, usually dbadmin. If HDFS uses Kerberos security, the following instructions apply to the principal stored in the Vertica keytab file, usually vertica. The instructions below use the term "database account" to refer to this user.
We recommend that you make the database administrator or principal a Hadoop superuser. If you are not able to do so, you must enable snapshotting on the directory before configuring it for use by Vertica.
The steps you need to take to make the Vertica database administrator account a superuser depend on the distribution of Hadoop you are using. Consult your Hadoop distribution's documentation for details.
Manually enabling snapshotting for a directory
If you cannot grant superuser status to the database account, you can instead enable snapshotting of each directory manually. Use the following command:
$ hdfs dfsadmin -allowSnapshot path
Issue this command for each directory on each node. Remember to do this each time you add a new node to your HDFS cluster.
Nested snapshottable directories are not allowed, so you cannot enable snapshotting for a parent directory to automatically enable it for child directories. You must enable it for each individual directory.
Additional requirements for Kerberos
If HDFS uses Kerberos, then in addition to granting the keytab principal access, you must give Vertica access to certain Hadoop configuration files. See Configuring Kerberos.
Testing the database account's ability to make HDFS directories snapshottable
After making the database account a Hadoop superuser, verify that the account can set directories snapshottable:
-
Log into the Hadoop cluster as the database account (dbadmin by default).
-
Determine a location in HDFS where the database administrator can create a directory. The /tmp directory is usually available. Create a test HDFS directory using the command:
$ hdfs dfs -mkdir /path/testdir
-
Make the test directory snapshottable using the command:
$ hdfs dfsadmin -allowSnapshot /path/testdir
The following example demonstrates creating an HDFS directory and making it snapshottable:
$ hdfs dfs -mkdir /tmp/snaptest
$ hdfs dfsadmin -allowSnapshot /tmp/snaptest
Allowing snaphot on /tmp/snaptest succeeded
4.2 - Removing HDFS storage locations
The steps to remove an HDFS storage location are similar to standard storage locations:.
The steps to remove an HDFS storage location are similar to standard storage locations:
-
Remove any existing data from the HDFS storage location by using SET_OBJECT_STORAGE_POLICY to change each object's storage location. Alternatively, you can use CLEAR_OBJECT_STORAGE_POLICY. Because the Tuple Mover runs infrequently, set the enforce-storage-move parameter to true to make the change immediately.
-
Retire the location on each host that has the storage location defined using RETIRE_LOCATION. Set enforce-storage-move to true.
-
Drop the location on each node using DROP_LOCATION.
-
Optionally remove the snapshots and files from the HDFS directory for the storage location.
-
Perform a full database backup.
For more information about changing storage policies, changing usage, retiring locations, and dropping locations, see Managing storage locations.
Important
If you have backed up the data in the HDFS storage location you are removing, you must perform a full database backup after you remove the location. If you do not and restore the database to a backup made before you removed the location, the location's data is restored.
Removing storage location files from HDFS
Dropping an HDFS storage location does not automatically clean the HDFS directory that stored the location's files. Any snapshots of the data files created when backing up the location are also not deleted. These files consume disk space on HDFS and also prevent the directory from being reused as an HDFS storage location. Vertica cannot create a storage location in a directory that contains existing files or subdirectories.
You must log into the Hadoop cluster to delete the files from HDFS. An alternative is to use some other HDFS file management tool.
Removing backup snapshots
HDFS returns an error if you attempt to remove a directory that has snapshots:
$ hdfs dfs -rm -r -f -skipTrash /user/dbadmin/v_vmart_node0001
rm: The directory /user/dbadmin/v_vmart_node0001 cannot be deleted since
/user/dbadmin/v_vmart_node0001 is snapshottable and already has snapshots
The Vertica backup script creates snapshots of HDFS storage locations as part of the backup process. If you made backups of your HDFS storage location, you must delete the snapshots before removing the directories.
HDFS stores snapshots in a subdirectory named .snapshot. You can list the snapshots in the directory using the standard HDFS ls command:
$ hdfs dfs -ls /user/dbadmin/v_vmart_node0001/.snapshot
Found 1 items
drwxrwx---   - dbadmin supergroup          0 2014-09-02 10:13 /user/dbadmin/v_vmart_node0001/.snapshot/s20140902-101358.629
To remove snapshots, use the command:
$ hdfs dfs -removeSnapshot directory snapshotname
The following example demonstrates the command to delete the snapshot shown in the previous example:
$ hdfs dfs -deleteSnapshot /user/dbadmin/v_vmart_node0001 s20140902-101358.629
You must delete each snapshot from the directory for each host in the cluster. After you have deleted the snapshots, you can delete the directories in the storage location.
Important
Each snapshot's name is based on a timestamp down to the millisecond. Nodes independently create their own snapshots. They do not synchronize snapshot creation, so their snapshot names differ. You must list each node's snapshot directory to learn the names of the snapshots it contains.
See Apache's HDFS Snapshot documentation for more information about managing and removing snapshots.
Removing the storage location directories
You can remove the directories that held the storage location's data by either of the following methods:
-
Use an HDFS file manager to delete directories. See your Hadoop distribution's documentation to determine if it provides a file manager.
-
Log into the Hadoop Name Node using the database administrator’s account and use HDFS's rmr command to delete the directories. See Apache's File System Shell Guide for more information.
The following example uses the HDFS rmr command from the Linux command line to delete the directories left behind in the HDFS storage location directory /user/dbamin. It uses the -skipTrash flag to force the immediate deletion of the files:
$ hdfsp dfs -ls /user/dbadmin
Found 3 items
drwxrwx---   - dbadmin supergroup          0 2014-08-29 15:11 /user/dbadmin/v_vmart_node0001
drwxrwx---   - dbadmin supergroup          0 2014-08-29 15:11 /user/dbadmin/v_vmart_node0002
drwxrwx---   - dbadmin supergroup          0 2014-08-29 15:11 /user/dbadmin/v_vmart_node0003

$ hdfs dfs -rmr -skipTrash /user/dbadmin/*
Deleted /user/dbadmin/v_vmart_node0001
Deleted /user/dbadmin/v_vmart_node0002
Deleted /user/dbadmin/v_vmart_node0003
5 - Using the HCatalog Connector
The Vertica HCatalog Connector lets you access data stored in Apache's Hive data warehouse software the same way you access it within a native Vertica table.
The Vertica HCatalog Connector lets you access data stored in Apache's Hive data warehouse software the same way you access it within a native Vertica table.
If your files are in the Optimized Columnar Row (ORC) or Parquet format and do not use complex types, the HCatalog Connector creates an external table and uses the ORC or Parquet reader instead of using the Java SerDe. See ORC and PARQUET for more information about these readers.
The HCatalog Connector performs predicate pushdown to improve query performance. Instead of reading all data across the network to evaluate a query, the HCatalog Connector moves the evaluation of predicates closer to the data. Predicate pushdown applies to Hive partition pruning, ORC stripe pruning, and Parquet row-group pruning. The HCatalog Connector supports predicate pushdown for the following predicates: >, >=, =, <>, <=, <.
5.1 - Overview
There are several Hadoop components that you need to understand to use the HCatalog connector:.
There are several Hadoop components that you need to understand to use the HCatalog connector:
-
Apache Hive lets you query data stored in a Hadoop Distributed File System (HDFS) the same way you query data stored in a relational database. Behind the scenes, Hive uses a set of serializer and deserializer (SerDe) classes to extract data from files stored in HDFS and break it into columns and rows. Each SerDe handles data files in a specific format. For example, one SerDe extracts data from comma-separated data files while another interprets data stored in JSON format.
-
Apache HCatalog is a component of the Hadoop ecosystem that makes Hive's metadata available to other Hadoop components (such as Pig).
-
HiveServer2 makes HCatalog and Hive data available via JDBC. Through it, a client can make requests to retrieve data stored in Hive, as well as information about the Hive schema. HiveServer2 can use authorization services (Sentry or Ranger). HiverServer2 can use Hive LLAP (Live Long And Process).
The Vertica HCatalog Connector lets you transparently access data that is available through HiveServer2. You use the connector to define a schema in Vertica that corresponds to a Hive database or schema. When you query data within this schema, the HCatalog Connector transparently extracts and formats the data from Hadoop into tabular data. Vertica supports authorization services and Hive LLAP.
Note
You can use the WebHCat service instead of HiveServer2, but performance is usually better with HiveServer2. Support for WebHCat is deprecated. To use WebHCat, set the HCatalogConnectorUseHiveServer2 configuration parameter to 0. See
Hadoop parameters. WebHCat does not support authorization services.
HCatalog connection features
The HCatalog Connector lets you query data stored in Hive using the Vertica native SQL syntax. Some of its main features are:
-
The HCatalog Connector always reflects the current state of data stored in Hive.
-
The HCatalog Connector uses the parallel nature of both Vertica and Hadoop to process Hive data. The result is that querying data through the HCatalog Connector is often faster than querying the data directly through Hive.
-
Because Vertica performs the extraction and parsing of data, the HCatalog Connector does not significantly increase the load on your Hadoop cluster.
-
The data you query through the HCatalog Connector can be used as if it were native Vertica data. For example, you can execute a query that joins data from a table in an HCatalog schema with a native table.
HCatalog Connector considerations
There are a few things to keep in mind when using the HCatalog Connector:
-
Hive's data is stored in flat files in a distributed file system, requiring it to be read and deserialized each time it is queried. This deserialization causes Hive performance to be much slower than that of Vertica. The HCatalog Connector has to perform the same process as Hive to read the data. Therefore, querying data stored in Hive using the HCatalog Connector is much slower than querying a native Vertica table. If you need to perform extensive analysis on data stored in Hive, you should consider loading it into Vertica. Vertica optimization often makes querying data through the HCatalog Connector faster than directly querying it through Hive.
-
If Hive uses Kerberos security, the HCatalog Connector uses the querying user's credentials in queries by default. If Hive uses Sentry or Ranger to enforce security, then you must either disable this behavior in Vertica by setting EnableHCatImpersonation to 0 or grant users access to the underlying data in HDFS. (Sentry supports ACL synchronization to automatically grant access.) Alternatively, you can specify delegation tokens for data and metadata access. See Configuring security.
-
Hive supports complex data types such as lists, maps, and structs that Vertica does not support. Columns containing these data types are converted to a JSON representation of the data type and stored as a VARCHAR. See Data type conversions from Hive to Vertica.
Note
The HCatalog Connector is read-only. It cannot insert data into Hive.
5.2 - How the HCatalog Connector works
When planning a query that accesses data from a Hive table, the Vertica HCatalog Connector on the initiator node contacts HiveServer2 (or WebHCat) in your Hadoop cluster to determine if the table exists.
When planning a query that accesses data from a Hive table, the Vertica HCatalog Connector on the initiator node contacts HiveServer2 (or WebHCat) in your Hadoop cluster to determine if the table exists. If it does, the connector retrieves the table's metadata from the metastore database so the query planning can continue. When the query executes, all nodes in the Vertica cluster directly retrieve the data necessary for completing the query from HDFS. They then use the Hive SerDe classes to extract the data so the query can execute. When accessing data in ORC or Parquet format, the HCatalog Connector uses Vertica's internal readers for these formats instead of the Hive SerDe classes.
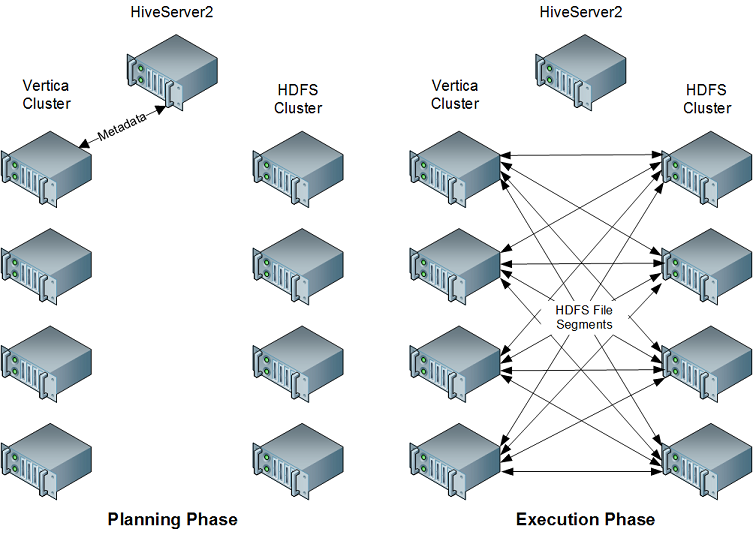
This approach takes advantage of the parallel nature of both Vertica and Hadoop. In addition, by performing the retrieval and extraction of data directly, the HCatalog Connector reduces the impact of the query on the Hadoop cluster.
For files in the Optimized Columnar Row (ORC) or Parquet format that do not use complex types, the HCatalog Connector creates an external table and uses the ORC or Parquet reader instead of using the Java SerDe. You can direct these readers to access custom Hive partition locations if Hive used them when writing the data. By default these extra checks are turned off to improve performance.
5.3 - HCatalog Connector requirements
Before you can use the HCatalog Connector, both your Vertica and Hadoop installations must meet the following requirements.
Before you can use the HCatalog Connector, both your Vertica and Hadoop installations must meet the following requirements.
Vertica requirements
All of the nodes in your cluster must have a Java Virtual Machine (JVM) installed. You must use the same Java version that the Hadoop cluster uses. See Installing the Java Runtime on Your Vertica Cluster.
You must also add certain libraries distributed with Hadoop and Hive to your Vertica installation directory. See Configuring Vertica for HCatalog.
Hadoop requirements
Your Hadoop cluster must meet several requirements to operate correctly with the Vertica Connector for HCatalog:
-
It must have Hive, HiveServer2, and HCatalog installed and running. See Apache's HCatalog page for more information.
-
The HiveServer2 server and all of the HDFS nodes that store HCatalog data must be directly accessible from all of the hosts in your Vertica database. Verify that any firewall separating the Hadoop cluster and the Vertica cluster will pass HiveServer2, metastore database, and HDFS traffic.
-
The data that you want to query must be in an internal or external Hive table.
-
If a table you want to query uses a non-standard SerDe, you must install the SerDe's classes on your Vertica cluster before you can query the data. See Using nonstandard SerDes.
5.4 - Installing the Java runtime on your Vertica cluster
The HCatalog Connector requires a 64-bit Java Virtual Machine (JVM).
The HCatalog Connector requires a 64-bit Java Virtual Machine (JVM). The JVM must support Java 6 or later, and must be the same version as the one installed on your Hadoop nodes.
Note
If your Vertica cluster is configured to execute User Defined Extensions (UDxs) written in Java, it already has a correctly-configured JVM installed. See
Developing user-defined extensions (UDxs) for more information.
Installing Java on your Vertica cluster is a two-step process:
-
Install a Java runtime on all of the hosts in your cluster.
-
Set the JavaBinaryForUDx configuration parameter to tell Vertica the location of the Java executable.
Installing a Java runtime
For Java-based features, Vertica requires a 64-bit Java 6 (Java version 1.6) or later Java runtime. Vertica supports runtimes from either Oracle or OpenJDK. You can choose to install either the Java Runtime Environment (JRE) or Java Development Kit (JDK), since the JDK also includes the JRE.
Many Linux distributions include a package for the OpenJDK runtime. See your Linux distribution's documentation for information about installing and configuring OpenJDK.
To install the Oracle Java runtime, see the Java Standard Edition (SE) Download Page. You usually run the installation package as root in order to install it. See the download page for instructions.
Once you have installed a JVM on each host, ensure that the java command is in the search path and calls the correct JVM by running the command:
$ java -version
This command should print something similar to:
java version "1.8.0_102"
Java(TM) SE Runtime Environment (build 1.8.0_102-b14)
Java HotSpot(TM) 64-Bit Server VM (build 25.102-b14, mixed mode)
Note
Any previously installed Java VM on your hosts may interfere with a newly installed Java runtime. See your Linux distribution's documentation for instructions on configuring which JVM is the default. Unless absolutely required, you should uninstall any incompatible version of Java before installing the Java 6 or Java 7 runtime.
Setting the JavaBinaryForUDx configuration parameter
The JavaBinaryForUDx configuration parameter tells Vertica where to look for the JRE to execute Java UDxs. After you have installed the JRE on all of the nodes in your cluster, set this parameter to the absolute path of the Java executable. You can use the symbolic link that some Java installers create (for example /usr/bin/java). If the Java executable is in your shell search path, you can get the path of the Java executable by running the following command from the Linux command line shell:
$ which java
/usr/bin/java
If the java command is not in the shell search path, use the path to the Java executable in the directory where you installed the JRE. Suppose you installed the JRE in /usr/java/default (which is where the installation package supplied by Oracle installs the Java 1.6 JRE). In this case the Java executable is /usr/java/default/bin/java.
You set the configuration parameter by executing the following statement as a database superuser:
=> ALTER DATABASE DEFAULT SET PARAMETER JavaBinaryForUDx = '/usr/bin/java';
See ALTER DATABASE for more information on setting configuration parameters.
To view the current setting of the configuration parameter, query the CONFIGURATION_PARAMETERS system table:
=> \x
Expanded display is on.
=> SELECT * FROM CONFIGURATION_PARAMETERS WHERE parameter_name = 'JavaBinaryForUDx';
-[ RECORD 1 ]-----------------+----------------------------------------------------------
node_name                     | ALL
parameter_name                | JavaBinaryForUDx
current_value                 | /usr/bin/java
default_value                 |
change_under_support_guidance | f
change_requires_restart       | f
description                   | Path to the java binary for executing UDx written in Java
Once you have set the configuration parameter, Vertica can find the Java executable on each node in your cluster.
Note
Since the location of the Java executable is set by a single configuration parameter for the entire cluster, you must ensure that the Java executable is installed in the same path on all of the hosts in the cluster.
5.5 - Configuring Vertica for HCatalog
Before you can use the HCatalog Connector, you must add certain Hadoop and Hive libraries to your Vertica installation.
Before you can use the HCatalog Connector, you must add certain Hadoop and Hive libraries to your Vertica installation. You must also copy the Hadoop configuration files that specify various connection properties. Vertica uses the values in those configuration files to make its own connections to Hadoop.
You need only make these changes on one node in your cluster. After you do this you can install the HCatalog connector.
Copy Hadoop libraries and configuration files
Vertica provides a tool, hcatUtil, to collect the required files from Hadoop. This tool copies selected libraries and XML configuration files from your Hadoop cluster to your Vertica cluster. This tool might also need access to additional libraries:
-
If you plan to use Hive to query files that use Snappy compression, you need access to the Snappy native libraries, libhadoop*.so and libsnappy*.so.
-
If you plan to use Hive to query files that use LZO compression, you need access to the hadoop-lzo-*.jar and libgplcompression.so* libraries. In core-site.xml you must also edit the io.compression.codecs property to include com.hadoop.compression.lzo.LzopCodec.
-
If you plan to use a JSON SerDe with a Hive table, you need access to its library. This is the same library that you used to configure Hive; for example:
hive> add jar /home/release/json-serde-1.3-jar-with-dependencies.jar;


hive> create external table nationjson (id int,name string,rank int,text string)
      ROW FORMAT SERDE 'org.openx.data.jsonserde.JsonSerDe'
      LOCATION '/user/release/vt/nationjson';
-
If you are using any other libraries that are not standard across all supported Hadoop versions, you need access to those libraries.
If any of these cases applies to you, do one of the following:
-
Include the path(s) in the path you specify as the value of --hcatLibPath, or
-
Copy the file(s) to a directory already on that path.
If Vertica is not co-located on a Hadoop node, you should do the following:
-
Copy /opt/vertica/packages/hcat/tools/hcatUtil to a Hadoop node and run it there, specifying a temporary output directory. Your Hadoop, HIVE, and HCatalog lib paths might be different. In newer versions of Hadoop the HCatalog directory is usually a subdirectory under the HIVE directory, and Cloudera creates a new directory for each revision of the configuration files. Use the values from your environment in the following command:
hcatUtil --copyJars
      --hadoopHiveHome="$HADOOP_HOME/lib;$HIVE_HOME/lib;/hcatalog/dist/share"
       --hadoopHiveConfPath="$HADOOP_CONF_DIR;$HIVE_CONF_DIR;$WEBHCAT_CONF_DIR"
      --hcatLibPath="/tmp/hadoop-files"
If you are using Hive LLAP, specify the hive2 directories.
-
Verify that all necessary files were copied:
hcatUtil --verifyJars --hcatLibPath=/tmp/hadoop-files
-
Copy that output directory (/tmp/hadoop-files, in this example) to /opt/vertica/packages/hcat/lib on the Vertica node you will connect to when installing the HCatalog connector. If you are updating a Vertica cluster to use a new Hadoop cluster (or a new version of Hadoop), first remove all JAR files in /opt/vertica/packages/hcat/lib except vertica-hcatalogudl.jar.
-
Verify that all necessary files were copied:
hcatUtil --verifyJars --hcatLibPath=/opt/vertica/packages/hcat
If Vertica is co-located on some or all Hadoop nodes, you can do this in one step on a shared node. Your Hadoop, HIVE, and HCatalog lib paths might be different; use the values from your environment in the following command:
hcatUtil --copyJars
      --hadoopHiveHome="$HADOOP_HOME/lib;$HIVE_HOME/lib;/hcatalog/dist/share"
      --hadoopHiveConfPath="$HADOOP_CONF_DIR;$HIVE_CONF_DIR;$WEBHCAT_CONF_DIR"
      --hcatLibPath="/opt/vertica/packages/hcat/lib"
The hcatUtil script has the following arguments:
-c, --copyJars |
Copy the required JAR files from hadoopHiveHome and configuration files from hadoopHiveConfPath. |
-v, --verifyJars |
Verify that the required files are present in hcatLibPath. Check the output of hcatUtil for error and warning messages. |
--hadoopHiveHome= "value1;value2;..." |
Paths to the Hadoop, Hive, and HCatalog home directories. Separate directories by semicolons (;). Enclose paths in double quotes.
Note
Always place $HADOOP_HOME on the path before $HIVE_HOME. In some Hadoop distributions, these two directories contain different versions of the same library.
|
--hadoopHiveConfPath= "value1;value2;..." |
Paths of the following configuration files:
Separate directories by semicolons (;). Enclose paths in double quotes.
In previous releases of Vertica this parameter was optional under some conditions. It is now required.
|
--hcatLibPath="value" |
Output path for the libraries and configuration files. On a Vertica node, use /opt/vertica/packages/hcat/lib. If you have previously run hcatUtil with a different version of Hadoop, first remove the old JAR files from the output directory (all except vertica-hcatalogudl.jar). |
After you have copied the files and verified them, install the HCatalog connector.
Install the HCatalog Connector
On the same node where you copied the files from hcatUtil, install the HCatalog connector by running the install.sql script. This script resides in the ddl/ folder under your HCatalog connector installation path. This script creates the library and VHCatSource and VHCatParser.
Note
The data that was copied using hcatUtil is now stored in the database. If you change any of those values in Hadoop, you need to rerun hcatUtil and install.sql. The following statement returns the names of the libraries and configuration files currently being used:
=> SELECT dependencies FROM user_libraries WHERE lib_name='VHCatalogLib';
Now you can create HCatalog schema parameters, which point to your existing Hadoop services, as described in Defining a schema using the HCatalog Connector.
Upgrading to a new version of Vertica
After upgrading to a new version of Vertica, perform the following steps:
- Uninstall the HCatalog Connector using the uninstall.sql script. This script resides in the ddl/ folder under your HCatalog connector installation path.
- Delete the contents of the
hcatLibPath directory except for vertica-hcatalogudl.jar.
- Rerun hcatUtil.
- Reinstall the HCatalog Connector using the install.sql script.
For more information about upgrading Vertica, see Upgrade Vertica.
When reading Hadoop columnar file formats (ORC or Parquet), the HCatalog Connector attempts to use the built-in readers. When doing so, it uses WebHDFS by default. You can use the deprecated LibHDFS++ library by using the hdfs URI scheme and using ALTER DATABASE to set HDFSUseWebHDFS to 0. This setting applies to all HDFS access, not just the HCatalog Connector.
In either case, you must perform the configuration described in Configuring HDFS access.
5.6 - Configuring security
You can use any of the security options described in Accessing Kerberized HDFS Data to access Hive data.
You can use any of the security options described in Accessing kerberized HDFS data to access Hive data. This topic describes additional steps needed specifically for using the HCatalog Connector.
If you use Kerberos from Vertica, the HCatalog Connector can use an authorization service (Sentry or Ranger). If you use delegation tokens, you must manage authorization yourself.
Kerberos
You can use Kerberos from Vertica as described in Using Kerberos with Vertica.
How you configure the HCatalog Connector depends on how Hive manages authorization.
-
If Hive uses Sentry to manage authorization, and if Sentry uses ACL synchronization, then the HCatalog Connector must access HDFS as the current user. Verify that the EnableHCatImpersonation configuration parameter is set to 1 (the default). ACL synchronization automatically provides authorized users with read access to the underlying HDFS files.
-
If Hive uses Sentry without ACL synchronization, then the HCatalog Connector must access HDFS data as the Vertica principal. (The user still authenticates and accesses metadata normally.) Set the EnableHCatImpersonation configuration parameter to 0. The Vertica principal must have read access to the underlying HDFS files.
-
If Hive uses Ranger to manage authorization, and the Vertica users have read access to the underlying HDFS files, then you can use user impersonation. Verify that the EnableHCatImpersonation configuration parameter is set to 1 (the default). You can, instead, disable user impersonation and give the Vertica principal read access to the HDFS files.
-
If Hive uses either Sentry or Ranger, the HCatalog Connector must use HiveServer2 (the default). WebHCat does not support authorization services.
-
If Hive does not use an authorization service, or if you are connecting to Hive using WebHCat instead of HiveServer2, then the HCatalog Connector accesses Hive as the current user. Verify that EnableHCatImpersonation is set to 1. All users must have read access to the underlying HDFS files.
In addition, in your Hadoop configuration files (core-site.xml in most distributions), make sure that you enable all Hadoop components to impersonate the Vertica user. The easiest way to do so is to set the proxyuser property using wildcards for all users on all hosts and in all groups. Consult your Hadoop documentation for instructions. Make sure you set this property before running hcatUtil (see Configuring Vertica for HCatalog).
Delegation tokens
You can use delegation tokens for a session as described in Bring your own delegation token. When using the HCatalog Connector you specify two delegation tokens, one for the data and one for the metadata. The metadata token is tied to a Hive schema. See HadoopImpersonationConfig format for information about how to specify these two delegation tokens.
Verifying security configuration
To verify that the HCatalog Connector can access Hive data, use the HCATALOGCONNECTOR_CONFIG_CHECK function.
For more information about testing your configuration, see Verifying HDFS configuration.
5.7 - Defining a schema using the HCatalog Connector
After you set up the HCatalog Connector, you can use it to define a schema in your Vertica database to access the tables in a Hive database.
After you set up the HCatalog Connector, you can use it to define a schema in your Vertica database to access the tables in a Hive database. You define the schema using the CREATE HCATALOG SCHEMA statement.
When creating the schema, you must supply the name of the schema to define in Vertica. Other parameters are optional. If you do not supply a value, Vertica uses default values. Vertica reads some default values from the HDFS configuration files; see Configuration Parameters.
To create the schema, you must have read access to all Hive data. Verify that the user creating the schema has been granted access, either directly or through an authorization service such as Sentry or Ranger. The dbadmin user has no automatic special privileges.
After you create the schema, you can change many parameters using the ALTER HCATALOG SCHEMA statement.
After you define the schema, you can query the data in the Hive data warehouse in the same way you query a native Vertica table. The following example demonstrates creating an HCatalog schema and then querying several system tables to examine the contents of the new schema. See Viewing Hive schema and table metadata for more information about these tables.
=> CREATE HCATALOG SCHEMA hcat WITH HOSTNAME='hcathost' PORT=9083
   HCATALOG_SCHEMA='default' HIVESERVER2_HOSTNAME='hs.example.com'
   SSL_CONFIG='/etc/hadoop/conf/ssl-client.xml' HCATALOG_USER='admin';
CREATE SCHEMA
=> \x
Expanded display is on.

=> SELECT * FROM v_catalog.hcatalog_schemata;
-[ RECORD 1 ]----------------+-------------------------------------------
schema_id                    | 45035996273748224
schema_name                  | hcat
schema_owner_id              | 45035996273704962
schema_owner                 | admin
create_time                  | 2017-12-05 14:43:03.353404-05
hostname                     | hcathost
port                         | -1
hiveserver2_hostname         | hs.example.com
webservice_hostname          |
webservice_port              | 50111
webhdfs_address              | hs.example.com:50070
hcatalog_schema_name         | default
ssl_config                   | /etc/hadoop/conf/ssl-client.xml
hcatalog_user_name           | admin
hcatalog_connection_timeout  | -1
hcatalog_slow_transfer_limit | -1
hcatalog_slow_transfer_time  | -1
custom_partitions            | f

=> SELECT * FROM v_catalog.hcatalog_table_list;
-[ RECORD 1 ]------+------------------
table_schema_id    | 45035996273748224
table_schema       | hcat
hcatalog_schema    | default
table_name         | nation
hcatalog_user_name | admin
-[ RECORD 2 ]------+------------------
table_schema_id    | 45035996273748224
table_schema       | hcat
hcatalog_schema    | default
table_name         | raw
hcatalog_user_name | admin
-[ RECORD 3 ]------+------------------
table_schema_id    | 45035996273748224
table_schema       | hcat
hcatalog_schema    | default
table_name         | raw_rcfile
hcatalog_user_name | admin
-[ RECORD 4 ]------+------------------
table_schema_id    | 45035996273748224
table_schema       | hcat
hcatalog_schema    | default
table_name         | raw_sequence
hcatalog_user_name | admin
Configuration parameters
The HCatalog Connector uses the following values from the Hadoop configuration files if you do not override them when creating the schema.
|
File |
Properties |
hive-site.xml |
hive.server2.thrift.bind.host (used for HIVESERVER2_HOSTNAME) |
|
hive.server2.thrift.port |
|
hive.server2.transport.mode |
|
hive.server2.authentication |
|
hive.server2.authentication.kerberos.principal |
|
hive.server2.support.dynamic.service.discovery |
|
hive.zookeeper.quorum (used as HIVESERVER2_HOSTNAME if dynamic service discovery is enabled) |
|
hive.zookeeper.client.port |
|
hive.server2.zookeeper.namespace |
|
hive.metastore.uris (used for HOSTNAME and PORT) |
ssl-client.xml |
ssl.client.truststore.location |
|
ssl.client.truststore.password |
Using partitioned data
Hive supports partitioning data, as in the following example:
hive> create table users (name varchar(64), address string, city varchar(64))
    partitioned by (state varchar(64)) stored as orc;
Vertica takes advantage of partitioning information for formats that provide it in metadata (ORC and Parquet). Queries can skip irrelevant partitions entirely (partition pruning), and Vertica does not need to materialize partition columns. For more about how to use partitions in Vertica, see Partitioned file paths. For more information about how to create compatible partitions in Hive, see Hive primer for Vertica integration.
By default Hive stores partition information under the path for the table definition, which might be local to Hive. However, a Hive user can choose to store partition information elsewhere, such as in a shared location like S3, as in the following example:
hive> alter table users add partition (state='MA')
    location 's3a://DataLake/partitions/users/state=MA';
During query execution, therefore, Vertica must query Hive for the location of a table's partition information.
Because the additional Hive queries can be expensive, Vertica defaults to looking for partition information only in Hive's default location. If your Hive table specified a custom location, use the CUSTOM_PARTITIONS parameter:
=> CREATE HCATALOG SCHEMA hcat WITH HOSTNAME='hcathost' PORT=9083
    HCATALOG_SCHEMA='default' HIVESERVER2_HOSTNAME='hs.example.com'
    SSL_CONFIG='/etc/hadoop/conf/ssl-client.xml' HCATALOG_USER='admin'
    CUSTOM_PARTITIONS='yes';
Vertica can access partition locations in the S3 and S3a schemes, and does not support the S3n scheme.
The HIVE_CUSTOM_PARTITIONS_ACCESSED system table records all custom partition locations that have been used in queries.
Using the HCatalog Connector with WebHCat
By default the HCatalog Connector uses HiveServer2 to access Hive data. If you are instead using WebHCat, set the HCatalogConnectorUseHiveServer2 configuration parameter to 0 before creating the schema as in the following example.
=> ALTER DATABASE DEFAULT SET PARAMETER HCatalogConnectorUseHiveServer2 = 0;
=> CREATE HCATALOG SCHEMA hcat WITH WEBSERVICE_HOSTNAME='webhcat.example.com';
If you have previously used WebHCat, you can switch to using HiveServer2 by setting the configuration parameter to 1 and using ALTER HCATALOG SCHEMA to set HIVESERVER2_HOSTNAME. You do not need to remove the WebHCat values; the HCatalog Connector uses the value of HCatalogConnectorUseHiveServer2 to determine which parameters to use.
5.8 - Querying Hive tables using HCatalog Connector
Once you have defined the HCatalog schema, you can query data from the Hive database by using the schema name in your query.
Once you have defined the HCatalog schema, you can query data from the Hive database by using the schema name in your query.
=> SELECT * from hcat.messages limit 10;
 messageid |   userid   |        time         |             message
-----------+------------+---------------------+----------------------------------
         1 | nPfQ1ayhi  | 2013-10-29 00:10:43 | hymenaeos cursus lorem Suspendis
         2 | N7svORIoZ  | 2013-10-29 00:21:27 | Fusce ad sem vehicula morbi
         3 | 4VvzN3d    | 2013-10-29 00:32:11 | porta Vivamus condimentum
         4 | heojkmTmc  | 2013-10-29 00:42:55 | lectus quis imperdiet
         5 | coROws3OF  | 2013-10-29 00:53:39 | sit eleifend tempus a aliquam mauri
         6 | oDRP1i     | 2013-10-29 01:04:23 | risus facilisis sollicitudin sceler
         7 | AU7a9Kp    | 2013-10-29 01:15:07 | turpis vehicula tortor
         8 | ZJWg185DkZ | 2013-10-29 01:25:51 | sapien adipiscing eget Aliquam tor
         9 | E7ipAsYC3  | 2013-10-29 01:36:35 | varius Cum iaculis metus
        10 | kStCv      | 2013-10-29 01:47:19 | aliquam libero nascetur Cum mal
(10 rows)
Since the tables you access through the HCatalog Connector act like Vertica tables, you can perform operations that use both Hive data and native Vertica data, such as a join:
=> SELECT u.FirstName, u.LastName, d.time, d.Message from UserData u
-> JOIN hcat.messages d ON u.UserID = d.UserID LIMIT 10;
FirstName | LastName |        time         |                  Message
----------+----------+---------------------+-----------------------------------
Whitney   | Kerr     | 2013-10-29 00:10:43 | hymenaeos cursus lorem Suspendis
Troy      | Oneal    | 2013-10-29 00:32:11 | porta Vivamus condimentum
Renee     | Coleman  | 2013-10-29 00:42:55 | lectus quis imperdiet
Fay       | Moss     | 2013-10-29 00:53:39 | sit eleifend tempus a aliquam mauri
Dominique | Cabrera  | 2013-10-29 01:15:07 | turpis vehicula tortor
Mohammad  | Eaton    | 2013-10-29 00:21:27 | Fusce ad sem vehicula morbi
Cade      | Barr     | 2013-10-29 01:25:51 | sapien adipiscing eget Aliquam tor
Oprah     | Mcmillan | 2013-10-29 01:36:35 | varius Cum iaculis metus
Astra     | Sherman  | 2013-10-29 01:58:03 | dignissim odio Pellentesque primis
Chelsea   | Malone   | 2013-10-29 02:08:47 | pede tempor dignissim Sed luctus
(10 rows)
5.9 - Viewing Hive schema and table metadata
When using Hive, you access metadata about schemas and tables by executing statements written in HiveQL (Hive's version of SQL) such as SHOW TABLES.
When using Hive, you access metadata about schemas and tables by executing statements written in HiveQL (Hive's version of SQL) such as SHOW TABLES. When using the HCatalog Connector, you can get metadata about the tables in the Hive database through several Vertica system tables.
There are four system tables that contain metadata about the tables accessible through the HCatalog Connector:
-
HCATALOG_SCHEMATA lists all of the schemas that have been defined using the HCatalog Connector.
-
HCATALOG_TABLE_LIST contains an overview of all of the tables available from all schemas defined using the HCatalog Connector. This table only shows the tables that the user querying the table can access. The information in this table is retrieved using a single call to HiveServer2 for each schema defined using the HCatalog Connector, which means there is a little overhead when querying this table.
-
HCATALOG_TABLES contains more in-depth information than HCATALOG_TABLE_LIST.
-
HCATALOG_COLUMNS lists metadata about all of the columns in all of the tables available through the HCatalog Connector. As for HCATALOG_TABLES, querying this table results in one call to HiveServer2 per table, and therefore can take a while to complete.
The following example demonstrates querying the system tables containing metadata for the tables available through the HCatalog Connector.
=> CREATE HCATALOG SCHEMA hcat WITH hostname='hcathost'
-> HCATALOG_SCHEMA='default' HCATALOG_DB='default' HCATALOG_USER='hcatuser';
CREATE SCHEMA
=> SELECT * FROM HCATALOG_SCHEMATA;
-[ RECORD 1 ]--------+-----------------------------
schema_id            | 45035996273864536
schema_name          | hcat
schema_owner_id      | 45035996273704962
schema_owner         | dbadmin
create_time          | 2013-11-05 10:19:54.70965-05
hostname             | hcathost
port                 | 9083
webservice_hostname  | hcathost
webservice_port      | 50111
hcatalog_schema_name | default
hcatalog_user_name   | hcatuser
metastore_db_name    | hivemetastoredb

=> SELECT * FROM HCATALOG_TABLE_LIST;
-[ RECORD 1 ]------+------------------
table_schema_id    | 45035996273864536
table_schema       | hcat
hcatalog_schema    | default
table_name         | hcatalogtypes
hcatalog_user_name | hcatuser
-[ RECORD 2 ]------+------------------
table_schema_id    | 45035996273864536
table_schema       | hcat
hcatalog_schema    | default
table_name         | tweets
hcatalog_user_name | hcatuser
-[ RECORD 3 ]------+------------------
table_schema_id    | 45035996273864536
table_schema       | hcat
hcatalog_schema    | default
table_name         | messages
hcatalog_user_name | hcatuser
-[ RECORD 4 ]------+------------------
table_schema_id    | 45035996273864536
table_schema       | hcat
hcatalog_schema    | default
table_name         | msgjson
hcatalog_user_name | hcatuser

=> -- Get detailed description of a specific table
=> SELECT * FROM HCATALOG_TABLES WHERE table_name = 'msgjson';
-[ RECORD 1 ]---------+-----------------------------------------------------------
table_schema_id       | 45035996273864536
table_schema          | hcat
hcatalog_schema       | default
table_name            | msgjson
hcatalog_user_name    | hcatuser
min_file_size_bytes   |
total_number_files    | 10
location              | hdfs://hive.example.com:8020/user/exampleuser/msgjson
last_update_time      |
output_format         | org.apache.hadoop.hive.ql.io.HiveIgnoreKeyTextOutputFormat
last_access_time      |
max_file_size_bytes   |
is_partitioned        | f
partition_expression  |
table_owner           |
input_format          | org.apache.hadoop.mapred.TextInputFormat
total_file_size_bytes | 453534
hcatalog_group        |
permission            |

=> -- Get list of columns in a specific table
=> SELECT * FROM HCATALOG_COLUMNS WHERE table_name = 'hcatalogtypes'
-> ORDER BY ordinal_position;
-[ RECORD 1 ]------------+-----------------
table_schema             | hcat
hcatalog_schema          | default
table_name               | hcatalogtypes
is_partition_column      | f
column_name              | intcol
hcatalog_data_type       | int
data_type                | int
data_type_id             | 6
data_type_length         | 8
character_maximum_length |
numeric_precision        |
numeric_scale            |
datetime_precision       |
interval_precision       |
ordinal_position         | 1
-[ RECORD 2 ]------------+-----------------
table_schema             | hcat
hcatalog_schema          | default
table_name               | hcatalogtypes
is_partition_column      | f
column_name              | floatcol
hcatalog_data_type       | float
data_type                | float
data_type_id             | 7
data_type_length         | 8
character_maximum_length |
numeric_precision        |
numeric_scale            |
datetime_precision       |
interval_precision       |
ordinal_position         | 2
-[ RECORD 3 ]------------+-----------------
table_schema             | hcat
hcatalog_schema          | default
table_name               | hcatalogtypes
is_partition_column      | f
column_name              | doublecol
hcatalog_data_type       | double
data_type                | float
data_type_id             | 7
data_type_length         | 8
character_maximum_length |
numeric_precision        |
numeric_scale            |
datetime_precision       |
interval_precision       |
ordinal_position         | 3
-[ RECORD 4 ]------------+-----------------
table_schema             | hcat
hcatalog_schema          | default
table_name               | hcatalogtypes
is_partition_column      | f
column_name              | charcol
hcatalog_data_type       | string
data_type                | varchar(65000)
data_type_id             | 9
data_type_length         | 65000
character_maximum_length | 65000
numeric_precision        |
numeric_scale            |
datetime_precision       |
interval_precision       |
ordinal_position         | 4
-[ RECORD 5 ]------------+-----------------
table_schema             | hcat
hcatalog_schema          | default
table_name               | hcatalogtypes
is_partition_column      | f
column_name              | varcharcol
hcatalog_data_type       | string
data_type                | varchar(65000)
data_type_id             | 9
data_type_length         | 65000
character_maximum_length | 65000
numeric_precision        |
numeric_scale            |
datetime_precision       |
interval_precision       |
ordinal_position         | 5
-[ RECORD 6 ]------------+-----------------
table_schema             | hcat
hcatalog_schema          | default
table_name               | hcatalogtypes
is_partition_column      | f
column_name              | boolcol
hcatalog_data_type       | boolean
data_type                | boolean
data_type_id             | 5
data_type_length         | 1
character_maximum_length |
numeric_precision        |
numeric_scale            |
datetime_precision       |
interval_precision       |
ordinal_position         | 6
-[ RECORD 7 ]------------+-----------------
table_schema             | hcat
hcatalog_schema          | default
table_name               | hcatalogtypes
is_partition_column      | f
column_name              | timestampcol
hcatalog_data_type       | string
data_type                | varchar(65000)
data_type_id             | 9
data_type_length         | 65000
character_maximum_length | 65000
numeric_precision        |
numeric_scale            |
datetime_precision       |
interval_precision       |
ordinal_position         | 7
-[ RECORD 8 ]------------+-----------------
table_schema             | hcat
hcatalog_schema          | default
table_name               | hcatalogtypes
is_partition_column      | f
column_name              | varbincol
hcatalog_data_type       | binary
data_type                | varbinary(65000)
data_type_id             | 17
data_type_length         | 65000
character_maximum_length | 65000
numeric_precision        |
numeric_scale            |
datetime_precision       |
interval_precision       |
ordinal_position         | 8
-[ RECORD 9 ]------------+-----------------
table_schema             | hcat
hcatalog_schema          | default
table_name               | hcatalogtypes
is_partition_column      | f
column_name              | bincol
hcatalog_data_type       | binary
data_type                | varbinary(65000)
data_type_id             | 17
data_type_length         | 65000
character_maximum_length | 65000
numeric_precision        |
numeric_scale            |
datetime_precision       |
interval_precision       |
ordinal_position         | 9
5.10 - Synchronizing an HCatalog schema or table with a local schema or table
Querying data from an HCatalog schema can be slow due to Hive performance issues.
Querying data from an HCatalog schema can be slow due to Hive performance issues. This slow performance can be especially annoying when you want to examine the structure of the tables in the Hive database. Getting this information from Hive requires you to query the HCatalog schema's metadata using the HCatalog Connector.
To avoid this performance problem you can use the SYNC_WITH_HCATALOG_SCHEMA function to create a snapshot of the HCatalog schema's metadata within a Vertica schema. You supply this function with the name of a pre-existing Vertica schema, typically the one created through CREATE HCATALOG SCHEMA, and a Hive schema available through the HCatalog Connector. You must have permission both in Vertica to write the data and in Hive and HDFS to read it.
Note
To synchronize a schema, you must have read permission for the underlying files in HDFS. If Hive uses Sentry to manage authorization, then you can use ACL synchronization to manage HDFS access. Otherwise, the user of this function must have read access in HDFS.
The function creates a set of external tables within the Vertica schema that you can then use to examine the structure of the tables in the Hive database. Because the metadata in the Vertica schema is local, query planning is much faster. You can also use standard Vertica statements and system-table queries to examine the structure of Hive tables in the HCatalog schema.
Caution
The SYNC_WITH_HCATALOG_SCHEMA function overwrites tables in the Vertica schema whose names match a table in the HCatalog schema. Do not use the Vertica schema to store other data.
When SYNC_WITH_HCATALOG_SCHEMA creates tables in Vertica, it matches Hive's STRING and BINARY types to Vertica's VARCHAR(65000) and VARBINARY(65000) types. You might want to change these lengths, using ALTER TABLE SET DATA TYPE, in two cases:
-
If the value in Hive is larger than 65000 bytes, increase the size and use LONG VARCHAR or LONG VARBINARY to avoid data truncation. If a Hive string uses multi-byte encodings, you must increase the size in Vertica to avoid data truncation. This step is needed because Hive counts string length in characters while Vertica counts it in bytes.
-
If the value in Hive is much smaller than 65000 bytes, reduce the size to conserve memory in Vertica.
The Vertica schema is just a snapshot of the HCatalog schema's metadata. Vertica does not synchronize later changes to the HCatalog schema with the local schema after you call SYNC_WITH_HCATALOG_SCHEMA. You can call the function again to re-synchronize the local schema to the HCatalog schema. If you altered column data types, you will need to repeat those changes because the function creates new external tables.
By default, SYNC_WITH_HCATALOG_SCHEMA does not drop tables that appear in the local schema that do not appear in the HCatalog schema. Thus, after the function call the local schema does not reflect tables that have been dropped in the Hive database since the previous call. You can change this behavior by supplying the optional third Boolean argument that tells the function to drop any table in the local schema that does not correspond to a table in the HCatalog schema.
Instead of synchronizing the entire schema, you can synchronize individual tables by using SYNC_WITH_HCATALOG_SCHEMA_TABLE. If the table already exists in Vertica the function overwrites it. If the table is not found in the HCatalog schema, this function returns an error. In all other respects this function behaves in the same way as SYNC_WITH_HCATALOG_SCHEMA.
If you change the settings of any HCatalog Connector configuration parameters (Hadoop parameters), you must call this function again.
Examples
The following example demonstrates calling SYNC_WITH_HCATALOG_SCHEMA to synchronize the HCatalog schema in Vertica with the metadata in Hive. Because it synchronizes the HCatalog schema directly, instead of synchronizing another schema with the HCatalog schema, both arguments are the same.
=> CREATE HCATALOG SCHEMA hcat WITH hostname='hcathost' HCATALOG_SCHEMA='default'
   HCATALOG_USER='hcatuser';
CREATE SCHEMA
=> SELECT sync_with_hcatalog_schema('hcat', 'hcat');
sync_with_hcatalog_schema
----------------------------------------
Schema hcat synchronized with hcat
tables in hcat = 56
tables altered in hcat = 0
tables created in hcat = 56
stale tables in hcat = 0
table changes erred in hcat = 0
(1 row)

=> -- Use vsql's \d command to describe a table in the synced schema

=> \d hcat.messages
List of Fields by Tables
  Schema   |   Table  | Column  |      Type      | Size  | Default | Not Null | Primary Key | Foreign Key
-----------+----------+---------+----------------+-------+---------+----------+-------------+-------------
hcat       | messages | id      | int            |     8 |         | f        | f           |
hcat       | messages | userid  | varchar(65000) | 65000 |         | f        | f           |
hcat       | messages | "time"  | varchar(65000) | 65000 |         | f        | f           |
hcat       | messages | message | varchar(65000) | 65000 |         | f        | f           |
(4 rows)
This example shows synchronizing with a schema created using CREATE HCATALOG SCHEMA. Synchronizing with a schema created using CREATE SCHEMA is also supported.
You can query tables in the local schema that you synchronized with an HCatalog schema. However, querying tables in a synchronized schema isn't much faster than directly querying the HCatalog schema, because SYNC_WITH_HCATALOG_SCHEMA only duplicates the HCatalog schema's metadata. The data in the table is still retrieved using the HCatalog Connector.
5.11 - Data type conversions from Hive to Vertica
The data types recognized by Hive differ from the data types recognized by Vertica.
The data types recognized by Hive differ from the data types recognized by Vertica. The following table lists how the HCatalog Connector converts Hive data types into data types compatible with Vertica.
|
Hive Data Type |
Vertica Data Type |
|
TINYINT (1-byte) |
TINYINT (8-bytes) |
|
SMALLINT (2-bytes) |
SMALLINT (8-bytes) |
|
INT (4-bytes) |
INT (8-bytes) |
|
BIGINT (8-bytes) |
BIGINT (8-bytes) |
|
BOOLEAN |
BOOLEAN |
|
FLOAT (4-bytes) |
FLOAT (8-bytes) |
|
DECIMAL (precision, scale) |
DECIMAL (precision, scale) |
|
DOUBLE (8-bytes) |
DOUBLE PRECISION (8-bytes) |
|
CHAR (length in characters) |
CHAR (length in bytes) |
|
VARCHAR (length in characters) |
VARCHAR (length in bytes), if length <= 65000
LONG VARCHAR (length in bytes), if length > 65000 |
|
STRING (2 GB max) |
VARCHAR (65000) |
|
BINARY (2 GB max) |
VARBINARY (65000) |
|
DATE |
DATE |
|
TIMESTAMP |
TIMESTAMP |
|
LIST/ARRAY |
VARCHAR (65000) containing a JSON-format representation of the list. |
|
MAP |
VARCHAR (65000) containing a JSON-format representation of the map. |
|
STRUCT |
VARCHAR (65000) containing a JSON-format representation of the struct. |
Data-width handling differences between Hive and Vertica
The HCatalog Connector relies on Hive SerDe classes to extract data from files on HDFS. Therefore, the data read from these files are subject to Hive's data width restrictions. For example, suppose the SerDe parses a value for an INT column into a value that is greater than 232-1 (the maximum value for a 32-bit integer). In this case, the value is rejected even if it would fit into a Vertica's 64-bit INTEGER column because it cannot fit into Hive's 32-bit INT.
Hive measures CHAR and VARCHAR length in characters and Vertica measures them in bytes. Therefore, if multi-byte encodings are being used (like Unicode), text might be truncated in Vertica.
Once the value has been parsed and converted to a Vertica data type, it is treated as native data. This treatment can result in some confusion when comparing the results of an identical query run in Hive and in Vertica. For example, if your query adds two INT values that result in a value that is larger than 232-1, the value overflows its 32-bit INT data type, causing Hive to return an error. When running the same query with the same data in Vertica using the HCatalog Connector, the value will probably still fit within Vertica's 64-int value. Thus the addition is successful and returns a value.
5.12 - Using nonstandard SerDes
Hive stores its data in unstructured flat files located in the Hadoop Distributed File System (HDFS).
Hive stores its data in unstructured flat files located in the Hadoop Distributed File System (HDFS). When you execute a Hive query, it uses a set of serializer and deserializer (SerDe) classes to extract data from these flat files and organize it into a relational database table. For Hive to be able to extract data from a file, it must have a SerDe that can parse the data the file contains. When you create a table in Hive, you can select the SerDe to be used for the table's data.
Hive has a set of standard SerDes that handle data in several formats such as delimited data and data extracted using regular expressions. You can also use third-party or custom-defined SerDes that allow Hive to process data stored in other file formats. For example, some commonly-used third-party SerDes handle data stored in JSON format.
The HCatalog Connector directly fetches file segments from HDFS and uses Hive's SerDes classes to extract data from them. The Connector includes all Hive's standard SerDes classes, so it can process data stored in any file that Hive natively supports. If you want to query data from a Hive table that uses a custom SerDe, you must first install the SerDe classes on the Vertica cluster.
Determining which SerDe you need
If you have access to the Hive command line, you can determine which SerDe a table uses by using Hive's SHOW CREATE TABLE statement. This statement shows the HiveQL statement needed to recreate the table. For example:
hive> SHOW CREATE TABLE msgjson;
OK
CREATE EXTERNAL TABLE msgjson(
messageid int COMMENT 'from deserializer',
userid string COMMENT 'from deserializer',
time string COMMENT 'from deserializer',
message string COMMENT 'from deserializer')
ROW FORMAT SERDE
'org.apache.hadoop.hive.contrib.serde2.JsonSerde'
STORED AS INPUTFORMAT
'org.apache.hadoop.mapred.TextInputFormat'
OUTPUTFORMAT
'org.apache.hadoop.hive.ql.io.HiveIgnoreKeyTextOutputFormat'
LOCATION
'hdfs://hivehost.example.com:8020/user/exampleuser/msgjson'
TBLPROPERTIES (
'transient_lastDdlTime'='1384194521')
Time taken: 0.167 seconds
In the example, ROW FORMAT SERDE indicates that a special SerDe is used to parse the data files. The next row shows that the class for the SerDe is named org.apache.hadoop.hive.contrib.serde2.JsonSerde.You must provide the HCatalog Connector with a copy of this SerDe class so that it can read the data from this table.
You can also find out which SerDe class you need by querying the table that uses the custom SerDe. The query will fail with an error message that contains the class name of the SerDe needed to parse the data in the table. In the following example, the portion of the error message that names the missing SerDe class is in bold.
=> SELECT * FROM hcat.jsontable;
ERROR 3399:  Failure in UDx RPC call InvokePlanUDL(): Error in User Defined
Object [VHCatSource], error code: 0
com.vertica.sdk.UdfException: Error message is [
org.apache.hcatalog.common.HCatException : 2004 : HCatOutputFormat not
initialized, setOutput has to be called. Cause : java.io.IOException:
java.lang.RuntimeException:
MetaException(message:org.apache.hadoop.hive.serde2.SerDeException
SerDe com.cloudera.hive.serde.JSONSerDe does not exist) ] HINT If error
message is not descriptive or local, may be we cannot read metadata from hive
metastore service thrift://hcathost:9083 or HDFS namenode (check
UDxLogs/UDxFencedProcessesJava.log in the catalog directory for more information)
at com.vertica.hcatalogudl.HCatalogSplitsNoOpSourceFactory
.plan(HCatalogSplitsNoOpSourceFactory.java:98)
at com.vertica.udxfence.UDxExecContext.planUDSource(UDxExecContext.java:898)
. . .
Installing the SerDe on the Vertica cluster
You usually have two options to getting the SerDe class file the HCatalog Connector needs:
-
Find the installation files for the SerDe, then copy those over to your Vertica cluster. For example, there are several third-party JSON SerDes available from sites like Google Code and GitHub. You may find the one that matches the file installed on your Hive cluster. If so, then download the package and copy it to your Vertica cluster.
-
Directly copy the JAR files from a Hive server onto your Vertica cluster. The location for the SerDe JAR files depends on your Hive installation. On some systems, they may be located in /usr/lib/hive/lib.
Wherever you get the files, copy them into the /opt/vertica/packages/hcat/lib directory on every node in your Vertica cluster.
Important
If you add a new host to your Vertica cluster, remember to copy every custom SerDer JAR file to it.
5.13 - Troubleshooting HCatalog Connector problems
You may encounter the following issues when using the HCatalog Connector.
You may encounter the following issues when using the HCatalog Connector.
Connection errors
The HCatalog Connector can encounter errors both when you define a schema and when you query it. The types of errors you get depend on which CREATE HCATALOG SCHEMA parameters are incorrect. Suppose you have incorrect parameters for the metastore database, but correct parameters for HiveServer2. In this case, HCatalog-related system table queries succeed, while queries on the HCatalog schema fail. The following example demonstrates creating an HCatalog schema with the correct default HiveServer2 information. However, the port number for the metastore database is incorrect.
=> CREATE HCATALOG SCHEMA hcat2 WITH hostname='hcathost'
-> HCATALOG_SCHEMA='default' HCATALOG_USER='hive' PORT=1234;
CREATE SCHEMA
=> SELECT * FROM HCATALOG_TABLE_LIST;
-[ RECORD 1 ]------+---------------------
table_schema_id    | 45035996273864536
table_schema       | hcat2
hcatalog_schema    | default
table_name         | test
hcatalog_user_name | hive

=> SELECT * FROM hcat2.test;
ERROR 3399:  Failure in UDx RPC call InvokePlanUDL(): Error in User Defined
 Object [VHCatSource], error code: 0
com.vertica.sdk.UdfException: Error message is [
org.apache.hcatalog.common.HCatException : 2004 : HCatOutputFormat not
initialized, setOutput has to be called. Cause : java.io.IOException:
MetaException(message:Could not connect to meta store using any of the URIs
provided. Most recent failure: org.apache.thrift.transport.TTransportException:
java.net.ConnectException:
Connection refused
at org.apache.thrift.transport.TSocket.open(TSocket.java:185)
at org.apache.hadoop.hive.metastore.HiveMetaStoreClient.open(
HiveMetaStoreClient.java:277)
. . .
To resolve these issues, you must drop and recreate the schema or alter the schema to correct the parameters. If you still have issues, determine whether there are connectivity issues between your Vertica cluster and your Hadoop cluster. Such issues can include a firewall that prevents one or more Vertica hosts from contacting the HiveServer2, metastore, or HDFS hosts.
UDx failure when querying data: error 3399
You might see an error message when querying data (as opposed to metadata like schema information). This might be accompanied by a ClassNotFoundException in the log. This can happen for the following reasons:
-
You are not using the same version of Java on your Hadoop and Vertica nodes. In this case you need to change one of them to match the other.
-
You have not used hcatUtil to copy all Hadoop and Hive libraries and configuration files to Vertica, or you ran hcatutil and then changed your version of Hadoop or Hive.
-
You upgraded Vertica to a new version and did not rerun hcatutil and reinstall the HCatalog Connector.
-
The version of Hadoop you are using relies on a third-party library that you must copy manually.
-
You are reading files with LZO compression and have not copied the libraries or set the io.compression.codecs property in core-site.xml.
-
You are reading Parquet data from Hive, and columns were added to the table after some data was already present in the table. Adding columns does not update existing data, and the ParquetSerDe provided by Hive and used by the HCatalog Connector does not handle this case. This error is due to a limitation in Hive and there is no workaround.
-
The query is taking too long and is timing out. If this is a frequent problem, you can increase the value of the UDxFencedBlockTimeout configuration parameter. See General parameters.
If you did not copy the libraries or configure LZO compression, follow the instructions in Configuring Vertica for HCatalog.
If the Hive jars that you copied from Hadoop are out of date, you might see an error message like the following:
ERROR 3399: Failure in UDx RPC call InvokePlanUDL(): Error in User Defined Object [VHCatSource],
error code: 0 Error message is [ Found interface org.apache.hadoop.mapreduce.JobContext, but
class was expected ]
HINT hive metastore service is thrift://localhost:13433 (check UDxLogs/UDxFencedProcessesJava.log
in the catalog directory for more information)
This error usually signals a problem with hive-hcatalog-core jar. Make sure you have an up-to-date copy of this file. Remember that if you rerun hcatUtil you also need to re-create the HCatalog schema.
You might also see a different form of this error:
ERROR 3399: Failure in UDx RPC call InvokePlanUDL(): Error in User Defined Object [VHCatSource],
error code: 0 Error message is [ javax/servlet/Filter ]
This error can be reported even if hcatUtil reports that your libraries are up to date. The javax.servlet.Filter class is in a library that some versions of Hadoop use but that is not usually part of the Hadoop installation directly. If you see an error mentioning this class, locate servlet-api-*.jar on a Hadoop node and copy it to the hcat/lib directory on all database nodes. If you cannot locate it on a Hadoop node, locate and download it from the Internet. (This case is rare.) The library version must be 2.3 or higher.
After you have copied the jar to the hcat/lib directory, reinstall the HCatalog connector as explained in Configuring Vertica for HCatalog.
Authentication error when querying data
You might have successfully created a schema using CREATE HCATALOG SCHEMA but get errors at query time such as the following:
=> SELECT * FROM hcat.clickdata;
ERROR 6776:  Failed to glob [hdfs:///user/hive/warehouse/click-*.parquet]
because of error: hdfs:///user/hive/warehouse/click-12214.parquet: statAll failed;
error: AuthenticationFailed
You might see this error if Hive uses an authorization service. If the permissions on the underlying files in HDFS match those in the authorization service, then Vertica must use user impersonation when accessing that data. To enable user impersonation, set the EnableHCatImpersonation configuration parameter to 1.
Vertica uses the database principal to access HDFS. Therefore, if EnableHCatImpersonation is 0, the Vertica database principal must have access to the data inside the hive warehouse on HDFS. If it does not, you might see the following error:
=> SELECT * FROM hcat.salesdata;
ERROR 6776:  Failed to glob [vertica-hdfs:///hive/warehouse/sales/*/*]
because of error: vertica-hdfs:///hive/warehouse/sales/: listStat failed;
error: Permission denied: user=vertica, access=EXECUTE, inode="/hive/warehouse/sales":hdfs:hdfs:d---------
The URL scheme in this error message has been changed from hdfs to vertica-hdfs. This is an internal scheme and is not valid in URLs outside of Vertica. You cannot use this scheme when specifying paths in HDFS.
Differing results between Hive and Vertica queries
Sometimes, running the same query on Hive and on Vertica through the HCatalog Connector can return different results. There are a few common causes of this problem.
This discrepancy is often caused by the differences between the data types supported by Hive and Vertica. See Data type conversions from Hive to Vertica for more information about supported data types.
If Hive string values are being truncated in Vertica, this might be caused by multi-byte character encodings in Hive. Hive reports string length in characters, while Vertica records it in bytes. For a two-byte encoding such as Unicode, you need to double the column size in Vertica to avoid truncation.
Discrepancies can also occur if the Hive table uses partition columns of types other than string.
If the Hive table stores partition data in custom locations instead of the default, you will see different query results if you do not specify the CUSTOM_PARTITIONS parameter when creating the Vertica schema. See Using Partitioned Data. Further, even when using custom partitions, there are differences between Vertica and Hive:
-
If a custom partition is unavailable at query time, Hive ignores it and returns the rest of the results. Vertica reports an error.
-
If a partition is altered in Hive to use a custom location after table creation, Hive reads data from only the new location while Vertica reads data from both the default and the new locations.
-
If a partition value and its corresponding directory name disagree, Hive uses the value in its metadata while Vertica uses the value in the directory name.
The following example illustrates these differences. A table in Hive, partitioned on the state column, starts with the following data:
hive> select * from inventory;
+--------------+-----------------+-----------------+--+
| inventory.ID | inventory.quant | inventory.state |
+--------------+-----------------+-----------------+--+
| 2            | 300             | CA              |
| 4            | 400             | CA              |
| 5            | 500             | DC              |
| 1            | 100             | PA              |
| 2            | 200             | PA              |
+--------------+-----------------+-----------------+--+
The partition for one state, CA, is then moved. This directory contains some data already. Note that the query now returns different results for the CA partitions.
hive> ALTER TABLE inventory PARTITION (state='CA') SET LOCATION 'hdfs:///partitions/inventory/state=MD';
hive> select * from inventory;
+--------------+-----------------+-----------------+--+
| inventory.ID | inventory.quant | inventory.state |
+--------------+-----------------+-----------------+--+
| 20           | 30000           | CA              |
| 40           | 40000           | CA              |
| 5            | 500             | DC              |
| 1            | 100             | PA              |
| 2            | 200             | PA              |
+--------------+-----------------+-----------------+--+
5 rows selected (0.399 seconds)
The CA partitions were moved to a directory named state=MD. Vertica reports the state for the first two rows, the ones in the new partition location, as MD because of the directory name. It also reports the CA values from the original location in addition to the new one:
=> SELECT * FROM hcat.inventory;
 ID | quant | state
----+----------+------
 20 | 30000 | MD
 40 | 40000 | MD
  2 | 300   | CA
  4 | 400   | CA
  1 | 100   | PA
  2 | 200   | PA
  5 | 500   | DC
(7 rows)
HCatalog Connector installation fails on MapR
If you mount a MapR file system as an NFS mount point and then install the HCatalog Connector, it could fail with a message like the following:
ROLLBACK 2929: Couldn't create new UDx side process,
failed to get UDx side process info from zygote: Broken pipe
This might be accompanied by an error like the following in dbLog:
java.io.IOException: Couldn't get lock for /home/dbadmin/node02_catalog/UDxLogs/UDxFencedProcessesJava.log
    at java.util.logging.FileHandler.openFiles(FileHandler.java:389)
    at java.util.logging.FileHandler.<init>(FileHandler.java:287)
    at com.vertica.udxfence.UDxLogger.setup(UDxLogger.java:78)
    at com.vertica.udxfence.UDxSideProcess.go(UDxSideProcess.java:75)
    ...
This error occurs if you locked your NFS mount point when creating it. Locking is the default. If you use the HCatalog Connector with MapR mounted as an NFS mount point, you must create the mount point with the -o nolock option. For example:
sudo mount -o nolock -t nfs MaprCLDBserviceHostname:/mapr/ClusterName/vertica/$(hostname -f)/ vertica
You can use the HCatalog Connector with MapR without mounting the MapR file system. If you mount the MapR file system, you must do so without a lock.
Excessive query delays
Network issues or high system loads on the HiveServer2 server can cause long delays while querying a Hive database using the HCatalog Connector. While Vertica cannot resolve these issues, you can set parameters that limit how long Vertica waits before canceling a query on an HCatalog schema. You can set these parameters globally using Vertica configuration parameters. You can also set them for specific HCatalog schemas in the CREATE HCATALOG SCHEMA statement. These specific settings override the settings in the configuration parameters.
The HCatConnectionTimeout configuration parameter and the CREATE HCATALOG SCHEMA statement's HCATALOG_CONNECTION_TIMEOUT parameter control how many seconds the HCatalog Connector waits for a connection to the HiveServer2 server. A value of 0 (the default setting for the configuration parameter) means to wait indefinitely. If the server does not respond by the time this timeout elapses, the HCatalog Connector breaks the connection and cancels the query. If you find that some queries on an HCatalog schema pause excessively, try setting this parameter to a timeout value, so the query does not hang indefinitely.
The HCatSlowTransferTime configuration parameter and the CREATE HCATALOG SCHEMA statement's HCATALOG_SLOW_TRANSFER_TIME parameter specify how long the HCatlog Connector waits for data after making a successful connection to the server. After the specified time has elapsed, the HCatalog Connector determines whether the data transfer rate from the server is at least the value set in the HCatSlowTransferLimit configuration parameter (or by the CREATE HCATALOG SCHEMA statement's HCATALOG_SLOW_TRANSFER_LIMIT parameter). If it is not, then the HCatalog Connector terminates the connection and cancels the query.
You can set these parameters to cancel queries that run very slowly but do eventually complete. However, query delays are usually caused by a slow connection rather than a problem establishing the connection. Therefore, try adjusting the slow transfer rate settings first. If you find the cause of the issue is connections that never complete, you can alternately adjust the Linux TCP socket timeouts to a suitable value instead of relying solely on the HCatConnectionTimeout parameter.
SerDe errors
Errors can occur if you attempt to query a Hive table that uses a nonstandard SerDe. If you have not installed the SerDe JAR files on your Vertica cluster, you receive an error similar to the one in the following example:
=> SELECT * FROM hcat.jsontable;
ERROR 3399:  Failure in UDx RPC call InvokePlanUDL(): Error in User Defined
Object [VHCatSource], error code: 0
com.vertica.sdk.UdfException: Error message is [
org.apache.hcatalog.common.HCatException : 2004 : HCatOutputFormat not
initialized, setOutput has to be called. Cause : java.io.IOException:
java.lang.RuntimeException:
MetaException(message:org.apache.hadoop.hive.serde2.SerDeException
SerDe com.cloudera.hive.serde.JSONSerDe does not exist) ] HINT If error
message is not descriptive or local, may be we cannot read metadata from hive
metastore service thrift://hcathost:9083 or HDFS namenode (check
UDxLogs/UDxFencedProcessesJava.log in the catalog directory for more information)
at com.vertica.hcatalogudl.HCatalogSplitsNoOpSourceFactory
.plan(HCatalogSplitsNoOpSourceFactory.java:98)
at com.vertica.udxfence.UDxExecContext.planUDSource(UDxExecContext.java:898)
. . .
In the error message, you can see that the root cause is a missing SerDe class (shown in bold). To resolve this issue, install the SerDe class on your Vertica cluster. See Using nonstandard SerDes for more information.
This error may occur intermittently if just one or a few hosts in your cluster do not have the SerDe class.
6 - Integrating with Cloudera Manager
The Cloudera distribution of Hadoop includes Cloudera Manager, a web-based tool for managing a Hadoop cluster.
The Cloudera distribution of Hadoop includes Cloudera Manager, a web-based tool for managing a Hadoop cluster. Cloudera Manager can manage any service for which a service description is available, including Vertica.
You can use Cloudera Manager to start, stop, and monitor individual database nodes or the entire database. You can manage both co-located and separate Vertica clusters—Cloudera can manage services on nodes that are not part of the Hadoop cluster.
You must install and configure your Vertica database before proceeding; you cannot use Cloudera Manager to create the database.
Installing the service
Note
Because the service has to send the database password over the network, you should enable encryption on your Hadoop cluster before proceeding.
A Cloudera Service Description (CSD) file describes a service that Cloudera can manage. The Vertica CSD is in /opt/vertica/share/CSD on a database node.
To install the Vertica CSD, follow these steps:
-
On a Vertica node, follow the instructions in VerticaAPIKey to generate an API key. You need this key to finish the installation of the CSD.
-
On the Hadoop node that hosts Cloudera Manager, copy the CSD file into /opt/cloudera/csd.
-
Restart Cloudera Manager:
$ service cloudera-scm-server restart
-
In a web browser, go to Cloudera Manager and restart the Cloudera Management Service.
-
If your Vertica cluster is separate from your Hadoop cluster (not co-located on it): Use Cloudera Manager to add the hosts for your database nodes. If your cluster is co-located, skip this step.
-
Use Cloudera Manager to add the Vertica service.
-
On the "Role Assignment" page, select the hosts that are database nodes.
-
On the "Configuration" page, specify values for the following fields:
About the agent
When you manage Vertica through Cloudera Manager, you are actually interacting with the Vertica Agent, not the database directly. The Agent runs on all database nodes and interacts with the database on your behalf. Management Console uses the same agent. Most of the time this extra indirection is transparent to you.
A Cloudera-managed service contains one or more roles. In this case the service is "Vertica" and the single role is "Vertica Node".
Available operations
Cloudera Manager shows two groups of operations. Service-level operations apply to the service on all nodes, while role-level operations apply only to a single node.
You can perform the following service-level operations on all nodes:
-
Start: Starts the agent and, if it is not already running, the database.
-
Stop: Stops the database and agent.
-
Restart: Calls Stop and then Start.
-
Add Role Instances: Adds new database nodes to Cloudera Manager. The nodes must already be part of the Vertica cluster, and the hosts must already be known to Cloudera Manager.
-
Enter Maintenance Mode: Suppresses health alerts generated by Cloudera Manager.
-
Exit Maintenance Mode: Resumes normal reporting.
-
Update Memory Pool Size: Applies memory-pool settings from the Static Service Pools configuration page.
You can perform all of these operations except Add Role Instances on individual nodes as role-level operations.
Managing memory pools
Cloudera Manager allows you to change resource allocations, such as memory and CPU, for the nodes it manages. If you are using co-located clusters, centrally managing resources can simplify your cluster management. If you are using separate Hadoop and Vertica clusters, you might prefer to manage Vertica separately as described in Managing the database.
Use the Cloudera Manager "Static Service Pools" configuration page to configure resource allocations. The "Vertica Memory Pool" value, specified in GB, is the maximum amount of memory to allocate to the database on each node. If the configuration page includes "Cgroup Memory Hard Limit", set it to the same value as "Vertica Memory Pool".
After you have set these values, you can use the "Update Memory Pool Size" operation to apply the value to the managed nodes. This operation is equivalent to ALTER RESOURCE POOL GENERAL MAXMEMORYSIZE. Configuration changes in "Static Service Pools" do not take effect in Vertica until you perform this operation.
Uninstalling the service
To uninstall the Vertica CSD, follow these steps:
-
Stop the Vertica service and then remove it from Cloudera Manager.
-
Remove the CSD file from /opt/cloudera/csd.
-
From the command line, restart the Cloudera Manager server.
-
In Cloudera Manager, restart the Cloudera Management Service.
7 - Integrating Vertica with the MapR distribution of Hadoop
MapR is a distribution of Apache Hadoop produced by MapR Technologies that extends the standard Hadoop components with its own features.
MapR is a distribution of Apache Hadoop produced by MapR Technologies that extends the standard Hadoop components with its own features. Vertica can integrate with MapR in the following ways:
-
You can read data from MapR through an NFS mount point. After you mount the MapR file system as an NFS mount point, you can use CREATE EXTERNAL TABLE AS COPY or COPY to access the data as if it were on the local file system. This option provides the best performance for reading data.
-
You can use the HCatalog Connector to read Hive data. Do not use the HCatalog Connector with ORC or Parquet data in MapR for performance reasons. Instead, mount the MapR file system as an NFS mount point and create external tables without using the Hive schema. For more about reading Hive data, see Using the HCatalog Connector.
-
You can create a storage location to store data in MapR using the native Vertica format (ROS). Mount the MapR file system as an NFS mount point and then use CREATE LOCATION...ALL NODES SHARED to create a storage location. (CREATE LOCATION does not support NFS mount points in general, but does support them for MapR.)
Note
If you create a Vertica database and place its initial storage location on MapR, Vertica designates the storage location for both DATA and TEMP usage. Vertica does not support TEMP storage locations on MapR, so after you create the location, you must alter it to store only DATA files. See
Altering location use. Ensure that you have a TEMP location on the Linux file system.
Other Vertica integrations for Hadoop are not available for MapR.
For information on mounting the MapR file system as an NFS mount point, seeAccessing Data with NFS and Configuring Vertica Analytics Platform with MapR on the MapR website. In particular, you must configure MapR to add Vertica as a MapR service.
Examples
In the following examples, the MapR file system has been mounted as /mapr.
The following statement creates an external table from ORC data:
=> CREATE EXTERNAL TABLE t (a1 INT, a2 VARCHAR(20))
   AS COPY FROM '/mapr/data/file.orc' ORC;
The following statement creates an external table from Parquet data and takes advantage of partition pruning (see Partitioned file paths):
=> CREATE EXTERNAL TABLE t2 (id int, name varchar(50), created date, region varchar(50))
   AS COPY FROM '/mapr/*/*/*' PARTITION COLUMNS created, region PARQUET();
The following statement loads ORC data from MapR into Vertica:
=> COPY t FROM '/mapr/data/*.orc' ON ANY NODE ORC;
The following statements create a storage location to hold ROS data in the MapR file system:
=> CREATE LOCATION '/mapr/my.cluster.com/data' SHARED USAGE 'DATA' LABEL 'maprfs';

=> SELECT ALTER_LOCATION_USE('/mapr/my.cluster.com/data', '', 'DATA');
8 - Hive primer for Vertica integration
You can use Hive to export data for use by Vertica.
You can use Hive to export data for use by Vertica. Decisions you make when doing the Hive export affect performance in Vertica.
Tuning ORC stripes and Parquet rowgroups
Vertica can read ORC and Parquet files generated by any Hive version. However, newer Hive versions store more metadata in these files. This metadata is used by both Hive and Vertica to prune values and to read only the required data. Use the latest Hive version to store data in these formats. ORC and Parquet are fully forward- and backward-compatible. To get the best performance, use Hive 0.14 or later.
The ORC format splits a table into groups of rows called stripes and stores column-level metadata in each stripe. The Parquet format splits a table into groups of rows called rowgroups and stores column-level metadata in each rowgroup. Each stripe/rowgroup's metadata is used during predicate evaluation to determine whether the values from this stripe need to be read. Large stripes usually yield better performance, so set the stripe size to at least 256M.
Hive writes ORC stripes and Parquet rowgroups to HDFS, which stores data in HDFS blocks distributed among multiple physical data nodes. Accessing an HDFS block requires opening a separate connection to the corresponding data node. It is advantageous to ensure that an ORC stripe or Parquet rowgroup does not span more than one HDFS block. To do so, set the HDFS block size to be larger than the stripe/rowgroup size. Setting HDFS block size to 512M is usually sufficient.
Hive provides three compression options: None, Snappy, and Zlib. Use Snappy or Zlib compression to reduce storage and I/O consumption. Usually, Snappy is less CPU-intensive but can yield lower compression ratios compared to Zlib.
Storing data in sorted order can improve data access and predicate evaluation performance. Sort table columns based on the likelihood of their occurrence in query predicates; columns that most frequently occur in comparison or range predicates should be sorted first.
Partitioning tables is a very useful technique for data organization. Similarly to sorting tables by columns, partitioning can improve data access and predicate evaluation performance. Vertica supports Hive-style partitions and partition pruning.
The following Hive statement creates an ORC table with stripe size 256M and Zlib compression:
hive> CREATE TABLE customer_visits (
        customer_id bigint,
        visit_num int,
        page_view_dt date)
    STORED AS ORC tblproperties("orc.compress"="ZLIB",
        "orc.stripe.size"="268435456");
The following statement creates a Parquet table with stripe size 256M and Zlib compression:
hive> CREATE TABLE customer_visits (
        customer_id bigint,
        visit_num int,
        page_view_dt date)
    STORED AS PARQUET tblproperties("parquet.compression"="ZLIB",
        "parquet.stripe.size"="268435456");
Creating sorted files in Hive
Unlike Vertica, Hive does not store table columns in separate files and does not create multiple projections per table with different sort orders. For efficient data access and predicate pushdown, sort Hive table columns based on the likelihood of their occurrence in query predicates. Columns that most frequently occur in comparison or range predicates should be sorted first.
Data can be inserted into Hive tables in a sorted order by using the ORDER BY or SORT BY keywords. For example, to insert data into the ORC table "customer_visit" from another table "visits" with the same columns, use these keywords with the INSERT INTO command:
hive> INSERT INTO TABLE customer_visits
        SELECT * from visits
        ORDER BY page_view_dt;
hive> INSERT INTO TABLE customer_visits
        SELECT * from visits
        SORT BY page_view_dt;
The difference between the two keywords is that ORDER BY guarantees global ordering on the entire table by using a single MapReduce reducer to populate the table. SORT BY uses multiple reducers, which can cause ORC or Parquet files to be sorted by the specified column(s) but not be globally sorted. Using the latter keyword can increase the time taken to load the file.
You can combine clustering and sorting to sort a table globally. The following table definition adds a hint that data is inserted into this table bucketed by customer_id and sorted by page_view_dt:
hive> CREATE TABLE customer_visits_bucketed (
        customer_id bigint,
        visit_num int,
        page_view_dt date)
    CLUSTERED BY (page_view_dt)
    SORTED BY (page_view_dt)INTO 10 BUCKETS
    STORED AS ORC;
When inserting data into the table, you must explicitly specify the clustering and sort columns, as in the following example:
hive> INSERT INTO TABLE customer_visits_bucketed
    SELECT * from visits
    DISTRIBUTE BY page_view_dt
    SORT BY page_view_dt;
The following statement is equivalent:
hive> INSERT INTO TABLE customer_visits_bucketed
    SELECT * from visits
    CLUSTER BY page_view_dt;
Both of the above commands insert data into the customer_visits_bucketed table, globally sorted on the page_view_dt column.
Partitioning Hive tables
Table partitioning in Hive is an effective technique for data separation and organization, as well as for reducing storage requirements. To partition a table in Hive, include it in the PARTITIONED BY clause:
hive> CREATE TABLE customer_visits (
        customer_id bigint,
        visit_num int)
    PARTITIONED BY (page_view_dt date)
    STORED AS ORC;
Hive does not materialize partition column(s). Instead, it creates subdirectories of the following form:
path_to_table/partition_column_name=value/
When the table is queried, Hive parses the subdirectories' names to materialize the values in the partition columns. The value materialization in Hive is a plain conversion from a string to the appropriate data type.
Inserting data into a partitioned table requires specifying the value(s) of the partition column(s). The following example creates two partition subdirectories, "customer_visits/page_view_dt=2016-02-01" and "customer_visits/page_view_dt=2016-02-02":
hive> INSERT INTO TABLE customer_visits
    PARTITION (page_view_dt='2016-02-01')
    SELECT customer_id, visit_num from visits
    WHERE page_view_dt='2016-02-01'
    ORDER BY page_view_dt;

hive> INSERT INTO TABLE customer_visits
    PARTITION (page_view_dt='2016-02-02')
    SELECT customer_id, visit_num from visits
    WHERE page_view_dt='2016-02-02'
    ORDER BY page_view_dt;
Each directory contains ORC files with two columns, customer_id and visit_num.
Example: a partitioned, sorted ORC table
Suppose you have data stored in CSV files containing three columns: customer_id, visit_num, page_view_dtm:
1,123,2016-01-01
33,1,2016-02-01
2,57,2016-01-03
...
The goal is to create the following Hive table:
hive> CREATE TABLE customer_visits (
            customer_id bigint,
            visit_num int)
    PARTITIONED BY (page_view_dt date)
    STORED AS ORC;
To achieve this, perform the following steps:
-
Copy or move the CSV files to HDFS.
-
Define a textfile Hive table and copy the CSV files into it:
hive> CREATE TABLE visits (
            customer_id bigint,
            visit_num int,
            page_view_dt date)
    ROW FORMAT DELIMITED FIELDS TERMINATED BY ','
    STORED AS TEXTFILE;

hive> LOAD DATA INPATH path_to_csv_files INTO TABLE visits;
-
For each unique value in page_view_dt, insert the data into the target table while materializing page_view_dt as page_view_dtm:
hive> INSERT INTO TABLE customer_visits
        PARTITION (page_view_dt='2016-01-01')
        SELECT customer_id, visit_num FROM visits
        WHERE page_view_dt='2016-01-01'
        ORDER BY page_view_dt;
...
This operation inserts data from visits.customer_id into customer_visits.customer_id, and from visits.visit_num into customer_visits.visit_num. These two columns are stored in generated ORC files. Simultaneously, values from visits.page_view_dt are used to create partitions for the partition column customer_visits.page_view_dt, which is not stored in the ORC files.
Data modification in Hive
Hive is well-suited for reading large amounts of write-once data. Its optimal usage is loading data in bulk into tables and never modifying the data. In particular, for data stored in the ORC and Parquet formats, this usage pattern produces large, globally (or nearly globally) sorted files.
Periodic addition of data to tables (known as “trickle load”) is likely to produce many small files. The disadvantage of this is that Vertica has to access many more files during query planning and execution. These extra access can result in longer query-processing time. The major performance degradation comes from the increase in the number of file seeks on HDFS.
Hive can also modify underlying ORC or Parquet files without user involvement. If enough records in a Hive table are modified or deleted, for example, Hive deletes existing files and replaces them with newly-created ones. Hive can also be configured to automatically merge many small files into a few larger files.
When new tables are created, or existing tables are modified in Hive, you must manually synchronize Vertica to keep it up to date. The following statement synchronizes the Vertica schema "hcat" after a change in Hive:
=> SELECT sync_with_hcatalog_schema('hcat_local', 'hcat');
Schema evolution in Hive
Hive supports two kinds of schema evolution:
- New columns can be added to existing tables in Hive. Vertica automatically handles this kind of schema evolution. The old records display NULLs for the newer columns.
- The type of a column for a table can be modified in Hive. Vertica does not support this kind of schema evolution.
The following example demonstrates schema evolution through new columns. In this example, hcat.parquet.txt is a file with the following values:
-1|0.65|0.65|6|'b'
hive> create table hcat.parquet_tmp (a int, b float, c double, d int, e varchar(4))
      row format delimited fields terminated by '|' lines terminated by '\n';

hive> load data local inpath 'hcat.parquet.txt' overwrite into table
      hcat.parquet_tmp;

hive> create table hcat.parquet_evolve (a int) partitioned by (f int) stored as
      parquet;
hive> insert into table hcat.parquet_evolve partition (f=1) select a from
      hcat.parquet_tmp;
hive> alter table hcat.parquet_evolve add columns (b float);
hive> insert into table hcat.parquet_evolve partition (f=2) select a, b from
      hcat.parquet_tmp;
hive> alter table hcat.parquet_evolve add columns (c double);
hive> insert into table hcat.parquet_evolve partition (f=3) select a, b, c from
      hcat.parquet_tmp;
hive> alter table hcat.parquet_evolve add columns (d int);
hive> insert into table hcat.parquet_evolve partition (f=4) select a, b, c, d from
      hcat.parquet_tmp;
hive> alter table hcat.parquet_evolve add columns (e varchar(4));
hive> insert into table hcat.parquet_evolve partition (f=5) select a, b, c, d, e
      from hcat.parquet_tmp;
hive> insert into table hcat.parquet_evolve partition (f=6) select a, b, c, d, e
      from hcat.parquet_tmp;

=> SELECT * from hcat_local.parquet_evolve;

  a |         b         |  c   | d | e | f
----+-------------------+------+---+---+---
 -1 |                   |      |   |   | 1
 -1 | 0.649999976158142 |      |   |   | 2
 -1 | 0.649999976158142 | 0.65 |   |   | 3
 -1 | 0.649999976158142 | 0.65 | 6 |   | 4
 -1 | 0.649999976158142 | 0.65 | 6 | b | 5
 -1 | 0.649999976158142 | 0.65 | 6 | b | 6
(6 rows)