This is the multi-page printable view of this section.
Click here to print.
Return to the regular view of this page.
Flex tables
Flex tables are a different kind of database table designed for loading and querying unstructured data, also called data.
Flex tables are a different kind of database table designed for loading and querying unstructured data, also called semi-structured data. Flex tables allow you to load data with different or evolving schemas into a single table. You can then explore this data and materialize real columns from it.
If you know some of the columns in the data, you can define them. A flex table that also has real columns is called a hybrid table. Both flex and hybrid tables are fully supported tables, stored as projections and with the same K-safety as your database.
After you create a flex table, you can quickly load data without specifying its schema. This allows you to load arbitrary JSON data, log files, and other semi-structured data and immediately begin querying it.
Creating flex tables is similar to creating other tables, except column definitions are optional. When you create flex tables, with or without column definitions, Vertica implicitly adds a real column to your table, called __raw__. This column stores loaded data. The __raw__ column is a LONG VARBINARY column with a NOT NULL constraint. It contains the documented limits for its data type (see Long data types). The __raw__ column's default maximum width is 130,000 bytes (with an absolute maximum of 32,000,000 bytes). You can change the default width with the FlexTableRawSize configuration parameter.
If you create a flex table without other column definitions, the table includes a second default column, __identity__, declared as an auto-incrementing IDENTITY (1,1) column. When no other columns are defined, flex tables use the __identity__ column for segmentation and sort order.
Loading data into a flex table encodes the record into a VMap type and populates the __raw__ column. The VMap is a standard dictionary type, pairing keys with string values as virtual columns.
Flex table terms
Flex tables have the following special vocabulary:
-
VMap: An internal map data format.
-
Virtual Columns: Key-value pairs contained in a flex table __raw__ column.
-
Real Columns: Explicit columns defined in addition to the flex (VMap) column.
-
Promoted Columns: Virtual columns that have been materialized to real columns.
-
Map Keys: Virtual column names within VMap data.
1 - Getting started
The following tutorial demonstrates the basics of creating, exploring, and using flex tables.
The following tutorial demonstrates the basics of creating, exploring, and using flex tables.
These examples use a data file named mountains.json with the following contents:
{"name": "Everest", "type":"mountain", "height":29029, "hike_safety": 34.1}
{"name": "Mt St Helens", "type":"volcano", "height":29029, "hike_safety": 15.4}
{"name": "Denali", "type":"mountain", "height":17000, "hike_safety": 12.2}
{"name": "Kilimanjaro", "type":"mountain", "height":14000 }
{"name": "Mt Washington", "type":"mountain", "hike_safety": 50.6}
Create a flex table
Create a flex table and load the sample data as follows:
=> CREATE FLEX TABLE mountains();

=> COPY mountains FROM '/home/dbadmin/data/mountains.json'
    PARSER FJSONPARSER();
 Rows Loaded
-------------
           5
(1 row)
You can now query this table, just as if you had created the table with explicit columns:
=> SELECT name, type, height FROM mountains;
     name      |   type   | height
---------------+----------+--------
 Everest       | mountain | 29029
 Mt St Helens  | volcano  | 29029
 Denali        | mountain | 17000
 Kilimanjaro   | mountain | 14000
 Mt Washington | mountain |
(5 rows)
The __raw__ column
Data loaded into a flex table is added to a special column named __raw__, which holds a map of all the keys and values. The following example shows this column, with carriage returns added for readability:
=> \x
Expanded display is on.
=> SELECT * FROM mountains;
[ RECORD 1 ]+----------------------------------------------------------------------------
__identity__ | 1
__raw__      | \001\000\000\000,\000\000\000\004\000\000\000\024\000\000\000\031\000\000\000\
035\000\000\000$\000\000\0002902934.1Everestmountain\004\000\000\000\024\000\000\000\032\000\
000\000%\000\000\000)\000\000\000heighthike_safetynametype
[ RECORD 2 ]+----------------------------------------------------------------------------
__identity__ | 2
__raw__      | \001\000\000\0000\000\000\000\004\000\000\000\024\000\000\000\031\000\000\000\
035\000\000\000)\000\000\0002902915.4Mt St Helensvolcano\004\000\000\000\024\000\000\000\032\000\
000\000%\000\000\000)\000\000\000heighthike_safetynametype
[ RECORD 3 ]+----------------------------------------------------------------------------
__identity__ | 3
__raw__      | \001\000\000\000+\000\000\000\004\000\000\000\024\000\000\000\031\000\000\000\
035\000\000\000#\000\000\0001700012.2Denalimountain\004\000\000\000\024\000\000\000\032\000\000
\000%\000\000\000)\000\000\000heighthike_safetynametype
[ RECORD 4 ]+----------------------------------------------------------------------------
__identity__ | 4
__raw__      | \001\000\000\000(\000\000\000\003\000\000\000\020\000\000\000\025\000\000\000\
000\000\00014000Kilimanjaromountain\003\000\000\000\020\000\000\000\026\000\000\000\032\000\
000\000heightnametype
[ RECORD 5 ]+----------------------------------------------------------------------------
__identity__ | 5
__raw__      | \001\000\000\000)\000\000\000\003\000\000\000\020\000\000\000\024\000\000\000\
000\000\00050.6Mt Washingtonmountain\003\000\000\000\020\000\000\000\033\000\000\000\037\000\
000\000hike_safetynametype
As this example demonstrates, querying __raw__ directly is not generally helpful. Instead, you can use functions to extract values from it. Use the MAPTOSTRING function to see this column in a more readable JSON format:
=> SELECT MAPTOSTRING(__raw__) FROM mountains;
                                         MAPTOSTRING
------------------------------------------------------------------------------------------
  {
   "height" : "29029",
   "hike_safety" : "34.1",
   "name" : "Everest",
   "type" : "mountain"
}

 {
   "height" : "29029",
   "hike_safety" : "15.4",
   "name" : "Mt St Helens",
   "type" : "volcano"
}

 {
   "height" : "17000",
   "hike_safety" : "12.2",
   "name" : "Denali",
   "type" : "mountain"
}

 {
   "height" : "14000",
   "name" : "Kilimanjaro",
   "type" : "mountain"
}

 {
   "hike_safety" : "50.6",
   "name" : "Mt Washington",
   "type" : "mountain"
}
You can use the COMPUTE_FLEXTABLE_KEYS function to extract information about the keys in the __raw__ column into a new table. The new table shows the key names, frequencies, and inferred data types:
=> SELECT COMPUTE_FLEXTABLE_KEYS('mountains');
    COMPUTE_FLEXTABLE_KEYS
---------------------------------------------------
Please see public.mountains_keys for updated keys
(1 row)

=> SELECT * FROM public.mountains_keys;
  key_name   | frequency | data_type_guess
-------------+-----------+-----------------
 height      |         4 | Integer
 hike_safety |         4 | Numeric(6,2)
 name        |         5 | Varchar(26)
 type        |         5 | Varchar(20)
(4 rows)
Vertica generates this table automatically when you create a flex table.
Review data types
Vertica infers data types from the raw data. You can adjust these types, either to be more specific or more general. The example that follows changes the NUMERIC value to FLOAT. Note also that VARCHAR sizes are based on the strings in the data and might not be large enough for future data. You should review and adjust data types before loading more data into a new flex table.
When you create a flex table, you can create a corresponding view. If you make changes in the data types in the keys table, regenerate the view. The following example demonstrates this process.
First, create the view:
=> SELECT BUILD_FLEXTABLE_VIEW('mountains');
                 BUILD_FLEXTABLE_VIEW
------------------------------------------------------
 The view public.mountains_view is ready for querying
(1 row)

=> SELECT * FROM public.mountains_view;
     name      |   type   | height | hike_safety
---------------+----------+--------+-------------
 Everest       | mountain |  29029 |       34.10
 Mt St Helens  | volcano  |  29029 |       15.40
 Denali        | mountain |  17000 |       12.20
 Kilimanjaro   | mountain |  14000 |
 Mt Washington | mountain |        |       50.60
(5 rows)
Query the VIEW_COLUMNS system table to review the columns and data types:
=> SELECT column_name, data_type FROM VIEW_COLUMNS
   WHERE table_name = 'mountains_view';
 column_name |  data_type
-------------+--------------
 name        | varchar(26)
 type        | varchar(20)
 height      | int
 hike_safety | numeric(6,2)
(4 rows)
The view has the same data types as the keys table. Now update one of these data types in the keys table. After making the change, rebuild the view:
=> UPDATE mountains_keys SET data_type_guess = 'float' WHERE key_name = 'hike_safety';
 OUTPUT
--------
      1
(1 row)

=> COMMIT;

=> SELECT BUILD_FLEXTABLE_VIEW('mountains');
                 BUILD_FLEXTABLE_VIEW
------------------------------------------------------
 The view public.mountains_view is ready for querying
(1 row)
Now, repeat the VIEW_COLUMNS query and note the changed type:
=> SELECT column_name, data_type FROM VIEW_COLUMNS WHERE table_name = 'mountains_view';
 column_name |  data_type
-------------+-------------
 name        | varchar(26)
 type        | varchar(20)
 height      | int
 hike_safety | float
(4 rows)
Create a hybrid flex table
If you already know that some of the data you load and query regularly needs full Vertica performance and support, you can create a hybrid flex table. A hybrid flex table has one or more real columns that you define, as well as the __raw__ column that holds all of the data. Querying real columns is faster than querying the __raw__ column. You can define default values for the columns.
When creating a hybrid flex table, specify real columns as you would for other tables:
=> CREATE FLEX TABLE mountains_hybrid(
    name VARCHAR(41) DEFAULT name::VARCHAR(41),
    hike_safety FLOAT DEFAULT hike_safety::float);

=> COPY mountains_hybrid FROM '/home/dbadmin/Downloads/mountains.json'
    PARSER FJSONPARSER();
 Rows Loaded
-------------
           5
(1 row)
You can compute keys and build the view in a single step:
=> SELECT COMPUTE_FLEXTABLE_KEYS_AND_BUILD_VIEW('mountains_hybrid');
                                        COMPUTE_FLEXTABLE_KEYS_AND_BUILD_VIEW
------------------------------------------------------------------------------------------------
 Please see public.mountains_hybrid_keys for updated keys
The view public.mountains_hybrid_view is ready for querying
(1 row)
The keys table shows the data types you declared for the real columns and inferred types for other fields:
=> SELECT * FROM mountains_hybrid_keys;
  key_name   | frequency | data_type_guess
-------------+-----------+-----------------
 height      |         4 | Integer
 hike_safety |         4 | float
 name        |         5 | varchar(41)
 type        |         5 | Varchar(20)
(4 rows)
If you create a basic flex table, you can later promote one or more virtual columns to real columns by using ALTER TABLE. See Materializing flex tables.
Materialize virtual columns in a hybrid flex table
After you explore your flex table data, you can promote one or more virtual columns in your flex table to real columns. You do not need to create a separate columnar table.
The MATERIALIZE_FLEXTABLE_COLUMNS function creates real columns for a specified number of virtual columns, starting with the most-used:
=> SELECT MATERIALIZE_FLEXTABLE_COLUMNS('mountains_hybrid', 3);
                                 MATERIALIZE_FLEXTABLE_COLUMNS
--------------------------------------------------------------------------------------------
 The following columns were added to the table public.mountains_hybrid:
    type
    height
For more details, run the following query:
SELECT * FROM v_catalog.materialize_flextable_columns_results WHERE table_schema = 'public' and table_name = 'mountains_hybrid';

(1 row)
The call specified three columns to materialize, but the table was created with two real columns, leaving only two more virtual columns. After materializing columns, you can check the results in the MATERIALIZE_FLEXTABLE_COLUMNS_RESULTS system table. The following output shows two columns with a status of ADDED and one with a status of EXISTS:
=> \x
Expanded display is on.
=> SELECT table_id, table_schema, table_name, key_name, status, message FROM MATERIALIZE_FLEXTABLE_COLUMNS_RESULTS
WHERE table_name = 'mountains_hybrid';
-[ RECORD 1 ]+-------------------------------------------------------
table_id     | 45035996273708192
table_schema | public
table_name   | mountains_hybrid
key_name     | type
status       | ADDED
message      | Added successfully
-[ RECORD 2 ]+-------------------------------------------------------
table_id     | 45035996273708192
table_schema | public
table_name   | mountains_hybrid
key_name     | height
status       | ADDED
message      | Added successfully
-[ RECORD 3 ]+-------------------------------------------------------
table_id     | 45035996273708192
table_schema | public
table_name   | mountains_hybrid
key_name     | name
status       | EXISTS
message      | Column of same name already exists in table definition
View the definition of the hybrid table after these changes:
=> \d mountains_hybrid
List of Fields by Tables
-[ RECORD 1 ]-------------------------------------------------------------------
Schema      | public
Table       | mountains_hybrid
Column      | __raw__
Type        | long varbinary(130000)
Size        | 130000
Default     |
Not Null    | t
Primary Key | f
Foreign Key |
-[ RECORD 2 ]-------------------------------------------------------------------
Schema      | public
Table       | mountains_hybrid
Column      | name
Type        | varchar(41)
Size        | 41
Default     | (public.MapLookup(mountains_hybrid.__raw__, 'name'))::varchar(41)
Not Null    | f
Primary Key | f
Foreign Key |
-[ RECORD 3 ]-------------------------------------------------------------------
Schema      | public
Table       | mountains_hybrid
Column      | hike_safety
Type        | float
Size        | 8
Default     | (public.MapLookup(mountains_hybrid.__raw__, 'hike_safety'))::float
Not Null    | f
Primary Key | f
Foreign Key |
-[ RECORD 4 ]-------------------------------------------------------------------
Schema      | public
Table       | mountains_hybrid
Column      | type
Type        | varchar(20)
Size        | 20
Default     | (public.MapLookup(mountains_hybrid.__raw__, 'type'))::!varchar(20)
Not Null    | f
Primary Key | f
Foreign Key |
-[ RECORD 5 ]-------------------------------------------------------------------
Schema      | public
Table       | mountains_hybrid
Column      | height
Type        | int
Size        | 8
Default     | (public.MapLookup(mountains_hybrid.__raw__, 'height'))::!int
Not Null    | f
Primary Key | f
Foreign Key |
2 - Understanding flex tables
The term (sometimes called or data) does not indicate that the data you load into flex tables is entirely without structure.
The term unstructured data (sometimes called semi-structured or dark data) does not indicate that the data you load into flex tables is entirely without structure. However, you may not know the data's composition or the inconsistencies of its design. In some cases, the data might not be relational.
Your data might have some structure (like JSON and delimited data). Data might be semi-structured or stringently structured, but in ways that you either do not know about or do not expect. The term flexible data encompasses these and other kinds of data. You can load your flexible data directly into a flex table and query its contents.
To summarize, you can load data first, without knowing its structure, and then query its content after a few simple transformations. In some cases, you already know the data structure, such as some keys in the data. If so, you can query these values explicitly as soon as you load the data.
Storing flex table data
While you can store unstructured data in a flex table __raw__ column, that column is implemented as a real column.
Vertica compresses __raw__ column data by about one half (1/2). While this factor is less than the compression rate for real columns, the reduction is significant for large amounts (more than 1TB) of unstructured data. After compression is complete, Vertica writes the data to disk. This approach maintains K-safety in your cluster and supports standard recovery processes should node failures occur. Flex tables are included in full backups (or, if you choose, in object-level backups).
What happens when you create flex tables?
Whenever you execute a CREATE FLEX TABLE statement, Vertica creates three objects, as follows:
-
The flexible table (flex_table)
-
An associated keys table (flex_table_keys)
-
A default view for the main table (flex_table_view)
The _keys and _view objects are dependents of the parent, flex_table. Dropping the flex table also removes its dependents, although you can drop the _keys or _view objects independently.
You can create a flex table without specifying any column definitions. When you do so, Vertica automatically creates two tables, the named flex table (such as darkdata) and its associated keys table, darkdata_keys:
=> CREATE flex table darkdata();
CREATE TABLE
=> \dt dark*
                List of tables
 Schema |     Name      | Kind  |  Owner  | Comment
--------+---------------+-------+---------+---------
 public | darkdata      | table | dbadmin |
 public | darkdata_keys | table | dbadmin |
(2 rows)
Each flex table has two default columns, __raw__ and __identity__. The __raw__ column exists in every flex table to hold the data you load. The __identity__ column is auto-incrementing. Vertica uses the __identity__ column for segmentation and sort order when no other column definitions exist. The flex keys table has three columns:
=> SELECT * FROM darkdata_keys;
 key_name | frequency | data_type_guess
----------+-----------+-----------------
(0 rows)
If you define columns when creating a flex table, Vertica still creates the __raw__ column. However, the table has no __identity__ column because columns are specified for segmentation and sort order. Two tables are created automatically, as shown in the following example:
=> CREATE FLEX TABLE darkdata1 (name VARCHAR);
CREATE TABLE

=> SELECT * FROM darkdata1;
 __raw__ | name
---------+------
(0 rows)

=> \d darkdata1*
                                            List of Fields by Tables
 Schema |   Table   | Column  |          Type          |  Size  | Default | Not Null | Primary Key | Foreign Key
--------+-----------+---------+------------------------+--------+---------+----------+-------------+-------------
 public | darkdata1 | __raw__ | long varbinary(130000) | 130000 |         | t        | f           |
 public | darkdata1 | name    | varchar(80)            |     80 |         | f        | f           |
(2 rows)

=> \dt darkdata1*
                   List of tables
 Schema |      Name      | Kind  |  Owner  | Comment
--------+----------------+-------+---------+---------
 public | darkdata1      | table | dbadmin |
 public | darkdata1_keys | table | dbadmin |
(2 rows)
For more examples, see Creating flex tables.
Creating superprojections automatically
In addition to creating two tables for each flex table, Vertica creates superprojections for both the main flex table and its associated keys table. Using the \dj command, you can display the projections created automatically for the darkdata and darkdata1 tables in this set of examples:
=> \dj darkdata*
                           List of projections
 Schema |          Name           |  Owner  |       Node       | Comment
--------+-------------------------+---------+------------------+---------
 public | darkdata1_b0            | dbadmin |                  |
 public | darkdata1_b1            | dbadmin |                  |
 public | darkdata1_keys_super    | dbadmin | v_vmart_node0001 |
 public | darkdata1_keys_super    | dbadmin | v_vmart_node0003 |
 public | darkdata1_keys_super    | dbadmin | v_vmart_node0004 |
 public | darkdata_b0             | dbadmin |                  |
 public | darkdata_b1             | dbadmin |                  |
 public | darkdata_keys__super    | dbadmin | v_vmart_node0001 |
 public | darkdata_keys_super     | dbadmin | v_vmart_node0003 |
 public | darkdata_keys_super     | dbadmin | v_vmart_node0004 |
(10 rows)
Default flex table view
When you create a flex table, you also create a default view. This default view uses the table name with a _view suffix. If you query the default view, you are prompted to use the COMPUTE_FLEXTABLE_KEYS_AND_BUILD_VIEW function. This view enables you to update the view after you load data so that it includes all keys and values:
=> \dv darkdata*
                  List of View Fields
 Schema |      View      | Column |     Type     | Size
--------+----------------+--------+--------------+------
 public | darkdata_view  | status | varchar(124) |  124
 public | darkdata1_view | status | varchar(124) |  124
(2 rows)
For more information, see Updating flex table views.
Flex functions
Three sets of functions support flex tables and extracting data into VMaps:
Using clients with flex tables
You can use the Vertica-supported client drivers with flex tables as follows:
-
To load data into a flex table, you can use the INSERT or COPY LOCAL statement with the appropriate flex parser.
-
The driver metadata APIs return only real columns. For example, if you select * from a flex table with a single materialized column, the statement returns that column and the __raw__. However, it does not return virtual columns from within __raw__. To access virtual columns and their values, query the associated _keys table, just as you would in vsql.
3 - Creating flex tables
You can create a flex table or an external flex table without column definitions or other parameters.
You can create a flex table or an external flex table without column definitions or other parameters. You can use any CREATE TABLE statement parameters you prefer, as usual.
Creating basic flex tables
Here's how to create the table:
=> CREATE FLEX TABLE darkdata();
CREATE TABLE
Selecting from the table before loading any data into it reveals its two real columns, __identity__ and __raw__:
=> SELECT * FROM darkdata;
__identity__    | __raw__
--------------+---------
(0 rows)
Below is an example of creating a flex table with a column definition:
=> CREATE FLEX TABLE darkdata1(name VARCHAR);
CREATE TABLE
When flex tables exist, you can add new columns (including those with default derived expressions), as described in Materializing Flex Tables.
Materializing flex table virtual columns
After you create your flex table and load data, you compute keys from virtual columns. After completing those tasks, you can materialize some keys by promoting virtual columns to real table columns. By promoting virtual columns, you query real columns rather than the raw data.
You can promote one or more virtual columns — materializing those keys from within the __raw__ data to real columns. Vertica recommends this approach to get the best query performance for all important keys. You don't need to create new columnar tables from your flex table.
Materializing flex table columns results in a hybrid table. Hybrid tables:
If you have only a few columns to materialize, try altering your flex table progressively, adding columns whenever necessary. You can use the ALTER TABLE...ADD COLUMN statement to do so, just as you would with a columnar table. See Materializing flex tables for ideas about adding columns.
If you want to materialize columns automatically, use the helper function MATERIALIZE_FLEXTABLE_COLUMNS.
Creating columnar tables from flex tables
You can create a regular Vertica table from a flex table, but you cannot use one flex table to create another.
Typically, you create a columnar table from a flex table after loading data. Then, you specify the virtual column data you want in a regular table, casting virtual columns to regular data types.
To create a columnar table from a flex table, darkdata, select two virtual columns, (user.lang and user.name), for the new table. Use a command such as the following, which casts both columns to varchars for the new table:
=> CREATE TABLE darkdata_full AS SELECT "user.lang"::VARCHAR, "user.name"::VARCHAR FROM darkdata;
CREATE TABLE
=> SELECT * FROM darkdata_full;
 user.lang |      user.name
-----------+---------------------
 en        | Frederick Danjou
 en        | The End
 en        | Uptown gentleman.
 en        | ~G A B R I E L A â¿
 es        | Flu Beach
 es        | I'm Toasterâ¥
 it        | laughing at clouds.
 tr        | seydo shi
           |
           |
           |
           |
(12 rows)
Creating temporary flex tables
Before you create temporary global and local flex tables, be aware of the following considerations:
-
GLOBAL TEMP flex tables are supported. Creating a temporary global flex table results in the flextable_keys table and the flextable_view having temporary table restrictions for their content.
-
LOCAL TEMP flex tables must include at least one column definition. The reason for this requirement is that local temp tables do not support automatically-incrementing data (such as the flex table default __identity__ column). Creating a temporary local flex table results in the flextable_keys table and the flextable_view existing in the local temporary object scope.
-
LOCAL TEMP views are supported for flex and columnar temporary tables.
For global or local temp flex tables to function correctly, you must also specify the ON COMMIT PRESERVE ROWS clause. You must use the ON COMMIT clause for the flex table helper functions, which rely on commits. Create a local temp table as follows:
=> CREATE FLEX LOCAL TEMP TABLE good(x int) ON COMMIT PRESERVE ROWS;
CREATE TABLE
After creating a local temporary flex table using this approach, you can then load data into the table, create table keys, and a flex table view:
=> COPY good FROM '/home/release/KData/bake.json' PARSER fjsonparser();
 Rows Loaded
-------------
           1
(1 row)

=> select compute_flextable_keys_and_build_view('good');
                            compute_flextable_keys_and_build_view
----------------------------------------------------------------------------------------------
 Please see v_temp_schema.good_keys for updated keys
The view good_view is ready for querying
(1 row)
Similarly, you can create global temp tables as follows:
=> CREATE FLEX GLOBAL TEMP TABLE good_global(x int) ON COMMIT PRESERVE ROWS;
After creating a global temporary flex table using this approach, you can then load data into the table, create table keys, and a flex table view:
=> COPY good_global FROM '/home/dbadmin/data/flex/bake_single.json' PARSER fjsonparser();
Rows Loaded
-------------
5
(1 row)

=> SELECT compute_flextable_keys_and_build_view('good_global');
                            compute_flextable_keys_and_build_view
----------------------------------------------------------------------------------------------
 Please see v_temp_schema.good_keys for updated keys
The view good_view is ready for querying
(1 row)
Creating external flex tables
To create an external flex table:
=> CREATE flex external table mountains() AS COPY FROM 'home/release/KData/kmm_ountains.json' PARSER fjsonparser();
CREATE TABLE
As with other flex tables, creating an external flex table produces two regular tables: the named table and its associated _keys table. The keys table is not an external table:
=> \dt mountains
                 List of tables
 Schema |   Name    | Kind  |  Owner  | Comment
--------+-----------+-------+---------+---------
 public | mountains | table | release |
(1 row)
You can use the helper function, COMPUTE_FLEXTABLE_KEYS_AND_BUILD_VIEW, to compute keys and create a view for the external table:
=> SELECT compute_flextable_keys_and_build_view ('appLog');

                     compute_flextable_keys_and_build_view
--------------------------------------------------------------------------------------------------
Please see public.appLog_keys for updated keys
The view public.appLog_view is ready for querying
(1 row)
Check the keys from the _keys table for the results of running the helper application:
=> SELECT * FROM appLog_keys;
                          key_name                       | frequency |   data_type_guess
----------------------------------------------------------+-----------+------------------
contributors                                             |         8 | varchar(20)
coordinates                                              |         8 | varchar(20)
created_at                                               |         8 | varchar(60)
entities.hashtags                                        |         8 | long varbinary(186)
.
.
.
retweeted_status.user.time_zone                          |         1 | varchar(20)
retweeted_status.user.url                                |         1 | varchar(68)
retweeted_status.user.utc_offset                         |         1 | varchar(20)
retweeted_status.user.verified                           |         1 | varchar(20)
(125 rows)
You can query the view:
=> SELECT "user.lang" FROM appLog_view;
 user.lang
-----------
it
en
es
en
en
es
tr
en
(12 rows)
Note
External tables are fully supported for both flex and columnar tables. However, using external flex (or columnar) tables is less efficient than using flex tables whose data is stored in the Vertica database. Data that is maintained externally requires reloading each time you query.
Creating a flex table from query results
You can use the CREATE FLEX TABLE AS statement to create a flex table from the results of a query.
You can use this statement to create three types of flex tables:
-
Flex table with no materialized columns
-
Flex table with some materialized columns
-
Flex table with all materialized columns
When a flex __raw__ column is present in the CTAS query, the entire source VMap is carried to the flex table. If the query has matching column names, the key values are overridden.
Note
ORDER BY and segmentation clauses are only passed to the new flex table if the relevant columns are materialized.
Examples
Creating a flex table with no materialized columns from a regular table causes the results of the query to be stored in the __raw__ column as a VMap.
-
Create a regular table named pets with two columns:
=> CREATE TABLE pets(age INT, name VARCHAR);
CREATE TABLE
-
Create a flex table named family_pets by using the CTAS statement to copy the columns age and name from the pets:
=> CREATE FLEX TABLE family_pets() AS SELECT age, name FROM pets;
CREATE TABLE
-
View the new flex table to confirm the operation has been successful and that the columns age and name have not been materialized.
=> \d family_pets;
    List of Fields by Tables
Schema | Table       |    Column    |          Type          |  Size  | Default | Not Null | Primary Key | Foreign Key
--------+------------+--------------+------------------------+--------+---------+----------+-------------+-------------
public | family_pets | __identity__ | int                    |      8 |         | t        | f           |
public | family_pets | __raw__      | long varbinary(130000) | 130000 |         | t        | f           |
(2 rows)
You can create a flex table with no materialized columns from the results of a query of another flex table. This inserts all the VMaps from the source flex table into the target. This creates a flex table segmented and ordered by the __identity__ column.
-
Create a flex table named city_pets by using the CTAS statement to copy the age and __raw__ columns from family_pets:
=> CREATE FLEX TABLE city_pets() AS SELECT age, __raw__ FROM family_pets;
CREATE TABLE
-
View the new flex table to confirm that the operation has been successful and the columnsageand __raw__ have not been materialized.
=> SELECT * FROM city_pets;
    List of Fields by Tables
Schema | Table     |    Column    |          Type          |  Size  | Default | Not Null | Primary Key | Foreign Key
--------+----------+--------------+------------------------+--------+---------+----------+-------------+-------------
public | city_pets | __identity__ | int                    |      8 |         | t        | f           |
public | city_pets | __raw__      | long varbinary(130000) | 130000 |         | t        | f           |
(2 rows)
You can create a flex table with some materialized columns. This uses a syntax similar to the syntax for creating columnar tables with some materialized columns. Unlike columnar tables, however, you need to match the number of columns with the columns that are returned by the query. In the following example, our query returns three columns (amount, type, and available), but Vertica only materializes the first two.
-
Create a table named animals with three columns, amount, type, and available:
=> CREATE TABLE animals(amount INT, type VARCHAR, available DATE);
-
Create a flex table named inventory with columns animal_amount and animal_type using the CTAS statement to copy columns amount, type, and available from animals.
=> CREATE FLEX TABLE inventory(animal_amount, animal_type) AS SELECT amount, type, available FROM animals;
CREATE TABLE
-
View the table data to confirm that columns amount and type have been materialized under the column names animal_amount and animal_type. Column available from animals has also been copied over but was not materialized:
=> \d inventory
    List of Fields by Tables
Schema | Table | Column           |          Type          |  Size  | Default | Not Null | Primary Key | Foreign Key
--------+-------+-----------------+------------------------+--------+---------+---------+-------------+-------------
public | flex3 | __raw__          | long varbinary(130000) | 130000 |         | t       | f           |
public | flex3 | animal_amount    | int                    |      8 |         | f       | f           |
public | flex3 | animal_type      | varchar(80)            |     80 |         | f       | f           |
(3 rows)
Notice that including empty parentheses in the statement results in a flex table with no materialized columns:
-
Create a flex table named animals_for_sale using the CTAS statement with empty parentheses to copy columns amount, type, and available from animals into a pure flex table:
=> CREATE FLEX TABLE animals__for_sale() AS SELECT amount, type, available FROM animals;
CREATE TABLE
-
View the table data to confirm that no columns were materialized:
=>\d animals_for_sale;
    List of Fields by Tables
Schema | Table            |    Column    |          Type          |  Size  | Default | Not Null | Primary Key | Foreign Key
--------+-----------------+--------------+------------------------+--------+---------+----------+------------+-------------
public | animals_for_sale | __identity__ | int                    |      8 |         | t        | f          |
public | animals_for_sale | __raw__      | long varbinary(130000) | 130000 |         | t        | f          |
(2 rows)
Omitting any parentheses in the statement causes all columns to be materialized:
-
Create a flex table named animals_sold using the CTAS statement without parentheses. This copies columns amount, type, and available from animals and materialize all columns:
=> CREATE FLEX TABLE animals_sold AS SELECT amount, type, available FROM animals;
CREATE TABLE
-
View the table data to confirm that all columns were materialized:
=> \d animals_sold;
    List of Fields by Tables
Schema | Table        | Column    |          Type          |  Size  | Default | Not Null | Primary Key | Foreign Key
--------+-------------+-----------+------------------------+--------+---------+----------+-------------+-------------
public | animals_sold | __raw__   | long varbinary(130000) | 130000  |         | t        | f           |
public | animals_sold | amount    | int                    |      8  |         | f        | f           |
public | animals_sold | type      | varchar(80)            |     80  |         | f        | f           |
public | animals_sold | available | date                   |      8  |         | f        | f           |
(4 rows)
4 - Bulk loading data into flex tables
You bulk load data into a flex table with a COPY statement, specifying one of the flex parsers:.
You bulk load data into a flex table with a COPY statement, specifying one of the flex parsers:
-
FAVROPARSER
-
FCEFPARSER
-
FCSVPARSER
-
FDELIMITEDPAIRPARSER
-
FDELIMITEDPARSER
-
FJSONPARSER
-
FREGEXPARSER
All flex parsers store the data as a single-value VMap. They reside in the VARBINARY __raw__ column, which is a real column with a NOT NULL constraint. The VMap is encoded into a single binary value for storage in the __raw__ column. The encoding places the value strings in a contiguous block, followed by the key strings. Vertica supports null values within the VMap for keys with NULL-specified columns. The key and value strings represent the virtual columns and their values in your flex table.
If a flex table data row is too large to fit in the __raw__ column, it is rejected. By default, the rejected data and exceptions files are stored in the standard CopyErrorLogs location, a subdirectory of the catalog directory:
v_mart_node003_catalog/CopyErrorLogs/trans-STDIN-copy-from-exceptions.1
v_mart_node003_catalog/CopyErrorLogs/trans-STDIN-copy-rejections.1
Flex tables do not copy any rejected data, due to disk space considerations. The rejected data file exists, but it contains only a new line character for every rejected record. The corresponding exceptions file lists the reason why each record was rejected.
You can specify a different path and file for the rejected data and exceptions files. To do so, use the COPY options REJECTED DATA and EXCEPTIONS, respectively. You can also save load rejections and exceptions in a table. For more information, see Data load.
Basic flex table load and query
Loading data into a flex table is similar to loading data into a regular columnar table. The difference is that you must use the PARSER option with one of the flex parsers:
=> COPY darkdata FROM '/home/dbadmin/data/tweets_12.json' PARSER fjsonparser();
 Rows Loaded
-------------
          12
(1 row)
Note
You can use many additional COPY parameters as required but not all are supported.
Loading data into flex table real columns
If you create a hybrid flex table with one or more real column definitions, COPY evaluates each virtual column key name during data load and automatically populates real columns with the values from their virtual column counterparts. For columns of scalar types, COPY also loads the keys and values as part of the VMap data in the __raw__ column. For columns of complex types, COPY does not add the values to the __raw__ column.
Note
Over time, storing values in both column types can impact your licensed data limits. For more information about Vertica licenses, see
Managing licenses.
For example, continuing with the JSON example:
-
Create a flex table with a column definition of one of the keys in the data you will load:
=> CREATE FLEX TABLE darkdata1 ("user.lang" VARCHAR);
CREATE TABLE
-
Load data into the table:
=> COPY darkdata1 FROM '/test/vertica/flextable/DATA/tweets_12.json' PARSER fjsonparser();
 Rows Loaded
-------------
          12
(1 row)
-
Query the real column directly:
=> SELECT "user.lang" FROM darkdata1;
 user.lang
-----------
 es
 es
 tr
 it
 en
 en
 en
 en
(12 rows)
Empty column rows indicate NULL values. For more information about how NULLs are handled in flex tables, see NULL value.
-
You can query for other virtual columns with similar results:
=> SELECT "user.name" FROM darkdata1;
      user.name
---------------------
 I'm Toasterâ¥
 Flu Beach
 seydo shi
 The End
 Uptown gentleman.
 ~G A B R I E L A â¿
 Frederick Danjou
 laughing at clouds.
(12 rows)
Note
While the results for these two queries are similar, the difference in accessing the keys and their values is significant. Data for user.lang has been materialized into a real table column, while user.name remains a virtual column. For production-level data usage (rather than test data sets), materializing flex table data improves query performance significantly.
Handling default values during loading
You can create a flex table with a real column, named for a virtual column that exists in your incoming data. For example, if the data you load has a user.lang virtual column, define the flex table with that column. You can also specify a default column value when creating the flex table with real columns. The next example shows how to define a real column (user.lang), which has a default value from a virtual column (user.name):
=> CREATE FLEX TABLE darkdata1 ("user.lang" LONG VARCHAR default "user.name");
When you load data into a flex table, COPY uses values from the flex table data, ignoring the default column definition. Loading data into a flex table requires MAPLOOKUP to find keys that match any real column names. A match exists when the incoming data has a virtual column with the same name as a real column. When COPY detects a match, it populates the column with values. COPY returns either a value or NULL for each row, so real columns always have values.
For example, after creating the flex table described in the previous example, load data with COPY:
=> COPY darkdata1 FROM '/test/vertica/flextable/DATA/tweets_12.json' PARSER fjsonparser();
 Rows Loaded
-------------
          12
(1 row)
If you query the table after loading, the data shows that the values for the user.lang column were extracted:
In this case, the table column default value for user.lang was ignored:
=> SELECT "user.lang" FROM darkdata1;
 user.lang
-----------
 it
 en
 es
 en
 en
 es
 tr
 en
(12 rows)
Using COPY to specify default column values
You can add an expression to a COPY statement to specify default column values when loading data. For flex tables, specifying any column information requires that you list the __raw__ column explicitly. The following example shows how to use an expression for the default column value. In this case, loading populates the defined user.lang column with data from the input data user.name values:
=> COPY darkdata1(__raw__, "user.lang" as "user.name"::VARCHAR)
   FROM '/test/vertica/flextable/DATA/tweets_12.json' PARSER fjsonparser();
 Rows Loaded
-------------
          12
(1 row)
=> SELECT "user.lang" FROM darkdata1;
      user.lang
---------------------
 laughing at clouds.
 Avita Desai
 I'm Toasterâ¥
 Uptown gentleman.
 ~G A B R I E L A â¿
 Flu Beach
 seydo shi
 The End
(12 rows)
You can specify default values when adding columns, as described in Altering Flex Tables. When you do so, a different behavior results. For more information about using COPY, its expressions and parameters, see Getting Data into Vertica and the COPY reference page.
5 - Inserting data into flex tables
You can load data into a Vertica flex table using a standard INSERT statement, specifying data for one or more columns.
You can load data into a Vertica flex table using a standard INSERT statement, specifying data for one or more columns. When you use INSERT, Vertica populates any materialized columns and stores the VMap data in the __raw__ column.
Vertica provides two ways to use INSERT with flex tables:
-
INSERT ... VALUES
-
INSERT ... SELECT
Inserting values into flex tables
To insert data values into a flex table, use an INSERT ... VALUES statement. If you do not specify any columns in your INSERT ... VALUES statement, Vertica positionally assigns values to the real columns of the flex table.
This example shows two ways to insert values into a simple flex table. For both statements, Vertica assigns the values 1 and 'x' to columns a and b, respectively.This example inserts values into the two real columns defined in the flex table:
=> CREATE FLEX TABLE flex0 (a INT, b VARCHAR);
CREATE TABLE
=> INSERT INTO flex0 VALUES (1, 'x');
 OUTPUT
--------
      1
(1 row)
This example inserts values into a flex table without any real columns:
=> CREATE FLEX TABLE flex1();
 CREATE TABLE
=> INSERT INTO flex1(a,b) VALUES (1, 'x');
 OUTPUT
--------
      1
(1 row)
For the preceding example, the __raw__ column contains the inserted data:
=> SELECT MapToString(__raw__) FROM flex1;
           MapToString
---------------------------------
{
"a" : "1",
"b" : "x"
}
(1 row)
Using INSERT ... SELECT with flex tables
Using an INSERT ... SELECT statement with a flex table is similar to using INSERT ... SELECT with a regular table. The SELECT statement returns the data to insert into the target table.
However, Vertica does not require that you balance the number of columns and values. If you do not specify a value for a column, Vertica inserts NULL.
In the next example, Vertica copies the a and b values from the flex1 table, and creates columns c, d, e, and f. Because the statement does not specify a value for f, Vertica assigns it a NULL.
=> CREATE FLEX TABLE flex2();
CREATE TABLE
=> INSERT INTO flex2(a,b) SELECT a,b, '2016-08-10 11:10' c, 'Hello' d, 3.1415 e, f from flex1;
 OUTPUT
--------
     1
(1 row)
=> SELECT MapToString(__raw__) FROM flex2;
                            MapToString
----------------------------------------------------------------------------------------------------------------
{
"a" : "1",
"b" : "x",
"c" : "2016-08-10 11:10",

"d" : "Hello",
"e" : "3.1415",
"f" : null
}
(1 row)
Inserting __raw__ columns into a flex table
Inserting a __raw__ column into a flex table inserts the entire source VMap into the target table. Vertica does not assign the __raw__ column to any target column. Its position in the SELECT statement does not matter.
The following two INSERT statements are equivalent.
=> INSERT INTO flex4(a,b) SELECT a, __raw__, b FROM flex3;
=> INSERT INTO flex4(a,b) SELECT a, b, __raw__ FROM flex3;
Error handling
Type coercion errors occur only with real columns. The insert operation fails as follows:
=> CREATE FLEX TABLE my_table(a INT, b VARCHAR);
 CREATE TABLE
=> INSERT INTO my_table(a, b) VALUES ('xyz', '5');
ERROR: Invalid input syntax for integer: "xyz"
If you try to insert values into the __raw__ column, the insert fails as follows:
=> CREATE FLEX TABLE my_table(a INT, b VARCHAR);
 CREATE TABLE
=> INSERT INTO my_table(a,b,__raw__) VALUES (1,'x','abcdef');
ERROR 7372: Cannot assign value to "__raw__" column
See also
6 - Using flex tables for IDOL data
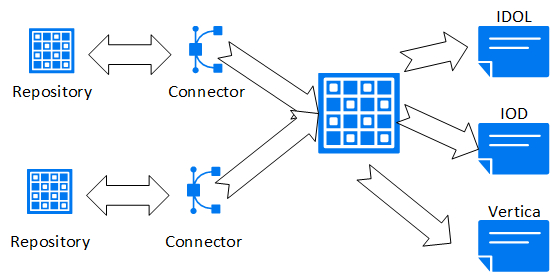
You can create flex tables to use with the IDOL Connector Framework Server (CFS) and an ODBC client.
You can create flex tables to use with the IDOL Connector Framework Server (CFS) and an ODBC client. The CFS VerticaIndexer module uses the connector to retrieve data. CFS then indexes the data into your Vertica database.
CFS supports many connectors for interfacing to different unstructured file types stored in repositories. Examples of repositories include Microsoft Exchange (email), file systems (including Word documents, images, and videos), Microsoft SharePoint, and Twitter (containing Tweets).
Connectors retrieve and aggregate data from repositories. CFS indexes the data, sending it to IDOL, IDOL OnDemand, or Vertica. The following figure illustrates a basic setup with a repository and a connector.
After you configure CFS and connect it to your Vertica database, the connector monitors the repository for changes and deletions to loaded documents, and for new files not previously added to the server. CFS then updates its server destinations automatically.
To achieve the best query results with ongoing CFS updates and deletes, Vertica recommends using live aggregate projections and top-K projections. For more information about how these projections work, and for examples of using them, see Projections.
ODBC connection string for CFS
There are several steps to setting up the CFS VerticaIndexer to load IDOL metadata into your database.
One of the first steps is to add information to the CFS configuration file. To do so, add an Indexing section to the configuration file that specifies the ODBC ConnectionString details.
Successfully loading data requires a valid database user with write permissions to the destination table. Two ODBC connection parameters (UID and PWD) specify the Vertica user and password. The following example shows a sample CFS Indexing section. The section includes a ConnectionString with the basic parameters, including a sample user (UID=fjones) and password (PWD=fjones_password):
[Indexing]
IndexerSections=vertica
IndexTimeInterval=30
[vertica]
IndexerType = Library
ConnectionString=Driver=Vertica;Server=123.456.478.900;Database=myDB;UID=fjones;PWD=fjones_password
TableName = marcomm.myFlexTable
LibraryDirectory = ./shared_library_indexers
LibraryName = verticaIndexer
For more information about ODBC connection parameters, see [ODBC Configuration Parameters. ](http://vertica.com/docs/7.1.x/HTML/index.htm#Authoring/ConnectingToVertica/ClientODBC/DSNParameters.htm?TocPath=Connecting to HP Vertica|Client Libraries|Creating an ODBC Data Source Name (DSN)|_____4)
CFS COPY LOCAL statement
CFS first indexes and processes metadata from a document repository to add to your database. Then, CFS uses the Indexing information you added to the configuration file to create an ODBC connection. After establishing a connection, CFS generates a standard COPY LOCAL statement, specifying the fjsonparser. CFS loads data directly into your pre-existing flex table with a statement such as the following:
=> COPY myFlexTable FROM LOCAL path_to_compressed_temporary_json_file PARSER fjsonparser();
=> SELECT * FROM myavro;
 __identity__ | __raw__
--------------+---------
(0 rows)
When your IDOL metadata appears in a flex table, you can optionally add new table columns, or materialize other data, as described in Altering Flex Tables.
7 - Using flex table parsers
You can load flex tables with one of several parsers, using the options that these parsers support.
You can load flex tables with one of several parsers, using the options that these parsers support.
In addition to the parsers listed in this section, the following parsers described in Data formats in Data load support flex tables:
7.1 - Loading columnar tables with flex parsers
You can use any of the flex parsers to load data into columnar tables.
You can use any of the flex parsers to load data into columnar tables. Using the flex table parsers to load columnar tables gives you the capability to mix data loads in one table. For example, you can load JSON data in one session and delimited data in another.
Note
For Avro data, you can load only data into a columnar table, not the schema. For flex tables, Avro schema information is required to be embedded in the data.
The following basic examples illustrate how you can use flex parsers with columnar tables.
-
Create a columnar table, super, with two columns, age and name:
=> CREATE TABLE super(age INT, name VARCHAR);
CREATE TABLE
-
Enter JSON values from STDIN, using the fjsonparser():
=> COPY super FROM stdin PARSER fjsonparser();
Enter data to be copied followed by a newline.
End with a backslash and a period on a line by itself.
>> {"age": 5, "name": "Tim"}
>>  {"age": 3}
>>  {"name": "Fred"}
>>  {"name": "Bob", "age": 10}
>> \.
-
Query the table to see the values you entered:
=> SELECT * FROM super;
 age | name
-----+------
     | Fred
  10 | Bob
   5 | Tim
   3 |
(4 rows)
-
Enter some delimited values from STDIN, using the fdelimitedparser():
=> COPY super FROM stdin PARSER fdelimitedparser();
Enter data to be copied followed by a newline.
End with a backslash and a period on a line by itself.
>> name |age
>> Tim|50
>> |30
>> Fred|
>> Bob|100
>> \.
-
Query the flex table. Both JSON and delimited data are saved in the same columnar table, super.
=> SELECT * FROM super;
 age | name
-----+------
  50 | Tim
  30 |
   3 |
   5 | Tim
 100 | Bob
     | Fred
  10 | Bob
     | Fred
(8 rows)
Use the reject_on_materialized_type_error parameter to avoid loading data with type mismatch. If reject_on_materialized_type_error is set to false, the flex parser will accept the data with type mismatch. Consider the following example:
Assume that the CSV file to be loaded has the following sample contents:
$ cat json.dat
{"created_by":"system","site_source":"flipkart_india_kol","updated_by":"system1","invoice_id":"INVDPKOL100",
"vendor_id":"VEN15731","total_quantity":12,"created_at":"2012-01-09 23:15:52.0"}
{"created_by":"system","site_source":"flipkart_india_kol","updated_by":"system2","invoice_id":"INVDPKOL101",
"vendor_id":"VEN15732","total_quantity":14,"created_at":"hello"}
-
Create a columnar table.
=> CREATE TABLE hdfs_test (
site_source VARCHAR(200),
total_quantity int ,
vendor_id varchar(200),
invoice_id varchar(200),
updated_by varchar(200),
created_by varchar(200),
created_at timestamp
);
-
Load JSON data.
=>COPY hdfs_test FROM '/home/dbadmin/json.dat' PARSER fjsonparser() ABORT ON ERROR;
Rows Loaded
-------------
2
(1 row)
-
View the contents.
=> SELECT * FROM hdfs_test;
site_source | total_quantity | vendor_id | invoice_id | updated_by | created_by | created_at
--------------------+----------------+-----------+-------------+------------+------------+---------------------
flipkart_india_kol | 12 | VEN15731 | INVDPKOL100 | system1 | system | 2012-01-09 23:15:52
flipkart_india_kol | 14 | VEN15732 | INVDPKOL101 | system2 | system |
(2 rows)
-
If reject_on_materialized_type_error parameter is set to true, you will receive errors when loading the sample JSON data.
=> COPY hdfs_test FROM '/home/dbadmin/data/flex/json.dat' PARSER fjsonparser(reject_on_materialized_type_error=true) ABORT ON ERROR;
ERROR 2035:  COPY: Input record 2 has been rejected (Rejected by user-defined parser)
7.2 - Loading CSV data
Use the fcsvparser to load data in CSV format (comma-separated values).
Use the fcsvparser to load data in CSV format (comma-separated values). Because no formal CSV standard exists, Vertica supports the RFC 4180 standard as the default behavior for fcsvparser. Other parser parameters simplify various combinations of CSV options into columnar or flex tables. Using fcsvparser parses the following CSV data formats:
-
RFC 4180: The RFC4180 CSV format parser for Vertica flex tables. The parameters for this format are fixed and cannot be changed.
-
Traditional: The traditional CSV parser lets you specify the parameter values such as delimiter or record terminator. For a detailed list of parameters, see FCSVPARSER.
Using default parser settings
These fixed parameter settings apply to the RCF4180 format.
You may use the same value for enclosed_by and escape. Other values must be unique.
|
Parameter |
Data Type |
Fixed Value (RCF4180) |
Default Value (Traditional) |
delimiter |
CHAR |
, |
, |
enclosed_by |
CHAR |
" |
" |
escape |
CHAR |
" |
\ |
record_terminator |
CHAR |
\n or \r\n |
\n or \r\n |
Use the type parameter to indicate either an RFC 4180-compliant file or a traditional-compliant file. You can specify type as RCF4180. However, you must first verify that the data is compatible with the preceding fixed values for parameters of the RFC4180 format. The default value of the type parameter is RFC4180.
Loading CSV data (RFC4180)
Follow these steps to use fcsvparser to load data in the RFC4180 CSV data format.
To perform this task, assume that the CSV file to be loaded has the following sample contents:
$ more /home/dbadmin/flex/flexData1.csv
sno,name,age,gender
1,John,14,male
2,Mary,23,female
3,Mark,35,male
-
Create a flex table:
=> CREATE FLEX TABLE csv_basic();
CREATE TABLE
-
Load the data from the CSV file using fcsvparser:
=> COPY csv_basic FROM '/home/dbadmin/flex/flexData1.csv' PARSER fcsvparser();
Rows Loaded
-------------
3
(1 row)
-
View the data loaded in the flex table:
=> SELECT maptostring(__raw__) FROM csv_basic;
maptostring
----------------------------------------------------------------------------------
{
"age" : "14",
"gender" : "male",
"name" : "John",
"sno" : "1"
}
{
"age" : "23",
"gender" : "female",
"name" : "Mary",
"sno" : "2"
}
{
"age" : "35",
"gender" : "male",
"name" : "Mark",
"sno" : "3"
}
(3 rows)
Loading CSV data (traditional)
Follow these steps to use fcsvparser to load data in traditional CSV data format using fcsvparser.
In this example, the CSV file uses $ as a delimiter and # as a record_terminator. The sample CSV file to load has the following contents:
$ more /home/dbadmin/flex/flexData1.csv
sno$name$age$gender#
1$John$14$male#
2$Mary$23$female#
3$Mark$35$male#
-
Create a flex table:
=> CREATE FLEX TABLE csv_basic();
CREATE TABLE
-
Load the data in flex table using fscvparser with parameters type='traditional', delimiter='$' and record_terminator='#' :
=> COPY csv_basic FROM '/home/dbadmin/flex/flexData2.csv' PARSER fcsvparser(type='traditional',
delimiter='$', record_terminator='#');
Rows Loaded
-------------
3
(1 row)
-
View the data loaded in the flex table:
=> SELECT maptostring(__raw__) FROM csv_basic;
maptostring
----------------------------------------------------------------------------------
{
"age" : "14",
"gender" : "male",
"name" : "John",
"sno" : "1"
}
{
"age" : "23",
"gender" : "female",
"name" : "Mary",
"sno" : "2"
}
{
"age" : "35",
"gender" : "male",
"name" : "Mark",
"sno" : "3"
}
(3 rows)
Rejecting duplicate values
You can reject duplicate values using the reject_on_duplicate=true option with the fcsvparser. The load continues after it rejects a duplicate value. The next example shows how to use this parameter and then displays the specified exception and rejected data files. Saving rejected data to a table, rather than a file, includes both the data and its exception.
=> CREATE FLEX TABLE csv_basic();
CREATE TABLE
=> COPY csv_basic FROM stdin PARSER fcsvparser(reject_on_duplicate=true)
exceptions '/home/dbadmin/load_errors/except.out' rejected data '/home/dbadmin/load_errors/reject.out';
Enter data to be copied followed by a newline.
End with a backslash and a period on a line by itself.
>> A|A
>> 1|2
>> \.
=> \! cat /home/dbadmin/load_errors/reject.out
A|A
=> \! cat /home/dbadmin/load_errors/except.out
COPY: Input record 1 has been rejected (Processed a header row with duplicate keys with
reject_on_duplicate specified; rejecting.).  Please see /home/dbadmin/load_errors/reject.out,
record 1 for the rejected record.
COPY: Loaded 0 rows, rejected 1 rows.
Rejecting data on materialized column type errors
The fcsvparser parser has a Boolean parameter, reject_on_materialized_type_error. Setting this parameter to true causes rows to be rejected if both the following conditions exist in the input data:
The following examples illustrate setting this parameter.
-
Create a table, reject_true_false, with two real columns:
=> CREATE FLEX TABLE reject_true_false(one int, two int);
CREATE TABLE
-
Load CSV data into the table (from STDIN), using the fcsvparser with reject_on_materialized_type_error=false. While false is the default value, you can specify it explicitly, as shown. Additionally, set the parameter header=true to specify the columns for input values:
=> COPY reject_true_false FROM stdin PARSER fcsvparser(reject_on_materialized_type_error=false,header=true);
Enter data to be copied followed by a newline.
End with a backslash and a period on a line by itself.
>> one,two
>> 1,2
>> "3","four"
>> "five",6
>> 7,8
>> \.
-
Invoke maptostring to display the table values after loading data:
=> SELECT maptostring(__raw__), one, two FROM reject_true_false;
maptostring               | one | two
----------------------------------------+-----+-----
{
"one" : "1",
"two" : "2"
}
|   1 |   2
{
"one" : "3",
"two" : "four"
}
|   3 |
{
"one" : "five",
"two" : "6"
}
|     |   6
{
"one" : "7",
"two" : "8"
}
|   7 |   8
(4 rows)
-
Truncate the table to empty the data stored in the table:
=> TRUNCATE TABLE reject_true_false;
TRUNCATE TABLE
-
Reload the same data again, but this time, set reject_on_materialized_type_error=true:
=> COPY reject_true_false FROM stdin PARSER fcsvparser(reject_on_materialized_type_error=true,header=true);
Enter data to be copied followed by a newline.
End with a backslash and a period on a line by itself.
>> one,two
>> 1,2
>> "3","four"
>> "five",6
>> 7,8
>> \.
-
Call maptostring to display the table contents. Only two rows are currently loaded, whereas the previous results had four rows. The rows having input values with incorrect data type have been rejected:
=> SELECT maptostring(__raw__), one, two FROM reject_true_false;
maptostring             | one | two
-------------------------------------+-----+-----
{
"one" : "1",
"two" : "2"
}
|   1 |   2
{
"one" : "7",
"two" : "8"
}
|   7 |   8
(2 rows)
Note
The parser fcsvparser uses null values if there is a type mismatch and you set the reject_on_materialized_type_error parameter to false.
Rejecting or omitting empty rows
Valid CSV files can include empty key and value pairs. Such rows are invalid for SQL. You can control the behavior for empty rows by either rejecting or omitting them, using two boolean FCSVPARSER parameters:
reject_on_empty_keyomit_empty_keys
The following example illustrates how to set these parameters:
-
Create a flex table:
 => CREATE FLEX TABLE csv_basic();
CREATE TABLE
-
Load CSV data into the table (from STDIN), using the fcsvparser with reject_on_empty_key=false. While false is the default value, you can specify it explicitly, as shown. Additionally, set the parameter header=true to specify the columns for input values:
=> COPY csv_basic FROM stdin PARSER fcsvparser(reject_on_empty_key=false,header=true);
Enter data to be copied followed by a newline.
End with a backslash and a period on a line by itself.
>> ,num
>> 1,2
>> \.
-
Invoke maptostring to display the table values after loading data:
=>SELECT maptostring(__raw__) FROM csv_basic;
maptostring
----------------------------------
{
"" : "1",
"num" : "2"
}

(1 row)
-
Truncate the table to empty the data stored in the table:
=> TRUNCATE TABLE csv_basic;
TRUNCATE TABLE
-
Reload the same data again, but this time, set reject_on_empty_key=true:
=> COPY csv_basic FROM stdin PARSER fcsvparser(reject_on_empty_key=true,header=true);
Enter data to be copied followed by a newline.
End with a backslash and a period on a line by itself.
>> ,num
>> 1,2
>> \.
-
Call maptostring to display the table contents. No rows are loaded because one of the keys is empty:
=>SELECT maptostring(__raw__) FROM csv_basic;
maptostring
-------------
(0 rows)
-
Truncate the table to empty the data stored in the table:
=> TRUNCATE TABLE csv_basic;
TRUNCATE TABLE
-
Reload the same data again, but this time, set omit_empty_keys=true:
=> COPY csv_basic FROM stdin PARSER fcsvparser(omit_empty_keys=true,header=true);
Enter data to be copied followed by a newline.
End with a backslash and a period on a line by itself.
>> ,num
>> 1,2
>> \.
-
Call maptostring to display the table contents. One row is now loaded, and the rows with empty keys are omitted:
=> SELECT maptostring(__raw__) FROM csv_basic;
maptostring
---------------------
{
"num" : "2"
}
(1 row)
Note
If no header names exist, fcsvparser uses a default header of ucoln, where n is the column offset number. If a table header name and key name match, the parser loads the column with values associated with the matching key name.
Using the NULL parameter
Use the COPY NULL metadata parameter with fcsvparser to load NULL values into a flex table.
The next example uses this parameter:
-
Create a flex table:
=> CREATE FLEX TABLE fcsv(c1 int);
CREATE TABLE
-
Load CSV data in the flex table using STDIN and the NULL parameter:
=> COPY fcsv FROM STDIN PARSER fcsvparser() NULL 'NULL' ;
Enter data to be copied followed by a newline.
End with a backslash and a period on a line by itself.
>> a,b,c1
>> 10,20,NULL
>> 20,30,50
>> 20,30,40
>> \.
-
Use the compute_flextable_keys_and_build_view function to compute keys and build the flex view:
=> SELECT compute_flextable_keys_and_build_view('fcsv');
compute_flextable_keys_and_build_view
--------------------------------------------------------------------------------
Please see public.fcsv_keys for updated keys
The view public.fcsv_view is ready for querying
(1 row)
-
View the flex view and replace the NULL values:
=> SELECT * FROM public.fcsv_view;
a  | b  | c1
----+----+----
20 | 30 | 50
10 | 20 |
20 | 30 | 40
(3 rows)
=> SELECT a,b, ISNULL(c1,-1) from public.fcsv_view;
a  | b  | ISNULL
----+----+--------
20 | 30 |     50
10 | 20 |     -1
20 | 30 |     40
(3 rows)
Handling column headings
The fcsvparser lets you specify your own column headings with the HEADER_NAMES= parameter. This parameter entirely replaces column names in the CSV source header row.
For example, to use these six column headings for a CSV file you are loading, use the fcsvparser parameter as follows:
HEADER_NAMES='FIRST, LAST, SOCIAL_SECURITY, TOWN, STATE, COUNTRY'
Supplying fewer header names than existing data columns causes fcsvparser to use default names after those you supply. Default header names consist of ucoln, where n is the column offset number, starting at 0 for the first column. For example, if you supply four header names for a 6-column table, fcsvparser supplies the default names ucol4 and ucol5, following the fourth header name you provide.
If you supply more headings than the existing table columns, any additional headings remain unused.
7.3 - Loading delimited data
You can load flex tables with one of two delimited parsers, fdelimitedparser or fdelimitedpairparser.
You can load flex tables with one of two delimited parsers, fdelimitedparser or fdelimitedpairparser.
This section describes using some options that fdelimitedpairparser and fdelimitedparser support.
Rejecting duplicate values
You can reject duplicate values using the reject_on_duplicate=true option with the fdelimitedparser. The load continues after it rejects a duplicate value. The next example shows how to use this parameter and then displays the specified exception and rejected data files. Saving rejected data to a table, rather than a file, includes both the data and its exception.
=> CREATE FLEX TABLE delim_dupes();
CREATE TABLE
=> COPY delim_dupes FROM stdin PARSER fdelimitedparser(reject_on_duplicate=true)
exceptions '/home/dbadmin/load_errors/except.out' rejected data '/home/dbadmin/load_errors/reject.out';
Enter data to be copied followed by a newline.
End with a backslash and a period on a line by itself.
>> A|A
>> 1|2
>> \.
=> \! cat /home/dbadmin/load_errors/reject.out
A|A
=> \! cat /home/dbadmin/load_errors/except.out
COPY: Input record 1 has been rejected (Processed a header row with duplicate keys with
reject_on_duplicate specified; rejecting.).  Please see /home/dbadmin/load_errors/reject.out,
record 1 for the rejected record.
COPY: Loaded 0 rows, rejected 1 rows.
Rejecting materialized column type errors
Both the fjsonparser and fdelimitedparser parsers have a boolean parameter, reject_on_materialized_type_error. Setting this parameter to true causes rows to be rejected if both the following conditions exist in the input data:
Suppose the flex table has a materialized column, OwnerPercent, declared as a FLOAT. Trying to load a row with an OwnerPercent key that has a VARCHAR value causes fdelimitedparser to reject the data row.
The following examples illustrate setting this parameter.
-
Create a table, reject_true_false, with two real columns:
=> CREATE FLEX TABLE reject_true_false(one VARCHAR, two INT);
CREATE TABLE
-
Load JSON data into the table (from STDIN), using the fjsonparser with reject_on_materialized_type_error=false. While false is the default value, the following example specifies it explicitly for illustration:
=> COPY reject_true_false FROM stdin PARSER fjsonparser(reject_on_materialized_type_error=false);
Enter data to be copied followed by a newline.
End with a backslash and a period on a line by itself.
>> {"one": 1, "two": 2}
>> {"one": "one", "two": "two"}
>> {"one": "one", "two": 2}
>> \.
-
Invoke maptostring to display the table values after loading data:
=>  SELECT maptostring(__raw__), one, two FROM reject_true_false;
               maptostring        | one | two
----------------------------------+-----+-----
 {
   "one" : "one",
   "two" : "2"
}
   | one |   2
{
   "one" : "1",
   "two" : "2"
}
   | 1   |   2
 {
   "one" : "one",
   "two" : "two"
}
   | one |
(3 rows)
-
Truncate the table:
=> TRUNCATE TABLE reject_true_false;
-
Reload the same data again, but this time, set reject_on_materialized_type_error=true:
=> COPY reject_true_false FROM stdin PARSER fjsonparser(reject_on_materialized_type_error=true);
Enter data to be copied followed by a newline.
End with a backslash and a period on a line by itself.
>> {"one": 1, "two": 2}
>> {"one": "one", "two": "two"}
>> {"one": "one", "two": 2}
>> \.
-
Call maptostring to display the table contents. Only two rows were loaded, whereas the previous results had three rows:
=> SELECT maptostring(__raw__), one, two FROM reject_true_false;
              maptostring              | one | two
---------------------------------------+-----+-----
 {
   "one" : "1",
   "two" : "2"
}
   | 1   |   2
 {
   "one" : "one",
   "two" : "2"
}
 | one |   2
(2 rows)
8 - Computing flex table keys
After loading data into a flex table, you can determine the set of keys that exist in the raw column (the map data).
After loading data into a flex table, you can determine the set of keys that exist in the __raw__ column (the map data). Two helper functions compute keys from flex table map data:
Using COMPUTE_FLEXTABLE_KEYS
During execution, this function calculates the following information for the flex keys table columns:
|
Column |
Description |
|
KEY_NAME |
The name of the virtual column (key). Keys larger than 65,000 bytes are truncated. |
|
FREQUENCY |
The number of times the key occurs in the VMap. |
|
DATA_TYPE_GUESS |
Estimate of the data type for the key based on the non-null values found in the VMap. The function determines the type of each non-string value, depending on the length of the key, and whether the key includes nested maps. If the EnableBetterFlexTypeGuessing configuration parameter is 0 (OFF), this function instead treats all flex table keys as string types ([LONG] VARCHAR or [LONG] VARBINARY). |
COMPUTE_FLEXTABLE_KEYS sets the column width for keys to the length of the largest value for each key multiplied by the FlexTableDataTypeGuessMultiplier factor.
Assigning flex key data types
When the EnableBetterFlexTypeGuessing configuration parameter is ON (the default), COMPUTE_FLEXTABLE_KEYS produces more specific results.
Use the sample CSV data in this section to compare the results of using or not using the parameter:
Year,Quarter,Region,Species,Grade,Pond Value,Number of Quotes,Available
2015,1,2 - Northwest Oregon & Willamette,Douglas-fir,1P,$615.12 ,12,No
2015,1,2 - Northwest Oregon & Willamette,Douglas-fir,SM,$610.78 ,12,Yes
2015,1,2 - Northwest Oregon & Willamette,Douglas-fir,2S,$596.00 ,20,Yes
2015,1,2 - Northwest Oregon & Willamette,Hemlock,P,$520.00 ,6,Yes
2015,1,2 - Northwest Oregon & Willamette,Hemlock,SM,$510.00 ,6,No
2015,1,2 - Northwest Oregon & Willamette,Hemlock,2S,$490.00 ,14,No
Create a flex table and load this data:
=> CREATE FLEX TABLE trees();
=> COPY trees FROM '/home/dbadmin/tempdat/trees.csv' PARSER fcsvparser();
Compute keys and check the results with the default setting:
=> SELECT COMPUTE_FLEXTABLE_KEYS('trees');
            COMPUTE_FLEXTABLE_KEYS
-----------------------------------------------
 Please see public.trees_keys for updated keys
(1 row)

=> SELECT * FROM trees_keys;
     key_name     | frequency | data_type_guess
------------------+-----------+-----------------
 Year             |         6 | Integer
 Quarter          |         6 | Integer
 Region           |         6 | Varchar(66)
 Available        |         6 | Boolean
 Number of Quotes |         6 | Integer
 Grade            |         6 | Varchar(20)
 Species          |         6 | Varchar(22)
 Pond Value       |         6 | Numeric(8,3)
(8 rows)
Set EnableBetterFlexTypeGuessing to 0 (OFF), compute keys again, and compare the results:
=> SELECT * FROM trees_keys;
    key_name     | frequency | data_type_guess
------------------+-----------+-----------------
 Year             |         6 | varchar(20)
 Quarter          |         6 | varchar(20)
 Region           |         6 | varchar(66)
 Available        |         6 | varchar(20)
 Grade            |         6 | varchar(20)
 Number of Quotes |         6 | varchar(20)
 Pond Value       |         6 | varchar(20)
 Species          |         6 | varchar(22)
(8 rows)
9 - Materializing flex tables
After creating flex tables, you can change the table structure to promote virtual columns to materialized (real) columns.
After creating flex tables, you can change the table structure to promote virtual columns to materialized (real) columns. If your table is already a hybrid table, you can change existing real columns and promote other important virtual columns. This section describes some key aspects of promoting columns, adding columns, specifying constraints, and declaring default values. It also presents some differences when loading flex or hybrid tables, compared with columnar tables.
Note
Materializing virtual columns by promoting them to real columns can significantly improve query performance. Vertica recommends that you materialize important virtual columns before running large and complex queries. Promoted columns cause a small decrease in load performance.
Adding columns to flex tables
Add columns to your flex tables to promote virtual columns:
-
Add a real column with the same name as a virtual column (user.name):
=> ALTER TABLE darkdata1 ADD COLUMN "user.name" VARCHAR;
ALTER TABLE
-
Load some data into the table.
 => COPY darkdata1 FROM '/vertica/flextable/DATA/tweets_12.json' PARSER fjsonparser();
 Rows Loaded
-------------
          12
(1 row)
-
Query the materialized column. Notice that loading data populates the column automatically. Blank rows indicate no values or NULLs:
=> SELECT "user.name" FROM darkdata1;
      user.name
---------------------
 I'm Toasterâ¥

 Flu Beach
 seydo shi

 The End
 Uptown gentleman.
 ~G A B R I E L A â¿
 Avita Desai

 laughing at clouds.
(12 rows)
Adding columns with default values
The section Bulk loading data into flex tables describes the use of default values, and how Vertica evaluates them during loading. As with all tables, using COPY to load data ignores any column default values.
Note
Adding a table column default expression to a flex table requires casting the column to an explicit data type.
-
Create a darkdata1 table with a column definition. The following example uses a column name (talker) that does not correspond to a virtual column name. Assign a default value with a virtual column name. In this example, the default value for the column talker is ("user.lang"). Since user.lang is a virtual column in the LONG VARBINARY __raw__ column, you must cast its value to VARCHAR to match the talker column definition:
=> CREATE FLEX TABLE darkdata1(talker VARCHAR default "user.lang"::VARCHAR);
CREATE TABLE
-
Load some JSON data, specifying the __raw__ column:
=> COPY darkdata1 (__raw__) FROM '/test/vertica/flextable/DATA/tweets_12.json'
   PARSER fjsonparser();
 Rows Loaded
-------------
          12
(1 row)
-
Query the talker column. Notice that Vertica used the default column value ("user.lang"), because you specified __raw__. Blank rows indicate no values or NULLs:
=> SELECT "talker" FROM darkdata1;
 talker
--------
 it
 en
 es
 en
 en
 es
 tr
 en
(12 rows)
-
Alter the table to add a column with a known virtual column name (user.name), assigning the key name as the default value (recommended), and casting it to a VARCHAR:
=> ALTER TABLE darkdata1 ADD COLUMN "user.name" VARCHAR default "user.name"::VARCHAR;
ALTER TABLE
-
Load data again, this time without __raw__:
=> COPY darkdata1 FROM '/test/vertica/flextable/DATA/tweets_12.json' PARSER fjsonparser();
-
Query the two real columns. Notice that talker has no values, because you did not specifiy the __raw__ column. The user.lang column contains values from the user.name virtual column:
=> SELECT "talker", "user.name" FROM darkdata1;
 talker |      user.name
--------+---------------------
        | laughing at clouds.
        | Avita Desai
        | I'm Toasterâ¥
        |
        |
        |
        | Uptown gentleman.
        | ~G A B R I E L A â¿
        | Flu Beach
        |
        | seydo shi
        | The End
(12 rows)
-
Load data once more, this time specifying a COPY statement with a default value expression for user.name:
=> COPY darkdata1 (__raw__, "user.name" as 'QueenElizabeth'::varchar) FROM
'/test/vertica/flextable/DATA/tweets_12.json' PARSER fjsonparser();
 Rows Loaded
-------------
          12
(1 row)
-
Query once more. Notice that the real column talker has its default values (you used __raw__). As specified in COPY, the "user.name" as 'QueenElizabeth' expression overrode the user.name default column value:
=> SELECT "talker", "user.name" FROM darkdata1;
 talker |   user.name
--------+----------------
 it     | QueenElizabeth
 en     | QueenElizabeth
 es     | QueenElizabeth
        | QueenElizabeth
        | QueenElizabeth
        | QueenElizabeth
 en     | QueenElizabeth
 en     | QueenElizabeth
 es     | QueenElizabeth
        | QueenElizabeth
 tr     | QueenElizabeth
 en     | QueenElizabeth
(12 rows)
To summarize, you can set a default column value as part of the ALTER TABLE...ADD COLUMN operation. For materializing columns, the default value should reference the key name of the virtual column (as in "user.lang"). Subsequently loading data with a COPY value expression overrides the default value of the column definition.
Changing the __raw__ column size
You can change the default size of the __raw__ column for flex tables you plan to create, the current size of an existing flex table, or both.
To change the default size for the __raw__ column in new flex tables, set the FlexTableRawSize configuration parameter:
=> ALTER DATABASE DEFAULT SET FlexTableRawSize = 120000;
Changing the configuration parameter affects all flex tables you create after making this change.
To change the size of the _raw_ column in an existing flex table, use the ALTER TABLE statement to change the definition of the __raw__ column:
=> ALTER TABLE tester ALTER COLUMN __raw__ SET DATA TYPE LONG VARBINARY(120000);
ALTER TABLE
Note
An error occurs if you try to reduce the __raw__ column size to a value smaller than any data the column contains.
Changing flex table real columns
You can make the following changes to the flex table real columns (__raw__ and __identity__), but not to any virtual columns:
|
Actions |
raw |
identity |
|
Change NOT NULL constraints (default) |
Yes |
Yes |
|
Add primary key and foreign key (PK/FK) constraints |
No |
Yes |
|
Create projections |
No |
Yes |
|
Segment |
No |
Yes |
|
Partition |
No |
Yes |
Specify a user-defined scalar function (UDSF) as a default column expression in ALTER TABLE x ADD COLUMN y statement |
No |
No |
Note
While segmenting and partitioning the __raw__ column is permitted, it is not recommended due to its long data type. By default, if you not define any real columns, flex tables are segmented on the __identity__ column.
Dropping flex table columns
There are two considerations about dropping columns:
-
You cannot drop the last column in your flex table's sort order.
-
If you have not created a flex table with any real columns, or materialized any columns, you cannot drop the __identity__ column.
Updating flex table views
Adding new columns to a flex table that has an associated view does not update the view's result set, even if the view uses a wildcard (*) to represent all table columns. To incorporate new columns, you must re-create the view.
10 - Updating flex table views
Creating a flex table also creates a default view to accompany the table.
Creating a flex table also creates a default view to accompany the table. The view has the name of the flex table with an underscore (_view) suffix. When you perform a SELECT query from the default view, Vertica prompts you to call the helper function COMPUTE_FLEXTABLE_KEYS_AND_BUILD_VIEW:
=> \dv dark*
                  List of View Fields
 Schema |      View      | Column |     Type     | Size
--------+----------------+--------+--------------+------
 public | darkdata_view  | status | varchar(124) |  124
 public | darkdata1_view | status | varchar(124) |  124
(2 rows)

=> SELECT * FROM darkdata_view;
                                        status
-----------------------------------------------------------------------------------------------
 Please run compute_flextable_keys_and_build_view() to update this view to reflect real and
virtual columns in the flex table
(1 row)
There are two helper functions that create views:
Using BUILD_FLEXTABLE_VIEW
After computing keys for a flex table (Computing flex table keys), call this function with one or more arguments. The records under the key_name column of the table_name_keys table are used as view columns, along with any values for the key. If no values exist, the column value is NULL.
Regardless of the number of arguments, calling this function replaces the contents of the existing view as follows:
-
BUILD_FLEXTABLE_VIEW ('table'): Changes the table's existing view with the current contents of the table_keys table.
-
BUILD_FLEXTABLE_VIEW ('table', 'view_name'): Changes the named view with the current contents of the table_keys table.
-
BUILD_FLEXTABLE_VIEW ('table', 'view_name', 'table_keys'): Changes the named view using the named keys table. Use this option if you created a custom keys table from the flex table map data, rather than from the default keys table.
If you do not specify a view name, the default name is the flex table name with a _view suffix. For example, if you specify the table darkdata as the sole argument to this function, the default view is called darkdata_view.
You cannot specify a custom view name with the same name as the default view (table_name_view), unless you first drop the default-named view and then create your own view of the same name.
Creating a view stores a definition of the column structure at the time of creation. Thus, if you create a flex table view and then promote virtual columns to real columns, you must rebuild the view. Querying a rebuilt flex table view that has newly promoted real columns produces two results. These results reflect values from both virtual columns in the map data and real columns.
Handling JSON duplicate key names in views
SQL is a case-insensitive language, so the names TEST, test, and TeSt are identical. JSON data is case sensitive, so that it can validly contain key names of different cases with separate values.
When you build a flex table view, the function generates a warning if it detects same-name keys with different cases in the table_keys table. For example, calling BUILD_FLEXTABLE_VIEW or COMPUTE_FLEXTABLE_KEYS_AND_BUILD_VIEW on a flex table with duplicate key names results in these warnings:
=> SELECT COMPUTE_FLEXTABLE_KEYS_AND_BUILD_VIEW('dupe');
WARNING 5821:  Detected keys sharing the same case-insensitive key name
WARNING 5909:  Found and ignored keys with names longer than the maximum column-name length limit


                            compute_flextable_keys_and_build_view
----------------------------------------------------------------------------------------------
 Please see public.dupe_keys for updated keys
The view public.dupe_view is ready for querying
(1 row)
While a keys table can include duplicate key names with different cases, a view cannot. Creating a flex table view with either of the helper functions consolidates any duplicate key names to one column name, consisting of all lowercase characters. All duplicate key values for that column are saved. For example, if a flex table contains keys named test, Test, and tESt, the view includes a virtual column test with values from all three keys.
The following examples include added line breaks for readability.
Consider the following query, showing the duplicate test key names:
=> \x
Expanded display is on.
dbt=> select * from dupe_keys;
-[ RECORD 1 ]---+--------------------------------------------------------------------------------------------------
key_name        | TesttestTesttestTesttestTesttestTesttestTesttestTesttestTesttestTesttestTesttestTesttestTesttest
TesttestTesttestTesttestTesttest
frequency       | 2
data_type_guess | varchar(20)
-[ RECORD 2 ]---+--------------------------------------------------------------------------------------------------
key_name        | TesttestTesttestTesttestTesttestTesttestTesttestTesttestTesttestTesttestTesttestTesttestTesttest
TesttestTesttestTesttestTest12345
frequency       | 2
data_type_guess | varchar(20)
-[ RECORD 3 ]---+--------------------------------------------------------------------------------------------------
key_name        | test
frequency       | 8
data_type_guess | varchar(20)
-[ RECORD 4 ]---+--------------------------------------------------------------------------------------------------
key_name        | TEst
frequency       | 8
data_type_guess | varchar(20)
-[ RECORD 5 ]---+--------------------------------------------------------------------------------------------------
key_name        | TEST
frequency       | 8
data_type_guess | varchar(20)
The following query displays the dupe flex table (dupe_view). It shows the consolidated virtual columns, with all values in the test column:
=> SELECT * FROM dupe_view;
  test  | testtesttesttesttesttesttesttesttesttesttesttesttesttesttesttesttesttesttesttesttesttesttesttest
testtesttesttesttesttesttesttest
--------+--------------------------------------------------------------------------------------------------
 upper2 |
 half4  |
 lower1 |
 upper1 |
 half1  |
 half4  |
        |
 lower1 |
 half1  |
 upper2 |
        |
 lower2 |
 lower3 |
 upper1 |
 lower2 |
 lower3 |
(16 rows)
Creating a flex table view
The following example shows how to create and query a view for a flex table that contains JSON data:
=> CREATE VIEW dd_view AS SELECT "user.lang"::VARCHAR, "user.name"::VARCHAR FROM darkdata;
CREATE VIEW

=> SELECT * FROM dd_view;
 user.lang |      user.name
-----------+---------------------
 en        | Uptown gentleman.
 en        | The End
 it        | laughing at clouds.
 es        | I'm Toasterâ¥
           |
 en        | ~G A B R I E L A â¿
           |
 en        | Avita Desai
 tr        | seydo shi
           |
           |
 es        | Flu Beach
(12 rows)
This example shows how to call BUILD_FLEXTABLE_VIEW with the original table and the view you previously created:
=> SELECT BUILD_FLEXTABLE_VIEW ('darkdata', 'dd_view');
            build_flextable_view
-----------------------------------------------
 The view public.dd_view is ready for querying
(1 row)
Query the view again. You can se that the function populated the view with the contents of the darkdata_keys table. Next, review a snippet from the results, with the key columns and their values:
=> \x
Expanded display is on.

=> SELECT * FROM dd_view;
.
.
.
user.following                                           |
user.friends_count                                       | 791
user.geo_enabled                                         | F
user.id                                                  | 164464905
user.id_str                                              | 164464905
user.is_translator                                       | F
user.lang                                                | en
user.listed_count                                        | 4
user.location                                            | Uptown..
user.name                                                | Uptown gentleman.
.
.
.
When building views, be aware that creating a view stores a definition of the column structure at the time the view is created. If you promote virtual columns to real columns after building a view, the existing view definition is not changed. Querying this view with a select statement such as the following, returns values from only the __raw__ column:
=> SELECT * FROM myflextable_view;
Also understand that rebuilding the view after promoting virtual columns changes the resulting value. Future queries return values from both virtual columns in the map data and from real columns.
Using COMPUTE_FLEXTABLE_KEYS_AND_BUILD_VIEW
Call this function with a flex table to compute Flex table keys (see Computing flex table keys ) and create a view in one step.
11 - Querying flex tables
After you create your flex table (with or without additional columns) and load data, you can use SELECT, COPY, TRUNCATE, and DELETE as with other tables.
After you create your flex table (with or without additional columns) and load data, you can use SELECT, COPY, TRUNCATE, and DELETE as with other tables. You can use SELECT queries for virtual columns that exist in the __raw__ column and other real columns in your flex tables. Field names in the __raw__ column are case-insensitive, as are the names of real columns.
Unsupported DDL and DML statements
You cannot use the following DDL and DML statements with flex tables:
-
CREATE TABLE...AS...
-
CREATE TABLE...LIKE...
-
SELECT INTO
-
UPDATE
-
MERGE
Determining flex table data contents
If you do not know what your flex table contains, two helper functions explore the VMap data to determine its contents. Use these functions to compute the keys in the flex table __raw__ column and, optionally, build a view based on those keys:
For more information about these and other helper functions, see Flex data functions.
To determine what key value pairs exist as virtual columns:
-
Call the function as follows:
=> SELECT compute_flextable_keys('darkdata');
            compute_flextable_keys
--------------------------------------------------
 Please see public.darkdata_keys for updated keys(1 row)
-
View the key names by querying the darkdata_keys table:
=> SELECT * FROM darkdata_keys;
                         key_name                    | frequency |   data_type_guess
-----------------------------------------------------+-----------+-------------
 contributors                                        |         8 | varchar(20)
 coordinates                                         |         8 | varchar(20)
 created_at                                          |         8 | varchar(60)
 entities.hashtags                                   |         8 | long varbinary(186)
 .
 .
 retweeted_status.user.time_zone                     |         1 | varchar(20)
 retweeted_status.user.url                           |         1 | varchar(68)
 retweeted_status.user.utc_offset                    |         1 | varchar(20)
 retweeted_status.user.verified                      |         1 | varchar(20)
(125 rows)
Querying virtual columns
Continuing with the JSON data example, use a SELECT statement query to explore content from the virtual columns. Then, analyze what is most important to you in case you want to materialize any virtual columns. This example shows how to query some common virtual columns in the VMap data:
=> SELECT "user.name", "user.lang", "user.geo_enabled" FROM darkdata1;
user.name | user.lang | user.geo_enabled
---------------------+-----------+------------------
laughing at clouds. | it | T
Avita Desai | en | F
I'm Toaster⥠| es | T
| |
| |
| |
Uptown gentleman. | en | F
~G A B R I E L A â¿ | en | F
Flu Beach | es | F
| |
seydo shi | tr | T
The End | en | F
(12 rows)
Querying flex table keys
If you reference an undefined column ('which_column') in a flex table query, Vertica converts the query to a call to the MAPLOOKUP function as follows:
MAPLOOKUP(__raw__, 'which_column')
The MAPLOOKUP function searches the VMap data for the requested key and returns the following information:
For more information about handling NULL values, see MAPCONTAINSKEY().
Using functions and casting in flex table queries
You can cast the virtual columns as required and use functions in your SELECT statement queries. The next example uses a SELECT statement to query the created_at and retweet_count virtual columns, and to cast their values in the process:
=> SELECT "created_at"::TIMESTAMP, "retweet_count"::INT FROM darkdata1 ORDER BY 1 DESC;
     created_at      | retweet_count
---------------------+---------------
 2012-10-15 14:41:05 |             0
 2012-10-15 14:41:05 |             0
 2012-10-15 14:41:05 |             0
 2012-10-15 14:41:05 |             0
 2012-10-15 14:41:05 |             0
 2012-10-15 14:41:05 |             0
 2012-10-15 14:41:05 |             0
 2012-10-15 14:41:04 |             1
                     |
                     |
                     |
                     |
(12 rows)
The following query uses the COUNT and AVG functions to determine the average length of text in different languages:
=> SELECT "user.lang", count (*), avg(length("text"))::int
   FROM darkdata1 GROUP BY 1 ORDER BY 2 DESC;
 user.lang | count | avg
-----------+-------+-----
 en        |     4 |  42
           |     4 |
 es        |     2 |  96
 it        |     1 |  50
 tr        |     1 |  16
(5 rows)
Casting data types in a query
The following query requests the values of the created_at virtual column, without casting to a specific data type:
=> SELECT "created_at" FROM darkdata1;
           created_at
--------------------------------
 Mon Oct 15 18:41:04 +0000 2012
 Mon Oct 15 18:41:05 +0000 2012
 Mon Oct 15 18:41:05 +0000 2012
 Mon Oct 15 18:41:05 +0000 2012
 Mon Oct 15 18:41:05 +0000 2012
 Mon Oct 15 18:41:05 +0000 2012
 Mon Oct 15 18:41:05 +0000 2012
 Mon Oct 15 18:41:05 +0000 2012
(12 rows)
The next example queries the same virtual column, casting created_at to a TIMESTAMP. Casting results in different output and the regional time:
=> SELECT "created_at"::TIMESTAMP FROM darkdata1 ORDER BY 1 DESC;
     created_at
---------------------
 2012-10-15 14:41:05
 2012-10-15 14:41:05
 2012-10-15 14:41:05
 2012-10-15 14:41:05
 2012-10-15 14:41:05
 2012-10-15 14:41:05
 2012-10-15 14:41:05
 2012-10-15 14:41:04
Accessing an epoch key
The term EPOCH (all uppercase letters) is reserved in Vertica for internal use.
If your JSON data includes a virtual column called epoch, you can query it within your flex table. However, use the MAPLOOKUP function to do so.
12 - Querying nested data
If you load JSON or Avro data with flatten_arrays=FALSE (the default), VMap data in the raw column can contain multiple nested structures.
If you load JSON or Avro data with flatten_arrays=FALSE (the default), VMap data in the __raw__ column can contain multiple nested structures. In fact, any VMap JSON or Avro data can contain nested structures. This section describes how best to query such data.
Query VMap nested values
To query a nested structure, you can use multiple maplookup() functions, one for each level. However, the most efficient method is to use bracket ([]) operators.
When parsing or extracting VMap data, the default behavior is to flatten data. Flattened VMap data concatenates key names into one long name, delimiting elements with either the default delimiter (.), or a user-defined delimiter character.
To use bracket operators for nested structures in your VMap data, the data must not be flattened. Further, you cannot use bracket operators on any existing, flattened VMap data.
To load or extract VMap data correctly, specify flatten_maps=FALSE for fjsonparser, favroparser, and the mapjsonextractor() function.
Note
While bracket operator values look similar to array element specifications, they are strings, not integers. You must enter each nested structure as a string, even if the value is an integer. For example, if the value is 2, specify it as ['2'], not [2].
Bracket operators for nested JSON
This example uses the following JSON data as an example of nested data. Save this data as restaurant.json:
{
  "restaurant" : {
      "_name_" : "Bob's pizzeria",
      "cuisine" : "Italian",
      "location" : {"city" : "Cambridge", "zip" : "02140"},
      "menu" : [{"item" : "cheese pizza", "price" : "$8.25"},
                {"item" : "chicken pizza", "price" : "$11.99"},
                {"item" : "spinach pizza", "price" : "$10.50"}]
  }
}
Create a flex table, rests, and load it with the restaurant.json file:
=> COPY rests FROM '/home/dbadmin/tempdat/restaurant.json' PARSER fjsonparser (flatten_maps=false);
 Rows Loaded
-------------
           1
(1 row)
After loading your data into a flex table, there are two ways to access nested data using brackets:
-
Beginning with the __raw__ column, followed by the character values in brackets
-
Starting with the name of the top-most element, followed by the character values in brackets
Both methods are equally efficient. Here are examples of both:
=> SELECT __raw__['restaurant']['location']['city'] FROM rests;
  __raw__
-----------
 Cambridge
(1 row)
=> SELECT restaurant['location']['city'] from rests;
 restaurant
------------
 Cambridge
(1 row)
This example shows how to extract some basic information from Twitter data.
After creating a flex table, tweets, and loading in some data, the flex table has a block of tweets.
In the following SELECT statement, notice how to specificy the __raw__ column of table tweets, followed by the bracket operators to define the virtual columns of interest (['delete']['status']['user_id']). This query uses the COUNT() function to calculate the number of deleted tweets and outputs 10 results:
=> SELECT  __raw__['delete']['status']['user_id'] as UserId, COUNT(*) as TweetsDelete from tweets
-> WHERE mapcontainskey(__raw__, 'delete')
-> GROUP BY __raw__['delete']['status']['user_id']
-> ORDER BY TweetsDelete DESC, UserID ASC LIMIT 10;
  UserId   | TweetsDelete
-----------+--------------
 106079547 |            4
 403474369 |            4
 181188657 |            3
 223136123 |            3
 770139481 |            3
 154602299 |            2
 192127653 |            2
 215011332 |            2
 23321883  |            2
 242173898 |            2
(10 rows)
13 - Querying flex views
Flex tables offer the ability of dynamic schema through the application of query rewriting.
Flex tables offer the ability of dynamic schema through the application of query rewriting. Use flex views to support restricted access to flex tables. As with flex tables, each time you use a select query on a flex table view, internally, Vertica invokes the maplookup() function, to return information on all virtual columns. This query behavior occurs for any flex or columnar table that includes a __raw__ column.
This example illustrates querying a flex view:
-
Create a flex table.
=> CREATE FLEX TABLE twitter();
-
Load JSON data into flex table using fjsonparser.
=> COPY twitter FROM '/home/dbadmin/data/flex/tweets_10000.json' PARSER fjsonparser();
Rows Loaded
-------------
10000
(1 row)
-
Create a flex view on top of flex table twitter with constraint retweet_count>0.
=> CREATE VIEW flex_view AS SELECT __raw__ FROM twitter WHERE retweet_count::int > 0;
CREATE VIEW
-
Query the view. First 5 rows are displayed.
=> SELECT retweeted,retweet_count,source FROM (select __raw__ from flex_view) t1 limit 5;
retweeted | retweet_count |                                        source
-----------+---------------+--------------------------------------------------------------------------------------
F         | 1             | <a href="http://blackberry.com/twitter" rel="nofollow">Twitter for BlackBerry®</a>
F         | 1             | web
F         | 1             | <a href="http://twitter.com/download/iphone" rel="nofollow">Twitter for iPhone</a>
F         | 23            | <a href="http://twitter.com/download/android" rel="nofollow">Twitter for Android</a>
F         | 7             | <a href="http://twitter.com/download/iphone" rel="nofollow">Twitter for iPhone</a>
(5 rows)
14 - Listing flex tables
You can determine which tables in your database are flex tables by querying the is_flextable column of the v_catalog.tables system table.
You can determine which tables in your database are flex tables by querying the is_flextable column of the v_catalog.tables system table. For example, use a query such as the following to see all tables with a true (t) value in the is_flextable column:
=> SELECT table_name, table_schema, is_flextable FROM v_catalog.tables;
     table_name      | table_schema | is_flextable
---------------------+--------------+-----------------
 bake1               | public       | t
 bake1_keys          | public       | f
 del                 | public       | t
 del_keys            | public       | f
 delicious           | public       | t
 delicious_keys      | public       | f
 bake                | public       | t
 bake_keys           | public       | f
 appLog              | public       | t
 appLog_keys         | public       | f
 darkdata            | public       | t
 darkdata_keys       | public       | f
(12 rows)