This is the multi-page printable view of this section.
Click here to print.
Return to the regular view of this page.
Deploy Vertica from the Google cloud marketplace
The Vertica entries in the Google Cloud Launcher Marketplace let you quickly deploy a Vertica cluster in the Google Cloud Platform (GCP).
The Vertica entries in the Google Cloud Launcher Marketplace let you quickly deploy a Vertica cluster in the Google Cloud Platform (GCP). Currently, three entries let you select the database mode and the license you want to use:
-
The Enterprise Mode launcher deploys a Vertica database with 3 or more nodes, plus an additional VM running the Management Console (MC). See Deploy an Enterprise Mode database in GCP from the marketplace for more information.
-
The Eon Mode BYOL (bring your own license) launcher deploys a single instance running the MC. You use this MC instance to deploy a Vertica database running on Eon Mode. This database has a community license applied to it initially. You can later upgrade it to a license you have obtained from Vertica. See Deploy an MC instance in GCP for Eon Mode for more information.
-
The Eon Mode BTH (by the hour) launcher also deploys a single instance running the MC that you use to deploy a database. This database has a by-the-hour license applied to it. Instead of paying for a license up front, you pay an hourly fee that covers both Vertica and running your instances. The BTH license is automatically applied to all clusters you create using a BTH MC instance. See Deploy an MC instance in GCP for Eon Mode for more information. If you choose, you can upgrade this hourly license to a longer-term license you purchase from Vertica. To move a BTH cluster to a BYOL license, follow the instructions in Moving a cloud installation from by the hour (BTH) to bring your own license (BYOL).
Note
Vertica clusters that use IPv6 to identify hosts have not been tested on GCP. Vertica recommends you use IPv4 addresses to identify the hosts in your cluster on GCP.
1 - Eon Mode on GCP prerequisites
Before deploying an Eon Mode database on GCP, you must take several steps:.
Before deploying an Eon Mode database on GCP, you must take several steps:
-
Review the default service account's permissions for your GCP project.
-
Create an HMAC key to use when creating your cluster.
-
Create a communal storage location.
Service account permissions
Service accounts allow automated processes to authenticate with GCP. The Eon Mode database deployment process uses the project's service account for your GCP project to deploy instances. When you create a new project, GCP automatically creates a default service account (identified by project_number-compute@developer.gserviceaccount.com) for the project and grants it the IAM role Editor. See the Google Cloud documentation's Understanding roles for details about this and other IAM roles.
The Editor role lets the service account create resources from the Marketplace. When you create an instance of the Management Console (MC), the MC uses the account to deploy further resources, such as provisioning instances for an database.
For details, see the Google Cloud documentation's Understanding service accounts page.
Permissions and roles
To deploy Vertica on GCP, your user account must have the:
Creating an HMAC key
Vertica uses a hash-based message authentication code (HMAC) key to authenticate requests to access the communal storage location. This key has two parts: an access ID and a secret. When you create an Eon Mode database in GCP, you provide both parts of an HMAC key for the nodes to use to access communal storage.
To create an HMAC key:
-
Log in to your Google Cloud account.
-
If the name of the project you will use to create your database does not appear in the top banner, click the dropdown and select the correct project.
-
In the navigation menu in the upper-left corner, under the Storage heading, click Storage and select Settings.
-
In the Settings page, click Interoperability.
-
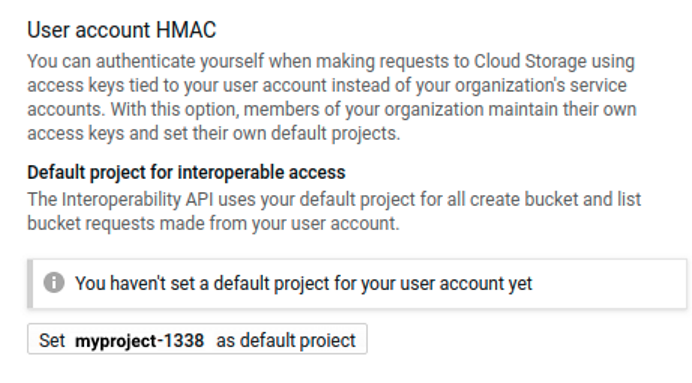
Scroll to the bottom of the page and find the User account HMAC heading.
-
Unless you have already set a default project, you will see the message stating you haven’t set a default project for your user account yet. Click the Set project-id as default project button to choose the current project as your default for interoperability.
Note
The project ID appears in the button label, not the project name.
-
Under Access keys for your user account, click Create a key.
-
Your new access key and secret appear in the HMAC key list. You will need them when you create your Eon Mode database. You can copy them to a handy location (such as a text editor) or leave a browser tab open to this page while you use another tab or window to create your database. These keys remain available on this page, so you do not need to worry about saving them elsewhere.
Caution
It is vital that you protect the security of your HMAC key. It can grant others access to your Eon Mode database's communal storage location. This means they could access all of the data in your database. Do not write the HMAC key anyplace where it may be exposed, such as email, shared folders, or similar insecure locations.
Creating a communal storage location
Your Eon Mode database needs a storage location for its communal storage. Eon Mode databases running on GCP use Google Cloud Storage (GCS) for their communal storage location. When you create your new Eon Mode database, you will supply the MC's wizard with a GCS URL for the storage location.
This location needs to meet the following criteria:
-
The URL must include at least a bucket name. You can use one or more levels of folders, as well. For example, the following GCS URLs are valid:
Multiple databases can share the same bucket, as long as each has its own folder.
-
If provided, the lowest-level folder in the URL must not already exist. For example, in the GCS URL gs://verticabucket/databases/mydatabase, the bucket named verticabucket and the directory named databases must exist. The subdirectory named mydatabase must not exist. The Vertica install process expects to create the final folder itself. If the folder already exists, the installation process fails.
-
The permissions on the bucket must be set to allow the service account read, write, and delete privileges on the bucket. The best role to assign to the user to gain these permissions is Storage Object Admin.
-
To prevent performance issues, the bucket must be in the same region as all of the nodes running the Eon Mode database.
-
If you create the database through the admintools UI, you must set gcsauth as a bootstrap parameter in admintools.conf. For more information on this and other GCP parameters, see Google Cloud Storage parameters.
[BootstrapParameters]
gcsauth = ID:secret
2 - Deploy an Enterprise Mode database in GCP from the marketplace
The Vertica Cloud Launcher solution creates a Vertica Enterprise Mode database.
The Vertica Cloud Launcher solution creates a Vertica Enterprise Mode database. The solution includes the Vertica Management Console (MC) as the primary UI for you to get started.
The launcher automatically creates a database named vdb using the Community Edition (CE) license. The CE license is limited to a maximum of 3 nodes. You can tell the launcher to add more than 3 nodes to your deployment. In this case, it uses the first three nodes in the cluster to create the database. The remaining nodes are not part of the database, but are added to your cluster. To add these nodes to your database, you must replace the Community Edition license with a license key you receive from the Software Entitlement support site. See Managing licenses for more information.
After the launcher creates the initial database, it configures the MC to attach to that database automatically.
To get started with a deployment of Vertica from the Google Cloud Launcher, search for the Vertica Data Warehouse, Enterprise Mode entry.
Follow these steps:
-
Verify that your user account has the Editor role and the runtimeconfig.waiters.getIamPolicy permission.
-
From the listing page, click LAUNCH.
-
On the New Vertica Analytics Platform deployment page, enter the following information:
-
Deployment name: Each deployment must have a unique name. That name is used as the prefix for the names of all VMs created during the deployment. The deployment name can only contain lowercase characters, numbers, and dashes. The name must start with a lowercase letter and cannot end with a dash.
-
Zone: GCP breaks its cloud data centers into regions and zones. Regions are a collection of zones in the same geographical location. Zones are collections of compute resources, which vary from zone to zone.
For best results, pick the zone in your designated region that supports the latest Intel CPUs. For a complete listing of regions and zones, including supported processors, see Regions and Zones.
-
Service Account: Service accounts allow automated processes to authenticate with GCP. Select the default service account, identified by project_number-compute@developer.gserviceaccount.com.
-
Under Vertica Management Console, choose the configuration for the virtual machine that will run the Management Console. The Vertica Analytics Platform in Cloud Launcher always deploys the Vertica Management Console (MC) as part of the solution.
The default machine type for MC is sufficient for most deployments. You can choose another machine type that better suits any additional purposes, such serving as a target node for backups, data transformation, or additional management tools.
-
Node count for Vertica Cluster: The total number of VMs you want to deploy in the Vertica Cluster. The default is 3.
Note
As mentioned above, the Cloud Launcher automatically deploys the Vertica Community Edition license, which limits the database to 3 nodes and up to 1 TB in raw data. Any additional nodes will be part of your database cluster, but will not be part of your database.
If you intend to use the Community Edition license for your database, leave the setting at 3. Otherwise, you would add nodes that will sit idle and cost you money without being part of your database.
-
Machine type for Vertica Cluster nodes: The Cloud Launcher builds each node in the cluster using the same machine type. Modify the machine type for your nodes based on the workloads you expect your database to handle. See Supported GCP machine types for more information.
-
Data disk type: GCP offers two types of persistent disk storage: Standard and SSD. The costs associated with Standard are less, but the performance of SSD storage is much better. Vertica recommends you use SSD storage. For more information on Standard and SSD persistent disks, see Storage Options.
-
Disk size in GB: Disk performance is directly tied to the disk size in GCP. The default value of 2000 GBs (2 TB) is the minimum disk size for SSD persistent disks that allows maximum throughput.
If you select a smaller disk size, the throughput performance decreases. If you select a large disk size, the performance remains the same as the 2 TB option.
-
Network: VMs in GCP must exist on a virtual private cloud (VPC). When you created your GCP account, a default VPC was created. Create additional VPCs to isolate solutions or projects from one another. The Vertica Analytics Plaform creates all the nodes in the same VPC.
-
Subnetwork: Just as a GCP account may have multiple VPCs, each VPC may also have multiple subnets. Use additional subnets to group or isolate solutions within the same VPC.
-
Firewall: If you want your MC to be accessible via the internet, check the Allow access to the Management Console from the Internet box. Vertica recommends you protect your MC using a firewall that restricts access to just the IP addresses of users that need to access it. You can enter one or more comma-separated CIDR address ranges.
After you have entered all the required information, click Deploy to begin the deployment process.
Monitor the deployment
After the deployment begins, Google Cloud Launcher automatically opens the Deployment Manager page that displays the status of the deployment. Items that are still being processed have a spinning circle to the left of them and the text is a light gray color. Items that have been created are dark gray in color, with an icon designating that resource type on the left.
After the deployment completes, a green check mark appears next to the deployment name in the upper left-hand section of the screen.
Accessing the cluster after deployment
After the deployment completes, the right-hand section of the screen displays the following information:
-
dbadmin password: A randomly generated password for the dbadmin account on the nodes. For security reasons, change the dbadmin password when you first log in to one of the Vertica cluster nodes.
-
mcadmin password: A randomly generated password for the mcadmin account for accessing the Management Console. For security reasons, change the mcadmin password after you first log in to the MC.
-
Vertica Node 1 IP address: The external IP address for the first node in the Vertica cluster is exposed here so that you can connect to the VM using a standard SSH client.To access the MC, press the Access Vertica MC button in the Get Started section of the dialog box. Copy the mcadmin password and paste it when asked.
For more information on using the MC, see Management Console.
Access the cluster nodes
There are two ways to access the cluster nodes directly:
-
Use GCP's integrated SSH shell by selecting the SSH button in the Get Started section. This shell opens a pop-up in your browser that runs GCP's web-based SSH client. You are automatically logged on as the user you authenticated as in the GCP environment.
After you have access to the first Vertica cluster node, execute the su dbadmin command, and authenticate using the dbadmin password.
-
In addition, use other standard SSH clients to connect directly to the first Vertica cluster node. Use the Vertica Node 1 IP address listed on the screen as the dbadmin user, and authenticate with the dbadmin password.
Follow the on-screen directions to log in using the mcadmin account and accept the EULA. After you've been authenticated, access the initial database by clicking the vdb icon (looks like a green cylinder) in the Recent Databases section.
Using a custom service account
In general, you should use the default service account created by the GCP deployment (project_number-compute@developer.gserviceaccount.com), but if you want to use a custom service account:
3 - Deploy an MC instance in GCP for Eon Mode
To deploy an Eon Mode database to GCP using Google Cloud Platform Launcher, you must deploy a Management Console (MC) instance.
To deploy an Eon Mode database to GCP using Google Cloud Platform Launcher, you must deploy a Management Console (MC) instance. You then use the MC instance to provision and deploy an Eon Mode database.
Once you have taken the steps listed in Eon Mode on GCP prerequisites, you are ready to deploy an Eon Mode database in GCP. To deploy an MC instance that is able to deploy Eon Mode databases to GCP:
-
Log into your GCP account, if you are not currently logged in.
-
Verify that your user account has the Editor role and the runtimeconfig.waiters.getIamPolicy permission.
-
Verify that the name of the GCP project you want to use for the deployment appears in the top banner. If it does not, click the down arrow next to the project name and select the correct project.
-
Click the navigation menu icon in the top left of the page and select Marketplace.
-
In the Search for solutions box, type Vertica Eon Mode and press enter.
-
Click the search result for Vertica Data Warehouse, Eon Mode. There are two license options: by the hour (BTH) and bring your own license (BYOL). See Deploy Vertica from the Google cloud marketplace for more information on this license choice.
-
Click Launch on the license option you prefer.
-
On the following page, fill in the fields to configure your MC instance:
-
Deployment name identifies your MC deployment in the GCP Deployments page.
-
Zone is the location where the virtual machine running your MC instance will be deployed. Make this the same location where your communal storage bucket is located.
-
Service Account: Service accounts allow automated processes to authenticate with GCP. Select the default service account, identified by project_number-compute@developer.gserviceaccount.com.
-
Machine Type is the virtual hardware configuration of the instance that will run the MC. The default values here are "middle of the road" settings which are sufficient for most use cases. If you are doing a small proof-of-concept deployment, you can choose a less powerful instance to save some money. If you are planning on deploying multiple large databases, consider increasing the count of virtual CPUs and RAM.
For details about Vertica's default volume configurations, see Eon Mode volume configuration defaults for GCP.
-
User Name for Access to MC is the administrator username for the MC. You can customize this if you want.
-
Network and Subnetwork are the virtual private cloud (VPC) network and subnet within that network you want your MC instance and your Vertica nodes to use. This setting does not affect your MC's external network address. If you want to isolate your Vertica cluster from other GCP instances in your project, create a custom VPC network and optionally a subnet in your GCP project and select them in these fields. See the Google Cloud documentation's VPC network overview page for more information.
-
Firewall enables access to the MC from the internet by opening port 5450 in the firewall. You can choose to not open this port by clearing the I accept opening a port in the firewall (5450) for Vertica box. However, if you do not open the port in the firewall, your MC instance will only be accessible from within the VPC network. Not opening the port will make accessing your MC instance much harder.
-
Source IP ranges for MC traffic: If you choose to open the MC for external access, add one or more or more CIDR address ranges to this box for network addresses that you want to be able to access to the MC.
Caution
Make the address ranges as limited as possible to reduce the chances of unauthorized access to your MC instance.
-
Click the Deploy button to start the deployment of your MC instance.
The deployment process will take several minutes.
Using a custom service account
In general, you should use the default service account created by the GCP deployment (project_number-compute@developer.gserviceaccount.com), but if you want to use a custom service account:
Connect and log into the MC instance
After the deployment process is finished, the Deployment Manager page for your MC instance contains links to connect to the MC via your browser or ssh.
To connect to the MC instance:
-
The MC administrator user has a randomly-generated password that you need to log into the MC. Copy the password in the MC Admin Password field to the clipboard.
-
Click Access Management Console.
-
A new browser tab or window opens, showing you a page titled Redirection Notice. Click the link for the MC URL to continue to the MC login page.
-
Your browser will likely show you a security warning. The MC instance uses a self-signed security certificate. Most browsers treat these certificates as a security hazard because they cannot verify their origin. You can safely ignore this warning and continue. In most browsers, click the Advanced button on the warning page, and select the option to proceed. In Chrome, this is a link titled Proceed to xxx.xxx.xxx.xxx (unsafe). In Firefox, it is a button labeled Accept the Risk and Continue.
-
At the login screen, enter the MC administrator user name into the Username box. This user name is mcadmin, unless you changed the user name in the MC deployment form.
-
Paste the automatically-generated password you copied from the MC Admin Password field earlier into the Password box.
-
Click Log In.
Once you have logged into the MC, change the MC administrator account's password.
Caution
The automatically-generated password appears on the MC instance's deployment page and can be revealed in several locations in the deployment logs. Failure to change this password can lead to unauthorized access to your MC instance.
To change the password:
-
On the home page of the MC, under the MC Tools section, click MC Settings.
-
In the left-hand menu, click User Management.
-
Select the entry for the MC administrator account and click Edit.
-
Click either the Generate new or Edit password button to change the password. If you click the Generate new button, be sure to save the automatically-generated password in a safe location. If you click Edit password, you are prompted to enter a new password twice.
-
Click Save to update the password.
Now that you have created your MC instance, you are ready to deploy a Vertica Eon Mode cluster. See Provision an Eon Mode cluster and database on GCP in MC.