This is the multi-page printable view of this section.
Click here to print.
Return to the regular view of this page.
Loading data from Amazon S3 using MC
You can use the Data Load Activity page in Management Console to import data from Amazon S3 storage to an existing Vertica table.
You can use the Data Load Activity page in Management Console to import data from Amazon S3 storage to an existing Vertica table. When you run a load job, Vertica appends rows to the target table you provide. If the job fails, or you cancel the job, Vertica commits no rows to the target table.
When you view your load history on the Instance tab, loading jobs initiated in MC using Amazon S3 have the name MC_S3_Load in the Stream Name column.
Prerequisites
To use the MC Load feature, you must have:
-
Access to an Amazon S3 storage account.
-
An existing table in your Vertica database to which you can copy your data. You must be the owner of the table.
-
(For non-CloudFormation Template installs) An S3 gateway endpoint.
If you aren't using a CloudFormation Template (CFT) to install Vertica, you must create an S3 gateway endpoint in your VPC. For more information, see the AWS documentation.
For example, the Vertica CFT has the following VPC endpoint:
"S3Enpoint" : {
    "Type" : "AWS::EC2::VPCEndpoint",
    "Properties" : {
    "PolicyDocument" : {
        "Version":"2012-10-17",
        "Statement":[{
        "Effect":"Allow",
        "Principal": "*",
        "Action":["*"],
        "Resource":["*"]
        }]
    },
    "RouteTableIds" : [ {"Ref" : "RouteTable"} ],
    "ServiceName" : { "Fn::Join": [ "", [ "com.amazonaws.", { "Ref": "AWS::Region" }, ".s3" ] ] },
    "VpcId" : {"Ref" : "VPC"}
}
Create a loading job
To load data from an Amazon S3 bucket to an existing table in your target database:
-
On the target database MC dashboard, click on the Load tab at the bottom of the page to view the Data Load Activity page.
-
Click on the Instance tab.
-
Click New S3 Data Load at the top-right of the tab. The Create New Amazon S3 Loading Job dialog box opens.
-
Enter your AWS account credentials and your target location information in the required fields, which are indicated by asterisks (*). Use the format S3:// for the bucket name.
-
(Optional) Specify additional options by completing the following fields:
For more about using these fields, see About configuring a data load from S3.
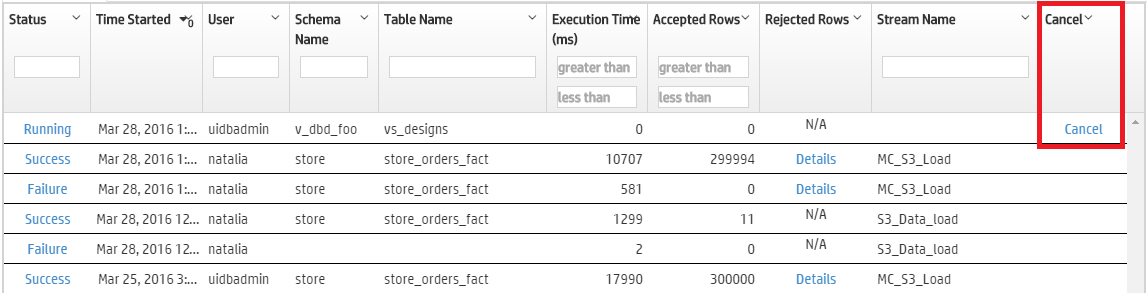
Cancel an initiated loading job
If a loading job is in progress, you can cancel it using the Cancel option in the Load History tab's Cancel column. Click Cancel to cancel the loading job. When you cancel a job, Vertica rolls back all rows and does not commit any data to the target table.
See also
1 - About configuring a data load from S3
When you create an S3 Data Load using MC, you have the option of further configuring the load operation.
When you create an S3 Data Load using MC, you have the option of further configuring the load operation. You can optionally specify the following:
Add COPY parameters
MC performs the load operation with COPY. You can use the COPY Parameters field to further configure the COPY operation. This field accepts parameters that are specified after the COPY statement's FROM clause. For details on these parameters and special requirements, see Parameters.
Note
The FILTER and PARSER parameters must appear in that order and precede all other parameters.
For example, you can specify the DELIMITER and SKIP parameters to separate columns with a comma, and skip one record of input data, respectively:
DELIMITER ',' SKIP 1
You can also add comments in this field with standard C comment notation.
Note
This field does not support SQL comment notation (double hyphen --).
Capture rejected data in a table
Set Capture rejected data in a table to Yes to create a table that contains rejected row data. You can view this data in the Load History tab.
This table uses the following naming convention:
schema.s3_load_rejections_target-table-name
You must have CREATE privilege on the schema if the table doesn't already exist. When you invoke multiple load processes for the same target table, MC appends all rejections data to the same table. For details, see Saving rejected data to a table.
Set a rejected records maximum
Set Reject Max to the maximum number of rows that can be rejected before the load operation fails. If COPY rejects the specified maximum rows, Vertica rolls back the entire load operation.
See also
2 - Viewing load history
You can view a history of all your continuous and instance loading jobs in Vertica on the Data Load Activity page.
You can view a history of all your continuous and instance loading jobs in Vertica on the Data Load Activity page.
-
Continuous jobs: Loading jobs that continuously monitor a source and stream data from the source.
-
Instance jobs: Loading jobs that batch load from a source. Instance jobs are of a fixed length and shorter-term than continuous loads.
View continuous loads
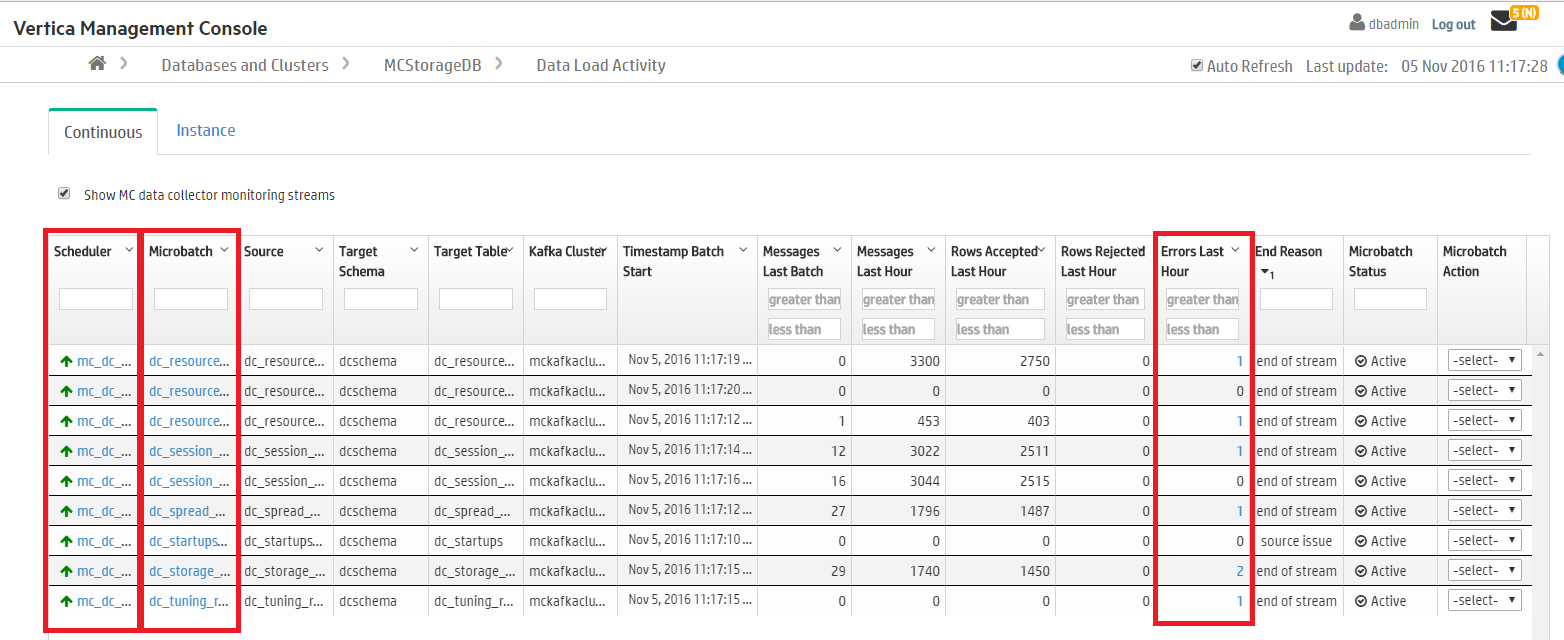
The Continuous tab on the Data Load Activity page displays history of your database’s continuous loading jobs. For example, you can see loading jobs you create using the Vertica integration with Kafka (see Apache Kafka integration). Additionally, if you enable the MC extended monitoring feature, the Continuous tab displays the continuous jobs that stream data from your monitored database to a storage database. (See Extended monitoring for more on how MC can use Kafka to monitor databases externally.)
Use the Continuous tab to view details about continuous jobs, such as their source, target tables, and other microbatch configuration details.
If extended monitoring is enabled, jobs streaming to the MC storage database show mc_dc_kafka_config as the scheduler name. Deselect Show MC data collector monitoring streams at the top of the tab to remove these jobs from the display.
In the Continuous tab, click the labels in the Scheduler, Microbatch, and Errors Last Hour to view additional details about those loading jobs.
For more on continuous data streaming terminology, see Data streaming integration terms.
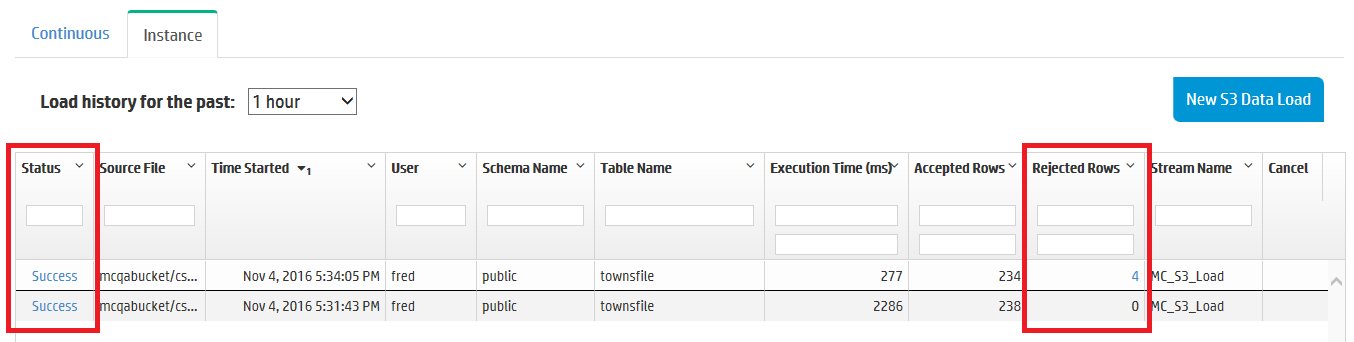
View load instances
In the Instance tab, you can see a history of your database's one-time loading jobs. For example, you can view instance jobs you created using the COPY command in vsql (see COPY), or instance jobs you created in MC to copy data from an Amazon S3 bucket. (For more about initiating loading jobs in MC, see Loading data from Amazon S3 using MC.)
In the Instance tab, click the labels in the Status column and Rejected Rows column to view more details about completed jobs. For more about rejected rows, see Handling messy data.
The number of load history results on the Instance tab depends on the Data collector retention policy for Requests Issued and Requests Completed. To change the retention policy, see Configuring data retention policies.
See also