You can access your Vertica database with various programming languages and tools by installing the appropriate client driver. The following table lists the required client drivers for each access method:
All available client drivers for Windows are included in the Vertica Client Drivers and Tools installer.
All available client drivers for Windows are included in the Vertica Client Drivers and Tools installer. This installs the following components on systems that meet the prerequisites. The individual components may require additional configuration before use, so navigate to their pages linked below for more information:
The Vertica Client Drivers and Tools for Windows has basic system prerequisite requirements.
The Vertica Client Drivers and Tools for Windows has basic system prerequisite requirements. The pack also requires that specific Microsoft components be installed for full integration.
For a list of all prerequisites, see Client drivers support in the Supported Platforms document.
Fully update your system
Before you install the Vertica driver package, verify that your system is fully up to date with all Windows updates and patches. See the documentation for your version of Windows for instructions on how to run Windows update. The Vertica client libraries and vsql executable install updated Windows libraries that depend on Windows service packs. Be sure to resolve any issues that block the installation of Windows updates.
If your system is not fully up-to-date, you may receive error messages about missing libraries such as api-ms-win-crt-runtime-l1-1-0.dll when starting vsql.
1.1.1 - .NET framework
The Vertica Client Drivers and Tools for Windows requires and prompts you to install the Microsoft .NET Framework 4.6 if it is not installed.
The Vertica Client Drivers and Tools for Windows requires and prompts you to install the Microsoft .NET Framework 4.6 if it is not installed.
Use SQL Server 2012, 2014 or 2016. The Vertica Client Drivers and Tools for Windows installer enables support for the following:
SQL Server 2012, 2014, and 2016:
SQL Server Integration Services (SSIS)
SQL Server Reporting Services (SSRS)
SQL Server Analysis Services (SSAS)
SQL Server using 2012, 2013, and 2015—SQL Server Data Tool - Business Intelligence (SSDT-BI)
Note
For SQL Server 2012, you can use either SQL Server 2012 or SQL Server 2012 SP1.
To use the enhanced Vertica .NET support, you must first install SQL Server. Then, you can install the Client Drivers and Tools for Windows. The following components must be installed on the SQL server:
For...
Install...
SSAS
The Analysis Services Instance Feature.
SSRS
The Reporting Services Instance Feature.
SSIS (Data Type Mappings)
The SQL Server Integration Services Shared Feature.
SSDT-BI (Visual Studio 2012, 2013, or 2015)
SQL Server Data Tool - Business Intelligence Shared Feature only after installing Microsoft Visual Studio 2012, 2013, or 2015.
1.2 - Uninstalling, modifying, or repairing the client drivers and tools
To uninstall, modify, or repair the client drivers and tools, run the Client Drivers and Tools for Windows installer.
To uninstall, modify, or repair the client drivers and tools, run the Client Drivers and Tools for Windows installer.
The installer provides three options:
Action
Description
Modify
Remove installed client drivers and tools or install missing client drivers and tools.
Repair
Reinstall already-installed client drivers and tools.
Uninstall
Uninstall all of the client drivers and tools.
Silently uninstall the client drivers and tools
As a Windows Administrator, open a command-line session, and change directory to the folder that contains the installer.
Run the command:
VerticaSetup.exe -q -uninstall
The client drivers and tools are silently uninstalled.
2 - FIPS client drivers
Vertica offers a FIPS-compliant version of the ODBC and JDBC client drivers.
Vertica offers a FIPS-compliant version of the ODBC and JDBC client drivers.
2.1 - Installing the FIPS client driver for JDBC
Vertica offers a JDBC client driver that is compliant with the Federal Information Processing Standard (FIPS).
Vertica offers a JDBC client driver that is compliant with the Federal Information Processing Standard (FIPS). Use this JDBC client driver to access systems that are FIPS-compatible. For more information on FIPS, see Federal information processing standard.
Implementing FIPS on a JDBC client requires a third-party JRE extension called BouncyCastle, a collection of APIs used for cryptography. Use BouncyCastle APIs with JDK 1.7 and 1.8, and a supported FIPS-compliant operating system.
Important
When using the JDBC FIPS-compliant client, expect a slight delay for the client to establish a secure connection with the database. If necessary, increase your system's entropy to ensure a fast and secure connection.
The following procedure adds the FIPS BouncyCastle .jar as a JVM JSSE provider:
Download the BouncyCastle FIPS .jar file bc-fips-1.0.0.jar.
Add bc-fips-1.0.0.jar as a JRE library extension:
path/to/jre/lib/ext/bc-fips-1.0.0.jar
Add BouncyCastle as an SSL security provider in <path to jre>/lib/security/java.security:
Set the default type for the KeyStore implementation to BCFKS in path/to/jre/lib/security/java.security:
keystore type=BCFKS
ssl.keystore.type=BCFKS
Note
If you are using FIPS with BouncyCastle, you must create all client keys and certificates with the BCFKS store type, including the Vertica-to-Kafka keys and certificates.
The FIPS client installer checks your host system for the value of the sysctl parameter, crypto.fips_enabled. You must set this parameter to 1 (enabled). If your host is not enabled, the client does not install.
You can optionally add the vsql client to your PATH environment variable so that you do not need to enter its full path to run it. To do so, add the following to the .profile file in your home directory or the global /etc/profile file:
export PATH=$PATH:/opt/vertica/bin
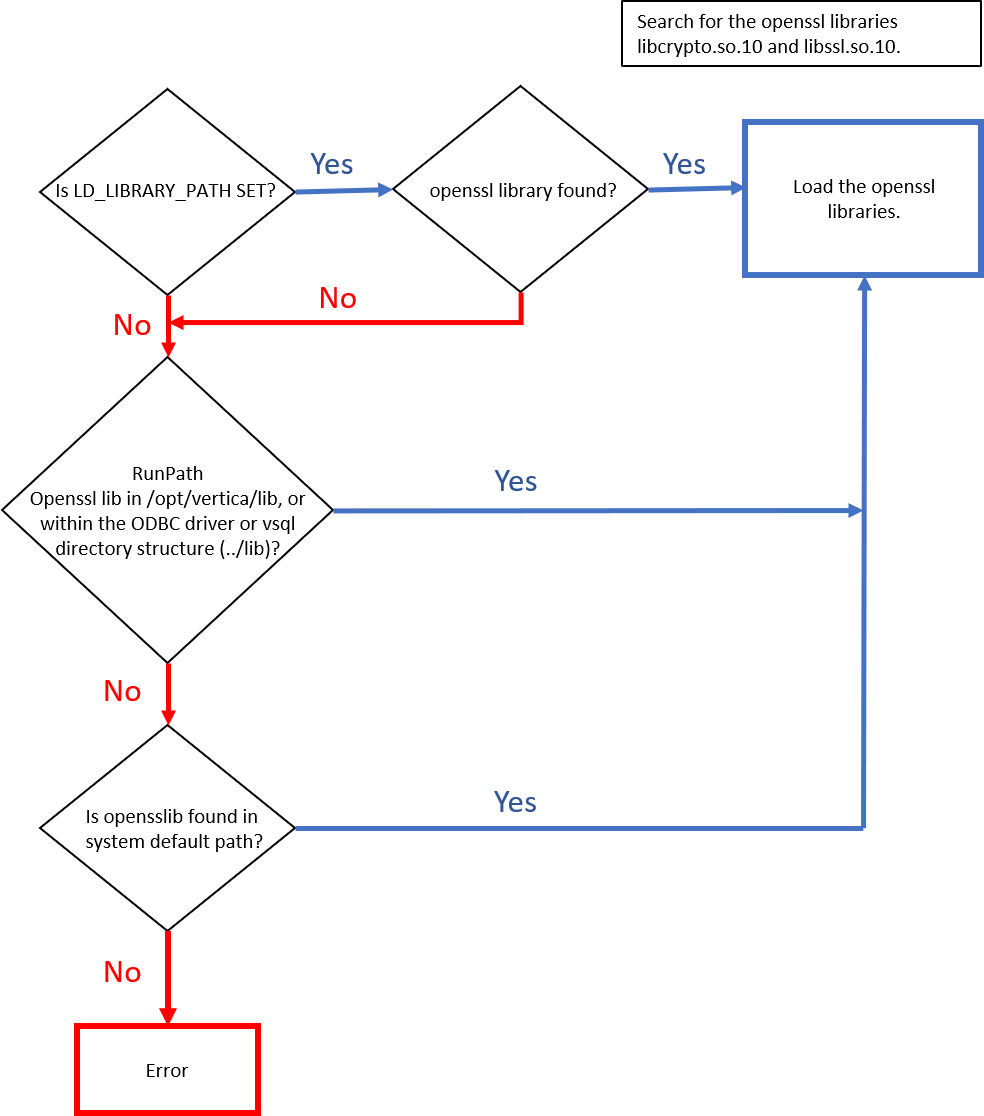
How the client searches for OpenSSL libraries
When you launch the client application to connect to the server, the client searches for and loads the OpenSSL libraries libcrypto.so.10 and libssl.so.10 for supported OpenSSL versions:
The client first checks to see if LD_LIBRARY_PATH is set.
If the LD_LIBARY_PATH location does not include the libraries, it checks RunPath, either /opt/vertica/lib or within the ODBC or vsql directory structure (../lib).
Important
The LD_LIBRARY_PATH, if set, directs the search path for the OpenSSL libraries. The client loads the libraries from any set or preset LD_LIBRARY_PATH location.
The following figure depicts the search process for the OpenSSL libraries:
3 - JDBC client driver
The Vertica JDBC client driver conforms to JDK 5 specifications and provides an interface for communicating with the Vertica database with Java.
The Vertica JDBC client driver conforms to JDK 5 specifications and provides an interface for communicating with the Vertica database with Java. For details on this and other APIs, see API Reference.
Download the version of the JDBC client driver from the Client Drivers downloads page compatible with your version of Vertica.
Copy the .jar file to a directory in your Java CLASSPATH on every client system with which you want to access Vertica. You can either:
Copy the .jar file to its own directory (such as
/opt/vertica/java/lib) and then add that directory to your CLASSPATH (recommended). See Modifying the Java CLASSPATH for details.
Copy the .jar file to directory that is already in your CLASSPATH (for example, a directory where you have placed other .jar files on which your application depends).
Copy the .jar file to the system-wide Java Extensions directory. The exact location differs between operating systems. Some examples include:
The CLASSPATH environment variable contains a list of directories where the Java runtime looks for library class files.
The CLASSPATH environment variable contains a list of directories where the Java runtime looks for library class files. For your Java client code to access Vertica, you must add to the CLASSPATH the directory containing the Vertica JDBC .jar.
Using symbolic links for the CLASSPATH
You can optionally add to the CLASSPATH a symbolic link vertica-jdbc-x.x.x.jar (where x.x.x is a version number) that points to the JDBC library .jar file, rather than the .jar file itself.
Using the symbolic link ensures that any updates to the JDBC library .jar file (which will use a different filename) will not invalidate your CLASSPATH setting, since the symbolic link's filename will remain the same. You just need to update the symbolic link to point at the new .jar file.
Linux and OS X
The following examples use a POSIX-compliant shell.
Provide the class paths to the .jar, .zip, or .class files.
C:> SET CLASSPATH=classpath1;classpath2...
For example:
C:> SET CLASSPATH=C:\java\MyClasses\vertica-jdbc-x.x.x.jar
As with the Linux/UNIX settings, this setting only lasts for the current session. To set the CLASSPATH permanently, set an environment variable:
On the Windows Control Panel, click System.
Click Advanced or Advanced Systems Settings.
Click Environment Variables.
Under User variables, click New.
In the Variable name box, type CLASSPATH.
In the Variable value box, type the path to the Vertica JDBC .jar file on your system (for example,
C:\Program Files (x86)\Vertica\JDBC\vertica-jdbc-x.x.x.jar)
Specifying the library directory in the Java command
Another, OS-agnostic way to tell the Java runtime where to find the Vertica JDBC driver is to explicitly add the directory containing the .jar file to the Java command line using either the -cp or -classpath argument. For example, you can start your client application with:
Your Java IDE may also let you add directories to your CLASSPATH, or let you import the Vertica JDBC driver into your project. See your IDE documentation for details.
4 - ODBC client driver
The Vertica ODBC client driver provides an interface for creating client applications with several languages:.
The Vertica ODBC client driver provides an interface for creating client applications with several languages:
Installing Vertica from the RPM automatically installs the ODBC client driver, so you do not need to install them again on the machine running Vertica. To use the ODBC client driver in this case, create a DSN.
To install the ODBC client driver manually on other machines:
Log in to the client system as root.
Verify that your system has a supported ODBC driver manager.
Download the ODBC client driver for Linux in the format appropriate for your distribution.
Install or extract the driver:
If you downloaded the .rpm, install the driver:
Note
If the client driver is already installed on your system (either from a manual installation or from automatic installation from the Vertica RPM) and you attempt to reinstall them manually, you will receive error messages. To bypass these errors and overwrite the existing driver installations, use the --force flag.
$ rpm -Uvh driver_name.rpm
If you downloaded the .tar, create the /opt/vertica/ directory if it does not already exist, copy the .tar to it, navigate to it, and extract the .tar:
/opt/vertica/lib64/ (64-bit) or /opt/vertica/lib/ (32-bit): Contains library files.
Set the following ODBC driver settings in vertica.ini. For details on each, see ODBC driver settings:
ErrorMessagesPath: Required, the path of the directory containing the ODBC driver's error message files.
ODBCInstLib: The path to the ODBC installer library. This is only required if the driver manager's installation library is not in the environment variables LD_LIBRARY_PATH or LIB_PATH.
DriverManagerEncoding: The UTF encoding standard used by the driver manager. This is only required if your driver manager does not use UTF-8.
The following is an example configuration in vertica.ini:
Use encoding for the 64-bit UNIXODBC driver manager.
Use the error messages defined in the standard Vertica 64-bit ODBC driver installation directory.
You can only have one installation per version of the ODBC driver on a macOS system. This is because each installation is identified by a package ID and version number, and package ID does not change between versions of the driver.
To install the ODBC client driver on macOS:
Verify that your system has a compatible driver manager. The driver is designed to be used with the standard iODBC Driver Manager that ships with macOS. You can also use unixODBC.
If you installed a previous version of the ODBC driver, your system might already have a registered driver named "Vertica". You must remove or rename this older version of the driver before installing a new version from the .pkg installer. Renaming the older version allows you to retain the old version after you install the new one.
Upgrade: Newly installed versions of the Vertica ODBC driver for macOS automatically upgrade the relevant driver system settings. Any DSNs associated with a previous version of the driver are not affected, except that they begin using the newer version of the driver.
Downgrade: Run the uninstall script to remove the current version of the Vertica ODBC driver for macOS. Complete this step before installing an older driver version.
Run the installer and follow the prompts to upgrade the driver. The installer upgrades existing drivers in place.
Reboot your system.
4.3 - Uninstalling ODBC
If you installed ODBC with the .rpm:.
Linux
If you installed ODBC with the .rpm:
$ rpm -e package_name
If you installed ODBC with the .tar, delete the directory manually.
macOS
Uninstalling the macOS ODBC Client-Driver does not remove any existing DSNs associated with the driver.
To uninstall:
Open a terminal window.
Run the command:
sudo /Library/Vertica/ODBC/bin/Uninstall
Windows
Open the Add or Remove Programs menu.
EIther uninstall the Vertica Client Installer to remove all client drivers from the system or, to only uninstall ODBC, uninstall the following applications:
Vertica ODBC Driver (32 Bit)
Vertica ODBC Driver (64 Bit)
4.4 - Creating an ODBC data source name (DSN)
A Data Source Name (DSN) is the logical name that is used by Open Database Connectivity (ODBC) to refer to the driver and other information that is required to access data from a data source.
A Data Source Name (DSN) is the logical name that is used by Open Database Connectivity (ODBC) to refer to the driver and other information that is required to access data from a data source. Whether you are developing your own ODBC client code or you are using a third-party tool that needs to access Vertica using ODBC, you need to configure and test a DSN. The method you use depends upon the client operating system you are using.
Refer to the following sections for information specific to your client operating system.
4.4.1 - Creating an ODBC DSN for Linux
You define DSN on Linux and other UNIX-like platforms in a text file.
You define DSN on Linux and other UNIX-like platforms in a text file. Your client's driver manager reads this file to determine how to connect to your Vertica database. The driver manager usually looks for the DSN definitions in two places:
/etc/odbc.ini
~/.odbc.ini (a file named .odbc.ini in the user's home directory)
Users must be able to read the odbc.ini file in order to use it to connect to the database. If you use a global odbc.ini file, consider creating a UNIX group with read access to the file. Then, add the users who need to use the DSN to this group.
The structure of these files is the same—only their location differs. If both files are present, the ~/.odbc.ini file usually overrides the system-wide /etc/odbc.ini file.
Note
See your ODBC driver manager's documentation for details on where these files should be located and any other requirements.
odbc.ini file structure
The odbc.ini is a text file that contains two types of lines:
Section definitions, which are text strings enclosed in square brackets.
Parameter definitions, which contain a parameter name, an equals sign (=), and then the parameter's value.
Caution
The unixODBC driver manager supports parameter values of up to 1000 characters in odbc.ini. If your parameter value is greater than 1000 characters (for example, OAuthAccessToken), you must pass it through a connection string rather than specifying it in odbc.ini.
The first section of the file is always named [ODBC Data Sources], and contains a list of all the DSNs that the odbc.ini file defines. The parameters in this section are the names of the DSNs, which appear as section definitions later in the file. The value is a text description of the DSN and has no function. For example, an odbc.ini file that defines a single DSN named Vertica DSN could have this ODBC Data Sources section:
[ODBC Data Sources]
VerticaDSN = "vmartdb"
Appearing after the ODBC data sources section are sections that define each DSN. The name of a DSN section must match one of the names defined in the ODBC Data Sources section.
Configuring the odbc.ini file:
To create or edit the DSN definition file:
Using the text editor of your choice, open odbc.ini or ~/.odbc.ini.
Create an ODBC Data Sources section and define a parameter:
Whose name is the name of the DSN you want to create
Whose value is a description of the DSN
For example, to create a DSN named VMart, you would enter:
[ODBC Data Sources]
VMart = "VMart database on Vertica"
Create a section whose name matches the DSN name you defined in step 2. In this section, you add parameters that define the DSN's settings. The most commonly-defined parameters are:
Description – Additional information about the data source.
Driver – The location and designation of the Vertica ODBC driver, or the name of a driver defined in the odbcinst.ini file (see below). For future compatibility, use the name of the symbolic link in the library directory, rather than the library file:
(
/opt/vertica/lib, on 32-bit clients
/opt/vertica/lib64, on 64-bit clients
For example, the symbolic link for the 64-bit ODBC driver library is:
/opt/vertica/lib64/libverticaodbc.so
The symbolic link always points to the most up-to-date version of the Vertica client ODBC library. Use this link so that you do not need to update all of your DSNs when you update your client drivers.
Database – The name of the database running on the server. This example uses vmartdb for the vmartdb.
ServerName — The name of the server where Vertica is installed. Use localhost if Vertica is installed on the same machine.
You can provide an IPv4 address, IPv6 address, or host name.
In mixed IPv4/IPv6 networks, the DNS server configuration determines which IP version address is sent first. Use the PreferredAddressFamily option to force the connection to use either IPv4 or IPv6.
UID — Either the database superuser (same name as database administrator account) or a user that the superuser has created and granted privileges. This example uses the user name dbadmin.
PWD —The password for the specified user name. This example leaves the password field blank.
Port — The port number on which Vertica listens for ODBC connections. For example, 5433.
ConnSettings — Can contain SQL commands separated by a semicolon. These commands can be run immediately after connecting to the server.
SSLKeyFile — The file path and name of the client's private key. This file can reside anywhere on the system.
SSLCertFile —The file path and name of the client's public certificate. This file can reside anywhere on the system.
Locale — The default locale used for the session. By default, the locale for the database is: en_US@collation=binary (English as in the United States of America). Specify the locale as an ICU Locale. See the ICU User Guide (http://userguide.icu-project.org/locale) for a complete list of parameters that can be used to specify a locale.
PreferredAddressFamily:
The IP version to use if the client and server have both IPv4 and IPv6 addresses and you have provided a host name, one of the following:
ipv4: Connect to the server using IPv4.
ipv6: Connect to the server using IPv6.
none: Use the IP address provided by the DNS server.
Instead of giving the path of the ODBC driver library in your DSN definitions, you can use the name of a driver defined in the odbcinst.ini file. This method is useful method if you have many DSNs and often need to update them to point to new driver libraries. It also allows you to set some additional ODBC parameters, such as the threading model.
Just as in the odbc.ini file, odbcinst.ini has sections. Each section defines an ODBC driver that can be referenced in the odbc.ini files.
In a section, you can define the following parameters:
Description— Additional information about the data source.
Driver— The location and designation of the Vertica ODBC driver, such as
/opt/vertica/lib64/libverticaodbc.so
If you are using the unixODBC driver manager, you should also add an ODBC section to override its standard threading settings. By default, unixODBC serializes all SQL calls through ODBC, which prevents multiple parallel loads. To change this default behavior, add the following to your odbcinst.ini file:
[ODBC]
Threading = 1
Configuring additional ODBC settings
On Linux and UNIX systems, you need to configure some additional driver settings before you can use your DSN. See ODBC driver settings for details.
4.4.1.1 - Testing an ODBC DSN using isql
The unixODBC driver manager includes a utility named isql, which is a simple ODBC command-line client.
The unixODBC driver manager includes a utility named isql, which is a simple ODBC command-line client. It lets you to connect to a DSN to send commands and receive results, similarly to vsql.
To use isql to test a DSN connection:
Run the following command:
$ isql –v DSNname
Where DSNname is the name of the DSN you created.
A connection message and a SQL prompt display. If they do not, you could have a configuration problem or you could be using the wrong user name or password.
Try a simple SQL statement. For example:
SQL> SELECT table_name FROM tables;
The isql tool returns the results of your SQL statement.
Note
If you have not set the ErrorMessagesPath in the additional driver configuration settings, any errors during testing will trigger a missing error message file ("The error message NoSQLGetPrivateProfileString could not be found in the en-US locale"). See ODBC driver settings for more information.
4.4.2 - Creating an ODBC DSN for windows clients
To create a DSN for Microsoft Windows clients, you must perform the following tasks:.
To create a DSN for Microsoft Windows clients, you must perform the following tasks:
4.4.2.1 - Setting up an ODBC DSN
A Data Source Name (DSN) is the ODBC logical name for the drive and other information the database needs to access data.
A Data Source Name (DSN) is the ODBC logical name for the drive and other information the database needs to access data. The name is used by Internet Information Services (IIS) for a connection to an ODBC data source.
This section describes how to use the Vertica ODBC Driver to set up an ODBC DSN. This topic assumes that the driver is already installed, as described in Installing Client Drivers on Windows.
To set up a DSN
Open the ODBC Administrator. For example, you could navigate to Start > Control Panel > Administrative Tools > Data Sources (ODBC).
Note
The method you use to open the ODBC Administrator depends on your version of Windows. Differences between Windows versions and Start Menu customizations could require you to take a different action to open the ODBC Administrator.
Decide if you want all users on your client system to be able to access to the DSN for the Vertica database.
If you want all users to have access, then click the System DSN tab.
Otherwise, click the User DSN tab to create a DSN that is only usable by your Windows user account.
Click Add to create a new DSN to connect to the Vertica database.
Scroll through the list of drivers in the Create a New Data Source dialog box to locate the Vertica driver. Select the driver, and then click Finish.
Note
If you have installed more than one version of the Vertica client drivers on your Windows client system, you may see multiple versions of the driver in this list. Choose the version that you know is compatible with your client application and Vertica Analytic Database server. If you are unsure, use the latest version of the driver.
The Vertica ODBC DSN configuration dialog box appears.
Click the More >>> button to view a description of the field you are editing and the connection string defined by the DSN.
Enter the information for your DSN. The following fields are required:
DSN Name — The name for the DSN. Clients use this name to identify the DSN to which they want to connect. The DSN name must satisfy the following requirements:
Its maximum length is 32 characters.
It is composed of ASCII characters except for the following: { } , ; ? * = ! @ \
It contains no spaces.
Server — The host name or IP address of the Vertica server to which you want to connect. Use localhost, if Vertica is installed on the same machine.
You can provide an IPv4 address, IPv6 address, or host name.
In mixed IPv4/IPv6 networks, the DNS server configuration determines which IP version address is sent first. Use the PreferredAddressFamily option to force the connection to use either IPv4 or IPv6.
The PreferredAddressFamily option is available on the Client Settings tab.
Backup Servers — A comma-separated list of host names or IP addresses used to connect to if the server specified by the Server field is down. Optional.
Database —The name of the Vertica database.
User Name — The name of the user account to use when connecting to the database. If the application does not supply its own user name when connecting to the DSN, this account name is used to log into the database.
The rest of the fields are optional. See DSN Parameters for detailed information about the DSN parameters you can define.
If you want to test your connection:
Enter at least a valid DSN name, Server name, Database, and either User name or select Windows authentication.
If you have not selected Windows authentication, you can enter a password in the Password box. Alternately, you can select Password for missing password to have the driver prompt you for a password when connecting.
Caution
Passwords entered into the Password box are saved, in plaintext, to the Windows registry.
Click Test Connection.
When you have finished editing and testing the DSN, click OK. The Vertica ODBC DSN configuration window closes, and your new DSN is listed in the ODBC Data Source Administrator window.
Click OK to close the ODBC Data Source Administrator.
Setting up a 32-Bit DSN on 64-Bit versions of Microsoft windows
On 64-bit versions of Windows, the default ODBC Data Source Administrator creates and edits DSNs that are associated with the 64-bit Vertica ODBC library.
Attempting to use these 64-bit DSNs with a 32-bit client application results in an architecture mismatch error. Instead, you must create a specific 32-bit DSN for 32-bit clients by running the 32-bit ODBC Administrator usually located at:
c:\Windows\SysWOW64\odbcad32.exe
This administrator window edits a set of DSNs that are associated with the 32-bit ODBC library. You can then use your 32-bit client applications with the DSNs you create with this version of the ODBC administrator.
4.4.2.2 - Encrypting passwords on ODBC DSN
When you install an ODBC driver and create a Data Source Name (DSN) the DSN settings are stored in the registry, including the password.
When you install an ODBC driver and create a Data Source Name (DSN) the DSN settings are stored in the registry, including the password. Encrypting passwords on ODBC DSN applies only to Windows systems.
Encrypting passwords on an ODBC data source name (DSN) provides security against unauthorized database access. The password is not encrypted by default and is stored in plain-text.
Note
ODBC DSN passwords that were created in Vertica ≤8.0.x are not encrypted when you upgrade to a higher version, regardless of encryption settings.
Enable password encryption
Use the EncryptPassword parameter to enable or disable password encryption for an ODBC DSN:
Use Windows Registry editor to determine if password encryption is enabled based on the value of EncryptPassword. Depending on the type of DSN you installed, check the following:
For a user DSN: HKEY_CURRENT_USER > Software > ODBC > ODBC.INI > dsn name > isPasswordEncrypted=<1/0>
For a system DSN: HKEY_LOCAL_MACHINE > Software > ODBC > ODBC.INI > dsn name > isPasswordEncrypted=<1/0>
For each DSN, the value of the isPasswordEncrypted parameter indicates the status of the password encryption, where 1 indicates an encrypted password and 0 indicates an unencrypted password.
4.4.2.3 - Testing an ODBC DSN using Excel
You can use Microsoft Excel to verify that an application can connect to an ODBC data source or other ODBC application.
You can use Microsoft Excel to verify that an application can connect to an ODBC data source or other ODBC application.
Open Microsoft Excel, and select Data > Get External Data > From Other Sources > From Microsoft Query.
When the Choose Data Source dialog box opens:
Select New Data Source, and click OK.
Enter the name of the data source.
Select the Vertica driver.
Click Connect.
When the Vertica Connection Dialog box opens, enter the connection information for the DSN, and click OK.
Click OK on the Create New Data Source dialog box to return to the Choose Data Source dialog box.
Select VMart_Schema*, and verify that the Use the Query Wizard check box is deselected. Click OK.
When the Add Tables dialog box opens, click Close.
When the Microsoft Query window opens, click the SQL button.
In the SQL window, write any simple query to test your connection. For example:
SELECT DISTINCT calendar_year FROM date_dimension;
* If you see the caution, "SQL Query can't be represented graphically. Continue anyway?" click **OK**. * The data values 2003, 2004, 2005, 2006, 2007 indicate that you successfully connected to and ran a query through ODBC.
Select File > Return Data to Microsoft Office Excel.
In the Import Data dialog box, click OK.
The data is now available for use in an Excel worksheet.
4.4.3 - Creating an ODBC DSN for macOS clients
You can use the Vertica ODBC Driver to set up an ODBC DSN.
You can use the Vertica ODBC Driver to set up an ODBC DSN. This procedure assumes that the driver is already installed, as described in Installing the ODBC client driver.
Locate and open the ODBC Administrator Tool after installation:
Navigate to Finder > Applications > Utilities.
Open the ODBC Administrator Tool.
Click the Drivers tab, and verify that the Vertica driver is installed.
Specify if you want all users on your client system to be able to access the DSN for the Vertica database:
If you want all users to have access, then click the System DSN tab.
Otherwise, click the User DSN tab to create a DSN that is only usable by your Macintosh user account.
Click Add... to create a new DSN to connect to the Vertica database.
Scroll through the list of drivers in the Choose A Driver dialog box to locate the Vertica driver. Select the driver, and then click OK. A dialog box opens that requests DSN parameter information.
In the dialog box, enter the Data Source Name (DSN) and an optional Description. To do so, click Add to insert keywords (parameters) and values that define the settings needed to connect to your database, including database name, server host, database user name (such as dbadamin), database password, and port. Then, click OK.
In the ODBC Administrator dialog box, click Apply.
After configuring the ODBC Administrator Tool, you may need to configure additional driver settings before you can use your DSN, depending on your environment. See Additional ODBC Driver Configuration Settings for details.
The standard iODBC Driver Manager on OS X includes a utility named iodbctest that lets you test a DSN to verify that it is correctly configured.
The standard iODBC Driver Manager on OS X includes a utility named iodbctest that lets you test a DSN to verify that it is correctly configured. You pass this command a connection string in the same format that you would use to open an ODBC database connection. After configuring your DSN connection, you can run a query to verify that the connection works.
For example:
# iodbctest "DSN=VerticaDSN;UID=dbadmin;PWD=password"
iODBC Demonstration program
This program shows an interactive SQL processor
Driver Manager: 03.52.0607.1008
Driver: 07.01.0200 (verticaodbcw.so)
SQL> SELECT table_name FROM tables;
table_name
--------------------------------------------------------------------------------------------------------------------------------
customer_dimension
product_dimension
promotion_dimension
date_dimension
vendor_dimension
employee_dimension
shipping_dimension
warehouse_dimension
inventory_fact
store_dimension
store_sales_fact
store_orders_fact
online_page_dimension
call_center_dimension
online_sales_fact
numbers
result set 1 returned 16 rows.
4.4.4 - ODBC DSN connection properties
The following tables list the connection properties you can set in the DSNs for use with Vertica's ODBC driver.
The following tables list the connection properties you can set in the DSNs for use with Vertica's ODBC driver. To set these parameters, see Setting DSN connection properties.
Required connection properties
These connection properties are the minimum required to create a functioning DSN.
Note
If you use a host name (Servername) whose DNS entry resolves to multiple IP addresses, the client attempts to connect to the first IP address returned by the DNS. If a connection cannot be made to the first address, the client attempts to connect to the second, then the third, continuing until it either connects successfully or runs out of addresses.
Property
Description
Driver
The file path and name of the driver used.
Database
The name of the database running on the server.
Servername
The host name or IP address of any active node in a Vertica cluster.
You can provide an IPv4 address, IPv6 address, or host name.
In mixed IPv4/IPv6 networks, the DNS server configuration determines which IP version address is sent first. Use the PreferredAddressFamily option to force the connection to use either IPv4 or IPv6.
You can also use the aliases "server" and "host" for this property.
UID
The database username.
Optional properties
Property
Description
Port
The port number on which Vertica listens for ODBC connections.
Default: 5433
PWD
The password for the specified user name. You may insert an empty string to leave this property blank.
Default: None, login only succeeds if the user does not have a password set.
PreferredAddressFamily
The IP version to use if the client and server have both IPv4 and IPv6 addresses and you have provided a host name, one of the following:
ipv4: Connect to the server using IPv4.
ipv6: Connect to the server using IPv6.
none: Use the IP address provided by the DNS server.
Default: none
Advanced settings
Property
Description
AutoCommit
A Boolean value that controls whether the driver automatically commits transactions after executing a DML statement.
Default: true
BackupServerNode
A string containing the host name or IP address that client libraries can try to connect to if the host specified in ServerName is unreachable. Connection attempts continue until successful or until the list of server nodes is exhausted.
Valid values: Comma-separated list of servers optionally followed by a colon and port number.
ConnectionLoadBalance
A Boolean value that indicates whether the connection can be redirected to a host in the database other than the ServerNode.
This affects the connection only if the load balancing. is set to something other than "none". When the node differs from the node the client is connected to, the client disconnects and reconnects to the targeted node. See About Native Connection Load Balancing in the Administration Guide.
Default: false
ConnSettings
A string containing SQL commands that the driver should execute immediately after connecting to the server. You can use this property to configure the connection, such as setting a schema search path.
Reserved symbol: In the connection string semicolon (;) is a reserved symbol. To set multiple properties as part of ConnSettings properties, use %3B as the comma delimiter, and + (plus) for spaces.
ConnectionTimeout
The number of seconds to wait for a request to complete before returning to the client application. This is equivalent to the SQL_ATTR_CONNECTION_TIMEOUT parameter in the ODBC API.
Default: 0 (no timeout)
ConvertSquareBracketIdentifiers
Controls whether square-bracket query identifiers are converted to a double quote identifier for compatibility when making queries to a Vertica database.
Default: false
DirectBatchInsert
Deprecated, always set to true.
DriverStringConversions
Controls whether the ODBC driver performs type conversions on strings sent between the ODBC driver and the database. Possible values are:
NONE: No conversion in either direction. This results in the highest performance.
INPUT: Strings sent from the client to the server are converted, but strings sent from the server to the client are not.
OUTPUT: Strings sent by the server to the client are converted, but strings sent from the client to the server are not.
BOTH: Strings are converted in both directions.
Default: OUTPUT
Locale
The locale used for the session. Specify the locale as an ICU Locale.
**See **the ICU User Guide for a complete list of properties that can be used to specify a locale.
Default:en_US@collation=binary
PromptOnNoPassword
[Windows only] Controls whether users are prompted to enter a password, if none is supplied by the connection string or DSN used to connect to Vertica. See Prompting windows users for passwords.
Default: false
ReadOnly
A true or false value that controls whether the connection can read data only from Vertica.
Default: false
ResultBufferSize
Size of memory buffer for the large result sets in streaming mode. A value of 0 means ResultBufferSize is turned off.
Default: 131072 (128KB)
TransactionIsolation
Sets the transaction isolation for the connection, one of the following:
The name of the workload for the session. For details, see Workload routing.
Default: None (no workload)
Identification
Property
Description
Standard/ Vertica
Description
Description for the DSN entry.
Required? No
Insert an empty string to leave the description empty.
Standard
Label / SessionLabel
Sets a label for the connection on the server. This value appears in the client_label column of the V_MONITOR.SESSIONS system table.
Label and SessionLabel are synonyms and can be used interchangeably.
Vertica
OAuth connection properties
The following connection properties pertain to OAuth in ODBC.
Caution
The unixODBC driver manager supports parameter values of up to 1000 characters in odbc.ini. If your parameter value is greater than 1000 characters (for example, OAuthAccessToken), you must pass it through a connection string rather than specifying it in odbc.ini.
Property
Description
OAuthAccessToken
Required if OAuthRefreshToken is unspecified, an OAuth token that authorizes a user to the database.
Either OAuthAccessToken or OAuthRefreshToken must be set (programmatically or manually) to authenticate to Vertica with OAuth authentication.
You can omit both OAuthAccessToken and OAuthRefreshToken only if you authenticate to your identity provider directly with single sign-on through the client driver, which requires the machine running the ODBC driver to have access to a web browser.
For details on the different methods for retrieving access tokens, see Retrieving access tokens.
OAuthRefreshToken
Deprecated
Use OAuthAccessToken instead. Token refresh should be handled by the client application separately.
Required if OAuthAccessToken is unspecified, a token that used to obtain a new access token when their old one expires.
Either OAuthAccessToken or OAuthRefreshToken must be set (programmatically or manually) to authenticate to Vertica with OAuth authentication.
You can omit both OAuthAccessToken and OAuthRefreshToken only if you authenticate to your identity provider directly with single sign-on through the client driver, which requires the machine running the ODBC driver to have access to a web browser.
For details on the different methods for retrieving access tokens, see Retrieving access tokens.
If you set this parameter, you must also set the OAuthClientSecret connection property.
In cases where introspection fails (e.g. when the access token expires), Vertica responds to the request with an error. If introspection fails and OAuthRefreshToken is specified, the driver attempts to refresh and silently retrieve a new access token. Otherwise, the driver passes error to the client application.
OAuthClientSecret
Deprecated
Use OAuthAccessToken instead. Token refresh should be handled by the client application separately.
The secret provided by your identity provider for your client. This parameter is required for confidential clients.
Encryption
Property
Description
Standard/ Vertica
SSLMode
Controls whether the connection to the database uses SSL encryption, one of the following. For information on using these parameters to configure TLS, see Configuring TLS for ODBC Clients:
require: Requires that the server use TLS. If the TLS connection attempt fails, the client rejects the connection.
prefer: Prefers that the server use TLS. The client first attempts to connect using TLS. If that attempt fails, the client attempts to connect again in plaintext.
allow: Makes a connection to the server whether the server uses TLS or not. The first connection attempt to the database is attempted over a clear channel. If that fails, a second connection is attempted over TLS.
verify_ca: The client verifies that the server's certificate was issued by a trusted certificate authority (CA).
verify_full: The client verifies that the following conditions are met:
The server's certificate was issued by a trusted CA.
One of the following:
The server's hostname matches the common name specified in the server's certificate.
The server's hostname or IP address appears in the Subject Alternative Name (SAN) field of the server's certificate.
disable: Never connect to the server using TLS. This setting is typically used for troubleshooting.
Default: prefer
Vertica
SSLCertFile
The absolute path of the client's public certificate file. This file can reside anywhere on the system.
Vertica
SSLKeyFile
The absolute path to the client's private key file. This file can reside anywhere on the system.
Vertica
Third-party compatibility
Property
Description
Default
Standard/ Vertica
ColumnsAsChar
Specifies how character column types are reported when the driver is in Unicode mode. When set to false, the ODBC driver reports the data type of character columns as WCHAR. If you set ColumnsAsChar to true, the driver identifies character column as CHAR.
You typically use this setting for compatibility with some third-party clients.
Default: false
false
Vertica
ThreePartNaming
A Boolean value that controls how catalog names are interpreted by the driver. When this value is false, the driver reports that catalog names are not supported. When catalog names are not supported, they cannot be used as a filter in database metadata API calls. In this case, the driver returns NULL as the catalog name in all driver metadata results.
When this value is true, catalog names can be used as a filter in database metadata API calls. In this case, the driver returns the database name as the catalog name in metadata results. Some third-party applications assume a certain catalog behavior and do not work properly with the default values. Enable this option if your client software expects to get the catalog name from the database metadata and use it as part of a three-part name reference.
Default: false for UNIX, true for Windows
false (UNIX)
true (Window)
Vertica
EnforceBatchInsertNullConstraints
Prevents NULL values from being loaded into columns with a NOT NULL constraint during batch inserts. When this value is set to true, batch inserts roll back when NULL values are inserted in to columns with NOT NULL constraints. When this value is set to false, batch insert behavior is unchanged.
Vertica recommends only using this property with SAP Data Services as it could negatively impact database performance.
false
Vertica
Kerberos connection properties
Use the following properties for client authentication using Kerberos.
Property
Description
Standard/ Vertica
KerberosServiceName
Provides the service name portion of the Vertica Kerberos principal; for example: vertichost@EXAMPLE.COM
Default: vertica
Vertica
KerberosHostname
Provides the instance or host name portion of the Vertica Kerberos principal; for example: verticaosEXAMPLE.COM
Default: Value specified in the servername connection string property
The properties in the following tables are common for all user and system DSN entries.
The properties in the following tables are common for all user and system DSN entries. The examples provided are for Windows clients.
To edit DSN properties:
On UNIX and Linux client platforms, you can edit the odbc.ini file. The location of this file is specific to the driver manager. See Creating an ODBC DSN for Linux.
You can also edit the DSN properties directly by opening the DSN entry in the Windows registry (for example, at HKEY_LOCAL_MACHINE\SOFTWARE\ODBC\ODBC.INI\DSNname). Directly editing the registry can be risky, so you should only use this method for properties that cannot be set through the ODBC driver's user interface, or via your client code.
You can set properties in the connection string when opening a connection using the SQLDriverConnect() function:
In the connection string ';' is a reserved symbol. If you need to set multiple properties as part of the ConnSettings property use '%3B' in place of ';'. Also use '+' instead of spaces.
Your client code can retrieve DSN property values after a connection has been made to Vertica using the SQLGetConnectAttr() and SQLGetStmtAttr() API calls. Some properties can be set and using SQLSetConnectAttr() and SQLSetStmtAttr().
While required settings are required for all platforms, these settings automatically set by the Windows and macOS installers, so all directives to change these settings are for Linux users.
Note
While required settings are required for all platforms, these settings automatically set by the Windows and macOS installers, so all directives to change these settings are for Linux users.
DriverManagerEncoding: The UTF encoding standard used by the driver manager. This can be one of the following:
UTF-8
UTF-16
UTF-32
The ODBC driver encoding must match that of your driver manager. The following table lists default encodings for various platforms that take effect if you do not set this parameter. If the defaults do not match the encoding used by your driver manager, you must set it manually. Consult your driver manager's documentation for details on its encoding.
Note
While both UTF-16 and UTF-8 are valid settings for the DataDirect driver manager, UTF-16 is recommended.
Client Platform
Default Encoding
Linux 32-bit
UTF-32
Linux 64-bit
UTF-32
Linux Itanium 64-bit
UTF-32
OS X
UTF-32
Windows 32-bit
UTF-16
Windows 64-bit
UTF-16
ErrorMessagesPath: Required, the path of the directory containing the ODBC driver's error message files. These files (ODBCMessages.xml and VerticaMessages.xml) are stored in the same directory as the Vertica ODBC driver files (for example, opt/vertica/en-US in the downloaded.tar).
ODBCInstLib: The path to the ODBC installer library. This setting is only required if the directory containing the library is not set in the LD_LIBRARY_PATH or LIB_PATH environment variables. The library files for the major driver managers are:
UnixODBC: libodbcinst.so
iODBC: libiodbcinst.so (libiodbcinst.2.dylib on macOS)
DataDirect: libodbcinst.so
You can also control client-server message logging for both ODBC and ADO.NET. For details, see Configuring ODBC logs.
Linux and macOS
To set these parameters on Linux or macOS:
Create a file vertica.ini anywhere on the client system. Common locations are in /etc/ for a shared configuration, or the home directory for a per-user configuration.
Verify that users of the ODBC driver have read privileges on the file.
Set the VERTICAINI environment variable to the path of vertica.ini. For example:
$ export VERTICAINI=/etc/vertica.ini
Create a section called [Driver] in vertica.ini:
[Driver]
Under [Driver], set parameters with the following format. Each parameter must have its own line:
The Windows client driver installer automatically configures all necessary settings for the ODBC driver. Settings are stored in the registry in HKEY_LOCAL_MACHINE\SOFTWARE\Vertica\ODBC\Driver.
If you want to configure ODBC further, use the ODBC Data Sources program.
4.6 - Configuring ODBC logs
The following parameters control whether and how the ODBC client driver logs messages between the client and server.
The following parameters control whether and how the ODBC client driver logs messages between the client and server.
The way you set these parameters differs between operating systems:
On Linux and macOS, edit vertica.ini you created during the installation. For example, to log all warnings and more severe messages to log files in /tmp/:
[Driver]
LogLevel=4
LogPath=/tmp
On Windows, edit the keys in the Windows Registry under HKEY_LOCAL_MACHINE\SOFTWARE\Vertica\ODBC\Driver.
Parameters
LogLevel: The severity of messages that are logged between the client and the server. The valid values are:
0: No logging
1: Fatal errors
2: Errors
3: Warnings
4: Info
5: Debug
6: Trace (all messages)
The value you specify for this setting sets the minimum severity for a message to be logged. For example, setting LogLevel to 3 means that the client driver logs all warnings, errors, and fatal errors.
LogPath: The absolute path of a directory to store log files. For example: /var/log/verticaodbc
Diverting log entires to ETW (windows)
On Windows clients, ODBC log entries can be sent to Event Tracing for Windows (ETW) so they appear in the Windows Event Viewer:
Register the driver as a Windows Event Log provider and enable the logs.
Activate ETW by adding a string value LogType with data ETW to your Windows Registry.
Understand how Vertica compresses log levels for the Windows Event Viewer.
Know where to find the logs within Event Viewer.
Understand the meaning of the Event IDs in your log entries.
Registering the ODBC driver as a windows event log provider
To use ETW logging, you must register the ODBC driver as a Windows Event Log provider. You can choose to register either the 32-bit or 64-bit driver. After you have registered the driver, you must enable the logs.
Important
If you do not both register the driver and enable the logs, output is directed to stdout.
Open a command prompt window as Administrator, or launch the command prompt with the Run as Administrator option.
Important
You must have administrator privileges to successfully complete the next step.
Run the command wevtutil im to register either the 32-bit or 64-bit version of the driver.
Should you want to later disable the logs, you can use the same wevtutil sl command, substituting /e:false in place of /e:true when you issue the statement. Alternatively, you can enable or disable logs within the Windows Event Viewer itself.
Add the string value LogType
By default, Vertica does not send ODBC log entries to ETW. To activate ETW, add the string LogType to your Windows registry, and set its value to ETW.
Start the registry editor by typing regedit.exe in the Windows Run command box.
Navigate to HKEY_LOCAL_MACHINE\SOFTWARE\Vertica\ODBC\Driver in the registry.
Right-click in the right pane of the Registry Editor window.
Select New, then select String Value.
Change the name of the string value from New Value #1 to LogType.
Double-click the new LogType entry. When prompted for a new value, enter ETW.
Exit the registry editor.
ETW is disabled by default. When ETW is enabled, you can disable it by clearing the value ETW from the LogType string.
LogLevel in the windows event viewer
While LogLevel ranges from 0 through 6, this range is compressed for the Windows Event Viewer to a range of 0 through 3.
Vertica LogLevel Setting
Vertica LogLevel Description
Log level sent to the Windows Event Viewer
Log level displayed by the Windows Event Viewer
0
(No logging)
0
(No logging)
1
Fatal Errors
1
Critical
2
Errors
2
Error
3
Warnings
3
Warning
4
Info
4
Information
5
Debug
4
6
Trace (all messages)
4
The following examples show how LogLevel is converted when displayed in the Windows Event Viewer.
A LogLevel of 5 sends fatal errors, errors, warnings, info and debug log level entries to Event Viewer as Level 4 (Information).
A LogLevel of 6 sends fatal errors, errors, warnings, debug and trace log level entries to Event Viewer as Level 4.
Finding logs in the event viewer
Launch the Windows Event Viewer.
From Event Viewer (Local), expand Applications and Services Logs.
Expand the folder that contains the log you want to review (for example, VerticaODBC64).
Select the Vertica ODBC log under the folder. Entries appear in the right pane.
Note the value in the Event ID field. Each Event Log entry includes one of four Event IDs:
0: Informational (debug, info, and trace events)
1: Error
2: Fatal event
3: Warning
5 - Python client drivers
Vertica supports several Python drivers for creating client applications.
Vertica supports several Python drivers for creating client applications.
Prerequisites
To create Python client applications, you must install the required drivers.
5.1 - Installing Python client drivers
Vertica supports several Python client drivers.
Vertica supports several Python client drivers.
Installing vertica-python
See the vertica-python repository for installation and usage instructions.
Installing pyodbc
The pyodbc module interacts with the Vertica ODBC client driver. To install it:
Use the Connection Manager to set the OLE DB connection string properties, which define your connection.
Use the Connection Manager to set the OLE DB connection string properties, which define your connection. You access the Connection Manager from within Visual Studio.
These connection parameters appear on the Connection page.
Parameters
Action
Provider
Select the native OLE DB provider for the connection.
OLE DB Provider
Indicates Vertica OLE DB Provider.
Server or file name
Enter the server or file name.
Location
Not supported.
Use Windows NT Integrated Security
Not supported.
Use a specific user name and password
Enter a user name and password.
Connect with No Password:
Select the Blank password check box.
Save and Encrypt Password:
Select Allow saving password.
Initial Catalog
The name of the database running on the server.
The All page from the Connection Manager dialog box includes all possible connection string properties for the provider.
The table that follows lists the connection parameters for the All page.
For OLE DB properties information specific to Microsoft, see the Microsoft documentation OLE DB Properties.
Parameters
Action
Extended Properties
Not supported.
Locale Identifier
Indicates the Locale ID.
Default: 0
Mode
Specifies access permissions.
Default: 0
Connect Timeout
Not supported.
Default: 0
General Timeout
Not supported.
File Name
Not supported.
OLE DB Services
Specifies which OLE DB services to enable or disable.
Password
Specifies the password for the user ID.
For no password, insert an empty string.
Persist Security Info
A security measure. When False, security sensitive-information, such as the password, is not returned as part of the connection if the connection is open or has ever been in an open state.
Default: true
User ID
The database username.
Data Source
The host name or IP address of any active node in a Vertica cluster.
You can provide an IPv4 address, IPv6 address, or host name.
In mixed IPv4/IPv6 networks, the DNS server configuration determines which IP version address is sent first. Use the PreferredAddressFamily option to force the connection to use either IPv4 or IPv6.
Initial Catalog
The name of the database running on the server.
Provider
The name of the OLE DB Provider to use when connecting to the Data Source.
Default: VerticaOLEDB.1
BackupServerNode
A designated host name or IP address to use if the ServerName host is unavailable. Enter as a string.
Connection attempts continue until successful or until the list of server nodes is exhausted.
Valid values: Comma-separated list of servers optionally followed by a colon and port number. For example:
server1:5033,server2:5034
ConnectionLoadBalance
A Boolean value that determines whether the connection can be redirected to a host in the database other than the ServerNode.
This parameter affects the connection only if load balancing is set to a value other than NONE. When the node differs from the node that the client is connected to, the client disconnects and reconnects to the targeted node. See About Native Connection Load Balancing in the Administration Guide.
Default: false
ConnSettings
SQL commands that the driver should execute immediately after connecting to the server. Use to configure the connection, such as setting a schema search path.
Reserved symbol:';' To set multiple parameters in this field use '%3B' for ','.
Spaces: Use '+'.
ConvertSquareBracketIdentifiers
Controls whether square-bracket query identifiers are converted to a double quote identifier for compatibility when making queries to a Vertica database.
Default: false
DirectBatchInsert
Deprecated, always set to true.
KerberosHostName
Provides the instance or host name portion of the Vertica Kerberos principal; for example: verticaosEXAMPLE.COM
KerberosServiceName
Provides the service name portion of the Vertica Kerberos principal; for example: vertichost@EXAMPLE.COM
Label
Sets a label for the connection on the server. This value appears in the session_id column of system table SESSIONS .
LogLevel
Specifies the amount of information included in the log. Leave this field blank or set to 0 unless otherwise instructed by Vertica Customer Support.
LogPath
The path for the log file.
Port
The port number on which Vertica listens for OLE DB connections.
Default: port 5433
PreferredAddressFamily
The IP version to use if the client and server have both IPv4 and IPv6 addresses and you have provided a host name, one of the following:
ipv4: Connect to the server using IPv4.
ipv6: Connect to the server using IPv6.
none: Use the IP address provided by the DNS server.
SSLCertFile
The absolute path of the client's public certificate file. This file can reside anywhere on the system.
SSLKeyFile
The absolute path to the client's private key file. This file can reside anywhere on the system.
SSLMode
Controls whether the connection to the database uses SSL encryption, one of the following:
require: Requires the server to use SSL. If the server cannot provide an encrypted channel, the connection fails.
prefer: Prefers that the server use SSL. If the server does not offer an encrypted channel, the client requests one. The first attempt is made with SSL. If that attempt fails, the second attempt is over a clear channel.
allow: Makes a connection to the server whether or not the server uses SSL. The first attempt is made over a clear channel. If that attempt fails, a second attempt is over SSL.
disable: Never connects to the server using SSL. Typically, you use this setting for troubleshooting.
Default:prefer
8.1.2 - Configuring OLE DB logs
The following parameters control how the OLE DB client driver logs messages between the client and server.
The following parameters control how the OLE DB client driver logs messages between the client and server. To set them, edit the keys in the Windows Registry under HKEY_LOCAL_MACHINE\SOFTWARE\Vertica\OLEDB\Driver:
LogLevel: The severity of messages that are logged between the client and the server. The valid values are:
0: No logging
1: Fatal errors
2: Errors
3: Warnings
4: Info
5: Debug
6: Trace (all messages)
The value you specify for this setting sets the minimum severity for a message to be logged. For example, setting LogLevel to 3 means that the client driver logs all warnings, errors, and fatal errors.
LogPath: The absolute path of a directory to store log files. For example: /var/log/verticaoledb
Diverting OLE DB log entries to ETW
On Windows clients, you can direct Vertica to send OLE DB log entries to Event Tracing for Windows (ETW). Once set, OLE DB log entries appear in the Windows Event Viewer. To use ETW:
Register the driver as a Windows Event Log provider, and enable the logs.
Activate ETW by adding a string value to your Windows Registry.
Understand how Vertica compresses log levels for the Windows Event Viewer.
Know where to find the logs within Event Viewer.
Understand the meaning of the Event IDs in your log entries.
Registering the OLE DB driver as a windows event log provider
To use ETW logging, you must register the OLE DB driver as a Windows Event Log provider. You can choose to register either the 32-bit or 64-bit driver. Once you have registered the driver, you must enable the logs.
Important
If you do not both register the driver and enable the logs, output is directed to stdout.
Open a command prompt window as Administrator, or launch the command prompt with the Run as Administrator option.
Important
You must have administrator privileges to successfully complete the next step.
Run the command wevtutil im to register either the 32-bit or 64-bit version of the driver.
Should you want to later disable the logs, you can use the same wevtutil sl command, substituting /e:false in place of /e:true when you issue the statement. Alternatively, you can enable or disable logs within the Windows Event Viewer itself.
Add the string value LogType
By default, Vertica does not send OLE DB log entries to ETW. To activate ETW, add the string LogType to your Windows registry, and set its value to ETW.
Start the registry editor by typing regedit.exe in the Windows Run command box.
Navigate, in the registry, to: HKEY_LOCAL_MACHINE\SOFTWARE\Vertica\OLEDB\Driver.
Right-click in the right pane of the Registry Editor window.
Select New, then select String Value.
Change the name of the string value from New Value #1 to LogType.
Double-click the new LogType entry. When prompted for a new value, enter ETW.
Exit the registry editor.
ETW is off by default. When ETW is activated, you can subsequently turn it off by clearing the value ETW from the LogType string.
LogLevel in the windows event viewer
While LogLevel ranges from 0 through 6, this range is compressed for the Windows Event Viewer to a range of 0 through 3.
Vertica LogLevel Setting
Vertica LogLevel Description
Log level sent to the Windows Event Viewer
Log level displayed by the Windows Event Viewer
0
(No logging)
0
(No logging)
1
Fatal Errors
1
Critical
2
Errors
2
Error
3
Warnings
3
Warning
4
Info
4
Information
5
Debug
4
6
Trace (all messages)
4
The following examples show how LogLevel is converted when displayed in the Windows Event Viewer.
A LogLevel of 5 sends fatal errors, errors, warnings, info and debug log level entries to Event Viewer as Level 4 (Information).
A LogLevel of 6 sends fatal errors, errors, warnings, debug and trace log level entries to Event Viewer as Level 4.
Finding logs in the event viewer
Launch the Windows Event Viewer.
From Event Viewer (Local), expand Applications and Services Logs.
Expand the folder that contains the log you want to review (for example, VerticaOLEDB64).
Select the Vertica ODBC log under the folder. Entries appear in the right pane.
Note the value in the Event ID field. Each Event Log entry includes one of four Event IDs:
0: Informational (debug, info, and trace events)
1: Error
2: Fatal event
3: Warning
9 - ADO.NET client driver
The Vertica ADO.NET driver lets you access with C#.
You can also download the Vertica.Data package and reference it locally.
On Windows platforms, you can install the ADO.NET driver with the Windows installer and then reference the .dll. This is required for certain applications like TIBCO Spotfire to interact with the driver:
The following parameters control how messages between the client and server are logged. If they are not set, then the client library does not log any messages.
Config-level Settings
The following parameters control how messages between the client and server are logged. If they are not set, then the client library does not log any messages.
To set these parameters, create and edit the configuration file Vertica.Data.dll.config in one of the following locations. If the file exists in both locations, the one in the home directory takes priority:
Home directory
Project directory
LogLevel
The minimum severity of a message for it to be logged, one of the following:
0: No logging
1: Fatal errors
2: Errors
3: Warnings
4: Info
5: Debug
6: Trace (all messages)
For example, a LogLevel of 3 means that the client driver logs messages with severities 1, 2, and 3.
LogPath
The absolute path of the log file. For example: /var/log/verticaadonet/ado.log.
LogNamespace
Limits logging to messages generated by certain objects in the client driver.
Example configuration file
The following example configuration file uses the default values for each configuration setting:
You can set the log properties of the ADO.NET driver with the VerticaLogProperties class, which includes the following methods:
SetLogPath(String path)
SetLogNamespace(String lognamespace)
SetLogLevel(VerticaLogLevel loglevel)
Logs are created when the first connection is opened, so you cannot change the log path with SetLogPath() after the connection starts. You can change the log level and log namespace at any time.
Changes made by these functions last for the lifetime of the application. To make permanent changes, use Vertica.Data.dll.config.
SetLogPath()
The SetLogPath() method takes as an argument a String path containing the path to the log file. If the path string contains only a directory path, then the log file is created with the name vdp-driver-MM-dd_HH.mm.ss.log (where MM-dd_HH.mm.ss is the date and time the log was created). If the path ends in a filename, such as log.txt or log.log, then the log is created with that filename.
If SetLogPath() is called with an empty string for the path argument, then the client executable's current directory is used as the log path.
If SetLogPath() is not called and entry exists for the log path in Vertica.Data.dll.config, and you have called any of the other VerticaLogProperties methods, then the client executable's current directory is used as the log path.
Note
The path must exist on the client system prior to calling this method. The method does not create directories.
For example:
//set the log pathstringpath="C:\\log";VerticaLogProperties.SetLogPath(path);
SetLogNamespace()
The SetLogNamespace() method takes as an argument a String lognamespace containing the namespace to log. The namespace string to log can be one of the following:
Vertica
Vertica.Data.VerticaClient
Vertica.Data.Internal.IO
Vertica.Data.Internal.DataEngine
Vertica.Data.Internal.Core
Namespaces can be truncated to include child namespaces. For example, you can specify Vertica.Data.Internal to log for all of the Vertica.Data.Internal namespaces.
If a log namespace is not set, and no value is stored in Vertica.Data.dll.config, then the Vertica namespace is used for logging.
For example:
//set namespace to logstringlognamespace="Vertica.Data.VerticaClient";VerticaLogProperties.SetLogNamespace(lognamespace);
SetLogLevel()
The SetLogLevel() method takes as an argument a VerticaLogLevel loglevel, one of the following:
VerticaLogLevel.None
VerticaLogLevel.Fatal
VerticaLogLevel.Error
VerticaLogLevel.Warning
VerticaLogLevel.Info
VerticaLogLevel.Debug
VerticaLogLevel.Trace
If a log level is not set, and no value is stored in Vertica.Data.dll.config, then VerticaLogLevel.None is used.