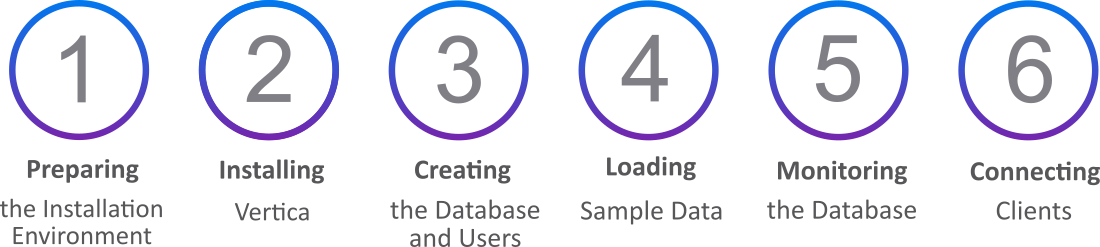
This section contains a short guide to setting up an installation environment for Vertica, loading data, and using various client drivers.
Examples in the documentation use $ to denote a terminal prompt and => to denote a vsql prompt.
This is the multi-page printable view of this section. Click here to print.
This section contains a short guide to setting up an installation environment for Vertica, loading data, and using various client drivers.
Examples in the documentation use $ to denote a terminal prompt and => to denote a vsql prompt.
Before installing Vertica, you must configure your environment.
To run Vertica Enterprise on-premises, follow the numbered instructions below.
To run the Vertica in a Virtual Machine instead, see Vertica community edition (CE).
Copy the installation file to your home directory. The example shows an rpm file for CentOS/RHEL, but you may have a deb file for Debian.
$ scp vertica-10.1.0.x86_64.RHEL6.rpm /~
Identify the IP address of the current node.
$ ipconfig -a
If the ipconfig command is not found in your path, you can try running it directly using the paths /sbin/ipconfig or /usr/sbin/ipconfig. If neither of those work, use the ip command:
$ ip a
Ensure your packages are up to date. Run the command based on your distribution.
On CentOS and RedHat:
$ sudo yum update -y
On openSUSE:
$ sudo zypper up
On Debian and Ubuntu:
$ sudo apt-get update && sudo apt-get upgrade
Set swappiness to 0 (recommended).
$ sudo systemctl vm.swappiness=0
Verify that SELinux is running in permissive mode or is disabled.
$ sudo setenforce 0
Disable the system firewall.
$ sudo systemctl mask firewalld
$ sudo systemctl disable firewalld
$ sudo systemctl stop firewalld
To install from the binary, run the command based on your distribution.
On CentOS, RedHat, and openSUSE:
$ sudo rpm -Uvh vertica-10.1.0.x86_64.RHEL6.rpm
On Debian and Ubuntu:
$ sudo dpkg -i vertica-10.1.0.x86_64.deb
Run the installation script. The following command specifies the localhost, the rpm, a database admin, and home directory.
$ sudo /opt/vertica/sbin/install_vertica -s localhost -r vertica-10.1.0.x86_64.RHEL6.rpm
-u dbadmin -g dbadmin -d /home/dbadmin -p vertica -L -Y
Switch to the newly created dbadmin user.
$ su dbadmin
Run admintools and accept the EULA and operating license.
$ admintools
The admintools utility included in the installation provides a number of administrative functions. The following steps show how to create a database and users with this utility.
View the status of your cluster. It should return an empty table.
$ admintools -t view_cluster
 DB | Host | State
----+------+-------
Create a database called "vdb" in the home directory with the password "vertica". This command also sets the plaintext password "vertica" for both the database and dbadmin.
$ admintools -t create_db --data_path=/home/dbadmin --catalog_path=/home/dbadmin --database=vdb --password=vertica --hosts=localhost
Run vsql and enter "vertica" at the password prompt.
$ vsql
Create a user named "Mike" with the password "inventor."
=> CREATE USER Mike IDENTIFIED BY 'inventor';
Grant the USAGE permission on the public schema.
=> GRANT USAGE ON SCHEMA PUBLIC TO Mike;
Vertica offers several solutions for loading files with structured and unstructred data, and from several formats.
Create a sample CSV file called cities.csv with the following contents and save it to /home/dbadmin/cities.csv.
City,State,Zip,Population
Boston,MA,02108,694583
Chicago,IL,60601,2705994
Seattle,WA,98101,744955
Dallas,TX,75201,1345047
New York,NY,10001,8398748
Run vsql.
$ vsql
Create the cities table.
=> CREATE TABLE cities (
city       varchar(20),
state      char(2),
zip        int,
population int
);
Use the COPY statement to load the data from the cities.csv file. The following command logs exceptions and rejections in the home directory.
=> COPY cities FROM LOCAL '/home/dbadmin/cities.csv' DELIMITER ',' NULL '' EXCEPTIONS '/home/dbadmin/cities_exceptions.log'
REJECTED DATA '/home/dbadmin/cities_rejections.log';
Review the rejections log for what data was excluded. Here, the header was excluded.
$ cat /home/dbadmin/cities_rejections.log

City,State,Zip,Population
Review the exceptions for details on the error. In this case, the header failed Vertica's integer data type verification.
$ cat /home/dbadmin/cities_exceptions.log

COPY: Input record 1 has been rejected (Invalid integer format 'Zip' for column 3 (zip)).
Please see /home/dbadmin/cities_rejections.log, record 1 for the rejected record. This record was record 1 from cities.csv
To fix this, add SKIP 1 to the original COPY statement. This excludes the first row.
=> COPY cities FROM LOCAL '/home/dbadmin/cities.csv' DELIMITER, 'NULL'
EXCEPTIONS '/home/dbadmin/cities_exceptions.log'
REJECTED DATA '/home/dbadmin/cities_rejections.log' SKIP 1;
To load data from another source, Vertica uses Flex tables. Flex tables simplify data loading by allowing you to load unstructured or "semi-structured" data without having to create a schema or column definitions.
Supported formats include:
Avro Data
CEF
CSV
Delimited
JSON
Create a table called cities_flex. Notice how it does not include column names or data types.
=> CREATE FLEXIBLE TABLE cities_flex();
Load the CSV file into the table.
=> COPY cities_flex FROM '/source/cities.csv' PARSER FDELIMITEDPARSER (delimiter=',');
Query the cities_flex table, specifying the column names from the original CSV file.
=> SELECT city, state FROM cities_flex;
This page includes a collection of general-purpose SQL statements useful for monitoring your database.
Check disk space used by tables.
=> SELECT projection_schema, anchor_table_name, to_char(sum(used_bytes)/1024/1024/1024,'999,999.99')
as disk_space_used_gb FROM
projection_storage
GROUP by projection_schema, anchor_table_name ORDER by
disk_space_used_gb desc limit 50;
Check total disk space used.
=> SELECT to_char(sum(used_bytes)/1024/1024/1024,'999,999.99') AS gb FROM projection_storage;
Check the amount of free disk space.
=> SELECT to_char(sum(disk_space_free_mb)/1024,'999,999,999') AS
disk_space_free_gb, to_char(sum(disk_space_used_mb)/1024,'999,999,999') AS
disk_space_used_gb FROM disk_storage;
Change the Zip and Population columns from VARCHAR to INT.
=> UPDATE cities_flex_keys set data_type_guess='int' WHERE key_name='Zip';
=> UPDATE cities_flex_keys set data_type_guess='int' WHERE key_name='Population';
=> COMMIT;
Refresh the cities_flex_view with the new data types
=> SELECT build_flextable_view('cities_flex');
Materialize the flex table and all columns into a persistent Vertica table.
=> CREATE TABLE cities AS SELECT * from cities_flex_view;
View user information.
=> SELECT user_name, is_super_user, resource_pool, memory_cap_kb, temp_space_cap_kb, run_time_cap FROM users;
Identify users.
=> SELECT * FROM user_sessions;
View queries by user.
=> SELECT * FROM query_profiles WHERE user_name ILIKE '%dbadmin%';
View roles.
=> SELECT * FROM roles;
View resource pool assignments.
=> SELECT user_name, resource_pool FROM users;
View table information.
=> SELECT table_name, is_flextable, is_temp_table, is_system_table, count(*) FROM tables GROUP by 1,2,3,4;
View projection information.
=> SELECT is_segmented, is_aggregate_projection, has_statistics, is_super_projection, count(*) FROM projections GROUP by 1,2,3,4,5;
View update information.
=> SELECT substr(query, 0, instr(query, '')+1) count(*) FROM (SELECT transaction_id, statement_id, upper(query::varchar(30000)) as query FROM query_profiles
WHERE regexp_like(query,'^\s*update\s','i')) sq GROUP BY 1 ORDER BY 1;
View active events.
=> SELECT * FROM active_events WHERE event_problem_description NOT ILIKE '%state to UP';
View backups.
=> SELECT * FROM database_backups;
View disk storage.
=> SELECT node_name, storage_path, storage_usage, storage_status, disk_space_free_percent FROM disk_storage;
View long-running queries
=> SELECT query_duration_us/1000000/60 AS query_duration_mins, table_name, user_name, processed_row_count AS rows_processed, substr(query,0,70) FROM query_profiles
ORDER BY query_duration_us DESCLIMIT 250;
View sizes and counts of Read Optimized Store (ROS) containers.
=> SELECT node_name, projection_name, sum(ros_count), sum(ros_used_bytes) FROM projection_storage GROUP BY 1,2 HAVING sum(ros_count) >= 50
ORDER BY 3 DESC LIMIT 250;
View license consumption.
=> SELECT GET_COMPLIANCE_STATUS();
View how the database complies with your license.
=> SELECT AUDIT('');
Audit the database to check if it complies with raw storage allowance of your license.
=> SELECT AUDIT_LICENSE_SIZE;
Compare storage size of database the database and your license.
=> SELECT /*+(license_utilization)*/
audit_start_timestamp,
database_size_bytes / (1024^3) AS database_size_gb,
license_size_bytes / (1024^3) AS license_size_gb, usage_percent
FROM v_catalog.license_audits ORDER BYaudit_start_timestamp DESC LIMIT 30;
Vertica supports several third-party clients. A list of Vertica client drivers can be found here.
Download the DbVisualizer client application.
Create a database. Database Menu -> Create Database Connection.
Specify a name for the connection.
In the "Driver (JDBC)" field, specify Vertica.
In the "Database Server" field, specify an IP address.
In the "Database Port" field, specify a port number.
In the "Database Name" field, specify a database name.
In the "Database Userid" field, specify a username.
In the "Database Password" field, specify a password.
Use the "ping" function to test the connection.
Download Tableau.
Open Tableau Desktop.
Select Server Connection.
Select Vertica as the server type.
Set the Server IP.
Set the Port to "vdb".
Sign into the database.