This is the multi-page printable view of this section.
Click here to print.
Return to the regular view of this page.
Getting started
Welcome to Getting Started.
Welcome to Getting Started. This guide walks you through the process of configuring a Vertica Analytics Platform database and running typical queries.
For short tutorial on how to install Vertica, create a database, and load data, see the Quickstart guide.
1 - Using this guide
This guide shows how to set up a Vertica database and run simple queries that perform common database tasks.
This guide shows how to set up a Vertica database and run simple queries that perform common database tasks.
Who should use this guide?
This guide targets anyone who wants to learn how to create and run a Vertica database. This guide requires no special knowledge at this point, although a rudimentary knowledge of basic SQL commands is useful when you begin to run queries.
For short tutorial on how to install Vertica, create a database, and load data, see the Quickstart guide.
What you need
The examples in this guide require one of the following:
For further instructions about installation, see Installing Vertica.
Accessing your database
You access your database with an SSH client or the terminal utility in your Linux console, such as vsql. Throughout this guide, you use the following user interfaces:
2 - Quickstart guide
This section contains a short guide to setting up an installation environment for Vertica, loading data, and using various client drivers.
This section contains a short guide to setting up an installation environment for Vertica, loading data, and using various client drivers.
Examples in the documentation use $ to denote a terminal prompt and => to denote a vsql prompt.
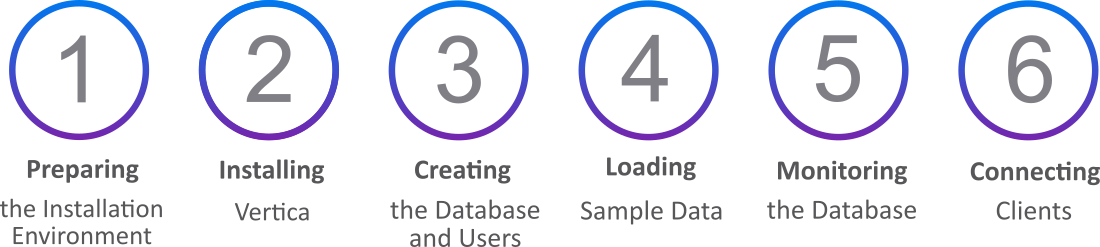
2.1 - Preparing the installation environment
Before installing Vertica, you must configure your environment.
Before installing Vertica, you must configure your environment.
To run Vertica Enterprise on-premises, follow the numbered instructions below.
To run the Vertica in a Virtual Machine instead, see Vertica community edition (CE).
-
Copy the installation file to your home directory. The example shows an rpm file for CentOS/RHEL, but you may have a deb file for Debian.
$ scp vertica-10.1.0.x86_64.RHEL6.rpm /~
-
Identify the IP address of the current node.
$ ipconfig -a
If the ipconfig command is not found in your path, you can try running it directly using the paths /sbin/ipconfig or /usr/sbin/ipconfig. If neither of those work, use the ip command:
$ ip a
Note
The previous commands can return multiple addresses. For example, if your system is configured to use both IPv4 and IPv6 addressing, the commands will list two addresses, one for each address family. In this case, you must determine which address you want to use.
-
Ensure your packages are up to date. Run the command based on your distribution.
On CentOS and RedHat:
$ sudo yum update -y
On openSUSE:
$ sudo zypper up
On Debian and Ubuntu:
$ sudo apt-get update && sudo apt-get upgrade
-
Set swappiness to 0 (recommended).
$ sudo systemctl vm.swappiness=0
-
Verify that SELinux is running in permissive mode or is disabled.
$ sudo setenforce 0
-
Disable the system firewall.
$ sudo systemctl mask firewalld
$ sudo systemctl disable firewalld
$ sudo systemctl stop firewalld
-
Install Vertica.
2.2 - Installing Vertica
On CentOS, RedHat, and openSUSE:.
-
To install from the binary, run the command based on your distribution.
On CentOS, RedHat, and openSUSE:
$ sudo rpm -Uvh vertica-10.1.0.x86_64.RHEL6.rpm
On Debian and Ubuntu:
$ sudo dpkg -i vertica-10.1.0.x86_64.deb
-
Run the installation script. The following command specifies the localhost, the rpm, a database admin, and home directory.
$ sudo /opt/vertica/sbin/install_vertica -s localhost -r vertica-10.1.0.x86_64.RHEL6.rpm
-u dbadmin -g dbadmin -d /home/dbadmin -p vertica -L -Y
-
Switch to the newly created dbadmin user.
$ su dbadmin
-
Run admintools and accept the EULA and operating license.
$ admintools
-
Creating a database and users.
2.3 - Creating a database and users
The admintools utility included in the installation provides a number of administrative functions.
The admintools utility included in the installation provides a number of administrative functions. The following steps show how to create a database and users with this utility.
-
View the status of your cluster. It should return an empty table.
$ admintools -t view_cluster
 DB | Host | State
----+------+-------
-
Create a database called "vdb" in the home directory with the password "vertica". This command also sets the plaintext password "vertica" for both the database and dbadmin.
$ admintools -t create_db --data_path=/home/dbadmin --catalog_path=/home/dbadmin --database=vdb --password=vertica --hosts=localhost
-
Run vsql and enter "vertica" at the password prompt.
$ vsql
-
Create a user named "Mike" with the password "inventor."
=> CREATE USER Mike IDENTIFIED BY 'inventor';
-
Grant the USAGE permission on the public schema.
=> GRANT USAGE ON SCHEMA PUBLIC TO Mike;
-
Load sample data.
2.4 - Loading sample data
Vertica offers several solutions for loading files with structured and unstructred data, and from several formats.
Vertica offers several solutions for loading files with structured and unstructred data, and from several formats.
Creating a sample data file
Create a sample CSV file called cities.csv with the following contents and save it to /home/dbadmin/cities.csv.
City,State,Zip,Population
Boston,MA,02108,694583
Chicago,IL,60601,2705994
Seattle,WA,98101,744955
Dallas,TX,75201,1345047
New York,NY,10001,8398748
Loading structured data from a file
-
Run vsql.
$ vsql
-
Create the cities table.
=> CREATE TABLE cities (
city       varchar(20),
state      char(2),
zip        int,
population int
);
-
Use the COPY statement to load the data from the cities.csv file. The following command logs exceptions and rejections in the home directory.
=> COPY cities FROM LOCAL '/home/dbadmin/cities.csv' DELIMITER ',' NULL '' EXCEPTIONS '/home/dbadmin/cities_exceptions.log'
REJECTED DATA '/home/dbadmin/cities_rejections.log';
-
Review the rejections log for what data was excluded. Here, the header was excluded.
$ cat /home/dbadmin/cities_rejections.log

City,State,Zip,Population
-
Review the exceptions for details on the error. In this case, the header failed Vertica's integer data type verification.
$ cat /home/dbadmin/cities_exceptions.log

COPY: Input record 1 has been rejected (Invalid integer format 'Zip' for column 3 (zip)).
Please see /home/dbadmin/cities_rejections.log, record 1 for the rejected record. This record was record 1 from cities.csv
-
To fix this, add SKIP 1 to the original COPY statement. This excludes the first row.
=> COPY cities FROM LOCAL '/home/dbadmin/cities.csv' DELIMITER, 'NULL'
EXCEPTIONS '/home/dbadmin/cities_exceptions.log'
REJECTED DATA '/home/dbadmin/cities_rejections.log' SKIP 1;
Loading unstructured data with flex tables
To load data from another source, Vertica uses Flex tables. Flex tables simplify data loading by allowing you to load unstructured or "semi-structured" data without having to create a schema or column definitions.
Supported formats include:
-
Avro Data
-
CEF
-
CSV
-
Delimited
-
JSON
-
Create a table called cities_flex. Notice how it does not include column names or data types.
=> CREATE FLEXIBLE TABLE cities_flex();
-
Load the CSV file into the table.
=> COPY cities_flex FROM '/source/cities.csv' PARSER FDELIMITEDPARSER (delimiter=',');
-
Query the cities_flex table, specifying the column names from the original CSV file.
=> SELECT city, state FROM cities_flex;
2.5 - Monitoring the database
This page includes a collection of general-purpose SQL statements useful for monitoring your database.
This page includes a collection of general-purpose SQL statements useful for monitoring your database.
Check disk space
Check disk space used by tables.
=> SELECT projection_schema, anchor_table_name, to_char(sum(used_bytes)/1024/1024/1024,'999,999.99')
as disk_space_used_gb FROM
projection_storage
GROUP by projection_schema, anchor_table_name ORDER by
disk_space_used_gb desc limit 50;
Check total disk space used.
=> SELECT to_char(sum(used_bytes)/1024/1024/1024,'999,999.99') AS gb FROM projection_storage;
Check the amount of free disk space.
=> SELECT to_char(sum(disk_space_free_mb)/1024,'999,999,999') AS
disk_space_free_gb, to_char(sum(disk_space_used_mb)/1024,'999,999,999') AS
disk_space_used_gb FROM disk_storage;
Adjust data types
Change the Zip and Population columns from VARCHAR to INT.
=> UPDATE cities_flex_keys set data_type_guess='int' WHERE key_name='Zip';
=> UPDATE cities_flex_keys set data_type_guess='int' WHERE key_name='Population';
=> COMMIT;
Refresh the cities_flex_view with the new data types
=> SELECT build_flextable_view('cities_flex');
Materialize the flex table
Materialize the flex table and all columns into a persistent Vertica table.
=> CREATE TABLE cities AS SELECT * from cities_flex_view;
View user information.
=> SELECT user_name, is_super_user, resource_pool, memory_cap_kb, temp_space_cap_kb, run_time_cap FROM users;
Identify users.
=> SELECT * FROM user_sessions;
View queries by user.
=> SELECT * FROM query_profiles WHERE user_name ILIKE '%dbadmin%';
View roles.
=> SELECT * FROM roles;
View resource pool assignments.
=> SELECT user_name, resource_pool FROM users;
View table information.
=> SELECT table_name, is_flextable, is_temp_table, is_system_table, count(*) FROM tables GROUP by 1,2,3,4;
View projection information.
=> SELECT is_segmented, is_aggregate_projection, has_statistics, is_super_projection, count(*) FROM projections GROUP by 1,2,3,4,5;
View update information.
=> SELECT substr(query, 0, instr(query, '')+1) count(*) FROM (SELECT transaction_id, statement_id, upper(query::varchar(30000)) as query FROM query_profiles
WHERE regexp_like(query,'^\s*update\s','i')) sq GROUP BY 1 ORDER BY 1;
View active events.
=> SELECT * FROM active_events WHERE event_problem_description NOT ILIKE '%state to UP';
View backups.
=> SELECT * FROM database_backups;
View disk storage.
=> SELECT node_name, storage_path, storage_usage, storage_status, disk_space_free_percent FROM disk_storage;
View long-running queries
=> SELECT query_duration_us/1000000/60 AS query_duration_mins, table_name, user_name, processed_row_count AS rows_processed, substr(query,0,70) FROM query_profiles
ORDER BY query_duration_us DESCLIMIT 250;
View sizes and counts of Read Optimized Store (ROS) containers.
=> SELECT node_name, projection_name, sum(ros_count), sum(ros_used_bytes) FROM projection_storage GROUP BY 1,2 HAVING sum(ros_count) >= 50
ORDER BY 3 DESC LIMIT 250;
View license consumption.
=> SELECT GET_COMPLIANCE_STATUS();
View how the database complies with your license.
=> SELECT AUDIT('');
Audit the database to check if it complies with raw storage allowance of your license.
=> SELECT AUDIT_LICENSE_SIZE;
Compare storage size of database the database and your license.
=> SELECT /*+(license_utilization)*/
audit_start_timestamp,
database_size_bytes / (1024^3) AS database_size_gb,
license_size_bytes / (1024^3) AS license_size_gb, usage_percent
FROM v_catalog.license_audits ORDER BYaudit_start_timestamp DESC LIMIT 30;
2.6 - Connecting clients
Vertica supports several third-party clients.
Vertica supports several third-party clients. A list of Vertica client drivers can be found here.
Connecting to DbVisualizer
-
Download the DbVisualizer client application.
-
Create a database. Database Menu -> Create Database Connection.
-
Specify a name for the connection.
-
In the "Driver (JDBC)" field, specify Vertica.
-
In the "Database Server" field, specify an IP address.
-
In the "Database Port" field, specify a port number.
-
In the "Database Name" field, specify a database name.
-
In the "Database Userid" field, specify a username.
-
In the "Database Password" field, specify a password.
-
Use the "ping" function to test the connection.
Connecting to tableau
-
Download Tableau.
-
Open Tableau Desktop.
-
Select Server Connection.
-
Select Vertica as the server type.
-
Set the Server IP.
-
Set the Port to "vdb".
-
Sign into the database.
3 - Vertica community edition (CE)
The Vertica Community Edition (CE) is a free, limited license that Vertica provides users so that they can get a hands-on introduction to the platform.
The Vertica Community Edition (CE) is a free, limited license that Vertica provides users so that they can get a hands-on introduction to the platform. It allows you to deploy up to three nodes using a maximum of 1TB of data.
As part of the CE license, you agree to the collection of some anonymous, non-identifying usage data. This data lets Vertica understand how customers use the product, and helps guide the development of new features. None of your personal data is collected. For details on what is collected, see the Community Edition End User License Agreement.
Vertica provides two options to use the Community Edition:
-
CE container image. Container images require a container engine such as Docker Desktop. For installation details, see the official Docker documentation.
-
Vertica Community Edition Virtual Machine (Vertica CE VM), which is available for download on the Vertica website.
CE container image
The CE image is a single-node, lightweight alternative to the Vertica CE VM. Vertica provides two options to get the CE container image:
The CE container environment includes the following:
-
VMart example database
-
admintools
-
vsql
-
Developer libraries
Important
Use the Vertica CE container image with the following limitations:
For more information about Vertica licensing, see Managing licenses.
Vertica CE VM
The Vertica CE VM is a preconfigured Linux environment that includes:
Note
The Vertica CE VM is not supported for production use.
For a preview of the tutorial included in the Vertica CE VM, see the Vertica CE VM User Guide.
To download and install the Vertica CE VM, follow the instructions in the Vertica CE VM Installation Guide.
4 - Vertica interfaces
Vertica provides tools to perform administrative tasks quickly and easily:.
Vertica provides tools to perform administrative tasks quickly and easily:
-
Management Console (MC) provides a unified view of your Vertica cluster through a browser connection.
-
Administration Tools provides a simple graphical user interface for you to perform certain tasks such as starting and stopping a database, running Database Designer, and more.
The following sections provide detailed information about both tools.
Management Console
Management Console (MC) is the Vertica in-browser monitoring and management tool. Its graphical user interface provides a unified view of your Vertica database operations. Through user-friendly, step-by-step screens, you can create, configure, manage, and monitor your Vertica databases and their associated clusters. You can use MC to operate your Vertica database in Eon Mode or in Enterprise Mode. You can use MC to provision and deploy a Vertica Eon Mode database.
For detailed instructions, see Management Console.
If possible, always run the Administration Tools using the database administrator account (dbadmin) on the administration host.
When you run Administration Tools, the Main Menu dialog box appears with a dark blue background and a title on top. The screen captures used in this documentation set are cropped down to the dialog box itself, as shown in the following screenshot.
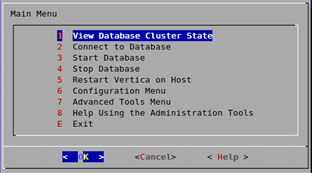
The Administration Tools interface responds to mouse clicks in some terminal windows, but it might respond only to keystrokes. The following table is a quick reference to keystroke usage in the Administration Tools interface:
|
Key |
Action |
|
Return |
Run selected command. |
|
Tab |
Cycle between OK, Cancel, Help, and menu. |
|
Up/Down Arrow |
Move cursor up and down in menu, window, or help file. |
|
Space |
Select item in list. |
|
Character |
Select corresponding command from menu. |
For details, see Using the Administration Tools in the Administrator’s Guide.
After your first login
The first time you log in as the database administrator and run the Administration Tools, complete the following steps:
-
Accept the end-user license agreement (EULA) to proceed.
A window displays, requesting the location of the license key file you downloaded from the OpenText website. The default path is /tmp/vlicense.dat.
-
Enter the absolute path to your license key and select OK.
-
To return to the command line, select Exit and click OK.
5 - Introducing the VMart example database
Vertica ships with a sample multi-schema database called the VMart Example Database, which represents a database that might be used by a large supermarket (VMart) to access information about its products, customers, employees, and online and physical stores.
Vertica ships with a sample multi-schema database called the VMart Example Database, which represents a database that might be used by a large supermarket (VMart) to access information about its products, customers, employees, and online and physical stores. Using this example, you can create, run, optimize, and test a multi-schema database.
The VMart database contains the following schema:
VMart database location and scripts
If you installed Vertica from the RPM package, the VMart schema is installed in the /opt/vertica/examples/VMart_Schema directory. This folder contains the following script files that you can use to get started quickly. Use the scripts as templates for your own applications.
|
Script/file name |
Description |
vmart_count_data.sql |
SQL script that counts rows of all example database tables, which you can use to verify load. |
vmart_define_schema.sql |
SQL script that defines the logical schema for each table and referential integrity constraints. |
vmart_gen.cpp |
Data generator source code (C++). |
vmart_gen |
Data generator executable file. |
vmart_load_data.sql |
SQL script that loads the generated sample data to the corresponding tables using COPY. |
vmart_ queries.sql |
SQL script that contains concatenated sample queries for use as a training set for the Database Designer. |
vmart_query_##.sql |
SQL scripts that contain individual queries; for example, vmart_query_01 through vmart_query_09.sql |
vmart_schema_drop.sql |
SQL script that drops all example database tables. |
For more information about the schema, tables, and queries included with the VMart example database, see the Appendix.
6 - Installing and connecting to the VMart example database
Follow the steps in this section to create the fully functioning, multi-schema VMart example database to run sample queries.
Follow the steps in this section to create the fully functioning, multi-schema VMart example database to run sample queries. The number of example databases you create within a single Vertica installation is limited only by the disk space available on your system. However, Vertica strongly recommends that you start only one example database at a time to avoid unpredictable results.
Vertica provides two options to install the example database:
-
Quick Installation Using a Script: This option lets you create the example database and start using it immediately. Use this method to bypass the schema and table creation processes and start querying immediately.
-
Advanced Installation. The advance option is an advanced-but-simple example database installation using the Administration Tools interface. Use this method to better understand the database creation process and practice creating a schema, creating tables, and loading data.
Note
Both installation methods create a database named VMart. If you try both installation methods, you need to drop the VMart database you created (see Restoring the Status of Your Host) or create the subsequent database with a new name. However, Vertica strongly recommends that you start only one example database at a time to avoid unpredictable results
This tutorial uses Vertica-provided queries, but if you create your own design and use your own queries, you can follow the same set of procedures.
6.1 - Quick installation using a script
The script you need to perform a quick installation is located in /opt/vertica/sbin and is called install_example.
The script you need to perform a quick installation is located in /opt/vertica/sbin and is called install_example. This script creates a database on the default port (5433), generates data, creates the schema and a default superprojection, and loads the data. The folder also contains a delete_example script, which stops and drops the database.
-
In a terminal window, log in as the database administrator.
$ su dbadmin
Password: (your password)
-
Change to the /examples directory.
$ cd /opt/vertica/examples
-
Run the install script:
$ /opt/vertica/sbin/install_example VMart
After installation, you should see the following:
[dbadmin@localhost examples]$ /opt/vertica/sbin/install_example VMart
Installing VMart example example database
Mon Jul 22 06:57:40 PDT 2013
Creating Database
Completed
Generating Data. This may take a few minutes.
Completed
Creating schema
Completed
Loading 5 million rows of data. Please stand by.
Completed
Removing generated data files
Example data
The example database log files, ExampleInstall.txt and ExampleDelete.txt, are written to /opt/vertica/examples/log.
To start using your database, continue to Connecting to the Database in this guide. To drop the example database, see Restoring the Status of Your Host in this guide.
6.2 - Advanced installation
To perform an advanced-but-simple installation, set up the VMart example database environment and then create the database using the Administration Tools or Management Console.
To perform an advanced-but-simple installation, set up the VMart example database environment and then create the database using the Administration Tools or Management Console.
Note
If you installed the VMart database using the quick installation method, you cannot complete the following steps because the database has already been created.
To try the advanced installation, drop the example database (see Restoring the Status of Your Host on this guide) and perform the advanced Installation, or create a new example database with a different name. However, Vertica strongly recommends that you install only one example database at a time to avoid unpredictable results.
The advanced installation requires the following steps:
6.2.1 - Step 1: setting up the example environment
Stop all databases running on the same host on which you plan to install your example database.
-
Stop all databases running on the same host on which you plan to install your example database.
If you are unsure if other databases are running, run the Administration Tools and select View Cluster State. The State column should show DOWN values on pre-existing databases.
If databases are running, click Stop Database in the Main Menu of the Administration Tools interface and click OK.
-
In a terminal window, log in as the database administrator:
$ su dbadmin
Password:
-
Change to the /VMart_Schema directory.
$ cd /opt/vertica/examples/VMart_Schema
Do not change directories while following this tutorial. Some steps depend on being in a specific directory.
-
Run the sample data generator.
$ ./vmart_gen
-
Let the program run with the default parameters, which you can review in the README file.
Using default parameters
datadirectory = ./
numfiles = 1
seed = 2
null = ' '
timefile = Time.txt
numfactsalesrows = 5000000
numfactorderrows = 300000
numprodkeys = 60000
numstorekeys = 250
numpromokeys = 1000
numvendkeys = 50
numcustkeys = 50000
numempkeys = 10000
numwarehousekeys = 100
numshippingkeys = 100
numonlinepagekeys = 1000
numcallcenterkeys = 200
numfactonlinesalesrows = 5000000
numinventoryfactrows = 300000
gen_load_script = false
Data Generated successfully !
-
If the vmart_gen executable does not work correctly, recompile it as follows, and run the sample data generator script again.
$ g++ vmart_gen.cpp -o vmart_gen
$ chmod +x vmart_gen
$ ./vmart_gen
6.2.2 - Step 2: creating the example database
To create the example database: use the Administration Tools or Management Console, as described in this section.
To create the example database: use the Administration Tools or Management Console, as described in this section.
In this procedure, you create the example database using the Administration Tools. To use the Management Console, go to the next section.
-
Run the Administration Tools.
$ /opt/vertica/bin/admintools
or simply type admintools
-
From the Administration Tools Main Menu, click Configuration Menu and click OK.
-
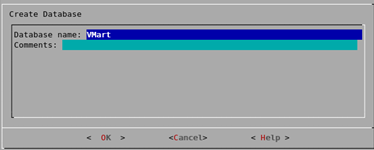
Click Create Database and click OK.
-
Name the database VMart and click OK.
-
Click OK to bypass the password and click Yes to confirm.
There is no need for a database administrator password in this tutorial. When you create a production database, however, always specify an administrator password. Otherwise, the database is permanently set to trust authentication (no passwords).
-
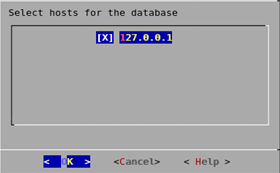
Select the hosts you want to include from your Vertica cluster and click OK.
This example creates the database on a one-host cluster. Vertica recommends a minimum of three hosts in the cluster. If you are using the Vertica Community Edition, you are limited to three nodes.
-
Click OK to select the default paths for the data and catalog directories.

-
Catalog and data paths must contain only alphanumeric characters and cannot have leading space characters. Failure to comply with these restrictions could result in database creation failure.
-
When you create a production database, you’ll likely specify other locations than the default. See Prepare Disk Storage Locations in the Administrator’s Guide for more information.
-
Since this tutorial uses a one-host cluster, a K-safety warning appears. Click OK.

-
Click Yes to create the database.
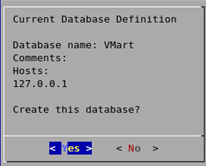
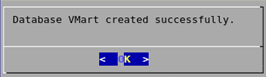
During database creation, Vertica automatically creates a set of node definitions based on the database name and the names of the hosts you selected and returns a success message.
-
Click OK to close the Database VMart created successfully message.
Creating the example database using Management Console
In this procedure, you create the example database using Management Console. To use the Administration Tools, follow the steps in the preceding section.
Note
To use Management Console, the console should already be installed and you should be familiar with its concepts and layout. For details, see
Management Console.
-
Connect to Management Console and log in.
-
On the Home page, click Infrastructure to go to the Databases and Clusters page.
-
Click to select the appropriate existing cluster and click Create Database.
-
Follow the on-screen wizard, which prompts you to provide the following information:
-
Database name, which must be between 3–25 characters, starting with a letter, and followed by any combination of letters, numbers, or underscores.
-
(Optional) database administrator password for the database you want to create and connect to.
-
IP address of a node in your database cluster, typically the IP address of the administration host.
-
Click Next.
6.2.3 - Step 3: connecting to the database
Regardless of the installation method you used, follow these steps to connect to the database.
Regardless of the installation method you used, follow these steps to connect to the database.
-
As
dbadmin, run the Administration Tools.
$ /opt/vertica/bin/admintools
or simply type admintools.
-
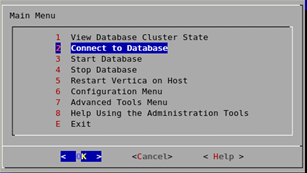
If you are already in the Administration Tools, navigate to the Main Menu page.
-
Select Connect to Database, click OK.
To configure and load data into the VMart database, complete the following steps:
If you installed the VMart database using the Quick Installation method, the schema, tables, and data are already defined. You can choose to drop the example database (see Restoring the Status of Your Host in this guide) and perform the Advanced Installation, or continue straight to Querying Your Data in this guide.
6.2.4 - Step 4: defining the database schema
The VMart database installs with sample scripts with SQL commands that are intended to represent queries that might be used in a real business.
The VMart database installs with sample scripts with SQL commands that are intended to represent queries that might be used in a real business. The vmart_define_schema.sql script runs a script that defines the VMart schema and creates tables. You must run this script before you load data into the VMart database.
This script performs the following tasks:
-
Defines two schemas in the VMart database schema: online_sales and store.
-
Defines tables in both schemas.
-
Defines constraints on those tables.
Vmart=> \i vmart_define_schema.sql
CREATE SCHEMA
CREATE SCHEMA
CREATE TABLE
CREATE TABLE
CREATE TABLE
CREATE TABLE
CREATE TABLE
CREATE TABLE
CREATE TABLE
CREATE TABLE
CREATE TABLE
ALTER TABLE
CREATE TABLE
CREATE TABLE
ALTER TABLE
CREATE TABLE
ALTER TABLE
CREATE TABLE
CREATE TABLE
CREATE TABLE
ALTER TABLE
6.2.5 - Step 5: loading data
Now that you have created the schemas and tables, you can load data into a table by running the vmart_load_data.sql script.
Now that you have created the schemas and tables, you can load data into a table by running the vmart_load_data.sql script. This script loads data from the 15 .tbl text files in /opt/vertica/examples/VMart_Schema into the tables that vmart_design_schema.sql created.
It might take several minutes to load the data on a typical hardware cluster. Check the load status by monitoring the vertica.log file, as described in Monitoring Log Files in the Administrator’s Guide.
VMart=> \i vmart_load_data.sql
Rows Loaded
-------------
1826
(1 row)
Rows Loaded
-------------
60000
(1 row)
Rows Loaded
-------------
250
(1 row)
Rows Loaded
-------------
1000
(1 row)
Rows Loaded
-------------
50
(1 row)
Rows Loaded
-------------
50000
(1 row)
Rows Loaded
-------------
10000
(1 row)
Rows Loaded
-------------
100
(1 row)
Rows Loaded
-------------
100
(1 row)
Rows Loaded
-------------
1000
(1 row)
Rows Loaded
-------------
200
(1 row)
Rows Loaded
-------------
5000000
(1 row)
Rows Loaded
-------------
300000
(1 row)
VMart=>
7 - Querying data
The VMart database installs with sample scripts that contain SQL commands that represent queries that might be used in a real business.
The VMart database installs with sample scripts that contain SQL commands that represent queries that might be used in a real business. Use basic SQL commands to query the database, or try out the following command. Once you’re comfortable running the example queries, you might want to write your own.
Note
The data that your queries return might differ from the example output shown in this guide because the sample data generator is random.
Type the following SQL command to return the values for five products with the lowest fat content in the Dairy department. The command selects the fat content from Dairy department products in the product_dimension table in the public schema, orders them from low to high and limits the output to the first five (the five lowest fat contents).
VMart => SELECT fat_content
         FROM ( SELECT DISTINCT fat_content
                FROM product_dimension
                WHERE department_description
                IN ('Dairy') ) AS food
         ORDER BY fat_content
         LIMIT 5;
Your results will be similar to the following:
 fat_content
-------------
80
81
82
83
84
(5 rows)
The preceding example is from the vmart_query_01.sql file. You can execute more sample queries using the scripts that installed with the VMart database or write your own. For a list of the sample queries supplied with Vertica, see Appendix: VMart example database schema, tables, and scripts.
8 - Backing up and restoring the database
Vertica supplies a comprehensive utility, vbr, that lets you back up and restore a full database, as well as create backups of specific schema or tables.
Important
Inadequate security on backups can compromise overall database security. Be sure to secure backup locations and strictly limit access to backups only to users who already have permissions to access all database data.
Vertica supplies a comprehensive utility, vbr, that lets you back up and restore a full database, as well as create backups of specific schema or tables. You should back up your database regularly and before major or destructive operations.
All vbr operations rely on a configuration file that describes your database, backup locations, and other parameters. Typically you use the same configuration file for both the backup and restore operations. To create your first configuration file, copy one of the sample files for backup listed in Sample vbr configuration files. Edit the copy to specify a snapshot (backup) name, your database details, and where to back up. The comments in the sample file guide you.
The following example shows a full backup:
$ vbr -t backup --config full-backup.ini
Starting backup of database VTDB.
Participating nodes: v_vmart_node0001, v_vmart_node0002, v_vmart_node0003, v_vmart_node0004.
Snapshotting database.
Snapshot complete.
Approximate bytes to copy: 2315056043 of 2356089422 total.
[==================================================] 100%
Copying backup metadata.
Finalizing backup.
Backup complete!
By default, there is no screen output other than the progress bar.
You can restore the entire database or selected schemas and tables. You can also use vbr to replicate data from one database to another or to copy an entire cluster. For more information about vbr, see Backing up and restoring the database.
9 - Using Database Designer to create a comprehensive design
Vertica Database Designer:.
Vertica Database Designer:
-
Analyzes your logical schema, sample data, and, optionally, your sample queries.
-
Creates a physical schema design (a set of projections) that can be deployed automatically or manually.
-
Does not require specialized database knowledge.
-
Can be run and rerun any time for additional optimization without stopping the database.
-
Uses strategies to provide optimal query performance and data compression.
Use Database Designer to create a comprehensive design, which allows you to create projections for all tables in your database.
You can also use Database Designer to create an incremental design, which creates projections for all tables referenced in the queries you supply.
You can create a comprehensive design with Database Designer using Management Console or through Administration Tools. You can also choose to run Database Designer programmatically.
9.1 - Running Database Designer with Management Console
In this tutorial, you'll create a comprehensive design with Database Designer through the Management Console interface.
In this tutorial, you'll create a comprehensive design with Database Designer through the Management Console interface. If, in the future, you have a query that you want to optimize, you can create an enhanced (incremental) design with additional projections. You can tune these projections specifically for the query you provide.
Note
To run Database Designer outside Administration Tools, you must be a dbadmin user. If you are not a dbadmin user, you must have the DBDUSER role assigned to you and own the tables for which you are designing projections. For details, see
Database Designer access requirements.
You can choose to create the design manually or use the Management Console wizard, as described below.
Important
Set your browser so it does not cache pages. If a browser caches pages, you might be unable to see the new design added.
Follow these steps to to create a comprehensive design with the Management Console wizard:
-
Log in to Management Console.
-
Verify that your database is up and running.
-
Choose the database for which you want to create the design. You can find the database under the Recent Databases section or by clicking Existing Infrastructure to reach the Databases and Clusters page.
The database overview page opens.
-
At the bottom of the screen, click the Design button.
-
In the New Design dialog box, enter the design name.
-
Click Wizard to continue.
-
Create an initial design. For Design Type, select Comprehensive and click Next.
-
In the Optimization Objective window, select Balance Load and Performance to create a design that is balanced between database size and query performance. Click Next.
-
Select the schemas. Because the VMart design is a multi-schema database, select all three schemas (public, store, and online_sales) for your design in the Select Sample Data window. Click Next.
If you include a schema that contains tables without data, the design could be suboptimal. You can choose to continue, but Vertica recommends that you deselect the schemas that contain empty tables before you proceed.
-
Choose the K-safety value for your design. The K-Safety value determines the number of buddy projections you want Database Designer to create.
-
Choose Analyze Correlations Mode. Analyze Correlations Mode determines if Database Designer analyzes and considers column correlations when creating the design.
-
Ignore: When creating a design, ignore any column correlations in the specified tables.
-
Consider existing: Consider the existing correlations in the tables when creating the design. If you set the mode to 1, and there are no existing correlations, Database Designer does not consider correlations.
-
Analyze missing: Analyze column correlations on tables where the correlation analysis was not previously performed. When creating the design, consider all column correlations (new and existing).
-
Analyze all: Analyze all column correlations in the tables and consider them when creating the design. Even if correlations exist for a table, reanalyze the table for correlations.
Click Next.
-
Submit query files to Database Designer in one of two ways:
-
Supply your own query files by selecting the Browse button.
-
Click Use Query Repository, which submits recently executed queries from the QUERY_REQUESTS system table.
Click Next.
-
In the Execution Options window, select any of the following options:
-
Analyze statistics: Select this option to run statistics automatically after design deployment, so Database Designer can make better decisions for its proposed design.
-
Auto-build: Select this option to run Database Designer as soon as you complete the wizard. This option only builds the proposed design.
-
Auto-deploy: Select this option for auto-build designs that you want to deploy automatically.
-
Click Submit Design. The Database Designer page opens:
-
If you chose to automatically deploy your design, Database Designer executes in the background.
-
If you did not select the Auto-build or Auto-deploy options, you can click Build Design or Deploy Design on the Database Designer page.
-
In the My Designs pane, view the status of your design:
-
When the deployment completes, the My Design pane shows Design Deployed.
-
The event history window shows the details of the design build and deployment.
To run Database Designer with Administration Tools, see Running Database Designer with administration tools in this guide.
9.2 - Running Database Designer with administration tools
In this procedure, you create a comprehensive design with Database Designer using the Administration Tools interface.
In this procedure, you create a comprehensive design with Database Designer using the Administration Tools interface. If, in the future, you have a query that you want to optimize, you can create an enhanced (incremental) design with additional projections. You can tune these projections specifically for the query you provide. See Incremental Design for more information.
Follow these steps to create the comprehensive design using Database Designer in Administration Tools:
-
If you are not in Administration Tools, exit the vsql session and access Administration Tools:
-
Start the database for which you want to create a design.
-
From the Main Menu, click Configuration Menu and then click OK.
-
From the Configuration Menu, click Run Database Designer and then click OK.
-
When the Select a database for design dialog box opens, select VMart and then click OK.
If you are prompted to enter the password for the database, click OK to bypass the message. Because no password was assigned when you installed the VMart database, you do not need to enter one now.
-
Click OK to accept the default directory for storing Database Designer output and log files.
-
In the Database Designer window, enter a name for the design, for example, vmart_design, and click OK. Design names can contain only alphanumeric characters or underscores. No other special characters are allowed.
-
Create a complete initial design. In the Design Type window, click Comprehensive and click OK.
-
Select the schemas. Because the VMart design is a multi-schema database, you can select all three schemas (online_sales, public, and store) for your design. Click OK.
If you include a schema that contains tables without data, the Administration Tools notifies you that designing for tables without data could be suboptimal. You can choose to continue, but Vertica recommends that you deselect the schemas that contain empty tables before you proceed.
-
In the Design Options window, accept all three options and click OK.
The three options are:
- Optimize with queries: Supplying the Database Designer with queries is especially important if you want to optimize the database design for query performance. Vertica recommends that you limit the design input to 100 queries.
- Update statistics: Accurate statistics help the Database Designer choose the best strategy for data compression. If you select this option, the database statistics are updated to maximize design quality.
- Deploy design: The new design deploys automatically. During deployment, new projections are added, some existing projections retained, and any necessary existing projections removed. Any new projections are refreshed to populate them with data.
-
Because you selected the Optimize with queries option, you must enter the full path to the file containing the queries that will be run on your database. In this example, it is:
/opt/vertica/examples/VMart_Schema/vmart_queries.sql
The queries in the query file must be delimited with semicolons (;). The last query must end with a semicolon (;).
-
Choose the K-safety value you want and click OK. The design K-Safety determines the number of buddy projections you want Database Designer to create.
If you create a comprehensive design on a single node, you are not prompted to enter a K-safety value.
-
In the Optimization Objective window, select Balanced query/load performance to create a design that is balanced between database size and query performance. Click OK.
-
When the informational message displays, click Proceed.
Database Designer automatically performs these actions:
-
Sets up the design session.
-
Examines table data.
-
Loads queries from the query file you provided (in this example, /opt/vertica/examples/VMart_Schema/vmart_queries.sql).
-
Creates the design.
Deploys the design or saves a SQL file containing the commands to create the design, based on your selections in the Desgin Options window.
Depending on system resources, the design process could take several minutes. You should allow this process to complete uninterrupted. If you must cancel the session, use Ctrl+C.
-
When Database Designer finishes, press Enter to return to the Administration Tools menu. Examine the steps taken to create the design. The files are in the directory you specified to store the output and log files. In this example, that directory is /opt/vertica/examples/VMart_Schema. For more information about the script files, see About Database Designer.
For additional information about managing your designs, see Creating a database design in the Administrator’s Guide.
10 - Restoring the status of your host
When you finish the tutorial, you can restore your host machines to their original state.
When you finish the tutorial, you can restore your host machines to their original state. Use the following instructions to clean up your host and start over from scratch.
Stopping and dropping the database
Follow these steps to stop and/or drop your database. A database must be stopped before it can be dropped.
-
If connected to the database, disconnect by typing \q.
-
In the Administration Tools Main Menu dialog box, click Stop Database and click OK.
-
In the Select database to stop window, select the database you want to stop and click OK.
-
After stopping the database, click Configuration Menu and click OK.
-
Click Drop Database and click OK.
-
In the Select database to drop window, select the database you want to drop and click OK.
-
Click Yes to confirm.
-
In the next window type yes (lowercase) to confirm and click OK.
Alternatively, use the delete_example script, which stops and drops the database:
-
If connected to the database, disconnect by typing \q.
-
In the Administration Tools Main Menu dialog box, select Exit.
-
Log in as the database administrator.
-
Change to the /examples directory.
$ cd /opt/vertica/examples
-
Run the delete_example script.
$ /opt/vertica/sbin/delete_example Vmart
Uninstalling Vertica
See Uninstall Vertica.
Optional steps
You can also choose to:
11 - Appendix: VMart example database schema, tables, and scripts
This appendix provides detailed information about the VMart example database’s schema, tables, and scripts.
This appendix provides detailed information about the VMart example database’s schema, tables, and scripts.
The VMart example database contains three different schemas:
-
public
-
store
-
online_sales
The term “schema” has several related meanings in Vertica:
-
In SQL statements, a schema refers to named namespace for a logical schema.
-
Logical schema refers to a set of tables and constraints.
-
Physical schema refers to a set of projections.
Tables identifies the three schemas and all the data tables in the VMart database. Each schema contains tables that are created and loaded during database installation. See the schema maps for a list of tables and their contents:
Sample scripts describes the sample scripts that contain SQL commands that represent queries that might be used in a real business using a VMart-like database. Once you’re comfortable running the example queries, you might want to write your own.
11.1 - Tables
The three schemas in the VMart database include the following tables:.
The three schemas in the VMart database include the following tables:
public Schema |
store Schema |
online_sales Schema |
inventory_fact |
store_orders_fact |
online_sales_fact |
customer_dimension |
store_sales_fact |
call_center_dimension |
date_dimension |
store_dimension |
online_page_dimension |
employee_dimension |
|
|
product_dimension |
|
|
promotion_dimension |
|
|
shipping_dimension |
|
|
vendor_dimension |
|
|
warehouse_dimension |
|
|
11.2 - Public schema map
The public schema is a snowflake schema.
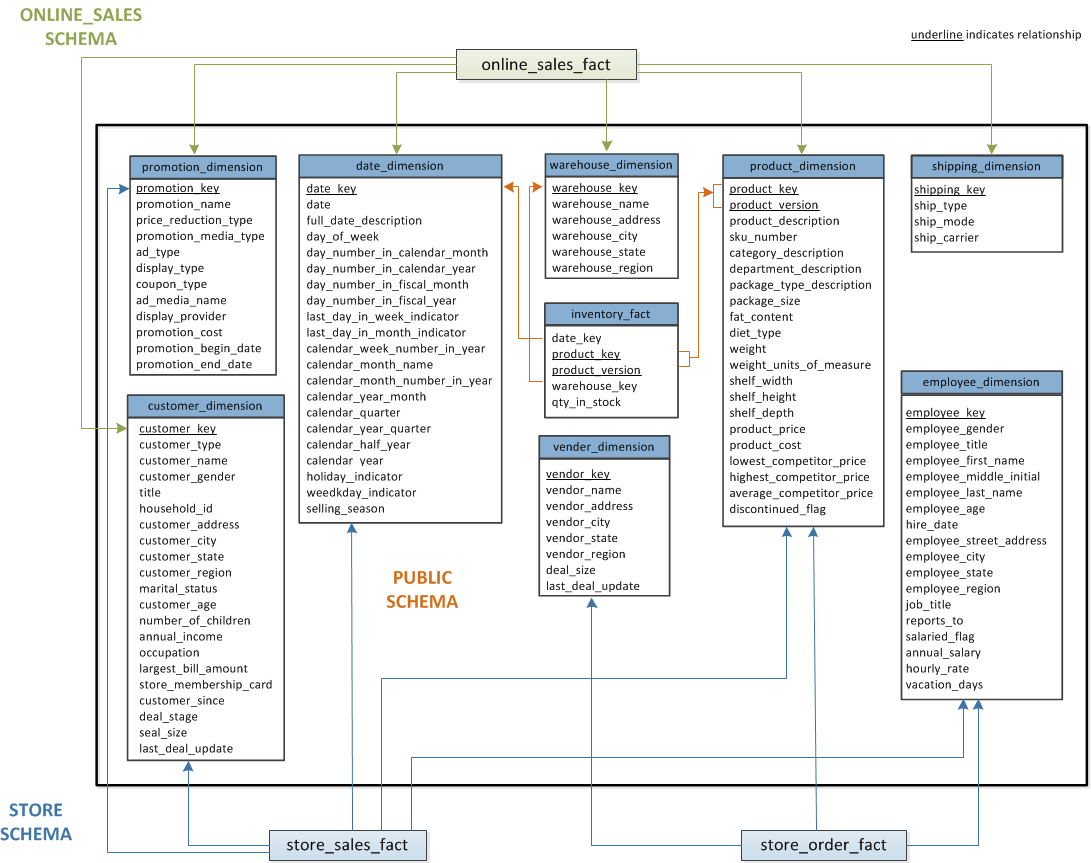
The public schema is a snowflake schema. The following graphic illustrates the public schema and its relationships with tables in the online_sales and store schemas.
The subsequent subsections describe database tables.
11.2.1 - inventory_fact
This table contains information about each product in inventory.
This table contains information about each product in inventory.
|
Column Name |
Data Type |
NULLs |
date_key |
INTEGER |
No |
product_key |
INTEGER |
No |
product_version |
INTEGER |
No |
warehouse_key |
INTEGER |
No |
qty_in_stock |
INTEGER |
No |
11.2.2 - customer_dimension
This table contains information about all the retail chain’s customers.
This table contains information about all the retail chain’s customers.
|
Column Name |
Data Type |
NULLs |
customer_key |
INTEGER |
No |
customer_type |
VARCHAR(16) |
Yes |
customer_name |
VARCHAR(256) |
Yes |
customer_gender |
VARCHAR(8) |
Yes |
title |
VARCHAR(8) |
Yes |
household_id |
INTEGER |
Yes |
customer_address |
VARCHAR(256) |
Yes |
customer_city |
VARCHAR(64) |
Yes |
customer_state |
CHAR(2) |
Yes |
customer_region |
VARCHAR(64) |
Yes |
marital_status |
VARCHAR(32) |
Yes |
customer_age |
INTEGER |
Yes |
number_of_children |
INTEGER |
Yes |
annual_income |
INTEGER |
Yes |
occupation |
VARCHAR(64) |
Yes |
largest_bill_amount |
INTEGER |
Yes |
store_membership_card |
INTEGER |
Yes |
customer_since |
DATE |
Yes |
deal_stage |
VARCHAR(32) |
Yes |
deal_size |
INTEGER |
Yes |
last_deal_update |
DATE |
Yes |
11.2.3 - date_dimension
This table contains information about dates.
This table contains information about dates. It is generated from a file containing correct date/time data.
|
Column Name |
Data Type |
NULLs |
date_key |
INTEGER |
No |
date |
DATE |
Yes |
full_date_description |
VARCHAR(18) |
Yes |
day_of_week |
VARCHAR(9) |
Yes |
day_number_in_calendar_month |
INTEGER |
Yes |
day_number_in_calendar_year |
INTEGER |
Yes |
day_number_in_fiscal_month |
INTEGER |
Yes |
day_number_in_fiscal_year |
INTEGER |
Yes |
last_day_in_week_indicator |
INTEGER |
Yes |
last_day_in_month_indicator |
INTEGER |
Yes |
calendar_week_number_in_year |
INTEGER |
Yes |
calendar_month_name |
VARCHAR(9) |
Yes |
calendar_month_number_in_year |
INTEGER |
Yes |
calendar_year_month |
CHAR(7) |
Yes |
calendar_quarter |
INTEGER |
Yes |
calendar_year_quarter |
CHAR(7) |
Yes |
calendar_half_year |
INTEGER |
Yes |
calendar_year |
INTEGER |
Yes |
holiday_indicator |
VARCHAR(10) |
Yes |
weekday_indicator |
CHAR(7) |
Yes |
selling_season |
VARCHAR(32) |
Yes |
11.2.4 - employee_dimension
This table contains information about all the people who work for the retail chain.
This table contains information about all the people who work for the retail chain.
|
Column Name |
Data Type |
NULLs |
employee_key |
INTEGER |
No |
employee_gender |
VARCHAR(8) |
Yes |
courtesy_title |
VARCHAR(8) |
Yes |
employee_first_name |
VARCHAR(64) |
Yes |
employee_middle_initial |
VARCHAR(8) |
Yes |
employee_last_name |
VARCHAR(64) |
Yes |
employee_age |
INTEGER |
Yes |
hire_date |
DATE |
Yes |
employee_street_address |
VARCHAR(256) |
Yes |
employee_city |
VARCHAR(64) |
Yes |
employee_state |
CHAR(2) |
Yes |
employee_region |
CHAR(32) |
Yes |
job_title |
VARCHAR(64) |
Yes |
reports_to |
INTEGER |
Yes |
salaried_flag |
INTEGER |
Yes |
annual_salary |
INTEGER |
Yes |
hourly_rate |
FLOAT |
Yes |
vacation_days |
INTEGER |
Yes |
11.2.5 - product_dimension
This table describes all products sold by the department store chain.
This table describes all products sold by the department store chain.
|
Column Name |
Data Type |
NULLs |
product_key |
INTEGER |
No |
product_version |
INTEGER |
No |
product_description |
VARCHAR(128) |
Yes |
sku_number |
CHAR(32) |
Yes |
category_description |
CHAR(32) |
Yes |
department_description |
CHAR(32) |
Yes |
package_type_description |
CHAR(32) |
Yes |
package_size |
CHAR(32) |
Yes |
fat_content |
INTEGER |
Yes |
diet_type |
CHAR(32) |
Yes |
weight |
INTEGER |
Yes |
weight_units_of_measure |
CHAR(32) |
Yes |
shelf_width |
INTEGER |
Yes |
shelf_height |
INTEGER |
Yes |
shelf_depth |
INTEGER |
Yes |
product_price |
INTEGER |
Yes |
product_cost |
INTEGER |
Yes |
lowest_competitor_price |
INTEGER |
Yes |
highest_competitor_price |
INTEGER |
Yes |
average_competitor_price |
INTEGER |
Yes |
discontinued_flag |
INTEGER |
Yes |
11.2.6 - promotion_dimension
This table describes every promotion ever done by the retail chain.
This table describes every promotion ever done by the retail chain.
|
Column Name |
Data Type |
NULLs |
promotion_key |
INTEGER |
No |
promotion_name |
VARCHAR(128) |
Yes |
price_reduction_type |
VARCHAR(32) |
Yes |
promotion_media_type |
VARCHAR(32) |
Yes |
ad_type |
VARCHAR(32) |
Yes |
display_type |
VARCHAR(32) |
Yes |
coupon_type |
VARCHAR(32) |
Yes |
ad_media_name |
VARCHAR(32) |
Yes |
display_provider |
VARCHAR(128) |
Yes |
promotion_cost |
INTEGER |
Yes |
promotion_begin_date |
DATE |
Yes |
promotion_end_date |
DATE |
Yes |
11.2.7 - shipping_dimension
This table contains information about shipping companies that the retail chain uses.
This table contains information about shipping companies that the retail chain uses.
|
Column Name |
Data Type |
NULLs |
shipping_key |
INTEGER |
No |
ship_type |
CHAR(30) |
Yes |
ship_mode |
CHAR(10) |
Yes |
ship_carrier |
CHAR(20) |
Yes |
11.2.8 - vendor_dimension
This table contains information about each vendor that provides products sold through the retail chain.
This table contains information about each vendor that provides products sold through the retail chain.
|
Column Name |
Data Type |
NULLs |
vendor_key |
INTEGER |
No |
vendor_name |
VARCHAR(64) |
Yes |
vendor_address |
VARCHAR(64) |
Yes |
vendor_city |
VARCHAR(64) |
Yes |
vendor_state |
CHAR(2) |
Yes |
vendor_region |
VARCHAR(32) |
Yes |
deal_size |
INTEGER |
Yes |
last_deal_update |
DATE |
Yes |
11.2.9 - warehouse_dimension
This table provides information about each of the chain’s warehouses.
This table provides information about each of the chain’s warehouses.
|
Column Name |
Data Type |
NULLs |
warehouse_key |
INTEGER |
No |
warehouse_name |
VARCHAR(20) |
Yes |
warehouse_address |
VARCHAR(256) |
Yes |
warehouse_city |
VARCHAR(60) |
Yes |
warehouse_state |
CHAR(2) |
Yes |
warehouse_region |
VARCHAR(32) |
Yes |
11.3 - Store schema map
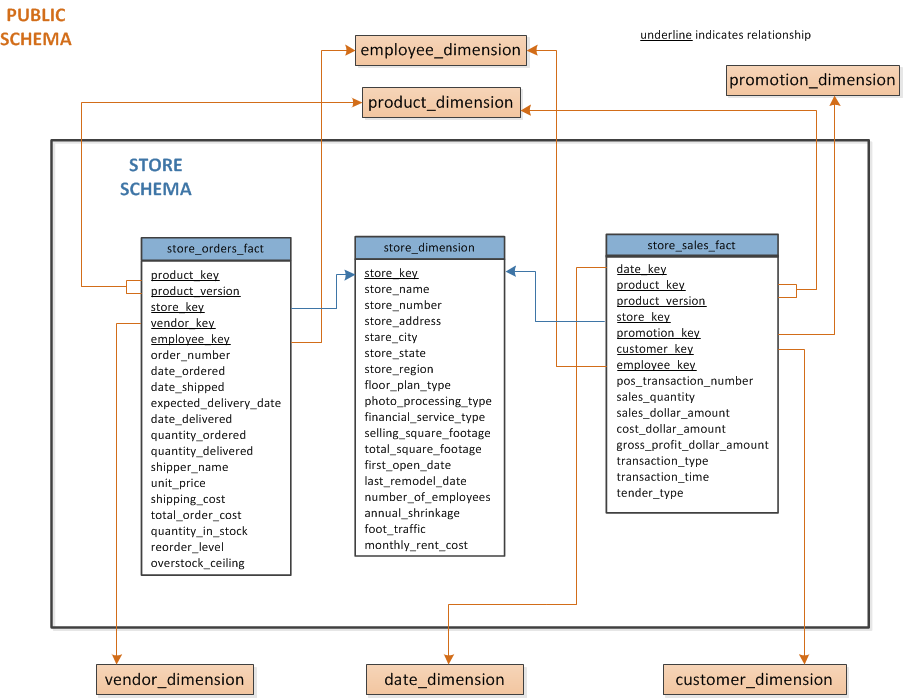
The store schema is a snowflake schema that contains information about the retail chain’s bricks-and-mortar stores.
The store schema is a snowflake schema that contains information about the retail chain’s bricks-and-mortar stores. The following graphic illustrates the store schema and its relationship with tables in the public schema.
The subsequent subsections describe database tables.
11.3.1 - store_orders_fact
This table contains information about all orders made at the company’s brick-and-mortar stores.
This table contains information about all orders made at the company’s brick-and-mortar stores.
|
Column Name |
Data Type |
NULLs |
product_key |
INTEGER |
No |
product_version |
INTEGER |
No |
store_key |
INTEGER |
No |
vendor_key |
INTEGER |
No |
employee_key |
INTEGER |
No |
order_number |
INTEGER |
No |
date_ordered |
DATE |
Yes |
date_shipped |
DATE |
Yes |
expected_delivery_date |
DATE |
Yes |
date_delivered |
DATE |
Yes |
quantity_ordered |
INTEGER |
Yes |
quantity_delivered |
INTEGER |
Yes |
shipper_name |
VARCHAR(32) |
Yes |
unit_price |
INTEGER |
Yes |
shipping_cost |
INTEGER |
Yes |
total_order_cost |
INTEGER |
Yes |
quantity_in_stock |
INTEGER |
Yes |
reorder_level |
INTEGER |
Yes |
overstock_ceiling |
INTEGER |
Yes |
11.3.2 - store_sales_fact
This table contains information about all sales made at the company’s brick-and-mortar stores.
This table contains information about all sales made at the company’s brick-and-mortar stores.
|
Column Name |
Data Type |
NULLs |
date_key |
INTEGER |
No |
product_key |
INTEGER |
No |
product_version |
INTEGER |
No |
store_key |
INTEGER |
No |
promotion_key |
INTEGER |
No |
customer_key |
INTEGER |
No |
employee_key |
INTEGER |
No |
pos_transaction_number |
INTEGER |
No |
sales_quantity |
INTEGER |
Yes |
sales_dollar_amount |
INTEGER |
Yes |
cost_dollar_amount |
INTEGER |
Yes |
gross_profit_dollar_amount |
INTEGER |
Yes |
transaction_type |
VARCHAR(16) |
Yes |
transaction_time |
TIME |
Yes |
tender_type |
VARCHAR(8) |
Yes |
11.3.3 - store_dimension
This table contains information about each brick-and-mortar store within the retail chain.
This table contains information about each brick-and-mortar store within the retail chain.
|
Column Name |
Data Type |
NULLs |
store_key |
INTEGER |
No |
store_name |
VARCHAR(64) |
Yes |
store_number |
INTEGER |
Yes |
store_address |
VARCHAR(256) |
Yes |
store_city |
VARCHAR(64) |
Yes |
store_state |
CHAR(2) |
Yes |
store_region |
VARCHAR(64) |
Yes |
floor_plan_type |
VARCHAR(32) |
Yes |
photo_processing_type |
VARCHAR(32) |
Yes |
financial_service_type |
VARCHAR(32) |
Yes |
selling_square_footage |
INTEGER |
Yes |
total_square_footage |
INTEGER |
Yes |
first_open_date |
DATE |
Yes |
last_remodel_date |
DATE |
Yes |
number_of_employees |
INTEGER |
Yes |
annual_shrinkage |
INTEGER |
Yes |
foot_traffic |
INTEGER |
Yes |
monthly_rent_cost |
INTEGER |
Yes |
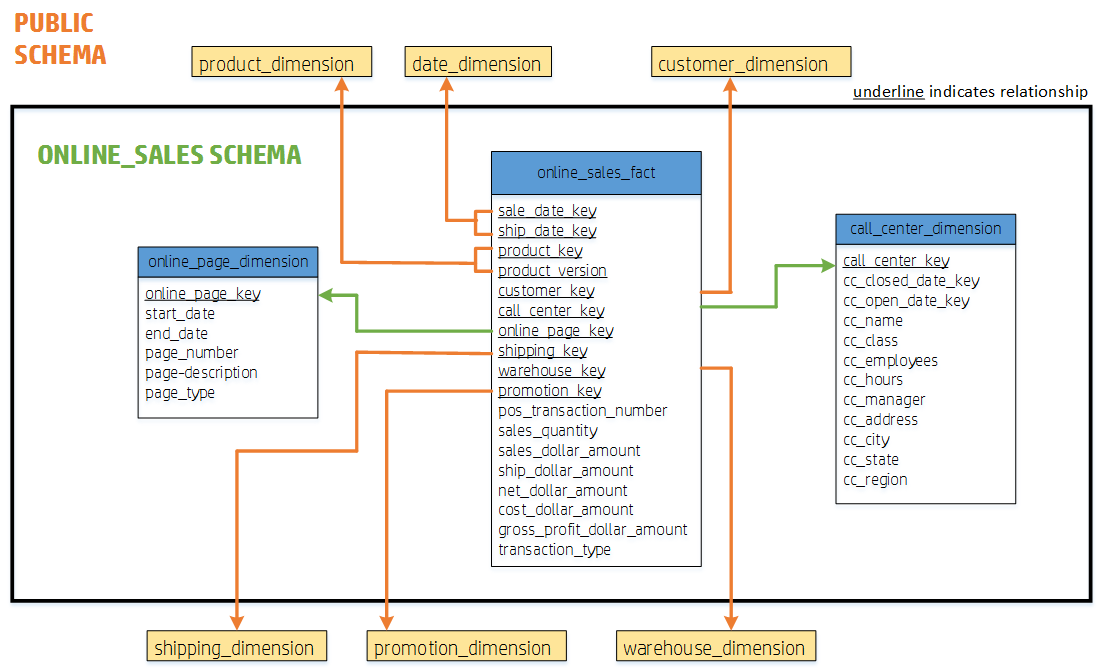
11.4 - online_sales schema map
The online_sales schema is a snowflake schema that contains information about the retail chains.
The online_sales schema is a snowflake schema that contains information about the retail chains. The following graphic illustrates the online_sales schema and its relationship with tables in the public schema.
The subsequent subsections describe database tables.
11.4.1 - online_sales_fact
This table describes all the items purchased through the online store front.
This table describes all the items purchased through the online store front.
|
Column Name |
Data Type |
NULLs |
sale_date_key |
INTEGER |
No |
ship_date_key |
INTEGER |
No |
product_key |
INTEGER |
No |
product_version |
INTEGER |
No |
customer_key |
INTEGER |
No |
call_center_key |
INTEGER |
No |
online_page_key |
INTEGER |
No |
shipping_key |
INTEGER |
No |
warehouse_key |
INTEGER |
No |
promotion_key |
INTEGER |
No |
pos_transaction_number |
INTEGER |
No |
sales_quantity |
INTEGER |
Yes |
sales_dollar_amount |
FLOAT |
Yes |
ship_dollar_amount |
FLOAT |
Yes |
net_dollar_amount |
FLOAT |
Yes |
cost_dollar_amount |
FLOAT |
Yes |
gross_profit_dollar_amount |
FLOAT |
Yes |
transaction_type |
VARCHAR(16) |
Yes |
11.4.2 - call_center_dimension
This table describes all the chain’s call centers.
This table describes all the chain’s call centers.
|
Column Name |
Data Type |
NULLs |
call_center_key |
INTEGER |
No |
cc_closed_date |
DATE |
Yes |
cc_open_date |
DATE |
Yes |
cc_date |
VARCHAR(50) |
Yes |
|
cc_class |
VARCHAR(50) |
Yes |
cc_employees |
INTEGER |
Yes |
cc_hours |
CHAR(20) |
Yes |
cc_manager |
VARCHAR(40) |
Yes |
cc_address |
VARCHAR(256) |
Yes |
cc_city |
VARCHAR(64) |
Yes |
cc_state |
CHAR(2) |
Yes |
cc_region |
VARCHAR(64) |
Yes |
11.4.3 - online_page_dimension
This table describes all the pages in the online store front.
This table describes all the pages in the online store front.
|
Column Name |
Data Type |
NULLs |
online_page_key |
INTEGER |
No |
start_date |
DATE |
Yes |
end_date |
DATE |
Yes |
page_number |
INTEGER |
Yes |
page_description |
VARCHAR(100) |
Yes |
page_type |
VARCHAR(100) |
Yes |
11.5 - Sample scripts
You can create your own queries, but the VMart example directory includes sample query script files to help you get started quickly.
You can create your own queries, but the VMart example directory includes sample query script files to help you get started quickly.
You can find the following sample scripts at this path /opt/vertica/examples/VMart_Schema.
To run any of the scripts, enter
=> \i <script_name>
Alternatively, type the commands from the script file manually.
Note
The data that your queries return might differ from the example output shown in this guide because the sample data generator is random.
11.5.1 - vmart_query_01.sql
Output.
-- vmart_query_01.sql
-- FROM clause subquery
-- Return the values for five products with the
-- lowest-fat content in the Dairy department
SELECT fat_content
FROM (
  SELECT DISTINCT fat_content
  FROM product_dimension
  WHERE department_description
  IN ('Dairy') ) AS food
  ORDER BY fat_content
  LIMIT 5;
Output
 fat_content
-------------
          80
          81
          82
          83
          84
(5 rows)
11.5.2 - vmart_query_02.sql
Output.
-- vmart_query_02.sql
-- WHERE clause subquery
-- Asks for all orders placed by stores located in Massachusetts
-- and by vendors located elsewhere before March 1, 2003:
SELECT order_number, date_ordered
FROM store.store_orders_fact orders
WHERE orders.store_key IN (
  SELECT store_key
  FROM store.store_dimension
  WHERE store_state = 'MA')
    AND orders.vendor_key NOT IN (
  SELECT vendor_key
  FROM public.vendor_dimension
  WHERE vendor_state = 'MA')
    AND date_ordered < '2012-03-01';
Output
order_number | date_ordered
-------------+--------------
       53019 | 2012-02-10
      222168 | 2012-02-05
      160801 | 2012-01-08
      106922 | 2012-02-07
      246465 | 2012-02-10
      234218 | 2012-02-03
      263119 | 2012-01-04
       73015 | 2012-01-01
      233618 | 2012-02-10
       85784 | 2012-02-07
      146607 | 2012-02-07
      296193 | 2012-02-05
       55052 | 2012-01-05
      144574 | 2012-01-05
      117412 | 2012-02-08
      276288 | 2012-02-08
      185103 | 2012-01-03
      282274 | 2012-01-01
      245300 | 2012-02-06
      143526 | 2012-01-04
       59564 | 2012-02-06
...
11.5.3 - vmart_query_03.sql
Output.
-- vmart_query_03.sql
-- noncorrelated subquery
-- Requests female and male customers with the maximum
-- annual income from customers
SELECT customer_name, annual_income
FROM public.customer_dimension
WHERE (customer_gender, annual_income) IN (
  SELECT customer_gender, MAX(annual_income)
  FROM public.customer_dimension
  GROUP BY customer_gender);
Output
  customer_name   | annual_income
------------------+---------------
 James M. McNulty |        999979
 Emily G. Vogel   |        999998
(2 rows)
11.5.4 - vmart_query_04.sql
Output.
-- vmart_query_04.sql
-- IN predicate
-- Find all products supplied by stores in MA
SELECT DISTINCT s.product_key, p.product_description
FROM store.store_sales_fact s, public.product_dimension p
WHERE s.product_key = p.product_key
AND s.product_version = p.product_version AND s.store_key IN (
  SELECT store_key
  FROM store.store_dimension
  WHERE store_state = 'MA')
ORDER BY s.product_key;
Output
 product_key |          product_description
-------------+----------------------------------------
1 | Brand #1 butter
1 | Brand #2 bagels
2 | Brand #3 lamb
2 | Brand #4 brandy
2 | Brand #5 golf clubs
2 | Brand #6 chicken noodle soup
3 | Brand #10 ground beef
3 | Brand #11 vanilla ice cream
3 | Brand #7 canned chicken broth
3 | Brand #8 halibut
3 | Brand #9 camera case
4 | Brand #12 rash ointment
4 | Brand #13 low fat milk
4 | Brand #14 chocolate chip cookies
4 | Brand #15 silver polishing cream
5 | Brand #16 cod
5 | Brand #17 band aids
6 | Brand #18 bananas
6 | Brand #19 starch
6 | Brand #20 vegetable soup
6 | Brand #21 bourbon
...
11.5.5 - vmart_query_05.sql
Output.
-- vmart_query_05.sql
-- EXISTS predicate
-- Get a list of all the orders placed by all stores on
-- January 2, 2003 for the vendors with records in the
-- vendor_dimension table
SELECT store_key, order_number, date_ordered
FROM store.store_orders_fact
WHERE EXISTS (
   SELECT 1
   FROM public.vendor_dimension
   WHERE public.vendor_dimension.vendor_key = store.store_orders_fact.vendor_key)
   AND date_ordered = '2012-01-02';
Output
 store_key | order_number | date_ordered
-----------+--------------+--------------
        98 |       151837 | 2012-01-02
       123 |       238372 | 2012-01-02
       242 |       263973 | 2012-01-02
       150 |       226047 | 2012-01-02
       247 |       232273 | 2012-01-02
       203 |       171649 | 2012-01-02
       129 |        98723 | 2012-01-02
        80 |       265660 | 2012-01-02
       231 |       271085 | 2012-01-02
       149 |        12169 | 2012-01-02
       141 |       201153 | 2012-01-02
         1 |        23715 | 2012-01-02
       156 |        98182 | 2012-01-02
        44 |       229465 | 2012-01-02
       178 |       141869 | 2012-01-02
       134 |        44410 | 2012-01-02
       141 |       129839 | 2012-01-02
       205 |        54138 | 2012-01-02
       113 |        63358 | 2012-01-02
        99 |        50142 | 2012-01-02
        44 |       131255 | 2012-01-02
...
11.5.6 - vmart_query_06.sql
Output.
-- vmart_query_06.sql
-- EXISTS predicate
-- Orders placed by the vendor who got the best deal
-- on January 4, 2004
SELECT store_key, order_number, date_ordered
FROM store.store_orders_fact ord, public.vendor_dimension vd
WHERE ord.vendor_key = vd.vendor_key
AND vd.deal_size IN (
   SELECT MAX(deal_size)
   FROM public.vendor_dimension)
AND date_ordered = '2013-01-04';
Output
 store_key | order_number | date_ordered
-----------+--------------+--------------
        45 |       202416 | 2013-01-04
        24 |       250295 | 2013-01-04
       121 |       251417 | 2013-01-04
       198 |        75716 | 2013-01-04
       166 |        36008 | 2013-01-04
        27 |       150241 | 2013-01-04
       148 |       182207 | 2013-01-04
         9 |       188567 | 2013-01-04
       113 |        66017 | 2013-01-04
...
11.5.7 - vmart_query_07.sql
Output.
-- vmart_query_07.sql
-- Multicolumn subquery
-- Which products have the highest cost,
-- grouped by category and department
SELECT product_description, sku_number, department_description
FROM public.product_dimension
WHERE (category_description, department_description, product_cost) IN (
   SELECT category_description, department_description,
   MAX(product_cost) FROM product_dimension
   GROUP BY category_description, department_description);
Output
product_description        |      sku_number       |   department_description
---------------------------+-----------------------+---------------------------------
 Brand #601 steak           | SKU-#601             | Meat
 Brand #649 brooms          | SKU-#649             | Cleaning supplies
 Brand #677 veal            | SKU-#677             | Meat
 Brand #1371 memory card    | SKU-#1371            | Photography
 Brand #1761 catfish        | SKU-#1761            | Seafood
 Brand #1810 frozen pizza   | SKU-#1810            | Frozen Goods
 Brand #1979 canned peaches | SKU-#1979            | Canned Goods
 Brand #2097 apples         | SKU-#2097            | Produce
 Brand #2287 lens cap       | SKU-#2287            | Photography
...
11.5.8 - vmart_query_08.sql
Output.
-- vmart_query_08.sql
-- between online_sales_fact and online_page_dimension
SELECT page_description, page_type, start_date, end_date
FROM online_sales.online_sales_fact f, online_sales.online_page_dimension d
WHERE f.online_page_key = d.online_page_key
AND page_number IN
   (SELECT MAX(page_number)
     FROM online_sales.online_page_dimension)
AND page_type = 'monthly' AND start_date = '2012-06-02';
Output
      page_description     | page_type | start_date | end_date
---------------------------+-----------+------------+-----------
Online Page Description #1 | monthly   | 2012-06-02 | 2012-06-11
Online Page Description #1 | monthly   | 2012-06-02 | 2012-06-11
Online Page Description #1 | monthly   | 2012-06-02 | 2012-06-11
Online Page Description #1 | monthly   | 2012-06-02 | 2012-06-11
Online Page Description #1 | monthly   | 2012-06-02 | 2012-06-11
Online Page Description #1 | monthly   | 2012-06-02 | 2012-06-11
Online Page Description #1 | monthly   | 2012-06-02 | 2012-06-11
Online Page Description #1 | monthly   | 2012-06-02 | 2012-06-11
Online Page Description #1 | monthly   | 2012-06-02 | 2012-06-11
Online Page Description #1 | monthly   | 2012-06-02 | 2012-06-11
Online Page Description #1 | monthly   | 2012-06-02 | 2012-06-11
Online Page Description #1 | monthly   | 2012-06-02 | 2012-06-11
(12 rows)
11.5.9 - vmart_query_09.sql
Output.
-- vmart_query_09.sql
-- Equi join
-- Joins online_sales_fact table and the call_center_dimension
-- table with the ON clause
SELECT sales_quantity, sales_dollar_amount, transaction_type, cc_name
FROM online_sales.online_sales_fact
INNER JOIN online_sales.call_center_dimension
ON (online_sales.online_sales_fact.call_center_key
      = online_sales.call_center_dimension.call_center_key
     AND sale_date_key = 156)
ORDER BY sales_dollar_amount DESC;
Output
 sales_quantity | sales_dollar_amount | transaction_type |      cc_name
----------------+---------------------+------------------+-------------------
              7 |                 589 | purchase         | Central Midwest
              8 |                 589 | purchase         | South Midwest
              8 |                 589 | purchase         | California
              1 |                 587 | purchase         | New England
              1 |                 586 | purchase         | Other
              1 |                 584 | purchase         | New England
              4 |                 584 | purchase         | New England
              7 |                 581 | purchase         | Mid Atlantic
              5 |                 579 | purchase         | North Midwest
              8 |                 577 | purchase         | North Midwest
              4 |                 577 | purchase         | Central Midwest
              2 |                 575 | purchase         | Hawaii/Alaska
              4 |                 573 | purchase         | NY Metro
              4 |                 572 | purchase         | Central Midwest
              1 |                 570 | purchase         | Mid Atlantic
              9 |                 569 | purchase         | Southeastern
              1 |                 569 | purchase         | NY Metro
              5 |                 567 | purchase         | Other
              7 |                 567 | purchase         | Hawaii/Alaska
              9 |                 567 | purchase         | South Midwest
              1 |                 566 | purchase         | New England
...