This is the multi-page printable view of this section.
Click here to print.
Return to the regular view of this page.
Containerized Vertica
Vertica leverages container technology to meet the needs of modern application development and operations workflows that must deliver software quickly and efficiently across a variety of infrastructures.
Vertica Eon Mode leverages container technology to meet the needs of modern application development and operations workflows that must deliver software quickly and efficiently across a variety of infrastructures. Containerized Vertica supports Kubernetes with automation tools to help maintain the state of your environment with minimal disruptions and manual intervention.
Containerized Vertica provides the following benefits:
-
Performance: Eon Mode separates compute from storage, which provides the optimal architecture for stateful, containerized applications. Eon Mode subclusters can target specific workloads and scale elastically according to the current computational needs.
-
High availability: Vertica containers provide a consistent, repeatable environment that you can deploy quickly. If a database host or service fails, you can easily replace the resource.
-
Resource utilization: A container is a runtime environment that packages an application and its dependencies in an isolated process. This isolation allows containerized applications to share hardware without interference, providing granular resource control and cost savings.
-
Flexibility: Kubernetes is the de facto container orchestration platform. It is supported by a large ecosystem of public and private cloud providers.
Containerized Vertica ecosystem
Vertica provides various tools and artifacts for production and development environments. The containerized Vertica ecosystem includes the following:
-
Vertica Helm chart: Helm is a Kubernetes package manager that bundles into a single package the YAML manifests that deploy Kubernetes objects. Download Vertica Helm charts from the Vertica Helm Charts Repository.
-
Custom Resource Definition (CRD): A CRD is a shared global object that extends the Kubernetes API with your custom resource types. You can use a CRD to instantiate a custom resource (CR), a deployable object with a desired state. Vertica provides CRDs that deploy and support the Eon Mode architecture on Kubernetes.
-
VerticaDB Operator: The operator is a custom controller that monitors the state of your CR and automates administrator tasks. If the current state differs from the declared state, the operator works to correct the current state.
-
Admission controller: The admission controller uses a webhook that the operator queries to verify changes to mutable states in a CR.
-
VerticaDB vlogger: The vlogger is a lightweight image used to deploy a sidecar utility container. The sidecar sends logs from vertica.log in the Vertica server container to standard output on the host node to simplify log aggregation.
-
Vertica Community Edition (CE) image: The CE image is the containerized version of the limited Enterprise Mode Vertica community edition (CE) license. The CE image provides a test environment consisting of an example database and developer tools.
In addition to the pre-built CE image, you can build a custom CE image with the tools provided in the Vertica one-node-ce GitHub repository.
-
Communal Storage Options: Vertica supports a variety of public and private cloud storage providers. For a list of supported storage providers, see Containerized environments.
-
UDx development tools: The UDx-container GitHub repository provides the tools to build a container that packages the binaries, libraries, and compilers required to create C++ Vertica user-defined extensions. For additional details about extending Vertica in C++, see C++ SDK.
1 - Containerized Vertica on Kubernetes
Kubernetes is an open-source container orchestration platform that automatically manages infrastructure resources and schedules tasks for containerized applications at scale.
Kubernetes is an open-source container orchestration platform that automatically manages infrastructure resources and schedules tasks for containerized applications at scale. Kubernetes achieves automation with a declarative model that decouples the application from the infrastructure. The administrator provides Kubernetes the desired state of an application, and Kubernetes deploys the application and works to maintain its desired state. This frees the administrator to update the application as business needs evolve, without worrying about the implementation details.
An application consists of resources, which are stateful objects that you create from Kubernetes resource types. Kubernetes provides access to resource types through the Kubernetes API, an HTTP API that exposes resource types as endpoints. The most common way to create a resource is with a YAML-formatted manifest file that defines the desired state of the resource. You use the kubectl command line tool to request a resource instance of that type from the Kubernetes API. In addition to the default resource types, you can extend the Kubernetes API and define your own resource types as a Custom Resource Definition (CRD).
To manage the infrastructure, Kubernetes uses a host to run the control plane, and designates one or more hosts as worker nodes. The control plane is a collection of services and controllers that maintain the desired state of Kubernetes objects and schedule tasks on worker nodes. Worker nodes complete tasks that the control plane assigns. Just as you can create a CRD to extend the Kubernetes API, you can create a custom controller that maintains the state of your custom resources (CR) created from the CRD.
Vertica custom resource definition and custom controller
The VerticaDB CRD extends the Kubernetes API so that you can create custom resources that deploy an Eon Mode database as a StatefulSet. In addition, Vertica provides the VerticaDB operator, a custom controller that maintains the desired state of your CR and automates lifecycle tasks. The result is a self-healing, highly-available, and scalable Eon Mode database that requires minimal manual intervention.
To simplify deployment, Vertica packages the CRD and the operator in Helm charts. A Helm chart bundles manifest files into a single package to create multiple resource type objects with a single command.
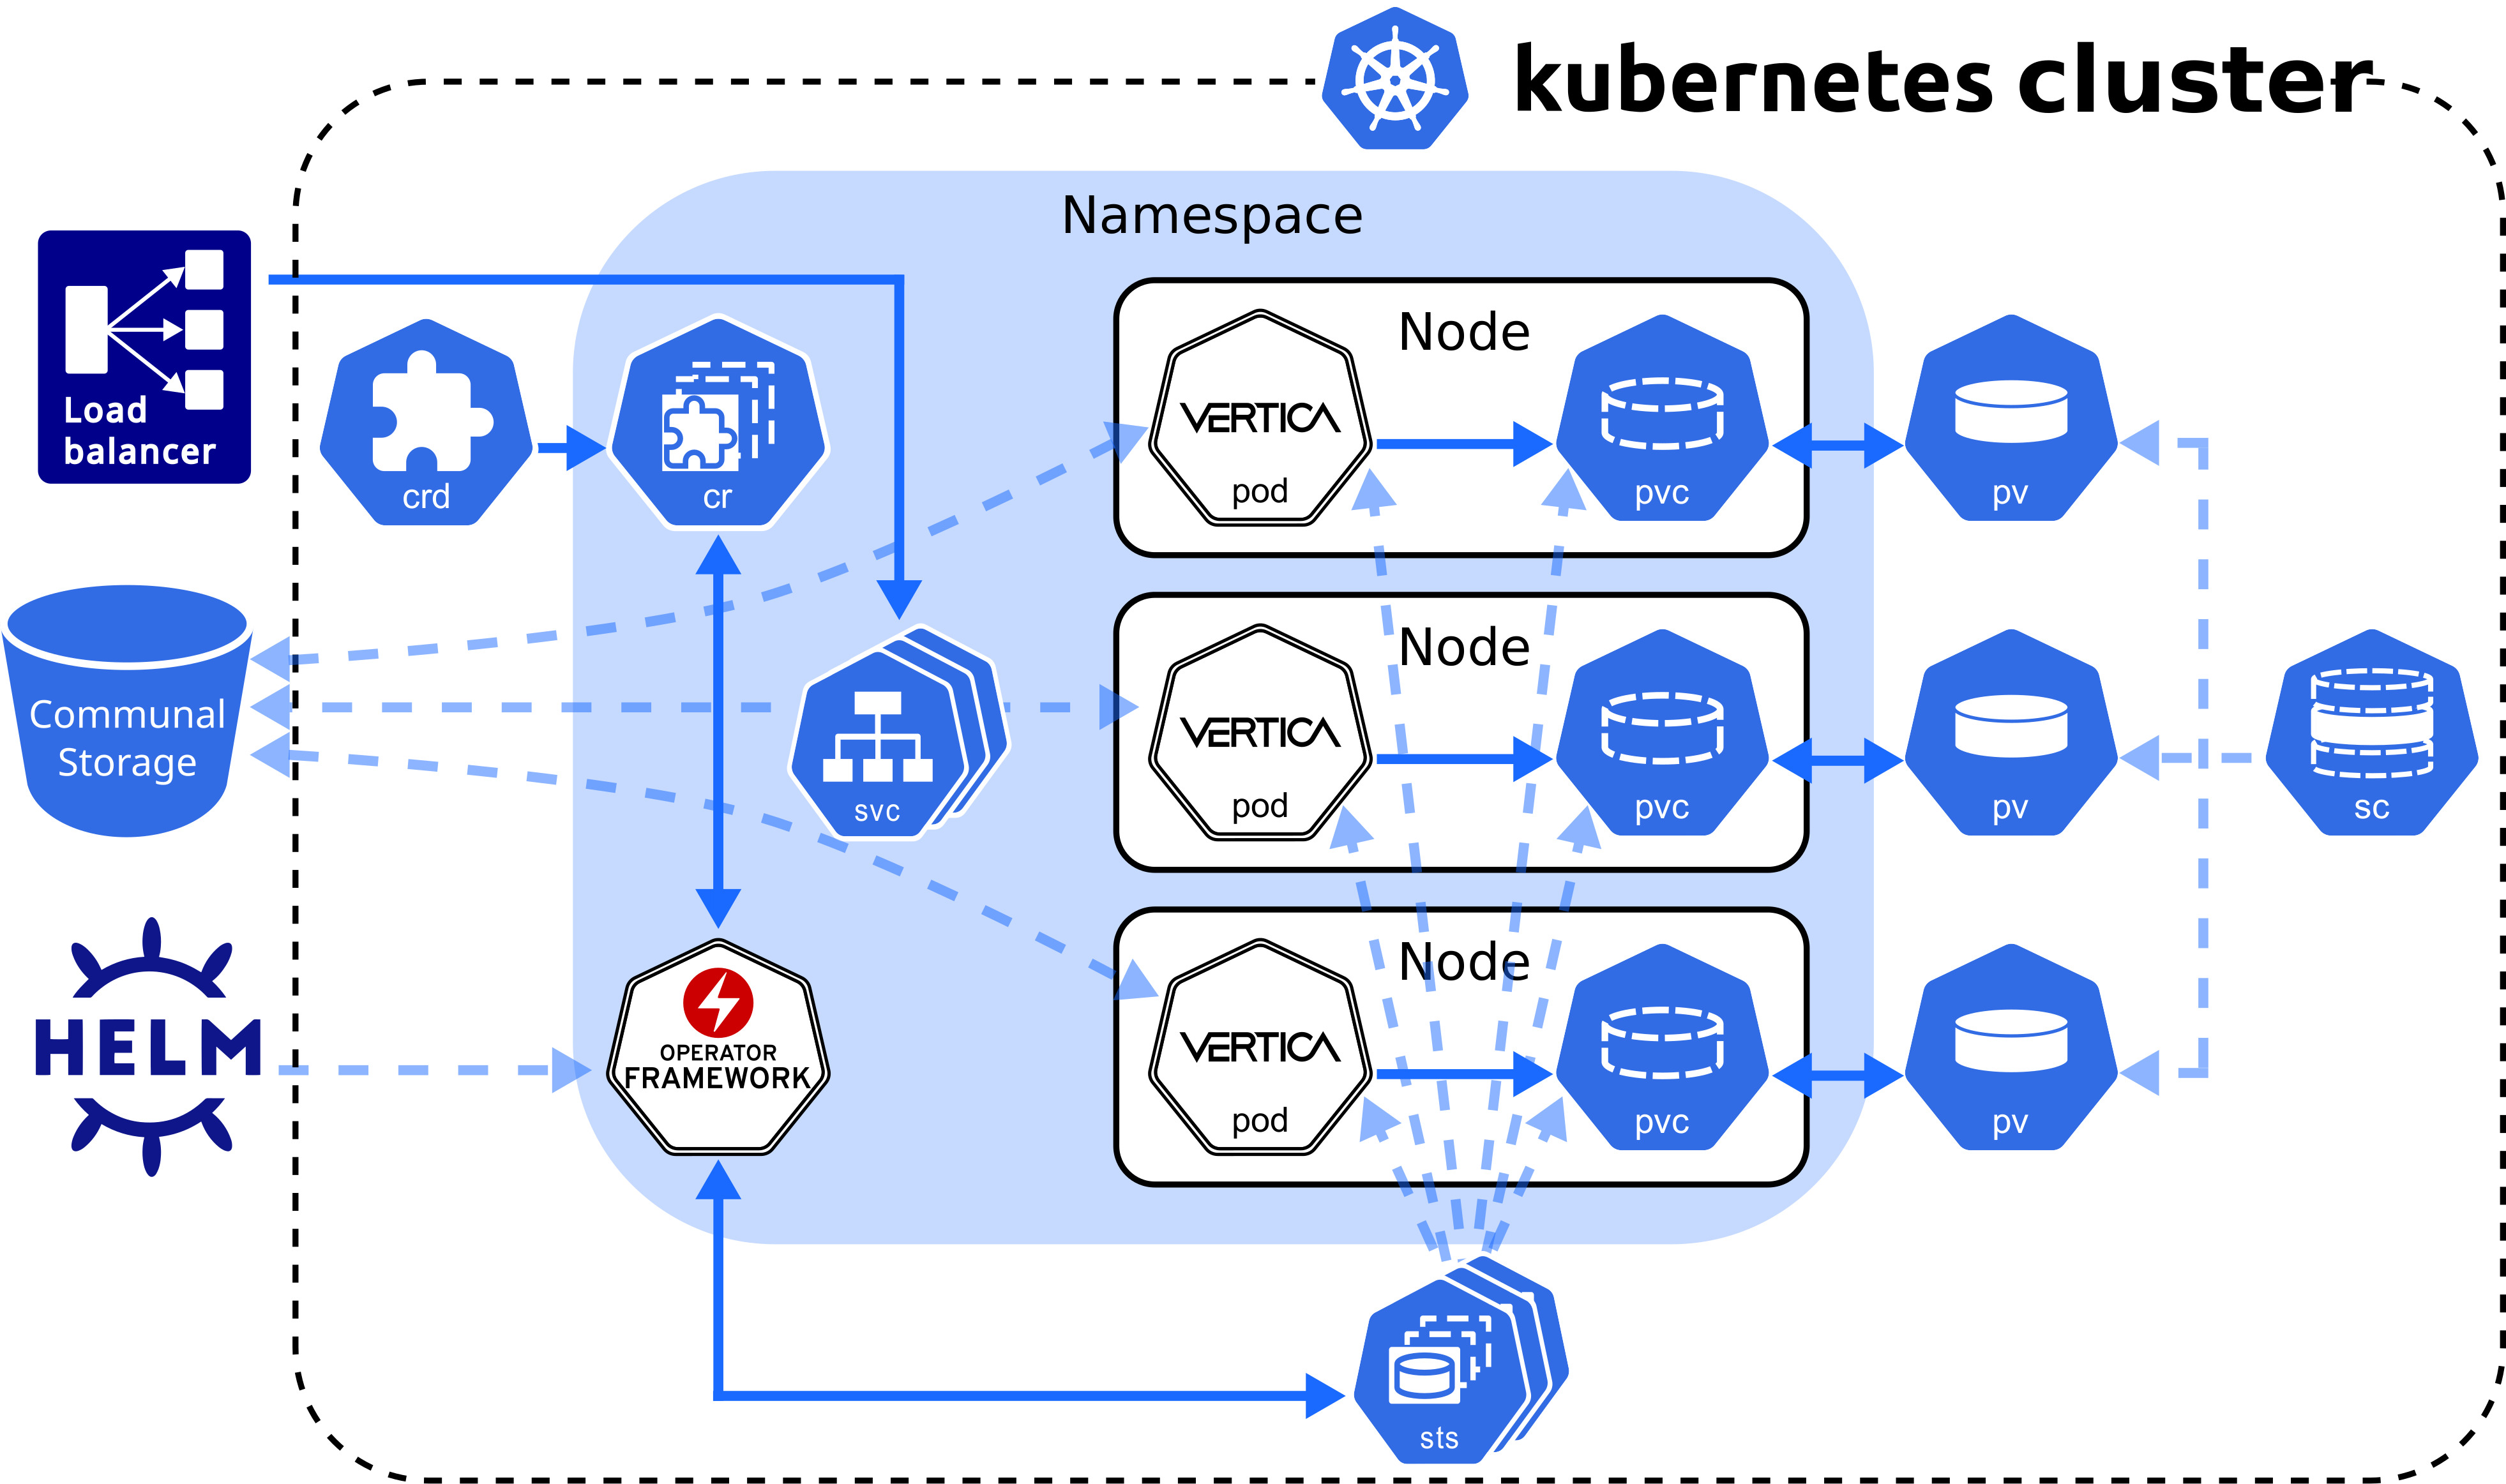
Custom resource definition architecture
The Vertica CRD creates a StatefulSet, a workload resource type that persists data with ephemeral Kubernetes objects. The following diagram describes the Vertica CRD architecture:
VerticaDB operator
The operator is a namespace-scoped custom controller that maintains the state of custom objects and automates administrator tasks. The operator watches objects and compares their current state to the desired state declared in the custom resource. When the current state does not match the desired state, the operator works to restore the objects to the desired state.
In addition to state maintenance, the operator:
-
Installs Vertica
-
Creates an Eon Mode database
-
Upgrades Vertica
-
Revives an existing Eon Mode database
-
Restarts and reschedules DOWN pods
-
Scales subclusters
-
Manages services for pods
-
Monitors pod health
-
Handles load balancing for internal and external traffic
To validate changes to the custom resource, the operator queries the admission controller, a webhook that provides rules for mutable states in a custom resource.
Vertica makes the operator and admission controller available through OperatorHub.io or as a Helm chart. For details about installing the operator and the admission controller with both methods, see Installing the Vertica DB operator.
Vertica pod
A pod is essentially a wrapper around one or more logically-grouped containers. These containers consume the host node resources in a shared execution environment. In addition to sharing resources, a pod extends the container to interact with Kubernetes services. For example, you can assign labels to associate pods to other objects, and you can implement affinity rules to schedule pods on specific host nodes.
DNS names provide continuity between pod lifecycles. Each pod is assigned an ordered and stable DNS name that is unique within its cluster. When a Vertica pod fails, the rescheduled pod uses the same DNS name as its predecessor. If a pod needs to persist data between lifecycles, you can mount a custom volume in its filesystem.
Rescheduled pods require information about the environment to become part of the cluster. This information is provided by the Downward API. Environment information, such as the superuser password Secret, is mounted in the /etc/podinfo directory.
Sidecar container
Pods run multiple containers to tightly couple containers that contribute to the same process. The Vertica pod allows a sidecar, a utility container that can access and perform utility tasks for the Vertica server process.
For example, logging is a common utility task. Idiomatic Kubernetes practices retrieve logs from standard output and standard error on the host node for log aggregation. To facilitate this practice, Vertica offers the vlogger sidecar image that sends the contents of vertica.log to standard output on the host node.
If a sidecar needs to persist data, you can mount a custom volume in the sidecar filesystem.
For implementation details, see VerticaDB CRD.
Persistent storage
A pod is an ephemeral, immutable object that requires access to external storage to persist data between lifecycles. To persist data, the operator uses the following API resource types:
-
StorageClass: Represents an external storage provider. You must create a StorageClass object separately from your custom resource and set this value with the local.storageClassName configuration parameter.
-
PersistentVolume (PV): A unit of storage that mounts in a pod to persist data. You dynamically or statically provision PVs. Each PV references a StorageClass.
-
PersistentVolumeClaim (PVC): The resource type that a pod uses to describe its StorageClass and storage requirements.
A pod mounts a PV in its filesystem to persist data, but a PV is not associated with a pod by default. However, the pod is associated with a PVC that includes a StorageClass in its storage requirements. When a pod requests storage with a PVC, the operator observes this request and then searches for a PV that meets the storage requirements. If the operator locates a PV, it binds the PVC to the PV and mounts the PV as a volume in the pod. If the operator does not locate a PV, it must either dynamically provision one, or the administrator must manually provision one before the operator can bind it to a pod.
PVs persist data because they exist independently of the pod life cycle. When a pod fails or is rescheduled, it has no effect on the PV. When you delete a VerticaDB, the VerticaDB operator automatically deletes any PVCs associated with that VerticaDB instance.
For additional details about StorageClass, PersistentVolume, and PersistentVolumeClaim, see the Kubernetes documentation.
StorageClass requirements
The StorageClass affects how the Vertica server environment and operator function. For optimum performance, consider the following:
-
If you do not set the local.storageClassName configuration parameter, the operator uses the default storage class. If you use the default storage class, confirm that it meets storage requirements for a production workload.
-
Select a StorageClass that uses a recommended storage format type as its fsType.
-
Use dynamic volume provisioning. The operator requires on-demand volume provisioning to create PVs as needed.
Local volume mounts
The operator mounts a single PVC in the /home/dbadmin/local-data/ directory of each pod to persist data. Each of the following subdirectories is a sub-path into the volume that backs the PVC:
-
/catalog: Optional subdirectory that you can create if your environment requires a catalog location that is separate from the local data. You can customize this path with the local.catalogPath parameter.
By default, the catalog is stored in the /data subdirectory.
-
/data: Stores any temporary files, and the catalog if local.catalogPath is not set. You can customize this path with the local.dataPath parameter.
-
/depot: Improves depot warming in a rescheduled pod. You can customize this path with the local.depotPath parameter.
Note
You can change the volume type for the
/depot with the
local.depotVolume parameter. By default, this parameter is set to
PersistentVolume, and the operator creates the
/depot sub-path. If
local.depotVolume is not set to
PersistentVolume, the operator does not create the sub-path.
-
/opt/vertica/config: Persists the contents of the configuration directory between restarts.
-
/opt/vertica/log: Persists log files between pod restarts.
Note
Kubernetes assigns each custom resource a unique identifier. The volume mount paths include the unique identifier between the mount point and the subdirectory. For example, the full path to the /data directory is /home/dbadmin/local-data/uid/data.
By default, each path mounted in the /local-data directory are owned by the dbadmin user and the verticadb group. For details, see Linux users created by Vertica.
Custom volume mounts
You might need to persist data between pod lifecycles in one of the following scenarios:
You can mount a custom volume in the Vertica pod or sidecar filesystem. To mount a custom volume in the Vertica pod, add the definition in the spec section of the CR. To mount the custom volume in the sidecar, add it in an element of the sidecars array.
The CR requires that you provide the volume type and a name for each custom volume. The CR accepts any Kubernetes volume type. The volumeMounts.name value identifies the volume within the CR, and has the following requirements and restrictions:
-
It must match the volumes.name parameter setting.
-
It must be unique among all volumes in the /local-data, /podinfo, or /licensing mounted directories.
For instructions on how to mount a custom volume in either the Vertica server container or in a sidecar, see VerticaDB CRD.
Service objects
Vertica on Kubernetes provides two service objects: a headless service that requires no configuration to maintain DNS records and ordered names for each pod, and a load balancing service that manages internal traffic and external client requests for the pods in your cluster.
Load balancing services
Each subcluster uses a single load balancing service object. You can manually assign a name to a load balancing service object with the subclusters[i].serviceName parameter in the custom resource. Assigning a name is useful when you want to:
-
Direct traffic from a single client to multiple subclusters.
-
Scale subclusters by workload with more flexibility.
-
Identify subclusters by a custom service object name.
To configure the type of service object, use the subclusters[i].serviceType parameter in the custom resource to define a Kubernetes service type. Vertica supports the following service types:
-
ClusterIP: The default service type. This service provides internal load balancing, and sets a stable IP and port that is accessible from within the subcluster only.
-
NodePort: Provides external client access. You can specify a port number for each host node in the subcluster to open for client connections.
-
LoadBalancer: Uses a cloud provider load balancer to create NodePort and ClusterIP services as needed. For details about implementation, see the Kubernetes documentation and your cloud provider documentation.
Important
To prevent performance issues during heavy network traffic, Vertica recommends that you set
--proxy-mode to
iptables for your Kubernetes cluster.
Because native Vertica load balancing interferes with the Kubernetes service object, Vertica recommends that you allow the Kubernetes services to manage load balancing for the subcluster. You can configure the native Vertica load balancer within the Kubernetes cluster, but you receive unexpected results. For example, if you set the Vertica load balancing policy to ROUNDROBIN, the load balancing appears random.
For additional details about Kubernetes services, see the official Kubernetes documentation.
Security considerations
Vertica on Kubernetes supports both TLS and mTLS for communications between resource objects. You must manually configure TLS in your environment. For details, see TLS protocol.
The VerticaDB operator manages changes to the certificates. If you update an existing certificate, the operator replaces the certificate in the Vertica server container. If you add or delete a certificate, the operator reschedules the pod with the new configuration.
The subsequent sections detail internal and external connections that require TLS for secure communications.
Admission controller webhook certificates
The VerticaDB operator Helm chart includes the admission controller, a webhook that communicates with the Kubernetes API server to validate changes to a resource object. Because the API server communicates over HTTPS only, you must configure TLS certificates to authenticate communications between the API server and the webhook.
The method you use to install the VerticaDB operator determines how you manage TLS certificates for the admission controller:
- OperatorHub.io: Runs on the Operator Lifecycle Manager (OLM) and automatically creates and mounts a self-signed certificate for the webhook. This installation method does not require additional action.
- Helm charts: Manually manage admission TLS certificates with the
webhook.certSource Helm chart parameter.
For details about each installation method, see Installing the Vertica DB operator.
Communal storage certificates
Supported storage locations authenticate requests with a self-signed certificate authority (CA) bundle. For TLS configuration details for each provider, see Configuring communal storage.
Client-server certificates
You might require multiple certificates to authenticate external client connections to the load balancing service object. You can mount one or more custom certificates in the Vertica server container with the certSecrets custom resource parameter. Each certificate is mounted in the container at
/certs/cert-name/key.
For details, see VerticaDB CRD.
Prometheus metrics certificates
Vertica integrates with Prometheus to scrape metrics about the VerticaDB operator. The operator SDK framework enforces role-based access control (RBAC) to the metrics with a proxy sidecar that uses self-signed certificates to authenticate requests for authorized service accounts. If you run Prometheus outside of Kubernetes, you cannot authenticate with a service account, so you must provide the proxy sidecar with custom TLS certificates.
For details, see Prometheus integration.
System configuration
As a best practice, make system configurations on the host node so that pods inherit those settings from the host node. This strategy eliminates the need to provide each pod a privileged security context to make system configurations on the host.
To manually configure host nodes, refer to the following sections:
The dbadmin account must use one of the authentication techniques described in Dbadmin authentication access.
2 - Vertica images
The following table describes Vertica server and automation tool images:.
The following table describes Vertica server and automation tool images:
Creating a custom Vertica image
The Creating a Vertica Image tutorial in the Vertica Integrator's Guide provides a line-by-line description of the Dockerfile hosted on GitHub. You can add dependencies to replicate your development and production environments.
Python container UDx
The Vertica images with Python UDx development capabilities include the vertica_sdk package and the Python Standard Library.
If your UDx depends on a Python package that is not included in the image, you must make the package available to the Vertica process during runtime. You can either mount a volume that contains the package dependencies, or you can create a custom Vertica server image.
Important
When you load the UDx library with
CREATE LIBRARY, the DEPENDS clause must specify the location of the Python package in the Vertica server container filesystem.
Use the Python Package Index to download Python package source distributions.
Mounting Python libraries as volumes
You can mount a Python package dependency as a volume in the Vertica server container filesystem. A Python UDx can access the contents of the volume at runtime.
-
Download the package source distribution to the host machine.
-
On the host machine, extract the tar file contents into a mountable volume:
$ tar -xvf lib-name.version.tar.gz -C /path/to/py-dependency-vol
-
Mount the volume that contains the extracted source distribution in the custom resource (CR). The following snippet mounts the py-dependency-vol volume in the Vertica server container:
spec:
  ...
  volumeMounts:
  - name: nfs
    mountPath: /path/to/py-dependency-vol
  volumes:
  - name: nfs
    nfs:
      path: /nfs
      server: nfs.example.com
  ...
For details about mounting custom volumes in a CR, see VerticaDB CRD.
Adding a Python library to a custom Vertica image
Create a custom image that includes any Python package dependencies in the Vertica server base image.
For a comprehensive guide about creating a custom Vertica image, see the Creating a Vertica Image tutorial in the Vertica Integrator's Guide.
-
Download the package source distribution on the machine that builds the container.
-
Create a Dockerfile that includes the Python source distribution:
FROM vertica/vertica-k8s:latest
ADD lib-name.version.tar.gz /path/to/target-dir
...
In the preceding example, the ADD command automatically extracts the contents of the tar file into the target-dir directory.
-
Build the Dockerfile:
$ docker build . -t image-name:tag
-
Push the image to a container registry so that you can add the image to a Vertica custom resource:
$ docker image push registry-host:port/registry-username/image-name:tag
3 - VerticaDB operator
The Vertica operator automates error-prone and time-consuming tasks that a Vertica on Kubernetes administrator must otherwise perform manually.
The Vertica operator automates error-prone and time-consuming tasks that a Vertica on Kubernetes administrator must otherwise perform manually. The operator:
-
Installs Vertica
-
Creates an Eon Mode database
-
Upgrades Vertica
-
Revives an existing Eon Mode database
-
Restarts and reschedules DOWN pods
-
Scales subclusters
-
Manages services for pods
-
Monitors pod health
-
Handles load balancing for internal and external traffic
The Vertica operator is a Go binary that uses the SDK operator framework. It runs in its own pod, and is namespace-scoped to limit any failures to the objects in its namespace.
For details about installing and upgrading the operator, see Installing the Vertica DB operator.
Monitoring desired state
Each namespace is allowed one operator pod that acts as a custom controller and monitors the state of the custom resource objects within that namespace. The operator uses the control loop mechanism to reconcile state changes by investigating state change notifications from the custom resource instance, and periodically comparing the current state with the desired state.
If the operator detects a change in the desired state, it determines what change occurred and reconciles the current state with the new desired state. For example, if the user deletes a subcluster from the custom resource instance and successfully saves the changes, the operator deletes the corresponding subcluster objects in Kubernetes.
Validating state changes
The verticadb-operator Helm chart includes an admission controller, which uses a webhook to prevent invalid state changes to the custom resource. When you save a change to a custom resource, the admission controller webhook queries a REST endpoint that provides rules for mutable states in a custom resource. If a change violates the state rules, the admission controller prevents the change and returns an error. For example, it returns an error if you try to save a change that violates K-Safety.
Limitations
The operator has the following limitations:
-
You must manually configure TLS. For details, see Containerized Vertica on Kubernetes.
-
Vertica recommends that you do not use the Large cluster feature. If a control nodes fails, it might cause more than half of the database nodes to fail. This results in the database losing quorum.
-
Backup and Restore is a manual process.
-
Importing and exporting data between a cluster outside of Kubernetes requires that you expose the service with the NodePort or LoadBalancer service type and properly configure the network.
Important
When configuring the network to import or export data, you must assign each node a static IP export address. When pods are rescheduled to different nodes, you must update the static IP address to reflect the new node.
See Configuring the Network to Import and Export Data for more information.
3.1 - Installing the Vertica DB operator
The custom resource definition (CRD), DB operator, and admission controller work together to maintain the state of your environment and automate tasks:.
The custom resource definition (CRD), VerticaDB operator, and admission controller work together to maintain the state of your environment and automate tasks:
-
The CRD extends the Kubernetes API to provide custom objects. It serves as a blueprint for custom resource (CR) instances that specify the desired state of your environment.
-
The VerticaDB operator is a custom controller that monitors CR instances to maintain the desired state of VerticaDB objects. You can deploy one VerticaDB operator per namespace, and the operator monitors only the VerticaDB objects within that namespace.
-
The admission controller is a webhook that queries a REST endpoint to verify changes to mutable states in a CR instance.
Prerequisites
Installation options
Vertica provides two separate options to install the VerticaDB operator and admission controller:
Note
Each install option has its own workflow that is incompatible with the other option. For example, you cannot install the VerticaDB operator with the Helm charts, and then deploy an operator in the same environment using OperatorHub.io.
Helm charts
Vertica packages VerticaDB operator and admission controller in a Helm chart. Vertica on Kubernetes allows one operator instance per namespace.
Important
Vertica recommends that you use Kubernetes 1.21.1 or later. Earlier versions require that you add the kubernetes.io/metadata.name=namespace-name label to each namespace that contains an operator.
Configuring TLS for the admission controller
Before you can install the VerticaDB Helm chart, you must configure TLS for the admission controller. The admission controller uses a webhook that requires TLS certificates for data encryption. Use the webhook.certSource Helm chart parameter to manage the TLS certificates.
By default, webhook.certSource is set to internal, a setting that generates a self-signed certificate before starting the admission controller. There are two additional settings that require manual configuration before you install the operator:
- secret: You generate custom certificates before you create the Helm chart and store them in a Secret. This option requires that you set the
webhook.tlsSecret Helm chart parameter.
- cert-manager: Deprecated. You install the cert-manager operator, and it generates self-signed certificates. When the certificate nears expiration, cert-manager automatically handles private key rotation.
Defining custom certificates
Custom certificates require a TLS key that sets the Subjective Alternative Name (SAN) using the admission controller webhook's fully-qualified domain name (FDQN). You can set the SAN in a configuration file with the following format:
[alt_names]
DNS.1 = verticadb-operator-webhook-service.namespace.svc
DNS.2 = verticadb-operator-webhook-service.namespace.svc.cluster.local
For more information about TLS and Vertica, see TLS protocol.
When you install the VerticaDB operator and admission controller Helm chart, you can pass parameters to customize the Helm chart. Conceal custom certificates in a Secret before you pass them as parameters. The following command creates a Secret that stores the TLS key, TLS certificate, and CA certificate:
$ kubectl create secret generic tls-secret --from-file=tls.key=/path/to/tls.key --from-file=tls.crt=/path/to/tls.crt --from-file=ca.crt=/path/to/ca.crt
Use tls-secret when you install the VerticaDB operator and admission controller Helm chart. For a detailed example, see Helm chart parameters.
Installing cert-manager
Deprecated
This TLS certificate management method is deprecated and will be removed in a future release.
cert-manager is available as a YAML manifest in a GitHub repository:
-
Use kubectl to install cert-manager:
$ kubectl apply -f https://github.com/jetstack/cert-manager/releases/download/v1.5.3/cert-manager.yaml
Installation might take a few minutes.
-
Verify the cert-manager installation:
$ kubectl get pods --namespace cert-manager
NAME                                       READY   STATUS    RESTARTS   AGE
cert-manager-7dd5854bb4-skks7              1/1     Running   5          12d
cert-manager-cainjector-64c949654c-9nm2z   1/1     Running   5          12d
cert-manager-webhook-6bdffc7c9d-b7r2p      1/1     Running   5          12d
-
When you install the Helm chart, set the webhook.certSource Helm chart parameter to cert-manager:
$ helm install operator-name --namespace namespace --create-namespace vertica-charts/verticadb-operator \
  --set webhook.certSource=cert-manager
For additional details about cert-manager install verification, see the cert-manager documentation.
Granting operator privileges
Optionally, you can authorize a user without cluster administrator privileges to install the operator in a specific namespace. You can grant these operator privileges with a preconfigured Kubernetes service account.
Vertica leverages Kubernetes RBAC to authorize a service account with operator privileges to perform operator actions. You can grant these privileges to a Role resource type, then define a RoleBinding resource type that associates that Role with a ServiceAccount.
After the cluster administrator binds that ServiceAccount to a namespace, any user can perform operator actions if they install the Helm chart with the ServiceAccount.
Cluster administrator set up
The cluster administrator creates a namespace and then binds to it a service account with the required operator privileges:
-
Install the CRDs from the vertica-kubernetes GitHub repository:
$ kubectl apply -f https://github.com/vertica/vertica-kubernetes/releases/latest/download/verticadbs.vertica.com-crd.yaml
$ kubectl apply -f https://github.com/vertica/vertica-kubernetes/releases/latest/download/verticaautoscalers.vertica.com-crd.yaml
-
Create a namespace:
$ kubectl create namespace namespace
-
Apply the ServiceAccount, Roles, and RoleBindings required to grant operator privileges to a service account.
The following command applies operator-rbac.yaml, a sample file that defines the required operator privileges:
$ kubectl -n namespace apply -f https://github.com/vertica/vertica-kubernetes/releases/latest/download/operator-rbac.yaml
-
Verify the changes with kubectl get:
-
ServiceAccount:
$ kubectl get serviceaccounts -n namespace
NAME                                    SECRETS   AGE
default                                 1         71m
verticadb-operator-controller-manager   1         69m
-
Roles in the correct namespace:
$ kubectl get roles -n namespace
NAME                                      CREATED AT
verticadb-operator-leader-election-role   2022-04-14T16:26:53Z
verticadb-operator-manager-role           2022-04-14T16:26:53Z
-
RoleBindings in the correct namespace:
$ kubectl get rolebinding -n namespace
NAME                                             ROLE                                           AGE
verticadb-operator-leader-election-rolebinding   Role/verticadb-operator-leader-election-role   73m
verticadb-operator-manager-rolebinding           Role/verticadb-operator-manager-role           73m
Non-cluster administrator installation
Any user can perform operator actions if they use the serviceAccountOverride parameter to install the helm chart with the ServiceAccount with privileges.
-
Add the Vertica helm charts to your repository. The following command installs the CRD Helm chart and names it vertica-charts for future reference:
$ helm repo add vertica-charts https://vertica.github.io/charts
-
Update your Helm repository to ensure that you are using the latest version of your repository:
$ helm repo update
- Install the operator:
$ helm install vdb-op -n namespace vertica-charts/verticadb-operator \
  --skip-crds \
  --set webhook.enable=false \
  --set prometheus.createProxyRBAC=false \
  --set skipRoleAndRoleBindingCreation=true \
  --set serviceAccountNameOverride=verticadb-operator-controller-manager
Installing the helm chart
Before you can install the Helm chart, you must select a method to configure TLS for the admission controller.
The following install steps use custom certificates:
-
Add the Vertica helm charts to your repository. The following command installs the CRD Helm chart and names it vertica-charts for future reference:
$ helm repo add vertica-charts https://vertica.github.io/charts
-
Update your Helm repository to ensure that you are using the latest version of your repository:
$ helm repo update
-
Install the operator Helm chart. The following examples demonstrate the most common Helm chart configurations. For details about the Helm chart options and parameters, see Helm chart parameters.
Note
Each of the following commands include the --create-namespace option to create the provided namespace if it does not exist. If you do not provide the namespace during install, Helm installs the operator in the current namespace that is defined in the kubectl configuration file.
Enter one of the following commands to customize your Helm chart installation:
-
Default configuration. The following command requires cluster administrator privileges:
$ helm install operator-name --namespace namespace --create-namespace vertica-charts/verticadb-operator
-
Custom certificates. Pass custom certificates with the webhook.caBundle, webhook.certSource, and webhook.tlsSecret. The following command requires cluster administrator privileges, and uses the tls-secret Secret created in Defining Custom Certificates:
$ helm install operator-name --namespace namespace --create-namespace vertica-charts/verticadb-operator \
  --set webhook.certSource=secret \
  --set webhook.tlsSecret=tls-secret
-
Service account override. Use service accounts to allow users without cluster administrator privileges to install the operator. Pass the service account with the serviceAccountNameOverride parameter:
$ helm install operator-name --namespace namespace --create-namespace vertica-charts/verticadb-operator \
    --set serviceAccountNameOverride=service-account-name
For details, see Granting Operator Installation Privileges.
-
Do not install the admission controller webhook. Deploying the webhook requires cluster-scoped privileges that are not required to install the operator. If you use a service account that is granted the privileges required to install the operator but not the webhook, provide the service account with serviceAccountNameOverride, and set webhook.enable to false to deploy only the operator:
$ helm install operator-name --namespace namespace --create-namespace vertica-charts/verticadb-operator \
    --set serviceAccountNameOverride=service-account-name
    --set webhook.enable=false
Caution
Webhooks prevent invalid state changes to the custom resource. Running Vertica on Kubernetes without webhook validations might result in invalid state transitions.
For additional details about helm install, see the official documentation.
OperatorHub.io
OperatorHub.io is a registry that allows vendors to share Kubernetes operators. Each vendor must adhere to packaging guidelines to simplify user adoption.
To install the VerticaDB operator from OperatorHub.io, navigate to the Vertica operator page and follow the install instructions.
3.2 - Upgrading the VerticaDB operator
Vertica supports two separate options to upgrade the VerticaDB operator:.
Vertica supports two separate options to upgrade the VerticaDB operator:
-
OperatorHub.io
-
Helm Charts
Note
You must upgrade the operator with the same option that you selected for installation. For example, you cannot install the VerticaDB operator with Helm charts, and then upgrade the operator in the same environment using OperatorHub.io.
Prerequisites
OperatorHub.io
The Operator Lifecycle Manager (OLM) operator manages upgrades for OperatorHub.io installations. You can configure the OLM operator to upgrade the VerticaDB operator manually or automatically with the Subscription object's spec.installPlanApproval parameter.
Automatic upgrade
To configure automatic version upgrades, set spec.installPlanApproval to Automatic, or omit the setting entirely. When the OLM operator refreshes the catalog source, it installs the new VerticaDB operator automatically.
Manual upgrade
Upgrade the VerticaDB operator manually to approve version upgrades for specific install plans. To manually upgrade, set spec.installPlanApproval parameter to Manual and complete the following:
-
Verify if there is an install plan that requires approval to proceed with the upgrade:
$ kubectl get installplan
NAME CSV APPROVAL APPROVED
install-ftcj9 verticadb-operator.v1.7.0 Manual false
install-pw7ph verticadb-operator.v1.6.0 Manual true
The command output shows that the install plan install-ftcj9 for VerticaDB operator version 1.7.0 is not approved.
-
Approve the install plan with a patch command:
$ kubectl patch installplan install-ftcj9 --type=merge --patch='{"spec": {"approved": true}}'
installplan.operators.coreos.com/install-ftcj9 patched
After you set the approval, the OLM operator silently upgrades the VerticaDB operator. To monitor its progress, inspect the STATUS column of the Subscription object:
$ kubectl describe subscription subscription-object-name
Helm charts
The CRD is included when you install the Helm chart, but the helm install command does not overwrite an existing CRD. To upgrade the operator, you must update the CRD with the manifest from the GitHub repository. Upgrading the operator with the CRD requires the following prerequisites:
Additionally, you must upgrade the VerticaAutoscaler CRD and the EventTrigger CRD, even if you do not use either in your environment. These CRDs are installed with the operator and maintained as separate YAML manifests. Upgrade the VerticaAutoscaler and EventTrigger to ensure that your operator is upgraded completely.
Use kubectl apply to upgrade the CRDs:
-
Upgrade the VerticaDB operator CRD:
$ kubectl apply -f https://github.com/vertica/vertica-kubernetes/releases/latest/download/verticadbs.vertica.com-crd.yaml
-
Upgrade the VerticaAutoscaler CRD:
$ kubectl apply -f https://github.com/vertica/vertica-kubernetes/releases/latest/download/verticaautoscalers.vertica.com-crd.yaml
-
Upgrade the EventTrigger CRD:
$ kubectl apply -f https://github.com/vertica/vertica-kubernetes/releases/latest/download/eventtriggers.vertica.com-crd.yaml
-
Upgrade the Helm chart:
$ helm upgrade operator-name --wait vertica-charts/verticadb-operator
3.3 - Helm chart parameters
The following table describes the available settings for the VerticaDB operator and admission controller Helm chart.
The following table describes the available settings for the VerticaDB operator and admission controller Helm chart.
|
Parameter |
Description |
affinity |
Applies rules that constrain the VerticaDB operator to specific nodes. It is more expressive than nodeSelector. If this parameter is not set, then the operator uses no affinity setting. |
image.name |
The name of the image that runs the operator.
Default: vertica/verticadb-operator:version
|
imagePullSecrets |
A list of Secrets that store credentials to authenticate to the private container repository specified by image.repo and rbac_proxy_image. For details, see Specifying ImagePullSecrets in the Kubernetes documentation. |
image.repo |
The server that hosts the repository that contains image.name. Use this parameter for deployments that require control over a private hosting server, such as an air-gapped operator.
Use this parameter with rbac_proxy_image.name and rbac_proxy_image.repo.
Default: docker.io
|
logging.filePath |
The path to a log file in the VerticaDB operator filesystem. If this value is not specified, Vertica writes logs to standard output.
Default: Empty string (' ') that indicates standard output.
|
logging.level |
Minimum logging level. This parameter accepts the following values:
Default: info
|
logging.maxFileSize |
When logging.filePath is set, the maximum size in MB of the logging file before log rotation occurs.
Default: 500
|
logging.maxFileAge |
When logging.filePath is set, the maximum age in days of the logging file before log rotation deletes the file.
Default: 7
|
logging.maxFileRotation |
When logging.filePath is set, the maximum number of files that are kept in rotation before the old ones are removed.
Default: 3
|
nameOverride |
Sets the prefix for the name assigned to all objects that the Helm chart creates.
If this parameter is not set, each object name begins with the name of the Helm chart, verticadb-operator.
|
nodeSelector |
Provides control over which nodes are used to schedule the operator pod. If this is not set, the node selector is omitted from the operator pod when it is created. To set this parameter, provide a list of key/value pairs.
The following example schedules the operator only on nodes that have the region=us-east label:
nodeSelector:
      region: us-east
|
priorityClassName |
The PriorityClass name assigned to the operator pod. This affects where the pod is scheduled. |
prometheus.createProxyRBAC |
When set to true, creates role-based access control (RBAC) rules that authorize access to the operator's /metrics endpoint for the Prometheus integration.
Default: true
|
prometheus.createServiceMonitor |
Deprecated
This parameter is deprecated and will be removed in a future release.
When set to true, creates the ServiceMonitor custom resource for the Prometheus operator. You must install the Prometheus operator before you set this to true and install the Helm chart.
For details, see the Prometheus operator GitHub repository.
Default: false
|
prometheus.expose |
Configures the operator's /metrics endpoint for the Prometheus integration. The following options are valid:
-
EnableWithAuthProxy: Creates a new service object that exposes an HTTPS /metrics endpoint. The RBAC proxy controls access to the metrics.
-
EnableWithoutAuth: Creates a new service object that exposes an HTTP /metrics endpoint that does not authorize connections. Any client with network access can read the metrics.
-
Disable: Prometheus metrics are not exposed.
Default: EnableWithAuthProxy
|
prometheus.tlsSecret |
Secret that contains the TLS certificates for the Prometheus /metrics endpoint. You must create this Secret in the same namespace that you deployed the Helm chart.
The Secret requires the following values:
To ensure that the operator uses the certificates in this parameter, you must set prometheus.expose to EnableWithAuthProxy.
If prometheus.expose is not set to EnableWithAuthProxy, then this parameter is ignored, and the RBAC proxy sidecar generates its own self-signed certificate.
|
rbac_proxy_image.name |
The name of the Kubernetes RBAC proxy image that performs authorization. Use this parameter for deployments that require authorization by a proxy server, such as an air-gapped operator.
Use this parameter with image.repo and rbac_proxy_image.repo.
Default: kubebuilder/kube-rbac-proxy:v0.11.0
|
rbac_proxy_image.repo |
The server that hosts the repository that contains rbac_proxy_image.name. Use this parameter for deployments that perform authorization by a proxy server, such as an air-gapped operator.
Use this parameter with image.repo and rbac_proxy_image.name.
Default: gcr.io
|
resources.limits and resources.requests |
The resource requirements for the operator pod.
resources.limits is the maximum amount of CPU and memory that an operator pod can consume from its host node.
resources.requests is the maximum amount of CPU and memory that an operator pod can request from its host node.
Defaults:
resources:
  limits:
    cpu: 100m
    memory: 750Mi
  requests:
    cpu: 100m
    memory: 20Mi
|
serviceAccountNameOverride |
Service account that identifies any pods in the cluster for apiserver access. A cluster administrator can create a service account that grants the privileges required to install the operator so that users without cluster administrator privileges can install the Helm chart.
To correctly control access, the service account's Roles and RoleBindings must exist before you add the service account to the CR. If these are not set, the Vertica Helm chart creates and uses a service account.
Vertica provides the required Roles and RoleBindings as GitHub release artifacts.
Default: Empty string ("")
|
skipRoleAndRoleBindingCreation |
Determines whether the Helm chart creates any Roles or RoleBindings to authorize service accounts with VerticaDB operator privileges.
When set to true, the Helm chart does not create any Roles or RoleBindings. This allows a user that cannot create Roles and RoleBindings to install the Helm chart.
Vertica provides the required Roles and RoleBindings as GitHub release artifacts.
The service account that installs the Helm chart must exist, and you must set serviceAccountNameOverride to that service account.
Default: false
|
tolerations |
Any taints and tolerations that influence where the operator pod is scheduled. |
webhook.caBundle |
A PEM-encoded certificate authority (CA) bundle that validates the webhook's server certificate. If this is not set, the webhook uses the system trust roots on the apiserver.
Deprecated
This parameter is deprecated and will be removed in a future release. To add a CA bundle, see webhook.tlsSecret.
If webhook.caBundle is set and the webhook.tlsSecret Secret contains a ca.crt key, then the webhook.tlsSecret CA value takes precedence.
|
webhook.certSource |
Determines how TLS certificates are provided for the admission controller webhook. This parameter accepts the following values:
- internal: The VerticaDB operator internally generates a self-signed, 10-year expiry certificate before starting the managing controller. When the certificate expires, you must manually restart the operator pod to create a new certificate.
- cert-manager: The cert-manager operator generates self-signed certificates and automatically handles private key rotation when the certificate nears expiration.
Deprecated
This TLS certificate management method is deprecated and will be removed in a future release.
-
secret: You generate the custom certificates before you create the Helm chart and store them in a Secret. This option requires that you set webhook.tlsSecret.
If webhook.tlsSecret is set, then this option is implicitly selected.
Default: internal
For details, see Installing the Vertica DB operator.
|
webhook.enable |
Determines if the Helm chart installs the admission controller webhooks for the VerticaDB custom resource and VerticaAutoscaler. If you do not have the privileges required to install the admission controller, set this value to false to deploy the operator only.
This parameter enables or disables both webhooks. You cannot enable one webhook and disable the other.
Caution
Webhooks prevent invalid state changes to the custom resource. Running Vertica on Kubernetes without webhook validations might result in invalid state transitions.
Default: true
|
webhook.tlsSecret |
Secret that contains a PEM-encoded certificate authority (CA) bundle and its keys.
The CA bundle validates the webhook's server certificate. If this is not set, the webhook uses the system trust roots on the apiserver.
This Secret includes the following keys for the CA bundle:
|
3.4 - Red Hat OpenShift integration
Red Hat OpenShift is a hybrid cloud platform that provides enhanced security features and greater control over the Kubernetes cluster.
Red Hat OpenShift is a hybrid cloud platform that provides enhanced security features and greater control over the Kubernetes cluster. In addition, OpenShift provides the OperatorHub, a catalog of operators that meet OpenShift requirements.
For comprehensive instructions about the OpenShift platform, refer to the Red Hat OpenShift documentation.
Note
If your Kubernetes cluster is in the cloud or on a managed service, each Vertica node must operate in the same availability zone.
Enhanced security with security context constraints
OpenShift requires that each deployment uses a security context constraint (SCC) to enforce enhanced security measures. The SCC lets administrators control the privileges of the pods in a cluster. For example, you can restrict namespace access for specific users in a multi-user environment.
Default SCCs
OpenShift provides default SCCs that provide a range of security features without manual configuration. Vertica on Kubernetes supports the privileged SCC, the most relaxed default SCC. The privileged SCC allows Vertica to assign user and group IDs to the Kubernetes objects in the cluster. In addition, the privileged SCC has the following Linux capabilities that enable internal SSH communication between the pods:
Vertica provides anyuid-extra, a custom SCC that you can create that extends the anyuid SCC. The anyuid-extra SCC runs Vertica with more restrictions than the privileged SSC. For example, if you do not have the privileges to grant the privileged SCC, you can create the anyuid-extra SCC and add it to your Vertica workloads service account.
For installation details, see Creating a Custom SCC with anyuid-extra.
Installing the operator
The VerticaDB operator is a community operator that is maintained by Vertica. Each operator available in the OperatorHub must adhere to requirements defined by the Operator Lifecycle Manager (OLM). To meet these requirements, vendors must provide a cluster service version (CSV) manifest for each operator. Vertica provides a CSV for each version of the VerticaDB operator available in the OpenShift OperatorHub.
The VerticaDB operator supports OpenShift versions 4.8 and higher.
You must have cluster-admin privileges on your OpenShift account to install the VerticaDB operator. For detailed installation instructions, refer to the OpenShift documentation.
Installing the operator in multiple OpenShift namespaces
By default, the OpenShift user interface (UI) installs the VerticaDB operator in a single OpenShift namespace. In some circumstances, you might require that the operator watch and manage resource objects across multiple OpenShift namespaces.
Prequisites:
The following steps add the VerticaDB operator to an additional namespace:
-
Create a YAML-formatted OperatorGroup object file. The following example creates file named operatorgroup.yaml:
apiVersion: operators.coreos.com/v1alpha2
kind: OperatorGroup
metadata:
  name: vertica-operatorgroup
  namespace: $NAMESPACE
spec:
  targetNamespaces:
  - $NAMESPACE
In the previous command, $NAMESPACE is the namespace where you want to install the operator.
-
Create the OperatorGroup object:
$ oc apply -f operatorgroup.yaml
-
Create a YAML-formatted Subscription object file to subscribe a namespace to an operator. The following example creates a file named sub.yaml:
apiVersion: operators.coreos.com/v1alpha1
kind: Subscription
metadata:
  name: verticadb-operator
  namespace: $NAMESPACE
spec:
  channel: stable
  name: verticadb-operator
  source: community-operators
  sourceNamespace: openshift-marketplace
-
Create the Subscription object:
$ oc apply -f sub.yaml
After you create the Subscription object, the OLM is aware of the operator.
-
Use kubectl get to view the installation progress in a separate shell:
$ kubectl get -n $NAMESPACE clusterserviceversion -w --selector operators.coreos.com/verticadb-operator.$NAMESPACE
When the installation is complete, you can manage the operator from the UI.
Before you can create an operator, you must create the anyuid-extra SCC and add it to your Vertica workloads service account. The Vertica anyuid-extra SCC manifest is available on the Vertica GitHub repository.
-
Create the custom SCC using the anyuid-extra YAML-formatted manifest:
$ kubectl apply -f https://github.com/vertica/vertica-kubernetes/releases/latest/download/custom-scc.yaml
For detailed instructions, refer to the OpenShift documentation.
-
Execute the following command to add the custom SCC to your Vertica workloads service account:
$ oc adm policy add-scc-to-user -n $NAMESPACE -z verticadb-operator-controller-manager anyuid-extra
In the previous command, $NAMESPACE is the namespace with the operator installation.
By default, the anyuid-extra has a priority setting of 10, so it is automatically selected instead of the default privileged SCC. For additional details about the priority setting, refer to the OpenShift documentation.
Deploying Vertica on OpenShift
After you installed the VerticaDB operator and added a supported SCC to your Vertica workloads service account, you can deploy Vertica on OpenShift.
For details about installing OpenShift in supported environments, see the OpenShift Container Platform installation overview.
Before you deploy Vertica on OpenShift, create the required Secrets to store sensitive information. For details about Secrets and OpenShift, see the OpenShift documentation. For guidance on deploying a Vertica custom resource, see VerticaDB CRD.
3.5 - Prometheus integration
Vertica on Kubernetes integrates with Prometheus to scrape time series metrics about the VerticaDB operator.
Vertica on Kubernetes integrates with Prometheus to scrape time series metrics about the VerticaDB operator. These metrics create a detailed model of your application over time, which provides valuable performance and troubleshooting insights. Prometheus exposes these metrics with an HTTP endpoint to facilitate internal and external communications and service discovery in microservice and containerized architectures.
Prometheus requires that you set up targets—metrics that you want to monitor. Each target is exposed on the operator's /metrics endpoint, and Prometheus periodically scrapes that endpoint to collect target data. The operator supports the operator SDK framework, which requires that an authorization proxy impose role-based-access control (RBAC) to access operator metrics. To increase flexibility, Vertica provides the following options to access the /metrics endpoint with Prometheus:
-
Use a sidecar container as an RBAC proxy to authorize connections.
-
Expose the /metrics endpoint to external connections without RBAC.
-
Disable Prometheus entirely.
Vertica provides Helm chart parameters and YAML manifests to configure each option.
Note
If you installed the VerticaDB operator with
OperatorHub.io, you can use the Prometheus integration with the default Helm chart settings. OperatorHub.io installations cannot configure any Helm chart parameters.
Prerequisites
Access metrics with RBAC
The operator SDK framework requires that operators use an authorization proxy for metrics access. Because the operator sends metrics to localhost only, Vertica meets these requirements with a sidecar container with localhost access that enforces RBAC.
RBAC rules are cluster-scoped, and the sidecar authorizes connections from clients associated with a service account that has the correct ClusterRole and ClusterRoleBindings. Vertica provides the following example manifests:
For additional details about ClusterRoles and ClusterRoleBindings, see the Kubernetes documentation.
Create RBAC rules
Note
This section details how to create RBAC rules for environments that require that you set up ClusterRole and ClusterRoleBinding objects outside of the Helm chart installation.
The following steps create the ClusterRole and ClusterRoleBindings objects that grant access to the /metrics endpoint to a non-Kubernetes resource such as Prometheus. Because RBAC rules are cluster-scoped, you must create or add to an existing ClusterRoleBinding:
-
Create a ClusterRoleBinding that binds the role for the RBAC sidecar proxy with a service account:
-
Create a ClusterRoleBinding:
$ kubectl create clusterrolebinding verticadb-operator-proxy-rolebinding \
    --clusterrole=verticadb-operator-proxy-role \
    --serviceaccount=namespace:serviceaccount
-
Add a service account to an existing ClusterRoleBinding:
$ kubectl patch clusterrolebinding verticadb-operator-proxy-rolebinding \
    --type='json' \
    -p='[{"op": "add", "path": "/subjects/-", "value": {"kind": "ServiceAccount", "name": "serviceaccount","namespace": "namespace" } }]'
-
Create a ClusterRoleBinding that binds the role for the non-Kubernetes object to the RBAC sidecar proxy service account:
-
Create a ClusterRoleBinding:
$ kubectl create clusterrolebinding verticadb-operator-metrics-reader \
    --clusterrole=verticadb-operator-metrics-reader \
    --serviceaccount=namespace:serviceaccount \
    --group=system:authenticated
-
Bind the service account to an existing ClusterRoleBinding:
$ kubectl patch clusterrolebinding verticadb-operator-metrics-reader \
    --type='json' \
    -p='[{"op": "add", "path": "/subjects/-", "value": {"kind": "ServiceAccount", "name": "serviceaccount","namespace": "namespace"},{"op":"add","path":"/subjects/-","value":{"kind": "Group", "name": "system:authenticated"} }]'
$ kubectl patch clusterrolebinding verticadb-operator-metrics-reader \
    --type='json' \
    -p='[{"op": "add", "path": "/subjects/-", "value": {"kind": "ServiceAccount", "name": "serviceaccount","namespace": "namespace" } }]'
When you install the Helm chart, the ClusterRole and ClusterRoleBindings are created automatically. By default, the prometheus.expose parameter is set to EnableWithProxy, which creates the service object and exposes the operator's /metrics endpoint.
For details about creating a sidecar container, see VerticaDB CRD.
Service object
Vertica provides a service object verticadb-operator-metrics-service to access the Prometheus /metrics endpoint. The VerticaDB operator does not manage this service object. By default, the service object uses the ClusterIP service type to support RBAC.
Connect to the /metrics endpoint at port 8443 with the following path:
https://verticadb-operator-metrics-service.namespace.svc.cluster.local:8443/metrics
Bearer token authentication
Kubernetes authenticates requests to the API server with service account credentials. Each pod is associated with a service account and has the following credentials stored in the filesystem of each container in the pod:
Use these credentials to authenticate to the /metrics endpoint through the service object. You must use the credentials for the service account that you used to create the ClusterRoleBindings.
For example, the following cURL request accesses the /metrics endpoint. Include the --insecure option only if you do not want to verify the serving certificate:
$ curl --insecure --cacert /var/run/secrets/kubernetes.io/serviceaccount/ca.crt -H "Authorization: Bearer $(cat /var/run/secrets/kubernetes.io/serviceaccount/token)" https://verticadb-operator-metrics-service.vertica:8443/metrics
For additional details about service account credentials, see the Kubernetes documentation.
TLS client certificate authentication
Some environments might prevent you from authenticating to the /metrics endpoint with the service account token. For example, you might run Prometheus outside of Kubernetes. To allow external client connections to the /metrics endpoint, you have to supply the RBAC proxy sidecar with TLS certificates.
You must create a Secret that contains the certificates, and then use the prometheus.tlsSecret Helm chart parameter to pass the Secret to the RBAC proxy sidecar when you install the Helm chart. The following steps create the Secret and install the Helm chart:
-
Create a Secret that contains the certificates:
$ kubectl create secret generic metrics-tls --from-file=tls.key=/path/to/tls.key --from-file=tls.crt=/path/to/tls.crt --from-file=ca.crt=/path/to/ca.crt
-
Install the Helm chart with prometheus.tlsSecret set to the Secret that you just created:
$ helm install operator-name --namespace namespace --create-namespace vertica-charts/verticadb-operator \
  --set prometheus.tlsSecret=metrics-tls
The prometheus.tlsSecret parameter forces the RBAC proxy to use the TLS certificates stored in the Secret. Otherwise, the RBAC proxy sidecar generates its own self-signed certificate.
After you install the Helm chart, you can authenticate to the /metrics endpoint with the certificates in the Secret. For example:
$ curl --key tls.key --cert tls.crt --cacert ca.crt https://verticadb-operator-metrics-service.vertica.svc:8443/metrics
Prometheus operator integration (optional)
Vertica on Kubernetes integrates with the Prometheus operator, which provides custom resources (CRs) that simplify targeting metrics. Vertica supports the ServiceMonitor CR that discovers the VerticaDB operator automatically, and authenticates requests with a bearer token.
The ServiceMonitor CR is available as a release artifact in our GitHub repository. See Helm chart parameters for details about the prometheus.createServiceMonitor parameter.
Access metrics without RBAC
You might have an environment that does not require privileged access to Prometheus metrics. For example, you might run Prometheus outside of Kubernetes.
To allow external access to the /metrics endpoint with HTTP, set prometheus.expose to EnableWithoutAuth. For example:
$ helm install operator-name --namespace namespace --create-namespace vertica-charts/verticadb-operator \
    --set prometheus.expose=EnableWithoutAuth
Service object
Vertica provides a service object verticadb-operator-metrics-service to access the Prometheus /metrics endpoint. The VerticaDB operator does not manage this service object. By default, the service object uses the ClusterIP service type, so you must change the serviceType for external client access. The service object's fully-qualified domain name (FQDN) is as follows:
verticadb-operator-metrics-service.namespace.svc.cluster.local
Connect to the /metrics endpoint at port 8443 with the following path:
http://verticadb-operator-metrics-service.namespace.svc.cluster.local:8443/metrics
Disabling prometheus
To disable Prometheus, set the prometheus.expose Helm chart parameter to Disable. The following is an example command:
$ helm install operator-name --namespace namespace --create-namespace vertica-charts/verticadb-operator \
    --set prometheus.expose=Disable
For details about Helm install commands, see Installing the Vertica DB operator.
4 - Configuring communal storage
Vertica on Kubernetes supports a variety of communal storage providers to accommodate your storage requirements.
Vertica on Kubernetes supports a variety of communal storage providers to accommodate your storage requirements. Each storage provider uses authentication methods that conceal sensitive information so that you can declare that information in your Custom Resource (CR) without exposing any literal values.
Note
If your Kubernetes cluster is in the cloud or on a managed service, each Vertica node must operate in the same availability zone.
AWS S3 or S3-Compatible storage
Vertica on Kubernetes supports multiple authentication methods for Amazon Web Services (AWS) communal storage locations and private cloud S3 storage such as MinIO.
For additional details about Vertica and AWS, see Vertica on Amazon Web Services.
Secrets authentication
To connect to an S3-compatible storage location, create a Secret to store both your communal access and secret key credentials. Then, add the Secret, path, and S3 endpoint to the CR spec.
-
The following command stores both your S3-compatible communal access and secret key credentials in a Secret named s3-creds:
$ kubectl create secret generic s3-creds --from-literal=accesskey=accesskey --from-literal=secretkey=secretkey
-
Add the Secret to the communal section of the CR spec:
spec:
  ...
  communal:
    credentialSecret: s3-creds
    endpoint: https://path/to/s3-endpoint
    path: s3://bucket-name/key-name
    ...
For a detailed description of an S3-compatible storage implementation, see VerticaDB CRD.
IAM profile authentication
Identify and access management (IAM) profiles manage user identities and control which services and resources a user can access. IAM authentication to Vertica on Kubernetes reduces the number of manual updates when you rotate your access keys.
The IAM profile must have read and write access to the communal storage. The IAM profile is associated with the EC2 instances that run worker nodes.
-
Create an EKS node group using a Node IAM role with a policy that allows read and write access to the S3 bucket used for communal storage.
-
Deploy the VerticaDB operator in a namespace. For details, see Installing the Vertica DB operator.
-
Create a VerticaDB custom resource (CR), and omit the communal.credentialSecret field:
spec:
  ...
  communal:
    endpoint: https://path/to/s3-endpoint
    path: s3://bucket-name/key-name
When the Vertica server accesses the communal storage location, it uses the policy associated to the EKS node.
For additional details about authenticating to Vertica with an IAM profile, see AWS authentication.
IRSA profile authentication
Important
This authentication method requires an image running Vertica server version 12.0.3 or later.
You can use IAM roles for service accounts (IRSA) to associate an IAM role with a Kubernetes service account. You must set the IAM policies for the Kubernetes service account, and then pods running that service account have the IAM policies.
Before you begin, complete the following prerequisites:
-
Configure the EKS cluster's control plane. For details, see the Amazon documentation.
-
Create a bucket policy that has access to the S3 communal storage bucket. For details, see the Amazon documentation.
-
Create an EKS node group using a Node IAM role that does not have S3 access.
-
Use eksctl to create the IAM OpenID Connect (OIDC) provider for your EKS cluster:
$ eksctl utils associate-iam-oidc-provider --cluster cluster --approve
2022-10-07 08:31:37 [ℹ]  will create IAM Open ID Connect provider for cluster "cluster" in "us-east-1"
2022-10-07 08:31:38 [✔]  created IAM Open ID Connect provider for cluster "cluster" in "us-east-1"
-
Create the Kubernetes namespace where you deploy the VerticaDB operator:
$ kubectl create ns vertica
namespace/vertica created
-
Use eksctl to create a Kubernetes service account in the vertica namespace. When you create a service account with eksctl, you can attach an IAM policy that allows S3 access:
$ eksctl create iamserviceaccount --name my-serviceaccount --namespace vertica --cluster cluster --attach-policy-arn arn:aws:iam::profile:policy/policy --approve
2022-10-07 08:38:32 [ℹ]  1 iamserviceaccount (vertica/my-serviceaccount) was included (based on the include/exclude rules)
2022-10-07 08:38:32 [!]  serviceaccounts that exist in Kubernetes will be excluded, use --override-existing-serviceaccounts to override
2022-10-07 08:38:32 [ℹ]  1 task: {
    2 sequential sub-tasks: {
        create IAM role for serviceaccount "vertica/my-serviceaccount",
        create serviceaccount "vertica/my-serviceaccount",
    } }2022-10-07 08:38:32 [ℹ]  building iamserviceaccount stack "eksctl-cluster-addon-iamserviceaccount-vertica-my-serviceaccount"
2022-10-07 08:38:33 [ℹ]  deploying stack "eksctl-cluster-addon-iamserviceaccount-vertica-my-serviceaccount"
2022-10-07 08:38:33 [ℹ]  waiting for CloudFormation stack "eksctl-cluster-addon-iamserviceaccount-vertica-my-serviceaccount"
2022-10-07 08:39:03 [ℹ]  waiting for CloudFormation stack "eksctl-cluster-addon-iamserviceaccount-vertica-my-serviceaccount"
2022-10-07 08:39:04 [ℹ]  created serviceaccount "vertica/my-serviceaccount"
-
Install the VerticaDB operator, and set the service account:
$ helm install vdb-op --namespace vertica vertica-charts/verticadb-operator --set serviceAccountNameOverride=my-serviceaccount
-
Create a VerticaDB custom resource (CR), and omit the communal.credentialSecret field. When pods are created, they use the service account that has a policy that provides access to the S3 communal storage:
apiVersion: vertica.com/v1beta1
kind: VerticaDB
metadata:
  name: irsadb
spec:
  image: vertica/vertica-k8s:12.0.3-0
  communal:
    path: "s3://path/to/s3-endpoint
    endpoint: https://s3.amazonaws.com
  subclusters:
    - name: sc
      size: 3
Server-side encryption
Important
Vertica supports S3 server-side encryption in versions 12.0.1 and higher.
If your S3 communal storage uses server-side encryption (SSE), you must configure the encryption type when you create the CR. Vertica supports the following types of SSE:
For details about Vertica support for each encryption type, see S3 object store.
The following tabs provide examples on how to implement each SSE type. For details about the parameters, see Custom resource definition parameters.
apiVersion: vertica.com/v1beta1
kind: VerticaDB
metadata:
  name: verticadb
spec:
  communal:
    path: "s3://bucket-name"
    s3ServerSideEncryption: SSE-S3
This setting requires that you use the communal.additionalConfig parameter to pass the key identifier (not the key) of the Key management service. Vertica must have permission to use the key, which is managed through KMS:
apiVersion: vertica.com/v1beta1
kind: VerticaDB
metadata:
  name: verticadb
spec:
  communal:
    path: "s3://bucket-name"
    s3ServerSideEncryption: SSE-KMS
    additionalConfig:
      S3SseKmsKeyId: "kms-key-identifier"
Store the client key contents in a Secret and reference the Secret in the CR. The client key must be either a 32-character plaintext key or a 44-character base64-encoded key.
You must create the Secret in the same namespace as the CR:
- Create a Secret that stores the client key contents in the
stringData.clientKey field:
   apiVersion: v1
   kind: Secret
   metadata:
     name: sse-c-key
   stringData:
     clientKey: client-key-contents
- Add the Secret to the CR with the
communal.s3SseCustomerKeySecret parameter:
   apiVersion: vertica.com/v1beta1
   kind: VerticaDB
   metadata:
     name: verticadb
   spec:
     communal:
       path: "s3://bucket-name"
       s3ServerSideEncryption: SSE-C
       s3SseCustomerKeySecret: "sse-c-key"
   ...
Google Cloud Storage
Authenticating to Google Cloud Storage (GCS) requires your hash-based message authentication code (HMAC) access and secret keys, and the path to your GCS bucket. For details about HMAC keys, see Eon Mode on GCP prerequisites.
-
The following command stores your HMAC access and secret key in a Secret named gcs-creds:
$ kubectl create secret generic gcs-creds --from-literal=accesskey=accessKey --from-literal=secretkey=secretkey
-
Add the Secret and the path to the GCS bucket that contains your Vertica database to the communal section of the CR spec:
spec:
  ...
  communal:
    credentialSecret: gcs-creds
    path: gs://bucket-name/path/to/database-name
    ...
For additional details about Vertica and GCS, see Vertica on Google Cloud Platform.
Azure Blob Storage
Micosoft Azure provides a variety of options to authenticate to Azure Blob Storage location. Depending on your environment, you can use one of the following combinations to store credentials in a Secret:
If you use an Azure storage emulator such as Azurite in a tesing environment, you can authenticate with accountName and blobStorage values.
Important
Vertica does not officially support Azure storage emulators as a communal storage location.
-
The following command stores accountName and accountKey in a Secret named azb-creds:
$ kubectl create secret generic azb-creds --from-literal=accountKey=accessKey --from-literal=accountName=accountName
Alternately, you could store your accountName and your SAS credentials in azb-creds:
$ kubectl create secret generic azb-creds --from-literal=sharedAccessSignature=sharedAccessSignature --from-literal=accountName=accountName
-
Add the Secret and the path that contains your AZB storage bucket to the communal section of the CR spec:
spec:
  ...
  communal:
    credentialSecret: azb-creds
    path: azb://accountName/bucket-name/database-name
    ...
For details about Vertica and authenticating to Microsoft Azure, see Eon Mode on GCP prerequisites.
Hadoop file storage
Connect to Hadoop Distributed Filesystem (HDFS) communal storage with the standard webhdfs scheme, or the swebhdfs scheme for wire encryption. In addition, you must add your HDFS configuration files in a ConfigMap, a Kubernetes object that stores data in key-value pairs. You can optionally configure Kerberos to authenticate connections to your HDFS storage location.
The following example uses the swebhdfs wire encryption scheme that requires a certificate authority (CA) bundle in the CR spec.
-
The following command stores a PEM-encoded CA bundle in a Secret named hadoop-cert:
$ kubectl create secret generic hadoop-cert --from-file=ca-bundle.pem
-
HDFS configuration files are located in the /etc/hadoop directory. The following command creates a ConfigMap named hadoop-conf:
$ kubectl create configmap hadoop-conf --from-file=/etc/hadoop
-
Add the configuration values to the communal and certSecrets sections of the spec:
spec:
  ...
  communal:
    path: "swebhdfs://path/to/database"
    hadoopConfig: hadoop-conf
    caFile: /certs/hadoop-cert/ca-bundle.pem
  certSecrets:
    - name: hadoop-cert
  ...
The previous example defines the following:
-
communal.path: The path to the database, using the wire encryption scheme. Enclose the path in double quotes.
-
communal.hadoopConfig: The ConfigMap storing the contents of the /etc/hadoop directory.
-
communal.caFile: The mount path in the container filesystem containing the CA bundle used to create the hadoop-cert Secret.
-
certSecrets.name: The Secret containing the CA bundle.
For additional details about HDFS and Vertica, see Apache Hadoop integration.
Kerberos authentication (optional)
Vertica authenticates connections to HDFS with Kerberos. The Kerberos configuration between Vertica on Kubernetes is the same as between a standard Eon Mode database and Kerberos, as described in Kerberos authentication.
-
The following command stores the krb5.conf and krb5.keytab files in a Secret named krb5-creds:
$ kubectl create secret generic krb5-creds --from-file=kerberos-conf=/etc/krb5.conf --from-file=kerberos-keytab=/etc/krb5.keytab
Consider the following when managing the krb5.conf and krb5.keytab files in Vertica on Kubernetes:
-
Each pod uses the same krb5.keytab file, so you must update the krb5.keytab file before you begin any scaling operation.
-
When you update the contents of the krb5.keytab file, the operator updates the mounted files automatically, a process that does not require a pod restart.
-
The krb5.conf file must include a [domain_realm] section that maps the Kubernetes cluster domain to the Kerberos realm. The following example maps the default .cluster.local domain to a Kerberos realm named EXAMPLE.COM:
[domain_realm]
  .cluster.local = EXAMPLE.COM
-
Add the Secret and additional Kerberos configuration information to the CR:
spec:
  ...
  communal:
    path: "swebhdfs://path/to/database"
    hadoopConfig: hadoop-conf
    kerberosServiceName: verticadb
    kerberosRealm: EXAMPLE.COM
  kerberosSecret: krb5-creds
  ...
The previous example defines the following:
-
communal.path: The path to the database, using the wire encryption scheme. Enclose the path in double quotes.
-
communal.hadoopConfig: The ConfigMap storing the contents of the /etc/hadoop directory.
-
communal.kerberosServiceName: The service name for the Vertica principal.
-
communal.kerberosRealm: The realm portion of the principal.
-
kerberosSecret: The Secret containing the krb5.conf and krb5.keytab files.
For a complete definition of each of the previous values, see Custom resource definition parameters.
5 - Custom resource definitions
The custom resource definition (CRD) is a shared global object that extends the Kubernetes API beyond the standard resource types.
The custom resource definition (CRD) is a shared global object that extends the Kubernetes API beyond the standard resource types. The CRD serves as a blueprint for custom resource (CR) instances. You create CRs that specify the desired state of your environment, and the operator monitors the CR to maintain state for the objects within its namespace.
5.1 - VerticaDB CRD
The VerticaDB custom resource definition (CRD) deploys an Eon Mode database. Each subcluster is a StatefulSet, a workload resource type that persists data with ephemeral Kubernetes objects.
A VerticaDB custom resource (CR) requires a primary subcluster and a connection to a communal storage location to persist its data. The VerticaDB operator monitors the CR to maintain its desired state and validate state changes.
The following sections provide a YAML-formatted manifest that defines the minimum required fields to create a VerticaDB CR, and each subsequent section implements a production-ready recommendation or best practice using custom resource parameters. For a comprehensive list of all parameters and their definitions, see custom resource parameters.
Prerequisites
- Complete Installing the Vertica DB operator.
- Configure a dynamic volume provisioner.
- Confirm that you have the resources to deploy objects you plan to create.
- Optionally, acquire a Vertica license. By default, the Helm chart deploys the free Community Edition license. This license limits you to a three-node cluster and 1TB data.
- Configure a supported communal storage location with an empty communal path bucket.
- Understand Kubernetes Secrets. Secrets conceal sensitive information in your custom resource.
Note
Instead of creating a Secret with kubectl, you can manually base64 encode a string on the command line and then add the encoded output to a Secrets manifest.
For example, pass the string value to the echo command, and pipe the output to the base64 command to encode the value. In the echo command, include the -n option so that it does not append a newline character:
$ echo -n 'secret-value' | base64
c2VjcmV0LXZhbHVl
For detailed steps about creating the manifest and applying it to a namespace, see the Kubernetes documentation.
Minimal manifest
At minimum, a VerticaDB CR requires a connection to an empty communal storage bucket and a primary subcluster definition. The operator is namespace-scoped, so make sure that you apply the CR manifest in the same namespace as the operator.
The following VerticaDB CR connects to S3 communal storage and deploys a three-node primary subcluster on three nodes. This manifest serves as the starting point for all implementations detailed in the subsequent sections:
apiVersion: vertica.com/v1beta1
kind: VerticaDB
metadata:
  name: cr-name
spec:
  licenseSecret: vertica-license
  superuserPasswordSecret: su-password
  communal:
    path: "s3://bucket-name/key-name"
    endpoint: "https://path/to/s3-endpoint"
    credentialSecret: s3-creds
    region: region
  subclusters:
    - name: primary
      size: 3
  shardCount: 6
The following sections detail the minimal manifest's CR parameters, and how to create the CR in the current namespace.
Required fields
Each VerticaDB manifest begins with required fields that describe the version, resource type, and metadata:
apiVersion: The API group and Kubernetes API version in api-group/version format.kind: The resource type. VerticaDB is the name of the Vertica custom resource type.metadata: Data that identifies objects in the namespace.
name: The name of this CR object. Provide a unique metadata.name value so that you can identify the CR and its resources in its namespace.
spec definition
The spec field defines the desired state of the CR. The operator control loop compares the spec definition to the current state and reconciles any differences.
Nest all fields that define your StatefulSet under the spec field.
Add a license
By default, the Helm chart pulls the free Vertica Community Edition (CE) image. The CE image has a restricted license that limits you to a three-node cluster and 1TB of data.
To add your license so that you can deploy more nodes and use more data, store your license in a Secret and add it to the manifest:
- Create a Secret from your Vertica license file:
$ kubectl create secret generic vertica-license --from-file=license.dat=/path/to/license-file.dat
- Add the Secret to the
licenseSecret field:
...
spec:
  licenseSecret: vertica-license
  ...
The licenseSecret value is mounted in the Vertica server container in the /home/dbadmin/licensing/mnt directory.
Add password authentication
The superuserPasswordSecret field enables password authentication for the database. You must define this field when you create the CR—you cannot define a password for an existing database.
To create a database password, conceal it in a Secret before you add it to the mainfest:
- Create a Secret from a literal string. You must use
password as the key:
$ kubectl create secret generic su-passwd --from-literal=password=password-value
- Add the Secret to the
superuserPasswordSecret field:
...
spec:
  ...
  superuserPasswordSecret: su-password
Connect to communal storage
Vertica on Kubernetes supports multiple communal storage locations. For implementation details for each communal storage location, see Configuring communal storage.
This CR connects to an S3 communal storage location. Define your communal storage location with the communal field:
...
spec:
  ...
  communal:
    path: "s3://bucket-name/key-name"
    endpoint: "https://path/to/s3-endpoint"
    credentialSecret: s3-creds
    region: region
  ...
This manifest sets the following parameters:
-
credentialSecret: The Secret that contains your communal access and secret key credentials.
The following command stores both your S3-compatible communal access and secret key credentials in a Secret named s3-creds:
$ kubectl create secret generic s3-creds --from-literal=accesskey=accesskey --from-literal=secretkey=secretkey
Note
Omit
credentialSecret for environments that authenticate to S3 communal storage with Identity and Access Management (IAM) or IAM roles for service accounts (IRSA)—these methods do not require that you store your credentials in a Secret. For details, see
Configuring communal storage.
-
endpoint: The S3 endpoint URL.
-
path: The location of the S3 storage bucket, in S3 bucket notation. This bucket must exist before you create the custom resource. After you create the custom resource, you cannot change this value.
-
region: The geographic location of the communal storage resources. This field is valid for AWS and GCP only. If you set the wrong region, you cannot connect to the communal storage location.
Define a primary subcluster
Each CR requires a primary subcluster or it returns an error. At minimum, you must define the name and size of the subcluster:
...
spec:
  ...
  subclusters:
    - name: primary
      size: 3
  ...
This manifest sets the following parameters:
name: The name of the subcluster.size: The number of pods in the subcluster.
When you define a CR with a single subcluster, the operator designates it as the primary subcluster. If your manifest includes multiple subclusters, you must use the isPrimary parameter to identify the primary subcluster. For example:
spec:
  ...
  subclusters:
    - name: primary
      size: 3
      isPrimary: true
    - name: secondary
      size: 3
For additional details about primary and secondary subclusters, see Subclusters.
Set the shard count
shardCount specifies the number of shards in the database, which determines how subcluster nodes subscribe to communal storage data. You cannot change this value after you instantiate the CR. When you change the number of pods in a subcluster or add or remove a subcluster, the operator rebalances shards automatically.
Vertica recommends that the shard count equals double the number of nodes in the cluster. Because this manifest creates a three-node cluster with one Vertica server container per node, set shardCount to 6:
...
spec:
  ...
  shardCount: 6
For guidance on selecting the shard count, see Configuring your Vertica cluster for Eon Mode. For details about limiting each node to one Vertica server container, see Node affinity.
Apply the manifest
After you define the minimal manifest in a YAML-formatted file, use kubectl to create the VerticaDB CR. The following command creates a CR in the current namespace:
$ kubectl apply -f minimal.yaml
verticadb.vertica.com/cr-name created
After you apply the manifest, the operator creates the primary subcluster, connects to the communal storage, and creates the database. You can use kubectl wait to see when the database is ready:
$ kubectl wait --for=condition=DBInitialized=True vdb/cr-name --timeout=10m
verticadb.vertica.com/cr-name condition met
Specify an image
Each time the operator launches a container, it pulls the image for the most recently released Vertica version from the Vertica Dockerhub repository. Vertica recommends that you explicitly set the image that the operator pulls for your CR. For a list of available Vertica images, see the Vertica Dockerhub registry.
To run a specific image version, set the image parameter in docker-registry-hostname/image-name:tag format:
spec:
  ...
  image: vertica/vertica-k8s:version
When you specify an image other than the latest, the operator pulls the image only when it is not available locally. You can control when the operator pulls the image with the imagePullPolicy custom resource parameter.
Important
If your environment uses the Vertica Kubernetes (No keys) image, you must provide SSH keys for internal communication between the pods. This requires that you add the keys as a Secret with sshSecret parameter:
$ kubectl create secret generic ssh-keys --from-file=/path/to/ssh/keys
You can add this Secret with the sshSecret parameter:
spec:
  ...
  sshSecret: ssh-keys
Communal storage authentication
Your communal storage validates HTTPS connections with a self-signed certificate authority (CA) bundle. You must make the CA bundle's root certificate available to each Vertica server container so that the communal storage can authenticate requests from your subcluster.
This authentication requires that you set the following parameters:
-
certSecrets: Adds a Secret that contains the root certificate.
This parameter is a list of Secrets that encrypt internal and external communications for your CR. Each certificate is mounted in the Vertica server container filesystem in the /certs/Secret-name/cert-name directory.
-
communal.caFile: Makes the communal storage location aware of the mount path that stores the certificate Secret.
Complete the following to add these parameters to the manifest:
- Create a Secret that contains the PEM-encoded root certificate. The following command creates a Secret named
aws-cert:
$ kubectl create secret generic aws-cert --from-file=root-cert.pem
- Add the
certSecrets and communal.caFile parameters to the manifest:
spec:
  ...
    communal:
      ...
      caFile: /certs/aws-cert/root_cert.pem
    certSecrets:
      - name: aws-cert
Now, the communal storage authenticates requests with the /certs/aws-cert/root_cert.pem file, whose contents are stored in the aws-cert Secret.
External client connections
Each subcluster communicates with external clients and internal pods through a service object. To configure the service object to accept external client connections, set the following parameters:
-
serviceName: Assigns a custom name to the service object. A custom name lets you identify it among multiple subclusters.
Service object names use the metadata.name-serviceName naming convention.
-
serviceType: Defines the type of the subcluster service object.
By default, a subcluster uses the ClusterIP serviceType, which sets a stable IP and port that is accessible from within Kubernetes only. In many circumstances, external client applications need to connect to a subcluster that is fine-tuned for that specific workload. For external client access, set the serviceType to NodePort or LoadBalancer.
Note
The
LoadBalancer service type is an external service type that is managed by your cloud provider. For implementation details, refer to the
Kubernetes documentation and your cloud provider's documentation.
-
serviceAnnotations: Assigns a custom annotation to the service object for implementation-specific services.
Add these external client connection parameters under the subclusters field:
spec:
  ...
  subclusters:
    ...
    serviceName: connections
    serviceType: LoadBalancer
    serviceAnnotations:
      service.beta.kubernetes.io/load-balancer-source-ranges: 10.0.0.0/24
This example creates a LoadBalancer service object named verticadb-connections. The serviceAnnotations parameter defines the CIDRs that can access the network load balancer (NLB). For additional details, see the AWS Load Balancer Controller documentation.
Note
If you run your CR on Amazon Elastic Kubernetes Service (EKS), Vertica recommends the AWS Load Balancer Controller. To use the AWS Load Balancer Controller, apply the following annotations:
serviceAnnotations:
      service.beta.kubernetes.io/aws-load-balancer-type: external
      service.beta.kubernetes.io/aws-load-balancer-nlb-target-type: ip
      service.beta.kubernetes.io/aws-load-balancer-scheme: internet-facing
For longer-running queries, you might need to configure TCP keepalive settings.
For additional details about Vertica and service objects, see Containerized Vertica on Kubernetes.
Authenticate clients
You might need to connect applications or command-line interface (CLI) tools to your VerticaDB CR. You can add TLS certificates that authenticate client requests with the certSecrets parameter:
- Create a Secret that contains your TLS certificates. The following command creates a Secret named
mtls:
$ kubectl create secret generic mtls --from-file=mtls=/path/to/mtls-cert
- Add the Secret to the
certSecrets parameter:
spec:
  ...
  certSecrets:
    ...
    - name: mtls
/certs/mtls/mtls-cert directory.
Sidecar logger
A sidecar is a utility container that runs in the same pod as your main application container and performs a task for that main application's process. The VerticaDB CR uses a sidecar container to handle logs for the Vertica server container. You can use the vertica-logger image to add a sidecar that sends logs from vertica.log to standard output on the host node for log aggregation.
Add a sidecar with the sidecars parameter. This parameter accepts a list of sidecar definitions, where each element specifies the following:
name: Name of the sidecar. name indicates the beginning of a sidecar element.image: Image for the sidecar container.
The following example adds a single sidecar container that shares a pod with each Vertica server container:
spec:
  ...
  sidecars:
    - name: sidecar-container
      image: sidecar-image:latest
This configuration persists logs only for the lifecycle of the container. To persist log data between pod lifecycles, you must mount a custom volume in the sidecar filesystem.
Persist logs with a volume
An external service that requires long-term access to Vertica server data should use a volume to persist that data between pod lifecycles. For details about volumes, see the Kubernetes documentation.
The following parameters add a volume to your CR and mounts it in a sidecar container:
volumes: Make a custom volume available to the CR so that you can mount it in a container filesystem. This parameter requires a name value and a volume type.sidecars[i].volumeMounts: Mounts one or more volumes in the sidecar container filesystem. This parameter requires a name value and a mountPath value that defines where the volume is mounted in the sidecar container.
Note
Vertica also provides a spec.volumeMounts parameter so you can mount volumes for other use cases. This parameter behaves like sidecars[i].volumeMounts, but it mounts volumes in the Vertica server container filesystem.
For details, see Custom resource definition parameters.
The following example creates a volume of type emptyDir, and mounts it in the sidecar-container filesystem:
spec:
  ...
  volumes:
    - name: sidecar-vol
      emptyDir: {}
  ...
  sidecars:
    - name: sidecar-container
      image: sidecar-image:latest
      volumeMounts:
        - name: sidecar-vol
          mountPath: /path/to/sidecar-vol
Resource limits and requests
You should limit the amount of CPU and memory resources that each host node allocates for the Vertica server pod, and set the amount of resources each pod can request.
To control these values, set the following parameters under the subclusters.resources field:
limits.cpu: Maximum number of CPUs that each server pod can consume.limits.memory: Maximum amount of memory that each server pod can consume.requests.cpu: Number CPUs that each pod requests from the host node.requests.memory: Amount of memory that each pod requests from a PV.
When you change resource settings, Kubernetes restarts each pod with the updated settings.
Note
Select resource settings that your host nodes can accommodate. When a pod is started or rescheduled, Kubernetes searches for host nodes with enough resources available to start the pod. If there is not a host node with enough resources, the pod STATUS stays in Pending until the resources become available.
For guidance on setting production limits and requests, see Recommendations for Sizing Vertica Nodes and Clusters.
As a best practice, set resource.limits.* and resource.requests.* to equal values so that the pods are assigned to the Guaranteed Quality of Service (QoS) class. Equal settings also provide the best safeguard against the Out Of Memory (OOM) Killer in constrained environments.
The following example allocates 32 CPUs and 96 gigabytes of memory on the host node, and limits the requests to the same values. Because the limits.* and requests.* values are equal, the pods are assigned the Guaranteed QoS class:
spec:
  ...
  subclusters:
    ...
    resources:
      limits:
        cpu: 32
        memory: 96Gi
      requests:
        cpu: 32
        memory: 96Gi
Node affinity
Kubernetes affinity and anti-affinity settings control which resources the operator uses to schedule pods. As a best practice, you should set affinity to ensure that a single node does not serve more than one Vertica pod.
The following example creates an anti-affinity rule that schedules only one Vertica server pod per node:
spec:
  ...
  subclusters:
    ...
    affinity:
      podAntiAffinity:
        requiredDuringSchedulingIgnoredDuringExecution:
        - labelSelector:
            matchExpressions:
            - key: app.kubernetes.io/name
              operator: In
              values:
              - vertica
          topologyKey: "kubernetes.io/hostname"
The following provides a detailed explanation about all settings in the previous example:
affinity: Provides control over pod and host scheduling using labels.podAntiAffinity: Uses pod labels to prevent scheduling on certain resources.requiredDuringSchedulingIgnoredDuringExecution: The rules defined under this statement must be met before a pod is scheduled on a host node.labelSelector: Identifies the pods affected by this affinity rule.matchExpressions: A list of pod selector requirements that consists of a key, operator, and values definition. This matchExpression rule checks if the host node is running another pod that uses a vertica label.topologyKey: Defines the scope of the rule. Because this uses the hostname topology label, this applies the rule in terms of pods and host nodes.
For additional details, see the Kubernetes documentation.
5.2 - VerticaAutoscaler CRD
The VerticaAutoscaler custom resource (CR) is a HorizontalPodAutoscaler that automatically scales resources for existing subclusters using one of the following strategies:.
The VerticaAutoscaler custom resource (CR) is a HorizontalPodAutoscaler that automatically scales resources for existing subclusters using one of the following strategies:
The VerticaAutoscaler CR scales using resource or custom metrics. Vertica manages subclusters by workload, which helps you pinpoint the best metrics to trigger a scaling event. To maintain data integrity, the operator does not scale down unless all connections to the pods are drained and sessions are closed.
For details about the algorithm that determines when the VerticaAutoscaler scales, see the Kubernetes documentation.
Additionally, the VerticaAutoscaler provides a webhook to validate state changes. By default, this webhook is enabled. You can configure this webhook with the webhook.enable Helm chart parameter.
Examples
The examples in this section use the following VerticaDB custom resource. Each example uses CPU to trigger scaling:
apiVersion: vertica.com/v1beta1
kind: VerticaDB
metadata:
  name: dbname
spec:
  communal:
    path: "path/to/communal-storage"
    endpoint: "path/to/communal-endpoint"
    credentialSecret: credentials-secret
  subclusters:
    - name: primary1
      size: 3
      isPrimary: true
      serviceName: primary1
      resources:
        limits:
          cpu: "8"
        requests:
          cpu: "4"
Prerequisites
-
Complete Installing the Vertica DB operator.
-
Install the kubectl command line tool.
-
Complete VerticaDB CRD.
-
Confirm that you have the resources to scale.
Note
By default, the custom resource uses the free
Community Edition (CE) license. This license allows you to deploy up to three nodes with a maximum of 1TB of data. To add resources beyond these limits, you must add your Vertica license to the custom resource as described in
VerticaDB CRD.
- Set a value for the metric that triggers scaling. For example, if you want to scale by CPU utilization, you must set CPU limits and requests.
Subcluster scaling
Automatically adjust the number of subclusters in your custom resource to fine-tune resources for short-running dashboard queries. For example, increase the number of subclusters to increase throughput. For more information, see Improving query throughput using subclusters.
All subclusters share the same service object, so there are no required changes to external service objects. Pods in the new subcluster are load balanced by the existing service object.
The following example creates a VerticaAutoscaler custom resource that scales by subcluster when the VerticaDB uses 50% of the node's available CPU:
-
Define the VerticaAutoscaler custom resource in a YAML-formatted manifest:
apiVersion: vertica.com/v1beta1
kind: VerticaAutoscaler
metadata:
  name: autoscaler-name
spec:
  verticaDBName: dbname
  scalingGranularity: Subcluster
  serviceName: primary1
-
Create the VerticaAutoscaler with the kubectl autoscale command:
$ kubectl autoscale verticaautoscaler autoscaler-name --cpu-percent=50 --min=3 --max=12
The previous command creates a HorizontalPodAutoscaler object that:
-
Sets the target CPU utilization to 50%.
-
Scales to a minimum of three pods in one subcluster, and 12 pods in four subclusters.
Pod scaling
For long-running, analytic queries, increase the pod count for a subcluster. For additional information about Vertica and analytic queries, see Using elastic crunch scaling to improve query performance.
When you scale pods in an Eon Mode database, you must consider the impact on database shards. For details, see Shards and subscriptions.
The following example creates a VerticaAutoscaler custom resource that scales by pod when the VerticaDB uses 50% of the node's available CPU:
-
Define the VerticaAutoScaler custom resource in a YAML-formatted manifest:
apiVersion: vertica.com/v1beta1
kind: VerticaAutoscaler
metadata:
  name: autoscaler-name
spec:
  verticaDBName: dbname
  scalingGranularity: Pod
  serviceName: primary1
-
Create the autoscaler instance with the kubectl autoscale command:
$ kubectl autoscale verticaautoscaler autoscaler-name --cpu-percent=50 --min=3 --max=12
The previous command creates a HorizontalPodAutoscaler object that:
-
Sets the target CPU utilization to 50%.
-
Scales to a minimum of three pods in one subcluster, and 12 pods in four subclusters.
Event monitoring
To view the VerticaAutoscaler object, use the kubetctl describe hpa command:
$ kubectl describe hpa autoscaler-name
Name:                                                  as
Namespace:                                             vertica
Labels:                                                <none>
Annotations:                                           <none>
CreationTimestamp:                                     Tue, 12 Apr 2022 15:11:28 -0300
Reference:                                             VerticaAutoscaler/as
Metrics:                                               ( current / target )
  resource cpu on pods  (as a percentage of request):  0% (9m) / 50%
Min replicas:                                          3
Max replicas:                                          12
VerticaAutoscaler pods:                                3 current / 3 desired
Conditions:
  Type            Status  Reason              Message
  ----            ------  ------              -------
  AbleToScale     True    ReadyForNewScale    recommended size matches current size
  ScalingActive   True    ValidMetricFound    the HPA was able to successfully calculate a replica count from cpu resource utilization (percentage of request)
  ScalingLimited  False   DesiredWithinRange  the desired count is within the acceptable range
When a scaling event occurs, you can view the admintools commands to scale the cluster. Use kubectl to view the StatefulSets:
$ kubectl get statefulsets
NAME                                                   READY   AGE
db-name-as-instance-name-0                             0/3     71s
db-name-primary1                                       3/3     39m
Use kubectl describe to view the executing commands:
$ kubectl describe vdb dbname | tail
  Upgrade Status:
Events:
  Type    Reason                   Age   From                Message
  ----    ------                   ----  ----                -------
  Normal  ReviveDBStart            41m   verticadb-operator  Calling 'admintools -t revive_db'
  Normal  ReviveDBSucceeded        40m   verticadb-operator  Successfully revived database. It took 25.255683916s
  Normal  ClusterRestartStarted    40m   verticadb-operator  Calling 'admintools -t start_db' to restart the cluster
  Normal  ClusterRestartSucceeded  39m   verticadb-operator  Successfully called 'admintools -t start_db' and it took 44.713787718s
  Normal  SubclusterAdded          10s   verticadb-operator  Added new subcluster 'as-0'
  Normal  AddNodeStart             9s    verticadb-operator  Calling 'admintools -t db_add_node' for pod(s) 'db-name-as-instance-name-0-0, db-name-as-instance-name-0-1, db-name-as-instance-name-0-2'
5.3 - EventTrigger CRD
The EventTrigger custom resource definition (CRD) runs a task when the condition of a Kubernetes object changes to a specified status. EventTrigger extends the Kubernetes Job, a workload resource that creates pods, runs a task, then cleans up the pods after the task completes.
Prerequisites
- Deploy a VerticaDB operator.
- Confirm that you have the resources to deploy objects you plan to create.
Limitations
The EventTrigger CRD has the following limitations:
- It can monitor a condition status on only one VerticaDB custom resource (CR).
- You can match only one condition status.
- The EventTrigger and the object that it watches must exist within the same namespace.
Creating an EventTrigger
An EventTrigger resource defines the Kubernetes object that you want to watch, the status condition that triggers the Job, and a pod template that contains the Job logic and provides resources to complete the Job.
This example creates a YAML-formatted file named eventtrigger.yaml. When you apply eventtrigger.yaml to your VerticaDB CR, it creates a single-column database table when the VerticaDB CR's DBInitialized condition status changes to True:
$ kubectl describe vdb verticadb-name
Status:
 ...
  Conditions:
    ...
    Last Transition Time:   transition-time
    Status:                 True
    Type:                   DBInitialized
The following fields form the spec, which defines the desired state of the EventTrigger object:
references: The Kubernetes object whose condition status you want to watch.matches: The condition and status that trigger the Job.template: Specification for the pods that run the Job after the condition status triggers an event.
The following steps create an EventTrigger CR:
-
Add the apiVersion, kind, and metadata.name required fields:
apiVersion: vertica.com/v1beta1
kind: EventTrigger
metadata:
    name: eventtrigger-example
-
Begin the spec definition with the references field. The object field is an array whose values identify the VerticaDB CR object that you want to watch. You must provide the VerticaDB CR's apiVersion, kind, and name:
spec:
  references:
  - object:
      apiVersion: vertica.com/v1beta1
      kind: VerticaDB
      name: verticadb-example
-
Define the matches field that triggers the Job. EventTrigger can match only one condition:
spec:
  ...
  matches:
  - condition:
      type: DBInitialized
      status: "True"
The preceding example defines the following:
condition.type: The condition that the operator watches for state change.condition.status: The status that triggers the Job.
-
Add the template that defines the pod specifications that run the Job after matches.condition triggers an event.
A pod template requires its own spec definition, and it can optionally have its own metadata. The following example includes metadata.generateName, which instructs the operator to generate a unique, random name for any pods that it creates for the Job. The trailing dash (-) separates the user-provided portion from the generated portion:
spec:
  ...
  template:
    metadata:
      generateName: create-user-table-
    spec:
      template:
        spec:
          restartPolicy: OnFailure
          containers:
          - name: main
            image: "vertica/vertica-k8s:latest"
            command: ["/opt/vertica/bin/vsql", "-h", "verticadb-sample-defaultsubcluster", "-f", "CREATE TABLE T1 (C1 INT);"]
The remainder of the spec defines the following:
restartPolicy: When to restart all containers in the pod.containers: The containers that run the Job.
name: The name of the container.image: The image that the container runs.command: An array that contains a command, where each element in the array combines to form a command. The final element creates the single-column SQL table.
Apply the manifest
After you create the EventTrigger, apply the manifest in the same namespace as the VerticaDB CR:
$ kubectl apply -f eventtrigger.yaml

eventtrigger.vertica.com/eventtrigger-example created
configmap/create-user-table-sql created
After you create the database, the operator runs a Job that creates a table. You can check the status with kubectl get job:
$ kubectl get job
NAME                COMPLETIONS   DURATION   AGE
create-user-table   1/1           4s         7s
Verify that the table was created in the logs:
$ kubectl logs create-user-table-guid
CREATE TABLE
Complete file reference
apiVersion: vertica.com/v1beta1
kind: EventTrigger
metadata:
    name: eventtrigger-example
spec:
  references:
  - object:
      apiVersion: vertica.com/v1beta1
      kind: VerticaDB
      name: verticadb-example
  matches:
  - condition:
      type: DBInitialized
      status: "True"
  template:
    metadata:
      generateName: create-user-table-
    spec:
      template:
        spec:
          restartPolicy: OnFailure
          containers:
          - name: main
            image: "vertica/vertica-k8s:latest"
            command: ["/opt/vertica/bin/vsql", "-h", "verticadb-sample-defaultsubcluster", "-f", "CREATE TABLE T1 (C1 INT);"]
Monitoring an EventTrigger
The following table describes the status fields that help you monitor an EventTrigger CR:
|
Status Field |
Description |
references[].apiVersion |
Kubernetes API version of the object that the EventTrigger CR watches. |
references[].kind |
Type of object that the EventTrigger CR watches. |
references[].name |
Name of the object that the EventTrigger CR watches. |
references[].namespace |
Namespace of the object that the EventTrigger CR watches. The EventTrigger and the object that it watches must exist within the same namespace. |
references[].uid |
Generated UID of the reference object. The operator generates this identifier when it locates the reference object. |
references[].resourceVersion |
Current resource version of the object that the EventTrigger watches. |
references[].jobNamespace |
If a Job was created for the object that the EventTrigger watches, the namespace of the Job. |
references[].jobName |
If a Job was created for the object that the EventTrigger watches, the name of the Job. |
6 - Custom resource definition parameters
The following table describes the available settings for the Vertica Custom Resource Definition.
The following table describes the available settings for the Vertica Custom Resource Definitions.
VerticaDB
|
Parameter |
Description |
annotations |
Custom annotations added to all of the objects that the operator creates. Each annotation is encoded as an environment variable in the Vertica server container. The following values are accepted:
-
Letters
-
Numbers
-
Underscores
Invalid character values are converted to underscore characters. For example:
vertica.com/git-ref: 1234abcd
Is converted to:
VERTICA_COM_GIT_REF=1234abcd
Note
Enclose integer values in double quotes (""), or the admission controller returns an error.
|
autoRestartVertica |
Determines if the operator restarts the Vertica process when the process is not running.
Set this parameter to false when performing manual maintenance that requires a DOWN database. This prevents the operator from interfering with the database state.
Default: true
|
certSecrets |
A list of Secrets for custom TLS certificates.
Each certificate is mounted in the container at
/certs/cert-name/key. For example, a PEM-encoded CA bundle named root_cert.pem and concealed in a Secret named aws-cert is mounted in /certs/aws-cert/root_cert.pem.
If you update the certificate after you add it to a custom resource, the operator updates the value automatically. If you add or delete a certificate, the operator reschedules the pod with the new configuration.
For implementation details, see VerticaDB CRD.
|
communal.additionalConfig |
Sets one or more configuration parameters in the CR:
spec:
  communal:
    additionalConfig:
      config-param: "value"
      ...
...
Configuration parameters are set only when the database is initialized. After the database is initialized, changes to this parameter have no effect in the server.
Important
Configuration parameters in the CR have the following requirements and behaviors:
- If you set an invalid configuration parameter, the Vertica server process does not start. For example, the server does not start if you misspell a parameter name or if the configuration parameter is not supported by the Vertica server version.
- If
communal.addtitionalConfig sets a configuration parameter that the operator sets with a CR parameter, the operator ignores the communal.addtitionalConfig setting. For example, the communal.endpoint parameter sets the AWSEndpoint S3 parameter. If you set communal.endpoint and also set AWSEndpoint with communal.addtitionalConfig, the operator enforces the communal.endpoint setting.
|
communal.caFile |
The mount path in the container filesystem to a CA certificate file that validates HTTPS connections to a communal storage endpoint.
Typically, the certificate is stored in a Secret and included in certSecrets. For details, see VerticaDB CRD.
|
communal.credentialSecret |
The name of the Secret that stores the credentials for the communal storage endpoint.
For implementation details for each supported communal storage location, see Configuring communal storage.
This parameter is optional when you authenticate to an S3-compatible endpoint with an Identity and Access Management (IAM) profile.
|
communal.endpoint |
A communal storage endpoint URL. The endpoint must begin with either the http:// or https:// protocol. For example:
https://path/to/endpoint
You cannot change this value after you create the custom resource instance.
This setting is required when initPolicy is set to Create or Revive.
|
communal.s3ServerSideEncryption |
Server-side encryption type used when reading from or writing to S3. The value depends on which type of encryption at rest is configured for S3.
This parameter accepts the following values:
SSE-S3SSE-KMS: Requires that you pass the key identifier with the communal.additionalConfig parameter.SSE-C: Requires that you pass the client key with the communal.s3SSECustomerKeySecret parameter.
You cannot change this value after you create the custom resource instance.
For implementation examples of all encryption types, see Configuring communal storage.
For details about each encryption type, see S3 object store.
Default: Empty string (""), no encryption
|
communal.s3SSECustomerKeySecret |
If s3ServerSideEncryption is set to SSE-C, a Secret containing the client key for S3 access with the following requirements:
- The Secret must be in the same namespace as the CR.
- You must set the client key contents with the
clientKey field.
The client key must use one of the following formats:
- 32-character plaintext
- 44-character base64-encoded
For additional implementation details, see Configuring communal storage.
|
communal.hadoopConfig |
A ConfigMap that contains the contents of the /etc/hadoop directory.
This is mounted in the container to configure connections to a Hadoop Distributed File System (HDFS) communal path.
|
communal.includeUIDInPath |
When set to true, the operator includes in the path the unique identifier (UID) that Kubernetes assigns to the VerticaDB object. Including the UID creates a unique database path so that you can reuse the communal path in the same endpoint.
Default: false
|
communal.kerberosRealm |
The realm portion of the Vertica Kerberos principal. This value is set in the KerberosRealm database parameter during boostrapping. |
communal.kerberosServiceName |
The service name portion of the Vertica Kerberos principal. This value is set in the KerberosServiceName database parameter during bootstrapping. |
communal.path |
The path to the communal storage bucket. For example:
s3://bucket-name/key-name
You must create this bucket before you create the Vertica database.
The following initPolicy values determine how to set this value:
You cannot change this value after you create the custom resource.
|
communal.region |
The geographic location where the communal storage resources are located.
If you do not set the correct region, the configuration fails. You might experience a delay because Vertica retries several times before failing.
This setting is valid for Amazon Web Services (AWS) and Google Cloud Platform (GCP) only. Vertica ignores this setting for other communal storage providers.
Default:
-
AWS: us-east-1
-
GCP: US-EAST1
|
dbName |
The database name. When initPolicy is set to Revive or ScheduleOnly, this must match the name of the source database.
Default: vertdb
|
encryptSpreadComm |
Sets the EncryptSpreadComm security parameter to configure Spread encryption for a new Vertica database. The VerticaDB operator ignores this parameter unless you set initPolicy to Create.
This parameter accepts the following values:
Default: Empty string ("")
|
ignoreClusterLease |
Ignore the cluster lease when executing a revive or start_db.
Default: false
Caution
If another system is using the same communal storage, setting ignoreClusterLease to true results in data corruption.
|
image |
The image that defines the Vertica server container's runtime environment. If the container is hosted in a private container repository, this name must include the path to the repository.
When you update the image, the operator stops and restarts the cluster.
Default: vertica/vertica-k8s:latest
|
imagePullPolicy |
Determines how often Kubernetes pulls the image for an object. For details, see Updating Images in the Kubernetes documentation.
Default: If the image tag is latest, the default is Always. Otherwise, the default is IfNotPresent.
|
imagePullSecrets |
A list of Secrets that store credentials for authentication to a private container repository. For details, see Specifying imagePullSecrets in the Kubernetes documentation. |
initPolicy |
How to initialize the Vertica database in Kubernetes. This parameter accepts the following values:
-
Create: Forces the creation of a new database for the custom resource.
-
CreateSkipPackageInstall: Same as Create, but does not install any default packages to quickly create a database.
To install default packages, see the admintools install_packages command.
Note
CreateSkipPackageInstall is available in Vertica version 12.0.1 and later.
|
kerberosSecret |
The Secret that stores the following values for Kerberos authentication to Hadoop Distributed File System (HDFS):
The default location for each of these files is the /etc directory.
|
kSafety |
Sets the fault tolerance for the cluster. The operator supports setting this value to 0 or 1 only. For details, see K-safety.
You cannot change this value after you create the custom resource.
Default: 1
|
labels |
Custom labels added to all of the objects that the operator creates. |
licenseSecret |
The Secret that contains the contents of license files. The Secret must share a namespace with the custom resource (CR). Each of the keys in the Secret is mounted as a file in /home/dbadmin/licensing/mnt.
If this value is set when the CR is created, the operator installs one of the licenses automatically, choosing the first one alphabetically.
If you update this value after you create the custom resource, you must manually install the Secret in each Vertica pod.
|
livenessProbeOverride |
Overrides default livenessProbe settings that indicate whether the container is running. The VerticaDB operator sets or updates the liveness probe in the StatefulSet.
For example, the following object overrides the default initialDelaySeconds, periodSeconds, and failureThreshold settings:
spec:
...
  livenessProbeOverride:
    initialDelaySeconds: 120
    periodSeconds: 15
    failureThreshold: 8
For a detailed list of the available probe settings, see the Kubernetes documentation.
|
local.catalogPath |
Optional parameter that sets a custom path in the container filesystem for the catalog, if your environment requires that the catalog is stored in a location separate from the local data.
If initPolicy is set to Revive or ScheduleOnly, local.catalogPath for the new database must match local.catalogPath for the source database.
|
local.dataPath |
The path in the container filesystem for the local data. If local.catalogPath is not set, the catalog is stored in this location.
If initPolicy is set to Revive or ScheduleOnly, the dataPath for the new database must match the dataPath for the source database.
Default: /data
|
local.depotPath |
The path in the container filesystem that stores the depot.
If initPolicy is set to Revive or ScheduleOnly, the depotPath for the new database must match the depotPath for the source database.
Default: /depot
|
local.depotVolume |
The type of volume to use for the depot. This parameter accepts the following values:
PersistentVolume: A PersistentVolume is used to store the depot data. This volume type persists depot data between pod lifecycles.EmptyDir: A volume of type emptyDir is used to store the depot data. When the pod is removed from a node, the contents of the volume are deleted. If a container crashes, the depot data is unaffected.
Important
You cannot change the depot volume type on an existing database. If you want to change this setting, you must create a new custom resource.
For details about each volume type, see the Kubernetes documentation.
Default: PersistentVolume
|
local.requestSize |
The minimum size of the local data volume when selecting a PersistentVolume (PV).
If local.storageClass allows volume expansion, the operator automatically increases the size of the PV when you change this setting. It expands the size of the depot if the following conditions are met:
local.storageClass is set to PersistentVolume.- Depot storage is allocated using a percentage of the total disk space rather than a unit, such as a gigabyte.
If you decrease this value, the operator does not decrease the size of the PV or the depot.
Default: 500 Gi
|
local.storageClass |
The StorageClass for the PersistentVolumes that persist local data between pod lifecycles. Select this value when defining the persistent volume claim (PVC).
By default, this parameter is not set. The PVC in the default configuration uses the default storage class set by Kubernetes.
|
podSecurityContext |
Overrides any pod-level security context. This setting is merged with the default context for the pods in the cluster.
For details about the available settings for this parameter, see the Kubernetes documentation.
|
readinessProbeOverride |
Overrides default readinessProbe settings that indicate whether the Vertica pod is ready to accept traffic. The VerticaDB operator sets or updates the readiness probe in the StatefulSet.
For example, the following object overrides the default timeoutSeconds and periodSeconds settings:
spec:
...
  readinessProbeOverride:
    initialDelaySeconds: 0
    periodSeconds: 10
    failureThreshold: 3
For a detailed list of the available probe settings, see the Kubernetes documentation.
|
reviveOrder |
The order of nodes during a revive operation. Each entry contains the subcluster index, and the number of pods to include from the subcluster.
For example, consider a database with the following setup:
- v_db_node0001: subcluster A
- v_db_node0002: subcluster A
- v_db_node0003: subcluster B
- v_db_node0004: subcluster A
- v_db_node0005: subcluster B
- v_db_node0006: subcluster B
If the subclusters[] list is defined as {'A', 'B'}, the revive order is as follows:
- {subclusterIndex:0, podCount:2} # 2 pods from subcluster A
- {subclusterIndex:1, podCount:1} # 1 pod from subcluster B
- {subclusterIndex:0, podCount:1} # 1 pod from subcluster A
- {subclusterIndex:1, podCount:2} # 2 pods from subcluster B
This parameter is used only when initPolicy is set to Revive.
|
restartTimeout |
When restarting pods, the number of seconds before admintools times out.
Default: 0. The operator uses the 20 minutes default used by admintools.
|
securityContext |
Sets any additional security context for the Vertica server container. This setting is merged with the security context value set for the VerticaDB Operator.
For example, if you need a core file for the Vertica server process, you can set the privileged property to true to elevate the server privileges on the host node:
spec:
  ...
  securityContext:
    privileged: true
For additional information about generating a core file, see Metrics gathering. For details about this parameter, see the Kubernetes documentation.
|
shardCount |
The number of shards in the database. You cannot update this value after you create the custom resource.
For more information about database shards and Eon Mode, see Configuring your Vertica cluster for Eon Mode.
|
sidecars[] |
One or more optional utility containers that complete tasks for the Vertica server container. Each sidecar entry is a fully-formed container spec, similar to the container that you add to a Pod spec.
The following example adds a sidecar named vlogger to the custom resource:
spec:
  ...
  sidecars:
    - name: vlogger
      image: vertica/vertica-logger:1.0.0
      volumeMounts:
        - name: my-custom-vol
          mountPath: /path/to/custom-volume
volumeMounts.name is the name of a custom volume. This value must match volumes.name to mount the custom volume in the sidecar container filesystem. See volumes for additional details.
For implementation details, see VerticaDB CRD.
|
sidecars[i].volumeMounts |
List of custom volumes and mount paths that persist sidecar container data. Each volume element requires a name value and a mountPath.
To mount a volume in the Vertica sidecar container filesystem, volumeMounts.name must match the volumes.name value for the corresponding sidecar definition, or the webhook returns an error.
For implementation details, see VerticaDB CRD.
|
sshSecret |
A Secret that contains SSH credentials that authenticate connections to a Vertica server container. Example use cases include the following:
-
Authenticate communication between an Eon Mode database and custom resource in a hybrid architecture.
-
For environments that run the Vertica Kubernetes (No keys) image, pass the custom resource user-provided SSH keys for internal communication between Vertica pods.
The Secret requires the following values:
-
id_rsa
-
id_rsa.pub
-
authorized_keys
For details, see Hybrid Kubernetes clusters.
|
startupProbeOverride |
Overrides the default startupProbe settings that indicate whether the Vertica process is started in the container. The VerticaDB operator sets or updates the startup probe in the StatefulSet.
For example, the following object overrides the default initialDelaySeconds, periodSeconds, and failureThreshold settings:
spec:
...
  startupProbeOverride:
    initialDelaySeconds: 30
    periodSeconds: 10
    failureThreshold: 117
    timeoutSeconds: 5
For a detailed list of the available probe settings, see the Kubernetes documentation.
|
subclusters[i].affinity |
Applies rules that constrain the Vertica server pod to specific nodes. It is more expressive than nodeSelector. If this parameter is not set, then the pods use no affinity setting.
In production settings, it is a best practice to configure affinity to run one server pod per host node. For configuration details, see VerticaDB CRD.
|
subclusters[i].externalIPs |
Enables the service object to attach to a specified external IP. If not set, the external IP is empty in the service object. |
subclusters[i].isPrimary |
Indicates whether the subcluster is primary or secondary. Each database must have at least one primary subcluster.
Default: true
|
subclusters[i].loadBalancerIP |
When subcluster[i].serviceType is set to LoadBalancer, assigns a static IP to the load balancing service.
Default: Empty string ("")
|
subclusters[i].name |
The subcluster name. This is a required setting. If you change the name of an existing subcluster, the operator deletes the old subcluster and creates a new one with the new name.
Kubernetes derives names for the subcluster Statefulset, service object, and pod from the subcluster name. For additional details about Kubernetes and subcluster naming conventions, see Subclusters on Kubernetes.
|
subclusters[i].nodePort |
When subclusters[i].serviceType is set to NodePort, this parameter enables you to define the port that is opened at each node for external client connections. The port must be within the defined range allocated by the control plane (ports 30000-32767).
If you do not manually define a port number, Kubernetes chooses the port automatically.
|
subclusters[i].nodeSelector |
Provides control over which nodes are used to schedule each pod. If this is not set, the node selector is left off the pod when it is created. To set this parameter, provide a list of key/value pairs.
The following example schedules server pods only at nodes that have the disktype=ssd and region=us-east labels:
subclusters:
  - name: defaultsubcluster
    nodeSelector:
      disktype: ssd
      region: us-east
|
subclusters[i].priorityClassName |
The PriorityClass name assigned to pods in the StatefulSet. This affects where the pod gets scheduled. |
subclusters[i].resources.limits |
The resource limits for pods in the StatefulSet, which sets the maximum amount of CPU and memory that each server pod can consume.
Vertica recommends that you set these values equal to subclusters[i].resources.requests to ensure that the pods are assigned to the guaranteed QoS class. This reduces the possibility that pods are chosen by the out of memory (OOM) Killer.
For more information, see Recommendations for Sizing Vertica Nodes and Clusters in the Vertica Knowledge Base.
|
subclusters[i].resources.requests |
The resource requests for pods in the StatefulSet, which sets the maximum amount of CPU and memory that each server pod can consume.
Vertica recommends that you set these values equal to subclusters[i].resources.limits to ensure that the pods are assigned to the guaranteed QoS class. This reduces the possibility that pods are chosen by the out of memory (OOM) Killer.
For more information, see Recommendations for Sizing Vertica Nodes and Clusters in the Vertica Knowledge Base.
|
subclusters[i].serviceAnnotations |
Custom annotations added to implementation-specific services. Managed Kubernetes use service annotations to configure services such as network load balancers, virtual private cloud (VPC) subnets, and loggers. |
subclusters[i].serviceName |
Identifies the service object that directs client traffic to the subcluster. Assign a single service object to multiple subclusters to process client data with one or more subclusters. For example:
spec:
  ...
  subclusters:
    - name: subcluster-1
      size: 3
      serviceName: connections
    - name: subcluster-2
      size: 3
      serviceName: connections
The previous example creates a service object named metadata.name-connections that load balances client traffic among its assigned subclusters.
For implementation details, see VerticaDB CRD.
|
subclusters[i].serviceType |
Identifies the type of Kubernetes service to use for external client connectivity. The default is type is ClusterIP, which sets a stable IP and port that is accessible only from within Kubernetes itself.
Depending on the service type, you might need to set nodePort or externalIPs in addition to this configuration parameter.
Default: ClusterIP
|
subclusters[i].size |
The number of pods in the subcluster. This determines the number of Vertica nodes in the subcluster. Changing this number deletes or schedules new pods.
The minimum size of a subcluster is 1. The subclusters kSafety setting determines the minimum and maximum size of the cluster.
Note
By default, the Vertica container uses the Vertica community edition (CE) license. The CE license limits subclusters to 3 Vertica nodes and a maximum of 1TB of data. Use the licenseSecret parameter to add your Vertica license.
For instructions about how to create the license Secret, see VerticaDB CRD.
|
subclusters[i].tolerations |
Any taints and tolerations used to influence where a pod is scheduled. |
superuserPasswordSecret |
The Secret that contains the database superuser password. Create this Secret before deployment.
If you do not create this Secret before deployment, there is no password authentication for the database.
The Secret must use a key named password:
kubectl create secret generic su-passwd --from-literal=password=secret-password
The following text adds this Secret to the custom resource:
db:
  superuserSecretPassword: su-passwd
|
temporarySubclusterRouting.names |
Specifies an existing subcluster that accepts traffic during an online upgrade. The operator routes traffic to the first subcluster that is online. For example:
spec:
  ...
  temporarySubclusterRouting:
    names:
      - subcluster-2
      - subcluster-1
In the previous example, the operator selects subcluster-2 during the upgrade, and then routes traffic to subcluster-1 when subcluster-2 is down. As a best practice, use secondary subclusters when rerouting traffic.
Note
By default, the operator selects an existing subcluster to receive rerouted client traffic even if you do not specify a subcluster with this parameter.
|
temporarySubclusterRouting.template |
Instructs the operator create a new secondary subcluster during an Online upgrade. The operator creates the subcluster when the upgrade begins and deletes it when the upgrade completes.
To define a temporary subcluster, provide a name and size value. For example:
spec:
  ...
  temporarySubclusterRouting:
    template:
      name: transient
      size: 1
|
upgradePolicy |
Determines how the operator upgrades Vertica server versions. Accepts the following values:
-
Offline: The operator stops the cluster to prevent multiple versions from running simultaneously.
-
Online: The cluster continues to operator during a rolling update. The data is in read-only mode while the operator upgrades the image for the primary subcluster.
The Online setting has the following restrictions:
-
The cluster must currently run Vertica server version 11.1.0 or higher.
-
If you have only one subcluster, you must configure temporarySubclusterRouting.template to create a new secondary subcluster during the Online upgrade. Otherwise, the operator performs an Offline upgrade, regardless of the setting.
-
Auto: The operator selects either Offline or Online depending on the configuration. The operator selects Online if all of the following are true:
Default: Auto
|
upgradeRequeueTime |
During an online upgrade, the number of seconds that the operator waits to complete work for any resource that was requeued during the reconciliation loop.
Default: 30 seconds
|
volumeMounts |
List of custom volumes and mount paths that persist Vertica server container data. Each volume element requires a name value and a mountPath.
To mount a volume in the Vertica server container filesystem, volumeMounts.name must match the volumes.name value defined in the spec definition, or the webhook returns an error.
For implementation details, see VerticaDB CRD.
|
volumes |
List of custom volumes that persist Vertica server container data. Each volume element requires a name value and a volume type. volumes accepts any Kubernetes volume type.
To mount a volume in a filesystem, volumes.name must match the volumeMounts.name value for the corresponding volume mount, or the webhook returns an error.
For implementation details, see VerticaDB CRD.
|
VerticaAutoScaler
|
Parameter |
Description |
verticaDBName |
Required. Name of the VerticaDB CR that the VerticaAutoscaler CR scales resources for. |
scalingGranularity |
Required. The scaling strategy. This parameter accepts one of the following values:
-
Subcluster: Create or delete entire subclusters. To create a new subcluster, the operator uses a template or an existing subcluster with the same serviceName.
-
Pod: Increase or decrease the size of an existing subcluster.
Default: Subcluster
|
serviceName |
Required. Refers to the subclusters[i].serviceName for the VerticaDB CR.
VerticaAutoscaler uses this value as a selector when scaling subclusters together.
|
template |
When scalingGranularity is set to Subcluster, you can use this parameter to define how VerticaAutoscaler scales the new subcluster. The following is an example:
spec:
    verticaDBName: dbname
    scalingGranularity: Subcluster
    serviceName: service-name
    template:
        name: autoscaler-name
        size: 2
        serviceName: service-name
        isPrimary: false
If you set template.size to 0, VerticaAutoscaler selects as a template an existing subcluster that uses service-name.
This setting is ignored when scalingGranularity is set to Pod.
|
EventTrigger
|
Parameter |
Description |
matches[].condition.status |
The status portion of the status condition match. The operator watches the condition specified by matches[].condition.type on the EventTrigger reference object. When that condition changes to the status specified in this parameter, the operator runs the task defined in the EventTrigger. |
matches[].condition.type |
The condition portion of the status condition match. The operator watches this condition on the EventTrigger reference object. When this condition changes to the status specified with matches[].condition.status, the operator runs the task defined in the EventTrigger. |
references[].object.apiVersion |
Kubernetes API version of the object that the EventTrigger watches. |
references[].object.kind |
The type of object that the EventTrigger watches. |
references[].object.name |
The name of the object that the EventTrigger watches. |
references[].object.namespace |
Optional. The namespace of the object that the EventTrigger watches. The object and the EventTrigger CR must exist within the same namespace.
If omitted, the operator uses the same namespace as the EventTrigger.
|
template |
Full spec for the Job that EventTrigger runs when references[].condition.type and references[].condition.status are found for a reference object.
For implementation details, see EventTrigger CRD.
|
7 - Subclusters on Kubernetes
Eon Mode uses subclusters for workload isolation and scaling.
Eon Mode uses subclusters for workload isolation and scaling. The Vertica operator provides tools to direct external client communications to specific subclusters, and automate scaling without stopping your database.
The custom resource definition (CRD) provides parameters that allow you to fine-tune each subcluster for specific workloads. For example, you can increase the subcluster size setting for increased throughput, or adjust the resource requests and limits to manage compute power. When you create a custom resource instance, the operator deploys each subcluster as a StatefulSet. Each StatefulSet has a service object, which allows an external client to connect to a specific subcluster.
Naming conventions
Kubernetes derives names for the subcluster Statefulset, service object, and pod from the subcluster name. This naming convention tightly couples the subcluster objects to help Kubernetes manage the cluster effectively. If you want to rename a subcluster, you must delete it from the CRD and redefine it so that the operator can create new objects with a derived name.
Kubernetes forms an object's fully qualified domain name (FQDN) with its resource type name, so resource type names must follow FQDN naming conventions. The underscore character ( "_" ) does not follow FQDN rules, but you can use it in the subcluster name. Vertica converts each underscore to a hyphen ( "-" ) in the FQDN for any object name derived from the subcluster name. For example, Vertica generates a default subcluster and names it default_subcluster, and then converts the corresponding portion of the derived object's FQDN to default-subcluster.
For additional naming guidelines, see the Kubernetes documentation.
External client connections
External clients can target specific subclusters that are fine-tuned to handle their workload. Each subcluster has a service object that handles external connections. To target multiple subclusters with a single service object, assign each subcluster the same spec.subclusters.serviceName value in the custom resource (CR). For implementation details, see VerticaDB CRD.
The operator performs health monitoring that checks if the Vertica daemon is running on each pod. If it is, then the operator allows the service object to route traffic to the pod.
By default, the service object derives its name from the custom resource name and the associated subcluster and uses the customResourceName-subclusterName format. Use the subclusters[i].serviceName CR parameter to override the default naming format and use the metadata.name-serviceName format.
Vertica supports the following service object types:
-
ClusterIP: The default service type. This service provides internal load balancing, and sets a stable IP and port that is accessible from within the subcluster only.
-
NodePort: Provides external client access. You can specify a port number for each host node in the subcluster to open for client connections.
-
LoadBalancer: Uses a cloud provider load balancer to create NodePort and ClusterIP services as needed. For details about implementation, see the Kubernetes documentation and your cloud provider documentation.
For configuration details, see VerticaDB CRD.
Managing internal and external workloads
The Vertica StatefulSet is associated with an external service object. All external client requests are sent through this service object and load balanced among the pods in the cluster.
Import and export
Importing and exporting data between a cluster outside of Kubernetes requires that you expose the service with the NodePort or LoadBalancer service type and properly configure the network.
Important
When importing or exporting data, each node must have a static IP address. Rescheduled pods might be on different host nodes, so you must monitor and update the static IP addresses to reflect the new node.
For more information, see Configuring the Network to Import and Export Data.
7.1 - Scaling subclusters
The operator enables you to scale the number of subclusters, and the number of pods per subcluster automatically.
The operator enables you to scale the number of subclusters, and the number of pods per subcluster automatically. This allows you to utilize or conserve resources depending on the immediate needs of your workload.
The following sections explain how to scale resources for new workloads. For details about scaling resources for existing workloads, see VerticaAutoscaler CRD.
Prerequisites
-
Complete Installing the Vertica DB operator.
-
Install the kubectl command line tool.
-
Complete VerticaDB CRD.
-
Confirm that you have the resources to scale.
Note
By default, the custom resource uses the free
Community Edition (CE) license. This license allows you to deploy up to three nodes with a maximum of 1TB of data. To add resources beyond these limits, you must add your Vertica license to the custom resource as described in
VerticaDB CRD.
Scaling the number of subclusters
Adjust the number of subclusters in your custom resource to fine-tune resources for short-running dashboard queries. For example, increase the number of subclusters to increase throughput. For more information, see Improving query throughput using subclusters.
-
Use kubectl edit to open your default text editor and update the YAML file for the specified custom resource. The following command opens a custom resource named vdb for editing:
$ kubectl edit vdb
-
In the spec section of the custom resource, locate the subclusters subsection. Begin the isPrimary field to define a new subcluster.
The isPrimary field accepts a boolean that specifies whether the subcluster is a primary or secondary. Because there is already a primary subcluster in our custom resource, enter false:
spec:
...
  subclusters:
  ...
  - isPrimary: false
-
Follow the steps in VerticaDB CRD to complete the subcluster definition. The following completed example adds a secondary subcluster for dashboard queries:
spec:
...
  subclusters:
  - isPrimary: true
    name: primary-subcluster
  ...
  - isPrimary: false
    name: dashboard
    nodePort: 32001
    resources:
      limits:
        cpu: 32
        memory: 96Gi
      requests:
        cpu: 32
        memory: 96Gi
    serviceType: NodePort
    size: 3
-
Save and close the custom resource file. You receive a message similar to the following when you successfully update the file:
verticadb.vertica.com/vertica-db edited
-
Use the kubectl wait command to monitor when the new pods are ready:
$ kubectl wait --for=condition=Ready pod --selector app.kubernetes.io/name=verticadb --timeout 180s
pod/vdb-dashboard-0 condition met
pod/vdb-dashboard-1 condition met
pod/vdb-dashboard-2 condition met
Scaling the pods in a subcluster
For long-running, analytic queries, increase the pod count for a subcluster. See Using elastic crunch scaling to improve query performance.
-
Use kubectl edit to open your default text editor and update the YAML file for the specified custom resource. The following command opens a custom resource named vdb for editing:
$ kubectl edit verticadb
-
Update the subclusters.size value to 6:
spec:
...
  subclusters:
  ...
  - isPrimary: false
    ...
    size: 6
Shards are rebalanced automatically.
-
Save and close the custom resource file. You receive a message similar to the following when you successfully update the file:
verticadb.vertica.com/verticadb edited
-
Use the kubectl wait command to monitor when the new pods are ready:
$ kubectl wait --for=condition=Ready pod --selector app.kubernetes.io/name=verticadb --timeout 180s
pod/vdb-subcluster1-3 condition met
pod/vdb-subcluster1-4 condition met
pod/vdb-subcluster1-5 condition met
Removing a subcluster
Remove a subcluster when it is no longer needed, or to preserve resources.
Important
Because each custom resource instance requires a primary subcluster, you cannot remove all subclusters.
-
Use kubectl edit to open your default text editor and update the YAML file for the specified custom resource. The following command opens a custom resource named vdb for editing:
$ kubectl edit verticadb
-
In the subclusters subsection nested under spec, locate the subcluster that you want to delete. Delete the element in the subcluster array represents the subcluster that you want to delete. Each element is identified by a hyphen (-).
-
After you delete the subcluster and save, you receive a message similar to the following:
verticadb.vertica.com/verticadb edited
8 - Upgrading Vertica on Kubernetes
The operator automates Vertica server version upgrades for a custom resource (CR).
The operator automates Vertica server version upgrades for a custom resource (CR). Use the upgradePolicy setting in the CR to determine whether your cluster remains online or is taken offline during the version upgrade.
Note
Vertica recommends using incremental
upgrade paths. The operator validates the Vertica version before proceeding with the upgrade.
Prerequisites
Before you begin, complete the following:
Setting the policy
The upgradePolicy CR parameter setting determines how the operator upgrades Vertica server versions. It provides the following options:
|
Setting |
Description |
Offline |
The operator shuts down the cluster to prevent multiple versions from running simultaneously.
The operator performs all server version upgrades using the Offline setting in the following circumstances:
|
Online |
The cluster continues to operate during an online upgrade. The data is in read-only mode while the operator upgrades the image for the primary subcluster. |
Auto |
The default setting. The operator selects either Offline or Online depending on the configuration. The operator performs an Online upgrade if all of the following are true:
If the current configuration does not meet all of the previous requirements, the operator performs an Offline upgrade.
|
Set the reconcile loop iteration time
During an upgrade, the operator runs the reconcile loop to compare the actual state of the objects to the desired state defined in the CR. The operator requeues any unfinished work, and the reconcile loop compares states with a set period of time between each reconcile iteration. Set the upgradeRequeueTime parameter to determine the amount of time between each reconcile loop iteration.
Routing client traffic during an online upgrade
During an online upgrade, the operator begins by upgrading the Vertica server version in the primary subcluster to form a cluster with the new version. When the operator restarts the primary nodes, it places the secondary subclusters in read-only mode. Next, the operator upgrades any secondary subclusters one at a time. During the upgrade for any subcluster, all client connections are drained, and traffic is rerouted to either an existing subcluster or a temporary subcluster.
Online upgrades require more than one subcluster so that the operator can reroute client traffic for the subcluster while it is upgrading. By default, the operator selects which subcluster receives the rerouted traffic using the following rules:
-
When rerouting traffic for the primary subcluster, the operator selects the first secondary subcluster defined in the CR.
-
When restarting the first secondary subcluster after the upgrade, the operator selects the first subcluster that is defined in the CR that is up.
-
If no secondary subclusters exist, you cannot perform an online upgrade. The operator selects the first primary subcluster defined in the CR and performs an offline upgrade.
Routing client traffic to an existing subcluster
You might want to control which subclusters handle rerouted client traffic due to subcluster capacity or licensing limitations. You can set the temporarySubclusterRouting.names parameter to specify an existing subcluster to receive the rerouted traffic:
spec:
  ...
  temporarySubclusterRouting:
    names:
      - subcluster-2
      - subcluster-1
In the previous example, subcluster-2 accepts traffic when the other subcluster-1 is offline. When subcluster-2 is down, subcluster-1 accepts its traffic.
Routing client traffic to a temporary subcluster
To create a temporary subcluster that exists for the duration of the upgrade process, use the temporarySubclusterRouting.template parameter to provide a name and size for the temporary subcluster:
spec:
  ...
  temporarySubclusterRouting:
    template:
      name: transient
      size: 3
If you choose to upgrade with a temporary subcluster, ensure that you have the necessary resources.
Upgrading the Vertica server version
After you set the upgradePolicy and optionally configure temporary subcluster routing, use the kubectl command line tool to perform the upgrade and monitor its progress.
Note
Online upgrades require that you upgrade from Vertica server image for 11.1.0 and higher.
The following steps perform an online version upgrade:
-
Set the upgrade policy. The following command uses the kubectl patch command to set the upgradePolicy value to Online:
$ kubectl patch verticadb cluster-name --type=merge --patch '{"spec": {"upgradePolicy": "Online"}}'
-
Update the image value in the CR with kubectl patch:
$ kubectl patch verticadb cluster-name --type=merge --patch '{"spec": {"image": "vertica/vertica-k8s:new-version"}}'
-
Use kubectl wait to wait until the operator acknowledges the new image and begins upgrade mode:
$ kubectl wait --for=condition=ImageChangeInProgress=True vdb/cluster-name --timeout=180s
-
Use kubectl wait to wait until the operator leaves upgrade mode:
$ kubectl wait --for=condition=ImageChangeInProgress=False vdb/cluster-name --timeout=800s
Viewing the upgrade process
To view the current phase of the upgrade process, use kubectl get to inspect the upgradeStatus status field:
$ kubectl get vdb -n namespacedatabase-name -o jsonpath='{.status.upgradeStatus}{"\n"}'
Restarting cluster with new image
To view the entire upgrade process, use kubectl describe to list the events the operator generated during the upgrade:
$ kubectl describe vdb cluster-name

...
Events:
  Type    Reason                   Age    From                Message
  ----    ------                   ----   ----                -------
  Normal  UpgradeStart             5m10s  verticadb-operator  Vertica server upgrade has started.  New image is 'vertica-k8s:new-version'
  Normal  ClusterShutdownStarted   5m12s  verticadb-operator  Calling 'admintools -t stop_db'
  Normal  ClusterShutdownSucceeded 4m08s  verticadb-operator  Successfully called 'admintools -t stop_db' and it took 56.22132s
  Normal  ClusterRestartStarted    4m25s  verticadb-operator  Calling 'admintools -t start_db' to restart the cluster
  Normal  ClusterRestartSucceeded  25s    verticadb-operator  Successfully called 'admintools -t start_db' and it took 240s
  Normal  UpgradeSucceeded         5s     verticadb-operator  Vertica server upgrade has completed successfully
9 - Hybrid Kubernetes clusters
An Eon Mode database can run hosts separate from the database and within Kubernetes.
An Eon Mode database can run hosts separate from the database and within Kubernetes. This architecture is useful in the following scenarios:
-
Leveraging Kubernetes tooling to quickly create a secondary subcluster for a database.
-
Creating an isolated sandbox environment to run ad hoc queries on a communal dataset.
-
Experimenting with the Vertica on Kubernetes performance overhead without migrating your primary subcluster into Kubernetes.
Define the Kubernetes portion of a hybrid architecture with a custom resource (CR). The custom resource has no knowledge of Vertica hosts that exist separately from the custom resource. This limits the operator's functionality and requires that you manually complete some tasks that the operator automates for a standard Vertica on Kubernetes custom resource.

Requirements and restrictions
The hybrid Kubernetes architecture has the following requirements and restrictions:
-
Hybrid Kubernetes clusters require a tool that enables Border Gateway Protocol (BGP) so that pods are accessible to your on-premises subcluster for external communication. For example, you can use the Calico CNI plugin to enable BGP.
-
You cannot use network address translation (NAT) between the Kubernetes pods and the on-premises cluster.
Operator limitations
In a hybrid architecture, the operator has no visibility outside of the custom resource. This limited visibility means that the operator cannot interact with the Eon Mode database or the primary subcluster. Within the scope of the custom resource, the operator automates only the following:
-
Schedules pods based on the manifest.
-
Creates service objects for the subcluster.
-
Creates a PersistentVolumeClaim (PVC) that persists data for each pod.
-
Executes the restart_node administration tool command if the Vertica server process is not running. To override this default behavior, set the autoRestartVertica custom resource parameter to false.
Defining a hybrid cluster
To define a hybrid cluster, you must set up SSH communications between the Eon Mode nodes and containers, and then define the hybrid CR.
SSH between environments
In an Eon Mode database, nodes communicate through SSH. Vertica containers use SSH with a static key. Because the CR has no knowledge of any of the Eon Mode hosts, you must make the containers aware of the Eon Mode SSH keys.
You can create a Secret for the CR that stores SSH credentials for both the Eon Mode database and the Vertica container. The Secret must contain the following:
- id_rsa: private key shared among the pods.
- id_rsa.pub: public key shared among the pods.
- authorized_keys: file that contains the following keys:
- id_rsa.pub for pod-to-pod traffic.
- public key of on-premises root account.
- public key of on-prem dbadmin account.
The following command creates a Secret named ssh-key that stores these SSH credentials. The Secret persists between life cycles to allow secure connections between the on-premises nodes and the CR:
$ kubectl create secret generic ssh-keys --from-file=$HOME/.ssh
Hybrid CR definition
Create a custom resource to define a subcluster that runs outside your standard Eon Mode database:
apiVersion: vertica.com/v1beta1
kind: VerticaDB
metadata:
  name: hybrid-secondary-sc
spec:
  image: vertica/vertica-k8s:latest
  initPolicy: ScheduleOnly
  sshSecret: ssh-keys
  local:
    dataPath: /data
    depotPath: /depot
  dbName: vertdb
  subclusters:
    - name: sc1
      size: 3
    - name: sc2
      size: 3
In the previous example:
-
initPolicy: Hybrid clusters require that you set this to ScheduleOnly.
-
sshSecret: The Secret that contains SSH keys that authenticate connections to Vertica hosts outside the CR.
-
local: Required. The values persist data to the PersistentVolume (PV). These values must match the directory locations in the Eon Mode database that is associated with the Kubernetes pods.
-
dbName: This value must match the name of the standard Eon Mode database that is associated with this subcluster.
-
subclusters: Definition for each subcluster.
Note
Hybrid custom resources ignore configuration parameters that control settings outside the scope of the hybrid subcluster, such as the communal.* and the subclusters[i].isPrimary parameters.
For complete implementation details, see VerticaDB CRD. For details about each setting, see Custom resource definition parameters.
Maintaining quorum
If quorum is lost, you must manually restart the cluster with admintools:
$ /opt/vertica/bin/admintools -t restart_db --database database-name;
For details about maintaining quorum, see Data integrity and high availability in an Eon Mode database.
Scaling the Kubernetes subcluster
When you scale a hybrid cluster, you add nodes from the primary subcluster to the secondary subcluster on Kubernetes.
HDFS with Kerberos authentication
If you are scaling a cluster that authenticates Hadoop file storage (HDFS) data with Kerberos, you must alter the database configuration before you scale.
In the default configuration, the Vertica server process running in the Kubernetes pods cannot access the HDFS data due to incorrect permissions on the keytab file mounted in the pod. This requires that you set the KerberosEnableKeytabPermissionCheck Kerberos parameter:
- Set the
KerberosEnableKeytabPermissionCheck configuration parameter to 0:
=> ALTER DATABASE DEFAULT SET KerberosEnableKeytabPermissionCheck = 0;
WARNING 4324:  Parameter KerberosEnableKeytabPermissionCheck will not take effect until database restart
ALTER DATABASE
- Restart the cluster with admintools so that the new setting takes effect:
$ /opt/vertica/bin/admintools -t restart_db --database database-name;
For additional details about Vertica on Kubernetes and HDFS, see Configuring communal storage.
Scale the subcluster
When you add nodes from the primary subcluster to the secondary subcluster on Kubernetes, you must set up the configuration directory for the new nodes and change operator behavior during the scaling event:
-
Execute the update_vertica script to set up the configuration directory. Vertica on Kubernetes requires the following configuration options for update_vertica:
$ /opt/vertica/sbin/update_vertica \
    --accept-eula \
    --add-hosts host-list \
    --dba-user-password dba-user-password \
    --failure-threshold NONE \
    --no-system-configuration \
    --point-to-point \
    --data-dir /data-dir \
    --dba-user dbadmin \
    --no-package-checks \
    --no-ssh-key-install
-
Set autoRestartVertica to false so that the operator does not interfere with the scaling operation:
$ kubectl patch vdb database-name --type=merge --patch='{"spec": {"autoRestartVertica": false}}'
-
Add the new nodes with the admintools db_add_node option:
$ /opt/vertica/bin/admintools \
 -t db_add_node \
 --hosts host-list \
 --database database-name\
 --subcluster sc-name \
 --noprompt
For details, see Adding and removing nodes from subclusters.
-
After the scaling operation, set autoRestartVertica back to true:
$ kubectl patch vdb database-name --type=merge --patch='{"spec": {"autoRestartVertica": true}}'
10 - Generating a custom resource from an existing Eon Mode database
To simplify Vertica on Kubernetes adoption, Vertica provides the vdb-gen migration tool that revives an existing Eon Mode database as a StatefulSet in Kubernetes.
To simplify Vertica on Kubernetes adoption, Vertica provides the vdb-gen migration tool that revives an existing Eon Mode database as a StatefulSet in Kubernetes. vdb-gen generates a custom resource (CR) from an existing Eon Mode database by connecting to the database and writing to standard output.
The vdb-gen tool is available for download as a release artifact in the vertica-kubernetes GitHub repository.
Use the -h flag to view a full list of the available vdb-gen options, including options for debugging and working with environment variables. The following steps generate a CR using basic commands:
-
Execute vdb-gen and redirect the output to a YAML-formatted file:
$ vdb-gen --password secret --name mydb 10.20.30.40 vertdb > vdb.yaml
The previous command uses the following flags and values:
-
password: The existing database superuser secret password.
-
name: The name of the new custom resource object.
-
10.20.30.40: The IP address of the existing database
-
vertdb: The name of the existing Eon Mode database.
-
vdb.yaml: The YAML formatted file that contains the custom resource definition generated by the vdb-gen tool.
-
Use the admintools stop_db command to stop the existing database:
$ /opt/vertica/bin/admintools -t stop_db -d vertdb
Wait for the cluster lease to expire before continuing. For details, seeReviving an Eon Mode database cluster.
-
Apply the YAML-formatted manifest that was generated by the vdb-gen tool:
$ kubectl apply -f vdb.yaml
verticadb.vertica.com/mydb created
Note
For performance purposes, do not apply the manifest to resources that already contain a Vertica on Kubernetes install.
-
The operator creates the StatefulSet, installs Vertica on each pod, and runs revive. To view the events generated for the new database, use kubectl describe:
$ kubectl describe vdb mydb
11 - Backup and restore containerized Vertica
In Vertica on Kubernetes, backup and restore operations use the same components and tooling as non-containerized environments, including the following:
Containerized backup and restore operations require that you make these components and tools available to the Vertica server process running within a pod. The following sections describe strategies that back up and restore your VerticaDB custom resource (CR) with Kubernetes objects.
For comprehensive backup and restore documentation, see Backing up and restoring the database.
Prerequisites
Sample configuration file
The vbr configuration file defines parameters that the vbr utility uses to execute backup and restore tasks. For details, see the following:
To define a vbr configuration file in Kubernetes, you can create a ConfigMap whose data field defines vbr configuration values. After you create the ConfigMap object in your Kubernetes environment, you can run vbr commands from within a pod that has access to the ConfigMap.
The following backup-configmap.yaml manifest creates a configuration file named backup.ini that backs up to an S3 bucket:
apiVersion: v1
kind: ConfigMap
metadata:
  name: backup-configmap
data:
  backup-host: |
        backup-pod-dns
  backup.ini: |
    [CloudStorage]
    cloud_storage_backup_path = s3://backup-bucket/database-backup-path
    cloud_storage_backup_file_system_path = [backup-pod-dns]:/opt/vertica/config/

    [Database]
    dbName = database-name

    [Misc]
    tempDir = /tmp/vbr
    restorePointLimit = 7
    objectRestoreMode = coexist
To create the ConfigMap object, apply the manifest to your Kubernetes environment:
$ kubectl apply -f backup-configmap.yaml
backup-host definition
In the sample configuration file, backup-pod-dns is a portion of the pod's fully qualified domain name (FQDN). Vertica on Kubernetes creates a headless service object that constructs the FQDN for each object. The DNS format for each pod is as follows:
podName.headlessServiceName
Note
The headless service name always matches the VerticaDB CR name.
The podName portion of the DNS is itself constructed from Kubernetes object names. For example, the following is a complete pod DNS:
vdb-main-0.vdb
In the preceding example:
vdb: VerticaDB CR namemain: Subcluster name0: StatefulSet ordinal indexvdb: Headless service name (always identical to the VerticaDB CR name)
To access a pod from outside the namespace, append the namespace to the pod DNS:
podName.headlessService.namespace
For additional details, see the Kubernetes documentation.
Mount the configuration file
After you define a ConfigMap with vbr configuration information, you must make it available to the Vertica pods that can execute the vbr utility. You can mount the ConfigMap as a volume in a VerticaDB CR instance. For details about mounting volumes in the VerticaDB CR, see Mounting custom volumes.
Cloud storage locations require access to information that you cannot provide in your configuration file, such as environment variables. You can set environment variables in your CR with annotations.
The following mounted-vbr-config.yaml manifest mounts a backup-config ConfigMap object in the Vertica container's /vbr directory:
apiVersion: vertica.com/v1beta1
kind: VerticaDB
metadata:
  name: verticadb
spec:
  annotations:
    VBR_BACKUP_STORAGE_SECRET_ACCESS_KEY: "access-key"
    VBR_BACKUP_STORAGE_ACCESS_KEY_ID: "access-key-id"
    VBR_BACKUP_STORAGE_ENDPOINT_URL: "https://path/to/backup/storage"
    VBR_COMMUNAL_STORAGE_SECRET_ACCESS_KEY: "access-key"
    VBR_COMMUNAL_STORAGE_ACCESS_KEY_ID: "access-key-id"
    VBR_COMMUNAL_STORAGE_ENDPOINT_URL: "https://path/to/communal/storage"
  communal:
    endpoint: https://path/to/s3-endpoint
    path: "s3://bucket/database-path"
    includeUIDInPath: true
  image: vertica/vertica-k8s:version
  subclusters:
  - isPrimary: true
    name: main
  volumeMounts:
  - name: backup-configmap
    mountPath: /vbr
  volumes:
  - name: backup-configmap
    configMap:
      name: backup-configmap
To mount the ConfigMap, apply the manifest
$ kubectl apply -f mounted-vbr-config.yaml
After you apply the manifest, each Vertica pod restarts, and the new backup volume is mounted.
Prepare the backup location
Before you can run a backup, you must prepare the backup location with the vbr init command. This command initializes a directory on the backup host to receive and store Vertica backup data. You need to initialize a backup location only once. For details, see Setting up backup locations.
The following backup-init.yaml manifest creates a pod to initialize the backup-host defined in the sample configuration file:
apiVersion: v1
kind: Pod
metadata:
  name: backup-init
spec:
  restartPolicy: OnFailure
  containers:
    - name: main
      image: vertica/vertica-k8s:version
      command:
        - bash
        - -c
        - "ssh -o 'StrictHostKeyChecking no' -i /home/dbadmin/.ssh/id_rsa dbadmin@$BACKUP_HOST '/opt/vertica/bin/vbr -t init --cloud-force-init --config-file /vbr/backup.ini'"
      env:
        - name: BACKUP_HOST
          valueFrom:
            configMapKeyRef:
              key: backup-host
              name: backup-configmap
Apply the manifest to initialize the backup location:
$ kubectl create -f backup-init.yaml
Run a backup
Your organization might run backups as needed or on a schedule. The following sections use the sample configuration file ConfigMap to demonstrate both scenarios.
On-demand backups
In some circumstances, you might need to run backup operations as needed. You can create a Kubernetes Job to run an on-demand backup. The following backup-on-demand.yaml manifest creates a Job object that executes a backup:
apiVersion: batch/v1
kind: Job
metadata:
  generateName: vertica-backup-
spec:
  template:
    spec:
      restartPolicy: OnFailure
      containers:
        - name: main
          image: vertica/vertica-k8s:version
          command:
            - bash
            - -c
            - "ssh -o 'StrictHostKeyChecking no' -i /home/dbadmin/.ssh/id_rsa dbadmin@$BACKUP_HOST '/opt/vertica/bin/vbr -t backup --config-file /vbr/backup.ini'"
          env:
            - name: BACKUP_HOST
              valueFrom:
                configMapKeyRef:
                  key: backup-host
                  name: backup-configmap
Each time that you want to create a new backup, execute the following command:
$ kubectl create -f backup-on-demand.yaml
Scheduled backups
You might need to schedule a backup at a fixed time or interval. You can run the backup as a Kubenetes CronJob object that schedules a Kubernetes Job as specified in Cron format.
The following backup-cronjob.yaml manifest runs a daily backup at 2:00 AM:
apiVersion: batch/v1
kind: CronJob
metadata:
  generateName: vertica-backup-
spec:
  schedule: "00 2 * * *"
  jobTemplate:
    spec:
      template:
        spec:
          restartPolicy: OnFailure
          containers:
            - name: main
              image: vertica/vertica-k8s:version
              command:
                - bash
                - -c
                - "ssh -o 'StrictHostKeyChecking no' -i /home/dbadmin/.ssh/id_rsa dbadmin@$BACKUP_HOST '/opt/vertica/bin/vbr -t backup --config-file /vbr/backup.ini'"
              env:
                - name: BACKUP_HOST
                  valueFrom:
                    configMapKeyRef:
                      key: backup-host
                      name: backup-configmap
To schedule the backup, create the CronJob object:
$ kubectl create -f backup-cronjob.yaml
Restore from a backup
You can create a Kubernetes Job to restore database objects from a backup. For comprehensive documentation about the vbr restore task, see Restoring backups.
The following restore-on-demand-job.yaml manifest creates a Job object that restores a database:
apiVersion: batch/v1
kind: Job
metadata:
  generateName: vertica-restore-
spec:
  template:
    spec:
      restartPolicy: OnFailure
      containers:
        - name: main
          image: vertica/vertica-k8s:version
          command:
            - bash
            - -c
            - "ssh -o 'StrictHostKeyChecking no' -i /home/dbadmin/.ssh/id_rsa dbadmin@$BACKUP_HOST '/opt/vertica/bin/vbr -t restore --config-file /vbr/backup.ini'"
          env:
            - name: BACKUP_HOST
              valueFrom:
                configMapKeyRef:
                  key: backup-host
                  name: backup-configmap
The restore process requires that you stop the database, run the restore operation, and then restart the database. This workflow requires additional steps in a containerized environment because Kubernetes has components that monitor and maintain the desired state of the database. You must temporarily adjust some settings to provide time for the restore operation to complete. For details about the settings in this section, see Custom resource definition parameters.
The following steps change the environment for the resource process and then restore the original values:
-
Update the CR to extend the livenessProbe timeout. This timeout triggers a container restart when it expires. The default livenessProbe timeout is about two and half minutes, which does not provide enough time to restore the database. The following patch command uses the livenessProberOverride parameter to set the timeout to about 20 minutes:
$ kubectl patch vdb customResourceName --type=json --patch '[ { "op": "add", "path": "/spec/livenessProbeOverride", "value": {"initialDelaySeconds": 60, "periodSeconds": 30, "failureThreshold": 38}}]'
-
Delete the StatefulSet for each subcluster so that the pods are restarted with the new livenessProberOverride setting:
$ kubectl delete statefulset customResourceName-subclusterName
-
Wait until the pods restart and the new pod IPs are present in admintools.conf:
$ kubectl wait --for=condition=Ready=True pod --selector=app.kubernetes.io/instance=customResourceName --timeout=10m
-
Set autoRestartVertica to false so that the Vertica server process does not automatically restart when you stop the database:
$ kubectl patch vdb customResourceName --type=merge --patch '{"spec": {"autoRestartVertica": false}}'
-
Access a shell in a host that is running a Vertica pod, and stop the database with admintools:
$ kubectl exec -it hostname -- admintools -t stop_db -d database-name
After you stop the database, wait for the cluster lease to expire.
Note
In some scenarios, estimating when the cluster lease expires is difficult. If the restore fails, it logs when the lease expires.
You can also experiment with the restartPolicy and backoff failure policy in the Job spec to control how many times to retry the restore.
-
Apply the manifest to run a Job that restores the backup:
$ kubectl create -f restore-on-demand-job.yaml
-
After the Job completes, use patch to reset the livenessProbe timeout to its default setting:
$ kubectl patch vdb customResourceName --type=json --patch '[{ "op": "remove", "path": "/spec/livenessProbeOverride" }]'
-
Set autoRestartVertica back to true to reset the restart behavior to its state before the restore operation:
$ kubectl patch vdb customResourceName --type=merge --patch '{"spec": {"autoRestartVertica": true}}'
-
To speed up the restart process, delete the StatefulSet for each subcluster. The restart speed was affected when you increased the livenessProbeOverride setting:
$ kubectl delete statefulset customResourceName-subclusterName
-
Wait for the Vertica server to restart:
$ kubectl wait --for=condition=Ready=True pod --selector=app.kubernetes.io/instance=customResourceName --timeout=10m
12 - Troubleshooting your Kubernetes cluster
These tips can help you avoid issues related to your Vertica on Kubernetes deployment and troubleshoot any problems that occur.
These tips can help you avoid issues related to your Vertica on Kubernetes deployment and troubleshoot any problems that occur.
Download the kubectl command line tool to debug your Kubernetes resources.
12.1 - General cluster and database
Inspect objects to diagnose issues
When you deploy a custom resource (CR), you might encounter a variety of issues. To pinpoint an issue, use the following commands to inspect the objects that the CR creates:
kubectl get returns basic information about deployed objects:
$ kubectl get pods -n namespace
$ kubectl get statefulset -n namespace
$ kubectl get pvc -n namespace
$ kubectl get event
kubectl describe returns detailed information about deployed objects:
$ kubectl describe pod pod-name -n namespace
$ kubectl describe statefulset name -n namespace
$ kubectl describe custom-resource-name -n namespace
Verify updates to a custom resource
Because the operator takes time to perform tasks, updates to the custom resource are not effective immediately. Use the kubectl command line tool to verify that changes are applied.
You can use the kubectl wait command to wait for a specified condition. For example, the operator uses the ImageChangeInProgress condition to provide an upgrade status. After you begin the image version upgrade, wait until the operator acknowledges the upgrade and sets this condition to True:
$ kubectl wait --for=condition=ImageChangeInProgress=True vdb/cluster-name –-timeout=180s
After the upgrade begins, you can wait until the operator leaves upgrade mode and sets this condition to False:
$ kubectl wait --for=condition=ImageChangeInProgress=False vdb/cluster-name –-timeout=800s
For more information about kubectl wait, see the kubectl reference documentation.
Pods are running but the database is not ready
When you check the pods in your cluster, the pods are running but the database is not ready:
$ kubectl get pods
NAME                                                    READY   STATUS    RESTARTS   AGE
vertica-crd-sc1-0                                       0/1     Running   0          12m
vertica-crd-sc1-1                                       0/1     Running   1          12m
vertica-crd-sc1-2                                       0/1     Running   0          12m
verticadb-operator-controller-manager-5d9cdc9b8-kw9nv   2/2     Running   0          24m
To find the root cause of the issue, use kubectl logs to check the operator manager. The following example shows that the communal storage bucket does not exist:
$ kubectl logs -l app.kubernetes.io/name=verticadb-operator -c manager -f
2021-08-04T20:03:00.289Z        INFO    controllers.VerticaDB   ExecInPod entry {"verticadb": "default/vertica-crd", "pod": {"namespace": "default", "name": "vertica-crd-sc1-0"}, "command": "bash -c ls -l /opt/vertica/config/admintools.conf && grep '^node\\|^v_\\|^host' /opt/vertica/config/admintools.conf "}
2021-08-04T20:03:00.369Z        INFO    controllers.VerticaDB   ExecInPod stream        {"verticadb": "default/vertica-crd", "pod": {"namespace": "default", "name": "vertica-crd-sc1-0"}, "err": null, "stdout": "-rw-rw-r-- 1 dbadmin verticadba 1243 Aug  4 20:00 /opt/vertica/config/admintools.conf\nhosts = 10.244.1.5,10.244.2.4,10.244.4.6\nnode0001 = 10.244.1.5,/data,/data\nnode0002 = 10.244.2.4,/data,/data\nnode0003 = 10.244.4.6,/data,/data\n", "stderr": ""}
2021-08-04T20:03:00.369Z        INFO    controllers.VerticaDB   ExecInPod entry {"verticadb": "default/vertica-crd", "pod": {"namespace": "default", "name": "vertica-crd-sc1-0"}, "command": "/opt/vertica/bin/admintools -t create_db --skip-fs-checks --hosts=10.244.1.5,10.244.2.4,10.244.4.6 --communal-storage-location=s3://newbucket/db/26100df1-93e5-4e64-b665-533e14abb67c --communal-storage-params=/home/dbadmin/auth_parms.conf --sql=/home/dbadmin/post-db-create.sql --shard-count=12 --depot-path=/depot --database verticadb --force-cleanup-on-failure --noprompt --password ******* "}
2021-08-04T20:03:00.369Z        DEBUG   controller-runtime.manager.events       Normal  {"object": {"kind":"VerticaDB","namespace":"default","name":"vertica-crd","uid":"26100df1-93e5-4e64-b665-533e14abb67c","apiVersion":"vertica.com/v1beta1","resourceVersion":"11591"}, "reason": "CreateDBStart", "message": "Calling 'admintools -t create_db'"}
2021-08-04T20:03:17.051Z        INFO    controllers.VerticaDB   ExecInPod stream        {"verticadb": "default/vertica-crd", "pod": {"namespace": "default", "name": "vertica-crd-sc1-0"}, "err": "command terminated with exit code 1", "stdout": "Default depot size in use\nDistributing changes to cluster.\n\tCreating database verticadb\nBootstrap on host 10.244.1.5 return code 1 stdout '' stderr 'Logged exception in writeBufferToFile: RecvFiles failed in closing file [s3://newbucket/db/26100df1-93e5-4e64-b665-533e14abb67c/verticadb_rw_access_test.txt]: The specified bucket does not exist. Writing test data to file s3://newbucket/db/26100df1-93e5-4e64-b665-533e14abb67c/verticadb_rw_access_test.txt failed.\\nTesting rw access to communal location s3://newbucket/db/26100df1-93e5-4e64-b665-533e14abb67c/ failed\\n'\n\nError: Bootstrap on host 10.244.1.5 return code 1 stdout '' stderr 'Logged exception in writeBufferToFile: RecvFiles failed in closing file [s3://newbucket/db/26100df1-93e5-4e64-b665-533e14abb67c/verticadb_rw_access_test.txt]: The specified bucket does not exist. Writing test data to file s3://newbucket/db/26100df1-93e5-4e64-b665-533e14abb67c/verticadb_rw_access_test.txt failed.\\nTesting rw access to communal location s3://newbucket/db/26100df1-93e5-4e64-b665-533e14abb67c/ failed\\n'\n\n", "stderr": ""}
2021-08-04T20:03:17.051Z        INFO    controllers.VerticaDB   aborting reconcile of VerticaDB {"verticadb": "default/vertica-crd", "result": {"Requeue":true,"RequeueAfter":0}, "err": null}
2021-08-04T20:03:17.051Z        DEBUG   controller-runtime.manager.events       Warning {"object": {"kind":"VerticaDB","namespace":"default","name":"vertica-crd","uid":"26100df1-93e5-4e64-b665-533e14abb67c","apiVersion":"vertica.com/v1beta1","resourceVersion":"11591"}, "reason": "S3BucketDoesNotExist", "message": "The bucket in the S3 path 's3://newbucket/db/26100df1-93e5-4e64-b665-533e14abb67c' does not exist"}
Create an S3 bucket for the cluster:
$ S3_BUCKET=newbucket
$ S3_CLUSTER_IP=$(kubectl get svc | grep minio | head -1 | awk '{print $3}')
$ export AWS_ACCESS_KEY_ID=minio
$ export AWS_SECRET_ACCESS_KEY=minio123
$ aws s3 mb s3://$S3_BUCKET --endpoint-url http://$S3_CLUSTER_IP
make_bucket: newbucket
Use kubectl get pods to verify that the cluster uses the new S3 bucket and the database is ready:
$ kubectl get pods
NAME                                                    READY   STATUS    RESTARTS   AGE
minio-ss-0-0                                            1/1     Running   0          18m
minio-ss-0-1                                            1/1     Running   0          18m
minio-ss-0-2                                            1/1     Running   0          18m
minio-ss-0-3                                            1/1     Running   0          18m
vertica-crd-sc1-0                                       1/1     Running   0          20m
vertica-crd-sc1-1                                       1/1     Running   0          20m
vertica-crd-sc1-2                                       1/1     Running   0          20m
verticadb-operator-controller-manager-5d9cdc9b8-kw9nv   2/2     Running   0          63m
Database is not available
After you create a custom resource instance, the database is not available. The kubectl get custom-resource command does not display information:
$ kubectl get vdb
NAME          AGE   SUBCLUSTERS   INSTALLED   DBADDED   UP
vertica-crd   4s
Use kubectl describe custom-resource to check the events for the pods to identify any issues:
$ kubectl describe vdb
Name:         vertica-crd
Namespace:    default
Labels:       <none>
Annotations:  <none>
API Version:  vertica.com/v1beta1
Kind:         VerticaDB
Metadata:
  ...
  Superuser Password Secret:  su-passwd
Events:
  Type     Reason                           Age                From                Message
  ----     ------                           ----               ----                -------
  Warning  SuperuserPasswordSecretNotFound  5s (x12 over 15s)  verticadb-operator  Secret for superuser password 'su-passwd' was not found
In this circumstance, the custom resource uses a Secret named su-passwd to store the Superuser Password Secret, but there is no such Secret available. Create a Secret named su-passwd to store the Secret:
$ kubectl create secret generic su-passwd --from-literal=password=sup3rs3cr3t
secret/su-passwd created
Use kubectl get custom-resource to verify the issue is resolved:
$ kubectl get vdb
NAME          AGE   SUBCLUSTERS   INSTALLED   DBADDED   UP
vertica-crd   89s   1             0           0         0
Image pull failure
You receive an ImagePullBackOff error when you deploy a Vertica cluster with Helm charts, but you do not pre-pull the Vertica image from the local registry server:
$ kubectl describe pod pod-name-0
...
Events:
  Type     Reason            Age                    From               Message
  ----     ------            ----                   ----               -------
  ...
  Warning  Failed            2m32s                  kubelet            Failed to pull image "k8s-rhel7-01:5000/vertica-k8s:default-1": rpc error: code = Unknown desc = context canceled
  Warning  Failed            2m32s                  kubelet            Error: ErrImagePull
  Normal   BackOff           2m32s                  kubelet            Back-off pulling image "k8s-rhel7-01:5000/vertica-k8s:default-1"
  Warning  Failed            2m32s                  kubelet            Error: ImagePullBackOff
  Normal   Pulling           2m18s (x2 over 4m22s)  kubelet            Pulling image "k8s-rhel7-01:5000/vertica-k8s:default-1"
This occurs because the Vertica image size is too big to pull from the registry while deploying the Vertica cluster. Execute the following command on a Kubernetes host:
$ docker image list | grep vertica-k8s
k8s-rhel7-01:5000/vertica-k8s default-1 2d6f5d3d90d6 9 days ago 1.55GB
To solve this issue, complete one of the following:
-
Pull the Vertica images on each node before creating the Vertica StatefulSet:
$ NODES=`kubectl get nodes | grep -v NAME | awk '{print $1}'`
$ for node in $NODES; do ssh $node docker pull $DOCKER_REGISTRY:5000/vertica-k8s:$K8S_TAG; done
-
Use the reduced-size vertica/vertica-k8s:latest image for the Vertica server.
Pending pods due to insufficient CPU
If your host nodes do not have enough resources to fulfill the resource request from a pod, the pod stays in pending status.
Note
As a best practice, do not request the maximum amount of resources available on a host node to leave resources for other processes on the host node.
In the following example, the pod requests 40 CPUs on the host node, and the pod stays in Pending:
$ kubectl describe pod cluster-vertica-defaultsubcluster-0
...
Status:         Pending
...
Containers:
  server:
    Image:       docker.io/library/vertica-k8s:default-1
    Ports:       5433/TCP, 5434/TCP, 22/TCP
    Host Ports:  0/TCP, 0/TCP, 0/TCP
    Command:
      /opt/vertica/bin/docker-entrypoint.sh
      restart-vertica-node
    Limits:
      memory:  200Gi
    Requests:
      cpu: 40
      memory:  200Gi
...
Events:
  Type     Reason            Age    From               Message
  ----     ------            ----   ----               -------
  Warning  FailedScheduling  3h20m  default-scheduler  0/5 nodes are available: 5 Insufficient cpu.
To confirm the resources available on the host node. The following command confirms that the host node has only 40 allocatable CPUs:
$ kubectl describe node host-node-1
...
Conditions:
  Type             Status  LastHeartbeatTime                 LastTransitionTime                Reason                       Message
  ----             ------  -----------------                 ------------------                ------                       -------
  MemoryPressure   False   Sat, 20 Mar 2021 22:39:10 -0400   Sat, 20 Mar 2021 13:07:02 -0400   KubeletHasSufficientMemory   kubelet has sufficient memory available
  DiskPressure     False   Sat, 20 Mar 2021 22:39:10 -0400   Sat, 20 Mar 2021 13:07:02 -0400   KubeletHasNoDiskPressure     kubelet has no disk pressure
  PIDPressure      False   Sat, 20 Mar 2021 22:39:10 -0400   Sat, 20 Mar 2021 13:07:02 -0400   KubeletHasSufficientPID      kubelet has sufficient PID available
  Ready            True    Sat, 20 Mar 2021 22:39:10 -0400   Sat, 20 Mar 2021 13:07:12 -0400   KubeletReady                 kubelet is posting ready status
Addresses:
  InternalIP:  172.19.0.5
  Hostname:    eng-g9-191
Capacity:
  cpu:                40
  ephemeral-storage:  285509064Ki
  hugepages-1Gi:      0
  hugepages-2Mi:      0
  memory:             263839236Ki
  pods:               110
Allocatable:
  cpu:                40
  ephemeral-storage:  285509064Ki
  hugepages-1Gi:      0
  hugepages-2Mi:      0
  memory:             263839236Ki
  pods:               110
...
Non-terminated Pods:          (3 in total)
  Namespace                   Name                                   CPU Requests  CPU Limits  Memory Requests  Memory Limits  AGE
  ---------                   ----                                   ------------  ----------  ---------------  -------------  ---
  default                     cluster-vertica-defaultsubcluster-0    38 (95%)      0 (0%)      200Gi (79%)      200Gi (79%)    51m
  kube-system                 kube-flannel-ds-8brv9                  100m (0%)     100m (0%)   50Mi (0%)        50Mi (0%)      9h
  kube-system                 kube-proxy-lgjhp                       0 (0%)        0 (0%)      0 (0%)           0 (0%)         9h
...
To correct this issue, reduce the resource.requests in the subcluster to values lower than the maximum allocatable CPUs. The following example uses a YAML-formatted file named patch.yaml to lower the resource requests for the pod:
$ cat patch.yaml
spec:
  subclusters:
    - name: defaultsubcluster
      resources:
        requests:
          memory: 238Gi
          cpu: "38"
        limits:
          memory: 238Gi
$ kubectl patch vdb cluster-vertica –-type=merge --patch “$(cat patch.yaml)”
verticadb.vertica.com/cluster-vertica patched
Pending pod after node removed
When you remove a host node from your Kubernetes cluster, a Vertica pod might stay in pending status if the pod uses a PersistentVolume (PV) that has a node affinity rule that prevents the pod from running on another node.
To resolve this issue, you must verify that the pods are pending because of an affinity rule, and then use the vdb-gen tool to revive the entire cluster.
First, determine if the pod is pending because of a node affinity rule. This requires details about the pending pod, the PersistentVolumeClaim (PVC) associated with the pod, and the PersistentVolume (PV) associated with the PVC:
-
Use kubectl describe to return details about the pending pod:
$ kubectl describe pod pod-name
...
Events:
  Type     Reason            Age                From               Message
  ----     ------            ----               ----               -------
  Warning  FailedScheduling  28s (x2 over 48s)  default-scheduler  0/2 nodes are available: 1 node(s) had untolerated taint {node.kubernetes.io/unschedulable: }, 1 node(s) had volume node affinity conflict, 1 node(s) were unschedulable. preemption: 0/2 nodes are available: 2 Preemption is not helpful for scheduling.
The Message column verifies that the pod was not scheduled due a volume node affinity conflict.
-
Get the name of the PVC associated with the pod:
$ kubectl get pod -o jsonpath='{.spec.volumes[0].persistentVolumeClaim.claimName}{"\n"}' pod-name
local-data-pod-name
-
Use the PVC to get the PV. PVs are associated with nodes:
$ kubectl get pvc -o jsonpath='{.spec.volumeName}{"\n"}' local-data-pod-name
pvc-1926ae96-574d-4433-99b4-ec9ab0e5e497
-
Use the PV to get the name of the node that has the affinity rule:
$ kubectl get pv -o jsonpath='{.spec.nodeAffinity.required.nodeSelectorTerms[0].matchExpressions[0].values[0]}{"\n"}' pvc-1926ae96-574d-4433-99b4-ec9ab0e5e497
ip-10-20-30-40.ec2.internal
-
Verify that the node with the affinity rule is the node that was removed from the Kubernetes cluster.
Next, you must revive the entire cluster to get all pods running again. When you revive the cluster, you create new PVCs that restore the association between each pod and a PV to satisfy the node affinity rule.
While you have nodes running in the cluster, you can use the vdb-gen tool to generate a manifest and revive the database:
-
Download the vdb-gen tool from the vertica-kubernetes GitHub repository:
$ wget https://github.com/vertica/vertica-kubernetes/releases/latest/download/vdb-gen
-
Copy the tool into a pod that has a running Vertica process:
$ kubectl cp vdb-gen pod-name:/tmp/vdb-gen
-
The vdb-gen tool requires the database name, so retrieve it with the following command:
$ kubectl get vdb -o jsonpath='{.spec.dbName}{"\n"}' v
database-name
-
Run the vdb-gen tool with the database name. The following command runs the tool and pipes the output to a file named revive.yaml:
$ kubectl exec -i pod-name -- bash -c "chmod +x /tmp/vdb-gen && /tmp/vdb-gen --ignore-cluster-lease --name v localhost database-name | tee /tmp/revive.yaml"
-
Copy revive.yaml to your local machine so that you can use it after you remove the cluster:
$ kubectl cp pod-name:/tmp/revive.yaml revive.yaml
-
Save the current VerticaDB Custom Resource (CR). For example, the following command saves a CR named vertdb to a file named orig.yaml:
$ kubectl get vdb vertdb -o yaml > orig.yaml
-
Update revive.yaml with parts of orig.yaml that vdb-gen did not capture. For example, custom resource limits.
-
Delete the existing Vertica cluster:
$ kubectl delete vdb vertdb
verticadb.vertica.com "vertdb" deleted
-
Delete all PVCs that are associated with the deleted cluster.
-
Retrieve the PVC names. A PVC name uses the dbname-subcluster-podindex format:
$ kubectl get pvc
NAME                     STATUS   VOLUME                                     CAPACITY ACCESS MODES   STORAGECLASS   AGE
local-data-vertdb-sc-0   Bound    pvc-e9834c18-bf60-4a4b-a686-ba8f7b601230   1Gi      RWO            local-path     34m
local-data-vertdb-sc-1   Bound    pvc-1926ae96-574d-4433-99b4-ec9ab0e5e497   1Gi      RWO            local-path     34m
local-data-vertdb-sc-2   Bound    pvc-4541f7c9-3afc-47f0-8d04-67fac370ee88   1Gi      RWO            local-path     34m
-
Delete the PVCs:
$ kubectl delete pvc local-data-vertdb-sc-0 local-data-vertdb-sc-1 local-data-vertdb-sc-2
persistentvolumeclaim "local-data-vertdb-sc-0" deleted
persistentvolumeclaim "local-data-vertdb-sc-1" deleted
persistentvolumeclaim "local-data-vertdb-sc-2" deleted
-
Revive the database with revive.yaml:
$ kubectl apply -f revive.yaml
verticadb.vertica.com/vertdb created
After the revive completes, all Vertica pods are running, and PVCs are recreated on new nodes. Wait for the operator to start the database.
Deploying to Istio
Vertica does not officially support Istio because the Istio sidecar port requirement conflicts with the port that Vertica requires for internal node communication. However, you can deploy Vertica on Kubernetes to Istio with changes to the Istio InboundInterceptionMode setting. Vertica provides access to this setting with annotations on the VerticaDB CR.
REDIRECT mode
REDIRECT mode is the default InboundInterceptionMode setting, and it requires that you disable network address translation (NAT) on port 5434, the port that the pods use for internal communication. Disable NAT on this port with the excludeInboundPorts annotation:
apiVersion: vertica.com/v1beta1
kind: VerticaDB
metadata:
  name: vdb
spec:
  annotations:
    traffic.sidecar.istio.io/excludeInboundPorts: "5434"
TPROXY mode
Another option is TPROXY mode, which permits both encrypted and unencrypted traffic. Set this mode with the interceptionMode annotation:
apiVersion: vertica.com/v1beta1
kind: VerticaDB
metadata:
  name: vdb
spec:
  annotations:
    sidecar.istio.io/interceptionMode: TPROXY
By default, TPROXY mode permits both encrypted and unencrypted traffic. To disable unencrypted traffic, apply a PeerAuthentication CR that implements strict mTLS:
Important
If you use strict mTLS, you must use operator version
1.11.0 or higher.
$ kubectl apply -n namespace -f - <<EOF
apiVersion: security.istio.io/v1beta1
kind: PeerAuthentication
metadata:
  name: default
spec:
  mtls:
    mode: STRICT
EOF
12.2 - Helm charts
Helm install failure
When you install the VerticaDB operator and admission controller Helm chart, the helm install command might return the following error:
$ helm install vdb-op vertica-charts/verticadb-operator
Error: INSTALLATION FAILED: unable to build kubernetes objects from release manifest: [unable to recognize "": no matches for kind "Certificate" in version "cert-manager.io/v1", unable to recognize "": no matches for kind "Issuer" in version "cert-manager.io/v1"]
The error indicates that you have not met the TLS prerequisite for the admission controller webhook. To resolve this issue, install cert-manager or configure custom certificates. The following steps install cert-manager.
-
Install the cert-manager YAML manifest:
$ kubectl apply -f https://github.com/jetstack/cert-manager/releases/download/v1.5.3/cert-manager.yaml
-
Verify the cert-manager installation.
If you try to install the Helm chart immediately after you install cert-manager, you might receive the following error:
$ helm install vdb-op vertica-charts/verticadb-operator
Error: failed to create resource: Internal error occurred: failed calling webhook "webhook.cert-manager.io": failed to call webhook: Post "https://cert-manager-webhook.cert-manager.svc:443/mutate?timeout=10s": dial tcp 10.96.232.154:443: connect: connection refused
You receive this error because cert-manager needs time to create its pods and register the webhook with the cluster. Wait a few minutes, and then verify the cert-manager installation with the following command:
$ kubectl get pods --namespace cert-manager
NAME                                       READY   STATUS    RESTARTS   AGE
cert-manager-7dd5854bb4-skks7              1/1     Running   5          12d
cert-manager-cainjector-64c949654c-9nm2z   1/1     Running   5          12d
cert-manager-webhook-6bdffc7c9d-b7r2p      1/1     Running   5          12d
For additional details about cert-manager install verification, see the cert-manager documentation.
-
After you verify the cert-manager installation, you must uninstall the Helm chart and then reinstall:
$ helm uninstall vdb-op
$ helm install vdb-op vertica-charts/verticadb-operator
For additional information, see Installing the Vertica DB operator.
Custom certificate helm install error
If you use custom certificates when you install the operator with the Helm chart, the helm install or kubectl apply command might return an error similar to the following:
$ kubectl apply -f ../operatorcrd.yaml
Error from server (InternalError): error when creating "../operatorcrd.yaml": Internal error occurred: failed calling webhook "mverticadb.kb.io": Post "https://verticadb-operator-webhook-service.namespace.svc:443/mutate-vertica-com-v1beta1-verticadb?timeout=10s": x509: certificate is valid for ip-10-0-21-169.ec2.internal, test-bastion, not verticadb-operator-webhook-service.default.svc
You receive this error when the TLS key's Domain Name System (DNS) or Subject Alternate Name (SAN) is incorrect. To correct this error, define the DNS and SAN in a configuration file in the following format:
commonName = verticadb-operator-webhook-service.namespace.svc
...
[alt_names]
DNS.1 = verticadb-operator-webhook-service.namespace.svc
DNS.2 = verticadb-operator-webhook-service.namespace.svc.cluster.local
For additional details, see Installing the Vertica DB operator.
12.3 - Metrics gathering
Adding and testing the vlogger sidecar
Vertica provides the vlogger image that sends logs from vertica.log to standard output on the host node for log aggregation.
To add the sidecar to the CR, add an element to the spec.sidecars definition:
spec:
  ...
  sidecars:
    - name: vlogger
      image: vertica/vertica-logger:1.0.0
To test the sidecar, run the following command and verify that it returns logs:
$ kubectl logs pod-name -c vlogger

2021-12-08 14:39:08.538 DistCall Dispatch:0x7f3599ffd700-c000000000997e [Txn
2021-12-08 14:40:48.923 INFO New log
2021-12-08 14:40:48.923 Main Thread:0x7fbbe2cf6280 [Init] <INFO> Log /data/verticadb/v_verticadb_node0002_catalog/vertica.log opened; #1
2021-12-08 14:40:48.923 Main Thread:0x7fbbe2cf6280 [Init] <INFO> Processing command line: /opt/vertica/bin/vertica -D /data/verticadb/v_verticadb_node0002_catalog -C verticadb -n v_verticadb_node0002 -h 10.20.30.40 -p 5433 -P 4803 -Y ipv4
2021-12-08 14:40:48.923 Main Thread:0x7fbbe2cf6280 [Init] <INFO> Starting up Vertica Analytic Database v11.0.2-20211201
2021-12-08 14:40:48.923 Main Thread:0x7fbbe2cf6280 [Init] <INFO>
2021-12-08 14:40:48.923 Main Thread:0x7fbbe2cf6280 [Init] <INFO> vertica(v11.0.2) built by @re-docker5 from master@a44ffabdf3f05e8d104426506b088192f741c485 on 'Wed Dec  1 06:10:34 2021' $BuildId$
2021-12-08 14:40:48.923 Main Thread:0x7fbbe2cf6280 [Init] <INFO> CPU architecture: x86_64
2021-12-08 14:40:48.923 Main Thread:0x7fbbe2cf6280 [Init] <INFO> 64-bit Optimized Build
2021-12-08 14:40:48.923 Main Thread:0x7fbbe2cf6280 [Init] <INFO> Compiler Version: 7.3.1 20180303 (Red Hat 7.3.1-5)
2021-12-08 14:40:48.923 Main Thread:0x7fbbe2cf6280 [Init] <INFO> LD_LIBRARY_PATH=/opt/vertica/lib
2021-12-08 14:40:48.923 Main Thread:0x7fbbe2cf6280 [Init] <INFO> LD_PRELOAD=
2021-12-08 14:40:48.925 Main Thread:0x7fbbe2cf6280 <LOG> @v_verticadb_node0002: 00000/5081: Total swap memory used: 0
2021-12-08 14:40:48.925 Main Thread:0x7fbbe2cf6280 <LOG> @v_verticadb_node0002: 00000/4435: Process size resident set: 28651520
2021-12-08 14:40:48.925 Main Thread:0x7fbbe2cf6280 <LOG> @v_verticadb_node0002: 00000/5075: Total Memory free + cache: 59455180800
2021-12-08 14:40:48.925 Main Thread:0x7fbbe2cf6280 [Txn] <INFO> Looking for catalog at: /data/verticadb/v_verticadb_node0002_catalog/Catalog
...
Core file for Vertica server container process
In some circumstances, you might need to examine a core file that contains information about the Vertica server container process:
-
For the custom resource securityContext value, set the privileged property to true:
apiVersion: vertica.com/v1beta1
kind: VerticaDB
...
spec:
  ...
  securityContext:
    privileged: true
-
On the host machine, verify that /proc/sys/kernel/core_pattern is set to core:
$ cat /proc/sys/kernel/core_pattern
core
The /proc/sys/kernel/core_pattern file is not namespaced, so setting this value affects all containers running on that host.
When Vertica generates a core, the machine writes a message to vertica.log that indicates where you can locate the core file.
12.4 - Security
Custom PodSecurityPolicy errors
Vertica on Kubernetes requires the following Linux capabilities that enable SSH communications between the pods:
In some circumstances, these capabilities might conflict with custom security policy restrictions and cause errors. For example:
$ kubectl describe statefulset subcluster-name
...
Events:
  Type     Reason        Age                     From                    Message
  ----     ------        ----                    ----                    -------
  Warning  FailedCreate  29m (x73 over 15h)      statefulset-controller  create Pod subcluster-name-0 in StatefulSet subcluster-name failed error: pods "subcluster-name-0" is forbidden: PodSecurityPolicy: unable to admit pod: [spec.containers[0].securityContext.capabilities.add: Invalid value: "AUDIT_WRITE": capability may not be added spec.containers[0].securityContext.capabilities.add: Invalid value: "SYS_CHROOT": capability may not be added]
When a similar error is returned, you must update your PodSecurityPolicy. For details, see the Kubernetes documentation.
12.5 - VerticaAutoscaler
Cannot find CPU metrics with VerticaAutoscaler
You might notice that your VerticaAutoScaler is not scaling correctly according to CPU utilization:
$ kubectl get hpa
NAME                REFERENCE                           TARGETS         MINPODS   MAXPODS   REPLICAS   AGE
autoscaler-name     VerticaAutoscaler/autoscaler-name   <unknown>/50%   3         12        0          19h

$ kubectl describe hpa
Warning: autoscaling/v2beta2 HorizontalPodAutoscaler is deprecated in v1.23+, unavailable in v1.26+; use autoscaling/v2 HorizontalPodAutoscaler
Name: autoscaler-name
Namespace: namespace
Labels: <none>
Annotations: <none>
CreationTimestamp: Thu, 12 May 2022 10:25:02 -0400
Reference: VerticaAutoscaler/autoscaler-name
Metrics: ( current / target )
resource cpu on pods (as a percentage of request): <unknown> / 50%
Min replicas: 3
Max replicas: 12
VerticaAutoscaler pods: 3 current / 0 desired
Conditions:
Type Status Reason Message
---- ------ ------ -------
AbleToScale True SucceededGetScale the HPA controller was able to get the target's current scale
ScalingActive False FailedGetResourceMetric the HPA was unable to compute the replica count: failed to get cpu utilization: unable to get metrics for resource cpu: unable to fetch metrics from resource metrics API: the server could not find the requested resource (get pods.metrics.k8s.io)
Events:
Type Reason Age From Message
---- ------ ---- ---- -------
Warning FailedGetResourceMetric 7s horizontal-pod-autoscaler failed to get cpu utilization: unable to get metrics for resource cpu: unable to fetch metrics from resource metrics API: the server could not find the requested resource (get pods.metrics.k8s.io)
Warning FailedComputeMetricsReplicas 7s horizontal-pod-autoscaler invalid metrics (1 invalid out of 1), first error is: failed to get cpu utilization: unable to get metrics for resource cpu: unable to fetch metrics from resource metrics API: the server could not find the requested resource (get pods.metrics.k8s.io)
You receive this error because the metrics server is not installed:
$ kubectl top nodes
error: Metrics API not available
To install the metrics server:
-
Download the components.yaml file:
$ kubectl apply -f https://github.com/kubernetes-sigs/metrics-server/releases/latest/download/components.yaml
-
Optionally, disable TLS:
$ if ! grep kubelet-insecure-tls components.yaml; then
  sed -i 's/- args:/- args:\n - --kubelet-insecure-tls/' components.yaml;
-
Apply the YAML file:
$ kubectl apply -f components.yaml
-
Verify that the metrics server is running:
$ kubectl get svc metrics-server -n namespace
NAME             TYPE        CLUSTER-IP       EXTERNAL-IP   PORT(S)   AGE
metrics-server   ClusterIP   10.105.239.175   <none>        443/TCP   19h
CPU request error with VerticaAutoscaler
You might receive an error that states:
failed to get cpu utilization: missing request for cpu
You get this error because you must set resource limits on all containers, including sidecar containers. To correct this error:
-
Verify the error:
$ kubectl get hpa
NAME                REFERENCE                           TARGETS         MINPODS   MAXPODS   REPLICAS   AGE
autoscaler-name     VerticaAutoscaler/autoscaler-name   <unknown>/50%   3         12        0          19h

$ kubectl describe hpa
Warning: autoscaling/v2beta2 HorizontalPodAutoscaler is deprecated in v1.23+, unavailable in v1.26+; use autoscaling/v2 HorizontalPodAutoscaler
Name: autoscaler-name
Namespace: namespace
Labels: <none>
Annotations: <none>
CreationTimestamp: Thu, 12 May 2022 15:58:31 -0400
Reference: VerticaAutoscaler/autoscaler-name
Metrics: ( current / target )
resource cpu on pods (as a percentage of request): <unknown> / 50%
Min replicas: 3
Max replicas: 12
VerticaAutoscaler pods: 3 current / 0 desired
Conditions:
Type Status Reason Message
---- ------ ------ -------
AbleToScale True SucceededGetScale the HPA controller was able to get the target's current scale
ScalingActive False FailedGetResourceMetric the HPA was unable to compute the replica count: failed to get cpu utilization: missing request for cpu
Events:
Type Reason Age From Message
---- ------ ---- ---- -------
Warning FailedGetResourceMetric 4s (x5 over 64s) horizontal-pod-autoscaler failed to get cpu utilization: missing request for cpu
Warning FailedComputeMetricsReplicas 4s (x5 over 64s) horizontal-pod-autoscaler invalid metrics (1 invalid out of 1), first error is: failed to get cpu utilization: missing request for cpu
-
Add resource limits to the CR:
$ cat /tmp/vdb.yaml
apiVersion: vertica.com/v1beta1
kind: VerticaDB
metadata:
  name: vertica-vdb
spec:
  sidecars:
    - name: vlogger
      image: vertica/vertica-logger:latest
      resources:
        requests:
          memory: "100Mi"
          cpu: "100m"
        limits:
          memory: "100Mi"
          cpu: "100m"
  communal:
    credentialSecret: communal-creds
    endpoint: https://endpoint
        path: s3://bucket-location
  dbName: verticadb
  image: vertica/vertica-k8s:latest
  subclusters:
  - isPrimary: true
    name: sc1
    resources:
      requests:
        memory: "4Gi"
        cpu: 2
      limits:
        memory: "4Gi"
        cpu: 2
    serviceType: ClusterIP
    serviceName: sc1
    size: 3
  upgradePolicy: Auto
-
Apply the update:
$ kubectl apply -f /tmp/vdb.yaml
verticadb.vertica.com/vertica-vdb created
When you set a new CPU resource limit, Kubernetes reschedules each pod in the StatefulSet in a rolling update until all pods have the updated CPU resource limit.